change time NISSAN PATHFINDER 2000 R50 / 2.G Owners Manual
[x] Cancel search | Manufacturer: NISSAN, Model Year: 2000, Model line: PATHFINDER, Model: NISSAN PATHFINDER 2000 R50 / 2.GPages: 265, PDF Size: 2.2 MB
Page 2 of 265

MODIFICATION OF YOUR
VEHICLEThis vehicle should not be modified. Modi-
fication could affect its performance,
safety or durability, and may even violate
governmental regulations. In addition,
damage or performance problems result-
ing from modification may not be covered
under NISSAN warranties.WHEN READING THE MANUALThis manual includes information for all
options available on this model. Therefore,
you may find some information that does
not apply to your vehicle.
All information, specifications and illustrations
in this manual are those in effect at the time of
printing. NISSAN reserves the right to change
specifications or design at any time without
notice.
IMPORTANT INFORMATION
ABOUT THIS MANUALYou will see various symbols in this manual.
They are used in the following ways:
WARNING
This is used to indicate the presence of a
hazard that could cause death or serious
personal injury. To avoid or reduce the
risk, the procedures must be followed
precisely.
CAUTION
This is used to indicate the presence of a
hazard that could cause minor or moder-
ate personal injury or damage to your
vehicle. To avoid or reduce the risk, the
procedures must be followed carefully.If you see this symbol, it meansDo not do
thisorDo not let this happen.
1999 NISSAN MOTOR CO., LTD.
TOKYO, JAPAN
All rights reserved. No part of this Owner's Manual may
be reproduced or stored in a retrieval system, or trans-
mitted in any form, or by any means, electronic, me-
chanical, photocopying, recording or otherwise, without
the prior written permission of Nissan Motor Co., Ltd.
SIC0697
Z
00.1.17/R50-D/V5
X
Page 60 of 265

COMPASS DISPLAYPush the switch when the ignition key is in the
ACC or ON position. The direction will be
displayed.Zone variation change procedureThe difference between magnetic north and
geographical north is known as variance. In
some areas, this difference can sometimes be
great enough to cause false compass read-
ings. Follow these instructions to set the vari-
ance for your particular location if this hap-
pens:
1. Establish your location on the zone map.
Record your zone number.
2. Push the ON/OFF switch in for five seconds
until the current zone entry number is dis-
played.
3. Press the ON/OFF switch repeatedly until
the new zone entry number is displayed.
Once the desired zone number is displayed,
stop pressing the ON/OFF switch and the
display will show compass direction within a
few seconds.
SIC0611
Instruments and controls
2-7
Z
00.1.17/R50-D/V5
X
Page 92 of 265

indicator light begins to flash (approximately
20 seconds).ROLLING CODE PROGRAMMINGRolling code garage door openers (or other
rolling code devices) which are ªcode pro-
tectedº and manufactured after 1996, may be
determined by the following.
A. Reference the garage door opener Owner's
Manual for verification.
B. The hand-held transmitter appears to pro-
gram the Integrated HomeLink
Universal
Transceiver but does not activate the ga-
rage door.
C. Press and hold the trained HomeLink
but-
ton. If the garage door opener has the
rolling code feature, the HomeLink
indica-
tor light will flash rapidly, then remains on
after 2 seconds.
To program the Integrated HomeLinkUniver-
sal Transceiver to a garage door opener with
the rolling code feature, follow these instruc-
tions after completing the ªProgramming
HomeLink
º (the aid of a second person may
make the following procedures quicker and
easier).
1. Locate the training button on the garage
door opener motor unit. Exact location andcolor of the button may vary by garage door
opener brand. If there is difficulty locating
the training button, reference the garage
door opener Owner's Manual.
2. Press the training button on the garage
door opener motor unit (which may activate
a training light).
NOTE:
Following step 2, there are 30 seconds
in which to initiate step 3.
3. Firmly press and release the programmed
HomeLink
button. Press and release the
HomeLinkbutton a second time to com-
plete the training process. (Some garage
door openers may require you to do this
procedure a third time to complete the
training.)
The garage door opener should now recognize
the Integrated HomeLink
Universal Trans-
ceiver and activate when the HomeLink
but-
ton is pressed. The remaining two buttons may
now be programmed (if not yet programmed,
follow steps 2 through 4 in the ªProgramming
HomeLink
º procedures earlier in this section).
REPROGRAMMING A SINGLE
HomeLink
BUTTON
To reprogram an Integrated HomeLink
Uni-versal Transceiver button, complete the follow-
ing.
1. Press and hold the desired HomeLink
button.Do notrelease the button until step
4 has been completed.
2. When the indicator light begins to flash
slowly (after 20 seconds), position the
hand-held transmitter 2 to 5 inches (50 to
127 mm) away from the HomeLink
sur-
face.
3. Press and hold the hand-held transmitter
button.
4. The HomeLink
indicator light will flash,
first slowly and then rapidly. When the
indicator light begins to flash rapidly, re-
lease both buttons.
The Integrated HomeLink
Universal Trans-
ceiver button has now been reprogrammed.
The new device can be activated by pushing
the HomeLink
button that was just pro-
grammed. This procedure will not affect any
other programmed HomeLink
buttons.
IF YOUR VEHICLE IS STOLENIf your vehicle is stolen, you should change the
codes of any non-rolling code device that has
been programmed into HomeLink
. Consult
the Owner's Manual of each device or call the
Instruments and controls
2-39
Z
00.1.17/R50-D/V5
X
Page 101 of 265
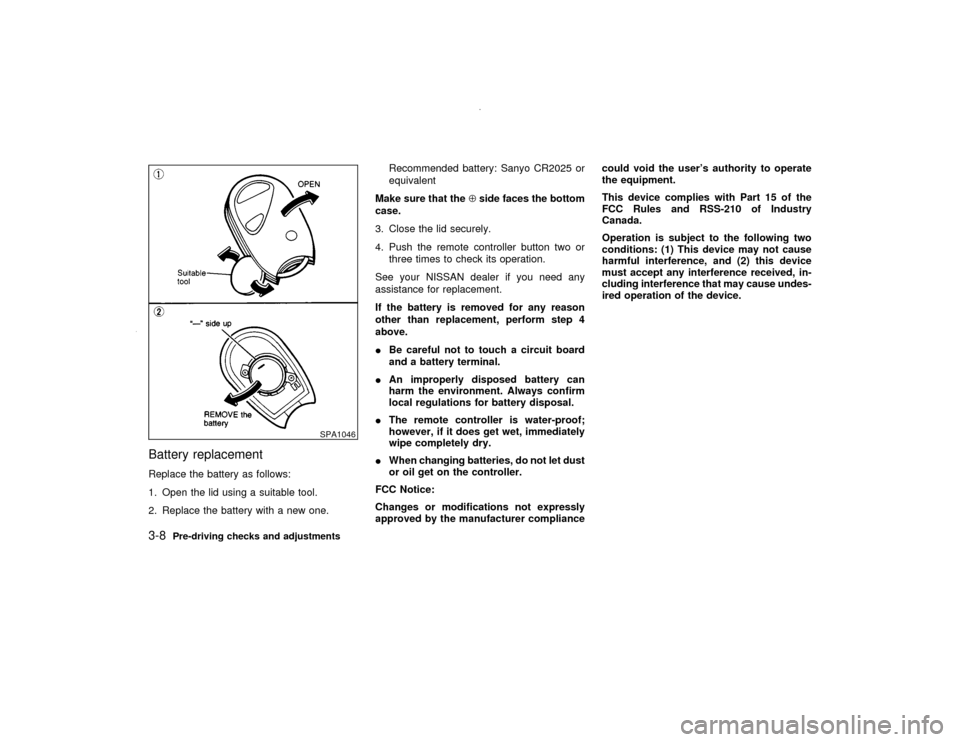
Battery replacementReplace the battery as follows:
1. Open the lid using a suitable tool.
2. Replace the battery with a new one.Recommended battery: Sanyo CR2025 or
equivalent
Make sure that theÅside faces the bottom
case.
3. Close the lid securely.
4. Push the remote controller button two or
three times to check its operation.
See your NISSAN dealer if you need any
assistance for replacement.
If the battery is removed for any reason
other than replacement, perform step 4
above.
IBe careful not to touch a circuit board
and a battery terminal.
IAn improperly disposed battery can
harm the environment. Always confirm
local regulations for battery disposal.
IThe remote controller is water-proof;
however, if it does get wet, immediately
wipe completely dry.
IWhen changing batteries, do not let dust
or oil get on the controller.
FCC Notice:
Changes or modifications not expressly
approved by the manufacturer compliancecould void the user's authority to operate
the equipment.
This device complies with Part 15 of the
FCC Rules and RSS-210 of Industry
Canada.
Operation is subject to the following two
conditions: (1) This device may not cause
harmful interference, and (2) this device
must accept any interference received, in-
cluding interference that may cause undes-
ired operation of the device.
SPA1046
3-8
Pre-driving checks and adjustments
Z
00.1.17/R50-D/V5
X
Page 121 of 265

Turn the ignition key to ACC or ON and press
the power on switch to turn on the radio. If you
listen to the radio with the engine not running,
the key should be turned to the ACC position.
Radio reception is affected by station signal
strength, distance from radio transmitter, build-
ings, bridges, mountains and other external
influences. Intermittent changes in reception
quality normally are caused by these external
influences.
Using a cellular phone in or near the ve-
hicle may influence radio reception quality.Radio receptionYour radio system is equipped with state-of-
the-art electronic circuits to enhance radio
reception. These circuits are designed to ex-
tend reception range, and to enhance the
quality of that reception.
However there are some general characteris-
tics of both FM and AM radio signals that can
affect radio reception quality in a moving ve-
hicle, even when the finest equipment is used.
These characteristics are completely normal in
a given reception area, and do not indicate any
malfunction in your radio system.
Remember that a moving vehicle is not the
ideal place to listen to a radio. Because of the
movement, reception conditions will constantlychange. Buildings, terrain, signal distance and
interference from other vehicles can work
against ideal reception. Described below are
some of the factors that can affect your radio
reception.
FM RADIO RECEPTIONRange: FM range is normally limited to 25 to
30 miles (40 to 48 km), with monaural (single
channel) FM having slightly more range than
stereo FM. External influences may some-
times interfere with FM station reception even
if the FM station is within 25 miles (40 km). The
strength of the FM signal is directly related to
the distance between the transmitter and re-
ceiver. FM signals follow a line-of-sight path,
exhibiting many of the same characteristics as
light. For example they will reflect off objects.
Fade and drift: As your vehicle moves away
SAA0306
AUDIO SYSTEM4-12
Heater, air conditioner and audio systems
Z
00.1.17/R50-D/V5
X
Page 126 of 265
CAUTION
Do not force the cassette tape into the
tape door. This could cause player dam-
age.
The cassette tape automatically changes di-
rections to play the other side when the first
side is complete. At this time, the moving
digital squares illuminate on the left side of the
display window.
Precaution on cassette player operation:
ITo maintain good quality sound, NISSAN
recommends using cassette tapes of 60
minutes or shorter in length.
ICassette tapes should be removed from the
player when not in use. Store cassettes in
their protective cases and away from direct
sunlight, heat, moisture and magnetic
sources.
IDirect sunlight can cause the cassette to
become deformed. The use of deformed
cassettes may cause the cassette to jam in
the player.
IDo not use cassettes with labels which arepeeling and loose. If used, the label could
jam in the player.
IIf a cassette has loose tape, insert a pencil
through one of the cassette hubs and re-
wind the tape firmly around the hubs. Loose
tape may cause tape jamming and waver-
ing sound quality.
IOver a period of time, the playback head,
capstan and pinch roller may collect a tape
coating residue as the tape is played. This
residue accumulation can cause weak or
wavering sound, and should be removed
periodically with a head cleaning tape. If the
residue is not removed periodically, the
player may need to be disassembled for
cleaning.
PLAY/STOP:
Push the PLAY/STOP button while the cas-
sette tape is playing to stop the tape. Push the
button again to play the tape.
FF (Fast Forward), REW
(Rewind):
Push either the FF or REW button for the
desired direction.
The FF or REW symbol illuminates in the
display.
To stop the FF or REW function, press the
or
again, or the
button.
APS (Automatic
Program Search) FF,
APS REW:
Push either the APS FF or APS REW button
while the cassette tape is playing. The tape
runs quickly, stops, then plays the next selec-
tion. Either the FF or REW symbol flashes in
the display while searching for the selection.
This system searches at the blank intervals
between selections. If there is a blank interval
within one selection or there is no interval
between selections, the system may not stop
in the desired or expected location.
PROG (Program):
Push the PROG (program) select button. The
moving digital squares illuminate on either the
right or left side of the display window to
indicate the side of program play.Dolby NR (Noise Reduction):
Push the Dolby NR button for Dolby NR en-
coded tapes to reduce high frequency tape
noise. The
indicator light comes on.
If in the clock display is in priority mode when
the Dolby NR button is pressed,
and
TAPE illuminate in the display window for
about 10 seconds. The clock mode then re-
Heater, air conditioner and audio systems
4-17
Z
00.1.17/R50-D/V5
X
Page 129 of 265
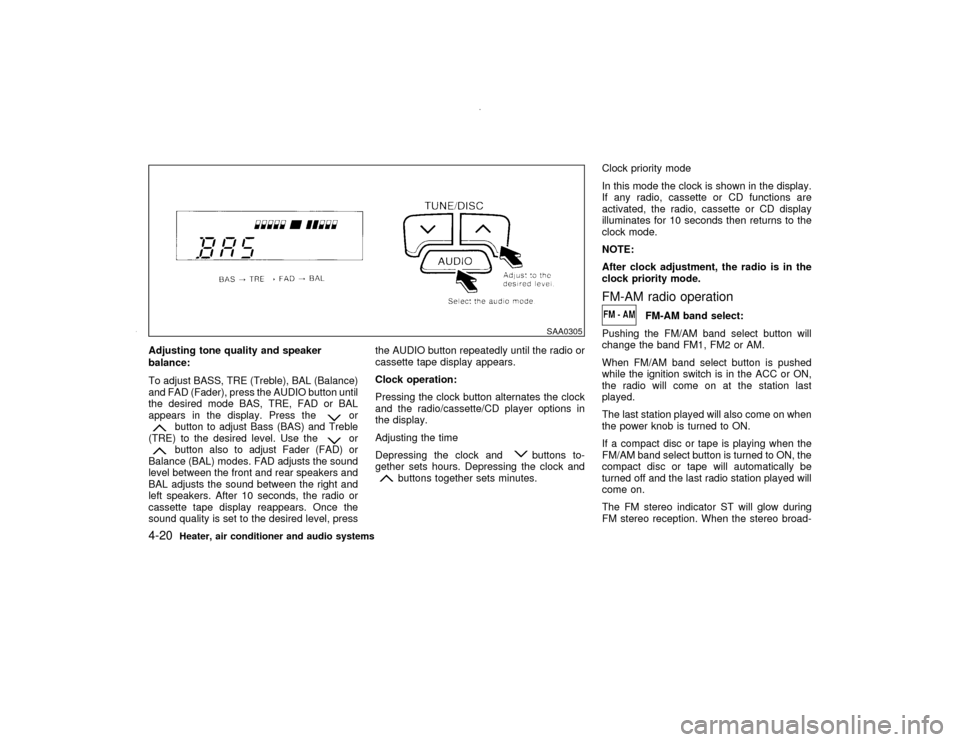
Adjusting tone quality and speaker
balance:
To adjust BASS, TRE (Treble), BAL (Balance)
and FAD (Fader), press the AUDIO button until
the desired mode BAS, TRE, FAD or BAL
appears in the display. Press the
or
button to adjust Bass (BAS) and Treble
(TRE) to the desired level. Use the
or
button also to adjust Fader (FAD) or
Balance (BAL) modes. FAD adjusts the sound
level between the front and rear speakers and
BAL adjusts the sound between the right and
left speakers. After 10 seconds, the radio or
cassette tape display reappears. Once the
sound quality is set to the desired level, pressthe AUDIO button repeatedly until the radio or
cassette tape display appears.
Clock operation:
Pressing the clock button alternates the clock
and the radio/cassette/CD player options in
the display.
Adjusting the time
Depressing the clock and
buttons to-
gether sets hours. Depressing the clock and
buttons together sets minutes.Clock priority mode
In this mode the clock is shown in the display.
If any radio, cassette or CD functions are
activated, the radio, cassette or CD display
illuminates for 10 seconds then returns to the
clock mode.
NOTE:
After clock adjustment, the radio is in the
clock priority mode.
FM-AM radio operation
FM-AM band select:
Pushing the FM/AM band select button will
change the band FM1, FM2 or AM.
When FM/AM band select button is pushed
while the ignition switch is in the ACC or ON,
the radio will come on at the station last
played.
The last station played will also come on when
the power knob is turned to ON.
If a compact disc or tape is playing when the
FM/AM band select button is turned to ON, the
compact disc or tape will automatically be
turned off and the last radio station played will
come on.
The FM stereo indicator ST will glow during
FM stereo reception. When the stereo broad-
SAA0305
4-20
Heater, air conditioner and audio systems
Z
00.1.17/R50-D/V5
X
Page 132 of 265
FF (Fast Forward), REW
(Rewind):
Push the(fast forward) button to fast
forward the tape. To rewind the tape, push the
(rewind) button. Either the FF or REW
symbol illuminates on the right side of the
display window. To stop the FF or REW func-
tion, press the
(fast forward) or
(re-
wind) again, or the TAPE button.
APS (Automatic Program
Search) FF, APS REW:
When the(APS FF) button is pushed
while the tape is being played, the next pro-
gram will start to play from the beginning. Push
the
(APS FF) button several times to skip
through programs. The tape will advance the
number of times the button is pushed (up to
nine programs).
When the
(APS REW) button is pushed
once, the program being played starts over
from the beginning. Push the
(APS
REW) button several times to skip back sev-
eral selections. The tape will go back the
number of times the button is pushed. Either
the FF or REW symbol flashes on the right
side of the display window while searching for
the selection.
This system searches for the blank intervalsbetween selections. If there is a blank interval
within one program or there is no interval
between programs, the system may not stop in
the desired or expected location.
PROG (Program):
Push the PROG button to change the tape
side while the tape is being played.
The cassette tape will automatically change
directions to play the other side when the first
side is completed.Dolby NR (Noise Reduction):
Push the Dolby NR
button for Dolby NR
encoded tapes to reduce high frequency tape
noise. The indicator will come on.
Dolby noise reduction manufactured under li-
cense from Dolby Laboratories Licensing Cor-
poration. Dolby NR and the double-D symbol
are trademarks of Dolby Laboratories
Licensing Corporation.
Metal or chrome tape usage:
The cassette player will be automatically set to
high performance play when playing a metal or
chrome cassette tape.TAPE EJECT:
When this button is pushed with the tape
loaded, the tape will be ejected.When the tape is ejected while it is being
played, the system will be turned off.
Compact Disc (CD) player operation
CAUTION
IDuring cold weather or rainy days,
the player may malfunction due to the
humidity. If this occurs, remove the
CD and dehumidify or ventilate the
player completely.
IThe player may skip while driving on
rough roads.
IThe CD player sometimes cannot
function when the compartment tem-
perature is extremely high. Decrease
the temperature before use.
IDo not expose the CD to direct sun-
light.
ICDs that are of poor quality, dirty,
scratched, or covered with finger-
prints may not work properly.
IDo not use an 8 cm CD adapter as this
will cause malfunction.
Heater, air conditioner and audio systems
4-23
Z
00.1.17/R50-D/V5
X
Page 133 of 265
IRecordable compact discs (CD-R)
may not function properly in the CD
player.
Turn the ignition key to the ACC or ON position
and insert the compact disc into the slot with
the label side facing up. The compact disc will
be guided automatically into the slot and start
playing.
After loading the disc, the number of tracks on
the disc and the play time will appear on the
display.
If the radio or tape is already operating, it will
automatically turn off and the compact disc will
play.
CAUTION
Do not force the compact disc into the
slot. This could damage the player.
If the system has been turned off while the
compact disc was playing, pushing the
ON×OFF/VOL control knob will start the com-
pact disc.
8 cm diameter compact discs can also be used
without an adapter.
PLAY:
When the CD/CHG button is pushed with the
system off and the compact disc loaded, the
system will turn on and the compact disc will
start to play.
When the CD/CHG button is pushed with the
compact disc loaded but the tape or the radio
playing, the tape or radio will automatically be
turned off and the compact disc will start to
play.
FF (Fast Forward), REW
(Rewind):
When the(fast forward) or
(rewind)
button is pushed while the compact disc is
being played, the compact disc will play while
fast forwarding or rewinding. When the button
is released, the compact disc will return to
normal play speed.
APS (Automatic Program
Search) FF, APS REW:
When the(APS FF) button is pushed
while the compact disc is being played, the
program next to the present one will start to
play from its beginning. Push several times to
skip through programs. The compact disc will
advance the number of times the button is
pushed. (When the last program on the com-
pact disc is skipped through, the first programwill be played.) When the
(APS REW)
button is pushed, the program being played
returns to its beginning. Push several times to
skip back through programs. The compact disc
will go back the number of times the button is
pushed.
PROG (Program):
When the PROG button is pushed while the
compact disc is being played, the play pattern
will change as follows:
no mark: All the programs will be played
repeatedly in sequence.
1: Only one program (the one being played
when the PROG button is pushed) will be
repeated.
RANDOM: Programs will be played at random,
not following the sequence on the compact
disc. The same program may be repeated
twice.
When the compact disc is ejected, the
play pattern will automatically change to
no mark.
CD EJECT:
When the CD EJECT button is pushed with the
compact disc loaded, the compact disc will be
ejected.
4-24
Heater, air conditioner and audio systems
Z
00.1.17/R50-D/V5
X
Page 149 of 265

When cruising at a low speed or
climbing a gentle slope, you may feel
uncomfortable shift shocks as the
transmission shifts between 3rd and
overdrive repeatedly. In this case,
press the overdrive switch. The O/D
OFF indicator light comes on at this
time.
When driving conditions change, press the
overdrive switch again. The O/D OFF indicator
light goes out.
Remember not to drive at high speeds for
extended periods of time with the O/D OFF
light illuminated. This reduces the fuel
economy.
Fail-safeWhen the Fail-safe operation occurs, the next
time the key is turned to the ON position, the
O/D OFF light will blink for approximately 8
seconds after coming on for 2 seconds. While
the vehicle can be driven under these circum-
stances please note that the gears in the
automatic transmission will be locked in third
gear.
If the vehicle is driven under extreme con-
ditions, such as excessive wheel spinning
and subsequent hard braking, the Fail-safe
system may be activated. This will occureven if all electrical circuits are functioning
properly. In this case, turn the ignition key
OFF and wait for 3 seconds. Then turn the
key back to the ON position. The vehicle
should return to its normal operating con-
dition. If it does not return to its normal
operating condition have your NISSAN
dealer check the transmission and repair if
necessary.
MANUAL TRANSMISSION
Shifting
WARNING
IDo not downshift abruptly on slippery
roads. This may cause a loss of con-
trol.
IDo not over-rev the engine when
shifting to a lower gear. This may
cause a loss of control or engine
SSD0107
5-14
Starting and driving
Z
00.1.17/R50-D/V5
X