mirror NISSAN PATHFINDER 2006 R51 / 3.G User Guide
[x] Cancel search | Manufacturer: NISSAN, Model Year: 2006, Model line: PATHFINDER, Model: NISSAN PATHFINDER 2006 R51 / 3.GPages: 344, PDF Size: 5.63 MB
Page 147 of 344
Push and hold
the
button for about:Feature:
(Push button again for about 1 sec-
ond to change settings)
1 secondCompass/outside temperature dis-
play toggles on/off (if so equipped)
5 secondsOutside temperature display toggles
between °C and °F (if so equipped)
8 secondsAutomatic anti-glare/indicator light
toggles on/off
11 secondsCompass zone can be changed to
correct false compass readings (if
so equipped)
13 secondsCompass enters calibration mode (if
so equipped)
For more information about the compass and
outside mirror features (if so equipped) , refer to
“Compass and outside temperature display” in
the “Instruments and controls” section.Type B
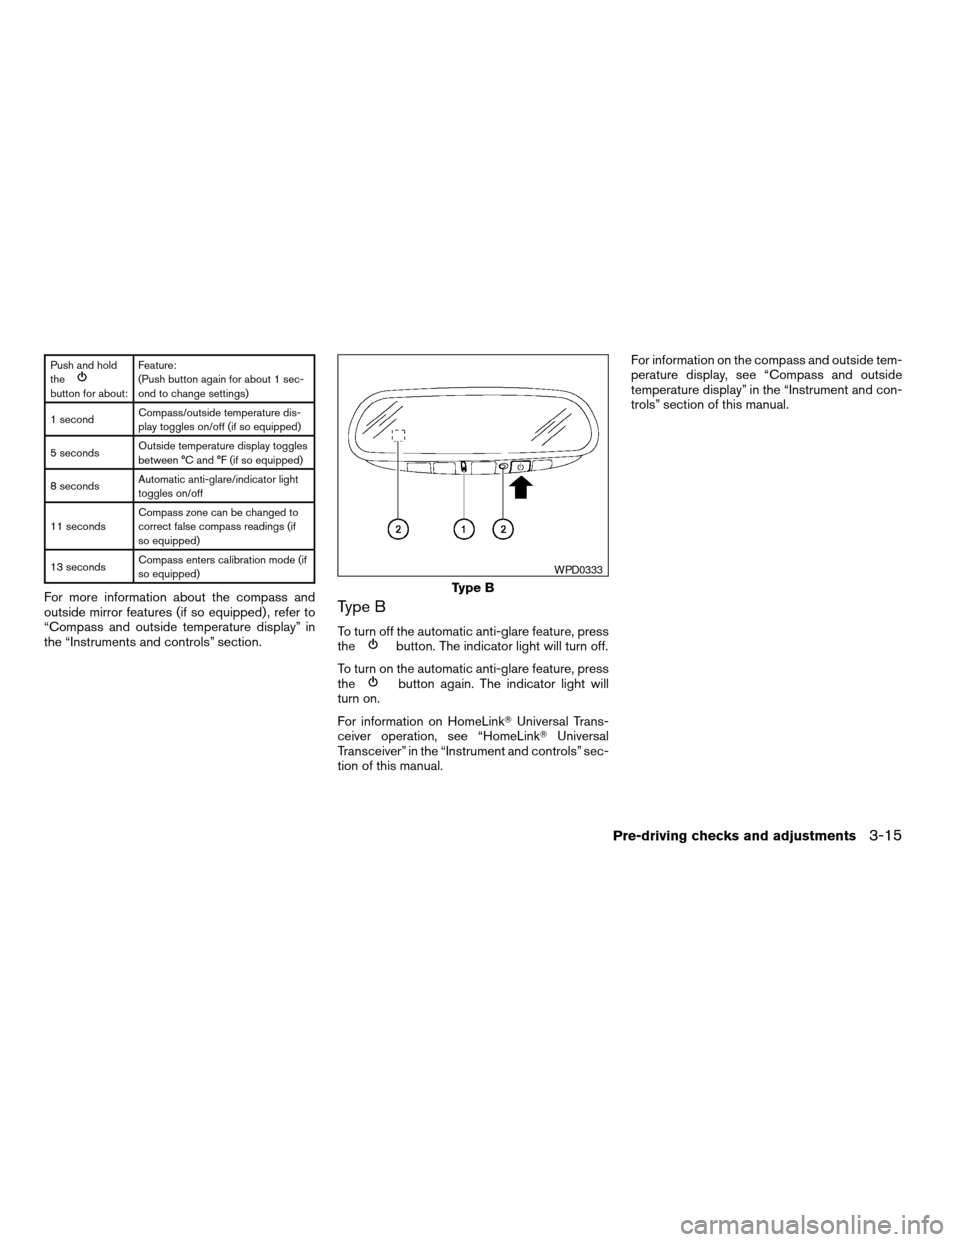
To turn off the automatic anti-glare feature, press
thebutton. The indicator light will turn off.
To turn on the automatic anti-glare feature, press
the
button again. The indicator light will
turn on.
For information on HomeLinkTUniversal Trans-
ceiver operation, see “HomeLinkTUniversal
Transceiver” in the “Instrument and controls” sec-
tion of this manual.For information on the compass and outside tem-
perature display, see “Compass and outside
temperature display” in the “Instrument and con-
trols” section of this manual.
Type B
WPD0333
Pre-driving checks and adjustments3-15
ZREVIEW COPYÐ2006 Pathfinder(pat)
Owners ManualÐUSA_English(nna)
07/29/05Ðcathy
X
Page 148 of 344
OUTSIDE MIRRORS
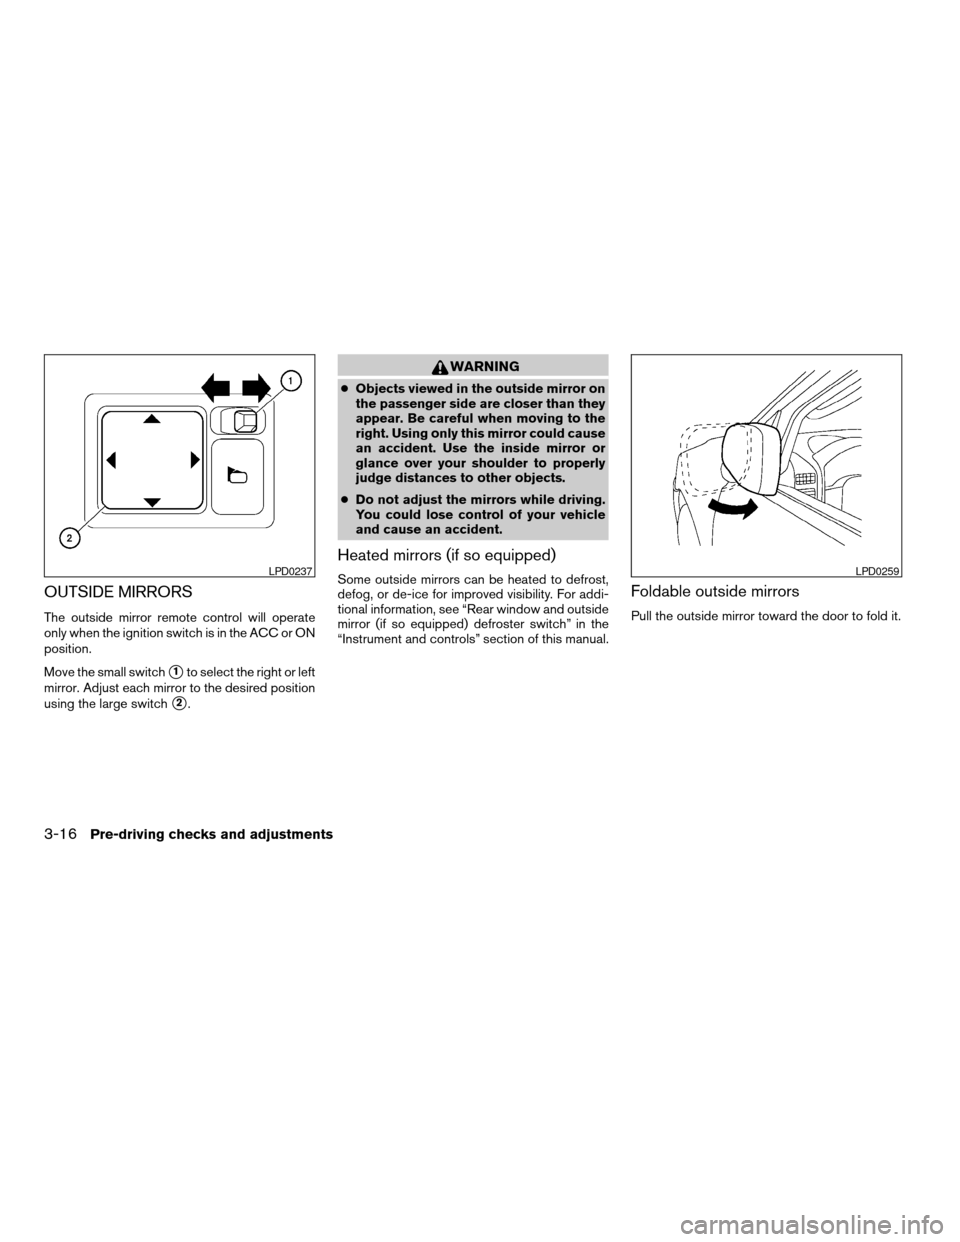
The outside mirror remote control will operate
only when the ignition switch is in the ACC or ON
position.
Move the small switch
s1to select the right or left
mirror. Adjust each mirror to the desired position
using the large switch
s2.
WARNING
cObjects viewed in the outside mirror on
the passenger side are closer than they
appear. Be careful when moving to the
right. Using only this mirror could cause
an accident. Use the inside mirror or
glance over your shoulder to properly
judge distances to other objects.
cDo not adjust the mirrors while driving.
You could lose control of your vehicle
and cause an accident.
Heated mirrors (if so equipped)
Some outside mirrors can be heated to defrost,
defog, or de-ice for improved visibility. For addi-
tional information, see “Rear window and outside
mirror (if so equipped) defroster switch” in the
“Instrument and controls” section of this manual.Foldable outside mirrors
Pull the outside mirror toward the door to fold it.
LPD0237LPD0259
3-16Pre-driving checks and adjustments
ZREVIEW COPYÐ2006 Pathfinder(pat)
Owners ManualÐUSA_English(nna)
07/29/05Ðcathy
X
Page 149 of 344

The automatic drive positioner system has two
features:
cMemory storage function
cEntry/exit function
MEMORY STORAGE FUNCTION
Two positions for the driver’s seat, accelerator
and brake pedals, and outside mirrors can be
stored in the automatic drive positioner memory.
Follow these procedures to use the memory sys-
tem.
1. Set the automatic transmission selector le-
ver to the P (Park) position.
2. Turn the ignition ON.3. Adjust the driver’s seat, accelerator and
brake pedals, and outside mirrors to the
desired positions by manually operating
each adjusting switch. For additional infor-
mation, see “Seats” in the “Safety—Seats,
seat belts and supplemental restraint sys-
tem” section and “Pedal position adjust-
ment” and “Outside mirrors” earlier in this
section.
During this step, do not turn the ignition to
any position other than ON.
4. Push the SET switch and, within 5 seconds,
push the memory switch (1 or 2) fully for at
least 1 second.
The indicator light for the pushed memory
switch will come on and stay on for approxi-
mately 5 seconds after pushing the switch.
After the indicator light goes off, the se-
lected positions are stored in the selected
memory (1 or 2) .
If a new memory is stored in the same memory
switch, the previous memory will be deleted.
Linking a keyfob to a stored memory
position
Each keyfob can be linked to a stored memory
position (memory switch 1 or 2) with the follow-
ing procedure.
1.
Follow the steps for storing a memory position.
LPD0306
AUTOMATIC DRIVE POSITIONER (if
so equipped)
Pre-driving checks and adjustments3-17
ZREVIEW COPYÐ2006 Pathfinder(pat)
Owners ManualÐUSA_English(nna)
07/29/05Ðcathy
X
Page 150 of 344

2. While the indicator light for the memory
switch being set is illuminated for 5 sec-
onds, press the
button on the keyfob.
The indicator light will blink. After the indica-
tor light goes off, the keyfob is linked to that
memory setting.
With the key removed from the ignition switch,
press the
button on the keyfob. The driv-
er’s seat, accelerator and brake pedals, and out-
side mirrors will move to the memorized position.
NOTE:
If a new memory position is saved to the
memory switch, the keyfob automatically
re-links.
Confirming memory storage
cTurn the ignition ON and push the SET
switch. If the main memory has not been
stored, the indicator light will come on for
approximately 0.5 seconds. When the
memory has stored the position, the indica-
tor light will stay on for approximately 5 sec-
onds.
cIf the battery cable is disconnected, or if the
fuse opens, the memory will be canceled. In
such a case, reset the desired positions
using the following procedures.1. Open and close the driver’s door more than
two times with the ignition key in the LOCK
position.
2. Reset the desired position using the previ-
ous procedure.
Selecting the memorized position
Set the automatic transmission selector lever to
the P (Park) position, then:
cWithin 45 seconds of opening the driver’s
door, push the memory switch (1 or 2) fully
for at least 1 second, or
cTurn the ignition switch to the ON position
and push the memory switch (1 or 2) fully for
at least 1 second.
The driver’s seat, accelerator and brake pedals,
and outside mirrors will move to the memorized
position with the indicator light blinking, and then
the light will stay on for approximately 5 seconds.
ENTRY/EXIT FUNCTION
This system is designed so that the driver’s seat
will automatically move when the automatic
transmission selector lever is in the P (Park)
position. This allows the driver to get into and out
of the driver’s seat more easily.The driver’s seat will slide backward:
cWhen the key is removed from the ignition
switch and the driver’s door is opened.
cWhen the driver’s door is opened with the
ignition key turned to LOCK.
cWhen the ignition key is turned from ACC to
LOCK with the driver’s door open.
The driver’s seat will return to the previous posi-
tion:
cWhen the key is inserted into the ignition
switch and the driver’s door is closed.
cWhen the driver’s door is closed with the key
turned to LOCK.
cWhen the key is turned from ACC to ON
while the automatic transmission selector
lever is in the P (Park) position.
The entry/exit function can be adjusted or can-
celed. For vehicles with navigation system, see
“Vehicle electronic systems” in the “Display
screen, heater, air conditioner and audio sys-
tems” section of this manual. For vehicles without
navigation system, see your NISSAN dealer.
3-18Pre-driving checks and adjustments
ZREVIEW COPYÐ2006 Pathfinder(pat)
Owners ManualÐUSA_English(nna)
07/29/05Ðcathy
X
Page 219 of 344

4. Restart the engine while holding the device
(which may have caused the interference)
separate from the registered key.
If the no start condition re-occurs, NISSAN rec-
ommends placing the registered key on a sepa-
rate key ring to avoid interference from other
devices.cMake sure the area around the vehicle is
clear.
cCheck fluid levels such as engine oil, cool-
ant, brake fluid, and window washer fluid as
frequently as possible, or at least whenever
you refuel.
cCheck that all windows and lights are clean.
cVisually inspect tires for their appearance
and condition. Also check tires for proper
inflation.
cLock all doors.
cPosition seat and adjust head restraints.
cAdjust inside and outside mirrors.
cFasten seat belts and ask all passengers to
do likewise.
cCheck the operation of warning lights when
the key is turned to the ON (3) position. See
“Warning/indicator lights and audible re-
minders” in the “Instruments and controls”
section of this manual.1. Apply the parking brake.
2. Move the shift selector lever to P (Park) or N
(Neutral) . P (Park) is recommended.
The shift selector lever cannot be
moved out of P (Park) and into any of
the other gear positions if the ignition
key is turned to the OFF position or if
the key is removed from the ignition
switch.
The starter is designed not to operate if
the shift selector lever is in any of the
driving positions.
3. Crank the enginewith your foot off the
accelerator pedalby turning the ignition
key to START. Release the key when the
engine starts. If the engine starts, but fails to
run, repeat the above procedure.
cIf the engine is very hard to start in ex-
tremely cold weather or when restarting,
depress the accelerator pedal a little (ap-
proximately 1/3 to the floor) and hold it
and then crank the engine. Release the
key and the accelerator pedal when the
engine starts.
BEFORE STARTING THE ENGINE STARTING THE ENGINE
Starting and driving5-9
ZREVIEW COPYÐ2006 Pathfinder(pat)
Owners ManualÐUSA_English(nna)
07/29/05Ðcathy
X
Page 328 of 344
Trailer brakes
If your trailer is equipped with a braking system,
make sure it conforms to federal and/or local
regulations and that it is properly installed.
WARNING
Never connect a trailer brake system di-
rectly to the vehicle brake system.
Pre-towing tips
cBe certain your vehicle maintains a level
position when a loaded and/or unloaded
trailer is hitched. Do not drive the vehicle if it
has an abnormal nose-up or nose-down
condition; check for improper tongue load,
overload, worn suspension or other possible
causes of either condition.
cAlways secure items in the trailer to prevent
load shift while driving.
cLoad the trailer so approximately 60% of the
trailer load is in the front half and 40% is in
the back half.
cCheck your hitch, trailer tire pressure, ve-
hicle tire pressure, trailer light operation, and
trailer wheel lug nuts every time you attach a
trailer to the vehicle.cBe certain your rearview mirrors conform to
all federal, state or local regulations. If not,
install any mirrors required for towing before
driving the vehicle.
Trailer towing tips
In order to gain skill and an understanding of the
vehicle’s behavior, you should practice turning,
stopping and backing up in an area which is free
from traffic. Steering stability and braking perfor-
mance will be somewhat different than under
normal driving conditions.
cAlways secure items in the trailer to prevent
load shift while driving.
cAvoid abrupt starts, acceleration or stops.
cAvoid sharp turns or lane changes.
cAlways drive your vehicle at a moderate
speed.
cWhen backing up, hold the bottom of the
steering wheel with one hand. Move your
hand in the direction in which you want the
trailer to go. Make small corrections and
back up slowly. If possible, have someone
guide you when you are backing up.
cAlways block the wheels on both vehicle and
trailer when parking. Parking on a slope is
not recommended; however, if you must do
so, first block the wheels and apply the park-ing brake, and then move the transmission
shift selector lever into the P (Park) position.
If you move the shift selector lever to the P
(Park) position before blocking the wheels
and applying the parking brake, transmission
damage could occur.
cWhen going down a hill, shift into a lower
gear and use the engine braking effect.
When going up a long grade, downshift the
transmission to a lower gear and reduce
speed to reduce chances of engine over-
loading and/or overheating. However, for
long steep grades, do not stay in 1st gear
when driving above 35 MPH (56 km/h) or
2nd gear when driving above 58 MPH (93
km/h) .
cIf the engine coolant rises to an extremely
high temperature when the air conditioner
system is on, turn off the air conditioner.
Coolant heat can be additionally vented by
opening the windows, switching the fan
control to high and setting the temperature
control to the HOT position.
cTrailer towing requires more fuel than normal
circumstances.
cAvoid towing a trailer for your vehicle’s first
500 miles (805 km) .
9-22Technical and consumer information
ZREVIEW COPYÐ2006 Pathfinder(pat)
Owners ManualÐUSA_English(nna)
08/01/05Ðcathy
X
Page 335 of 344

10 Index
4WD warning light...............2-16
A
Active head restraint...............1-8
Adjusting pedal position............3-12
Air bag (See supplemental restraint
system).....................1-43
Air bag system
Front (See supplemental front impact
air bag system)...............1-50
Air bag warning labels.............1-57
Air bag warning light...........1-58, 2-17
Air cleaner housing filter............8-17
Air conditioner
Air conditioner operation..........4-16
Air conditioner service...........4-24
Air conditioner specification label.....9-11
Air conditioner system refrigerant and oil
recommendations..............9-6
Heater and air conditioner
controls................4-13, 4-21
Rear seat air conditioner..........4-24
Servicing air conditioner..........4-24
Air flow charts..................4-17
Alarm system
(See vehicle security system).........2-22
Anchor point locations.............1-34
Antenna.....................4-47
Anti-lock brake system (ABS).........5-29
Anti-lock brake warning light..........2-14
Audible reminders................2-21Audio system..................4-25
AM-FM-SAT radio with compact disc (CD)
changer...................4-41
Compact Disc (CD) changer. . . .4-38, 4-44
Compact disc (CD) player.........4-34
FM-AM radio with compact disc (CD)
player.................4-31, 4-35
Radio....................4-25
Steering wheel audio control switch. . . .4-46
Autolight switch.................2-27
Automatic
Automatic drive positioner.........3-17
Automatic power window switch.....2-48
Automatic transmission position indicator
light.....................2-18
Driving with automatic transmission. . . .5-10
Transmission selector lever lock
release....................5-12
Automatic anti-glare inside mirror.......3-14
B
Battery......................8-13
Charge warning light............2-15
Before starting the engine............5-9
Belts (See drive belts).............8-15
Booster seats..................1-38
Brake
Anti-lock brake system (ABS).......5-29
Brake booster................8-22
Brake fluid..................8-12
Brake light (See stop light).........8-27Brake pedal.................8-21
Brake system................5-28
Brake warning light.............2-14
Brake wear indicators........2-21, 8-21
Parking brake check............8-21
Parking brake operation..........5-14
Self-adjusting brakes............8-21
Break-in schedule................5-16
Brightness control
Instrument panel..............2-29
Brightness/Contrast button..........4-12
Control panel buttons...........4-12
Bulb check/instrument panel..........2-13
Bulb replacement................8-27
C
Capacities and recommended fuel/
lubricants.....................9-2
Car phone or CB radio.............4-57
Cargo light...................2-52
Cargo net....................2-44
Cargo (See vehicle loading information) . . .9-12
CD care and cleaning.............4-46
CD changer (See audio system). . . .4-38, 4-44
CD player (See audio system).........4-34
Child restraint with top tether strap......1-33
Child restraints.......1-14, 1-15, 1-20, 1-32
Precautions on child restraints . . .1-20, 1-38
Top tether strap anchor point locations . .1-34
Child safety rear door lock............3-4
ZREVIEW COPYÐ2006 Pathfinder(pat)
Owners ManualÐUSA_English(nna)
08/01/05Ðcathy
X
Page 336 of 344

Chimes, audible reminders...........2-21
Cleaning exterior and interior..........7-2
Clock...................4-32, 4-42
(models with navigation system)......4-10
Clock set
Control panel buttons...........4-10
C.M.V.S.S. certification label..........9-10
Cold weather driving..............5-33
Compact disc (CD) player...........4-34
Compass display.................2-9
Console box...................2-38
Control panel buttons..............4-2
Controls
Audio controls (steering wheel)......4-46
Heater and air conditioner
controls................4-13, 4-21
Rear seat air conditioner..........4-24
Coolant
Capacities and recommended fuel/
lubricants...................9-2
Changing engine coolant..........8-8
Checking engine coolant level........8-7
Engine coolant temperature gauge.....2-6
Corrosion protection...............7-5
Cruise control..................5-15
Cup holders...................2-40
Curtain side-impact and rollover air bag . . .1-55
D
Daytime running light system
(Canada only)..................2-29
Defroster switch
Rear window and outside mirror defroster
switch....................2-26
Digital video disc DVD.............4-47Dimensions and weights.............9-8
Dimmer switch for instrument panel......2-29
Display controls
(see control panel buttons)...........4-2
Door locks....................3-3
Door open warning light............2-15
Drive belts....................8-15
Drive positioner, Automatic...........3-17
Driving
Cold weather driving............5-33
Driving with automatic transmission. . . .5-10
Precautions when starting and driving . . .5-2
E
Economy - fuel.................5-17
Emission control information label.......9-10
Emission control system warranty.......9-25
Engine
Before starting the engine..........5-9
Capacities and recommended fuel/
lubricants...................9-2
Changing engine coolant..........8-8
Changing engine oil.............8-9
Changing engine oil filter..........8-10
Checking engine coolant level........8-7
Checking engine oil level..........8-8
Engine compartment check locations. . . .8-7
Engine coolant temperature gauge.....2-6
Engine cooling system............8-7
Engine oil...................8-8
Engine oil and oil filter recommendation . .9-5
Engine oil pressure warning light.....2-15
Engine oil viscosity..............9-5
Engine serial number............9-10
Engine specifications.............9-7Starting the engine..............5-9
Engine oil pressure gauge............2-8
English/Metric button..............4-10
Control panel buttons...........4-10
ENTER button..................4-2
Enter button
Control panel buttons............4-2
Event data recorders..............9-26
Exhaust gas (Carbon monoxide)........5-2
Eyeglass case..................2-38
F
First aid kit....................6-2
Flashers
(See hazard warning flasher switch)......2-31
Flat tire......................6-2
Floor mat positioning aid.............7-4
Fluid
Brake fluid..................8-12
Capacities and recommended fuel/
lubricants...................9-2
Engine coolant................8-7
Engine oil...................8-8
Power steering fluid.............8-11
Window washer fluid............8-12
F.M.V.S.S. certification label..........9-10
Fog light switch.................2-30
Front air bag system
(See supplemental restraint system).....1-50
Front seats....................1-2
Fuel
Capacities and recommended fuel/
lubricants...................9-2
Fuel economy................5-17
10-2
ZREVIEW COPYÐ2006 Pathfinder(pat)
Owners ManualÐUSA_English(nna)
08/01/05Ðcathy
X
Page 337 of 344

Fuel gauge..................2-7
Fuel octane rating..............9-4
Fuel recommendation............9-3
Fuel-filler door and cap...........3-10
FUEL ECON button...............4-4
Fuel Econ button
Control panel buttons............4-4
Fuses......................8-22
Fusible links...................8-23
G
Garage door opener, HomeLinkTUniversal
Transceiver...................2-53
Gascap.....................3-10
Gauge
Engine coolant temperature gauge.....2-6
Engine oil pressure gauge..........2-8
Fuel gauge..................2-7
Odometer...................2-4
Speedometer.................2-4
Tachometer..................2-6
Trip computer.................2-5
Trip odometer.................2-4
Voltmeter...................2-8
General maintenance..............8-2
Glass hatch....................3-9
Glove box....................2-38
H
Hazard warning flasher switch.........2-31
Head restraints..................1-7
Active head restraint.............1-8Headlight and turn signal switch........2-26
Headlight control switch............2-26
Headlights....................8-26
Headphones (See NISSAN
mobile entertainment system).........4-50
Heated seats..................2-32
Heater
Heater and air conditioner
controls................4-13, 4-21
Heater operation...........4-15, 4-22
Rear seat air conditioner..........4-24
Hill descent control (HDC) switch.......2-33
Hill descent control (HDC) system......5-32
Hill start assist (HSA) system.........5-32
HomeLinkTUniversal Transceiver.......2-53
Hood release...................3-8
Hook
Luggage hook................2-42
Horn.......................2-31
I
Ignition switch..................5-7
Immobilizer system..........2-23, 3-2, 5-8
Important vehicle information label.......9-10
In-cabin microfilter...............8-17
Increasing fuel economy............5-17
Indicator lights and audible reminders
(See warning/indicator lights and audible
reminders)....................2-13
Inside automatic anti-glare mirror.......3-14
Inside mirror...................3-14
Instrument brightness control.........2-29
Instrument panel..............0-6, 2-2
Instrument panel dimmer switch........2-29Interior light...................2-51
ISOFIX child restraints.............1-32
J
Jump starting...................6-8
K
Key ........................3-2
Keyfob battery replacement..........8-25
Keyless entry system
(See remote keyless entry system).......3-5
L
Labels
Air conditioner specification label.....9-11
C.M.V.S.S. certification label........9-10
Emission control information label.....9-10
Engine serial number............9-10
F.M.V.S.S. certification label........9-10
Vehicle identification number (VIN) plate . .9-9
Warning labels (for SRS)..........1-57
LATCH (Lower Anchors and Tethers
for CHildren) System..............1-32
License plate
Installing the license plate.........9-12
Lift gate......................3-8
Light
Air bag warning light.........1-58, 2-17
Brake light (See stop light).........8-27
Bulb check/instrument panel........2-13
10-3
ZREVIEW COPYÐ2006 Pathfinder(pat)
Owners ManualÐUSA_English(nna)
08/01/05Ðcathy
X
Page 338 of 344

Bulb replacement..............8-27
Charge warning light............2-15
Fog light switch...............2-30
Headlight and turn signal switch......2-26
Headlight control switch..........2-26
Headlights..................8-26
Interior light.................2-51
Light bulbs..................8-26
Low tire pressure warning light......2-16
Low washer fluid warning light.......2-17
Passenger air bag and status light.....1-52
Personal lights...............2-52
Security indicator light...........2-20
Warning/indicator lights and audible
reminders..................2-13
Lights
Map lights..................2-52
Lock
Child safety rear door lock..........3-4
Door locks..................3-3
Power door locks...............3-4
Low fuel warning light.............2-16
Low tire pressure warning light........2-16
Low washer fluid warning light.........2-17
Luggage hook..................2-42
Luggage (See vehicle loading information) . .9-12
Luggage storage
(see vehicle loading information)........2-42
M
Maint (maintenance) button
Control panel buttons............4-4
Maint (Maintenance) button, control panel
display.......................4-4Maintenance
General maintenance............8-2
Inside the vehicle...............8-3
Maintenance precautions..........8-5
Outside the vehicle..............8-2
Seat belt maintenance...........1-19
Under the hood and vehicle.........8-4
Malfunction indicator light...........2-19
Manual front seat adjustment..........1-2
Map lights....................2-52
Map pocket...................2-39
Meters and gauges................2-3
Instrument brightness control.......2-29
Mirror
Automatic anti-glare inside mirror.....3-14
Inside mirror.................3-14
Outside mirror control...........3-16
Outside mirrors...............3-16
Vanity mirror.................3-13
N
NISSAN mobile entertainment system (MES)
..........................4-47
NISSAN vehicle immobilizer
system................2-23, 3-2, 5-8
O
Octane rating (See fuel octane rating).....9-4
Odometer.....................2-4
Oil
Capacities and recommended fuel/
lubricants...................9-2Changing engine oil.............8-9
Changing engine oil filter..........8-10
Checking engine oil level..........8-8
Engine oil...................8-8
Engine oil and oil filter recommendation . .9-5
Engine oil viscosity..............9-5
Outside mirror control.............3-16
Outside mirrors.................3-16
Overdrive switch................5-13
Overheat
If your vehicle overheats..........6-10
Owner’s manual order form..........9-27
Owner’s manual/service manual order
information....................9-27
P
Parking
Parking brake check............8-21
Parking brake operation..........5-14
Parking/parking on hills...........5-27
Pedal position adjustment...........3-12
Personal lights.................2-52
Power
Front seat adjustment............1-4
Power door locks...............3-4
Power outlet.................2-34
Power rear windows............2-48
Power steering fluid.............8-11
Power steering system...........5-28
Power windows...............2-47
Rear power windows............2-48
Precautions
Maintenance precautions..........8-5
On-pavement and off-road driving
precautions..................5-5
10-4
ZREVIEW COPYÐ2006 Pathfinder(pat)
Owners ManualÐUSA_English(nna)
08/01/05Ðcathy
X