lock NISSAN PATHFINDER 2008 R51 / 3.G 04IT Navigation Manual
[x] Cancel search | Manufacturer: NISSAN, Model Year: 2008, Model line: PATHFINDER, Model: NISSAN PATHFINDER 2008 R51 / 3.GPages: 270, PDF Size: 5.97 MB
Page 54 of 270

Black plate (54,1)
Model "NISSAN_NAVI" EDITED: 2007/ 2/ 26
NAI0414
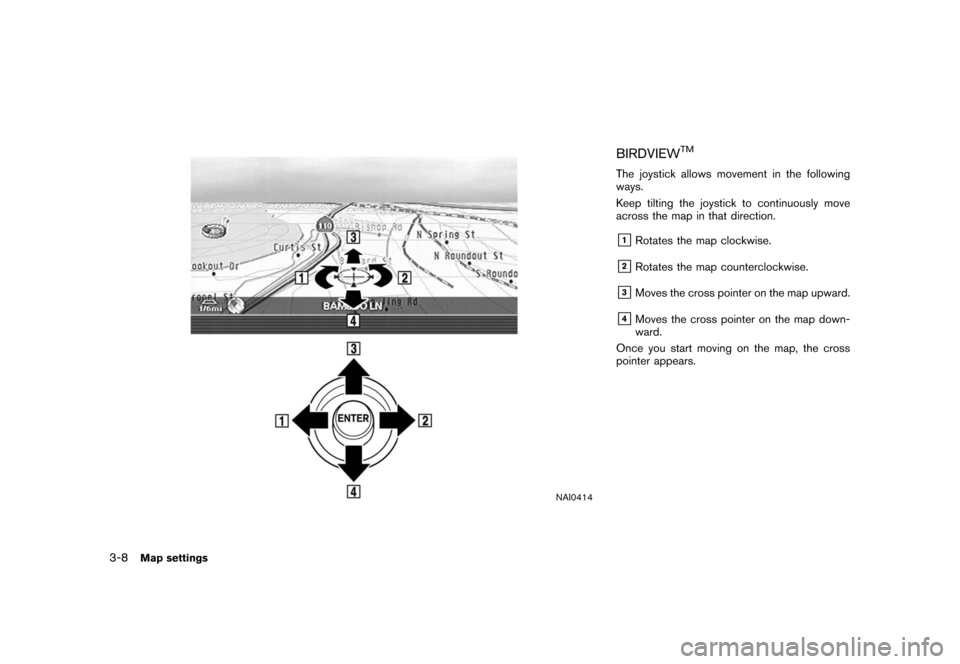
BIRDVIEWTM
The joystick allows movement in the following
ways.
Keep tilting the joystick to continuously move
across the map in that direction.
&1Rotates the map clockwise.
&2Rotates the map counterclockwise.
&3Moves the cross pointer on the map upward.
&4Moves the cross pointer on the map down-
ward.
Once you start moving on the map, the cross
pointer appears.
3-8Map settings
Page 201 of 270

Black plate (22,1)
8 Other settings
Model "NISSAN_NAVI" EDITED: 2007/ 2/
Settings screen (Maxima, Quest, Titan).................... 8-2
Basic operation............................................. 8-2
Display settings............................................. 8-3
System settings screen................................... 8-6
Language and unit settings............................... 8-7
Clock settings............................................. 8-10
Setting screen (350Z)....................................... 8-12
Basic operation........................................... 8-12Display settings........................................... 8-13
Volume adjustment....................................... 8-16
Clock settings............................................. 8-17
Language and unit settings............................. 8-19
Map color settings............................................ 8-22
Adjusting the current vehicle location.................... 8-23
Reset all navigation settings to default.................. 8-25
Page 206 of 270

Black plate (210,1)
Model "NISSAN_NAVI" EDITED: 2007/ 2/ 26
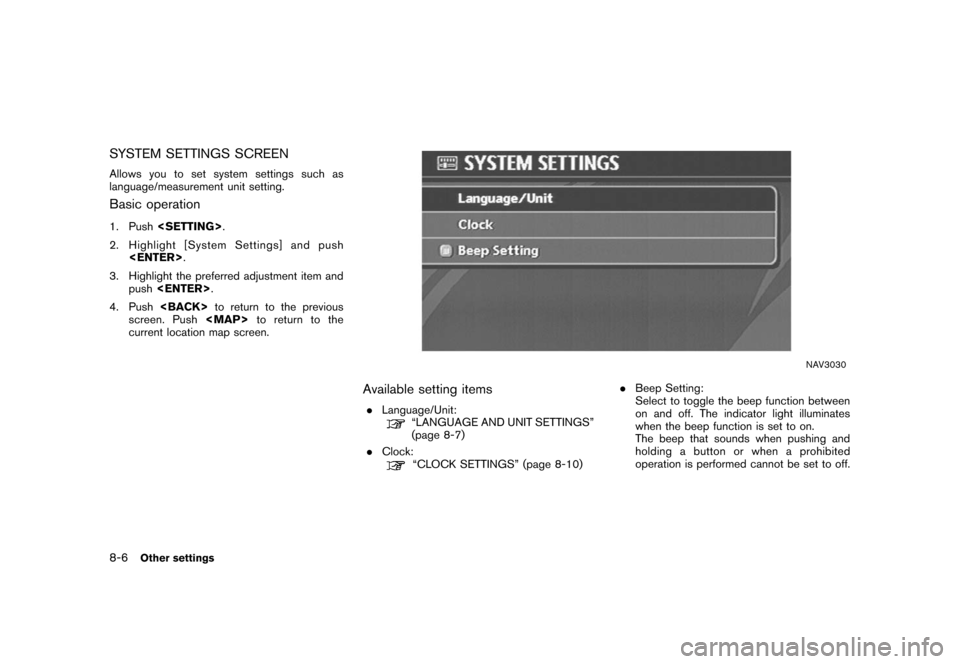
SYSTEM SETTINGS SCREEN
Allows you to set system settings such as
language/measurement unit setting.
Basic operation
1. Push
2. Highlight [System Settings] and push
3. Highlight the preferred adjustment item and
push
4. Push
screen. Push
Page 210 of 270
![NISSAN PATHFINDER 2008 R51 / 3.G 04IT Navigation Manual Black plate (214,1)
Model "NISSAN_NAVI" EDITED: 2007/ 2/ 26
CLOCK SETTINGS
This allows you to change the clock settings.
Basic operation
1. Highlight [Clock] and push<ENTER>.
2. Highlight the preferre NISSAN PATHFINDER 2008 R51 / 3.G 04IT Navigation Manual Black plate (214,1)
Model "NISSAN_NAVI" EDITED: 2007/ 2/ 26
CLOCK SETTINGS
This allows you to change the clock settings.
Basic operation
1. Highlight [Clock] and push<ENTER>.
2. Highlight the preferre](/img/5/794/w960_794-209.png)
Black plate (214,1)
Model "NISSAN_NAVI" EDITED: 2007/ 2/ 26
CLOCK SETTINGS
This allows you to change the clock settings.
Basic operation
1. Highlight [Clock] and push
2. Highlight the preferred adjustment item.
3. Use the joystick to adjust to the preferred
setting.
4. After setting, push
to apply the setting.
5. Push
screen. Push
Page 212 of 270

Black plate (216,1)
Model "NISSAN_NAVI" EDITED: 2007/ 2/ 26
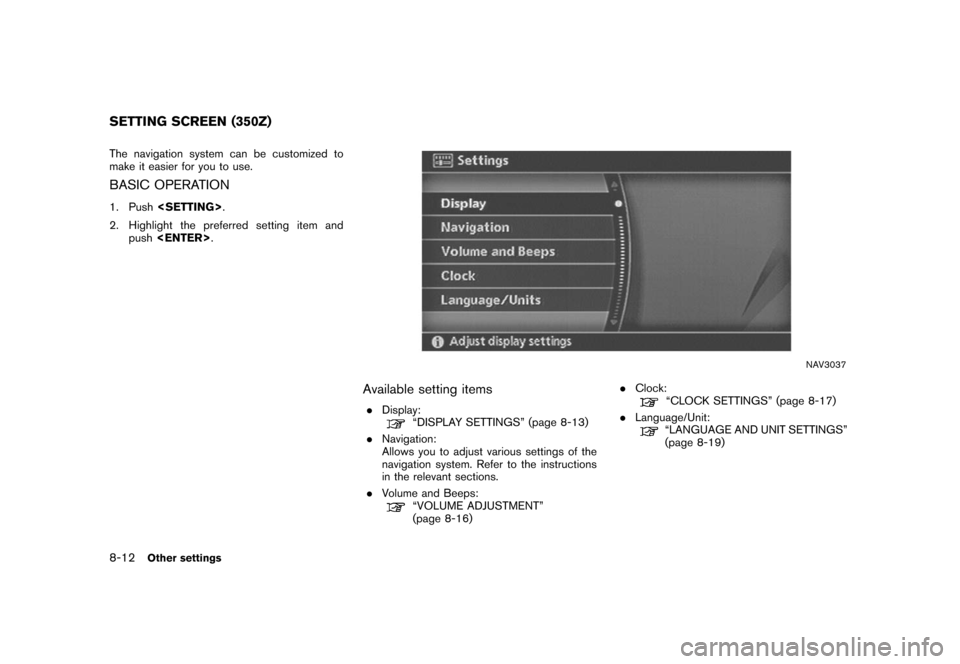
The navigation system can be customized to
make it easier for you to use.
BASIC OPERATION
1. Push
2. Highlight the preferred setting item and
push
NAV3037
Available setting items
.Display:“DISPLAY SETTINGS” (page 8-13)
.Navigation:
Allows you to adjust various settings of the
navigation system. Refer to the instructions
in the relevant sections.
.Volume and Beeps:
“VOLUME ADJUSTMENT”
(page 8-16).Clock:
“CLOCK SETTINGS” (page 8-17)
.Language/Unit:
“LANGUAGE AND UNIT SETTINGS”
(page 8-19)
SETTING SCREEN (350Z)
8-12Other settings
Page 217 of 270
![NISSAN PATHFINDER 2008 R51 / 3.G 04IT Navigation Manual Black plate (221,1)
Model "NISSAN_NAVI" EDITED: 2007/ 2/ 26
CLOCK SETTINGS
This allows you to change the clock settings.
Basic operation
1. Highlight [Clock] and push<ENTER>.
2. Highlight the preferre NISSAN PATHFINDER 2008 R51 / 3.G 04IT Navigation Manual Black plate (221,1)
Model "NISSAN_NAVI" EDITED: 2007/ 2/ 26
CLOCK SETTINGS
This allows you to change the clock settings.
Basic operation
1. Highlight [Clock] and push<ENTER>.
2. Highlight the preferre](/img/5/794/w960_794-216.png)
Black plate (221,1)
Model "NISSAN_NAVI" EDITED: 2007/ 2/ 26
CLOCK SETTINGS
This allows you to change the clock settings.
Basic operation
1. Highlight [Clock] and push
2. Highlight the preferred adjustment item and
push
3. Use the joystick to adjust to the preferred
setting.
Push
4. After setting, push
to apply the setting.
5. Push
screen. Push
Page 236 of 270

Black plate (240,1)
Model "NISSAN_NAVI" EDITED: 2007/ 2/ 26
.If waypoints are set, the system calculates
multiple routes between waypoints simulta-
neously, and the following may result.
— If one section between waypoints cannot
be calculated, none of the route will be
displayed.
— The route may not connect completely at
some waypoints.
— The route may require a U-turn close to
some waypoints.
.Route calculation may not be completed in
the following cases.
— If there is no main road within a range of
1.5 miles (2.5 km) from the vehicle, a
message saying so will appear on the
screen. Try recalculating when the vehi-
cle is closer to a main road.
— If there is no main road within a range of
1.5 miles (2.5 km) from the destination or
waypoint, a message saying so will
appear on the screen. Try setting the
location closer to a main road.
— If the vehicle is too close to the
destination or if there are no roads to
the destination, a message saying so will
appear on the screen.— If it is impossible to reach the destination
or waypoints because of traffic regula-
tions, etc.
— If the only route to reach the destination
or waypoints is extremely complicated.
— If the destination, current vehicle position
or waypoint is within the “Avoid Area”.
— If a part of the route is included in the
“Avoid Area”.
.The following may occur when the route is
displayed.
— If you calculate a route on a main road,
the starting point of the route may not
exactly match the current vehicle loca-
tion.
— The endpoint of the route may not
exactly match the destination.
— If you calculate a route on a main road,
the system may display a route from
another main road. This may be because
the position of the vehicle icon is not
accurate. In this case, park the vehicle in
a safe location and reset the vehicle
icon, or continue driving to see if the
position of the vehicle icon is automati-
cally adjusted before recalculating the
route.— There are cases in which the system
shows an indirect route to reach the
destination or waypoints, if you set them
from stored or facility information. In
order to correct this, you must be careful
about the traffic direction, especially
when lanes with different travel direc-
tions are shown separately, such as
interchanges and service areas.
— This system makes no distinction be-
tween limited traffic control and total
control (blockage) . It may show an
indirect route even if the road is usable.
— Even if the freeway preference is set to
OFF, a route that uses the freeway may
be suggested.
— Even if the preference is set to OFF, a
route that uses a ferry line may be
suggested.
— Ferry lines, excluding those that are only
for pedestrians, bicycles and motor-
cycles, are stored in this system. Take
into consideration the travel time re-
quired and operational condition before
deciding whether to use them or not.
9-10General system information
Page 262 of 270

Black plate (6,1)
Model "NISSAN_NAVI" EDITED: 2007/ 2/ 26
SETTING SCREEN (MAXIMA, QUEST, TITAN)
Display Brightness/Contrast
page 8-3
Display off
page 8-4
System Settings Language/Units Language
page 8-7
Unit
page 8-9
Clock Hours
page 8-10
Minutes
page 8-10
Auto Adjust
page 8-10
Daylight Saving Time
page 8-10
Select Time Zone
page 8-10
Beep Setting
page 8-6
Page 267 of 270

Black plate (11,1)
Model "NISSAN_NAVI" EDITED: 2007/ 2/ 26
Volume and Beeps Guidance Volume
page 8-16
Guidance Voice
page 8-16
Button Beeps
page 8-16
Clock On-screen Clock
page 8-17
Clock Format
page 8-17
Offset Adjust
page 8-17
Daylight Saving Time
page 8-17
Time Zone
page 8-17
Language/Units Select Language
page 8-19
Select Units
page 8-21
Page 269 of 270

Black plate (1,1)
A
About route guidance............................... 5-7
About the map DVD-ROM........................ 9-15
Adding a destination or waypoint................... 5-5
Adding additional destinations to a route........ 4-50
Address book........................................ 9-2
Adjusting the current vehicle location............ 8-23
Adjusting the location of the destination......... 4-49
Adjusting voice guidance volume................. 2-37
Automatic reroute.................................... 9-2
Avoid area settings.................................. 6-7
B
Background Color................................. 8-15
Basics of voice guidance......................... 9-11
Birdview
TM................................. 3-3, 3-8, 9-3
Brightness..................................... 8-4, 8-14
C
Change/edit route................................. 5-15
Changing the BirdviewTMangle.................. 3-17
Changing the scale of a map.............. 2-19, 3-12
Changing the scale of the left screen............ 3-20
Character (letter and number) input screen..... 2-23
Characteristics of a liquid crystal display........ 9-19
Clock settings............................... 8-10, 8-17
Confirming a route............................ 5-4, 5-26
Confirming by simulation.......................... 5-28
Control panel......................................... 2-3
Current vehicle location............................. 9-3
Customer assistance.............................. 10-2
Customizing nearby places....................... 6-33
D
Deleting a route............................. 2-33, 5-35
Deleting a stored item............................. 6-28
Deleting a stored item individually................ 6-28
Deleting all stored items.......................... 6-31
Deleting an individual item on the map.......... 6-30
Destination screen................................... 4-2
Detailed route priorities............................ 5-13
Detour................................................ 9-2
Directions provided and the distances to
guide points........................................ 9-11
Disc replacement.................................. 9-17
Display of current vehicle location.................. 9-3
Display settings............................... 8-3, 8-13
Displaying landmark icons......................... 3-22
E
Editing a route..................................... 5-19
Editing the address book......................... 6-15
Editing the avoid area............................. 6-27
Editing the stored home and location............ 6-16
Editing the stored route........................... 6-25
Editing the stored tracking........................ 6-26
F
For safe operation................................... 1-2
Free zoom................................... 2-19, 3-12
Functions disabled while driving.................. 2-13
G
Guidance screens and preview mode............. 5-8
H
Heading Up........................................ 3-16
How to handle the display........................ 9-19
How to handle the DVD-ROM.................... 9-18
How to order map DVD-ROM updates.......... 9-15
How to store your home.......................... 2-20
How to use this manual............................. 1-2
How to view map screen.......................... 2-14
I
Incorrect display of vehicle position................ 9-6
Information screen (350Z only)..................... 7-2
L
Language setting............................. 8-7, 8-19
Laser product........................................ 1-4
List screen.......................................... 2-27
Long Range Map View............................ 3-16
M
Maintenance of the display........................ 9-20
Map color settings................................. 8-22
Map DVD-ROM............................. 9-15, 10-6
Map DVD-ROM drive location.................... 9-16
Map icons.......................................... 3-22
Map menu screen.................................. 2-10
Map scale.......................................... 3-13
Map screen types.................................. 2-15
Map scrolling information.......................... 3-10
Map symbols....................................... 3-24
Map types............................................ 3-2
Menu screen types and how to operate........... 2-7
Model "NISSAN_NAVI" EDITED: 2007/ 2/ 26