ignition NISSAN PATHFINDER 2008 R51 / 3.G Workshop Manual
[x] Cancel search | Manufacturer: NISSAN, Model Year: 2008, Model line: PATHFINDER, Model: NISSAN PATHFINDER 2008 R51 / 3.GPages: 448, PDF Size: 6.06 MB
Page 160 of 448
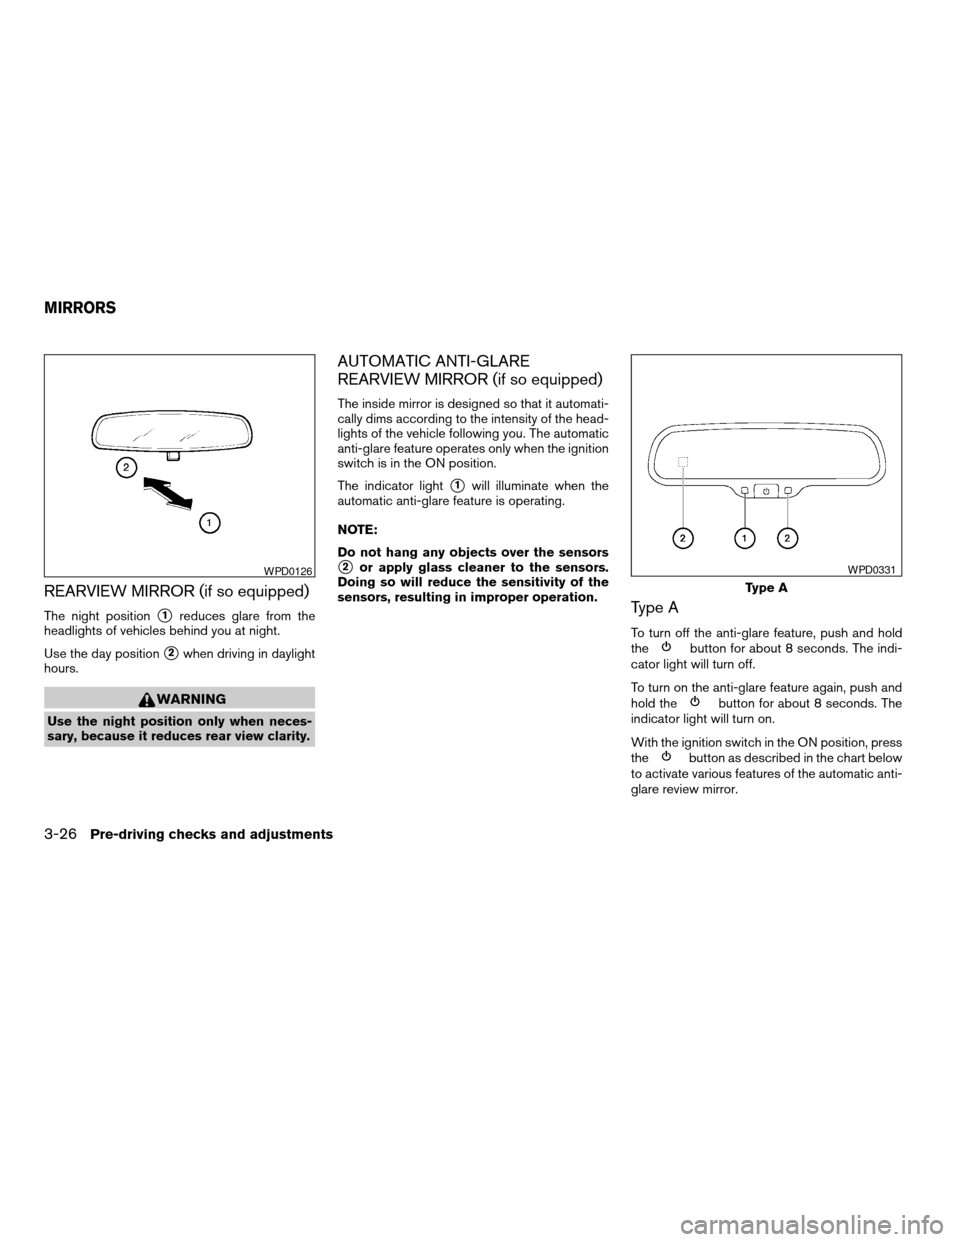
REARVIEW MIRROR (if so equipped)
The night positions1reduces glare from the
headlights of vehicles behind you at night.
Use the day position
s2when driving in daylight
hours.
WARNING
Use the night position only when neces-
sary, because it reduces rear view clarity.
AUTOMATIC ANTI-GLARE
REARVIEW MIRROR (if so equipped)
The inside mirror is designed so that it automati-
cally dims according to the intensity of the head-
lights of the vehicle following you. The automatic
anti-glare feature operates only when the ignition
switch is in the ON position.
The indicator light
s1will illuminate when the
automatic anti-glare feature is operating.
NOTE:
Do not hang any objects over the sensors
s2or apply glass cleaner to the sensors.
Doing so will reduce the sensitivity of the
sensors, resulting in improper operation.
Type A
To turn off the anti-glare feature, push and hold
thebutton for about 8 seconds. The indi-
cator light will turn off.
To turn on the anti-glare feature again, push and
hold the
button for about 8 seconds. The
indicator light will turn on.
With the ignition switch in the ON position, press
the
button as described in the chart below
to activate various features of the automatic anti-
glare review mirror.
WPD0126
Type A
WPD0331
MIRRORS
3-26Pre-driving checks and adjustments
ZREVIEW COPYÐ2008 Pathfinder(pat)
Owners ManualÐUSA_English(nna)
03/23/07Ðdebbie
X
Page 162 of 448
OUTSIDE MIRRORS
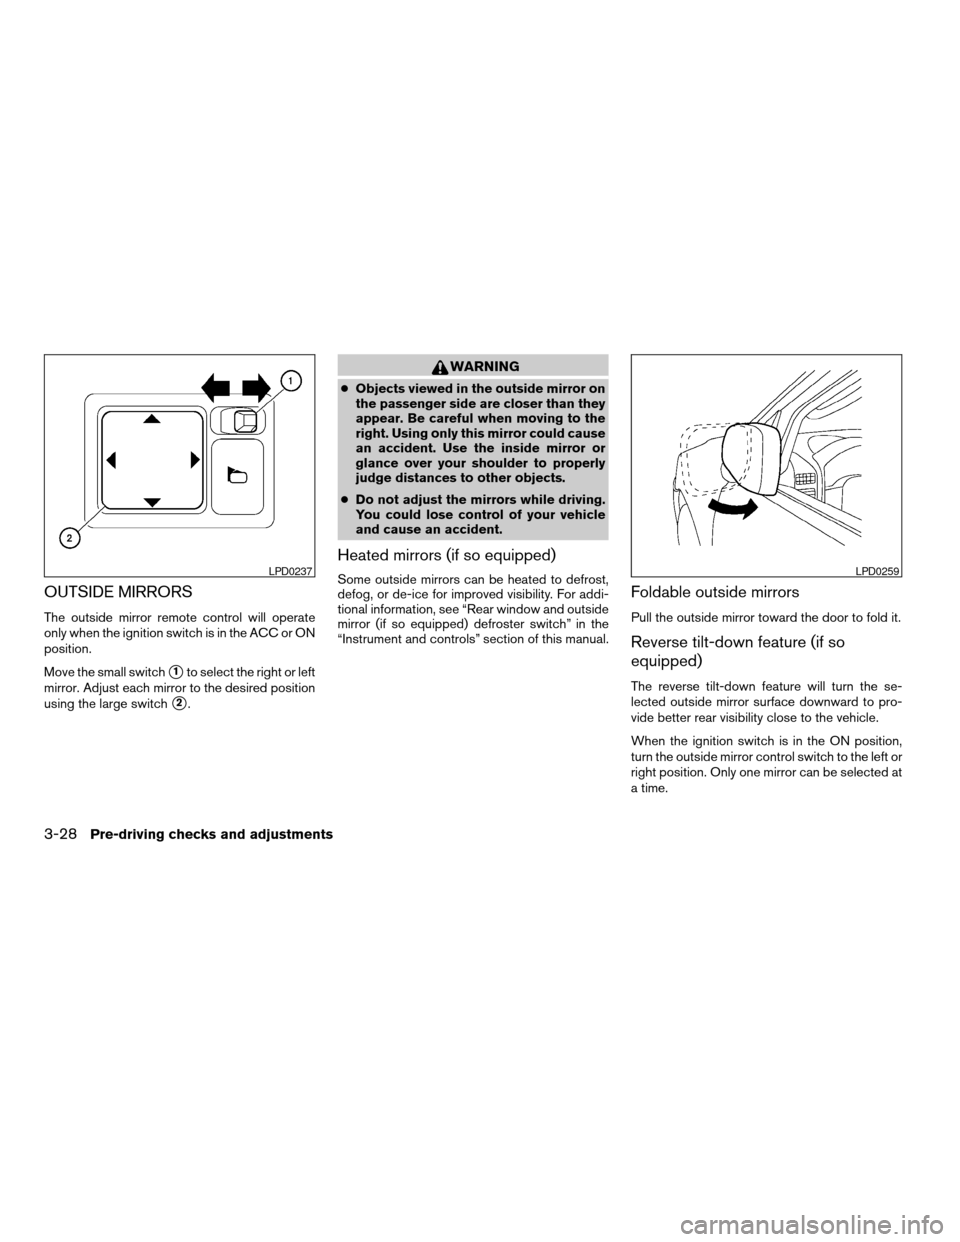
The outside mirror remote control will operate
only when the ignition switch is in the ACC or ON
position.
Move the small switch
s1to select the right or left
mirror. Adjust each mirror to the desired position
using the large switch
s2.
WARNING
cObjects viewed in the outside mirror on
the passenger side are closer than they
appear. Be careful when moving to the
right. Using only this mirror could cause
an accident. Use the inside mirror or
glance over your shoulder to properly
judge distances to other objects.
cDo not adjust the mirrors while driving.
You could lose control of your vehicle
and cause an accident.
Heated mirrors (if so equipped)
Some outside mirrors can be heated to defrost,
defog, or de-ice for improved visibility. For addi-
tional information, see “Rear window and outside
mirror (if so equipped) defroster switch” in the
“Instrument and controls” section of this manual.Foldable outside mirrors
Pull the outside mirror toward the door to fold it.
Reverse tilt-down feature (if so
equipped)
The reverse tilt-down feature will turn the se-
lected outside mirror surface downward to pro-
vide better rear visibility close to the vehicle.
When the ignition switch is in the ON position,
turn the outside mirror control switch to the left or
right position. Only one mirror can be selected at
a time.
LPD0237LPD0259
3-28Pre-driving checks and adjustments
ZREVIEW COPYÐ2008 Pathfinder(pat)
Owners ManualÐUSA_English(nna)
03/23/07Ðdebbie
X
Page 163 of 448

Move the shift selector lever to R (Reverse) . The
selected mirror will turn downward.
The selected mirror surface will return to its origi-
nal position when any of the following have oc-
curred:
cThe shift selector lever is moved to any po-
sition other than R (Reverse) .
cThe outside mirror control switch is set to the
N (Neutral) position.
cThe ignition switch is turned OFF.
NOTE:
If the outside mirror control switch is in the
neutral position, neither mirror will turn
downward when the shift selector lever is
moved to R (Reverse) .
For more information regarding this feature and
how to save the R (Reverse) mirror tilt-down
adjustment in the automatic drive positioner
memory, refer to “Automatic drive positioner” later
in this section.The automatic drive positioner system has two
features:
cMemory storage function
cEntry/exit function
MEMORY STORAGE FUNCTION
Two positions for the driver’s seat, accelerator
and brake pedals, and outside mirrors can be
stored in the automatic drive positioner memory.
Follow these procedures to use the memory sys-
tem.
1. Set the automatic transmission selector le-
ver to the P (Park) position.
2. Turn the ignition ON.
LPD0306
AUTOMATIC DRIVE POSITIONER (if
so equipped)
Pre-driving checks and adjustments3-29
ZREVIEW COPYÐ2008 Pathfinder(pat)
Owners ManualÐUSA_English(nna)
03/23/07Ðdebbie
X
Page 164 of 448

3. Adjust the driver’s seat, accelerator and
brake pedals, and outside mirrors to the
desired positions by manually operating
each adjusting switch. For additional infor-
mation, see “Seats” in the “Safety—Seats,
seat belts and supplemental restraint sys-
tem” section and “Pedal position adjust-
ment” and “Outside mirrors” earlier in this
section.
During this step, do not turn the ignition to
any position other than ON.
4. Push the SET switch and, within 5 seconds,
push the memory switch (1 or 2) fully for at
least 1 second.
The indicator light for the pushed memory
switch will come on and stay on for approxi-
mately 5 seconds after pushing the switch.
After the indicator light goes off, the se-
lected positions are stored in the selected
memory (1 or 2) .
If a new memory is stored in the same memory
switch, the previous memory will be deleted.
Linking a keyfob to a stored memory
position
Each keyfob can be linked to a stored memory
position (memory switch 1 or 2) with the follow-
ing procedure.1. Follow the steps for storing a memory posi-
tion.
2. While the indicator light for the memory
switch being set is illuminated for 5 sec-
onds, press the
button on the keyfob.
The indicator light will blink. After the indica-
tor light goes off, the keyfob is linked to that
memory setting.
With the key removed from the ignition switch,
press the
button on the keyfob. The driv-
er’s seat, accelerator and brake pedals, and out-
side mirrors will move to the memorized position.
NOTE:
If a new memory position is saved to the
memory switch, the keyfob automatically
re-links.
Confirming memory storage
cTurn the ignition ON and push the SET
switch. If the main memory has not been
stored, the indicator light will come on for
approximately 0.5 seconds. When the
memory has stored the position, the indica-
tor light will stay on for approximately 5 sec-
onds.
cIf the battery cable is disconnected, or if the
fuse opens, the memory storage function will
be canceled and must be restarted before astored memory position can be set again.
Drive the vehicle over 25 MPH (40 km/h) to
restart the memory storage function. You
can also restart the memory storage function
using the following procedure.
1. Connect the battery cable or replace the
fuse.
2. Open and close the driver’s door more than
two times with the ignition key in the LOCK
position.
Once the memory storage function has been
restarted, you can store a memory position.
See “Memory storage function” earlier in this
section.
Selecting the memorized position
Set the shift selector lever to the P (Park) posi-
tion, then:
cWithin 45 seconds of opening the driver’s
door, push the memory switch (1 or 2) fully
for at least 1 second, or
cTurn the ignition switch to the ON position
and push the memory switch (1 or 2) fully for
at least 1 second.
The driver’s seat, accelerator and brake pedals,
and outside mirrors will move to the memorized
position with the indicator light blinking, and then
the light will stay on for approximately 5 seconds.
3-30Pre-driving checks and adjustments
ZREVIEW COPYÐ2008 Pathfinder(pat)
Owners ManualÐUSA_English(nna)
03/23/07Ðdebbie
X
Page 165 of 448

ENTRY/EXIT FUNCTION
This system is designed so that the driver’s seat
will automatically move when the shift selector
lever is in the P (Park) position. This allows the
driver to get into and out of the driver’s seat more
easily.
The driver’s seat will slide backward:
cWhen the key is removed from the ignition
switch and the driver’s door is opened.
cWhen the driver’s door is opened with the
ignition key turned to LOCK.
cWhen the ignition key is turned from ACC to
LOCK with the driver’s door open.
The driver’s seat will return to the previous posi-
tion:
cWhen the key is inserted into the ignition
switch and the driver’s door is closed.
cWhen the driver’s door is closed with the key
turned to LOCK.
cWhen the key is turned from ACC to ON
while the shift selector lever is in the P (Park)
position.
The entry/exit function can be adjusted or can-
celed. For vehicles with navigation system, see
“Comfort & convenience settings” in the “Display
screen, heater, air conditioner and audio sys-tems” section of this manual. For vehicles without
navigation system, see your NISSAN dealer.Restarting the entry/exit function
If the battery cable is disconnected or if the fuse
opens, the entry/exit function will be disabled.
Drive the vehicle over 25 MPH (40 km/h) to
restart the entry/exit function. You can also restart
the entry/exit function using the following proce-
dure.
1. Connect the battery cable or replace the
fuse.
2. Open and close the driver’s door more than
two times with the ignition key in the LOCK
position.
The entry/exit function should now work properly.
SYSTEM OPERATION
The automatic drive positioner system will not
work or will stop operating under the following
conditions:
cWhen the vehicle speed is above 4 MPH (7
km/h) .
cWhen any of the memory switches are
pushed while the automatic drive positioner
is operating.cWhen the adjusting switch for the driver’s
seat is turned on while the automatic drive
positioner is operating.
cWhen the memory switch (1 or 2) is not
pushed and held for at least 1 second.
cWhen the seat has been already moved to
the memorized position.
cWhen no seat position is stored in the
memory switch.
cWhen the shift selector lever is moved from
P (Park) to any other position.
cWhen the driver’s door remains open more
than 45 seconds and the ignition switch is
not in the ON position.
The automatic drive positioner system can be
adjusted and canceled. For vehicles with naviga-
tion system, see “Comfort & convenience set-
tings” in the “Display screen, heater, air condi-
tioner and audio systems” section of this manual.
For vehicles without navigation system, see your
NISSAN dealer.
Pre-driving checks and adjustments3-31
ZREVIEW COPYÐ2008 Pathfinder(pat)
Owners ManualÐUSA_English(nna)
03/23/07Ðdebbie
X
Page 169 of 448

When you use this system, make sure the engine
is running.
If you use the system with the engine not
running (ignition ON or ACC) for a long
time, it will discharge the battery, and the
engine will not start.
Reference symbols:
ENTER button — This is a button on the control
panel.
“Display” key — This is a select key on the screen.
By selecting this key you can proceed to the next
function.
HOW TO USE THE NISSAN
CONTROLLER
Use the NISSAN controller to choose an item on
the display screen. Select an item on the display
using the main directional buttons
s2or the
center dial
s3. Then press the ENTER buttons1
to select the item or perform the action.
The BACK button
s4button has two functions:
cGo back to the previous display (cancel) .
If you press the BACK button
s4during setup,
the setup will be canceled and/or the display will
return to the previous screen.cFinish setup.
In some screens pressing the BACK button
s4
accepts the changes made during setup.
WHA0883
Monitor, climate, audio, phone and voice recognition systems4-3
ZREVIEW COPYÐ2008 Pathfinder(pat)
Owners ManualÐUSA_English(nna)
03/23/07Ðdebbie
X
Page 171 of 448

Fuel economy
Press the INFO button then select the “Fuel
Economy” key using the NISSAN controller and
press the ENTER button to display Average Fuel
Economy, Distance to Empty and Fuel Economy
Record.
Distance to empty (MI or km)
The Distance To Empty (DTE) mode provides you
with an estimation of the distance that can be
driven before refueling. The DTE is constantly
calculated based on the amount of fuel in the fuel
tank and the actual fuel consumption. The display
is updated every 30 seconds. When the fuel level
is low, the DTE display will change to (*) .NOTE:
cIf the amount of fuel added while the
ignition switch is OFF is small, the dis-
play just before the ignition switch is
turned OFF may continue to be dis-
played.
cWhen driving uphill or rounding curves,
the fuel in the tank shifts, which may
momentarily change the display.
Average fuel economy (MPG or L/100 km)
The Average Fuel Economy is calculated based
on fuel consumption since the last reset. The
display is updated every 30 seconds and 1/3
mile (500 m) . After a reset or connecting the
battery cables, the display might show (**.*) .
Resetting fuel economy
The average fuel economy calculation can be
reset to 0. Press the INFO button and select the
“Fuel Economy” key, then select the “Reset” key
using the NISSAN controller and press the EN-
TER button.Fuel economy record
Press the INFO button, then select the “Fuel
Economy” key, then select the “View” key using
the NISSAN controller and press the ENTER
button.
The average fuel consumption history will be
displayed in a graph form along with the average
fuel for the previous Reset-to-Reset period.
LHA0921LHA0922
Monitor, climate, audio, phone and voice recognition systems4-5
ZREVIEW COPYÐ2008 Pathfinder(pat)
Owners ManualÐUSA_English(nna)
03/23/07Ðdebbie
X
Page 174 of 448

Resetting the maintenance interval
To reset the reminder schedule (distance) to 0
miles (km) , select the “Reset Distance” key using
the NISSAN controller and press the ENTER
button.
Displaying the maintenance notice re-
minder
Select the “Interval Reminder ON” key and press
the ENTER button to display the MAINTENANCE
INFORMATION automatically at the set mainte-
nance interval. The indicator light will illuminate
when it is ON.
The MAINTENANCE NOTICE screen will be au-
tomatically displayed as shown when both of the
following conditions are met:
cThe vehicle is driven the set distance and the
ignition key is turned OFF.cThe ignition key is turned ON the next time
the vehicle will be driven.
To return to the previous display after the MAIN-
TENANCE NOTICE screen is displayed, press
the BACK button.
The MAINTENANCE NOTICE screen displays
each time the key is turned ON until one of the
following conditions are met:
cThe “Reset” key is selected.
cThe “Interval Reminder ON” key is set to
OFF (indicator light not illuminated) .
cThe maintenance interval is set again.
LHA0839
4-8Monitor, climate, audio, phone and voice recognition systems
ZREVIEW COPYÐ2008 Pathfinder(pat)
Owners ManualÐUSA_English(nna)
03/23/07Ðdebbie
X
Page 182 of 448

1. STATUS button (P. 4-20)
2. DEST button*
3. NISSAN controller (P. 4-17)
4. PHONE button**5.OFF brightness control button
(P. 4-33)
6. INFO button (P. 4-20)
7. SETTING button (P. 4-25)
8. VOICE button*9. BACK (previous) button (P. 4-17)
10. ROUTE button*
11. ZOOM IN button*
12. MAP button*
13. ZOOM OUT button*
*For Navigation system control buttons, refer to
the separate Navigation System Owner’s
Manual.
**For information on the PHONE button, see
“BluetoothTHands-Free Phone System with
Navigation System” later in this section.
When you use this system, make sure the engine
is running.
If you use the system with the engine not
running (ignition ON or ACC) for a long
time, it will discharge the battery, and the
engine will not start.
Reference symbols:
ENTER button — This is a button on the control
panel.
“Display” key — This is a select key on the screen.
By selecting this key, you can proceed to the next
function.
LHA0880
CONTROL PANEL BUTTONS —
COLOR SCREEN WITH NAVIGATION
SYSTEM (if so equipped)
4-16Monitor, climate, audio, phone and voice recognition systems
ZREVIEW COPYÐ2008 Pathfinder(pat)
Owners ManualÐUSA_English(nna)
03/23/07Ðdebbie
X
Page 185 of 448

cSymbols:
Shows symbols such as the question mark
(?) .
cDelete:
Deletes the last character that has been
input with one touch. Touch and hold the
“Delete” key to delete all of the characters.
cOK:
Completes the character input.
Touch screen maintenance
If you clean the display screen, use a dry, soft
cloth. If additional cleaning is necessary, use a
small amount of neutral detergent with a soft
cloth. Never spray the screen with water or de-
tergent. Dampen the cloth first, and then wipe the
screen.
START-UP SCREEN
When you push the ignition switch to the ACC or
ON position, the SYSTEM START-UP warning is
displayed on the screen. When you read and
agree with the warning, press the ENTER button.
If you do not push the ENTER button, you will not
be able to use the navigation system.
To proceed to the next step, refer to the separate
Navigation System Owner’s Manual.
HOW TO SELECT MENUS ON THE
SCREEN
Vehicle functions are viewed on the center dis-
play screen in menus. Whenever a menu selec-
tion is made or menu item is highlighted, different
areas on the screen provide you with important
information. See the following for details.
1. Header:
Shows the path used to get to the current
screen (for example, press the SETTING
button > then select the “Comfort & Conv.”
key) .2. Menu Selections:
Shows the options to choose within that
menu screen (for example, Auto Interior Illu-
mination, etc.) .
3. UP/DOWN Movement Indicator:
Shows that the NISSAN controller may be
used to move UP/DOWN on the screen and
select more options.
4. Screen Count:
Shows the number of menu selections avail-
able for that screen (for example, 1/14) .
5. Footer/Information Line:
Provides more information (if available)
about the menu selection currently high-
lighted (for example, Cabin lighting when
unlocking doors) .
LHA0890
Monitor, climate, audio, phone and voice recognition systems4-19
ZREVIEW COPYÐ2008 Pathfinder(pat)
Owners ManualÐUSA_English(nna)
03/23/07Ðdebbie
X