NISSAN PATHFINDER 2012 R52 / 4.G 06IT Navigation Manual
PATHFINDER 2012 R52 / 4.G
NISSAN
NISSAN
https://www.carmanualsonline.info/img/5/280/w960_280-0.png
NISSAN PATHFINDER 2012 R52 / 4.G 06IT Navigation Manual
Page 25 of 235
3. A confirmation message is displayed. High-light [Yes] and push .
INFO:
If a route is cancelled, [Cancel Route] changes
to [Resume Route].
Highlight [Resume Route] and push
to reactivate the cancelled route.
This is available only until a new route is set.
Getting started2-17
Page 27 of 235
&9Scale indicator:
Indicates the scale of the map.
Touch the icon to display the scale bar. This
allows the map scale to be adjusted.
“OPERATING WITH THE TOUCH OP-
ERATION” (page 3-10)
&10Street name:
Displays the name of the street that you are
currently driving on.
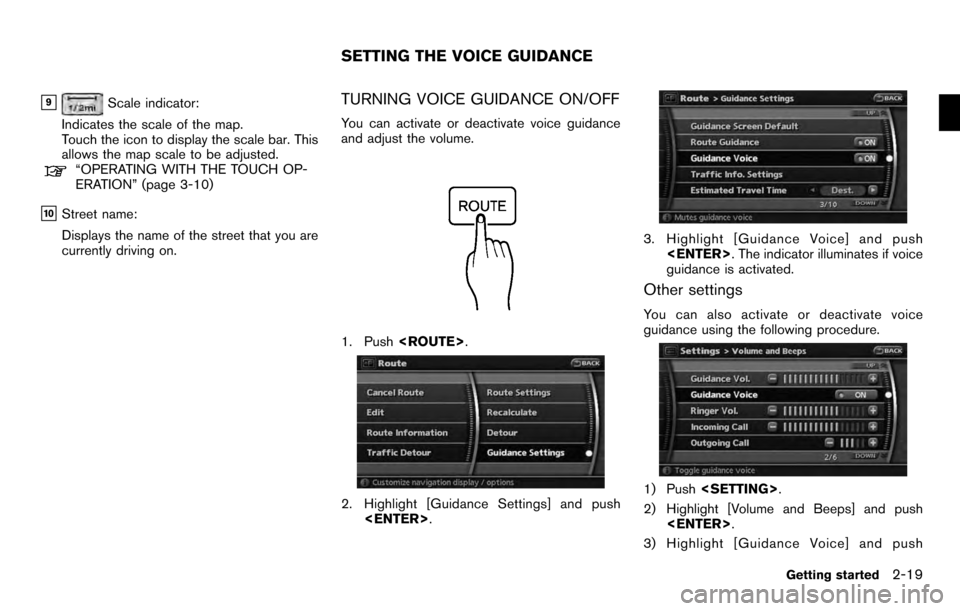
TURNING VOICE GUIDANCE ON/OFF
You can activate or deactivate voice guidance
and adjust the volume.
1. Push .
2. Highlight [Guidance Settings] and push
.
3. Highlight [Guidance Voice] and push
. The indicator illuminates if voice
guidance is activated.
Other settings
You can also activate or deactivate voice
guidance using the following procedure.
1) Push .
2) Highlight [Volume and Beeps] and push .
3) Highlight [Guidance Voice] and push
SETTING THE VOICE GUIDANCE
Getting started2-19
Page 28 of 235
.
ADJUSTING VOICE GUIDANCE VO-
LUME
You can adjust the volume of voice guidance.
1. Push .
2. Highlight [Volume and Beeps] and push
.
3. Highlight [Guidance Vol.] and push
.
4. Adjust the voice guidance volume by using
the center dial or main directional buttons.
INFO:
You can also adjust the volume by turning the
audio system volume knob on the steering
switch while voice guidance is tilting
on the steering switch.
2-20Getting started
Page 29 of 235

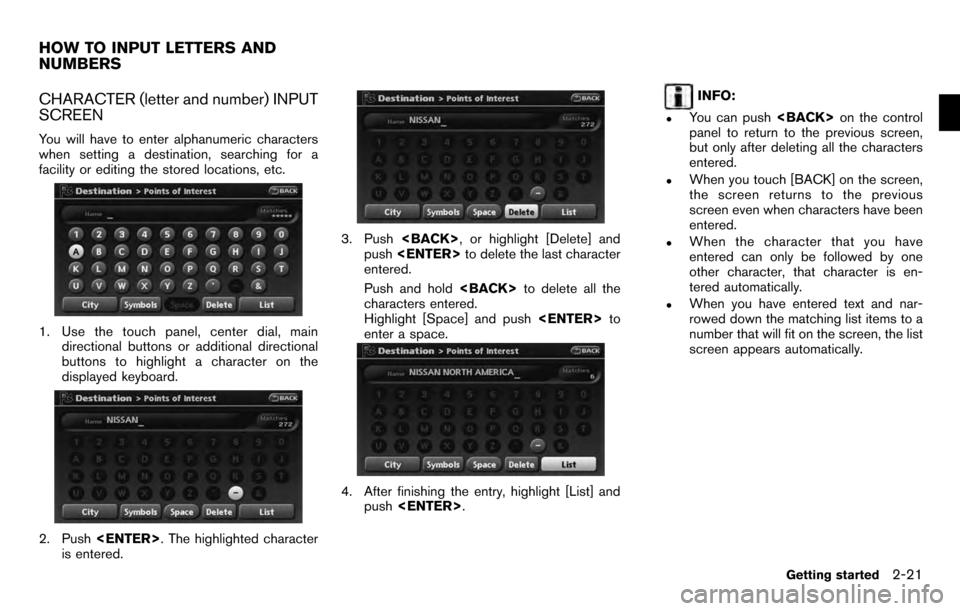
CHARACTER (letter and number) INPUT
SCREEN
You will have to enter alphanumeric characters
when setting a destination, searching for a
facility or editing the stored locations, etc.
1. Use the touch panel, center dial, maindirectional buttons or additional directional
buttons to highlight a character on the
displayed keyboard.
2. Push . The highlighted character
is entered.
3. Push , or highlight [Delete] and
push to delete the last character
entered.
Push and hold to delete all the
characters entered.
Highlight [Space] and push to
enter a space.
4. After finishing the entry, highlight [List] and push .
INFO:
.You can push on the control
panel to return to the previous screen,
but only after deleting all the characters
entered.
.When you touch [BACK] on the screen,
the screen returns to the previous
screen even when characters have been
entered.
.When the character that you have
entered can only be followed by one
other character, that character is en-
tered automatically.
.When you have entered text and nar-
rowed down the matching list items to a
number that will fit on the screen, the list
screen appears automatically.
HOW TO INPUT LETTERS AND
NUMBERS
Getting started2-21
Page 30 of 235
.Symbol keys are displayed by high-
lighting [Symbols] and pushing
. Alphabet keys are displayed
by highlighting [A-Z] and pushing
.
Symbol input screen
PHONE NUMBER INPUT SCREEN
You can enter a phone number as a search
method to look for a point of interest.
INFO:
Only the locations included in the database in
the map data can be searched by the phone
number.
1. Use the touch panel, center dial, main directional buttons or additional directional
buttons to highlight a number on the
displayed keyboard.
2. Push . The highlighted number is
entered.
3. Push , or highlight [Delete] and
push to delete the last number
entered.
Push and hold to delete all the
numbers entered.
4. After finishing the entry, highlight [Map] and push .
2-22Getting started
Page 53 of 235
![NISSAN PATHFINDER 2012 R52 / 4.G 06IT Navigation Manual 2. Highlight [Map Settings] and push<ENTER> .
3. Highlight [Change View] and push the right
button of the directional buttons.
4. Highlight the preferred map view and push <ENTER> . The indicator of t NISSAN PATHFINDER 2012 R52 / 4.G 06IT Navigation Manual 2. Highlight [Map Settings] and push<ENTER> .
3. Highlight [Change View] and push the right
button of the directional buttons.
4. Highlight the preferred map view and push <ENTER> . The indicator of t](/img/5/280/w960_280-52.png)
2. Highlight [Map Settings] and push .
3. Highlight [Change View] and push the right
button of the directional buttons.
4. Highlight the preferred map view and push . The indicator of the selected
map view illuminates.
5. Push
Page 54 of 235
![NISSAN PATHFINDER 2012 R52 / 4.G 06IT Navigation Manual Other settings
You can also set the map view using the
following procedure.
1) Push<SETTING> .
2) Highlight [Navigation] and push <ENTER>.
3) Highlight [Map Settings] and push <ENTER> .
Voice command
NISSAN PATHFINDER 2012 R52 / 4.G 06IT Navigation Manual Other settings
You can also set the map view using the
following procedure.
1) Push<SETTING> .
2) Highlight [Navigation] and push <ENTER>.
3) Highlight [Map Settings] and push <ENTER> .
Voice command](/img/5/280/w960_280-53.png)
Other settings
You can also set the map view using the
following procedure.
1) Push .
2) Highlight [Navigation] and push .
3) Highlight [Map Settings] and push .
Voice command
1. Push located on the steering
switch.
2. After the tone sounds, speak a command. . To display a map in Plan View:
“Plan View map” (Alternate command mode)
. To display a map in Birdview
TM:
“Birdview map” (Alternate command mode) .
To display a split map in Plan View:
“Plan View Split Map” (Alternate command
mode)
. To display a split map in Birdview
TM:
“Birdview Split Map” (Alternate command
mode)
SETTINGS OF HEADING/LONG
RANGE MAP VIEW
You can change the map direction (orientation)
in Plan View or change the position of the
vehicle icon to view a wider area in the traveling
direction.
These settings are available only in the Plan
View or Split (Plan View) mode.
1. Push while the current location
map screen is displayed.
2. Highlight [Map Settings] and push
.
3. Highlight [Settings] and push .
3-14Map settings
Page 55 of 235
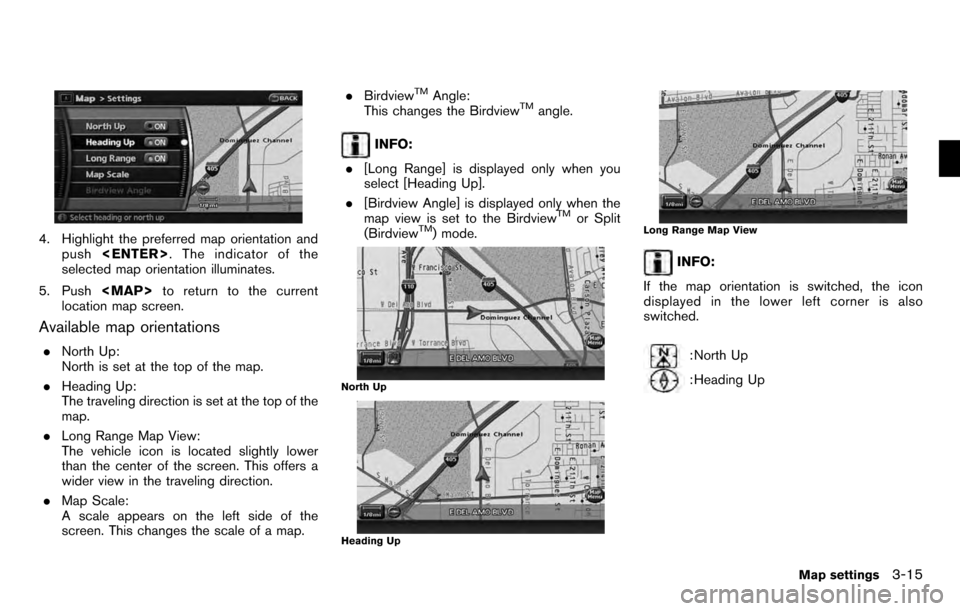
4. Highlight the preferred map orientation andpush . The indicator of the
selected map orientation illuminates.
5. Push
Page 56 of 235
Other settings
You can also set the orientation of the map using
the following procedure.
1) Push .
2) Highlight [Navigation] and push .
3) Highlight [Map Settings] and push .
4) Highlight [Settings] and push .
INFO:
Touching the icon on the map can also change
the direction of the map.
Voice command
1. Push located on the steering
switch.
2. After the tone sounds, speak a command.
To charge the map direction:
“North Up” (Alternate command mode)
“Heading Up” (Alternate command mode)
CHANGING THE BirdviewTMANGLE
This changes the BirdviewTMangle.
This setting is available only in the BirdviewTMor
Split (BirdviewTM) mode.
1. Push while the current location
map screen is displayed.
2. Highlight [Map settings] and push
.
3. Highlight [Settings] and push .
3-16Map settings
Page 57 of 235
4. Highlight [Birdview Angle] and push
.
5. Adjust the BirdviewTMangle by moving the
cursor in the direction ofor. 6. Push
![NISSAN PATHFINDER 2012 R52 / 4.G 06IT Navigation Manual 3. A confirmation message is displayed. High-light [Yes] and push <ENTER>.
INFO:
If a route is cancelled, [Cancel Route] changes
to [Resume Route].
Highlight [Resume Route] and push <ENTER>
to reactiv NISSAN PATHFINDER 2012 R52 / 4.G 06IT Navigation Manual 3. A confirmation message is displayed. High-light [Yes] and push <ENTER>.
INFO:
If a route is cancelled, [Cancel Route] changes
to [Resume Route].
Highlight [Resume Route] and push <ENTER>
to reactiv](/img/5/280/w960_280-24.png)

![NISSAN PATHFINDER 2012 R52 / 4.G 06IT Navigation Manual <ENTER>.
ADJUSTING VOICE GUIDANCE VO-
LUME
You can adjust the volume of voice guidance.
1. Push<SETTING> .
2. Highlight [Volume and Beeps] and push
<ENTER> .
3. Highlight [Guidance Vol.] and push
<ENT NISSAN PATHFINDER 2012 R52 / 4.G 06IT Navigation Manual <ENTER>.
ADJUSTING VOICE GUIDANCE VO-
LUME
You can adjust the volume of voice guidance.
1. Push<SETTING> .
2. Highlight [Volume and Beeps] and push
<ENTER> .
3. Highlight [Guidance Vol.] and push
<ENT](/img/5/280/w960_280-27.png)

![NISSAN PATHFINDER 2012 R52 / 4.G 06IT Navigation Manual .Symbol keys are displayed by high-
lighting [Symbols] and pushing
<ENTER>. Alphabet keys are displayed
by highlighting [A-Z] and pushing
<ENTER> .
Symbol input screen
PHONE NUMBER INPUT SCREEN
You ca NISSAN PATHFINDER 2012 R52 / 4.G 06IT Navigation Manual .Symbol keys are displayed by high-
lighting [Symbols] and pushing
<ENTER>. Alphabet keys are displayed
by highlighting [A-Z] and pushing
<ENTER> .
Symbol input screen
PHONE NUMBER INPUT SCREEN
You ca](/img/5/280/w960_280-29.png)
![NISSAN PATHFINDER 2012 R52 / 4.G 06IT Navigation Manual 2. Highlight [Map Settings] and push<ENTER> .
3. Highlight [Change View] and push the right
button of the directional buttons.
4. Highlight the preferred map view and push <ENTER> . The indicator of t NISSAN PATHFINDER 2012 R52 / 4.G 06IT Navigation Manual 2. Highlight [Map Settings] and push<ENTER> .
3. Highlight [Change View] and push the right
button of the directional buttons.
4. Highlight the preferred map view and push <ENTER> . The indicator of t](/img/5/280/w960_280-52.png)
![NISSAN PATHFINDER 2012 R52 / 4.G 06IT Navigation Manual Other settings
You can also set the map view using the
following procedure.
1) Push<SETTING> .
2) Highlight [Navigation] and push <ENTER>.
3) Highlight [Map Settings] and push <ENTER> .
Voice command
NISSAN PATHFINDER 2012 R52 / 4.G 06IT Navigation Manual Other settings
You can also set the map view using the
following procedure.
1) Push<SETTING> .
2) Highlight [Navigation] and push <ENTER>.
3) Highlight [Map Settings] and push <ENTER> .
Voice command](/img/5/280/w960_280-53.png)

![NISSAN PATHFINDER 2012 R52 / 4.G 06IT Navigation Manual Other settings
You can also set the orientation of the map using
the following procedure.
1) Push<SETTING> .
2) Highlight [Navigation] and push <ENTER>.
3) Highlight [Map Settings] and push <ENTER> .
NISSAN PATHFINDER 2012 R52 / 4.G 06IT Navigation Manual Other settings
You can also set the orientation of the map using
the following procedure.
1) Push<SETTING> .
2) Highlight [Navigation] and push <ENTER>.
3) Highlight [Map Settings] and push <ENTER> .](/img/5/280/w960_280-55.png)
![NISSAN PATHFINDER 2012 R52 / 4.G 06IT Navigation Manual 4. Highlight [Birdview Angle] and push
<ENTER> .
5. Adjust the BirdviewTMangle by moving the
cursor in the direction ofor. 6. Push
<MAP>to return to the current
location map screen.
Other settings
You NISSAN PATHFINDER 2012 R52 / 4.G 06IT Navigation Manual 4. Highlight [Birdview Angle] and push
<ENTER> .
5. Adjust the BirdviewTMangle by moving the
cursor in the direction ofor. 6. Push
<MAP>to return to the current
location map screen.
Other settings
You](/img/5/280/w960_280-56.png)