stop start NISSAN PATROL 2004 Electronic Repair Manual
[x] Cancel search | Manufacturer: NISSAN, Model Year: 2004, Model line: PATROL, Model: NISSAN PATROL 2004Pages: 579, PDF Size: 26.61 MB
Page 46 of 579
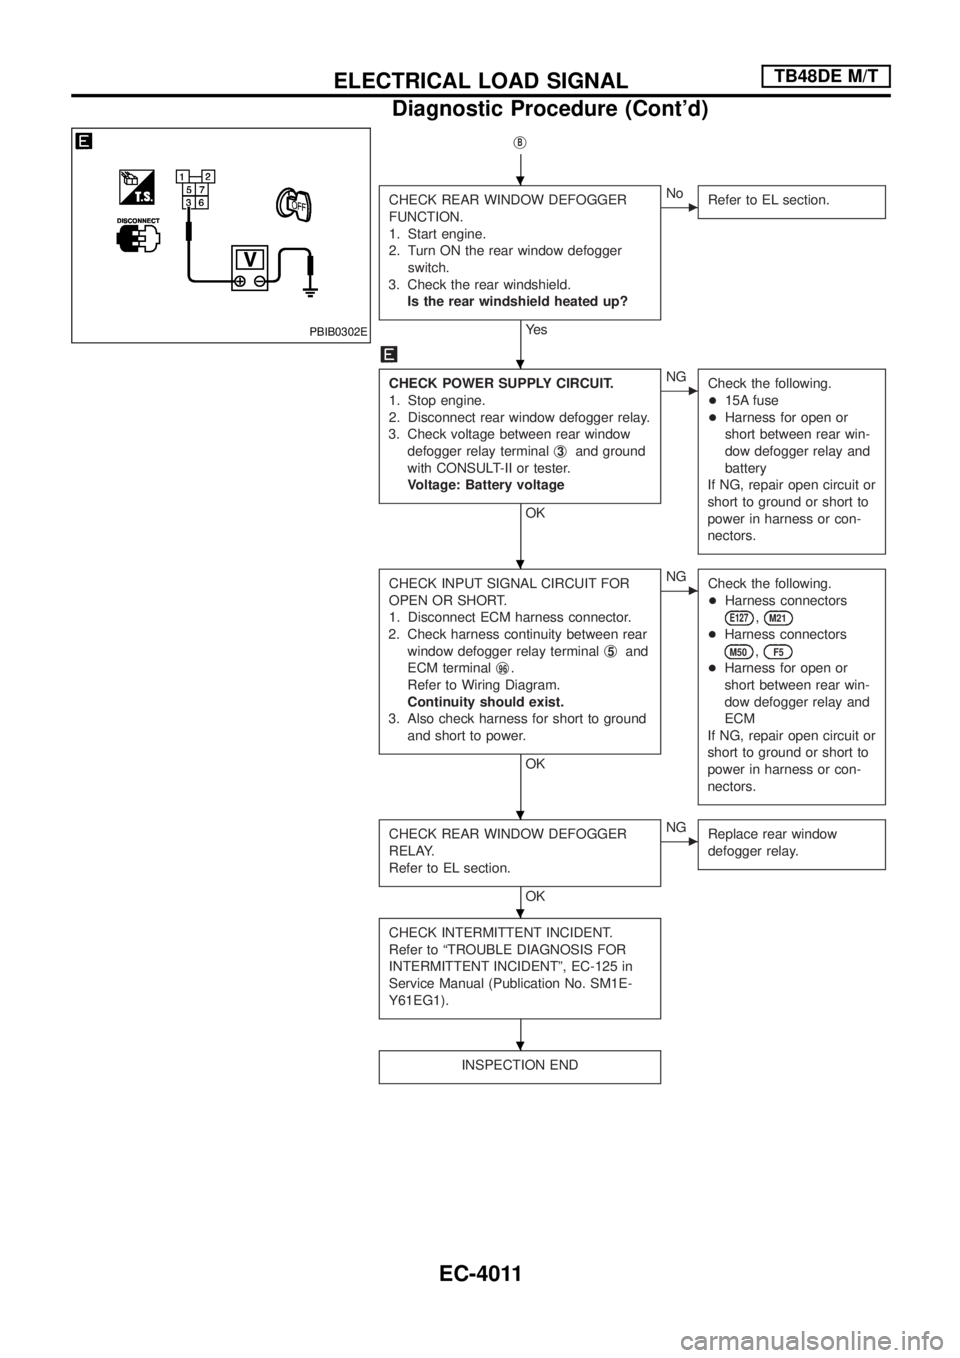
jB
CHECK REAR WINDOW DEFOGGER
FUNCTION.
1. Start engine.
2. Turn ON the rear window defogger
switch.
3. Check the rear windshield.
Is the rear windshield heated up?
Ye s
cNo
Refer to EL section.
CHECK POWER SUPPLY CIRCUIT.
1. Stop engine.
2. Disconnect rear window defogger relay.
3. Check voltage between rear window
defogger relay terminalj
3and ground
with CONSULT-II or tester.
Voltage: Battery voltage
OK
cNG
Check the following.
+15A fuse
+Harness for open or
short between rear win-
dow defogger relay and
battery
If NG, repair open circuit or
short to ground or short to
power in harness or con-
nectors.
CHECK INPUT SIGNAL CIRCUIT FOR
OPEN OR SHORT.
1. Disconnect ECM harness connector.
2. Check harness continuity between rear
window defogger relay terminalj
5and
ECM terminalj
96.
Refer to Wiring Diagram.
Continuity should exist.
3. Also check harness for short to ground
and short to power.
OK
cNG
Check the following.
+Harness connectors
E127,M21
+Harness connectors
M50,F5
+Harness for open or
short between rear win-
dow defogger relay and
ECM
If NG, repair open circuit or
short to ground or short to
power in harness or con-
nectors.
CHECK REAR WINDOW DEFOGGER
RELAY.
Refer to EL section.
OK
cNG
Replace rear window
defogger relay.
CHECK INTERMITTENT INCIDENT.
Refer to ªTROUBLE DIAGNOSIS FOR
INTERMITTENT INCIDENTº, EC-125 in
Service Manual (Publication No. SM1E-
Y61EG1).
INSPECTION END
PBIB0302E
.
.
.
.
.
.
ELECTRICAL LOAD SIGNALTB48DE M/T
Diagnostic Procedure (Cont'd)
EC-4011
Page 54 of 579
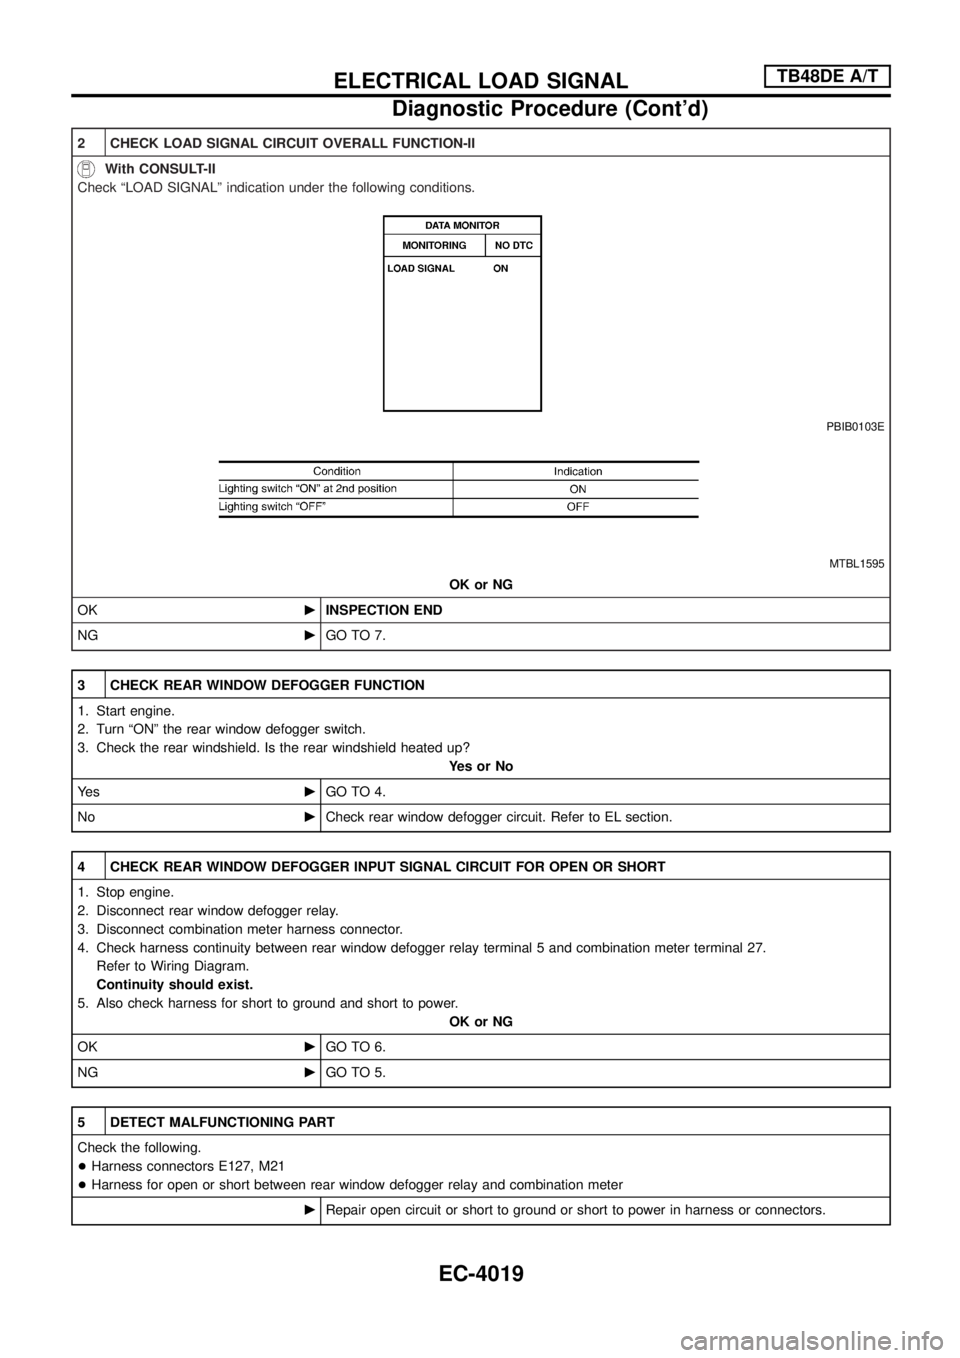
2 CHECK LOAD SIGNAL CIRCUIT OVERALL FUNCTION-II
With CONSULT-II
Check ªLOAD SIGNALº indication under the following conditions.
PBIB0103E
MTBL1595
OK or NG
OKcINSPECTION END
NGcGO TO 7.
3 CHECK REAR WINDOW DEFOGGER FUNCTION
1. Start engine.
2. Turn ªONº the rear window defogger switch.
3. Check the rear windshield. Is the rear windshield heated up?
YesorNo
Ye scGO TO 4.
NocCheck rear window defogger circuit. Refer to EL section.
4 CHECK REAR WINDOW DEFOGGER INPUT SIGNAL CIRCUIT FOR OPEN OR SHORT
1. Stop engine.
2. Disconnect rear window defogger relay.
3. Disconnect combination meter harness connector.
4. Check harness continuity between rear window defogger relay terminal 5 and combination meter terminal 27.
Refer to Wiring Diagram.
Continuity should exist.
5. Also check harness for short to ground and short to power.
OK or NG
OKcGO TO 6.
NGcGO TO 5.
5 DETECT MALFUNCTIONING PART
Check the following.
+Harness connectors E127, M21
+Harness for open or short between rear window defogger relay and combination meter
cRepair open circuit or short to ground or short to power in harness or connectors.
ELECTRICAL LOAD SIGNALTB48DE A/T
Diagnostic Procedure (Cont'd)
EC-4019
Page 55 of 579
6 CHECK COMBINATION METER
Refer to EL section.
OK or NG
OKcGO TO 11.
NGcReplace combination meter.
7 CHECK HEADLAMP FUNCTION
1. Start engine.
2. Lighting switch ªONº at 2nd position.
3. Check that headlamp high beams are illuminated.
OK or NG
OKcGO TO 8.
NGcCheck headlamp circuit. Refer to EL section.
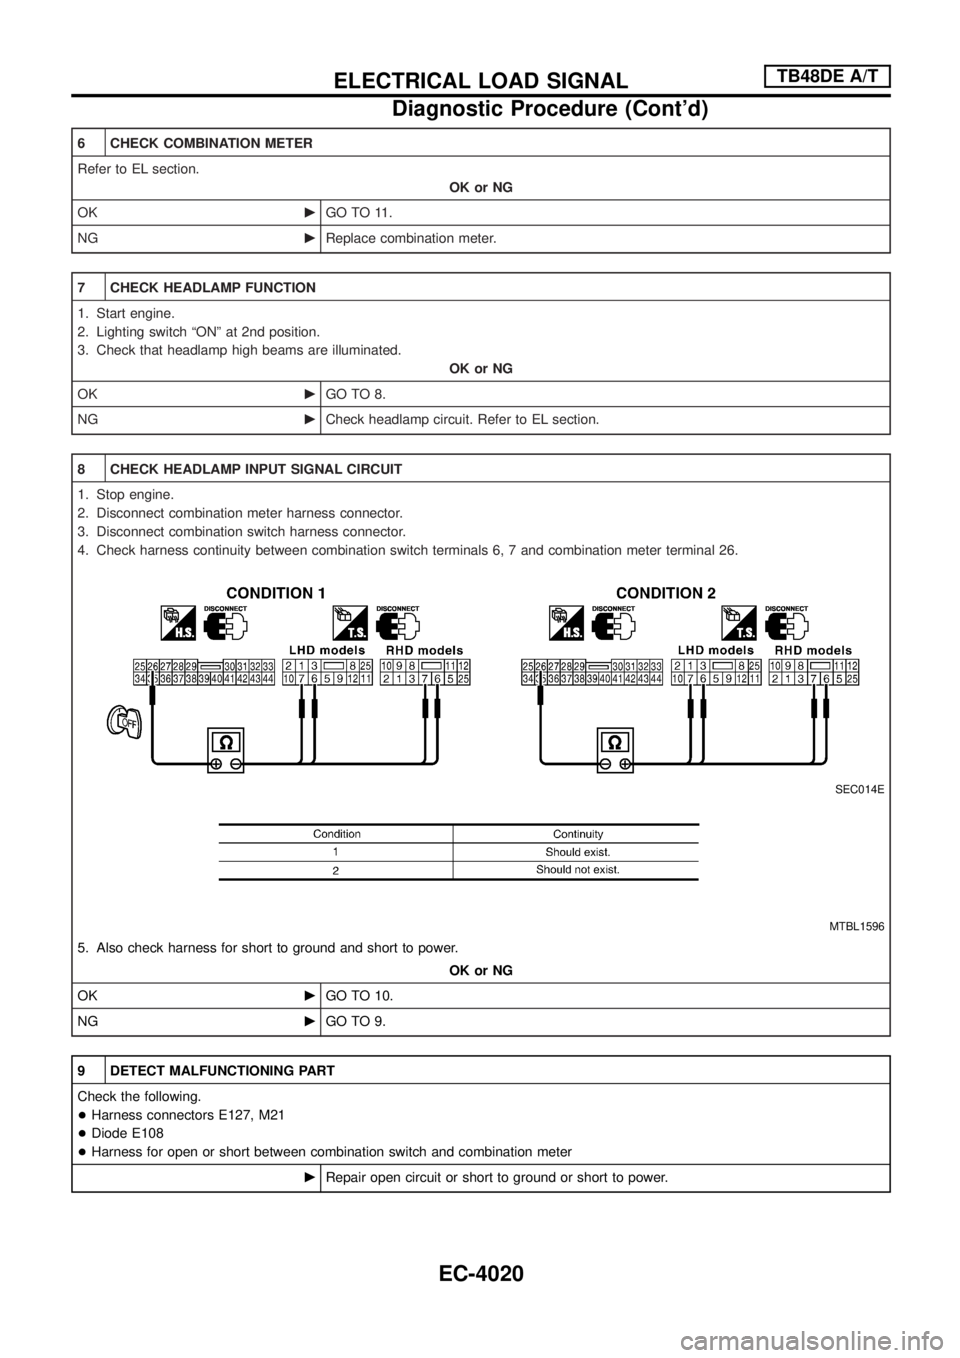
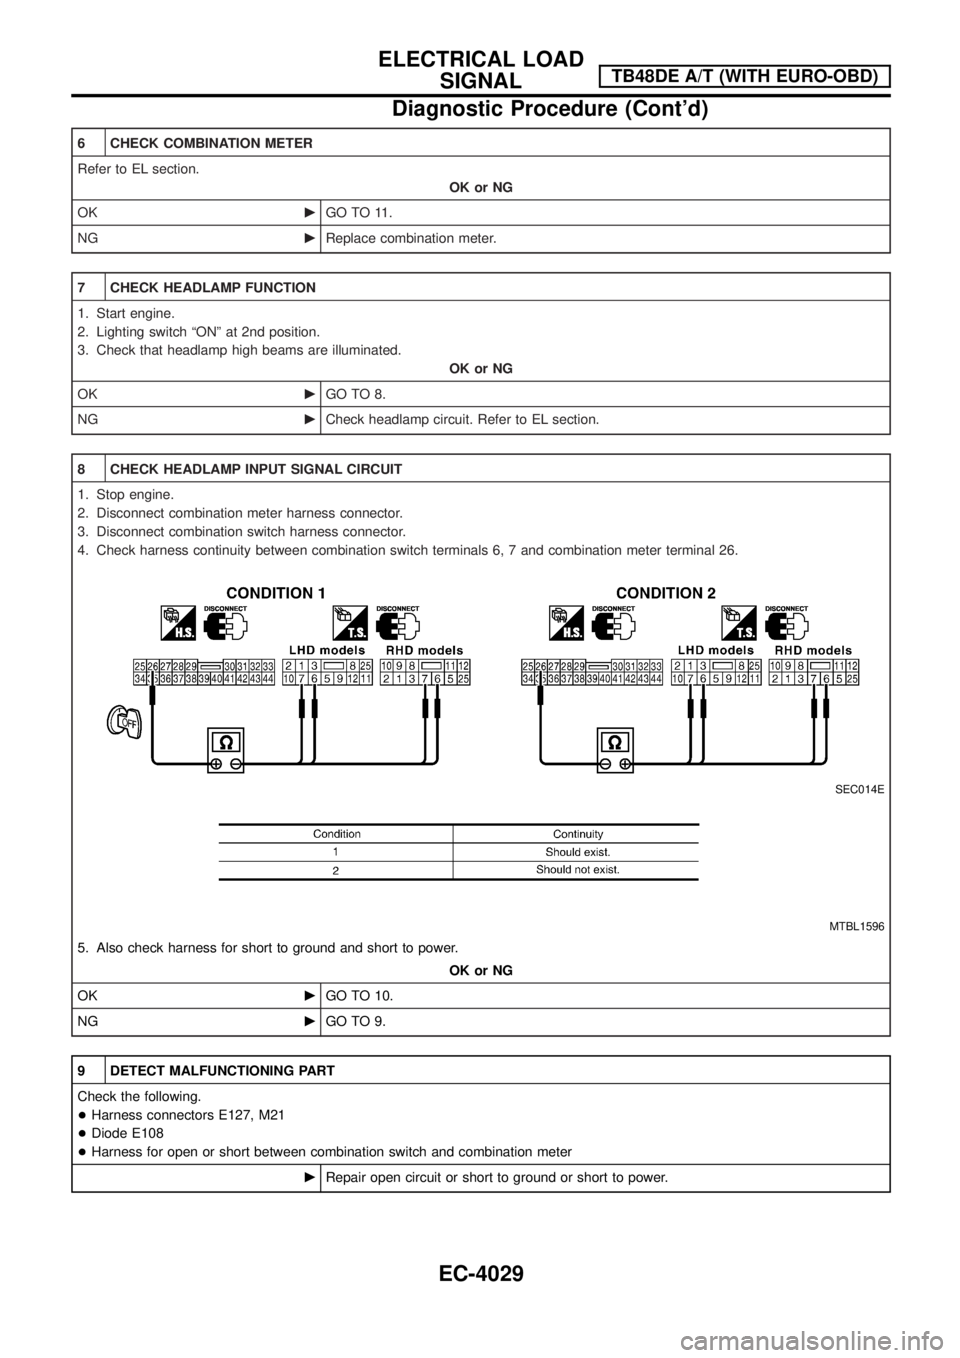
8 CHECK HEADLAMP INPUT SIGNAL CIRCUIT
1. Stop engine.
2. Disconnect combination meter harness connector.
3. Disconnect combination switch harness connector.
4. Check harness continuity between combination switch terminals 6, 7 and combination meter terminal 26.
SEC014E
MTBL1596
5. Also check harness for short to ground and short to power.
OK or NG
OKcGO TO 10.
NGcGO TO 9.
9 DETECT MALFUNCTIONING PART
Check the following.
+Harness connectors E127, M21
+Diode E108
+Harness for open or short between combination switch and combination meter
cRepair open circuit or short to ground or short to power.
ELECTRICAL LOAD SIGNALTB48DE A/T
Diagnostic Procedure (Cont'd)
EC-4020
Page 63 of 579
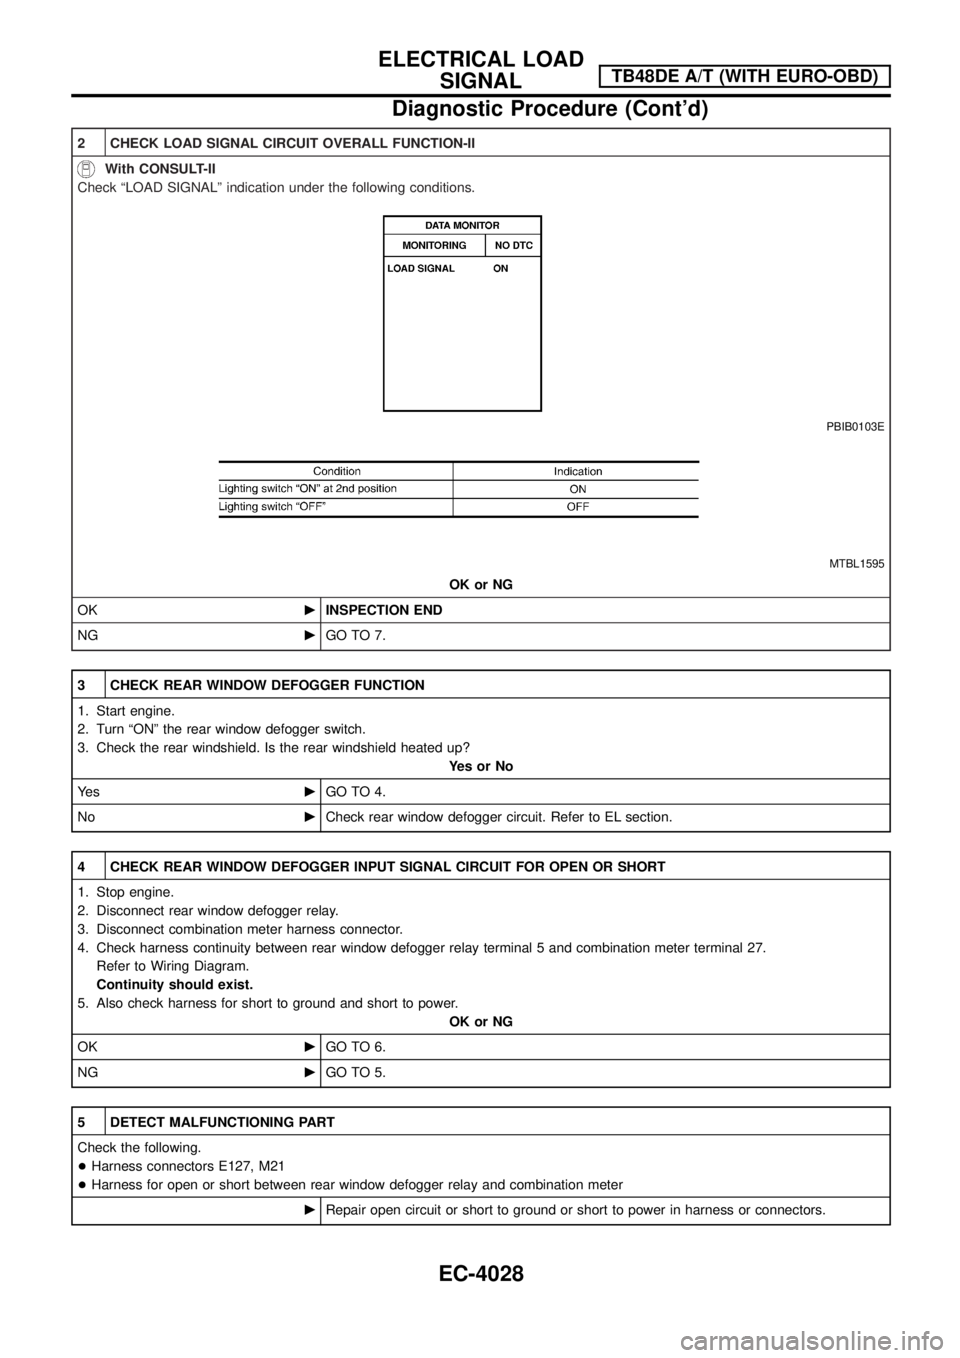
2 CHECK LOAD SIGNAL CIRCUIT OVERALL FUNCTION-II
With CONSULT-II
Check ªLOAD SIGNALº indication under the following conditions.
PBIB0103E
MTBL1595
OK or NG
OKcINSPECTION END
NGcGO TO 7.
3 CHECK REAR WINDOW DEFOGGER FUNCTION
1. Start engine.
2. Turn ªONº the rear window defogger switch.
3. Check the rear windshield. Is the rear windshield heated up?
YesorNo
Ye scGO TO 4.
NocCheck rear window defogger circuit. Refer to EL section.
4 CHECK REAR WINDOW DEFOGGER INPUT SIGNAL CIRCUIT FOR OPEN OR SHORT
1. Stop engine.
2. Disconnect rear window defogger relay.
3. Disconnect combination meter harness connector.
4. Check harness continuity between rear window defogger relay terminal 5 and combination meter terminal 27.
Refer to Wiring Diagram.
Continuity should exist.
5. Also check harness for short to ground and short to power.
OK or NG
OKcGO TO 6.
NGcGO TO 5.
5 DETECT MALFUNCTIONING PART
Check the following.
+Harness connectors E127, M21
+Harness for open or short between rear window defogger relay and combination meter
cRepair open circuit or short to ground or short to power in harness or connectors.
ELECTRICAL LOAD
SIGNALTB48DE A/T (WITH EURO-OBD)
Diagnostic Procedure (Cont'd)
EC-4028
Page 64 of 579
6 CHECK COMBINATION METER
Refer to EL section.
OK or NG
OKcGO TO 11.
NGcReplace combination meter.
7 CHECK HEADLAMP FUNCTION
1. Start engine.
2. Lighting switch ªONº at 2nd position.
3. Check that headlamp high beams are illuminated.
OK or NG
OKcGO TO 8.
NGcCheck headlamp circuit. Refer to EL section.
8 CHECK HEADLAMP INPUT SIGNAL CIRCUIT
1. Stop engine.
2. Disconnect combination meter harness connector.
3. Disconnect combination switch harness connector.
4. Check harness continuity between combination switch terminals 6, 7 and combination meter terminal 26.
SEC014E
MTBL1596
5. Also check harness for short to ground and short to power.
OK or NG
OKcGO TO 10.
NGcGO TO 9.
9 DETECT MALFUNCTIONING PART
Check the following.
+Harness connectors E127, M21
+Diode E108
+Harness for open or short between combination switch and combination meter
cRepair open circuit or short to ground or short to power.
ELECTRICAL LOAD
SIGNALTB48DE A/T (WITH EURO-OBD)
Diagnostic Procedure (Cont'd)
EC-4029
Page 73 of 579
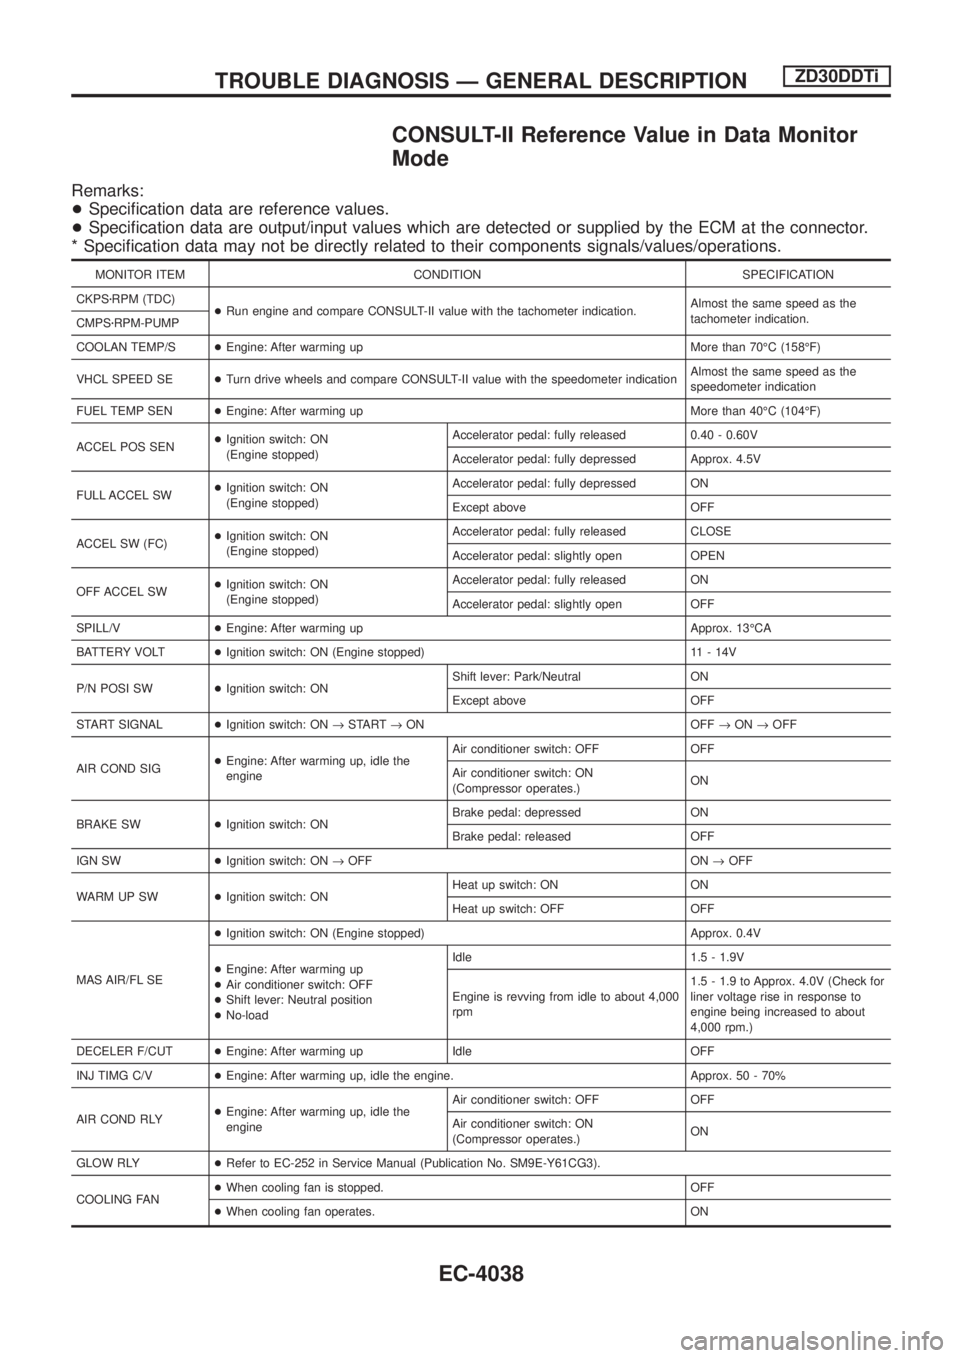
CONSULT-II Reference Value in Data Monitor
Mode
Remarks:
+Speci®cation data are reference values.
+Speci®cation data are output/input values which are detected or supplied by the ECM at the connector.
* Speci®cation data may not be directly related to their components signals/values/operations.
MONITOR ITEM CONDITION SPECIFICATION
CKPSzRPM (TDC)
+Run engine and compare CONSULT-II value with the tachometer indication.Almost the same speed as the
tachometer indication.
CMPSzRPM-PUMP
COOLAN TEMP/S+Engine: After warming up More than 70ÉC (158ÉF)
VHCL SPEED SE+Turn drive wheels and compare CONSULT-II value with the speedometer indicationAlmost the same speed as the
speedometer indication
FUEL TEMP SEN+Engine: After warming up More than 40ÉC (104ÉF)
ACCEL POS SEN+Ignition switch: ON
(Engine stopped)Accelerator pedal: fully released 0.40 - 0.60V
Accelerator pedal: fully depressed Approx. 4.5V
FULL ACCEL SW+Ignition switch: ON
(Engine stopped)Accelerator pedal: fully depressed ON
Except above OFF
ACCEL SW (FC)+Ignition switch: ON
(Engine stopped)Accelerator pedal: fully released CLOSE
Accelerator pedal: slightly open OPEN
OFF ACCEL SW+Ignition switch: ON
(Engine stopped)Accelerator pedal: fully released ON
Accelerator pedal: slightly open OFF
SPILL/V+Engine: After warming up Approx. 13ÉCA
BATTERY VOLT+Ignition switch: ON (Engine stopped) 11 - 14V
P/N POSI SW+Ignition switch: ONShift lever: Park/Neutral ON
Except above OFF
START SIGNAL+Ignition switch: ON®START®ON OFF®ON®OFF
AIR COND SIG+Engine: After warming up, idle the
engineAir conditioner switch: OFF OFF
Air conditioner switch: ON
(Compressor operates.)ON
BRAKE SW+Ignition switch: ONBrake pedal: depressed ON
Brake pedal: released OFF
IGN SW+Ignition switch: ON®OFF ON®OFF
WARM UP SW+Ignition switch: ONHeat up switch: ON ON
Heat up switch: OFF OFF
MAS AIR/FL SE+Ignition switch: ON (Engine stopped) Approx. 0.4V
+Engine: After warming up
+Air conditioner switch: OFF
+Shift lever: Neutral position
+No-loadIdle 1.5 - 1.9V
Engine is revving from idle to about 4,000
rpm1.5 - 1.9 to Approx. 4.0V (Check for
liner voltage rise in response to
engine being increased to about
4,000 rpm.)
DECELER F/CUT+Engine: After warming up Idle OFF
INJ TIMG C/V+Engine: After warming up, idle the engine. Approx. 50 - 70%
AIR COND RLY+Engine: After warming up, idle the
engineAir conditioner switch: OFF OFF
Air conditioner switch: ON
(Compressor operates.)ON
GLOW RLY+Refer to EC-252 in Service Manual (Publication No. SM9E-Y61CG3).
COOLING FAN+When cooling fan is stopped. OFF
+When cooling fan operates. ON
TROUBLE DIAGNOSIS Ð GENERAL DESCRIPTIONZD30DDTi
EC-4038
Page 76 of 579
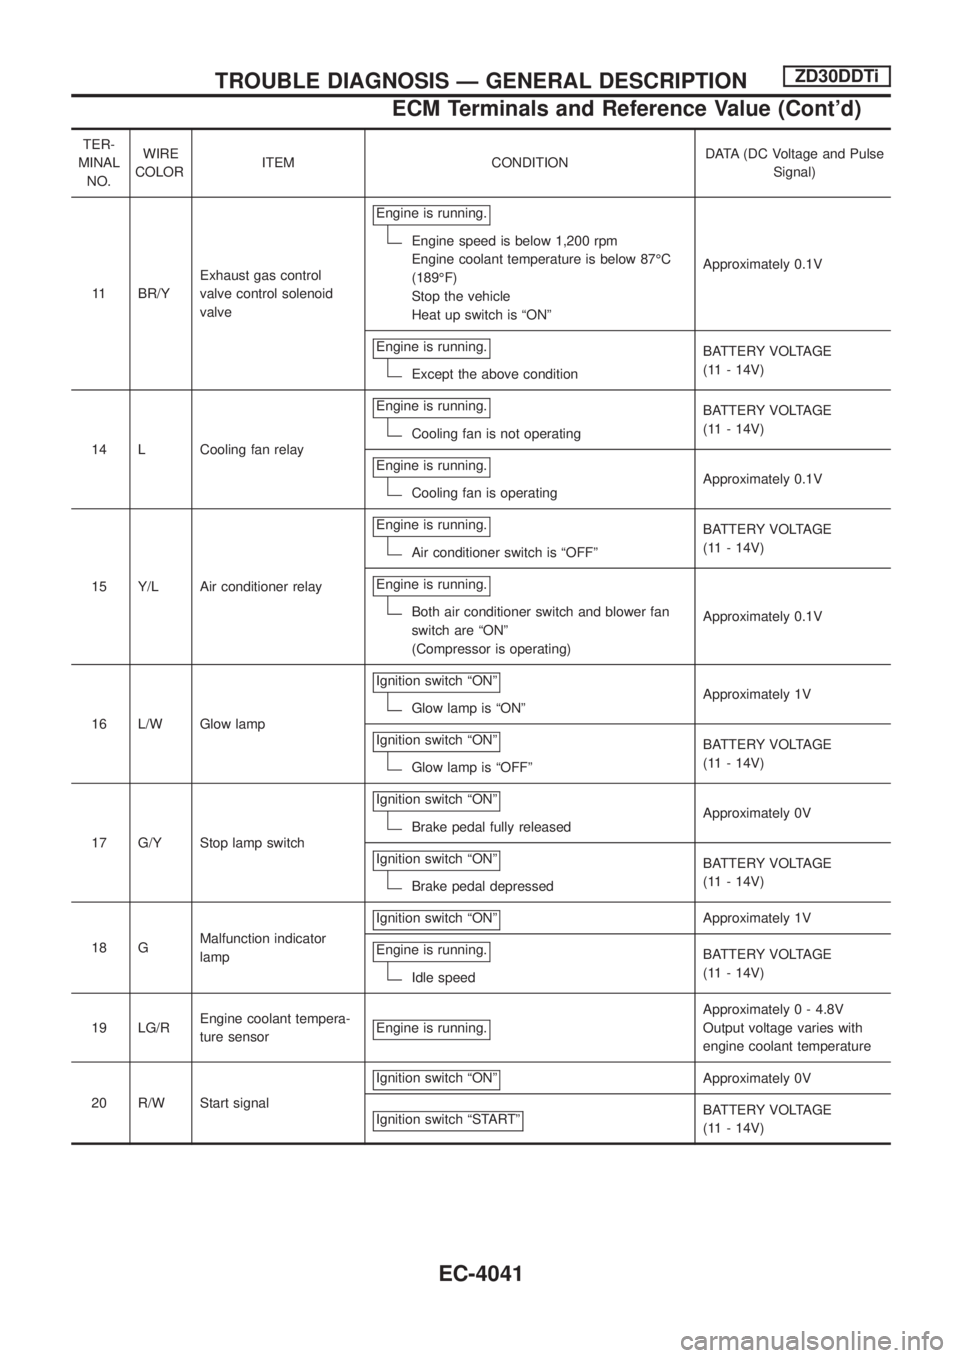
TER-
MINAL
NO.WIRE
COLORITEM CONDITIONDATA (DC Voltage and Pulse
Signal)
11 BR/YExhaust gas control
valve control solenoid
valveEngine is running.
Engine speed is below 1,200 rpm
Engine coolant temperature is below 87ÉC
(189ÉF)
Stop the vehicle
Heat up switch is ªONºApproximately 0.1V
Engine is running.
Except the above conditionBATTERY VOLTAGE
(11 - 14V)
14 L Cooling fan relayEngine is running.
Cooling fan is not operatingBATTERY VOLTAGE
(11 - 14V)
Engine is running.
Cooling fan is operatingApproximately 0.1V
15 Y/L Air conditioner relayEngine is running.
Air conditioner switch is ªOFFºBATTERY VOLTAGE
(11 - 14V)
Engine is running.
Both air conditioner switch and blower fan
switch are ªONº
(Compressor is operating)Approximately 0.1V
16 L/W Glow lampIgnition switch ªONº
Glow lamp is ªONºApproximately 1V
Ignition switch ªONº
Glow lamp is ªOFFºBATTERY VOLTAGE
(11 - 14V)
17 G/Y Stop lamp switchIgnition switch ªONº
Brake pedal fully releasedApproximately 0V
Ignition switch ªONº
Brake pedal depressedBATTERY VOLTAGE
(11 - 14V)
18 GMalfunction indicator
lampIgnition switch ªONº
Approximately 1V
Engine is running.
Idle speedBATTERY VOLTAGE
(11 - 14V)
19 LG/REngine coolant tempera-
ture sensorEngine is running.
Approximately 0 - 4.8V
Output voltage varies with
engine coolant temperature
20 R/W Start signalIgnition switch ªONº
Approximately 0V
Ignition switch ªSTARTº
BATTERY VOLTAGE
(11 - 14V)
TROUBLE DIAGNOSIS Ð GENERAL DESCRIPTIONZD30DDTi
ECM Terminals and Reference Value (Cont'd)
EC-4041
Page 262 of 579
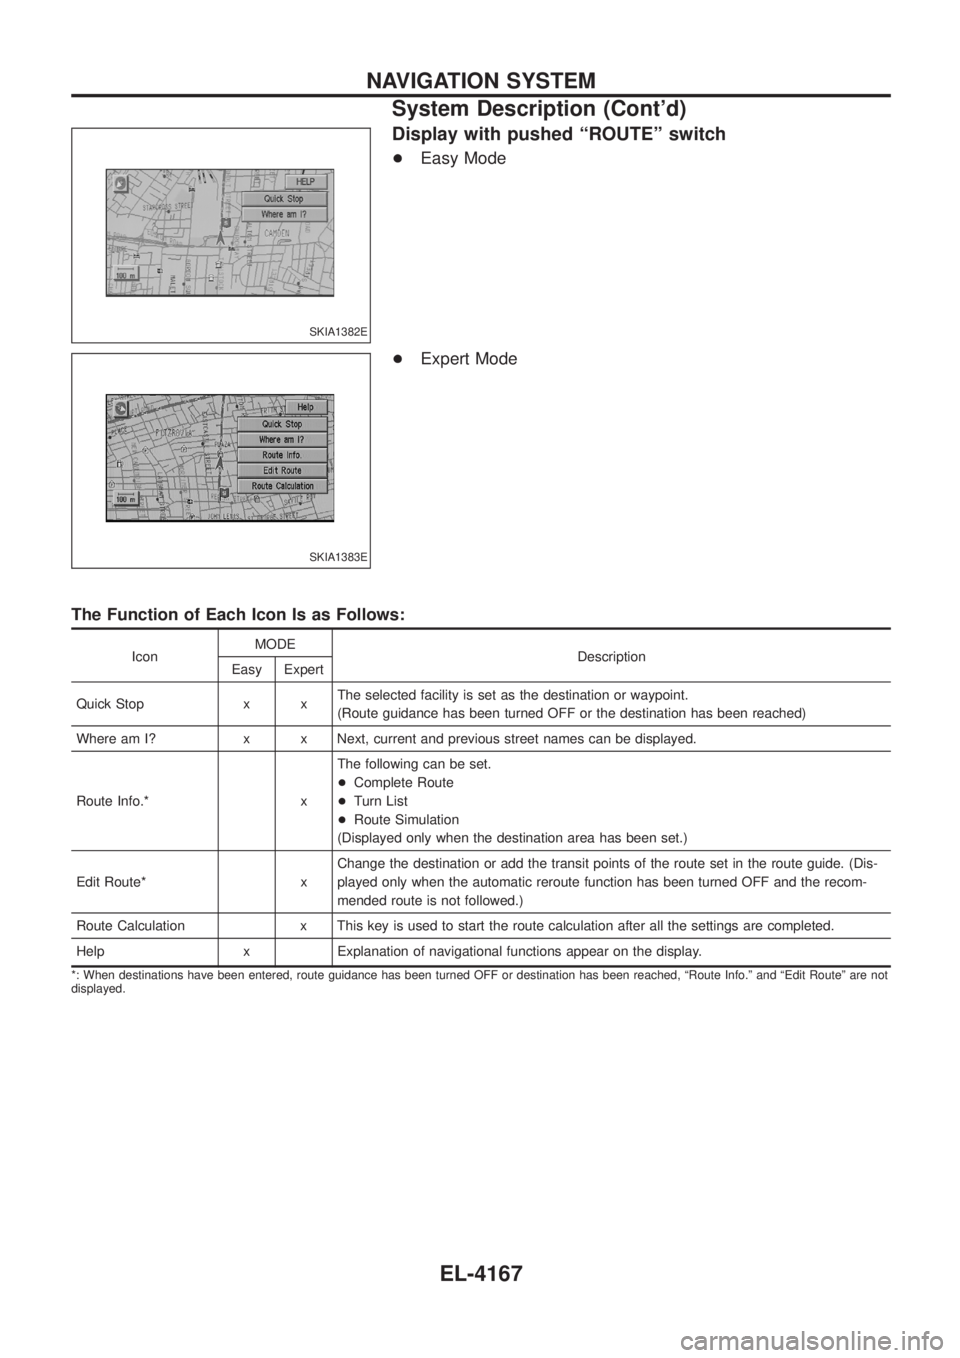
Display with pushed ªROUTEº switch
+Easy Mode
+ Expert Mode
The Function of Each Icon Is as Follows:
Icon MODE
Description
Easy Expert
Quick Stop x x The selected facility is set as the destination or waypoint.
(Route guidance has been turned OFF or the destination has been reached)
Where am I? x x Next, current and previous street names can be displayed.
Route Info.* x The following can be set.
+
Complete Route
+ Turn List
+ Route Simulation
(Displayed only when the destination area has been set.)
Edit Route* x Change the destination or add the transit points of the route set in the route guide. (Dis-
played only when the automatic reroute function has been turned OFF and the recom-
mended route is not followed.)
Route Calculation x This key is used to start the route calculation after all the settings are completed.
Help x Explanation of navigational functions appear on the display.
*: When destinations have been entered, route guidance has been turned OFF or destination has been reached, ªRoute Info.º and ªEdit Routeº are not
displayed.
SKIA1382E
SKIA1383E
NAVIGATION SYSTEM
System Description (Cont'd)
EL-4167
Page 264 of 579
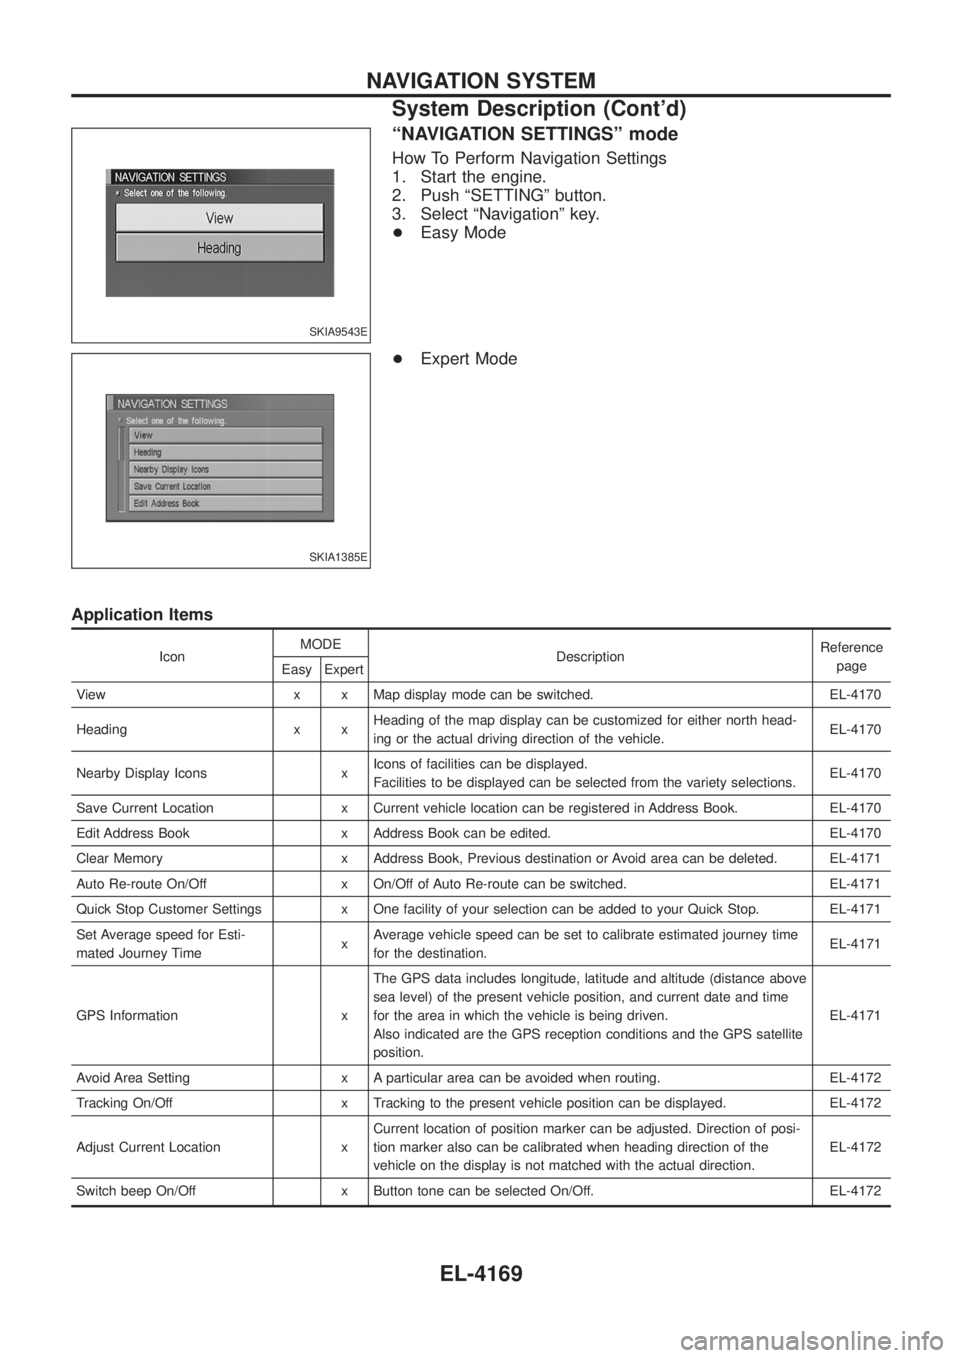
ªNAVIGATION SETTINGSº mode
How To Perform Navigation Settings
1. Start the engine.
2. Push ªSETTINGº button.
3. Select ªNavigationº key.
+Easy Mode
+ Expert Mode
Application Items
Icon MODE
Description Reference
page
Easy Expert
View x x Map display mode can be switched. EL-4170
Heading x x Heading of the map display can be customized for either north head-
ing or the actual driving direction of the vehicle. EL-4170
Nearby Display Icons x Icons of facilities can be displayed.
Facilities to be displayed can be selected from the variety selections. EL-4170
Save Current Location x Current vehicle location can be registered in Address Book. EL-4170
Edit Address Book x Address Book can be edited. EL-4170
Clear Memory x Address Book, Previous destination or Avoid area can be deleted. EL-4171
Auto Re-route On/Off x On/Off of Auto Re-route can be switched. EL-4171
Quick Stop Customer Settings x One facility of your selection can be added to your Quick Stop. EL-4171
Set Average speed for Esti-
mated Journey Time xAverage vehicle speed can be set to calibrate estimated journey time
for the destination. EL-4171
GPS Information x The GPS data includes longitude, latitude and altitude (distance above
sea level) of the present vehicle position, and current date and time
for the area in which the vehicle is being driven.
Also indicated are the GPS reception conditions and the GPS satellite
position. EL-4171
Avoid Area Setting x A particular area can be avoided when routing. EL-4172
Tracking On/Off x Tracking to the present vehicle position can be displayed. EL-4172
Adjust Current Location x Current location of position marker can be adjusted. Direction of posi-
tion marker also can be calibrated when heading direction of the
vehicle on the display is not matched with the actual direction. EL-4172
Switch beep On/Off x Button tone can be selected On/Off. EL-4172
SKIA9543E
SKIA1385E
NAVIGATION SYSTEM
System Description (Cont'd)
EL-4169
Page 314 of 579
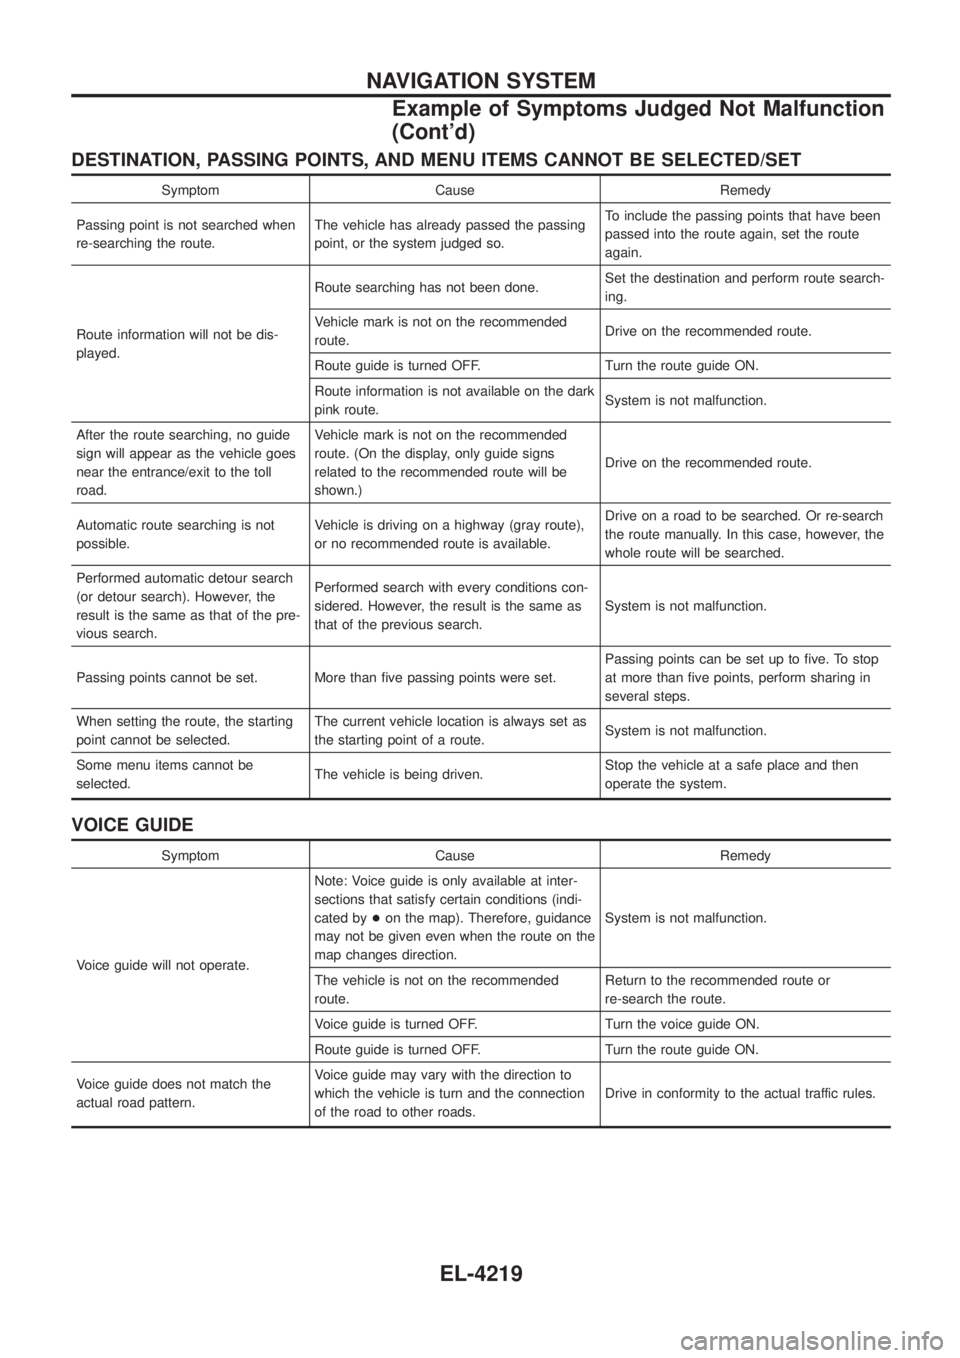
DESTINATION, PASSING POINTS, AND MENU ITEMS CANNOT BE SELECTED/SET
Symptom Cause Remedy
Passing point is not searched when
re-searching the route. The vehicle has already passed the passing
point, or the system judged so. To include the passing points that have been
passed into the route again, set the route
again.
Route information will not be dis-
played. Route searching has not been done.
Set the destination and perform route search-
ing.
Vehicle mark is not on the recommended
route. Drive on the recommended route.
Route guide is turned OFF. Turn the route guide ON.
Route information is not available on the dark
pink route. System is not malfunction.
After the route searching, no guide
sign will appear as the vehicle goes
near the entrance/exit to the toll
road. Vehicle mark is not on the recommended
route. (On the display, only guide signs
related to the recommended route will be
shown.)
Drive on the recommended route.
Automatic route searching is not
possible. Vehicle is driving on a highway (gray route),
or no recommended route is available. Drive on a road to be searched. Or re-search
the route manually. In this case, however, the
whole route will be searched.
Performed automatic detour search
(or detour search). However, the
result is the same as that of the pre-
vious search. Performed search with every conditions con-
sidered. However, the result is the same as
that of the previous search.
System is not malfunction.
Passing points cannot be set. More than ®ve passing points were set. Passing points can be set up to ®ve. To stop
at more than ®ve points, perform sharing in
several steps.
When setting the route, the starting
point cannot be selected. The current vehicle location is always set as
the starting point of a route.
System is not malfunction.
Some menu items cannot be
selected. The vehicle is being driven. Stop the vehicle at a safe place and then
operate the system.
VOICE GUIDE
Symptom Cause Remedy
Voice guide will not operate. Note: Voice guide is only available at inter-
sections that satisfy certain conditions (indi-
cated by
+on the map). Therefore, guidance
may not be given even when the route on the
map changes direction. System is not malfunction.
The vehicle is not on the recommended
route. Return to the recommended route or
re-search the route.
Voice guide is turned OFF. Turn the voice guide ON.
Route guide is turned OFF. Turn the route guide ON.
Voice guide does not match the
actual road pattern. Voice guide may vary with the direction to
which the vehicle is turn and the connection
of the road to other roads.
Drive in conformity to the actual traffic rules.
NAVIGATION SYSTEM
Example of Symptoms Judged Not Malfunction
(Cont'd)
EL-4219