lights NISSAN QASHQAI 2011 Owner's Manual
[x] Cancel search | Manufacturer: NISSAN, Model Year: 2011, Model line: QASHQAI, Model: NISSAN QASHQAI 2011Pages: 297, PDF Size: 4.09 MB
Page 104 of 297
Downloaded from www.Manualslib.com manuals search engine CAUTION
Do not store the sun visor before returning it to
its original position.
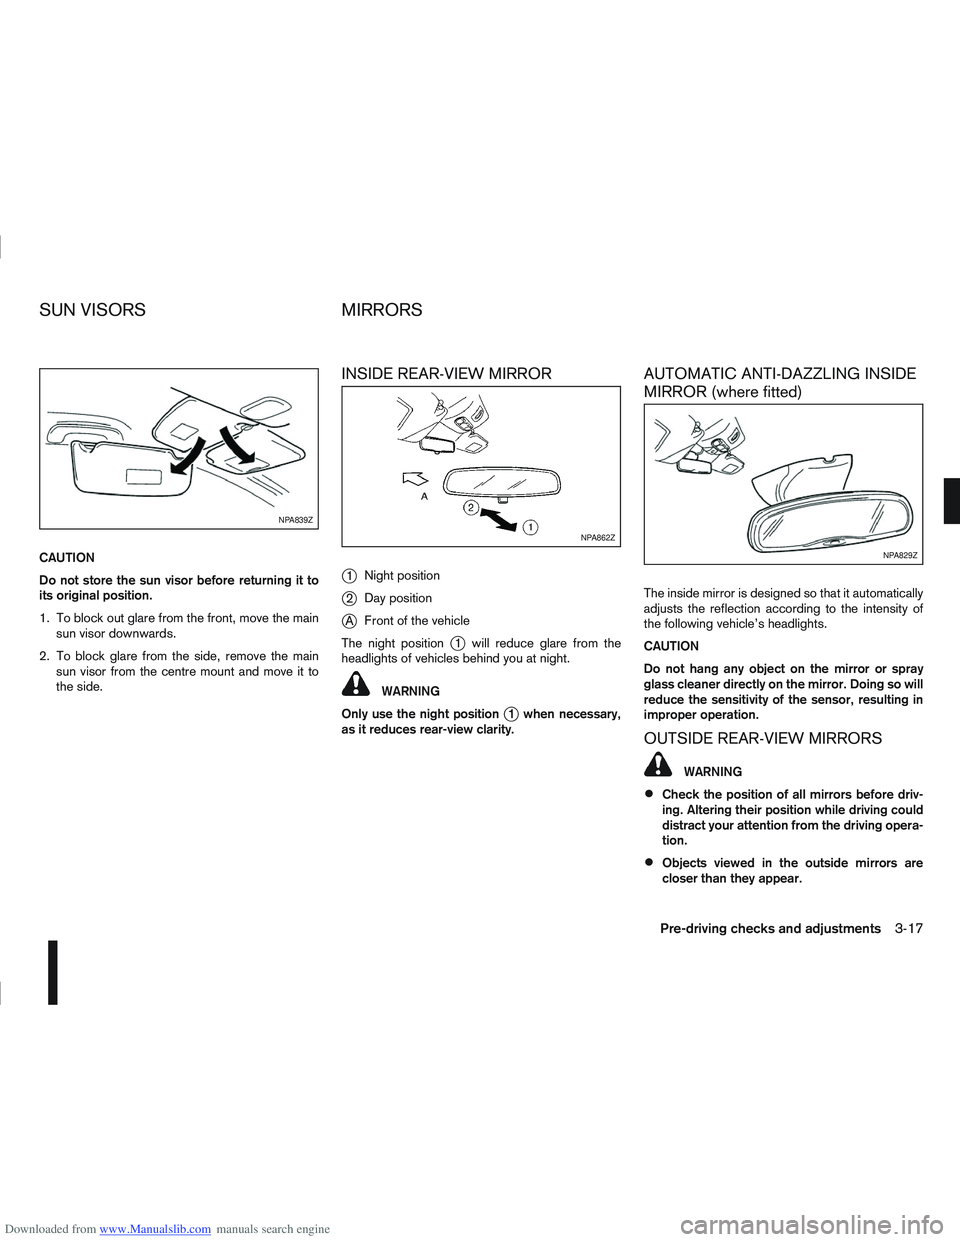
1. To block out glare from the front, move the mainsun visor downwards.
2. To block glare from the side, remove the main sun visor from the centre mount and move it to
the side.
INSIDE REAR-VIEW MIRROR
j
1 Night position
j2Day position
jA Front of the vehicle
The night position
j1 will reduce glare from the
headlights of vehicles behind you at night.
WARNING
Only use the night position
j1 when necessary,
as it reduces rear-view clarity.
AUTOMATIC ANTI-DAZZLING INSIDE
MIRROR (where fitted)
The inside mirror is designed so that it automatically
adjusts the reflection according to the intensity of
the following vehicle’s headlights.
CAUTION
Do not hang any object on the mirror or spray
glass cleaner directly on the mirror. Doing so will
reduce the sensitivity of the sensor, resulting in
improper operation.
OUTSIDE REAR-VIEW MIRRORS
WARNING
Check the position of all mirrors before driv-
ing. Altering their position while driving could
distract your attention from the driving opera-
tion.
Objects viewed in the outside mirrors are
closer than they appear.
NPA839Z
NPA862Z
NPA829Z
SUN VISORS MIRRORS
Pre-driving checks and adjustments3-17
Page 139 of 297
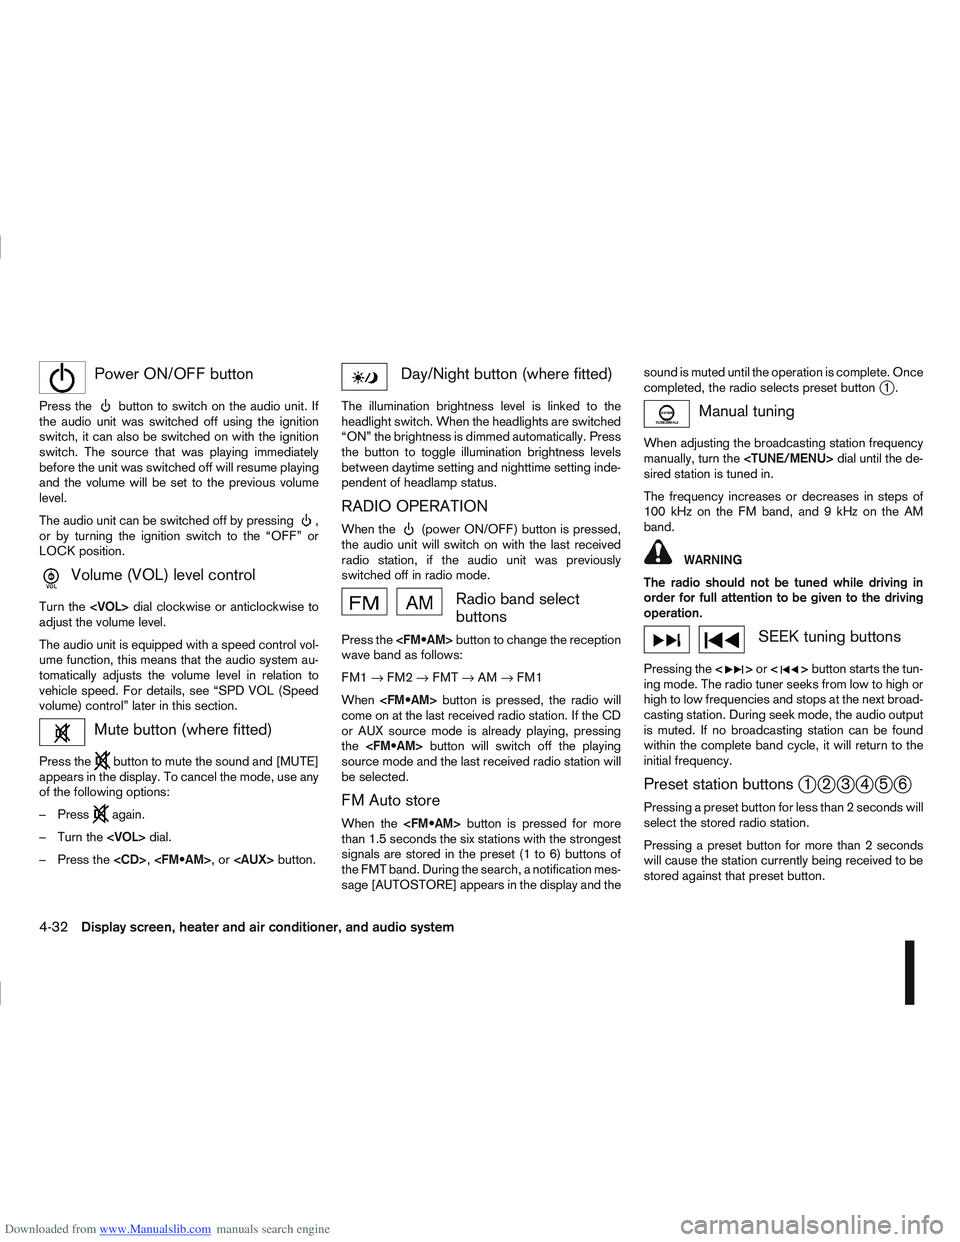
Downloaded from www.Manualslib.com manuals search engine mPower ON/OFF button
Press thebutton to switch on the audio unit. If
the audio unit was switched off using the ignition
switch, it can also be switched on with the ignition
switch. The source that was playing immediately
before the unit was switched off will resume playing
and the volume will be set to the previous volume
level.
The audio unit can be switched off by pressing
,
or by turning the ignition switch to the “OFF” or
LOCK position.
mVolume (VOL) level control
Turn the
adjust the volume level.
The audio unit is equipped with a speed control vol-
ume function, this means that the audio system au-
tomatically adjusts the volume level in relation to
vehicle speed. For details, see “SPD VOL (Speed
volume) control” later in this section.
Mute button (where fitted)
Press thebutton to mute the sound and [MUTE]
appears in the display. To cancel the mode, use any
of the following options:
– Press
again.
– Turn the
– Press the
Day/Night button (where fitted)
The illumination brightness level is linked to the
headlight switch. When the headlights are switched
“ON” the brightness is dimmed automatically. Press
the button to toggle illumination brightness levels
between daytime setting and nighttime setting inde-
pendent of headlamp status.
RADIO OPERATION
When the(power ON/OFF) button is pressed,
the audio unit will switch on with the last received
radio station, if the audio unit was previously
switched off in radio mode.
Radio band select
buttons
Press the button to change the reception
wave band as follows:
FM1 →FM2 →FMT →AM →FM1
When button is pressed, the radio will
come on at the last received radio station. If the CD
or AUX source mode is already playing, pressing
the button will switch off the playing
source mode and the last received radio station will
be selected.
FM Auto store
When the button is pressed for more
than 1.5 seconds the six stations with the strongest
signals are stored in the preset (1 to 6) buttons of
the FMT band. During the search, a notification mes-
sage [AUTOSTORE] appears in the display and the sound is muted until the operation is complete. Once
completed, the radio selects preset button
j1.
Manual tuning
When adjusting the broadcasting station frequency
manually, turn the
sired station is tuned in.
The frequency increases or decreases in steps of
100 kHz on the FM band, and 9 kHz on the AM
band.
WARNING
The radio should not be tuned while driving in
order for full attention to be given to the driving
operation.
SEEK tuning buttons
Pressing the <>or <>button starts the tun-
ing mode. The radio tuner seeks from low to high or
high to low frequencies and stops at the next broad-
casting station. During seek mode, the audio output
is muted. If no broadcasting station can be found
within the complete band cycle, it will return to the
initial frequency.
Preset station buttonsj1j2j3j4j5j6
Pressing a preset button for less than 2 seconds will
select the stored radio station.
Pressing a preset button for more than 2 seconds
will cause the station currently being received to be
stored against that preset button.
4-32Display screen, heater and air conditioner, and audio system
Page 163 of 297
Downloaded from www.Manualslib.com manuals search engine 5Starting and driving
Starting and driving
Running-in schedule ................................................ 5-2
Before starting the engine ........................................ 5-2
Precautions when starting and driving ...................... 5-3
Exhaust gas (Carbon Monoxide) ......................... 5-3
On-pavement and off-road driving precautions ......... 5-4
Three-way catalyst (Petrol engine models)................ 5-4 To help prevent damage ..................................... 5-4
Turbocharger system (Diesel engine models) ........... 5-5
Diesel Particulate Filter (DPF) (where fitted) ............. 5-5 Regeneration restrictions .................................... 5-5
If regeneration fails ............................................. 5-5
Care when driving ................................................... 5-6 Engine cold start period ...................................... 5-6
Loading luggage ................................................. 5-6
Driving on wet roads ........................................... 5-6
Driving under winter conditions ........................... 5-6
Ignition switch.......................................................... 5-6 Manual transmission ........................................... 5-6
Automatic transmission or Continuously
variable transmission........................................... 5-7
Steering lock ...................................................... 5-7
Key positions ...................................................... 5-7
NISSAN Anti-Theft System (NATS)..................... 5-7
Ignition knob (where fitted)....................................... 5-8 Manual transmission ........................................... 5-8
Automatic transmission or Continuously
variable transmission........................................... 5-9
Steering lock ...................................................... 5-9
Ignition knob position .......................................... 5-9 Emergency key – Intelligent Key dead battery
situation .............................................................. 5-10
NISSAN Anti-Theft System (NATS)..................... 5-10
Starting the engine................................................... 5-11
Driving the vehicle.................................................... 5-12 Driving with manual transmission......................... 5-12
Driving with automatic transmission or with
continuously variable transmission (Models
with manual shift) ................................................ 5-14
Driving with Continuously Variable Transmis-
sion (CVT) (Models without manual shift) ............ 5-17
Stop/Start System (where fitted) .............................. 5-21 Normal operation ................................................ 5-21
Precautions ........................................................ 5-22
Stop/Start System OFF switch ........................... 5-23
Environmental savings ........................................ 5-23
Ultrasonic Parking Sensor (where fitted) .................. 5-24
Four-wheel Drive (4WD) (where fitted)..................... 5-24 4WD mode operations........................................ 5-25
4WD shift tips .................................................... 5-25
4WD Warning light ............................................. 5-26
4WD Mode indicator lights ................................. 5-27
Driving four-wheel drive (4WD) safely ................. 5-27
Cruise control (where fitted) .................................... 5-29 Precautions on cruise control .............................. 5-29
Cruise control system operations ........................ 5-30
Speed limiter ........................................................... 5-31 Speed limiter operations ..................................... 5-32
Parking .................................................................... 5-33
Trailer towing ........................................................... 5-35
Page 165 of 297
Downloaded from www.Manualslib.com manuals search engine During the first 1,600 km (1,000 miles), follow these
recommendations for the future reliability and
economy of your new vehicle. Failure to follow the
recommendations may result in shortened engine
life and reduced engine performance.
Avoid driving for long periods at a constant
speed, either fast or slow.
Do not accelerate at full throttle in any gear.
Avoid quick starts.
Avoid hard braking as much as possible.
Do not tow a trailer during the first 800 km (500
miles).
NOTE
Models with K9K diesel engine will achieve top
performance only after approximately 5,000 km
(3,000 miles).
WARNING
The driving characteristics of your vehicle can be
changed remarkably by any additional load and
its distribution as well as by adding optional
equipment (trailer couplings, roof racks, etc.).
Your driving style and speed have to be adjusted
accordingly. Especially when carrying heavy
loads, your speed must be reduced adequately.
Make sure the area around the vehicle is free of
obstacles.
Check fluid levels such as engine oil, coolant,
brake and clutch fluid, and window washer fluid
as frequently as possible, at least whenever you
refuel.
Visually inspect tyres for their appearance and
condition. Also check the tyre pressure for
proper inflation.
Maintenance items in the “8. Maintenance and
do-it-yourself” section should be checked peri-
odically.
Check that all windows and light lenses are
clean.
Check that all doors are closed.
Position the seat and adjust the head restraints.
Adjust the inside and outside mirrors.
Fasten your seat belt and ask all passengers to
do likewise.
Check the operation of the warning/indicator
lights when the ignition switch is turned to the
ON position.
Do not place hard or heavy objects on the dash-
board or rear parcel shelf in order to prevent
injury in the event of a sudden stop.
RUNNING-IN SCHEDULE BEFORE STARTING THE ENGINE
5-2Starting and driving
Page 181 of 297
Downloaded from www.Manualslib.com manuals search engine The CVT is designed so the footbrake pedal
MUST be depressed before shifting from the P
(Park) position to any driving position while the
ignition switch is in the ON position.
The selector lever cannot be moved out of the P
(Park) position and into any of the other posi-
tions if the ignition switch is placed in the LOCK,
“OFF” or ACC position or if the key is removed.
CAUTION
DEPRESS THE FOOTBRAKE PEDAL - Shifting
the selector lever to D, R or L without de-
pressing the footbrake pedal causes the ve-
hicle to move slowly when the engine is run-
ning. Make sure the footbrake pedal is de-
pressed fully and the vehicle is stopped before
shifting the selector lever.
MAKE SURE OF THE SELECTOR LEVER POSI-
TION - Make sure the selector lever is in the
desired position. D and L are used to move
forward and R to reverse.
WARM UP THE ENGINE - Due to the higher
idle speeds when the engine is cold, extra
caution must be exercised when shifting the
selector lever into the driving position imme-
diately after starting the engine.
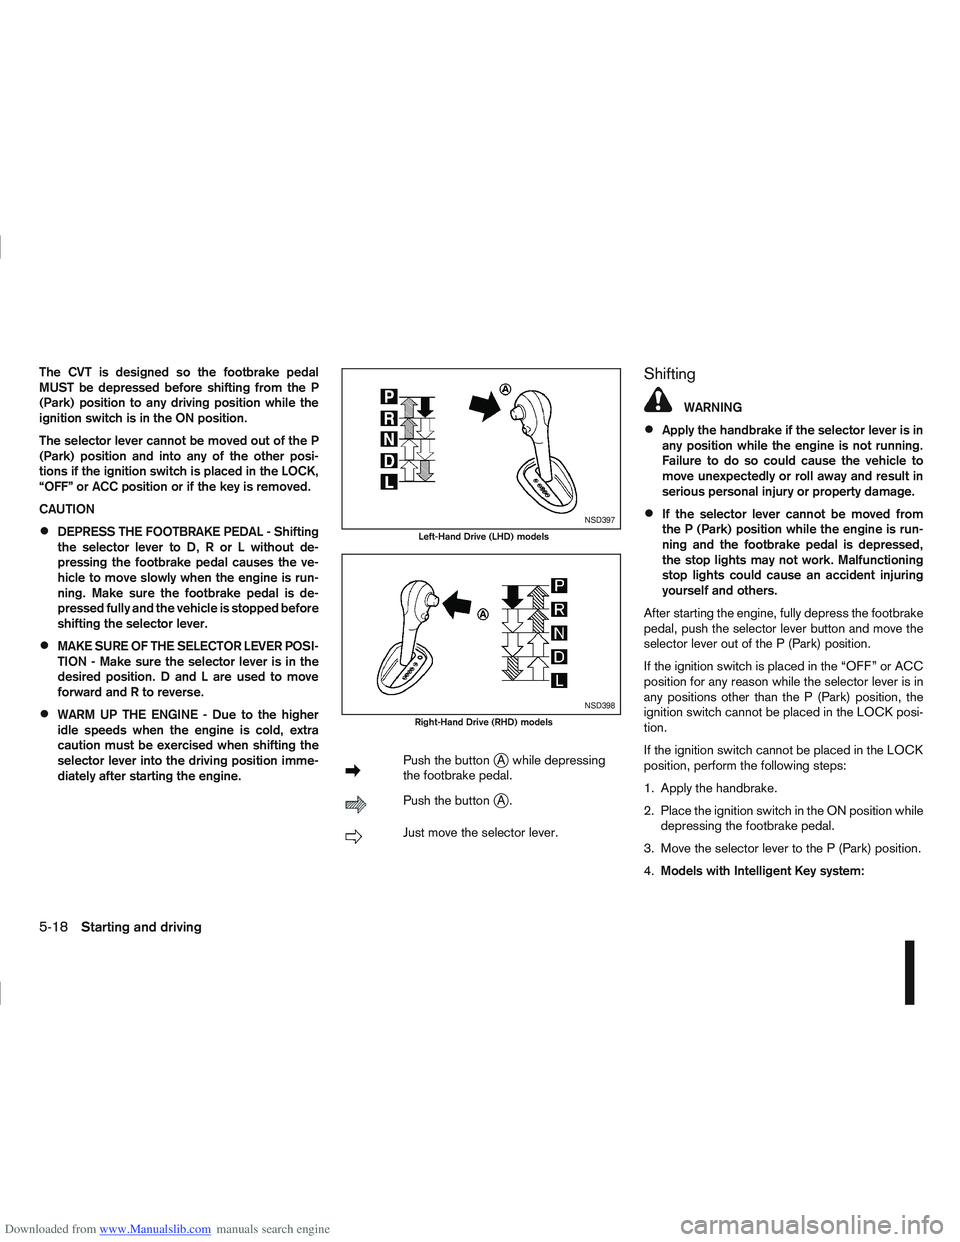
mPush the buttonjA while depressing
the footbrake pedal.
mPush the buttonjA.
mJust move the selector lever.
Shifting
WARNING
Apply the handbrake if the selector lever is in
any position while the engine is not running.
Failure to do so could cause the vehicle to
move unexpectedly or roll away and result in
serious personal injury or property damage.
If the selector lever cannot be moved from
the P (Park) position while the engine is run-
ning and the footbrake pedal is depressed,
the stop lights may not work. Malfunctioning
stop lights could cause an accident injuring
yourself and others.
After starting the engine, fully depress the footbrake
pedal, push the selector lever button and move the
selector lever out of the P (Park) position.
If the ignition switch is placed in the “OFF” or ACC
position for any reason while the selector lever is in
any positions other than the P (Park) position, the
ignition switch cannot be placed in the LOCK posi-
tion.
If the ignition switch cannot be placed in the LOCK
position, perform the following steps:
1. Apply the handbrake.
2. Place the ignition switch in the ON position while depressing the footbrake pedal.
3. Move the selector lever to the P (Park) position.
4. Models with Intelligent Key system:NSD397
Left-Hand Drive (LHD) models
NSD398
Right-Hand Drive (RHD) models
5-18Starting and driving
Page 183 of 297
Downloaded from www.Manualslib.com manuals search engine Shift lock release
j
1LHD models
j2RHD models
jA Shift lock release button
If the battery charge is low or discharged, the selec-
tor lever may not move from the P (Park) position
even with the brake pedal depressed and the selec-
tor lever button pushed.
To move the selector lever, perform the following
procedure:
1. Models with Intelligent Key system:
Place the ignition switch in the “OFF” or LOCK
position.
Models without Intelligent Key system:
Place the ignition switch in the LOCK position,
and remove the key if it is inserted.
2. Apply the handbrake.
3. Push down the shift lock release button
jA.Use
a suitable tool.
4. Push and hold the selector lever button and move the selector lever to the N (Neutral) position while
holding down the shift lock release button.
Place the ignition switch in the ON position to un-
lock the steering wheel. The vehicle may be moved
to the desired location. For models with Intelligent Key system: If the battery
is discharged completely, the steering wheel cannot
be unlocked. Do not move the vehicle with the steer-
ing wheel locked.
If the selector lever cannot be moved out of the P
(Park) position, have a NISSAN dealer or qualified
workshop check the CVT system as soon as pos-
sible.
WARNING
If the selector lever cannot be moved from the P
(Park) position while the engine is running and
the brake pedal is depressed, the stop lights may
not work. Malfunctioning stop lights could cause
an accident injuring yourself and others.
High fluid temperature protection mode
This transmission has a high fluid temperature pro-
tection mode. If the fluid temperature becomes too
high (for example, when climbing steep grades in
high temperature with heavy loads, such as when
towing a trailer), engine power and, under some
conditions, vehicle speed will be decreased auto-
matically to reduce the chance of transmission dam-
age. Vehicle speed can be controlled with the ac-
celerator pedal, but engine and vehicle speed may
be limited.
Fail-safe
When the fail-safe operation occurs, the CVT will
not be shifted to the selected driving position.
If the vehicle is driven under extreme conditions,
such as excessive wheel spinning and subse- quent hard braking, the fail-safe system may be
activated. This will occur even if all electrical cir-
cuits are functioning properly. In this case, place
the ignition switch in the “OFF” position and wait
for 10 seconds. Then turn the ignition switch back
to the ON position. The vehicle should return to
its normal operating condition. If it does not re-
turn to its normal operating condition, have a
NISSAN dealer or qualified workshop check the
transmission and repair it if necessary.
WARNING
When the fail-safe operation occurs, vehicle
speed may be gradually reduced. The reduced
speed may be lower than other traffic, which
could increase the chance of a collision. Be es-
pecially careful when driving. If necessary, pull to
the side of the road at a safe place and allow the
transmission to return to normal operation, or
have it repaired if necessary.
5-20Starting and driving
Page 184 of 297
Downloaded from www.Manualslib.com manuals search engine NISSAN GREEN PROGRAM
The Stop/Start System is designed to prevent un-
necessary fuel consumption, exhaust emissions,
and noise during a journey:
When the vehicle comes to rest the engine is
automatically stopped*.
The engine is then automatically restarted before
you are ready to drive away**.
CAUTION
At the end of the journey the engine must be
stopped and ignition turned OFF. Lock the ve-
hicle as normal. Turning the ignition OFF will shut
down all electrical systems. Failure to do this may
result in a flat battery.
NORMAL OPERATION
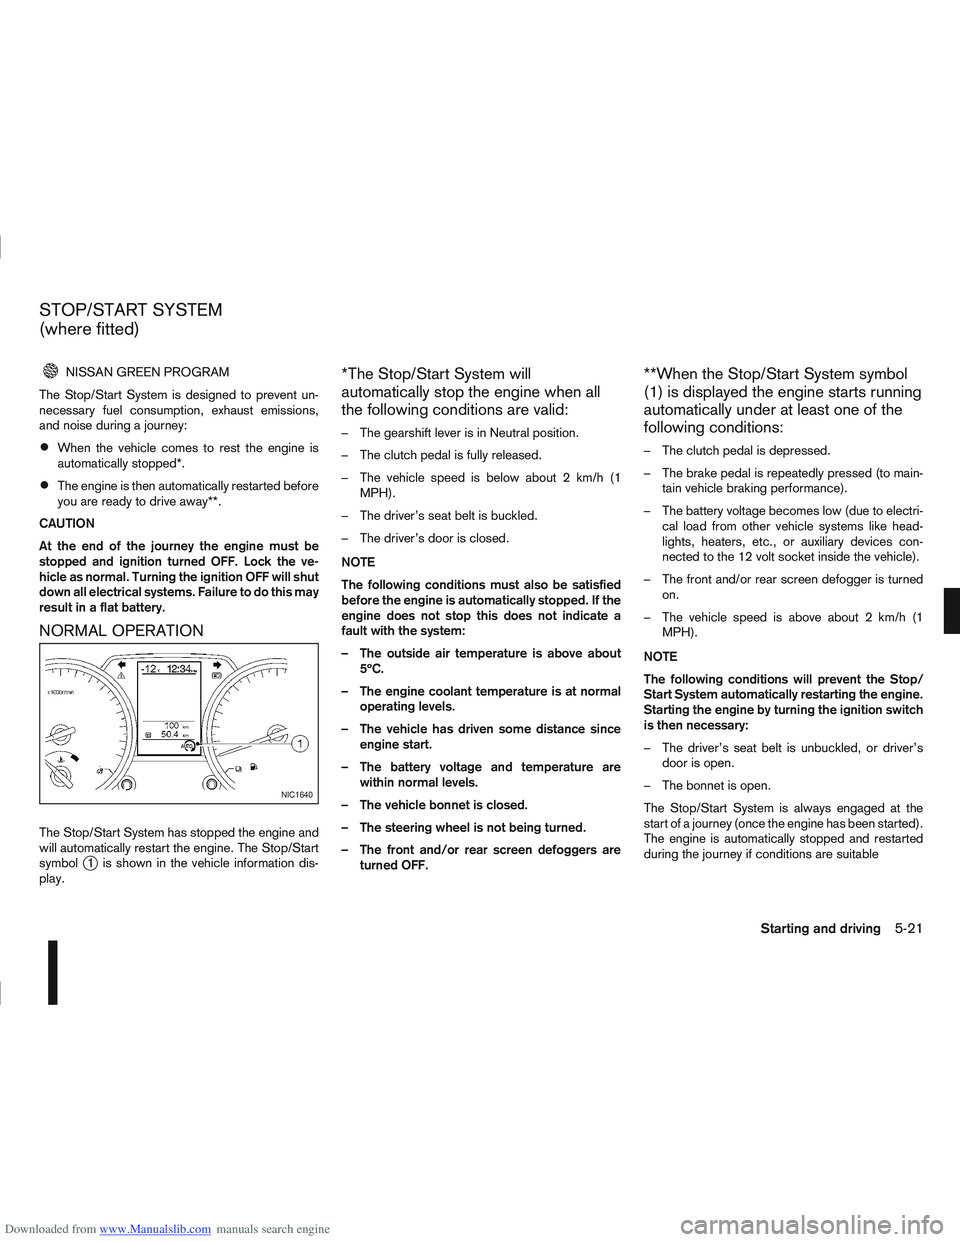
The Stop/Start System has stopped the engine and
will automatically restart the engine. The Stop/Start
symbol
j1 is shown in the vehicle information dis-
play.
*The Stop/Start System will
automatically stop the engine when all
the following conditions are valid:
– The gearshift lever is in Neutral position.
– The clutch pedal is fully released.
– The vehicle speed is below about 2 km/h (1 MPH).
– The driver’s seat belt is buckled.
– The driver’s door is closed.
NOTE
The following conditions must also be satisfied
before the engine is automatically stopped. If the
engine does not stop this does not indicate a
fault with the system:
– The outside air temperature is above about 5ºC.
– The engine coolant temperature is at normal operating levels.
– The vehicle has driven some distance since engine start.
– The battery voltage and temperature are within normal levels.
– The vehicle bonnet is closed.
– The steering wheel is not being turned.
– The front and/or rear screen defoggers are turned OFF.
**When the Stop/Start System symbol
(1) is displayed the engine starts running
automatically under at least one of the
following conditions:
– The clutch pedal is depressed.
– The brake pedal is repeatedly pressed (to main-tain vehicle braking performance).
– The battery voltage becomes low (due to electri- cal load from other vehicle systems like head-
lights, heaters, etc., or auxiliary devices con-
nected to the 12 volt socket inside the vehicle).
– The front and/or rear screen defogger is turned on.
– The vehicle speed is above about 2 km/h (1 MPH).
NOTE
The following conditions will prevent the Stop/
Start System automatically restarting the engine.
Starting the engine by turning the ignition switch
is then necessary:
– The driver’s seat belt is unbuckled, or driver’s door is open.
– The bonnet is open.
The Stop/Start System is always engaged at the
start of a journey (once the engine has been started).
The engine is automatically stopped and restarted
during the journey if conditions are suitable
NIC1640
STOP/START SYSTEM
(where fitted)
Starting and driving5-21
Page 190 of 297
Downloaded from www.Manualslib.com manuals search engine – Blinks slowly (about once every 2 seconds)Change the driving mode to 2WD and reduce
the vehicle speed as soon as safely possible.
If the warning light is still on after performing
the above operation, have the system
checked by a NISSAN dealer or qualified
workshop as soon as possible.
4WD MODE INDICATOR LIGHTS
4WD mode indicator light ( LOCK):
This light comes on when the ignition switch is
turned to the ON position, and turns off within 1
second. When selecting LOCK mode while the
engine is running, this light will illuminate simul-
taneously along with the 4WD mode indicator
light (AUTO).
4WD mode indicator light ( AUTO):
This light comes on when the ignition switch is
turned to the ON position, and turns off within 1
second. If the engine is running, this light will illu-
minate when selecting AUTO mode.
The 4WD mode indicator light is located in the
tachometer.
The light should turn off within 1 second of the
ignition switch being turned to the ON position.
While the engine is running, the 4WD mode indi-
cator light will display the position selected by
the 4WD mode control. NOTE
The 4WD mode indicator light may blink while
shifting from one drive mode to another. Once
shifting is completed, the 4WD mode indicator
light will come on. If the indicator light does not
come on immediately, make sure that the area
around the vehicle is safe and free from ob-
stacles. Drive the vehicle straight (DO NOT ac-
celerate, decelerate or reverse), then turn the
4WD mode control.
If the 4WD warning lights comes on, the 4WD indi-
cator light(s) will go out.
DRIVING FOUR-WHEEL DRIVE (4WD)
SAFELY
Your NISSAN is designed for both normal and off-
road use. However, avoid driving in deep water or
mud as your NISSAN is mainly designed for leisure
use, unlike a conventional off-road vehicle.
Remember that Two-Wheel drive (2WD) models are
less capable than Four-Wheel Drive (4WD) models
for rough road driving and extrication when stuck,
for example, in deep snow or mud.
Please observe the following precautions:
Drive carefully when off-road and avoid danger-
ous areas. Always wear seat belts to help keep
you and your passengers in position when driv-
ing over rough terrain.
Do not drive across steep slopes. Instead drive
either straight up or straight down the slope. Off- road vehicles can tip over sideways much more
easily than they can forwards or backwards.
Many hills are too steep for any vehicle. If you
drive up them, you may stall. If you drive down
them, you may not be able to control your speed.
If you drive across them, you may roll over.
Do not shift gears when driving on downhill
grades as this could cause loss of control of the
vehicle.
Stay alert when driving to the top of a hill. At the
top there could be a drop-off or other hazard that
could cause an accident.
If the engine of the vehicle stalls or you cannot
make it to the top of a steep grade, never at-
tempt to turn around. Your vehicle could tip or
roll over. Always drive backwards and straight
down in R (Reverse) gear.
Never drive backwards under the following con-
ditions as this could result in loss of control:
– with the gear lever in N (Neutral) and/or with
the clutch depressed and using the brake
(MT models).
– with the selector lever in N (Neutral) and us- ing only the brake (AT or CVT models).
Heavy braking down a hill could cause your
brakes to overheat and fade, resulting in loss of
control and an accident. Apply the brakes lightly
and use a low gear to control your vehicle speed.
Starting and driving5-27
Page 201 of 297
Downloaded from www.Manualslib.com manuals search engine When leaving your vehicle unoccupied:
Always remove the ignition key or Intelligent Key
(where fitted) and take it with you – even in your
own garage.
Close all windows completely and lock all doors.
Always park your vehicle where it can be seen.
At night, park in a well lit area.
If the vehicle is equipped with an alarm or immo-
bilization device, use it – even for short periods.
Do not leave children and pets in the vehicle
unattended.
Do not leave valuables on view to tempt a thief.
Always take your valuables with you. If you must
leave something in your vehicle, lock it in the lug-
gage compartment or hide it out of sight.
Do not leave the vehicle documents in your ve-
hicle. In the unfortunate event of your vehicle
being stolen, the documents will only help a thief
to sell the vehicle.
Do not leave articles on a roof rack as they are
particularly vulnerable. If possible, remove them
from the rack and lock them inside the vehicle.
Do not leave the spare key or Intelligent Key in
the vehicle – keep it in a safe place at home.
Do not leave a note of your vehicle’s key number
in the vehicle. A thief may break into the vehicle,
note the key number and return with a new key
and drive the vehicle.
WARNING
If the Electrically Power Assisted Steering
warning light (EPAS) illuminates while driv-
ing, the power assist for steering will be dis-
abled. Greater steering efforts are required to
operate the steering wheel, especially in
sharp turns and at low speed. Stop the ve-
hicle as soon as safely possible and contact a
NISSAN dealer or qualified workshop for fur-
ther assistance.
In certain circumstances, factors external to
the EPAS system may contribute to the illumi-
nation of the warning light. If the warning light
illuminates, stop the vehicle as soon as safely
possible if driving. Turn the ignition switch to
the “OFF” position and wait for approximately
20 seconds, then turn the ignition switch to
the ON position again. If the light remains illu-
minated, we recommend you to contact a
NISSAN dealer or qualified workshop. See
“Warning/indicator lights and audible
reminders” in the “2. Instruments and
controls” section for further details regarding
the EPAS warning light.
The EPAS (Electrically Power Assisted Steering)
system is designed to assist steering.
The steering may appear to feel slightly stiff follow-
ing parking manoeuvres including a great deal of
steering. This is not a malfunction; it is caused by a
control system designed to prevent the motor from overheating. No servicing is required. The EPAS
system will return to normal operation the next time
the vehicle is driven.
Similarly, the EPAS system may not provide full as-
sistance during periods of reduced battery voltage
but will recover once normal battery voltage is re-
stored.
If the EPAS warning light comes on while the engine
is running, it may indicate that the EPAS system is
not working properly. As result greater steering ef-
forts are required to steer the steering wheel, espe-
cially in sharp turns and at low speeds. Have the
system checked by a NISSAN dealer or qualified
workshop as soon as possible.
NOTE
Incorrectly inflated tyres can lead to poor steer-
ing ability and make the driver suspect a steering
problem: keep the vehicle’s tyres inflated to the
correct pressure at all times.
CAUTION
Any malfunction or accident that could have dam-
aged the steering components (including actual
or attempted theft damage) should be reported
to a NISSAN dealer or qualified workshop.
VEHICLE SECURITY
POWER STEERING SYSTEM
5-38Starting and driving
Page 203 of 297
Downloaded from www.Manualslib.com manuals search engine and varies the brake fluid pressure to prevent each
wheel from locking and sliding. By preventing each
wheel from locking, the system helps the driver to
maintain steering control and helps to minimise
swerving and spinning on slippery surfaces.
Using the system
Depress the brake pedal and hold it down. Depress
the brake pedal with firm steady pressure, but do
not pump the brakes. The ABS will operate to pre-
vent the wheels from locking up. Steer the vehicle to
avoid obstacles.
WARNING
Do not pump the brake pedal. Doing so may in-
crease the stopping distance.
Self-test feature
The ABS includes electronic sensors, electric
pumps, hydraulic solenoids and a computer. The
computer has a built-in diagnostic feature that tests
the system each time you start the engine and move
thevehicleatalowspeedinforwardorreverse.
When the self-test occurs, you may hear a “clunk”
noise and/or feel a pulsation in the brake pedal. This
is normal and does not indicate a malfunction. If the
computer senses a malfunction, it switches the ABS
off and illuminates the ABS warning light on the
instrument panel. The brake system then operates
normally, but without anti-lock assistance.
If the ABS warning light illuminates during the self-
test or while driving, have the vehicle checked by a
NISSAN dealer or qualified workshop.
Normal operation
The ABS will not initiate at speeds below 5 to 10
km/h (3 to 6 MPH). The speeds will vary according
to road conditions.
When the ABS senses that one or more wheels are
close to locking up, the actuator rapidly applies and
releases hydraulic pressure. This action is similar to
pumping the brakes very quickly. You may feel a
pulsation in the brake pedal and hear a noise from
the actuator under the bonnet when it is operating.
This is normal and indicates that the ABS is working
properly. However, the pulsation may indicate that
road conditions are hazardous and extra care is re-
quired while driving. When accelerating, driving on slippery surfaces or
suddenly avoiding obstacles on roads, the vehicle
might swerve or slip. The Electronic Stability Pro-
gramme (ESP) system continuously monitors and
compares the driver’s intended speed and the travel
direction. The system adjusts wheel brake pressure
and engine torque to assist in improving vehicle sta-
bility.
When the ESP system is operating, the “SLIP”
indicator light () in the combination meter
blinks.
When only the traction control (TCS) system in
the ESP system is operating, the “SLIP” indica-
tor light (
) in the combination meter will also
blink.
If the “SLIP” indicator light () blinks, the
road conditions are slippery. Be sure to drive
carefully. See “Warning/indicator lights and au-
dible reminders” in the “2. Instruments and
controls” section.
Indicator light
If a malfunction occurs in the system, the “SLIP”
indicator light (
) and the ESP indicator light
() come on in the combination meter.
As long as these indicator lights are on, the trac-
tion control function is cancelled.
The ESP system uses Active Brake Limited Slip
(ABLS) system to improve vehicle traction. The Ac-
tive Brake Limited Slip (ABLS) system works when
one of the driving wheels is spinning on a slippery
ELECTRONIC STABILITY
PROGRAMME (ESP) SYSTEM
(where fitted)
5-40Starting and driving