Code NISSAN QASHQAI 2012 Owners Manual
[x] Cancel search | Manufacturer: NISSAN, Model Year: 2012, Model line: QASHQAI, Model: NISSAN QASHQAI 2012Pages: 297, PDF Size: 4.09 MB
Page 89 of 297
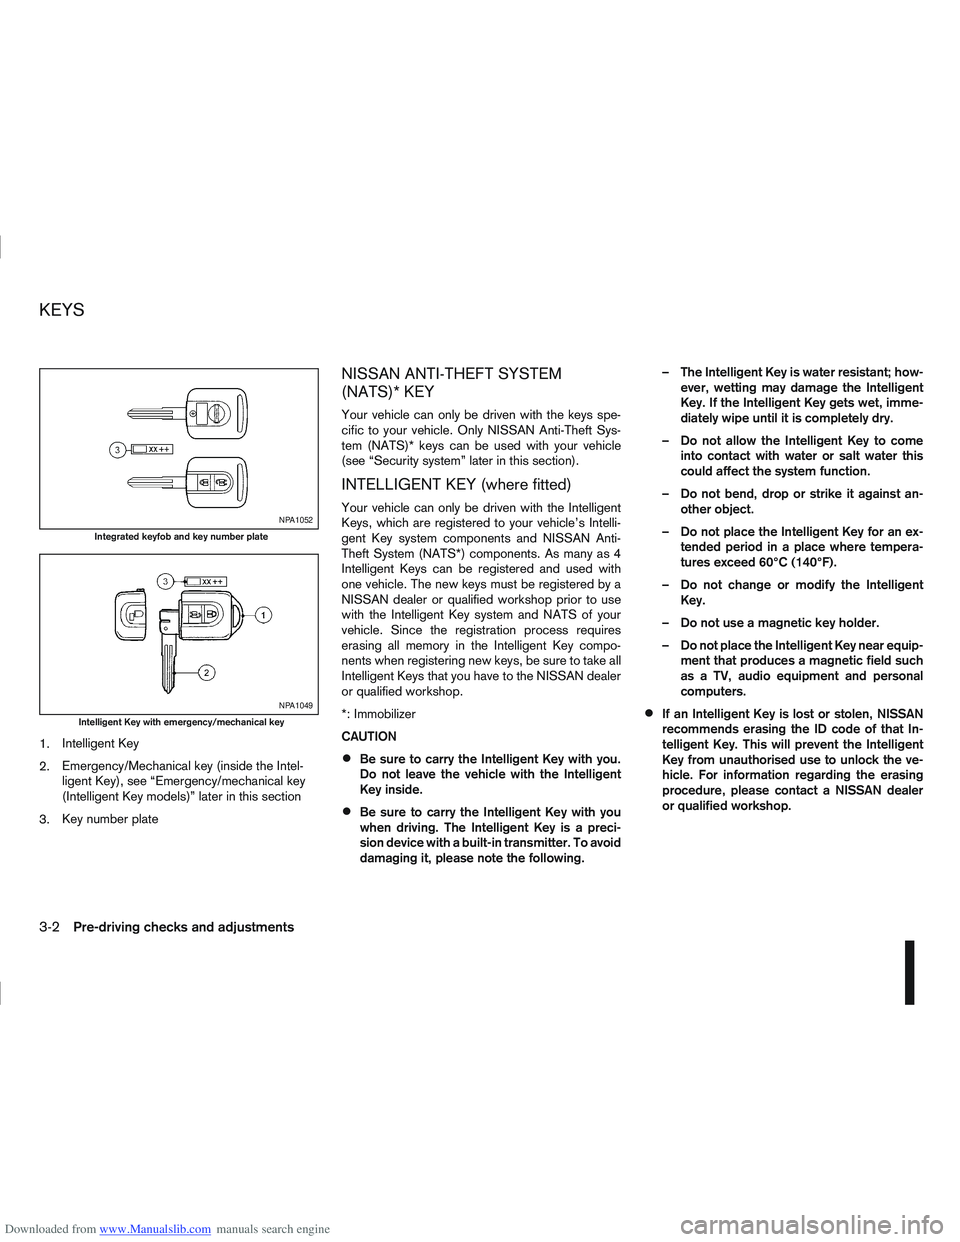
Downloaded from www.Manualslib.com manuals search engine 1.Intelligent Key
2. Emergency/Mechanical key (inside the Intel-
ligent Key), see “Emergency/mechanical key
(Intelligent Key models)” later in this section
3. Key number plate
NISSAN ANTI-THEFT SYSTEM
(NATS)* KEY
Your vehicle can only be driven with the keys spe-
cific to your vehicle. Only NISSAN Anti-Theft Sys-
tem (NATS)* keys can be used with your vehicle
(see “Security system” later in this section).
INTELLIGENT KEY (where fitted)
Your vehicle can only be driven with the Intelligent
Keys, which are registered to your vehicle’s Intelli-
gent Key system components and NISSAN Anti-
Theft System (NATS*) components. As many as 4
Intelligent Keys can be registered and used with
one vehicle. The new keys must be registered by a
NISSAN dealer or qualified workshop prior to use
with the Intelligent Key system and NATS of your
vehicle. Since the registration process requires
erasing all memory in the Intelligent Key compo-
nents when registering new keys, be sure to take all
Intelligent Keys that you have to the NISSAN dealer
or qualified workshop.
*: Immobilizer
CAUTION
Be sure to carry the Intelligent Key with you.
Do not leave the vehicle with the Intelligent
Key inside.
Be sure to carry the Intelligent Key with you
when driving. The Intelligent Key is a preci-
sion device with a built-in transmitter. To avoid
damaging it, please note the following. – The Intelligent Key is water resistant; how-
ever, wetting may damage the Intelligent
Key. If the Intelligent Key gets wet, imme-
diately wipe until it is completely dry.
– Do not allow the Intelligent Key to come into contact with water or salt water this
could affect the system function.
– Do not bend, drop or strike it against an- other object.
– Do not place the Intelligent Key for an ex- tended period in a place where tempera-
tures exceed 60°C (140°F).
– Do not change or modify the Intelligent Key.
– Do not use a magnetic key holder.
– Do not place the Intelligent Key near equip- ment that produces a magnetic field such
as a TV, audio equipment and personal
computers.
If an Intelligent Key is lost or stolen, NISSAN
recommends erasing the ID code of that In-
telligent Key. This will prevent the Intelligent
Key from unauthorised use to unlock the ve-
hicle. For information regarding the erasing
procedure, please contact a NISSAN dealer
or qualified workshop.
NPA1052
Integrated keyfob and key number plate
NPA1049
Intelligent Key with emergency/mechanical key
KEYS
3-2Pre-driving checks and adjustments
Page 91 of 297
Downloaded from www.Manualslib.com manuals search engine use of additional remote controllers, contact a
NISSAN dealer or qualified workshop.
The integrated keyfob will not function under the fol-
lowing conditions:
When the distance between the integrated key-
fob and vehicle is more than approximately 5 m
(15 ft).
When the integrated keyfob battery is
discharged.
When the key is in the ignition switch.
All doors can be locked or unlocked from the out-
side by pressing the “LOCK”
or “UNLOCK”button on the integrated keyfob.
For Super Lock system models only (RHD mod-
els):
When the vehicle is occupied, never lock the
doors with the integrated keyfob. Doing so will
trap the occupants, since the Super Lock system
prevents the doors from being opened from the
inside.
WARNING
Only operate the integrated keyfob lock button in
full and clear view of the vehicle to prevent any-
body being trapped inside the vehicle.
CAUTION
When locking the doors using the integrated
keyfob, be sure not to leave the key in the
vehicle.
Always remove the ignition key or Intelligent
Key, close all windows before operating the
keyfob door lock system.
Ensure that the driver’s door is securely
closed before operating the integrated keyfob
door lock system for correct operation of the
system.
Do not allow the integrated keyfob, which
contains electrical components, to come into
contact with water or salt water. This could
affect the system function.
Do not drop the integrated keyfob.
Do not strike the integrated keyfob sharply
against another object.
Do not place the integrated keyfob for an ex-
tended period in an area where temperatures
exceed 60°C (140°F).
If a integrated keyfob is lost or stolen, NISSAN rec-
ommends erasing the ID code of that integrated
keyfob from the vehicle. This may prevent the unau-
thorised use of the integrated keyfob to unlock the
vehicle. For information regarding the erasing pro-
cedure, contact a NISSAN dealer or qualified work-
shop.
For information regarding the replacement of a bat-
tery, see “Battery” in the “8. Maintenance and
do-it-yourself” section.
SWITCHING FROM CONVENIENCE
MODE TO ANTI-HIJACK MODE
Selective unlock or “Anti-hijack” mode allows the
remote unlocking of only the driver’s door to prevent
an attacker from entering the vehicle via an unlocked
passenger door.
As default, the unlock mode will be set to “Conve-
nience” mode (all doors will unlock). Follow the in-
structions below to switch between convenience
mode and anti-hijack mode.
jA Key with integrated keyfob (from
outside the vehicle)
1. Turn the ignition switch to the “OFF” position.
2. Press and hold both the “LOCK”
and “UN-
LOCK”buttons for 5 seconds.
Setting anti-hijack mode:
– The direction indicators flash once.
Setting convenience mode:
– The direction indicators flash three times.
jB Intelligent Key
1. Turn the ignition switch from ON to LOCK and
exit the vehicle.
2. From outside the vehicle, lock the vehicle using the integrated keyfob “LOCK” button
.
3. Press and hold both the “LOCK”
and “UN-
LOCK”buttons for 10 seconds.
4. Within 3 seconds, press and hold the driver’s
3-4Pre-driving checks and adjustments
Page 94 of 297
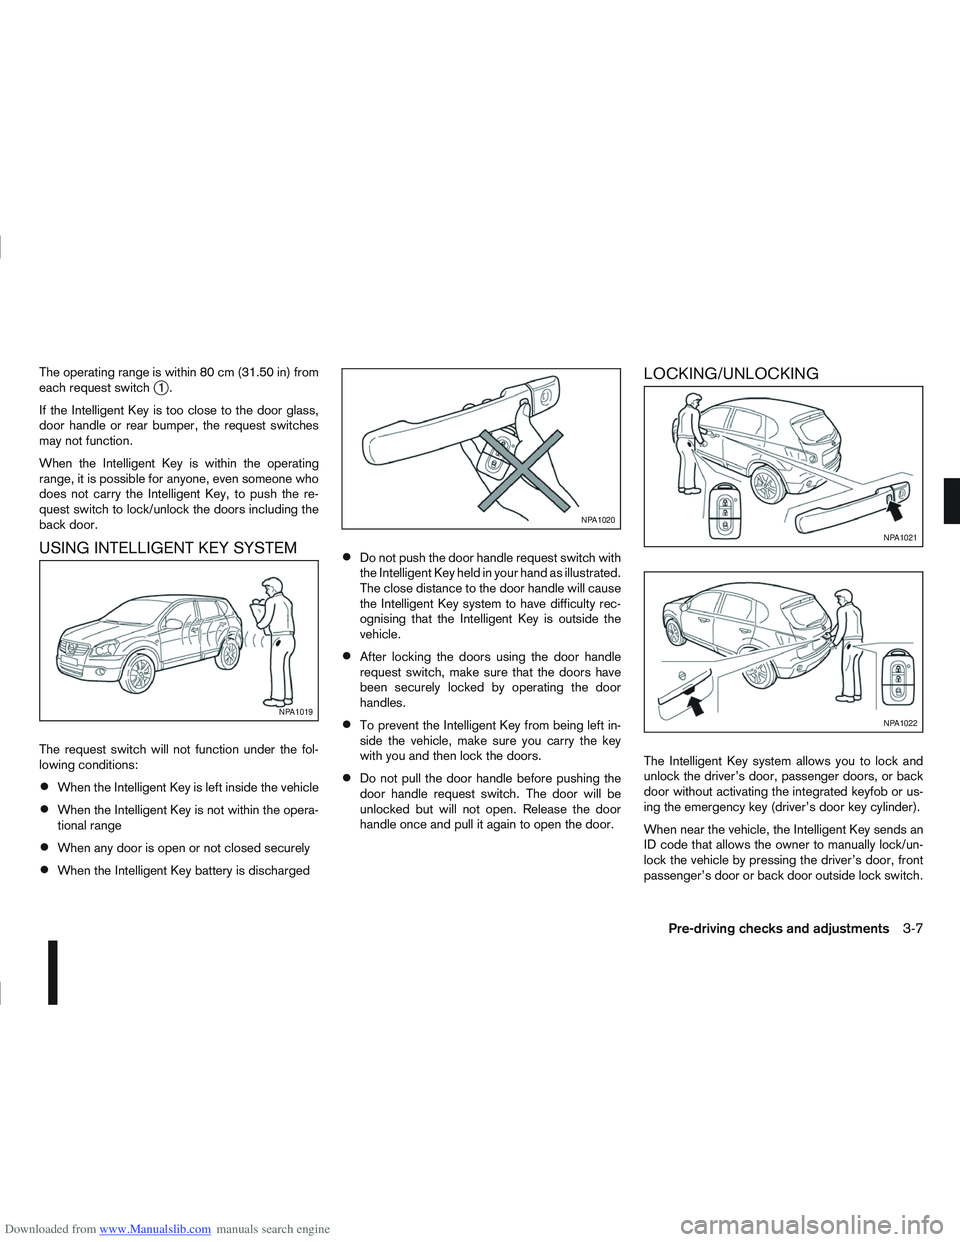
Downloaded from www.Manualslib.com manuals search engine The operating range is within 80 cm (31.50 in) from
each request switchj1.
If the Intelligent Key is too close to the door glass,
door handle or rear bumper, the request switches
may not function.
When the Intelligent Key is within the operating
range, it is possible for anyone, even someone who
does not carry the Intelligent Key, to push the re-
quest switch to lock/unlock the doors including the
back door.
USING INTELLIGENT KEY SYSTEM
The request switch will not function under the fol-
lowing conditions:
When the Intelligent Key is left inside the vehicle
When the Intelligent Key is not within the opera-
tional range
When any door is open or not closed securely
When the Intelligent Key battery is discharged
Do not push the door handle request switch with
the Intelligent Key held in your hand as illustrated.
The close distance to the door handle will cause
the Intelligent Key system to have difficulty rec-
ognising that the Intelligent Key is outside the
vehicle.
After locking the doors using the door handle
request switch, make sure that the doors have
been securely locked by operating the door
handles.
To prevent the Intelligent Key from being left in-
side the vehicle, make sure you carry the key
with you and then lock the doors.
Do not pull the door handle before pushing the
door handle request switch. The door will be
unlocked but will not open. Release the door
handle once and pull it again to open the door.
LOCKING/UNLOCKING
The Intelligent Key system allows you to lock and
unlock the driver’s door, passenger doors, or back
door without activating the integrated keyfob or us-
ing the emergency key (driver’s door key cylinder).
When near the vehicle, the Intelligent Key sends an
ID code that allows the owner to manually lock/un-
lock the vehicle by pressing the driver’s door, front
passenger’s door or back door outside lock switch.
NPA1019
NPA1020
NPA1021
NPA1022
Pre-driving checks and adjustments3-7
Page 132 of 297
Downloaded from www.Manualslib.com manuals search engine Band select button
Press the button to change the reception
wave band as follows:
FM1 →FM 2 →FM T →MW →LW →FM1
When button is pressed while the igni-
tion switch is in the Acc or ON position, the radio
will come on at the last received radio station. If the
CD is already playing, pressing the but-
ton will switch off the CD play mode and the last
received radio station will be selected.
FM Auto store
When the button is pressed for more
than 1.5 seconds and the six strongest stations are
stored in the preset (1 to 6) of the FM T band. Dur-
ing the search, a notification message [AU-
TOSTORE] appears in the display and the sound is
muted until the operation is complete. Once com-
pleted, the radio selects preset 1.
Manual tuning buttons
WARNING
The radio should not be tuned while driving in
order for full attention to be given to the driving
operation.
Press the
orbutton repeatedly to in-
crease or decrease the frequency. The frequency increases or decreases in steps of
100 kHz on the FM band, 9kHz on the MW band,
and 3 kHz on the LW band.
If the
orbutton is held down with a long
press, the frequency will continuously increase or
decrease until the button is released.
SEEK tuning buttons
Pressing briefly on theorbutton starts the
tuning mode. The radio tuner seeks from low to high
or high to low frequencies and stops at the next
broadcasting station. During seek mode, the audio
output is muted. If no broadcasting station can be
found within the complete band cycle, it will return
to the initial frequency.
If the
orbutton is held down with a long
press, the seek mode will continuously increase or
decrease until the button is released. When the but-
ton is released, the seek mode will seek the next
broadcasting station.
Preset station buttonsj1j2j3j4j5j6
Pressing a preset button for less than 2 seconds will
select the stored radio station.
Pressing a preset button for more than 2 seconds
will cause the station currently being received to be
stored against that preset button.
Eighteen stations can be stored in the FM band.
(Six each for FM1, FM2 and FMT)
Six stations can be set for both the MW and LW
bands. If the battery is disconnected, or if the fuse blows,
the radio memory will be erased. In that case, reset
the desired stations after battery connection or fuse
replacement.
Radio data system (RDS) operation
The RDS is a system through which encoded digital
information is transmitted by FM radio station in ad-
dition to the normal FM-radio broadcasting. The
RDS provides information services such as station
name, traffic information and news.
NOTE
In some countries or regions, some of these ser-
vices may not be available.
Alternative Frequency (AF) mode:
The AF mode operates in the FM (radio) mode.
The AF mode operates both in the FM (radio)
and CD mode (if FM was previously selected in
the radio mode).
When AF mode has been set to the “ON” posi-
tion in the user set up menu mode, the [AF] indi-
cator comes on. For activation or deactivation
details, see “MENU button” later in this section.
The AF function compares signal strengths and se-
lects the station with the optimum reception condi-
tions for the currently tuned-in station.
Display screen, heater and air conditioner, and audio system4-25
Page 133 of 297
Downloaded from www.Manualslib.com manuals search engine RDS functions
Programme Service (PS) function (station name
display function):
When an RDS station is tuned in with seek or manual
tuning, the RDS data is received and the PS name
is displayed.
Emergency broadcast interrupt function
(ALARM INTERRUPTION - EBU SPEC FOR
INFO):
When the radio receives PTY code 31 (an emer-
gency broadcast code), the sound is interrupted,
the emergency broadcast is heard, and [ALARM] is
displayed. The volume level at this time is the same
as that for traffic announcements. Once the emer-
gency broadcast is finished, the unit immediately
returns to the previous source.
REG (Regional) mode:
Some local radio stations are linked according to
region because they only offer limited coverage due
a limited number of transmitters. If the signal from
one station of these stations becomes weak while
driving, RDS mode will switch to another local sta-
tion in the region with a stronger signal.
When the REG mode is activated in the FM band
and the radio receiver is tuned to a local radio sta-
tion, it will keep receiving this radio station without
switching to another local station. For activation or
deactivation details, see “MENU button” later in this
section.
TA Traffic announcement
This function operates in both FM (radio) and CD
mode.
Pressing the
mode. The TA indicator is displayed while TA
mode is on.
When the
The mode will be switched off and the TA indica-
tor will disappear from the display.
If the TA mode is not activated ,aTiconwill
appear in the display when the currently received
radio station is capable of broadcasting traffic
announcements. Pressing the
ton will activate TA mode and the indicator will
change from T to TA.
Traffic announcement interrupt function:
When a traffic announcement is received, the an-
nouncement is tuned in.
Once the traffic announcement has finished, the unit
returns to the source that was active before the traf-
fic announcement started. The volume returns to the
previous level.
If the
announcement, the traffic announcement interrupt
mode is cancelled. The TA mode returns to the
standby mode and the audio unit returns to the pre-
vious source. NOTE
TA mode operates regardless of whether the AF
mode is on or off.
NEWS mode
When the NEWS mode is activated and the radio
receives a NEWS code from a FM broadcasting
station, the playing mode will be interrupted. Once
the news broadcast has finished, the audio unit will
return to the previous source. During the interrup-
tion, NEWS and the broadcasting station name will
be displayed.
To enable or disable the NEWS mode, press the
button for more than 2 seconds. When
the NEWS mode is enabled, the NEWS icon will be
displayed.
1. NEWS standby mode
The NEWS standby mode can be activated while
in FM or CD mode.
Pressing the TA NEWS button for more than 2
seconds, the NEWS standby mode will switch
off and the NEWS icon will disappear from the
display.
2. NEWS interruption mode
Pressing the
2 seconds, the NEWS standby mode will switch
off and the NEWS icon will disappear from the
display.
4-26Display screen, heater and air conditioner, and audio system
Page 138 of 297
Downloaded from www.Manualslib.com manuals search engine ANTI-THEFT SYSTEM
Use of a 4-digit radio PIN (Personal Identification
Number) code, known only to the vehicle owner,
effectively reduces the possibility of the audio unit
being stolen. Without the PIN code the audio unit
cannot be activated.
If force is used to try and remove the audio unit, the
Anti-theft system activates and the audio unit is
locked. The only way to unlock the audio unit is to
enter the radio code number shown on an identifica-
tion card supplied with the vehicle documentation.
NOTE
The 4 digit radio code is shown on a card that
you received with your vehicle documenta-
tion.
Record the 4 digit radio code on the “Security
information” page at the end of this manual.
Remove the security page and keep it in a
safe, not in the vehicle.
Contact a NISSAN dealer if you do lose the 4
digit radio code of the audio unit.
Unlocking the unit
If the battery supply to the vehicle is interrupted, the
audio unit will lock.
When the power is restored and the unit switched
on, the display will show [Radio Code:] and it will be
unlocked when the codes have been entered cor-
rectly.
Unlocking procedure:
Read this section very carefully. It is important
that the instructions are followed precisely.
To unlock the audio unit, proceed as follows:
1. Turn the ignition switch to the Acc or ON posi-tion.
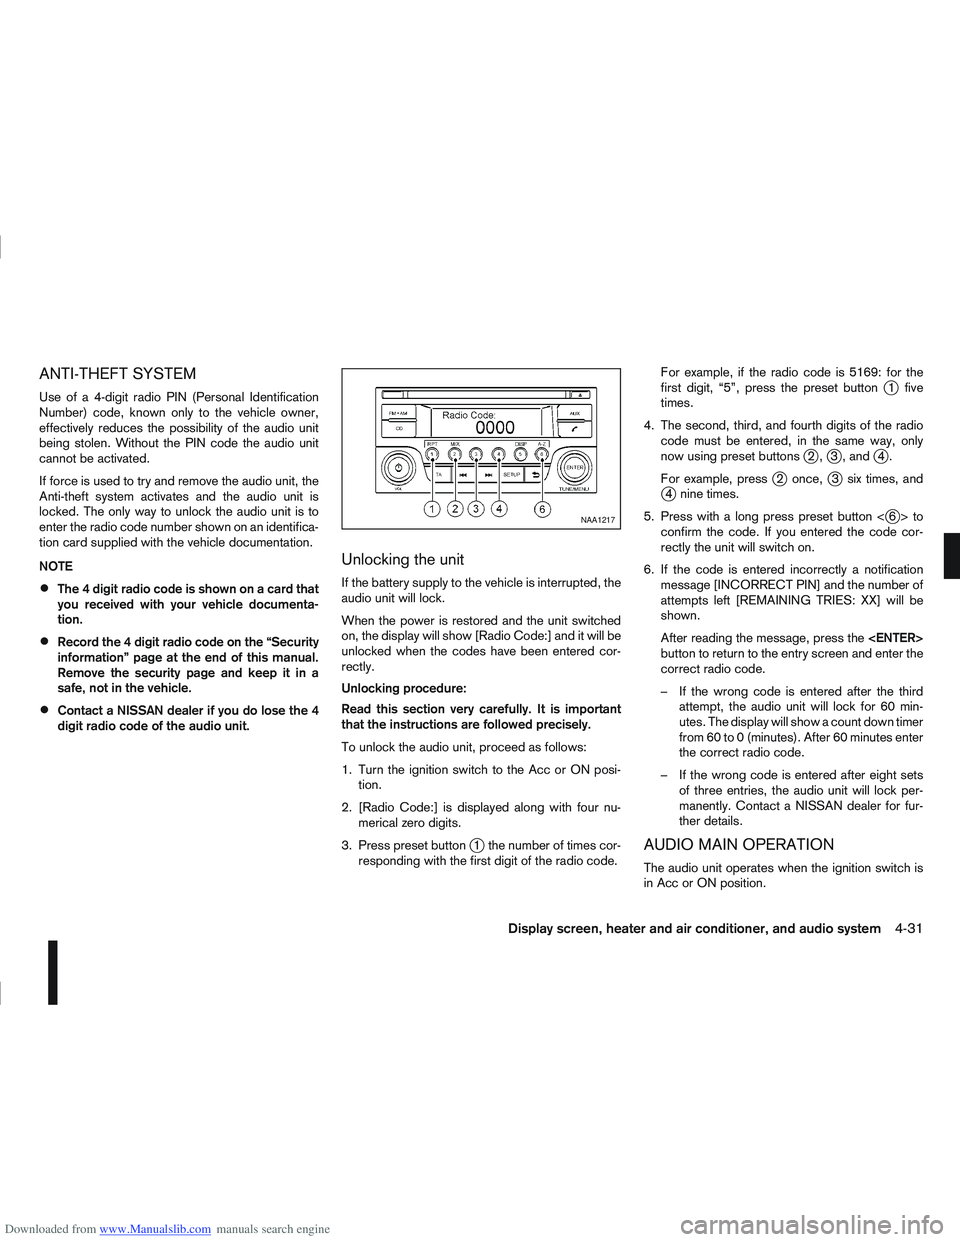
2. [Radio Code:] is displayed along with four nu- merical zero digits.
3. Press preset button
j1 the number of times cor-
responding with the first digit of the radio code. For example, if the radio code is 5169: for the
first digit, “5”, press the preset button
j1 five
times.
4. The second, third, and fourth digits of the radio code must be entered, in the same way, only
now using preset buttons
j2,j3 , andj4.
For example, press
j2 once,j3 six times, andj4 nine times.
5. Press with a long press preset button <
j6>to
confirm the code. If you entered the code cor-
rectly the unit will switch on.
6. If the code is entered incorrectly a notification message [INCORRECT PIN] and the number of
attempts left [REMAINING TRIES: XX] will be
shown.
After reading the message, press the
button to return to the entry screen and enter the
correct radio code.
– If the wrong code is entered after the third attempt, the audio unit will lock for 60 min-
utes. The display will show a count down timer
from 60 to 0 (minutes). After 60 minutes enter
the correct radio code.
– If the wrong code is entered after eight sets of three entries, the audio unit will lock per-
manently. Contact a NISSAN dealer for fur-
ther details.
AUDIO MAIN OPERATION
The audio unit operates when the ignition switch is
in Acc or ON position.
NAA1217
Display screen, heater and air conditioner, and audio system4-31
Page 140 of 297
Downloaded from www.Manualslib.com manuals search engine Eighteen stations can be stored in the FM band.
(Six each for FM1, FM2 and FMT)
Six stations can be set for the AM band.
If the battery is disconnected, or if the fuse blows,
the radio memory will be erased. In that case, reset
the desired stations after battery connection or fuse
replacement.
Radio data system (RDS) operation
The RDS is a system through which encoded digital
information is transmitted by FM radio stations in
addition to the normal FM radio broadcasting. The
RDS provides information services such as station
name, traffic information, or news.
NOTE
In some countries or regions, some of these ser-
vices may not be available.
Alternative Frequency (AF) mode:
The AF mode operates in the FM (radio) mode.
The AF mode operates in the FM (radio), AUX or
CD mode (if FM was previously selected in the
radio mode).
The AF function compares signal strengths and
selects the station with the optimum reception
conditions for the currently tuned-in station.
RDS functions
Programme Service (PS) function (station name
display function):
When an RDS station is tuned in with seek or manual
tuning, the RDS data is received and the PS name
is displayed.
TA Traffic announcement
This function operates in FM (Radio), CD or AUX
mode.
Pressing the
The TA indicator is displayed while TA mode is
on.
When
switched off and the TA indicator will disappear
from the display.
Traffic announcement interrupt function:
When a traffic announcement is received, the an-
nouncement is tuned in and the display shows a
notification message with the radio station name e.g.
[TA: Radio 1].
Once the traffic announcement has finished, the unit
returns to the source that was active before the traf-
fic announcement started.
If
the traffic announcement interrupt mode is can-
celled. The TA mode returns to the standby mode
and the audio unit returns to the previous source.
SETUP BUTTON
To configure Audio, Clock, Bluetooth, Language or
Scroll direction settings, perform the following pro-
cedure:
1. Press the
2. Turn the
clockwise, the display will appear in the following
order:
[Audio] ⇔[Clock] ⇔[Bluetooth] ⇔[Language]
⇔ [Scroll Direction]
After the desired levels have been set, press either
the
(Back) button repeatedly, the
button, or wait for 8 seconds without pressing any
buttons to exit the menu screen.
Display brightness (Day/Night mode)
Press the
switch the display brightness between the daytime
and nighttime mode.
Audio adjustments
Press the
screen then select [Audio].
Each time the
will change as follows:
[Bass] →[Treble] →[Balance] →[Fade] →[AUX
VOL] →[SPD VOL] →setup menu screen [Audio]
→ [Bass]
Display screen, heater and air conditioner, and audio system4-33
Page 142 of 297
![NISSAN QASHQAI 2012 Owners Manual Downloaded from www.Manualslib.com manuals search engine [Russian]
Scroll direction
Sets the scroll direction of the<TUNE/MENU>dial.
For example, to change the way in which you turn
the dial (anticloc NISSAN QASHQAI 2012 Owners Manual Downloaded from www.Manualslib.com manuals search engine [Russian]
Scroll direction
Sets the scroll direction of the<TUNE/MENU>dial.
For example, to change the way in which you turn
the dial (anticloc](/img/5/56764/w960_56764-141.png)
Downloaded from www.Manualslib.com manuals search engine [Russian]
Scroll direction
Sets the scroll direction of the
For example, to change the way in which you turn
the dial (anticlockwise or clockwise) in order to scroll
up or down a list.
COMPACT DISC (CD) OPERATION
The CD player can play a music CD or an encoded
MP3/WMA CD and while listening to those CD’s
certain text might be able to be displayed (when CD
encoded with text is being used).
Press the
start to play.
When
mode is already operating, it will automatically turn
off the playing source and the CD play mode will
start.
However, if the CD disc is not loaded, then a notifi-
cation message will be displayed and the audio unit
remains in radio or AUX source mode.
CAUTION
Do not force the CD into the slot. This could
damage the player.
Do not use 8 cm (3.1 in) discs.
CD insert (CD player)
Insert the CD disc into the slot with the label side
facing up. The disc will be guided automatically into
the slot and will start playing. After loading the disc,
track information will be displayed.
NOTE
The CD player accepts normal audio CD or
CD recorded with MP3/WMA files.
Inserting a CD recorded with MP3/WMA files,
the audio unit will automatically detect and
[MP3CD] will be indicated.
An error notification message will be
displayed when inserting a wrong disc type
(e.g. DVD), or the player cannot read the CD
disc. Eject the disc and insert another disc.
CD button
Press the
CD. Playing starts from the track that was being
played when the CD play mode was switched off.
Audio main operation
List view:
While the track is being played, press either the
button to display the available
tracks in a listed view mode. To select a track from
the list, or a track to start listening from, turn the
In the list view mode, quick search can be per-
formed to find a track from the list.
Push the
j6 button then turn the
of the track title then press
a list of the available tracks will be displayed. Select,
and press
Fast Forward (Cue), Fast
Reverse (Review) buttons:
When the
(Cue) or(Review) button is
pressed continuously, the track will be played at
high speed. When the button is released, the track
will be played at normal playing speed.
Track up/down buttons:
Pressing the
orbutton once, the track will
be skipped forward to the next track or backward to
the beginning of the current played track. Press the
orbutton more than once to skip through
the tracks.
Folder browsing:
If the recorded media contains folders with music
files, pressing the
orbutton will play in
sequence the tracks of each folder.
To select a preferred folder:
1. Press the
button and a list of
tracks in the current folder is displayed.
2. Press the
button.
Display screen, heater and air conditioner, and audio system4-35
Page 147 of 297
Downloaded from www.Manualslib.com manuals search engine Audio device without PIN code:
The Bluetooth connection will be automati-
cally connected without any further input.
Audio device with PIN code:
A new screen will appear. Assign the 4 digit
PIN code by turning the
to each code and press the
to confirm. Then select [Validate] and press
made.
The 4–digit PIN code is provided with the
audio device, see the owner’s manual of the
audio device.
3. On Bluetooth® audio/mobile phone devices. 1) Switch on the Bluetooth® connection, if not already switched on.
2) Switch on the search mode for Bluetooth® devices. If the search mode finds a device it
will be shown on the device display.
3) When a device is found use the
to select [My Car].
4) Enter the number code shown on the relevant device with the device’s own keypad, and
press the confirmation key on the device it-
self. Refer to the relevant Bluetooth® device
owner’s manual for further details.
When successfully paired a notification message
will be displayed, then the audio system display will return to the current audio source display.
During connection the following status icons will
be displayed (top left of the display): Signal
strength (), Battery status* () and Blue-
tooth “ON” ().
*: If the low battery message comes on, the
Bluetooth® device must be recharged soon.
The pairing procedure and operation may vary ac-
cording to device type and compatibility. See the
Bluetooth® owner’s manual for further details.
NOTE
For device details, see your audio/mobile
phone Owner’s Manual.
For assistance with the Bluetooth® audio/
mobile phone integration, please visit your lo-
cal NISSAN dealer.
[Select Device]:
The paired device list shows which Bluetooth® au-
dio or mobile phone devices have been paired or
registered with the Bluetooth® audio system. If the
list contains devices then select the appropriate de-
vice to connect to the Bluetooth® audio system.
The following symbols (where fitted) indicate the
capability of the registered device:
: Mobile phone integration
: Audio streaming (A2DP – Advanced Audio
Distribution Profile) [Delete Device]:
A registered device can be removed from the Blue-
tooth audio system. Select a registered device then
press
[On/Off]:
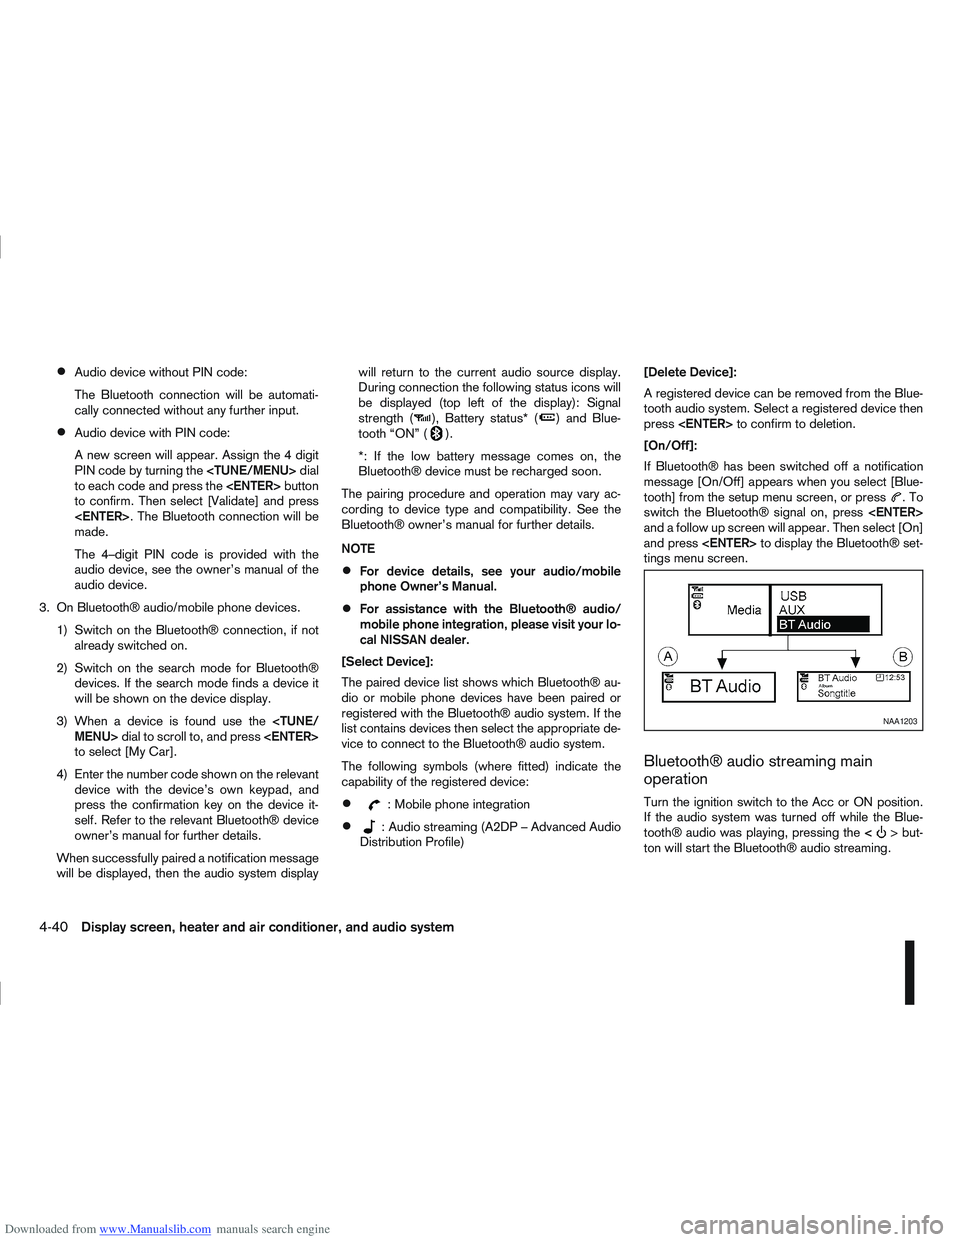
If Bluetooth® has been switched off a notification
message [On/Off] appears when you select [Blue-
tooth] from the setup menu screen, or press
.To
switch the Bluetooth® signal on, press
and a follow up screen will appear. Then select [On]
and press
tings menu screen.
Bluetooth® audio streaming main
operation
Turn the ignition switch to the Acc or ON position.
If the audio system was turned off while the Blue-
tooth® audio was playing, pressing the <
> but-
ton will start the Bluetooth® audio streaming.
NAA1203
4-40Display screen, heater and air conditioner, and audio system
Page 149 of 297
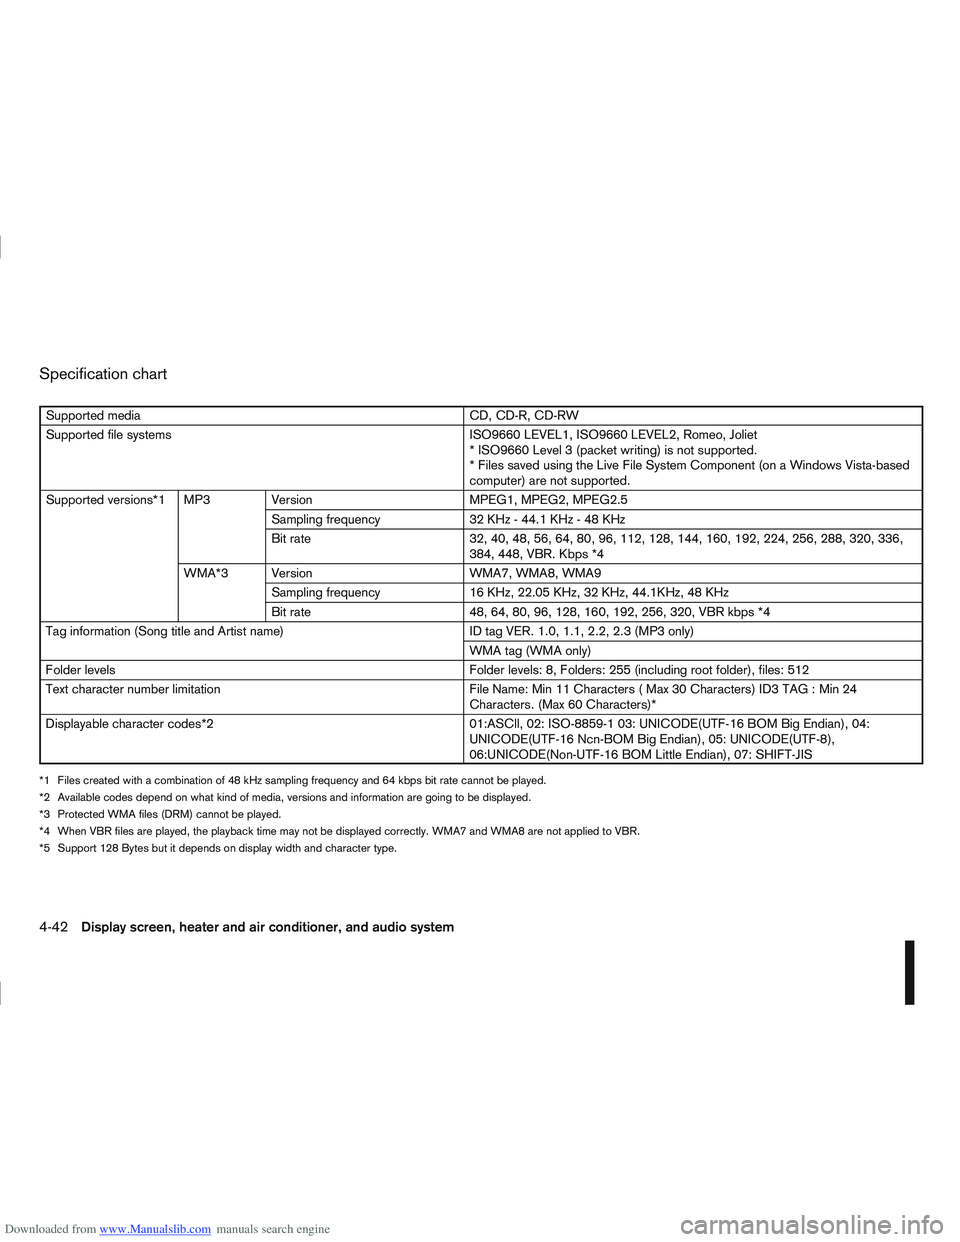
Downloaded from www.Manualslib.com manuals search engine Specification chart
Supported mediaCD, CD-R, CD-RW
Supported file systems ISO9660 LEVEL1, ISO9660 LEVEL2, Romeo, Joliet
* ISO9660 Level 3 (packet writing) is not supported.
* Files saved using the Live File System Component (on a Windows Vista-based
computer) are not supported.
Supported versions*1 MP3 Version MPEG1, MPEG2, MPEG2.5
Sampling frequency 32 KHz - 44.1 KHz - 48 KHz
Bit rate 32, 40, 48, 56, 64, 80, 96, 112, 128, 144, 160, 192, 224, 256, 288, 320, 336,
384, 448, VBR. Kbps *4
WMA*3 Version WMA7, WMA8, WMA9
Sampling frequency 16 KHz, 22.05 KHz, 32 KHz, 44.1KHz, 48 KHz
Bit rate 48, 64, 80, 96, 128, 160, 192, 256, 320, VBR kbps *4
Tag information (Song title and Artist name) ID tag VER. 1.0, 1.1, 2.2, 2.3 (MP3 only)
WMA tag (WMA only)
Folder levels Folder levels: 8, Folders: 255 (including root folder), files: 512
Text character number limitation File Name: Min 11 Characters ( Max 30 Characters) ID3 TAG : Min 24
Characters. (Max 60 Characters)*
Displayable character codes*2 01:ASCll, 02: ISO-8859-1 03: UNICODE(UTF-16 BOM Big Endian), 04:
UNICODE(UTF-16 Ncn-BOM Big Endian), 05: UNICODE(UTF-8),
06:UNICODE(Non-UTF-16 BOM Little Endian), 07: SHIFT-JIS
*1 Files created with a combination of 48 kHz sampling frequency and 64 kbps bit rate cannot be played.
*2 Available codes depend on what kind of media, versions and information are going to be displayed.
*3 Protected WMA files (DRM) cannot be played.
*4 When VBR files are played, the playback time may not be displayed correctly. WMA7 and WMA8 are not applied to VBR.
*5 Support 128 Bytes but it depends on display width and character type.
4-42Display screen, heater and air conditioner, and audio system