CD player NISSAN QASHQAI 2012 Owners Manual
[x] Cancel search | Manufacturer: NISSAN, Model Year: 2012, Model line: QASHQAI, Model: NISSAN QASHQAI 2012Pages: 297, PDF Size: 4.09 MB
Page 108 of 297
Downloaded from www.Manualslib.com manuals search engine 4Display screen, heater and air conditioner,
and audio system
Display screen, heater and air conditioner,
and
audio system
Rear-view monitor (where fitted)............................... 4-2
How to read the displayed lines .......................... 4-2
Rear-view monitor setting.................................... 4-3
Operating tips..................................................... 4-3
Around view monitor (where fitted)........................... 4-4 Operation ........................................................... 4-6
Guide lines ......................................................... 4-7
Difference between predictive and actual
distances ............................................................ 4-9
How to adjust the screen view ............................ 4-11
Operating tips..................................................... 4-11
Vents ....................................................................... 4-12 Side and centre vents ......................................... 4-12
High level vent (where fitted) ............................... 4-12
Heater and air conditioner operation ........................ 4-12 Manual air conditioner......................................... 4-13
Automatic air conditioner (where fitted) ............... 4-18
Audio system ........................................................... 4-21 Audio operation precautions ............................... 4-21
Antenna .............................................................. 4-22
LW-MW-FM radio with CD player or 6 CD
changer ................................................................... 4-23 Anti-theft system ................................................. 4-24
Audio main operation .......................................... 4-24
Radio operation .................................................. 4-24
MENU button...................................................... 4-27 Compact Disc (CD) operation ............................ 4-27
AUX socket ........................................................ 4-29
Bluetooth® mobile phone feature ........................ 4-29
FM AM radio with CD player.................................... 4-30 Anti-theft system ................................................. 4-31
Audio main operation .......................................... 4-31
Radio operation .................................................. 4-32
SETUP button .................................................... 4-33
Compact Disc (CD) operation ............................ 4-35
AUX socket ........................................................ 4-36
USB Memory operation (where fitted) ................. 4-37
iPod® player operation (where fitted) .................. 4-37
Bluetooth® operation.......................................... 4-39
NISSAN Connect (where fitted) ............................... 4-43
Steering wheel switch for audio control (where
fitted) ....................................................................... 4-43 Main operation .................................................... 4-43
Car phone or CB radio ............................................ 4-44
Mobile phone integration for LW-MW-FM radio
with CD player or 6 CD changer (Type A) ................ 4-44 Bluetooth® mobile phone feature ........................ 4-44
Mobile phone integration for FM AM radio with
CD player ................................................................ 4-52 Bluetooth® mobile phone feature ........................ 4-52
Hands-free telephone control .............................. 4-53
Steering wheel switches (where fitted) ................ 4-55
Page 128 of 297
Downloaded from www.Manualslib.com manuals search engine After parking in the sun, drive for two or three
minutes with the windows open to vent hot air
from the passenger compartment. Then, close
the windows. This will allow the acceleration of
the air conditioner’s cooling operation.
Keep windows closed while the air conditioner is
operating.
The air conditioning system should be operated
for about 10 minutes, at least once a month. This
helps prevent damage to the system due to lack
of lubrication.
If the coolant temperature gauge exceeds the
“HOT” position, turn the air conditioner off. For
additional information, see “Engine overheat” in
the “6. In case of emergency” section.
If the engine coolant reaches an extremely high
temperature, the air conditioning system will au-
tomatically turn off. This may happen for example
if the engine runs at idle speed for a long time on
a hot day.
Air conditioner filter
The air conditioning system is equipped with a filter
which collects dirt, pollen, dust, etc. To make sure
the air conditioner heats, defogs, and ventilates effi-
ciently, replace the filter regularly. To replace the fil-
ter, contact a NISSAN dealer or qualified workshop.
The filter should be replaced if the airflow is ex-
tremely reduced or when the windows fog up
easily while operating the heater or air condition-
ing system.
Servicing air conditioner
The air conditioning system in your NISSAN vehicle
is charged with an environmentally friendly refriger-
ant.
NISSAN GREEN PROGRAM
This refrigerant will not harm the earth’s ozone
layer.
Special charging equipment and lubricant are re-
quired when servicing the NISSAN air conditioner.
Using improper refrigerants or lubricants will cause
severe damage to the air conditioning system. See
“Air conditioning system refrigerant and lubricant
recommendations (where fitted)” in the “9. Techni-
cal information” section.
A NISSAN dealer or qualified workshop will be able
to service the air conditioning system.
WARNING
Do not adjust the audio system while driving.
The audio system operates when the ignition switch
is in the Acc or ON position. If you want to listen to
the radio or CD while the engine is not running, turn
the ignition switch to the Acc position. Do not use
for an extended period of time with the engine
stopped.
AUDIO OPERATION PRECAUTIONS
NOTE
Models with NISSAN Connect system, see the
audio operation precautions in the separately
provided NISSAN Connect Owner’s Manual.
Radio
Radio reception is affected by station signal
strength, distance from radio transmitter, build-
ings, bridges, mountains and other external influ-
ences. Intermittent changes in reception quality
are normally caused by these external influences.
Using a mobile phone in or near the vehicle may
influence radio reception quality.
Use the antenna for the best reception.
Compact Disc (CD) player
During cold weather or rainy days, the player
may malfunction due to the humidity. If this
occurs, remove the CD and dehumidify or
ventilate the player completely.
AUDIO SYSTEM
Display screen, heater and air conditioner, and audio system4-21
Page 129 of 297
Downloaded from www.Manualslib.com manuals search engine The player may skip while driving on rough
roads.
Occasionally, the CD player may not function
when the compartment temperature is ex-
tremely high. Decrease the temperature be-
fore use.
Do not expose the CD to direct sunlight.
CDs that are of poor quality, dirty, scratched,
covered with finger prints, or that have pin
holes may not work properly.
The following CDs may not work properly.
Copy control compact discs (CCCD)
Recordable compact discs (CD-R)
Rewritable compact discs (CD-RW)
Do not use the following CDs as they may
cause the CD player to malfunction.
8 cm (3.1 in) discs with an adaptor
CDs that are not round
CDs with a paper label
ANTENNA
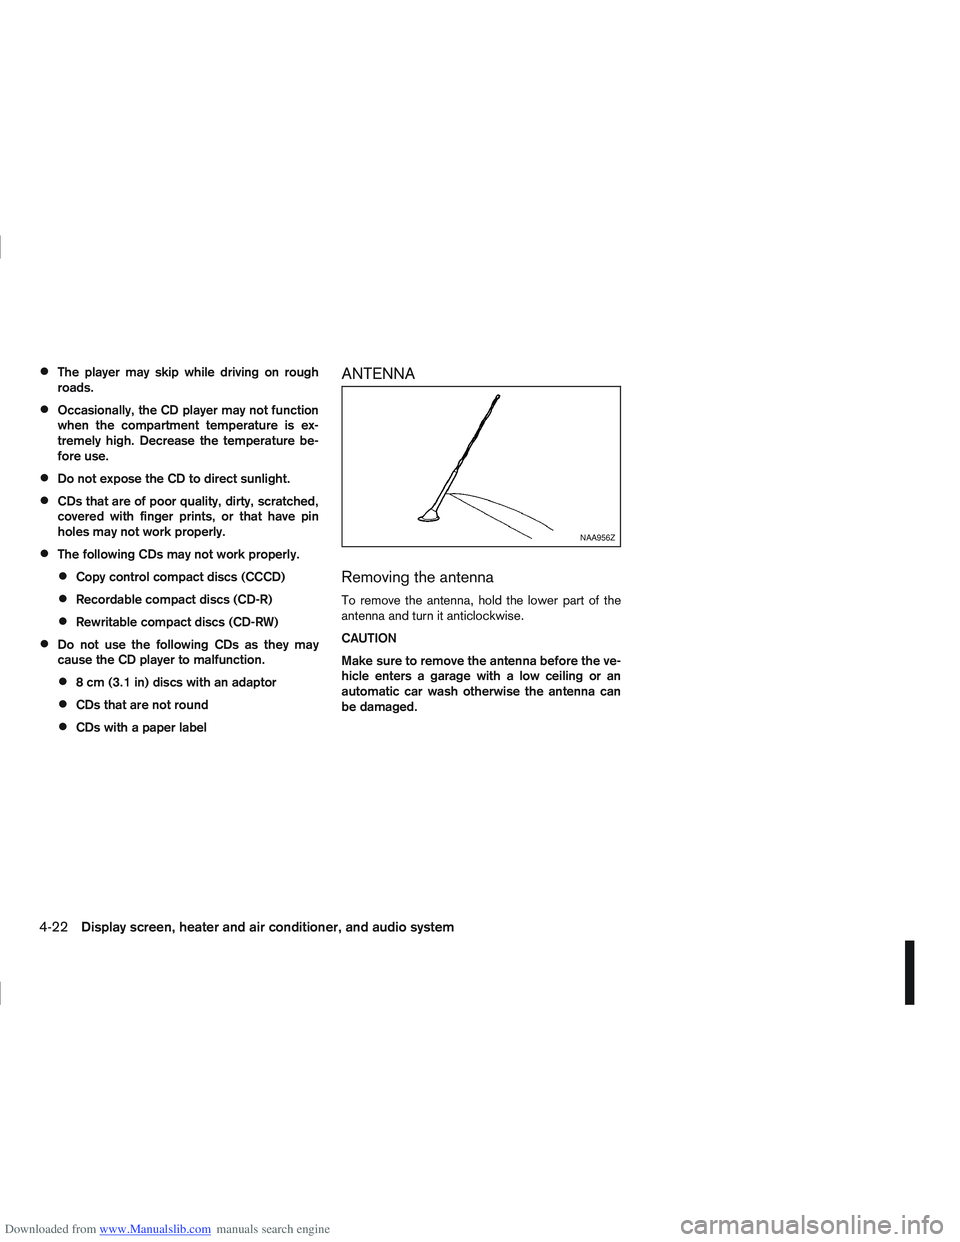
Removing the antenna
To remove the antenna, hold the lower part of the
antenna and turn it anticlockwise.
CAUTION
Make sure to remove the antenna before the ve-
hicle enters a garage with a low ceiling or an
automatic car wash otherwise the antenna can
be damaged.
NAA956Z
4-22Display screen, heater and air conditioner, and audio system
Page 130 of 297
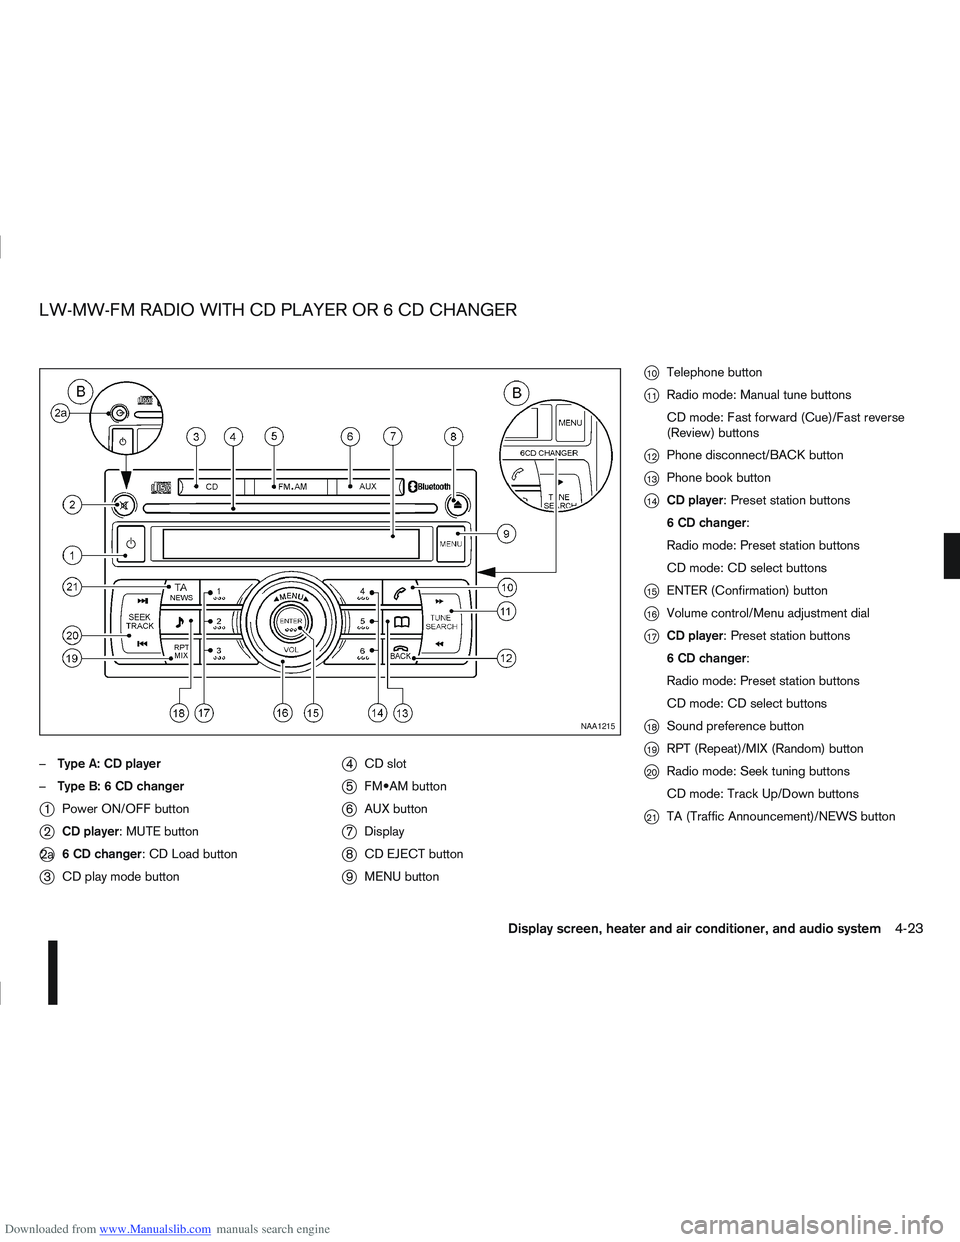
Downloaded from www.Manualslib.com manuals search engine –Type A: CD player
– Type B: 6 CD changer
j1 Power ON/OFF button
j2CD player: MUTE button
j2a 6 CD changer: CD Load button
j3CD play mode button
j4CD slot
j5 button
j6AUX button
j7Display
j8CD EJECT button
j9MENU button
j10Telephone button
j11Radio mode: Manual tune buttons
CD mode: Fast forward (Cue)/Fast reverse
(Review) buttons
j12Phone disconnect/BACK button
j13Phone book button
j14CD player: Preset station buttons
6 CD changer:
Radio mode: Preset station buttons
CD mode: CD select buttons
j15ENTER (Confirmation) button
j16Volume control/Menu adjustment dial
j17CD player: Preset station buttons
6 CD changer:
Radio mode: Preset station buttons
CD mode: CD select buttons
j18Sound preference button
j19RPT (Repeat)/MIX (Random) button
j20Radio mode: Seek tuning buttons
CD mode: Track Up/Down buttons
j21TA (Traffic Announcement)/NEWS button
NAA1215
LW-MW-FM RADIO WITH CD PLAYER OR 6 CD CHANGER
Display screen, heater and air conditioner, and audio system4-23
Page 134 of 297
Downloaded from www.Manualslib.com manuals search engine When the
during a NEWS interruption, the NEWS standby
mode remains active.
However, if the button is pressed and
the radio wave band changes to the MW or LW,
then the NEWS standby mode will be switched
off.
MENU BUTTON
To configure Alternative Frequency (AF), Regional
(REG) and Language settings, perform the follow-
ing procedure:
1) Press and hold the
Page 135 of 297
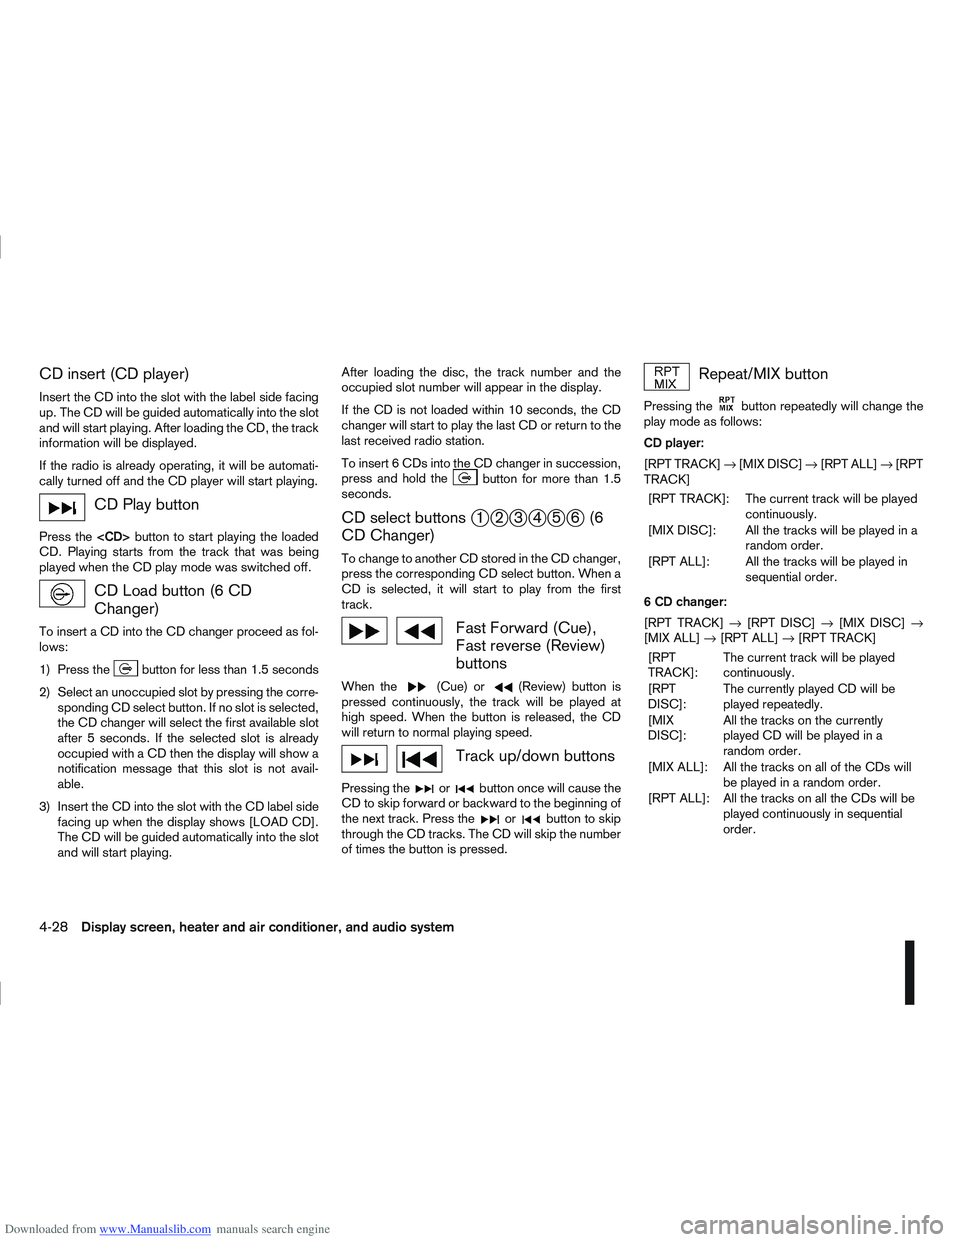
Downloaded from www.Manualslib.com manuals search engine CD insert (CD player)
Insert the CD into the slot with the label side facing
up. The CD will be guided automatically into the slot
and will start playing. After loading the CD, the track
information will be displayed.
If the radio is already operating, it will be automati-
cally turned off and the CD player will start playing.
CD Play button
Press the
CD. Playing starts from the track that was being
played when the CD play mode was switched off.
CD Load button (6 CD
Changer)
To insert a CD into the CD changer proceed as fol-
lows:
1) Press the
button for less than 1.5 seconds
2) Select an unoccupied slot by pressing the corre- sponding CD select button. If no slot is selected,
the CD changer will select the first available slot
after 5 seconds. If the selected slot is already
occupied with a CD then the display will show a
notification message that this slot is not avail-
able.
3) Insert the CD into the slot with the CD label side facing up when the display shows [LOAD CD].
The CD will be guided automatically into the slot
and will start playing. After loading the disc, the track number and the
occupied slot number will appear in the display.
If the CD is not loaded within 10 seconds, the CD
changer will start to play the last CD or return to the
last received radio station.
To insert 6 CDs into the CD changer in succession,
press and hold the
button for more than 1.5
seconds.
CD select buttonsj1j2j3j4j5j6(6
CD Changer)
To change to another CD stored in the CD changer,
press the corresponding CD select button. When a
CD is selected, it will start to play from the first
track.
Fast Forward (Cue),
Fast reverse (Review)
buttons
When the(Cue) or(Review) button is
pressed continuously, the track will be played at
high speed. When the button is released, the CD
will return to normal playing speed.
Track up/down buttons
Pressing theorbutton once will cause the
CD to skip forward or backward to the beginning of
the next track. Press the
orbutton to skip
through the CD tracks. The CD will skip the number
of times the button is pressed.
Repeat/MIX button
Pressing thebutton repeatedly will change the
play mode as follows:
CD player:
[RPT TRACK] →[MIX DISC] →[RPT ALL] →[RPT
TRACK]
[RPT TRACK]: The current track will be played continuously.
[MIX DISC]: All the tracks will be played in a random order.
[RPT ALL]: All the tracks will be played in sequential order.
6 CD changer:
[RPT TRACK] →[RPT DISC] →[MIX DISC] →
[MIX ALL] →[RPT ALL] →[RPT TRACK]
[RPT
TRACK]: The current track will be played
continuously.
[RPT
DISC]: The currently played CD will be
played repeatedly.
[MIX
DISC]: All the tracks on the currently
played CD will be played in a
random order.
[MIX ALL]: All the tracks on all of the CDs will be played in a random order.
[RPT ALL]: All the tracks on all the CDs will be played continuously in sequential
order.
4-28Display screen, heater and air conditioner, and audio system
Page 136 of 297
Downloaded from www.Manualslib.com manuals search engine CD eject button
CD player:
Press the eject (
) button and the CD will be
ejected.
6 CD changer:
1. A CD can be ejected by:
Pressing the eject () button (the currently
played CD will be ejected).
Pressing a CD select button followed by the
eject () button.
Pressing the eject () button followed by a
CD select button.
2. After pressing the eject (
) button, a notifica-
tion message appears in the display.
3. When the CD slot door opens, the CD is ejected and the CD can now be removed.
4. If necessary, insert another CD into the respec- tive CD slot or wait to let the system close the
CD slot door.
To eject all the discs sequentially, press and hold
the eject (
) button for longer than 1.5 seconds.
The CD changer will start to eject from the current
or last used CD. After removing an ejected CD, the
next CD will be ejected. Ejecting CD (with ignition switch in “OFF” or
LOCK):
When the ignition switch is in the “OFF” or LOCK
position it is possible to eject the currently played
CD. However the audio unit will not be activated.
CD player:
Press the eject (
) button and the CD will be
ejected.
6 CD changer:
Press the eject () button less than 1.5 sec-
onds and the CD will be ejected.
To eject all CD’s in sequential order, keep the
eject () button pressed for longer than 1.5
seconds. The CD changer starts to eject from
the current or last used CD onwards. After re-
moving an ejected CD, the next one comes out.
NOTE
When the CD is ejected and not removed
within 15 seconds, it will automatically retract
into the slot to protect it from damage.
If an error message appears in the display,
press the eject () button to eject the faulty
CD and insert another CD or check if the
ejected CD is inserted upside down.
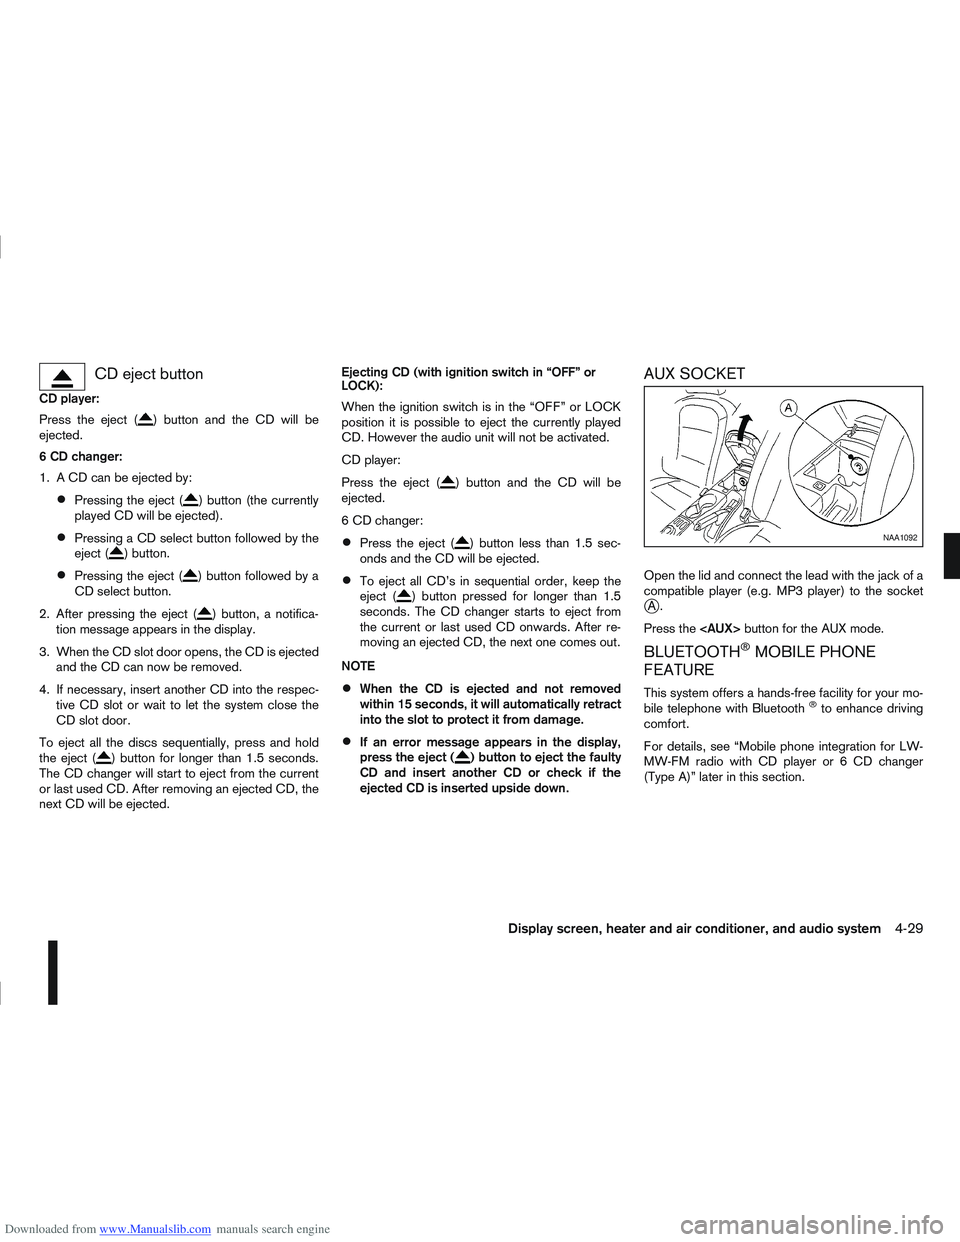
AUX SOCKET
Open the lid and connect the lead with the jack of a
compatible player (e.g. MP3 player) to the socket
jA.
Press the
BLUETOOTH®MOBILE PHONE
FEATURE
This system offers a hands-free facility for your mo-
bile telephone with Bluetooth®to enhance driving
comfort.
For details, see “Mobile phone integration for LW-
MW-FM radio with CD player or 6 CD changer
(Type A)” later in this section.
NAA1092
Display screen, heater and air conditioner, and audio system4-29
Page 137 of 297
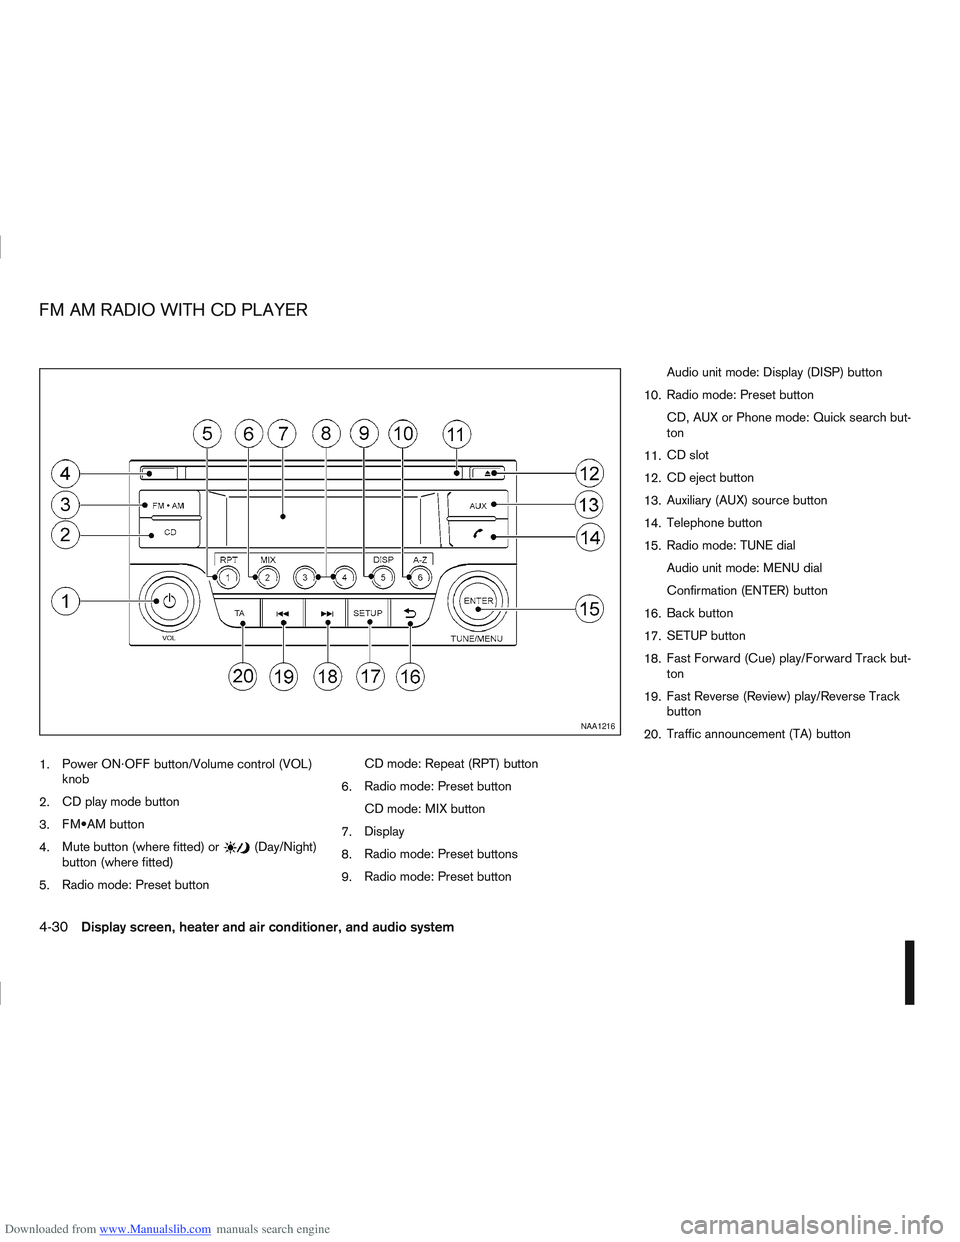
Downloaded from www.Manualslib.com manuals search engine 1.Power ON·OFF button/Volume control (VOL)
knob
2. CD play mode button
3. button
4. Mute button (where fitted) or
(Day/Night)
button (where fitted)
5. Radio mode: Preset button CD mode: Repeat (RPT) button
6. Radio mode: Preset button
CD mode: MIX button
7. Display
8. Radio mode: Preset buttons
9. Radio mode: Preset button Audio unit mode: Display (DISP) button
10. Radio mode: Preset button
CD, AUX or Phone mode: Quick search but-
ton
11. CD slot
12. CD eject button
13. Auxiliary (AUX) source button
14. Telephone button
15. Radio mode: TUNE dial
Audio unit mode: MENU dial
Confirmation (ENTER) button
16. Back button
17. SETUP button
18. Fast Forward (Cue) play/Forward Track but-
ton
19. Fast Reverse (Review) play/Reverse Track
button
20. Traffic announcement (TA) button
NAA1216
FM AM RADIO WITH CD PLAYER
4-30Display screen, heater and air conditioner, and audio system
Page 142 of 297
![NISSAN QASHQAI 2012 Owners Manual Downloaded from www.Manualslib.com manuals search engine [Russian]
Scroll direction
Sets the scroll direction of the<TUNE/MENU>dial.
For example, to change the way in which you turn
the dial (anticloc NISSAN QASHQAI 2012 Owners Manual Downloaded from www.Manualslib.com manuals search engine [Russian]
Scroll direction
Sets the scroll direction of the<TUNE/MENU>dial.
For example, to change the way in which you turn
the dial (anticloc](/img/5/56764/w960_56764-141.png)
Downloaded from www.Manualslib.com manuals search engine [Russian]
Scroll direction
Sets the scroll direction of the
For example, to change the way in which you turn
the dial (anticlockwise or clockwise) in order to scroll
up or down a list.
COMPACT DISC (CD) OPERATION
The CD player can play a music CD or an encoded
MP3/WMA CD and while listening to those CD’s
certain text might be able to be displayed (when CD
encoded with text is being used).
Press the
start to play.
When
mode is already operating, it will automatically turn
off the playing source and the CD play mode will
start.
However, if the CD disc is not loaded, then a notifi-
cation message will be displayed and the audio unit
remains in radio or AUX source mode.
CAUTION
Do not force the CD into the slot. This could
damage the player.
Do not use 8 cm (3.1 in) discs.
CD insert (CD player)
Insert the CD disc into the slot with the label side
facing up. The disc will be guided automatically into
the slot and will start playing. After loading the disc,
track information will be displayed.
NOTE
The CD player accepts normal audio CD or
CD recorded with MP3/WMA files.
Inserting a CD recorded with MP3/WMA files,
the audio unit will automatically detect and
[MP3CD] will be indicated.
An error notification message will be
displayed when inserting a wrong disc type
(e.g. DVD), or the player cannot read the CD
disc. Eject the disc and insert another disc.
CD button
Press the
CD. Playing starts from the track that was being
played when the CD play mode was switched off.
Audio main operation
List view:
While the track is being played, press either the
button to display the available
tracks in a listed view mode. To select a track from
the list, or a track to start listening from, turn the
In the list view mode, quick search can be per-
formed to find a track from the list.
Push the
j6 button then turn the
of the track title then press
a list of the available tracks will be displayed. Select,
and press
Fast Forward (Cue), Fast
Reverse (Review) buttons:
When the
(Cue) or(Review) button is
pressed continuously, the track will be played at
high speed. When the button is released, the track
will be played at normal playing speed.
Track up/down buttons:
Pressing the
orbutton once, the track will
be skipped forward to the next track or backward to
the beginning of the current played track. Press the
orbutton more than once to skip through
the tracks.
Folder browsing:
If the recorded media contains folders with music
files, pressing the
orbutton will play in
sequence the tracks of each folder.
To select a preferred folder:
1. Press the
button and a list of
tracks in the current folder is displayed.
2. Press the
button.
Display screen, heater and air conditioner, and audio system4-35
Page 143 of 297
Downloaded from www.Manualslib.com manuals search engine 3. Turn the
folder.
4. Press
turn the
If the current selected folder contains sub folders,
press
folders will be displayed. Turn the
dial for the sub folder then press
lect. Select the [Root] folder item when songs are
recorded additionally in the root folder.
To return to the previous folder screen, press
.
Repeat button:
Push the
j1 button and the current track will
be played continuously.
button:
Push the
j2 button and all the tracks will be
played in a random order.
mbutton:
While a CD with recorded music information tags
(CD-text/ID3–text tags) is being played, the title of
the played track is displayed. If the title information
is not provided then [Track] is displayed.
When the
j5 button is pressed repeatedly,
further information about the track can be displayed
along with the track title as follows:
CD: Track time
→Artist name→ Track title→Album
title→ Track time
CD with MP3/WMA:
Track time →Artist name→ Album title→Folder
name →Track time
Track details:
A long press on the
j5 button will turn the dis-
play into a detailed overview and after a few sec-
onds it returns to the main display, or press
j5
briefly.
CD eject button
CD player:
Press the
(eject) button and the CD will be
ejected.
Ejecting CD (with ignition switch in “OFF” or
LOCK):
When the ignition switch is in the “OFF” or LOCK
position it is possible to eject the currently played
CD. However the audio unit will not be activated.
Press the
button and the CD will be ejected.
NOTE
When the CD is ejected and not removed
within 8 seconds, it will automatically retract
into the slot to protect it from damage.
If an error message appears in the display,
pressto eject the faulty CD and insert an-
other CD or check if the ejected CD is in-
serted upside down.
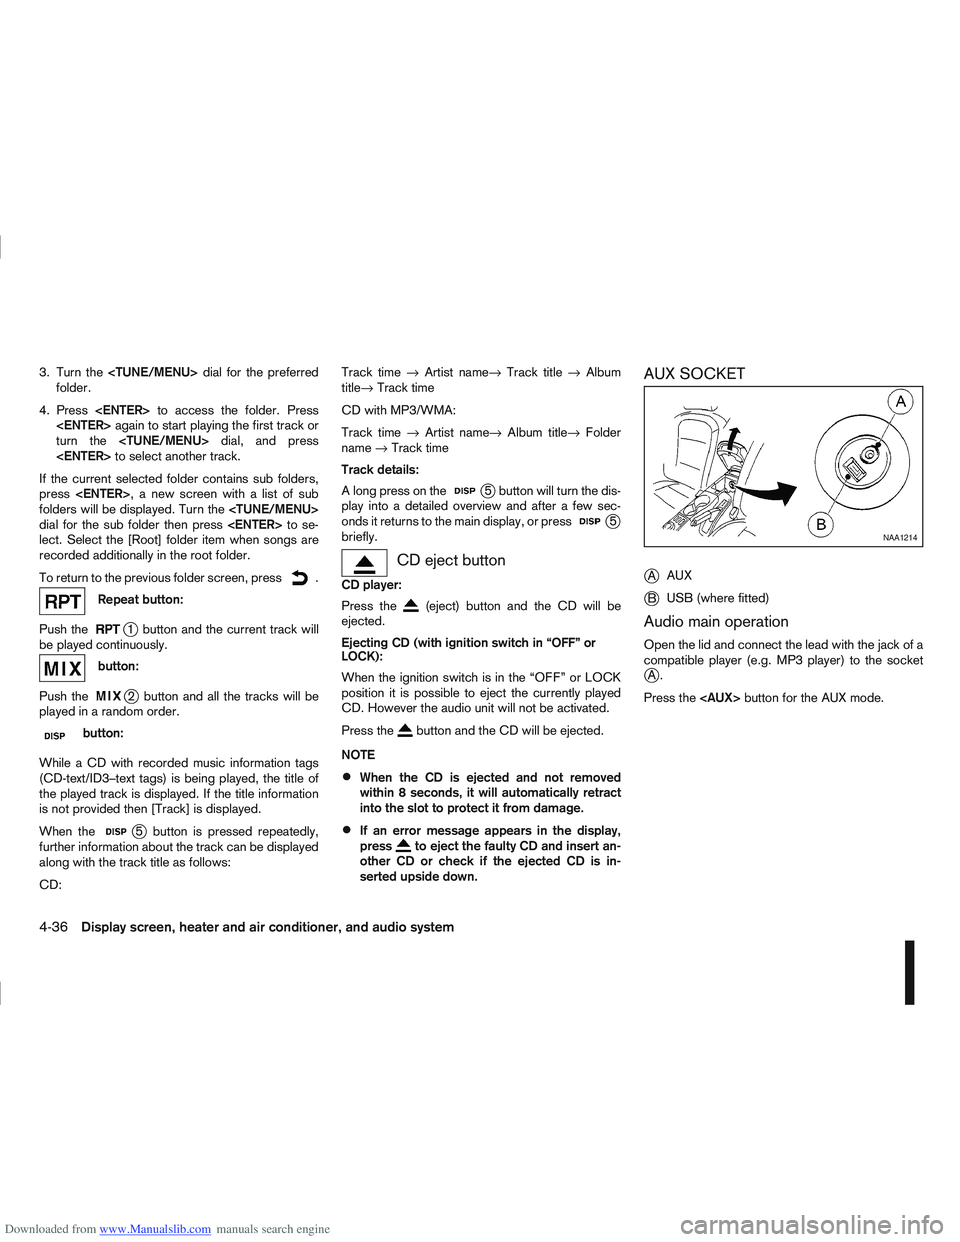
AUX SOCKET
j
A AUX
jB USB (where fitted)
Audio main operation
Open the lid and connect the lead with the jack of a
compatible player (e.g. MP3 player) to the socket
jA.
Press the
NAA1214
4-36Display screen, heater and air conditioner, and audio system