Speed monitor NISSAN QASHQAI 2013 Owners Manual
[x] Cancel search | Manufacturer: NISSAN, Model Year: 2013, Model line: QASHQAI, Model: NISSAN QASHQAI 2013Pages: 297, PDF Size: 4.09 MB
Page 10 of 297
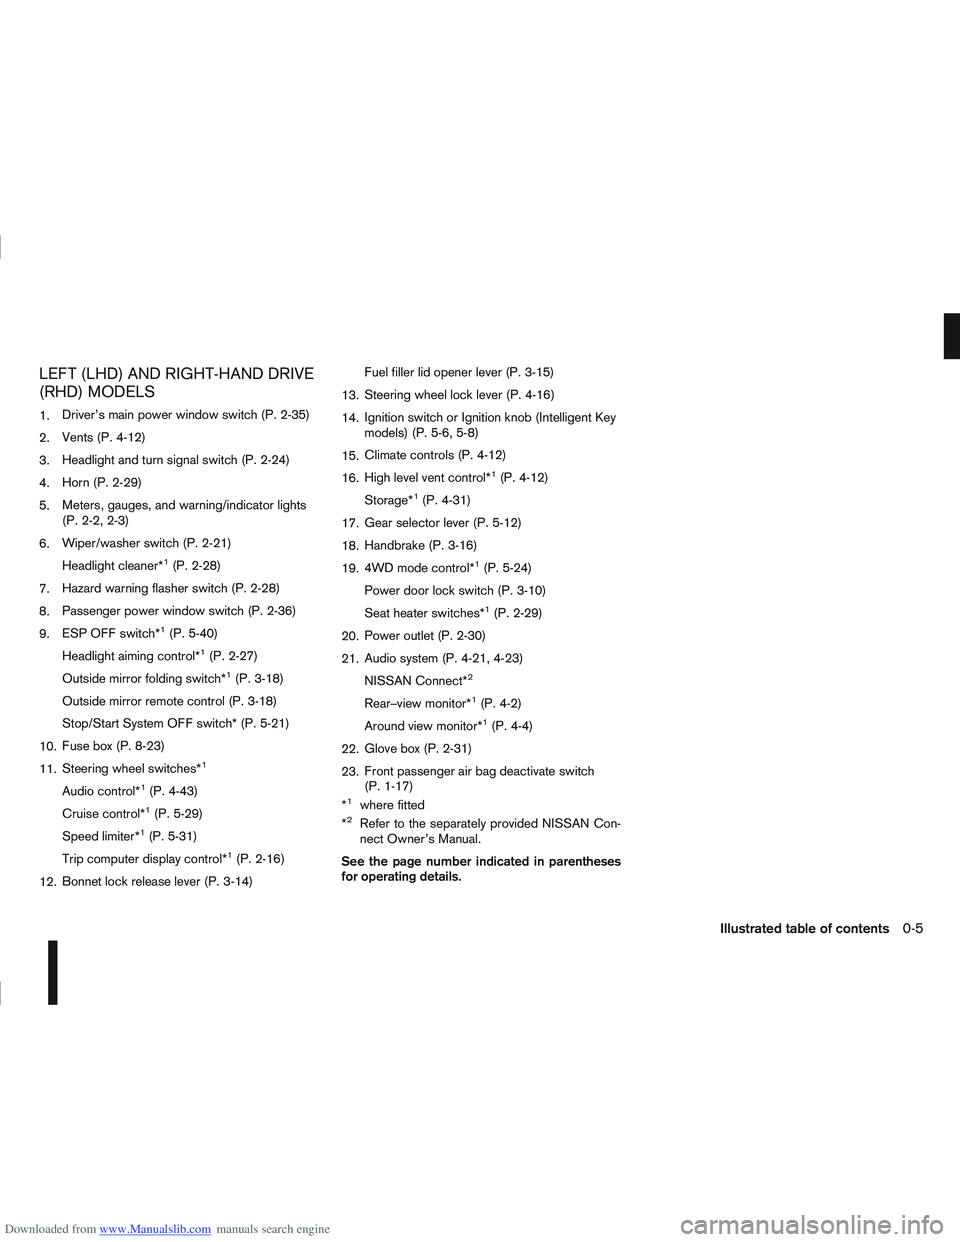
Downloaded from www.Manualslib.com manuals search engine LEFT (LHD) AND RIGHT-HAND DRIVE
(RHD) MODELS
1.Driver’s main power window switch (P. 2-35)
2. Vents (P. 4-12)
3. Headlight and turn signal switch (P. 2-24)
4. Horn (P. 2-29)
5. Meters, gauges, and warning/indicator lights
(P. 2-2, 2-3)
6. Wiper/washer switch (P. 2-21)
Headlight cleaner*
1(P. 2-28)
7. Hazard warning flasher switch (P. 2-28)
8. Passenger power window switch (P. 2-36)
9. ESP OFF switch*
1(P. 5-40)
Headlight aiming control*
1(P. 2-27)
Outside mirror folding switch*
1(P. 3-18)
Outside mirror remote control (P. 3-18)
Stop/Start System OFF switch* (P. 5-21)
10. Fuse box (P. 8-23)
11. Steering wheel switches*
1
Audio control*1(P. 4-43)
Cruise control*
1(P. 5-29)
Speed limiter*
1(P. 5-31)
Trip computer display control*
1(P. 2-16)
12. Bonnet lock release lever (P. 3-14) Fuel filler lid opener lever (P. 3-15)
13. Steering wheel lock lever (P. 4-16)
14. Ignition switch or Ignition knob (Intelligent Key
models) (P. 5-6, 5-8)
15. Climate controls (P. 4-12)
16. High level vent control*
1(P. 4-12)
Storage*
1(P. 4-31)
17. Gear selector lever (P. 5-12)
18. Handbrake (P. 3-16)
19. 4WD mode control*
1(P. 5-24)
Power door lock switch (P. 3-10)
Seat heater switches*
1(P. 2-29)
20. Power outlet (P. 2-30)
21. Audio system (P. 4-21, 4-23)
NISSAN Connect*
2
Rear–view monitor*1(P. 4-2)
Around view monitor*
1(P. 4-4)
22. Glove box (P. 2-31)
23. Front passenger air bag deactivate switch
(P. 1-17)
*
1where fitted
*2Refer to the separately provided NISSAN Con-
nect Owner’s Manual.
See the page number indicated in parentheses
for operating details.
Illustrated table of contents0-5
Page 25 of 297
Downloaded from www.Manualslib.com manuals search engine ACTIVE HEAD RESTRAINTS (front
seats)
WARNING
Always adjust the head restraints properly as
specified in the previous section. Failure to do
so can reduce the effectiveness of the active
head restraint.
Active head restraints are designed to supple-
ment other safety systems. Always wear seat
belts. No system can prevent all injuries in an
accident.
Do not attach anything to the head restraint
stalks. Doing so could impair the active head
restraint’s function.
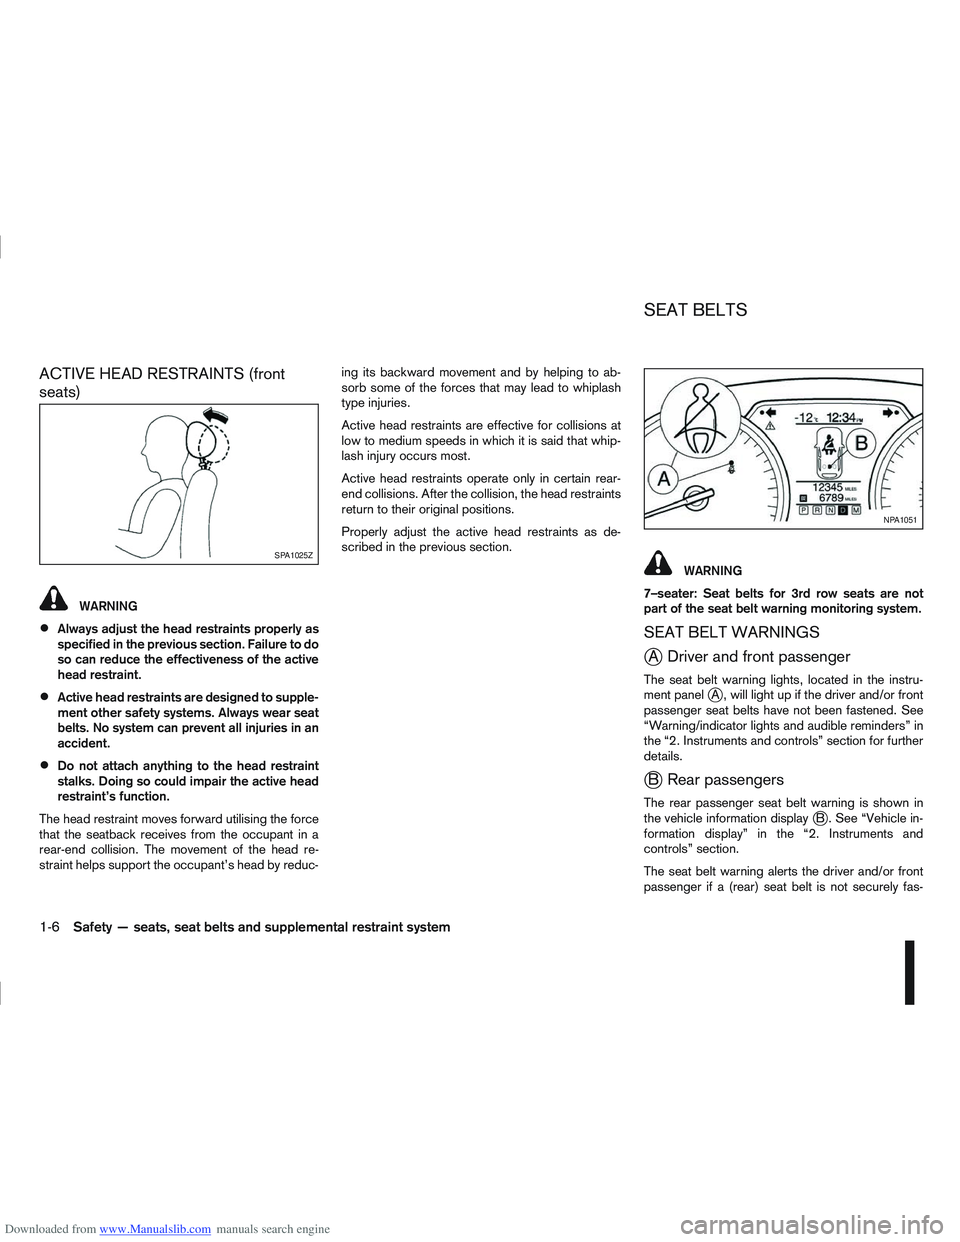
The head restraint moves forward utilising the force
that the seatback receives from the occupant in a
rear-end collision. The movement of the head re-
straint helps support the occupant’s head by reduc- ing its backward movement and by helping to ab-
sorb some of the forces that may lead to whiplash
type injuries.
Active head restraints are effective for collisions at
low to medium speeds in which it is said that whip-
lash injury occurs most.
Active head restraints operate only in certain rear-
end collisions. After the collision, the head restraints
return to their original positions.
Properly adjust the active head restraints as de-
scribed in the previous section.
WARNING
7–seater: Seat belts for 3rd row seats are not
part of the seat belt warning monitoring system.
SEAT BELT WARNINGS
jA Driver and front passenger
The seat belt warning lights, located in the instru-
ment paneljA , will light up if the driver and/or front
passenger seat belts have not been fastened. See
“Warning/indicator lights and audible reminders” in
the “2. Instruments and controls” section for further
details.
jB Rear passengers
The rear passenger seat belt warning is shown in
the vehicle information displayjB . See “Vehicle in-
formation display” in the “2. Instruments and
controls” section.
The seat belt warning alerts the driver and/or front
passenger if a (rear) seat belt is not securely fas-
SPA1025Z
NPA1051
SEAT BELTS
1-6Safety — seats, seat belts and supplemental restraint system
Page 115 of 297
Downloaded from www.Manualslib.com manuals search engine Yellow linej2 :approx.1m(3ft)
Green linej3 :approx.2m(7ft)
Green linej4 :approx.3m(10ft)
Vehicle width guide lines
j5:
Indicate the vehicle width when reversing.
Predictive course lines
j6:
Indicate the predictive course when operating the
vehicle. The predictive course lines will be displayed
on the monitor when the steering wheel is turned.
The predictive course lines will move depending on
how much the steering wheel is turned and will not
be displayed while the steering wheel is in the neu-
tral position.
The front view will not be displayed when the vehicle
speed is above 10 km/h (6 MPH).
WARNING
The distance between objects viewed in the
rear view differs from actual distance because
a wide-angle lens is used. Objects in the rear
view will appear visually opposite than when
viewed in the rear view and outside mirrors.
On a snow-covered or slippery road, there
may be a difference between the predictive
course line and the actual course line.
If the battery is disconnected or becomes dis-
charged, the predictive course lines may be
displayed incorrectly. If this occurs visit a
NISSAN dealer or qualified workshop.
If predictive course lines are displayed incor-
rectly visit a NISSAN dealer or qualified work-
shop.
The displayed lines on the rear view will ap-
pear slightly off to the right because the rear
view camera is not installed in the rear centre
of the vehicle.
NOTE
When the monitor displays the front view and the
steering wheel turns about 90 degrees or less
from the neutral position, both the right and left
predictive course lines
j6 are displayed. When
the steering wheel turns about 90 degrees or
more, a line is displayed only on the opposite
side of the turn.
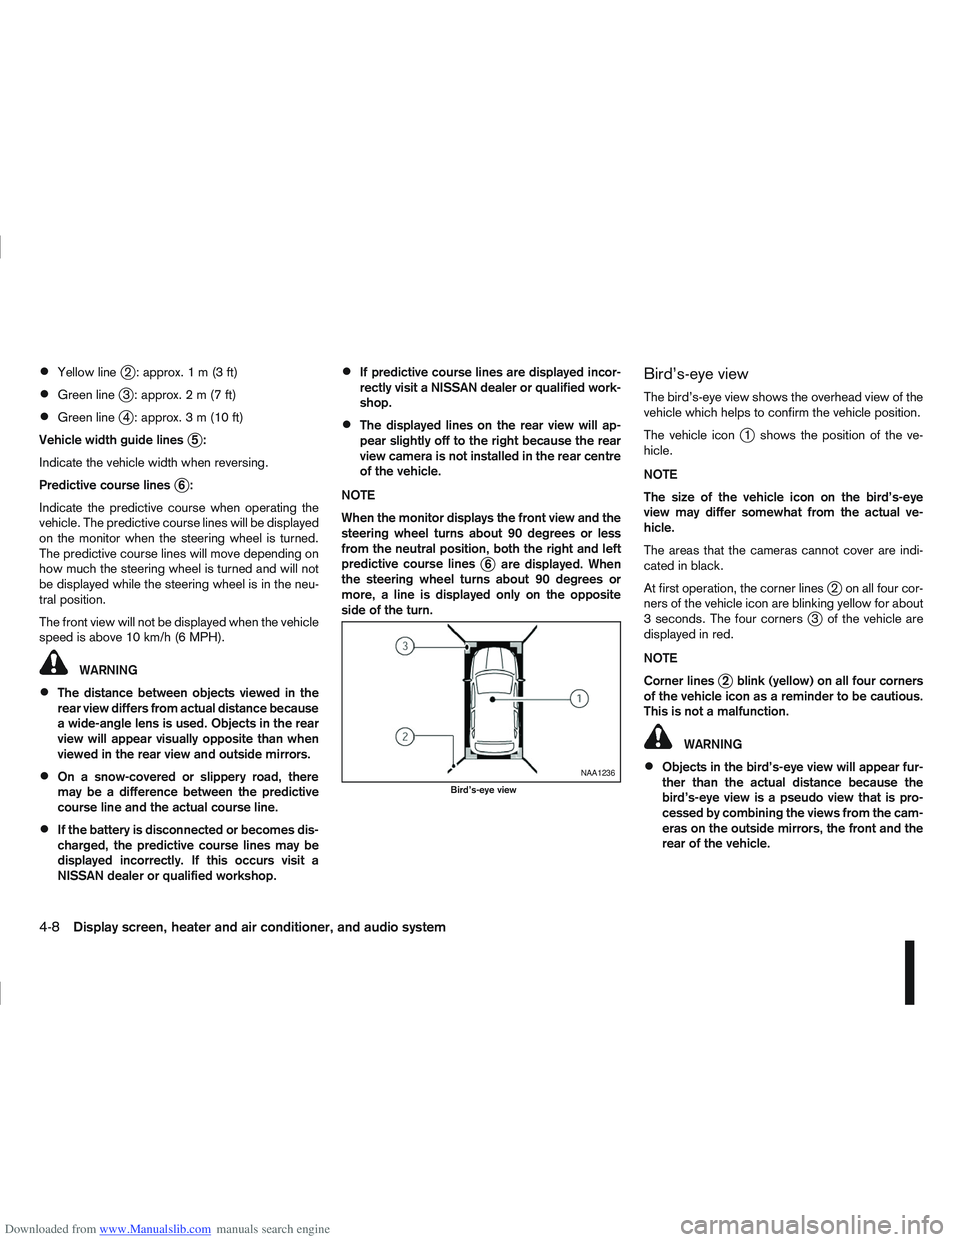
Bird’s-eye view
The bird’s-eye view shows the overhead view of the
vehicle which helps to confirm the vehicle position.
The vehicle icon
j1 shows the position of the ve-
hicle.
NOTE
The size of the vehicle icon on the bird’s-eye
view may differ somewhat from the actual ve-
hicle.
The areas that the cameras cannot cover are indi-
cated in black.
At first operation, the corner lines
j2 on all four cor-
ners of the vehicle icon are blinking yellow for about
3 seconds. The four corners
j3 of the vehicle are
displayed in red.
NOTE
Corner lines
j2 blink (yellow) on all four corners
of the vehicle icon as a reminder to be cautious.
This is not a malfunction.
WARNING
Objects in the bird’s-eye view will appear fur-
ther than the actual distance because the
bird’s-eye view is a pseudo view that is pro-
cessed by combining the views from the cam-
eras on the outside mirrors, the front and the
rear of the vehicle.NAA1236
Bird’s-eye view
4-8Display screen, heater and air conditioner, and audio system
Page 176 of 297
Downloaded from www.Manualslib.com manuals search engine To ensure smooth gear changes, fully depress the
clutch pedal before operating the gear lever. If the
clutch pedal is not fully depressed before the trans-
mission is shifted, a gear noise may be heard. This
could result in damage to the transmission.
Start the vehicle in 1st gear and shift through the
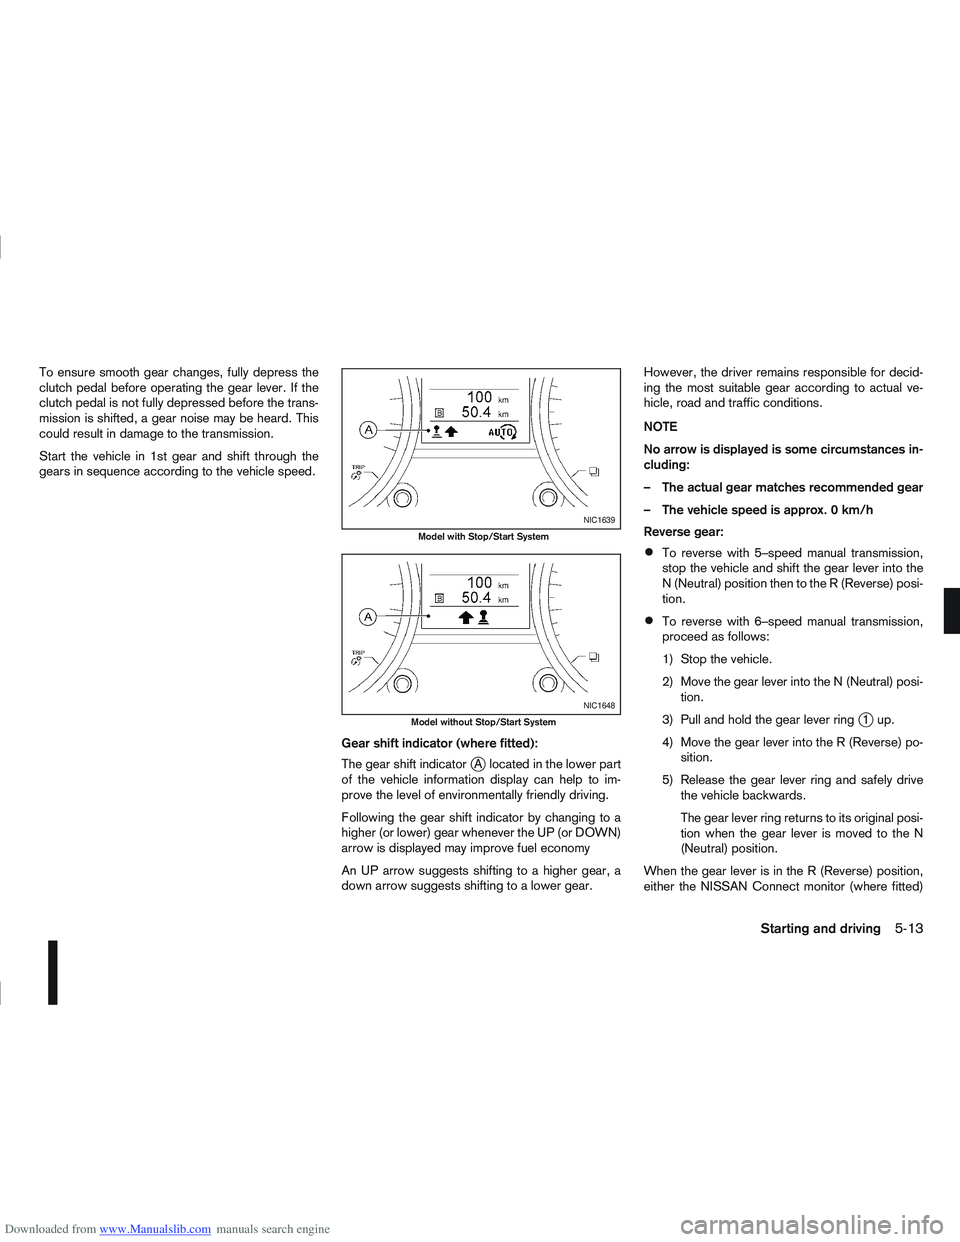
gears in sequence according to the vehicle speed.Gear shift indicator (where fitted):
The gear shift indicator
jA located in the lower part
of the vehicle information display can help to im-
prove the level of environmentally friendly driving.
Following the gear shift indicator by changing to a
higher (or lower) gear whenever the UP (or DOWN)
arrow is displayed may improve fuel economy
An UP arrow suggests shifting to a higher gear, a
down arrow suggests shifting to a lower gear. However, the driver remains responsible for decid-
ing the most suitable gear according to actual ve-
hicle, road and traffic conditions.
NOTE
No arrow is displayed is some circumstances in-
cluding:
– The actual gear matches recommended gear
– The vehicle speed is approx. 0 km/h
Reverse gear:
To reverse with 5–speed manual transmission,
stop the vehicle and shift the gear lever into the
N (Neutral) position then to the R (Reverse) posi-
tion.
To reverse with 6–speed manual transmission,
proceed as follows:
1) Stop the vehicle.
2) Move the gear lever into the N (Neutral) posi-
tion.
3) Pull and hold the gear lever ring
j1up.
4) Move the gear lever into the R (Reverse) po- sition.
5) Release the gear lever ring and safely drive the vehicle backwards.
The gear lever ring returns to its original posi-
tion when the gear lever is moved to the N
(Neutral) position.
When the gear lever is in the R (Reverse) position,
either the NISSAN Connect monitor (where fitted)
NIC1639
Model with Stop/Start System
NIC1648
Model without Stop/Start System
Starting and driving5-13
Page 177 of 297
Downloaded from www.Manualslib.com manuals search engine or the ultra sonic parking sensor (where fitted) will
be activated. For details, see “Rear-view monitor
(where fitted)” in the “4. Display screen, heater and
air conditioner, and audio system” section, “Around
view monitor (where fitted)” in the “4. Display
screen, heater and air conditioner, and audio
system” section or “Ultrasonic Parking Sensor
(where fitted)” later in this section.
If it is difficult to move the gear lever into R (Re-
verse) or 1st. Shift into N (Neutral), then release the
clutch pedal. Fully depress the clutch pedal again
and shift into R (Reverse) or 1st.
DRIVING WITH AUTOMATIC
TRANSMISSION OR WITH
CONTINUOUSLY VARIABLE
TRANSMISSION (Models with manual
shift)
CAUTION
The cold engine idle speed is high, so use
caution when shifting into a forward or re-
verse gear before the engine has warmed up.
Avoid revving up the engine while the vehicle
is stopped. This could cause unexpected ve-
hicle movement.
Driving precautions
Never shift to P (Park) or R (Reverse) while
the vehicle is moving, this could result in dam-
age to the transmission.
Start the engine in the P (Park) or N (Neutral)
position. The engine will not start in any otherselector position. If it does, have your vehicle
checked by a NISSAN dealer or qualified
workshop.
Do not depress the accelerator pedal while
shifting from P (Park) or N (Neutral) to R (Re-
verse), D (Drive) or Manual shift modes posi-
tion. Always depress the brake pedal until
shifting is completed.
On an uphill grade, do not hold the vehicle by
depressing the accelerator pedal. The foot-
brake should be used for this purpose, in or-
der to hold the vehicle in place and to prevent
overheating of the transmission.
Shift into the N (Neutral) position and apply
the handbrake when at a standstill for longer
than a short waiting period.
Keep the engine at idling speed while shifting
from the N (Neutral) position to any driving
position.
CAUTION (when starting the vehicle):
DEPRESS THE FOOTBRAKE PEDAL
When the engine is running, shifting the se-
lector lever into the R (Reverse), D (Drive) or
Manual shift mode position without depress-
ing the brake pedal causes the vehicle to
move slowly. Be sure the brake pedal is fully
depressed and the vehicle is stopped, before
shifting the selector lever.
BE AWARE OF THE SELECTOR LEVER POSI-
TION Make sure that the selector lever is in the
desired position. Use the D (Drive), or Manual
shift mode to move forwards and the R (Re-
verse) to move backwards. Release the hand-
brake lever and the footbrake pedal, then de-
press the accelerator pedal to start the vehicle
in motion and merge with traffic (avoid abrupt
starting and spinning the wheels).
Avoid revving up the engine while the vehicle
is stopped, this could cause unexpected ve-
hicle movement [if the selector lever is in the
R (Reverse), D (Drive), or Manual shift mode
position] or damage the engine [if the selec-
tor lever is in the N (Neutral) or P (Park) posi-
tion].
WARM THE ENGINE UP
Due to the higher idle speeds when the en-
gine is cold, extra caution must be taken when
shifting the selector lever into the driving po-
sition immediately after starting the engine.
PARKING THE VEHICLE
Depress the footbrake pedal and, once the
vehicle stops, move the selector lever into the
P (Park) position, pull the handbrake lever and
release the footbrake pedal.
Starting the vehicle
1. After starting the engine, fully depress the foot-
brake pedal before shifting the selector lever from
P (Park) to R (Reverse), D (Drive) or Manual shift
mode.
5-14Starting and driving
Page 182 of 297
Downloaded from www.Manualslib.com manuals search engine Place the ignition switch in the “OFF” position.
Models without Intelligent Key system:
Place the ignition switch in the LOCK position.
P (Park):
Use this position when the vehicle is parked or when
starting the engine. Make sure that the vehicle is
completely stopped and move the selector lever
into the P (Park) position. Apply the handbrake.
When parking on a hill, first depress the footbrake
pedal, apply the handbrake, and then move the se-
lector lever into the P (Park) position.
R (Reverse):
Use this position to reverse. Make sure that the
vehicle is completely stopped before selecting the R
(Reverse) position.
When the selector lever is in the R (Reverse) posi-
tion, either the NISSAN Connect monitor (where fit-
ted) or the ultra sonic parking sensor (where fitted)
will be activated. For details, see “Rear-view moni-
tor (where fitted)” or “Around view monitor (where
fitted)” earlier in this section or “Ultrasonic Parking
Sensor (where fitted)” later in this section
N (Neutral):
Neither the forward nor reverse gear is engaged.
The engine can be started in this position. You may
shift to the N (Neutral) position and restart a stalled
engine while the vehicle is moving.
D (Drive):
Use this position for all normal forward driving. L (Low):
Use this position when climbing steep hills slowly or
driving slowly through deep snow, sand or mud, or
for maximum engine braking on steep downhill
grades.
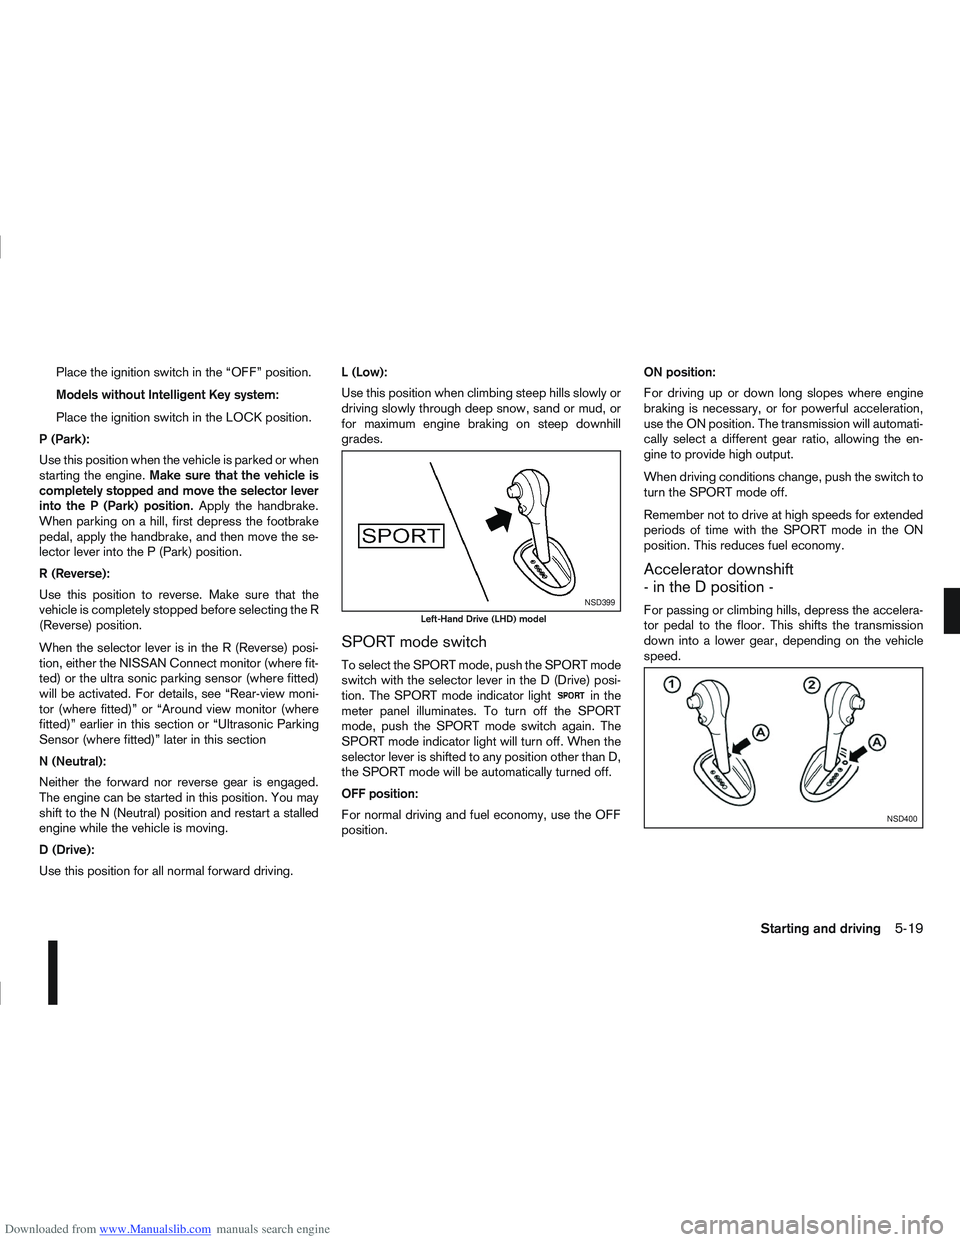
SPORT mode switch
To select the SPORT mode, push the SPORT mode
switch with the selector lever in the D (Drive) posi-
tion. The SPORT mode indicator light
in the
meter panel illuminates. To turn off the SPORT
mode, push the SPORT mode switch again. The
SPORT mode indicator light will turn off. When the
selector lever is shifted to any position other than D,
the SPORT mode will be automatically turned off.
OFF position:
For normal driving and fuel economy, use the OFF
position. ON position:
For driving up or down long slopes where engine
braking is necessary, or for powerful acceleration,
use the ON position. The transmission will automati-
cally select a different gear ratio, allowing the en-
gine to provide high output.
When driving conditions change, push the switch to
turn the SPORT mode off.
Remember not to drive at high speeds for extended
periods of time with the SPORT mode in the ON
position. This reduces fuel economy.
Accelerator downshift
- in the D position -
For passing or climbing hills, depress the accelera-
tor pedal to the floor. This shifts the transmission
down into a lower gear, depending on the vehicle
speed.NSD399
Left-Hand Drive (LHD) model
NSD400
Starting and driving5-19
Page 203 of 297
Downloaded from www.Manualslib.com manuals search engine and varies the brake fluid pressure to prevent each
wheel from locking and sliding. By preventing each
wheel from locking, the system helps the driver to
maintain steering control and helps to minimise
swerving and spinning on slippery surfaces.
Using the system
Depress the brake pedal and hold it down. Depress
the brake pedal with firm steady pressure, but do
not pump the brakes. The ABS will operate to pre-
vent the wheels from locking up. Steer the vehicle to
avoid obstacles.
WARNING
Do not pump the brake pedal. Doing so may in-
crease the stopping distance.
Self-test feature
The ABS includes electronic sensors, electric
pumps, hydraulic solenoids and a computer. The
computer has a built-in diagnostic feature that tests
the system each time you start the engine and move
thevehicleatalowspeedinforwardorreverse.
When the self-test occurs, you may hear a “clunk”
noise and/or feel a pulsation in the brake pedal. This
is normal and does not indicate a malfunction. If the
computer senses a malfunction, it switches the ABS
off and illuminates the ABS warning light on the
instrument panel. The brake system then operates
normally, but without anti-lock assistance.
If the ABS warning light illuminates during the self-
test or while driving, have the vehicle checked by a
NISSAN dealer or qualified workshop.
Normal operation
The ABS will not initiate at speeds below 5 to 10
km/h (3 to 6 MPH). The speeds will vary according
to road conditions.
When the ABS senses that one or more wheels are
close to locking up, the actuator rapidly applies and
releases hydraulic pressure. This action is similar to
pumping the brakes very quickly. You may feel a
pulsation in the brake pedal and hear a noise from
the actuator under the bonnet when it is operating.
This is normal and indicates that the ABS is working
properly. However, the pulsation may indicate that
road conditions are hazardous and extra care is re-
quired while driving. When accelerating, driving on slippery surfaces or
suddenly avoiding obstacles on roads, the vehicle
might swerve or slip. The Electronic Stability Pro-
gramme (ESP) system continuously monitors and
compares the driver’s intended speed and the travel
direction. The system adjusts wheel brake pressure
and engine torque to assist in improving vehicle sta-
bility.
When the ESP system is operating, the “SLIP”
indicator light () in the combination meter
blinks.
When only the traction control (TCS) system in
the ESP system is operating, the “SLIP” indica-
tor light (
) in the combination meter will also
blink.
If the “SLIP” indicator light () blinks, the
road conditions are slippery. Be sure to drive
carefully. See “Warning/indicator lights and au-
dible reminders” in the “2. Instruments and
controls” section.
Indicator light
If a malfunction occurs in the system, the “SLIP”
indicator light (
) and the ESP indicator light
() come on in the combination meter.
As long as these indicator lights are on, the trac-
tion control function is cancelled.
The ESP system uses Active Brake Limited Slip
(ABLS) system to improve vehicle traction. The Ac-
tive Brake Limited Slip (ABLS) system works when
one of the driving wheels is spinning on a slippery
ELECTRONIC STABILITY
PROGRAMME (ESP) SYSTEM
(where fitted)
5-40Starting and driving
Page 287 of 297
Downloaded from www.Manualslib.com manuals search engine – Maintenance requirements ............................................... 8-2
– Seat belt maintenance ................................................... 1-11
Manual transmission
– Driving with manual transmission ................................... 5-12
Mechanical/emergency key ................................................... 3-3
Meter and gauges
– Engine coolant temperature gauge ................................... 2-2
– Fuel gauge ...................................................................... 2-2
– Speedometer .................................................................. 2-2
– Tachometer ..................................................................... 2-2
Meters and gauges ............................................................... 2-2
Mirror ........................................................................\
.......... 3-17
– Automatic anti-dazzling inside mirror ....................... 3-17, 7-4
– Inside rear-view mirror ................................................... 3-17
– Outside rear-view mirrors .............................................. 3-17
– Vanity mirror .................................................................. 3-19
Mobile phone integration for FM AM radio with CD player ... 4-52
Mobile phone integration for LW-MW-FM radio with CD player or
6 CD changer (Type A) ....................................................... 4-44
Monitor display
– Monitor display’s maintenance ......................................... 7-4
– Rear-view monitor ............................................................ 4-2N
NISSAN Anti-Theft System (NATS) ....................... 3-2, 5-10, 5-7
– NATS immobilizer radio approval number ....................... 9-10
– NATS key ........................................................................\
3-2
– NATS security indicator light .......................................... 3-13O
Oil
– Changing engine oil ......................................................... 8-9
– Changing engine oil filter ............................................... 8-11 – Checking engine oil level ................................................. 8-8
– Engine oil ........................................................................\
8-8
– Recommended lubricants ................................................ 9-2
– Recommended SAE viscosity number .............................. 9-5
On-pavement and off-road driving precautions ....................... 5-4
Overheat
– Engine overheat ............................................................. 6-12
P
Parking ........................................................................\
....... 5-33
– Ultrasonic parking sensor .............................................. 5-24
Phone
– Bluetooth® ........................................................... 4-44, 4-52
– Mobile phone integration for FM AM radio with CDplayer ........................................................................\
.... 4-52
– Mobile phone integration for LW-MW-FM radio with CD player or 6 CD changer (Type A) ............................................. 4-44
Power
– Power door lock switch ................................................. 3-10
– Power outlet .................................................................. 2-30
– Power steering system .................................................. 5-38
– Power window — Driver’s side (Reinitialisation procedure) .................................................................... 2-35
– Power windows ............................................................. 2-34
Pre-tensioner seat belt system ............................................. 1-12
Precautions
– Audio operation precautions .......................................... 4-21
– Brake precautions ......................................................... 5-39
– Child restraint usage ..................................................... 1-18
– Cruise control precautions ............................................. 5-29
– Maintenance precautions ................................................. 8-4
– On-pavement and off-road driving precautions ................. 5-4
– Operating precautions (trailer) ....................................... 5-35
– Seat belt usage ............................................................... 1-7
– Towing precautions ....................................................... 6-13
10-6Index
Page 288 of 297
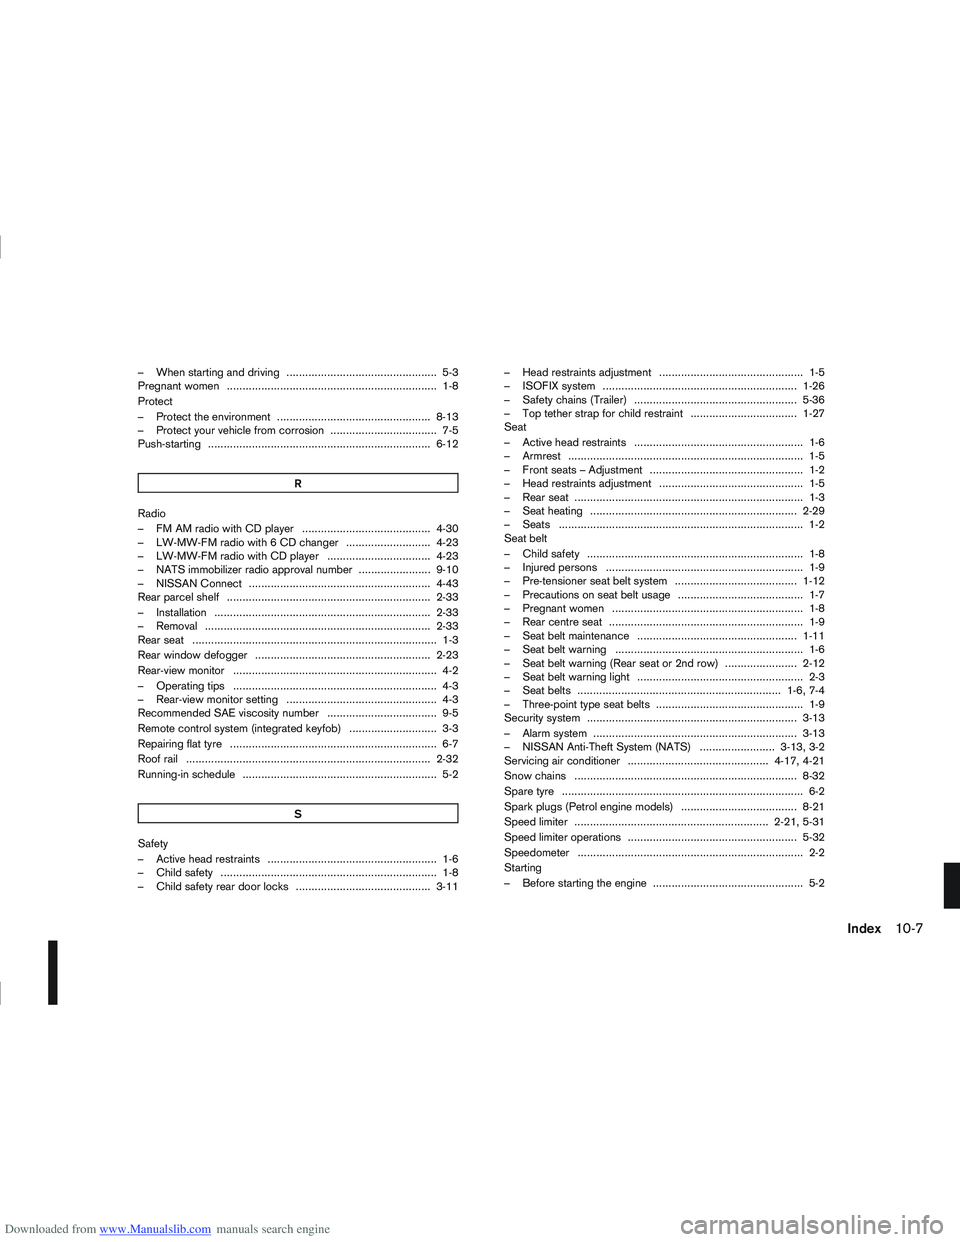
Downloaded from www.Manualslib.com manuals search engine – When starting and driving ................................................ 5-3
Pregnant women ................................................................... 1-8
Protect
– Protect the environment ................................................. 8-13
– Protect your vehicle from corrosion .................................. 7-5
Push-starting ....................................................................... 6-12R
Radio
– FM AM radio with CD player ......................................... 4-30
– LW-MW-FM radio with 6 CD changer ........................... 4-23
– LW-MW-FM radio with CD player ................................. 4-23
– NATS immobilizer radio approval number ....................... 9-10
– NISSAN Connect .......................................................... 4-43
Rear parcel shelf ................................................................. 2-33
– Installation ..................................................................... 2-33
– Removal ........................................................................\
2-33
Rear seat ........................................................................\
...... 1-3
Rear window defogger ........................................................ 2-23
Rear-view monitor ................................................................. 4-2
– Operating tips ................................................................. 4-3
– Rear-view monitor setting ................................................ 4-3
Recommended SAE viscosity number ................................... 9-5
Remote control system (integrated keyfob) ............................ 3-3
Repairing flat tyre .................................................................. 6-7
Roof rail ........................................................................\
...... 2-32
Running-in schedule .............................................................. 5-2S
Safety
– Active head restraints ...................................................... 1-6
– Child safety ..................................................................... 1-8
– Child safety rear door locks ........................................... 3-11 – Head restraints adjustment .............................................. 1-5
– ISOFIX system .............................................................. 1-26
– Safety chains (Trailer) .................................................... 5-36
– Top tether strap for child restraint .................................. 1-27
Seat
– Active head restraints ...................................................... 1-6
– Armrest ........................................................................\
... 1-5
– Front seats – Adjustment ................................................. 1-2
– Head restraints adjustment .............................................. 1-5
– Rear seat ........................................................................\
. 1-3
– Seat heating .................................................................. 2-29
– Seats ........................................................................\
...... 1-2
Seat belt
– Child safety ..................................................................... 1-8
– Injured persons ............................................................... 1-9
– Pre-tensioner seat belt system ....................................... 1-12
– Precautions on seat belt usage ........................................ 1-7
– Pregnant women ............................................................. 1-8
– Rear centre seat .............................................................. 1-9
– Seat belt maintenance ................................................... 1-11
– Seat belt warning ............................................................ 1-6
– Seat belt warning (Rear seat or 2nd row) ....................... 2-12
– Seat belt warning light ..................................................... 2-3
– Seat belts ................................................................. 1-6, 7-4
– Three-point type seat belts ............................................... 1-9
Security system ................................................................... 3-13
– Alarm system ................................................................. 3-13
– NISSAN Anti-Theft System (NATS) ........................ 3-13, 3-2
Servicing air conditioner ............................................. 4-17, 4-21
Snow chains ....................................................................... 8-32
Spare tyre ........................................................................\
..... 6-2
Spark plugs (Petrol engine models) ..................................... 8-21
Speed limiter .............................................................. 2-21, 5-31
Speed limiter operations ...................................................... 5-32
Speedometer ........................................................................\
2-2
Starting
– Before starting the engine ................................................ 5-2
Index10-7