window NISSAN QASHQAI 2015 Owner´s Manual
[x] Cancel search | Manufacturer: NISSAN, Model Year: 2015, Model line: QASHQAI, Model: NISSAN QASHQAI 2015Pages: 338, PDF Size: 4.88 MB
Page 81 of 338
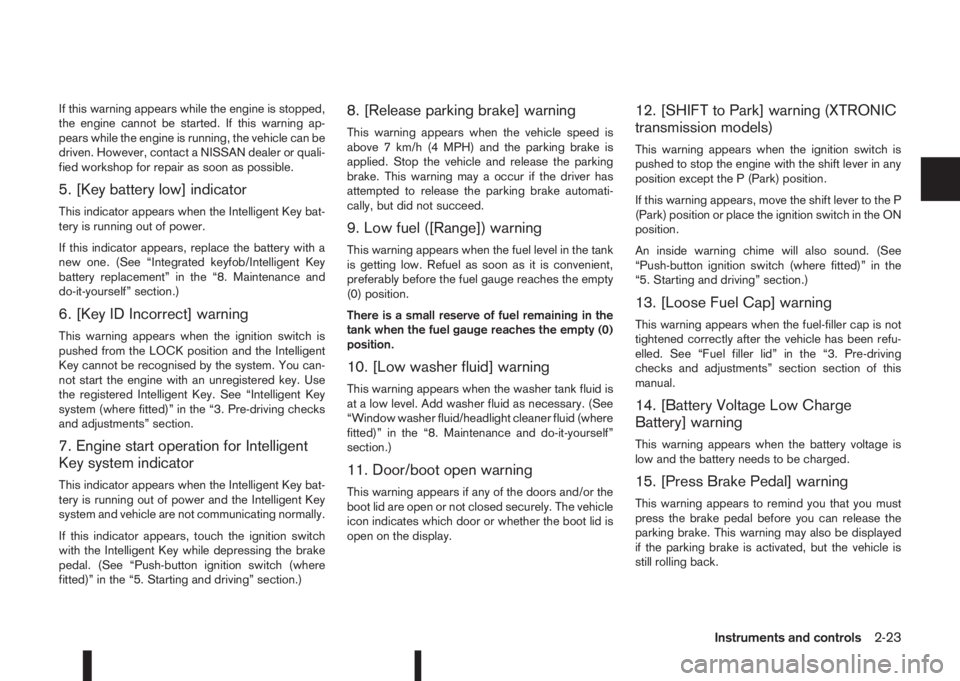
If this warning appears while the engine is stopped,
the engine cannot be started. If this warning ap-
pears while the engine is running, the vehicle can be
driven. However, contact a NISSAN dealer or quali-
fied workshop for repair as soon as possible.
5. [Key battery low] indicator
This indicator appears when the Intelligent Key bat-
tery is running out of power.
If this indicator appears, replace the battery with a
new one. (See “Integrated keyfob/Intelligent Key
battery replacement” in the “8. Maintenance and
do-it-yourself” section.)
6. [Key ID Incorrect] warning
This warning appears when the ignition switch is
pushed from the LOCK position and the Intelligent
Key cannot be recognised by the system. You can-
not start the engine with an unregistered key. Use
the registered Intelligent Key. See “Intelligent Key
system (where fitted)” in the “3. Pre-driving checks
and adjustments” section.
7. Engine start operation for Intelligent
Key system indicator
This indicator appears when the Intelligent Key bat-
tery is running out of power and the Intelligent Key
system and vehicle are not communicating normally.
If this indicator appears, touch the ignition switch
with the Intelligent Key while depressing the brake
pedal. (See “Push-button ignition switch (where
fitted)” in the “5. Starting and driving” section.)
8. [Release parking brake] warning
This warning appears when the vehicle speed is
above 7 km/h (4 MPH) and the parking brake is
applied. Stop the vehicle and release the parking
brake. This warning may a occur if the driver has
attempted to release the parking brake automati-
cally, but did not succeed.
9. Low fuel ([Range]) warning
This warning appears when the fuel level in the tank
is getting low. Refuel as soon as it is convenient,
preferably before the fuel gauge reaches the empty
(0) position.
There is a small reserve of fuel remaining in the
tank when the fuel gauge reaches the empty (0)
position.
10. [Low washer fluid] warning
This warning appears when the washer tank fluid is
at a low level. Add washer fluid as necessary. (See
“Window washer fluid/headlight cleaner fluid (where
fitted)” in the “8. Maintenance and do-it-yourself”
section.)
11. Door/boot open warning
This warning appears if any of the doors and/or the
boot lid are open or not closed securely. The vehicle
icon indicates which door or whether the boot lid is
open on the display.
12. [SHIFT to Park] warning (XTRONIC
transmission models)
This warning appears when the ignition switch is
pushed to stop the engine with the shift lever in any
position except the P (Park) position.
If this warning appears, move the shift lever to the P
(Park) position or place the ignition switch in the ON
position.
An inside warning chime will also sound. (See
“Push-button ignition switch (where fitted)” in the
“5. Starting and driving” section.)
13. [Loose Fuel Cap] warning
This warning appears when the fuel-filler cap is not
tightened correctly after the vehicle has been refu-
elled. See “Fuel filler lid” in the “3. Pre-driving
checks and adjustments” section section of this
manual.
14. [Battery Voltage Low Charge
Battery] warning
This warning appears when the battery voltage is
low and the battery needs to be charged.
15. [Press Brake Pedal] warning
This warning appears to remind you that you must
press the brake pedal before you can release the
parking brake. This warning may also be displayed
if the parking brake is activated, but the vehicle is
still rolling back.
Instruments and controls2-23
Page 91 of 338
Wiper drip wipe system (where fitted):
The wiper will also operate once about 3 seconds
after using the washer. This operation is to wipe
washer fluid that has dripped on the windscreen.
Rain sensor (where fitted)
The sensor of the rain-sensing auto wiper system
located on the upper part of the windscreen, in front
of the rear view mirror, can automatically turn on the
wipers and adjust the wiper speed depending on
the rainfall intensity and the vehicle speed when the
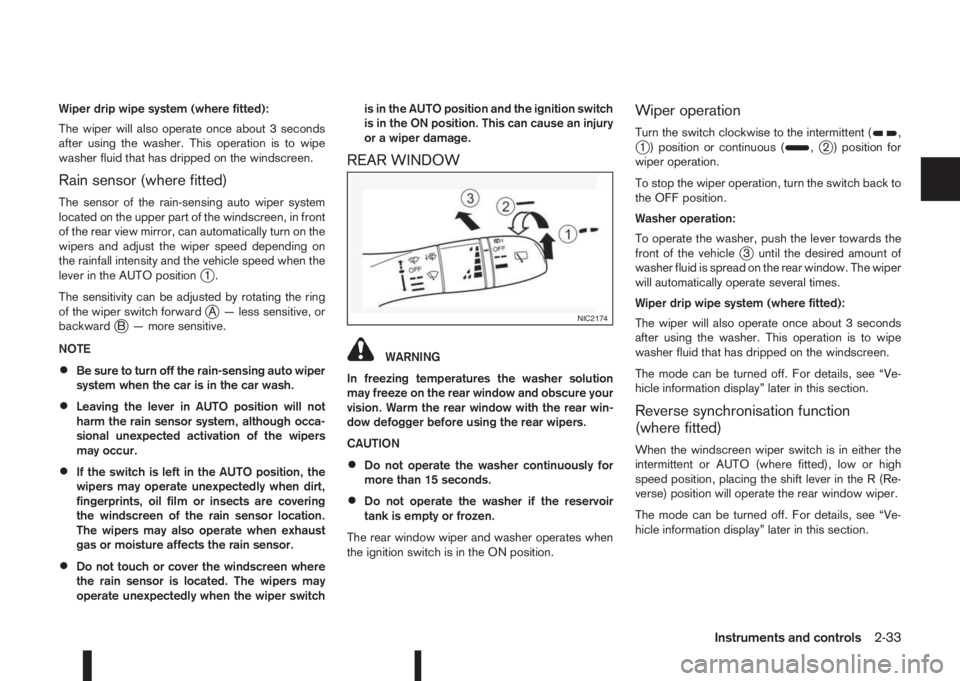
lever in the AUTO position
j1.
The sensitivity can be adjusted by rotating the ring
of the wiper switch forward
jA — less sensitive, or
backwardjB — more sensitive.
NOTE
•Be sure to turn off the rain-sensing auto wiper
system when the car is in the car wash.
•Leaving the lever in AUTO position will not
harm the rain sensor system, although occa-
sional unexpected activation of the wipers
may occur.
•If the switch is left in the AUTO position, the
wipers may operate unexpectedly when dirt,
fingerprints, oil film or insects are covering
the windscreen of the rain sensor location.
The wipers may also operate when exhaust
gas or moisture affects the rain sensor.
•Do not touch or cover the windscreen where
the rain sensor is located. The wipers may
operate unexpectedly when the wiper switchis in the AUTO position and the ignition switch
is in the ON position. This can cause an injury
or a wiper damage.
REAR WINDOW
WARNING
In freezing temperatures the washer solution
may freeze on the rear window and obscure your
vision. Warm the rear window with the rear win-
dow defogger before using the rear wipers.
CAUTION
•Do not operate the washer continuously for
more than 15 seconds.
•Do not operate the washer if the reservoir
tank is empty or frozen.
The rear window wiper and washer operates when
the ignition switch is in the ON position.
Wiper operation
Turn the switch clockwise to the intermittent (,j1 ) position or continuous (,j2 ) position for
wiper operation.
To stop the wiper operation, turn the switch back to
the OFF position.
Washer operation:
To operate the washer, push the lever towards the
front of the vehicle
j3 until the desired amount of
washer fluid is spread on the rear window. The wiper
will automatically operate several times.
Wiper drip wipe system (where fitted):
The wiper will also operate once about 3 seconds
after using the washer. This operation is to wipe
washer fluid that has dripped on the windscreen.
The mode can be turned off. For details, see “Ve-
hicle information display” later in this section.
Reverse synchronisation function
(where fitted)
When the windscreen wiper switch is in either the
intermittent or AUTO (where fitted), low or high
speed position, placing the shift lever in the R (Re-
verse) position will operate the rear window wiper.
The mode can be turned off. For details, see “Ve-
hicle information display” later in this section.
NIC2174
Instruments and controls2-33
Page 93 of 338
REAR WINDOW DEFOGGER
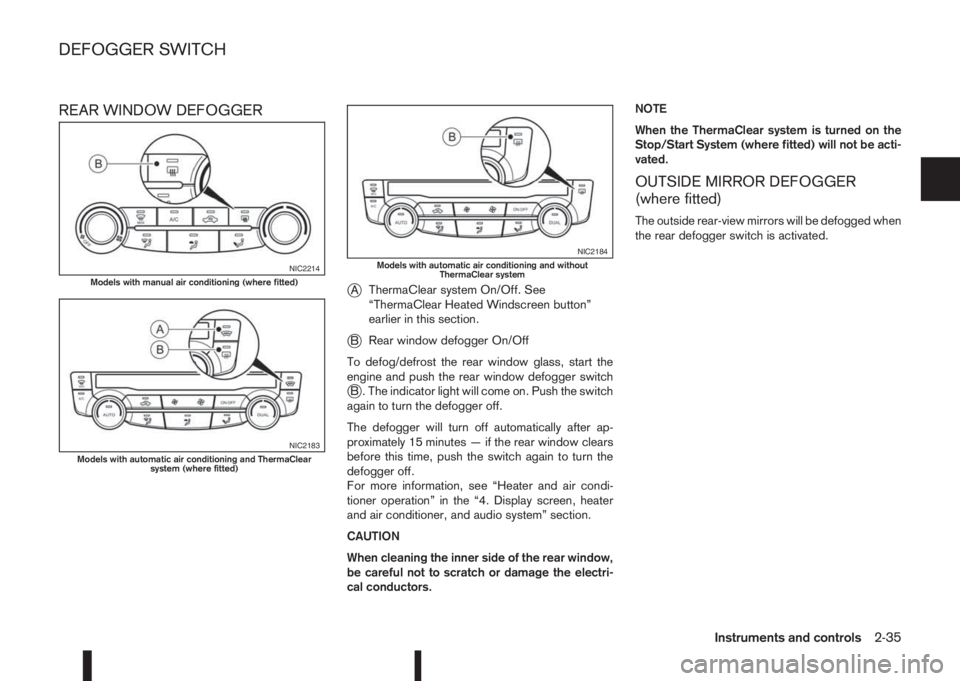
j
AThermaClear system On/Off. See
“ThermaClear Heated Windscreen button”
earlier in this section.
jBRear window defogger On/Off
To defog/defrost the rear window glass, start the
engine and push the rear window defogger switch
jB . The indicator light will come on. Push the switch
again to turn the defogger off.
The defogger will turn off automatically after ap-
proximately 15 minutes — if the rear window clears
before this time, push the switch again to turn the
defogger off.
For more information, see “Heater and air condi-
tioner operation” in the “4. Display screen, heater
and air conditioner, and audio system” section.
CAUTION
When cleaning the inner side of the rear window,
be careful not to scratch or damage the electri-
cal conductors.NOTE
When the ThermaClear system is turned on the
Stop/Start System (where fitted) will not be acti-
vated.
OUTSIDE MIRROR DEFOGGER
(where fitted)
The outside rear-view mirrors will be defogged when
the rear defogger switch is activated.
NIC2214Models with manual air conditioning (where fitted)
NIC2183Models with automatic air conditioning and ThermaClear
system (where fitted)
NIC2184Models with automatic air conditioning and without
ThermaClear system
DEFOGGER SWITCH
Instruments and controls2-35
Page 98 of 338
lowered using the switch located on the driver’s
side of the instrument panel, next to the steering
wheel.
The higher the number designated on the switch,
the lower the axis.
When travelling with no heavy load on a flat road,
select position 0.
AUTOMATIC AIMING CONTROL (LED
headlights)
Vehicles with LED headlights are equipped with an
automatic levelling system. The headlight axis is con-
trolled automatically.
NISSAN recommends consulting local regulations
on the use of lights.To clean the headlights, pull the windscreen washer
switch towards you while the headlight switch is in
the
position and the ignition switch is in the ON
position.
NOTE
The headlight cleaner will automatically operate
every fifth operation of the wiper and washer
switch.
HEADLIGHT CLEANER SWITCH
(where fitted)
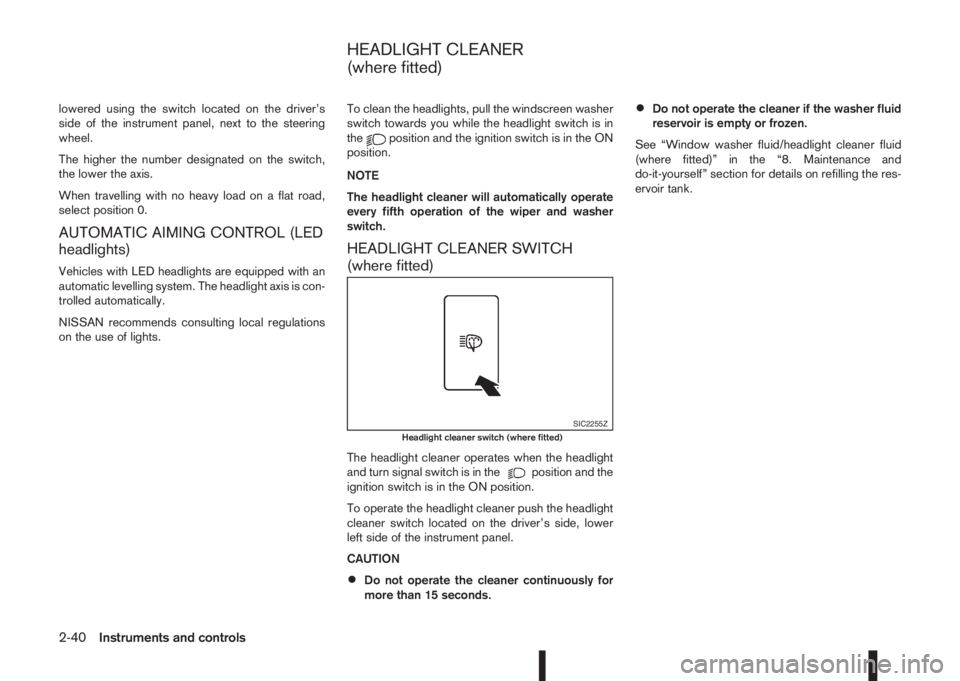
The headlight cleaner operates when the headlight
and turn signal switch is in theposition and the
ignition switch is in the ON position.
To operate the headlight cleaner push the headlight
cleaner switch located on the driver’s side, lower
left side of the instrument panel.
CAUTION
•Do not operate the cleaner continuously for
more than 15 seconds.
•Do not operate the cleaner if the washer fluid
reservoir is empty or frozen.
See “Window washer fluid/headlight cleaner fluid
(where fitted)” in the “8. Maintenance and
do-it-yourself” section for details on refilling the res-
ervoir tank.
SIC2255ZHeadlight cleaner switch (where fitted)
HEADLIGHT CLEANER
(where fitted)
2-40Instruments and controls
Page 100 of 338
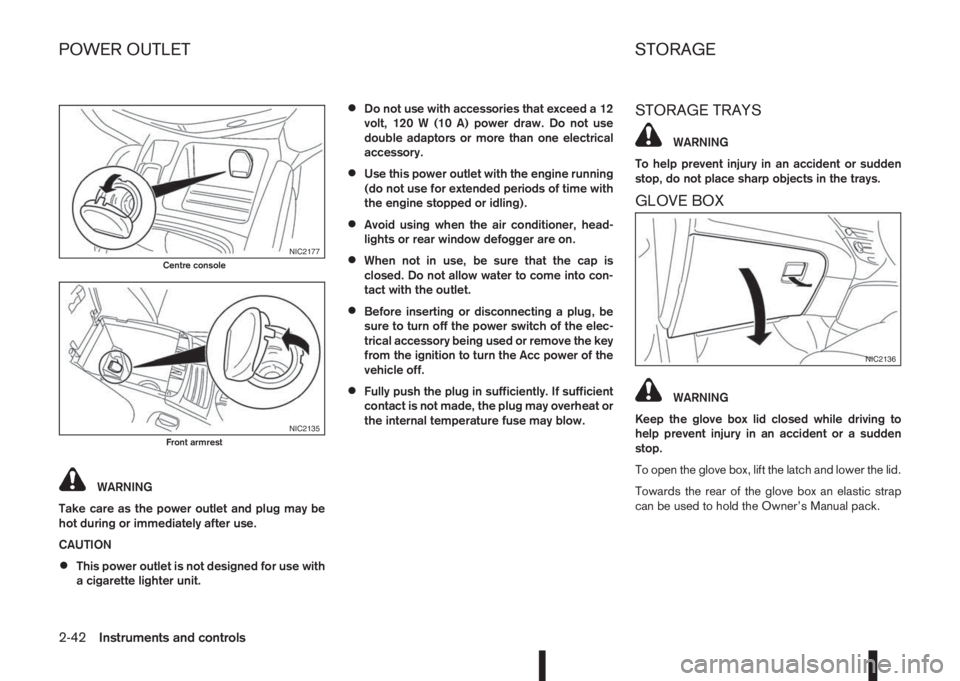
WARNING
Take care as the power outlet and plug may be
hot during or immediately after use.
CAUTION
•This power outlet is not designed for use with
a cigarette lighter unit.
•Do not use with accessories that exceed a 12
volt, 120 W (10 A) power draw. Do not use
double adaptors or more than one electrical
accessory.
•Use this power outlet with the engine running
(do not use for extended periods of time with
the engine stopped or idling).
•Avoid using when the air conditioner, head-
lights or rear window defogger are on.
•When not in use, be sure that the cap is
closed. Do not allow water to come into con-
tact with the outlet.
•Before inserting or disconnecting a plug, be
sure to turn off the power switch of the elec-
trical accessory being used or remove the key
from the ignition to turn the Acc power of the
vehicle off.
•Fully push the plug in sufficiently. If sufficient
contact is not made, the plug may overheat or
the internal temperature fuse may blow.
STORAGE TRAYS
WARNING
To help prevent injury in an accident or sudden
stop, do not place sharp objects in the trays.
GLOVE BOX
WARNING
Keep the glove box lid closed while driving to
help prevent injury in an accident or a sudden
stop.
To open the glove box, lift the latch and lower the lid.
Towards the rear of the glove box an elastic strap
can be used to hold the Owner’s Manual pack.
NIC2177Centre console
NIC2135Front armrest
NIC2136
POWER OUTLET STORAGE
2-42Instruments and controls
Page 106 of 338
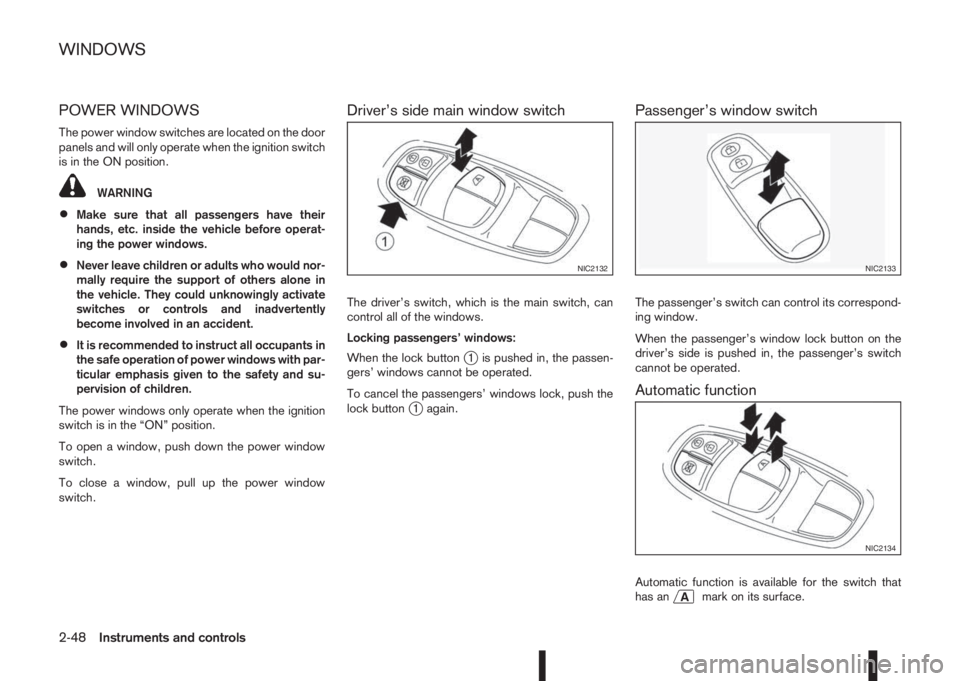
POWER WINDOWS
The power window switches are located on the door
panels and will only operate when the ignition switch
is in the ON position.
WARNING
•Make sure that all passengers have their
hands, etc. inside the vehicle before operat-
ing the power windows.
•Never leave children or adults who would nor-
mally require the support of others alone in
the vehicle. They could unknowingly activate
switches or controls and inadvertently
become involved in an accident.
•It is recommended to instruct all occupants in
the safe operation of power windows with par-
ticular emphasis given to the safety and su-
pervision of children.
The power windows only operate when the ignition
switch is in the “ON” position.
To open a window, push down the power window
switch.
To close a window, pull up the power window
switch.
Driver’s side main window switch
The driver’s switch, which is the main switch, can
control all of the windows.
Locking passengers’ windows:
When the lock button
j1 is pushed in, the passen-
gers’ windows cannot be operated.
To cancel the passengers’ windows lock, push the
lock button
j1 again.
Passenger’s window switch
The passenger’s switch can control its correspond-
ing window.
When the passenger’s window lock button on the
driver’s side is pushed in, the passenger’s switch
cannot be operated.
Automatic function
Automatic function is available for the switch that
has anmark on its surface.
NIC2132NIC2133
NIC2134
WINDOWS
2-48Instruments and controls
Page 107 of 338
The automatic function enables a window to fully
open or close without holding the switch down or
up.
To fully open the window, push the power window
switch down to the second detent and release the
switch. To fully close the window, pull the power
window switch up to the second detent and release
the switch. The switch does not have to be held dur-
ing window operation.
To stop the window open/close operation during
the automatic function, push down or pull up the
switch in opposite direction.
Auto-reverse function:
WARNING
•There is a small distance just before the
closed position which cannot be detected.
Make sure that all passengers have their
hands, etc. inside the vehicle before closing
the windows.
•The auto-reverse function does not work
when the window is closed manually (holding
the switch in the close position).
The auto-reverse function enables a window to au-
tomatically reverse when something is caught in the
window as it is closing by the automatic function.
When the control unit detects an obstacle, the win-
dow will be lowered immediately.Depending on the environment or driving conditions,
the auto-reverse function may activate if an impact
or load similar to something being caught in the win-
dow occurs.
Reinitialisation procedure after battery
reconnection
Some power window functions (automatic close
function, auto-reverse function) will not operate as
described after the battery cable is disconnected or
the electrical supply is interrupted. Perform the fol-
lowing procedure to initialise the power window
functions.
1. Place the ignition switch in the “ON” position.
2. If the driver’s window is closed, open it com-
pletely by operating the driver’s window switch.
3. Pull up and hold the driver’s window switch to
close the driver’s window. Hold the switch for
approximately 5 seconds after the window has
been fully closed, and then release it.
4. Check if the power window functions operate
properly.
If you open or close the power window continu-
ously, it may cause the power window not to oper-
ate properly. Perform the above procedure.
If the power window functions do not operate prop-
erly after performing the above procedure, repeat
the steps. See a NISSAN dealer or qualified work-
shop, if necessary, for checking the power window
system.
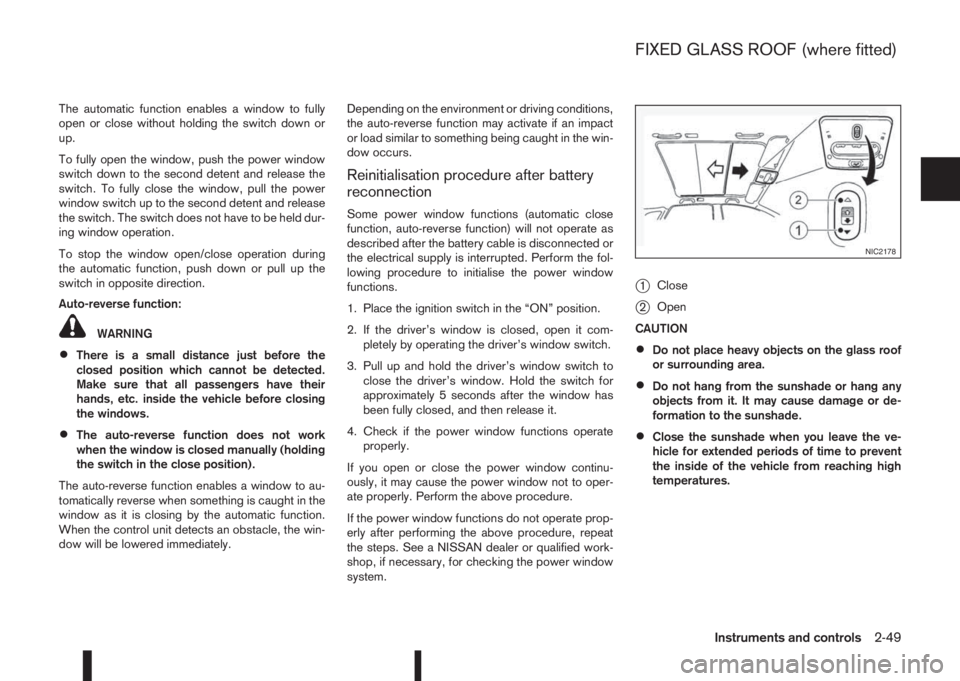
j1Close
j2Open
CAUTION
•Do not place heavy objects on the glass roof
or surrounding area.
•Do not hang from the sunshade or hang any
objects from it. It may cause damage or de-
formation to the sunshade.
•Close the sunshade when you leave the ve-
hicle for extended periods of time to prevent
the inside of the vehicle from reaching high
temperatures.
NIC2178
FIXED GLASS ROOF (where fitted)
Instruments and controls2-49
Page 114 of 338
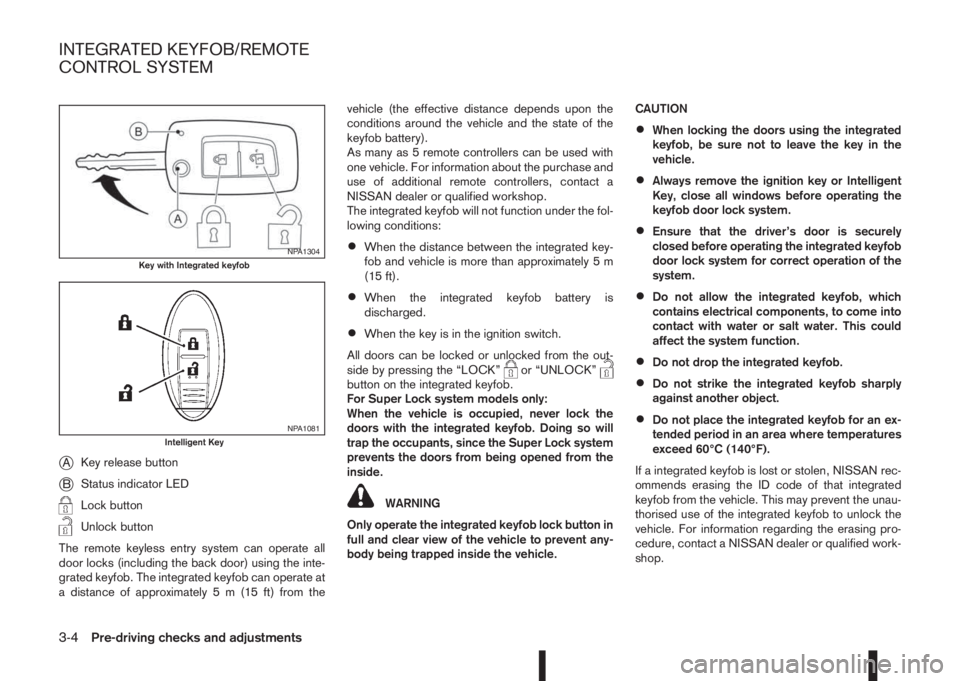
jAKey release button
jBStatus indicator LED
Lock button
Unlock button
The remote keyless entry system can operate all
door locks (including the back door) using the inte-
grated keyfob. The integrated keyfob can operate at
a distance of approximately 5 m (15 ft) from thevehicle (the effective distance depends upon the
conditions around the vehicle and the state of the
keyfob battery).
As many as 5 remote controllers can be used with
one vehicle. For information about the purchase and
use of additional remote controllers, contact a
NISSAN dealer or qualified workshop.
The integrated keyfob will not function under the fol-
lowing conditions:
•When the distance between the integrated key-
fob and vehicle is more than approximately 5 m
(15 ft).
•When the integrated keyfob battery is
discharged.
•When the key is in the ignition switch.
All doors can be locked or unlocked from the out-
side by pressing the “LOCK”
or “UNLOCK”button on the integrated keyfob.
For Super Lock system models only:
When the vehicle is occupied, never lock the
doors with the integrated keyfob. Doing so will
trap the occupants, since the Super Lock system
prevents the doors from being opened from the
inside.
WARNING
Only operate the integrated keyfob lock button in
full and clear view of the vehicle to prevent any-
body being trapped inside the vehicle.CAUTION
•When locking the doors using the integrated
keyfob, be sure not to leave the key in the
vehicle.
•Always remove the ignition key or Intelligent
Key, close all windows before operating the
keyfob door lock system.
•Ensure that the driver’s door is securely
closed before operating the integrated keyfob
door lock system for correct operation of the
system.
•Do not allow the integrated keyfob, which
contains electrical components, to come into
contact with water or salt water. This could
affect the system function.
•Do not drop the integrated keyfob.
•Do not strike the integrated keyfob sharply
against another object.
•Do not place the integrated keyfob for an ex-
tended period in an area where temperatures
exceed 60°C (140°F).
If a integrated keyfob is lost or stolen, NISSAN rec-
ommends erasing the ID code of that integrated
keyfob from the vehicle. This may prevent the unau-
thorised use of the integrated keyfob to unlock the
vehicle. For information regarding the erasing pro-
cedure, contact a NISSAN dealer or qualified work-
shop.
NPA1304Key with Integrated keyfob
NPA1081Intelligent Key
INTEGRATED KEYFOB/REMOTE
CONTROL SYSTEM
3-4Pre-driving checks and adjustments
Page 115 of 338
For information regarding the replacement of a bat-
tery, see “Integrated keyfob/Intelligent Key battery
replacement” in the “8. Maintenance and
do-it-yourself” section.
SWITCHING FROM CONVENIENCE
MODE TO ANTI-HIJACK MODE
(where fitted)
Selective unlock or “Anti-hijack” mode (where fit-
ted) allows the remote unlocking of only the driver’s
door to prevent an attacker from entering the vehicle
via an unlocked passenger door.
As default, the unlock mode will be set to “Conve-
nience” mode (all doors will unlock). Follow the in-
structions in “Vehicle information display” later in
this section.
USING THE REMOTE KEYLESS
ENTRY SYSTEM
WARNING
Super Lock system equipped models:
Failure to follow the precautions below may lead
to hazardous situations. Make sure the Super
Lock system activation is always conducted
safely.
•When the vehicle is occupied, never lock the
doors with the integrated keyfob. Doing so
will trap the occupants, since the Super Lock
system prevents the doors from being opened
from the inside of the vehicle.
•Only operate the integrated keyfob “LOCK”
button when there is a clear view of the ve-hicle. This is to prevent anybody from being
trapped inside the vehicle through the Super
Lock system activation.
For further details on the Super Lock system see
“Door locks” later in this section.
LOCKING THE DOORS
CAUTION
Before operating the keyfob remote control:
•Remove the ignition key or Intelligent Key
from the vehicle and close all windows.
•Check that the driver’s door is securely
closed.
Push the “LOCK” button
on the integrated key-
fob.
– All the doors lock.
– The direction indicators flash once.
If the “LOCK” button
is pushed with all the doors
locked, the direction indicators will flash once to
remind you that the doors are already locked.
UNLOCKING THE DOORS
When you first receive the vehicle, the door unlock
mode is set to unlock all the doors with one push of
the “UNLOCK”
button.
Convenience mode
Unlock all doors, pressing thebutton once.
Setting the convenience mode is done using the
[Settings] menu in the vehicle information display(Select the [Unlocking] menu key).
Also see “Vehicle information display” in the “2. In-
struments and controls” section.
ANTI-HIJACK MODE (where fitted)
Unlock the driver’s door only, pressing thebutton once.
Press thebutton twice to open all doors.
Setting the Anti-hijack mode is done using the [Set-
tings] menu in the vehicle information display (Se-
lect the [Unlocking] menu key). Set [Selective Un-
lock] to off.
For more information see “Vehicle information
display” in the “2. Instruments and controls” sec-
tion.
Auto-relock (where fitted):
An auto-relock function will a short period after a full
or partial unlock, if no further user action is taken.
The auto-relock will be cancelled if any door is
opened or the key is inserted into the ignition.
KEYFOB OPERATION FAILURE
The keyfob may not work properly if:
•The keyfob battery is low.
See “Integrated keyfob/Intelligent Key battery
replacement” in the “8. Maintenance and
do-it-yourself” section for keyfob battery replace-
ment instructions and the required battery type.
Pre-driving checks and adjustments3-5
Page 119 of 338
Emergency situations
If the Super Lock system is activated while you are
inside the vehicle, for example by a traffic accident
or other unexpected circumstances, follow the in-
structions below.
To release the Super Lock system:
– Insert the key into the ignition switch and turn it
to the ON position.
All doors can now be unlocked and opened from
inside the vehicle.
– Remove the key from the ignition switch and un-
lock the doors using the integrated keyfob “UN-
LOCK” button (
).
All doors can now be opened from inside the
vehicle.
To unlock and open the driver’s door from
inside the vehicle while the Super Lock system
is active:
1. Open or break the driver’s door window.
2. Insert the key into the outside door key cylinder
and turn it towards the rear of the vehicle.
3. The driver’s door will unlock and can now be
opened from inside the vehicle.
Locking without activating the Super
Lock system
WARNING
Do not leave the key inside the vehicle when leav-
ing the vehicle.
Locking the doors using the door key cylinder or
power door lock switch will not activate the Super
Lock system. See “Locking/unlocking with the key
(vehicle dead battery)” later in this section for fur-
ther information.
LOCKING/UNLOCKING WITH THE
KEY (vehicle dead battery)
WARNING
•When leaving the vehicle, do not leave the key
inside the vehicle.
•Never leave children unattended in a vehicle
and always be sure you have your keys withyou when leaving. If an emergency occurs it
may be more difficult to help them otherwise.
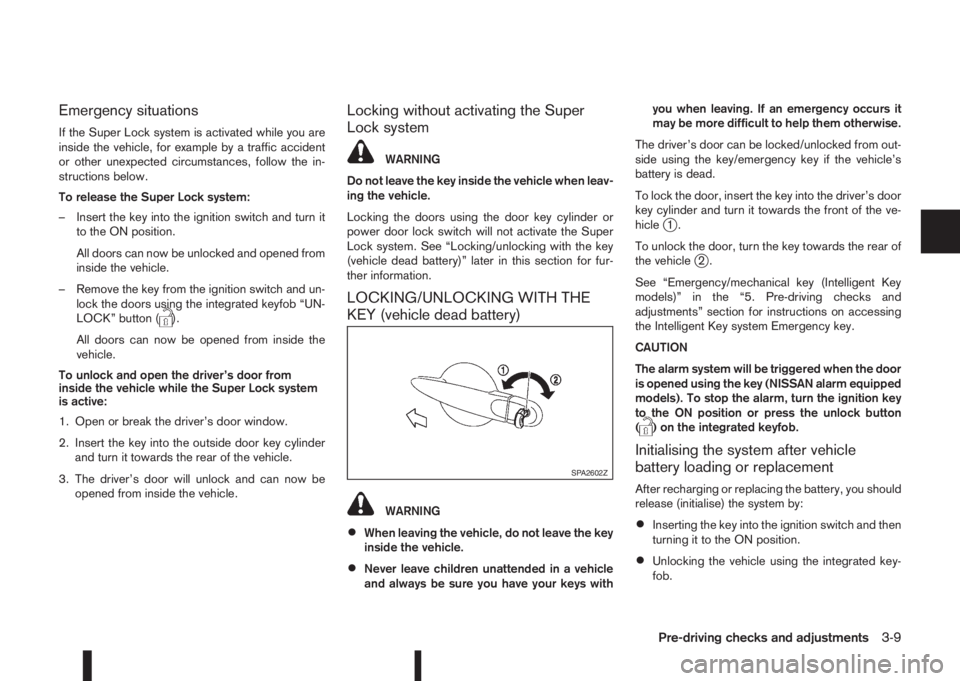
The driver’s door can be locked/unlocked from out-
side using the key/emergency key if the vehicle’s
battery is dead.
To lock the door, insert the key into the driver’s door
key cylinder and turn it towards the front of the ve-
hicle
j1.
To unlock the door, turn the key towards the rear of
the vehicle
j2.
See “Emergency/mechanical key (Intelligent Key
models)” in the “5. Pre-driving checks and
adjustments” section for instructions on accessing
the Intelligent Key system Emergency key.
CAUTION
The alarm system will be triggered when the door
is opened using the key (NISSAN alarm equipped
models). To stop the alarm, turn the ignition key
to the ON position or press the unlock button
(
) on the integrated keyfob.
Initialising the system after vehicle
battery loading or replacement
After recharging or replacing the battery, you should
release (initialise) the system by:
•Inserting the key into the ignition switch and then
turning it to the ON position.
•Unlocking the vehicle using the integrated key-
fob.
SPA2602Z
Pre-driving checks and adjustments3-9