window NISSAN QASHQAI 2015 Owner´s Manual
[x] Cancel search | Manufacturer: NISSAN, Model Year: 2015, Model line: QASHQAI, Model: NISSAN QASHQAI 2015Pages: 338, PDF Size: 4.88 MB
Page 122 of 338
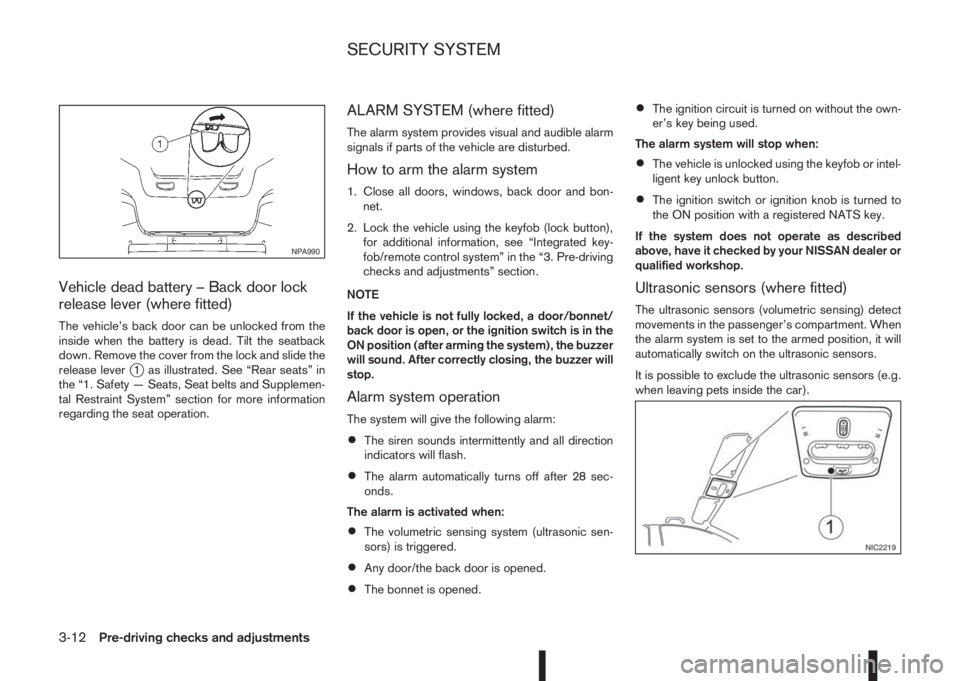
Vehicle dead battery – Back door lock
release lever (where fitted)
The vehicle’s back door can be unlocked from the
inside when the battery is dead. Tilt the seatback
down. Remove the cover from the lock and slide the
release lever
j1 as illustrated. See “Rear seats” in
the “1. Safety — Seats, Seat belts and Supplemen-
tal Restraint System” section for more information
regarding the seat operation.
ALARM SYSTEM (where fitted)
The alarm system provides visual and audible alarm
signals if parts of the vehicle are disturbed.
How to arm the alarm system
1. Close all doors, windows, back door and bon-
net.
2. Lock the vehicle using the keyfob (lock button),
for additional information, see “Integrated key-
fob/remote control system” in the “3. Pre-driving
checks and adjustments” section.
NOTE
If the vehicle is not fully locked, a door/bonnet/
back door is open, or the ignition switch is in the
ON position (after arming the system), the buzzer
will sound. After correctly closing, the buzzer will
stop.
Alarm system operation
The system will give the following alarm:
•The siren sounds intermittently and all direction
indicators will flash.
•The alarm automatically turns off after 28 sec-
onds.
The alarm is activated when:
•The volumetric sensing system (ultrasonic sen-
sors) is triggered.
•Any door/the back door is opened.
•The bonnet is opened.
•The ignition circuit is turned on without the own-
er’s key being used.
The alarm system will stop when:
•The vehicle is unlocked using the keyfob or intel-
ligent key unlock button.
•The ignition switch or ignition knob is turned to
the ON position with a registered NATS key.
If the system does not operate as described
above, have it checked by your NISSAN dealer or
qualified workshop.
Ultrasonic sensors (where fitted)
The ultrasonic sensors (volumetric sensing) detect
movements in the passenger’s compartment. When
the alarm system is set to the armed position, it will
automatically switch on the ultrasonic sensors.
It is possible to exclude the ultrasonic sensors (e.g.
when leaving pets inside the car).
NPA990
NIC2219
SECURITY SYSTEM
3-12Pre-driving checks and adjustments
Page 135 of 338
NOTE
At first operation, the corner lines are blinking
yellow for about 3 seconds. This is not a malfunc-
tion but a reminder to be cautious.
Available views:
•Bird’s-eye View
The surrounding view of the vehicle.
•Front-side View
The view around and ahead of the front passen-
ger’s side wheel.
•Front view
The view to the front of the vehicle.
•Rear view
The view to the rear of the vehicle.
•Full screen rear view
The view to the rear of the vehicle (which is a
little wider than the standard rear view)
The system is designed as an aid to the driver in
situations such as slot parking or parallel parking.
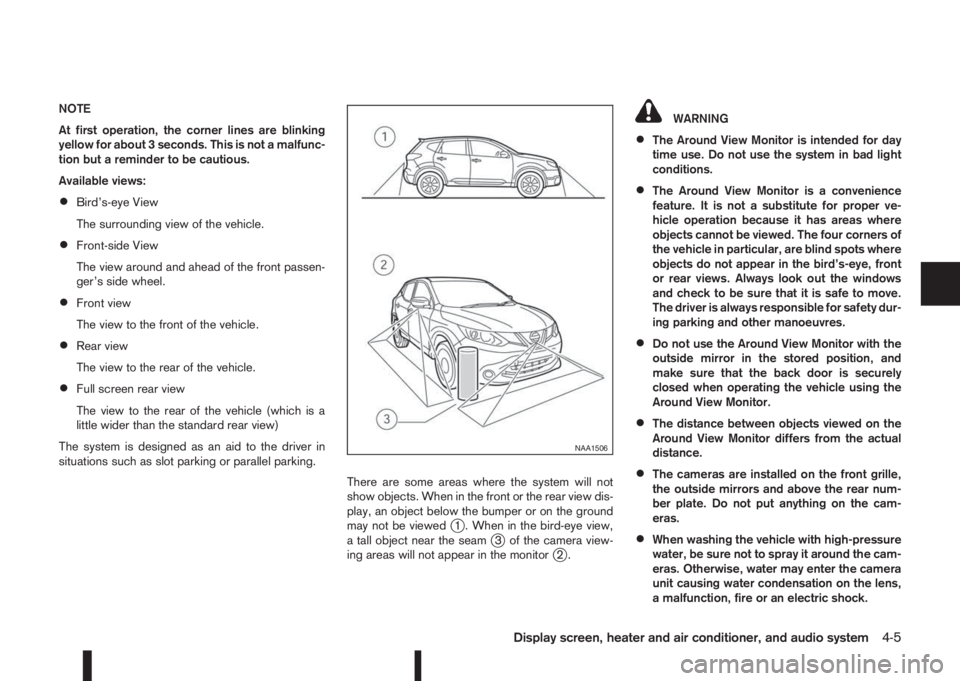
There are some areas where the system will not
show objects. When in the front or the rear view dis-
play, an object below the bumper or on the ground
may not be viewed
j1 . When in the bird-eye view,
a tall object near the seamj3 of the camera view-
ing areas will not appear in the monitorj2.
WARNING
•The Around View Monitor is intended for day
time use. Do not use the system in bad light
conditions.
•The Around View Monitor is a convenience
feature. It is not a substitute for proper ve-
hicle operation because it has areas where
objects cannot be viewed. The four corners of
the vehicle in particular, are blind spots where
objects do not appear in the bird’s-eye, front
or rear views. Always look out the windows
and check to be sure that it is safe to move.
The driver is always responsible for safety dur-
ing parking and other manoeuvres.
•Do not use the Around View Monitor with the
outside mirror in the stored position, and
make sure that the back door is securely
closed when operating the vehicle using the
Around View Monitor.
•The distance between objects viewed on the
Around View Monitor differs from the actual
distance.
•The cameras are installed on the front grille,
the outside mirrors and above the rear num-
ber plate. Do not put anything on the cam-
eras.
•When washing the vehicle with high-pressure
water, be sure not to spray it around the cam-
eras. Otherwise, water may enter the camera
unit causing water condensation on the lens,
a malfunction, fire or an electric shock.
NAA1506
Display screen, heater and air conditioner, and audio system4-5
Page 142 of 338
MOVING OBJECT DETECTION (MOD)
The Moving Object Detection (MOD) system can
inform the driver of the moving objects surrounding
the vehicle.
The MOD system detects moving objects by using
image processing technology on the image shown
on the Around View Monitor display.
The MOD system operates in the following condi-
tions when the camera view is displayed:
•When the shift lever is in the N (Neutral) position
(XTRONIC and MT models) or P (Park) position
(XTRONIC models) and the vehicle is stopped,
the MOD system detects the moving objects in
the bird-eye view.
•When the shift lever is in the any position other
than R (Reverse) position and the vehicle speed
is above 0 km/h and below approximately 8 km/h
(5 MPH), the MOD system detects moving ob-
jects in the front view.
•When the shift lever is in the R (Reverse) posi-
tion and the vehicle speed is below approximately
8 km/h (5 MPH), the MOD system detects mov-
ing objects in the rear view. The MOD system
will not operate correctly if the back door is open.
The MOD icon will change to blue to show which
view is currently active.
The MOD system does not detect moving objects in
the front-side view. The MOD icon is not displayed
on the screen when in this view.
WARNING
•The MOD system is not a substitute for proper
vehicle operation and is not designed to pre-
vent contact with the objects surrounding the
vehicle. When manoeuvring, always use the
outside mirror and rear view mirror and turn
and check the surroundings to ensure it is
safe to manoeuvre.
•The MOD system does not have the function
to detect the surrounding stationary objects.
*: For the Right-Hand Drive (RHD) model, the screen
layout will be opposite.
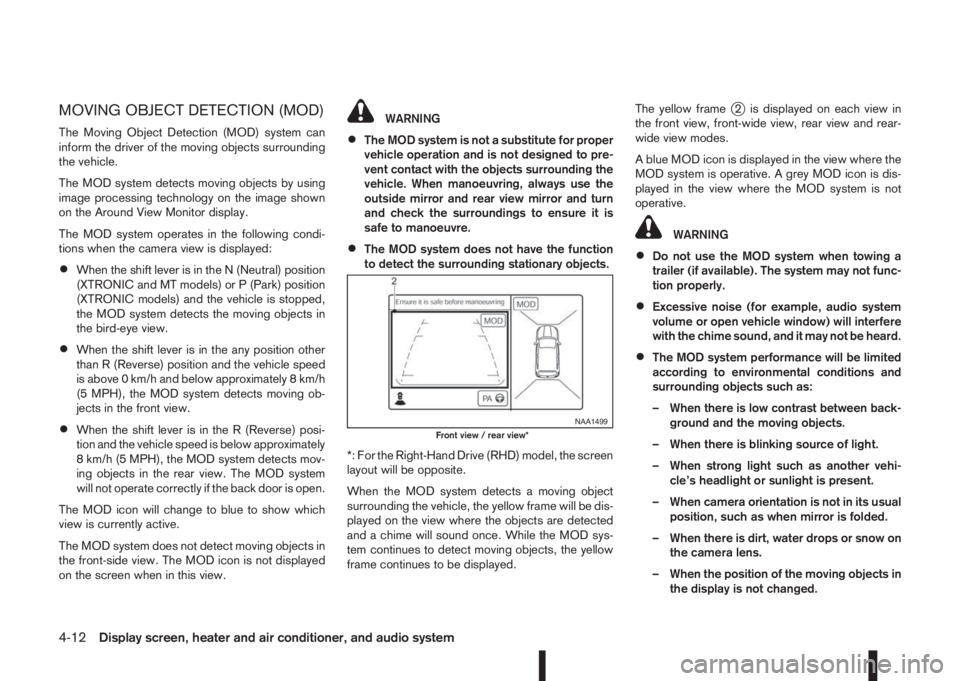
When the MOD system detects a moving object
surrounding the vehicle, the yellow frame will be dis-
played on the view where the objects are detected
and a chime will sound once. While the MOD sys-
tem continues to detect moving objects, the yellow
frame continues to be displayed.The yellow frame
j2 is displayed on each view in
the front view, front-wide view, rear view and rear-
wide view modes.
A blue MOD icon is displayed in the view where the
MOD system is operative. A grey MOD icon is dis-
played in the view where the MOD system is not
operative.
WARNING
•Do not use the MOD system when towing a
trailer (if available). The system may not func-
tion properly.
•Excessive noise (for example, audio system
volume or open vehicle window) will interfere
with the chime sound, and it may not be heard.
•The MOD system performance will be limited
according to environmental conditions and
surrounding objects such as:
– When there is low contrast between back-
ground and the moving objects.
– When there is blinking source of light.
– When strong light such as another vehi-
cle’s headlight or sunlight is present.
– When camera orientation is not in its usual
position, such as when mirror is folded.
– When there is dirt, water drops or snow on
the camera lens.
– When the position of the moving objects in
the display is not changed.
NAA1499Front view / rear view*
4-12Display screen, heater and air conditioner, and audio system
Page 145 of 338
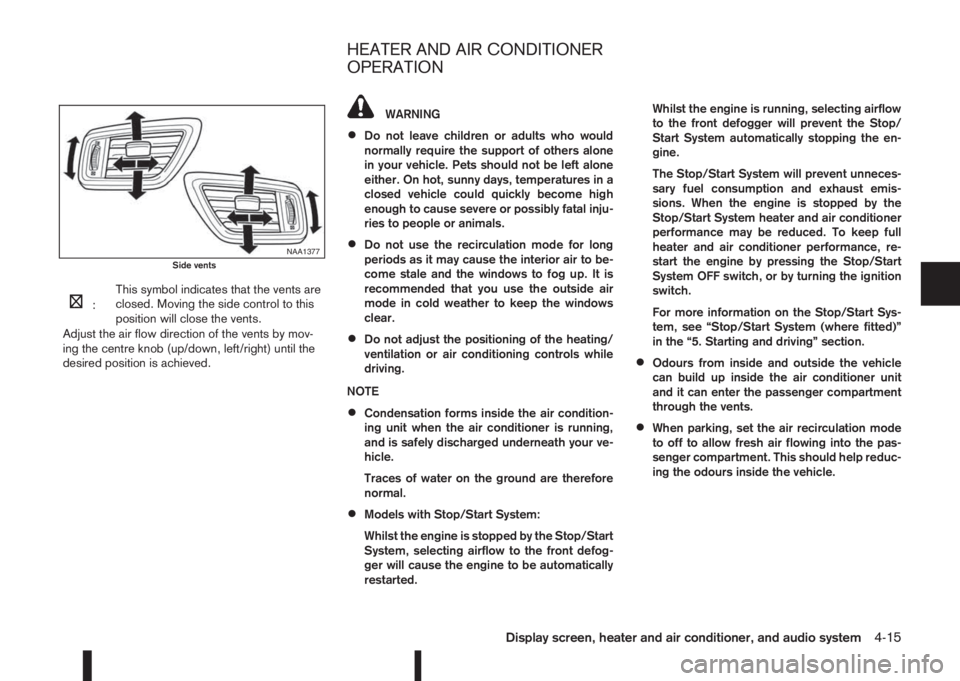
m:This symbol indicates that the vents are
closed. Moving the side control to this
position will close the vents.
Adjust the air flow direction of the vents by mov-
ing the centre knob (up/down, left/right) until the
desired position is achieved.
WARNING
•Do not leave children or adults who would
normally require the support of others alone
in your vehicle. Pets should not be left alone
either. On hot, sunny days, temperatures in a
closed vehicle could quickly become high
enough to cause severe or possibly fatal inju-
ries to people or animals.
•Do not use the recirculation mode for long
periods as it may cause the interior air to be-
come stale and the windows to fog up. It is
recommended that you use the outside air
mode in cold weather to keep the windows
clear.
•Do not adjust the positioning of the heating/
ventilation or air conditioning controls while
driving.
NOTE
•Condensation forms inside the air condition-
ing unit when the air conditioner is running,
and is safely discharged underneath your ve-
hicle.
Traces of water on the ground are therefore
normal.
•Models with Stop/Start System:
Whilst the engine is stopped by the Stop/Start
System, selecting airflow to the front defog-
ger will cause the engine to be automatically
restarted.Whilst the engine is running, selecting airflow
to the front defogger will prevent the Stop/
Start System automatically stopping the en-
gine.
The Stop/Start System will prevent unneces-
sary fuel consumption and exhaust emis-
sions. When the engine is stopped by the
Stop/Start System heater and air conditioner
performance may be reduced. To keep full
heater and air conditioner performance, re-
start the engine by pressing the Stop/Start
System OFF switch, or by turning the ignition
switch.
For more information on the Stop/Start Sys-
tem, see “Stop/Start System (where fitted)”
in the “5. Starting and driving” section.
•Odours from inside and outside the vehicle
can build up inside the air conditioner unit
and it can enter the passenger compartment
through the vents.
•When parking, set the air recirculation mode
to off to allow fresh air flowing into the pas-
senger compartment. This should help reduc-
ing the odours inside the vehicle.
NAA1377Side vents
HEATER AND AIR CONDITIONER
OPERATION
Display screen, heater and air conditioner, and audio system4-15
Page 146 of 338
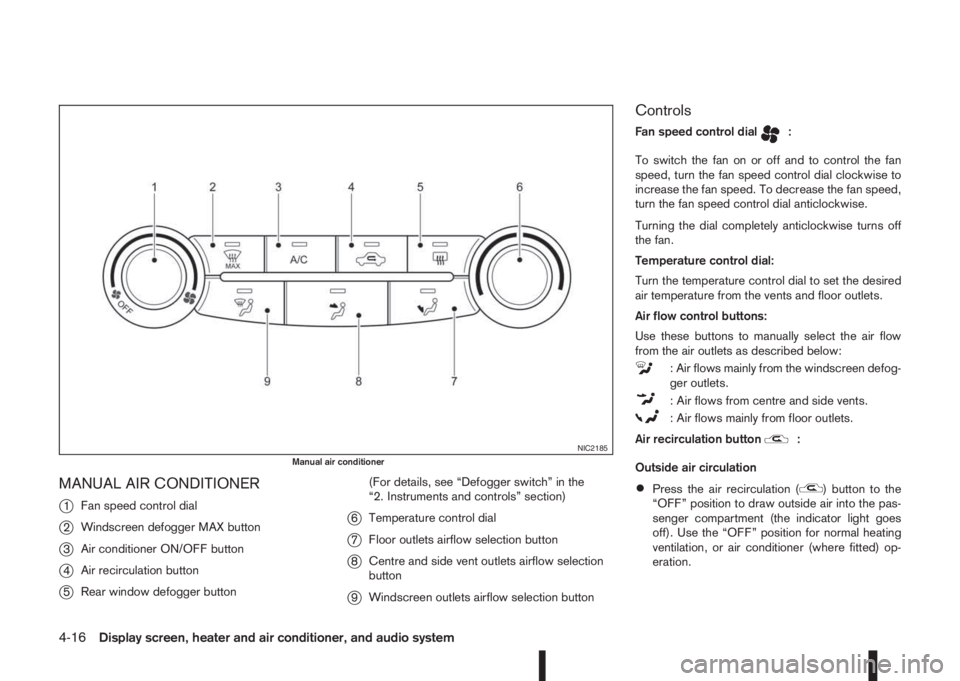
MANUAL AIR CONDITIONER
j
1Fan speed control dial
j2Windscreen defogger MAX button
j3Air conditioner ON/OFF button
j4Air recirculation button
j5Rear window defogger button(For details, see “Defogger switch” in the
“2. Instruments and controls” section)
j6Temperature control dial
j7Floor outlets airflow selection button
j8Centre and side vent outlets airflow selection
button
j9Windscreen outlets airflow selection button
Controls
Fan speed control dialm:
To switch the fan on or off and to control the fan
speed, turn the fan speed control dial clockwise to
increase the fan speed. To decrease the fan speed,
turn the fan speed control dial anticlockwise.
Turning the dial completely anticlockwise turns off
the fan.
Temperature control dial:
Turn the temperature control dial to set the desired
air temperature from the vents and floor outlets.
Air flow control buttons:
Use these buttons to manually select the air flow
from the air outlets as described below:
: Air flows mainly from the windscreen defog-
ger outlets.
: Air flows from centre and side vents.
: Air flows mainly from floor outlets.
Air recirculation button
m:
Outside air circulation
•Press the air recirculation () button to the
“OFF” position to draw outside air into the pas-
senger compartment (the indicator light goes
off). Use the “OFF” position for normal heating
ventilation, or air conditioner (where fitted) op-
eration.
NIC2185Manual air conditioner
4-16Display screen, heater and air conditioner, and audio system
Page 147 of 338
•Air recirculation
Press the air recirculation (
) button to the
“ON” position (the indicator light goes on). Use
the “ON” position in situations such as: driving
on a dust raised road, avoiding traffic fumes or
having maximum cooling from the air conditioner
(where fitted).
If the windows fog up, switch on the air condi-
tioning (where fitted).
A/C (Air Conditioner) button (where fitted):
Press the A/C button to turn the air conditioner on
or off. When the air conditioner is on, the A/C indi-
cator light illuminates.
Operation
The heater and air conditioner operate when the
engine is running. The air blower will operate even if
the engine is turned off and the ignition switch is in
the ON position.
NOTE
The air conditioner cooling function operates only
when the engine is running and the fan is acti-
vated.
1. Press the air recirculation (
) button to the
“OFF” position.
2. Use the airflow control buttons for:
–Cooling: select the
orsetting.
–Heating: select the
orsetting.–Heating and defogging: select the
set-
ting.
–Ventilation: select the
orsetting.
–Windscreen defogging: select the
set-
ting.
3. Set the fan speed to the desired position.
4. Turn the temperature control dial to the desired
position.
NOTE
When selecting the
orsetting, turn
the temperature control dial to the desired
position between the middle and the maxi-
mum “HOT” (right) position.
5. Press the A/C button (where fitted) to the “ON”
position and the indicator light will come on.
Switch this mode on for dehumidified heating or
cooling.
NOTE
•The air conditioner mode is used to cool and
dehumidify. For quick cooling when the out-
side temperature is high, select the air recir-
culation mode position (
). Be sure to re-
turn to the outside air mode to avoid windows
from fogging-up and interior air from becom-
ing stale.
A visible mist may be seen coming from the
vents in hot, humid conditions as the air is
cooled rapidly this is not a malfunction.
•For quick heating, press the air recirculation
() button to the “ON” position. Be sure to
return to the “OFF” position for normal heat-
ing (no indicator light) in order to avoid win-
dow fog and stale interior.
Windscreen defogger
m(manual mode):
Use this mode for defogging the windscreen as fol-
lows:
1. Press the
button.
The system will set the fan speed to maximum.
Air circulation is cancelled, the airflow mode
and the air conditioner is activated automatically.
Air flows mainly from the defogger outlets.
2. Set the temperature control dial to the maximum
(HOT) position.
3. To switch off, press the
button to return to
the previous mode.
NOTE
•To quickly defrost/defog the windscreen, set
the fan speed to the maximum position.
•As soon as possible after the windscreen has
been cleared of ice or fog, press the wind-
screen defogger button.
•When the windscreen defogging mode is acti-
vated, the air conditioner will automatically
switch on at outside temperatures above –2°C
(28°F) and the air recirculation mode will be
switched off.
Display screen, heater and air conditioner, and audio system4-17
Page 148 of 338
Operating tips
•In order to improve the heater operation, clear
any snow and ice from the wiper blade and air
inlet in front of the windscreen.
•After parking in the sun, drive for two or three
minutes with the windows open to vent hot air
from the passenger compartment. Then close
the windows to allow the acceleration of the air
conditioner’s cooling operation.
•Keep the windows closed while the air condi-
tioner is operating.
•The air conditioning system should be operated
for about 10 minutes, at least once a month. This
helps prevent damage to the system due to lack
of lubrication.
•If the coolant temperature gauge exceeds the
“HOT” position, turn the air conditioner off. For
additional information, see “Engine overheat” in
the “6. In case of emergency” section.
•If the engine coolant reaches an extremely high
temperature, the air conditioning system will au-
tomatically turn off. This may happen for example
if the engine runs at idle speed for a long time on
a hot day.
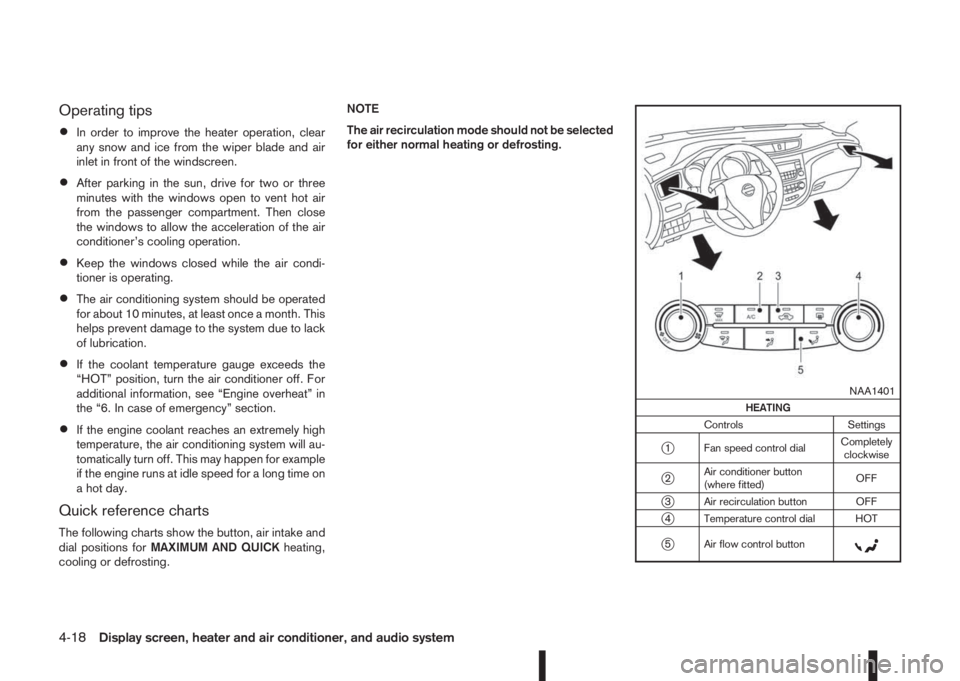
Quick reference charts
The following charts show the button, air intake and
dial positions forMAXIMUM AND QUICKheating,
cooling or defrosting.NOTE
The air recirculation mode should not be selected
for either normal heating or defrosting.
m
NAA1401
HEATING
Controls Settings
j1 Fan speed control dialCompletely
clockwise
j2Air conditioner button
(where fitted)OFF
j3 Air recirculation button OFF
j4 Temperature control dial HOT
j5 Air flow control buttonm
4-18Display screen, heater and air conditioner, and audio system
Page 149 of 338
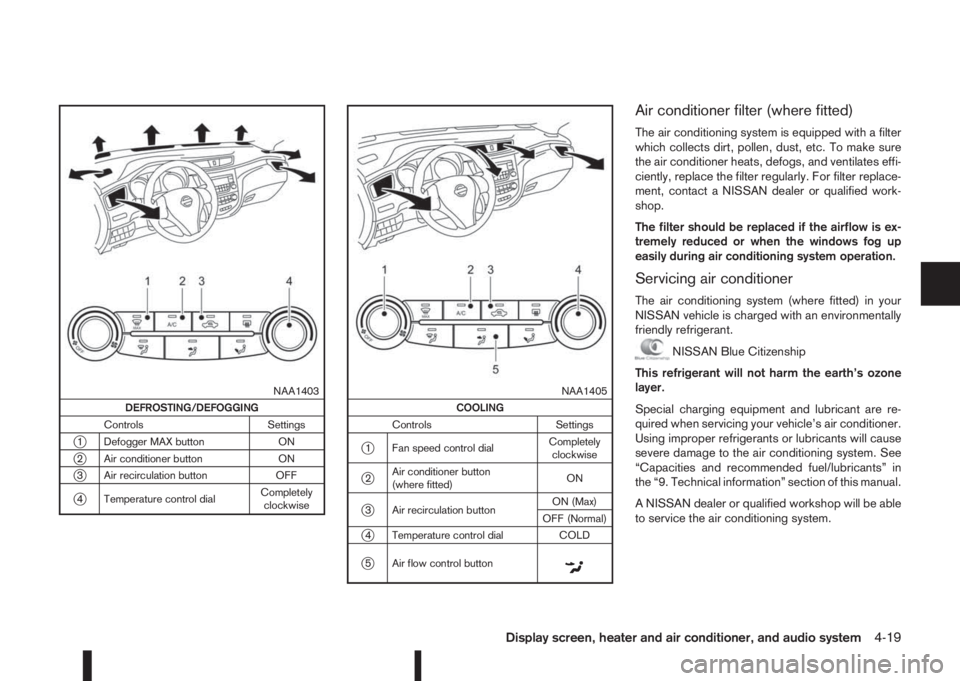
m
NAA1403
DEFROSTING/DEFOGGING
Controls Settings
j1 Defogger MAX button ON
j2 Air conditioner button ON
j3 Air recirculation button OFF
j4 Temperature control dialCompletely
clockwise
m
NAA1405
COOLING
Controls Settings
j1 Fan speed control dialCompletely
clockwise
j2Air conditioner button
(where fitted)ON
j3 Air recirculation buttonON (Max)
OFF (Normal)
j4 Temperature control dial COLD
j5 Air flow control buttonm
Air conditioner filter (where fitted)
The air conditioning system is equipped with a filter
which collects dirt, pollen, dust, etc. To make sure
the air conditioner heats, defogs, and ventilates effi-
ciently, replace the filter regularly. For filter replace-
ment, contact a NISSAN dealer or qualified work-
shop.
The filter should be replaced if the airflow is ex-
tremely reduced or when the windows fog up
easily during air conditioning system operation.
Servicing air conditioner
The air conditioning system (where fitted) in your
NISSAN vehicle is charged with an environmentally
friendly refrigerant.
NISSAN Blue Citizenship
This refrigerant will not harm the earth’s ozone
layer.
Special charging equipment and lubricant are re-
quired when servicing your vehicle’s air conditioner.
Using improper refrigerants or lubricants will cause
severe damage to the air conditioning system. See
“Capacities and recommended fuel/lubricants” in
the “9. Technical information” section of this manual.
A NISSAN dealer or qualified workshop will be able
to service the air conditioning system.
Display screen, heater and air conditioner, and audio system4-19
Page 150 of 338
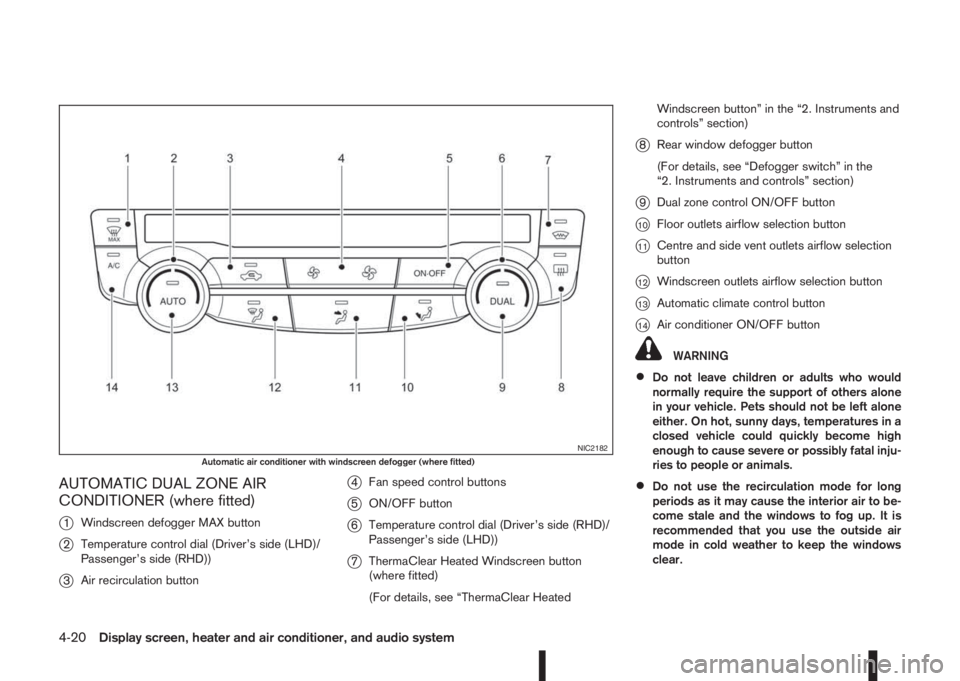
AUTOMATIC DUAL ZONE AIR
CONDITIONER (where fitted)
j
1Windscreen defogger MAX button
j2Temperature control dial (Driver’s side (LHD)/
Passenger’s side (RHD))
j3Air recirculation button
j4Fan speed control buttons
j5ON/OFF button
j6Temperature control dial (Driver’s side (RHD)/
Passenger’s side (LHD))
j7ThermaClear Heated Windscreen button
(where fitted)
(For details, see “ThermaClear HeatedWindscreen button” in the “2. Instruments and
controls” section)
j8Rear window defogger button
(For details, see “Defogger switch” in the
“2. Instruments and controls” section)
j9Dual zone control ON/OFF button
j10Floor outlets airflow selection button
j11Centre and side vent outlets airflow selection
button
j12Windscreen outlets airflow selection button
j13Automatic climate control button
j14Air conditioner ON/OFF button
WARNING
•Do not leave children or adults who would
normally require the support of others alone
in your vehicle. Pets should not be left alone
either. On hot, sunny days, temperatures in a
closed vehicle could quickly become high
enough to cause severe or possibly fatal inju-
ries to people or animals.
•Do not use the recirculation mode for long
periods as it may cause the interior air to be-
come stale and the windows to fog up. It is
recommended that you use the outside air
mode in cold weather to keep the windows
clear.
NIC2182Automatic air conditioner with windscreen defogger (where fitted)
4-20Display screen, heater and air conditioner, and audio system
Page 152 of 338
Heating and defogging (Manual mode):
This mode heats the interior and defogs the wind-
screen.
Use the airflow control buttons to select the
button is pressed. Switch on the air-conditioning to
improve the defogging and adjust the preferred fan
speed and temperature.
Fan speed control
m(Manual mode):
Press the fan speed control buttons to adjust the fan
speed.
Press the AUTO button to change the fan speed to
automatic mode.
Air recirculation:
Use this mode to recirculate interior air inside the
passenger compartment in situations such as driv-
ing on a dust raised road, avoiding traffic fumes or
having maximum cooling from the air conditioner.
Press the<
>button to recirculate interior air.
The indicator light illuminates and the air conditioner
will automatically come on.
When the air recirculation mode is switched off, out-
side air is drawn into the passenger compartment.
Outside air circulation :
Use this mode to draw outside air into the passen-
ger compartment for normal heating, ventilation or
air conditioner operation.
Press the<
>button to change the air intake
from the air recirculation to the outside air mode.
The indicator light (
) turns off.To turn the system on/off:
Press the “ON/OFF” button to turn the system on or
off.
Operating tips
•In order to improve the heater operation, clear
the snow and ice from the wiper blade and air
inlet in front of the windscreen.
•When the engine coolant temperature and out-
side air temperature are low, the airflow from the
floor outlets may not operate for a maximum of
150 seconds. However, this is not a malfunction.
After the coolant temperature has warmed up,
the airflow from the floor outlets will operate nor-
mally.
•After parking in the sun, drive for two or three
minutes with the windows open to vent hot air
from the passenger compartment. Then, close
the windows. This will allow the acceleration of
the air conditioner’s cooling operation.
•Keep windows closed while the air conditioner is
operating.
•The air conditioning system should be operated
for about 10 minutes, at least once a month. This
helps prevent damage to the system due to lack
of lubrication.
•If the coolant temperature gauge exceeds the
“HOT” position, turn the air conditioner off. For
additional information, see “Engine overheat” in
the “6. In case of emergency” section.
•If the engine coolant reaches an extremely high
temperature, the air conditioning system will au-
tomatically turn off. This may happen for example
if the engine runs at idle speed for a long time on
a hot day.
Air conditioner filter
The air conditioning system is equipped with a filter
which collects dirt, pollen, dust, etc. To make sure
the air conditioner heats, defogs, and ventilates effi-
ciently, replace the filter regularly. To replace the fil-
ter, contact a NISSAN dealer or qualified workshop.
The filter should be replaced if the airflow is ex-
tremely reduced or when the windows fog up
easily while operating the heater or air condition-
ing system.
Servicing air conditioner
The air conditioning system in your NISSAN vehicle
is charged with an environmentally friendly refriger-
ant.
NISSAN Blue Citizenship
This refrigerant will not harm the earth’s ozone
layer.
Special charging equipment and lubricant are re-
quired when servicing the NISSAN air conditioner.
Using improper refrigerants or lubricants will cause
severe damage to the air conditioning system. See
“Capacities and recommended fuel/lubricants” in
the “9. Technical information” section.
A NISSAN dealer or qualified workshop will be able
to service the air conditioning system.
4-22Display screen, heater and air conditioner, and audio system