clock reset NISSAN QASHQAI 2015 Owner´s Manual
[x] Cancel search | Manufacturer: NISSAN, Model Year: 2015, Model line: QASHQAI, Model: NISSAN QASHQAI 2015Pages: 338, PDF Size: 4.88 MB
Page 72 of 338

HOW TO USE THE VEHICLE
INFORMATION DISPLAY
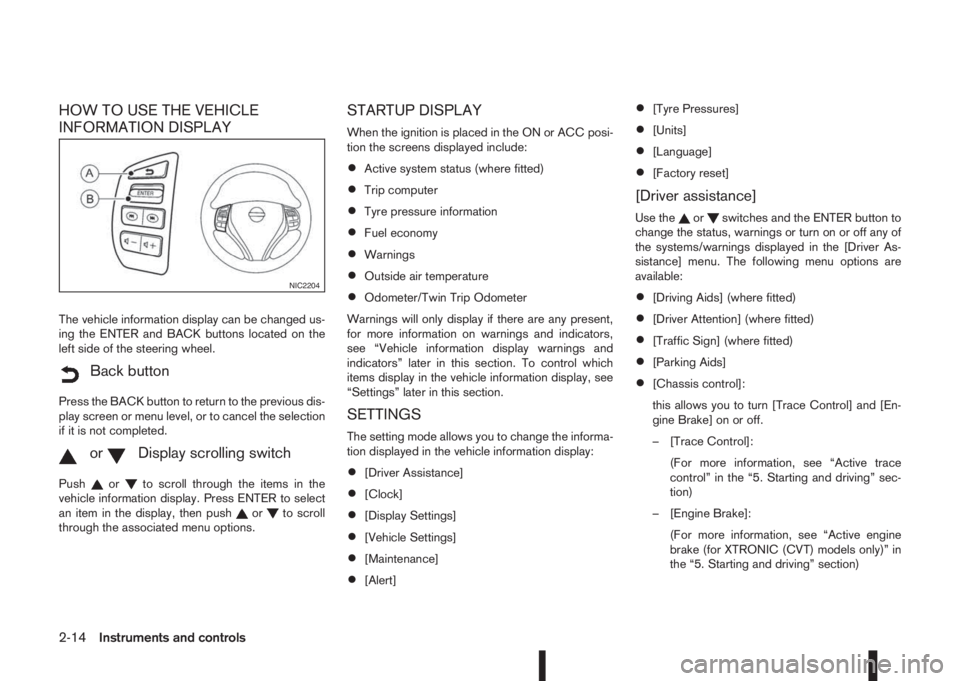
The vehicle information display can be changed us-
ing the ENTER and BACK buttons located on the
left side of the steering wheel.
mBack button
Press the BACK button to return to the previous dis-
play screen or menu level, or to cancel the selection
if it is not completed.
mormDisplay scrolling switch
Pushorto scroll through the items in the
vehicle information display. Press ENTER to select
an item in the display, then push
orto scroll
through the associated menu options.
STARTUP DISPLAY
When the ignition is placed in the ON or ACC posi-
tion the screens displayed include:
•Active system status (where fitted)
•Trip computer
•Tyre pressure information
•Fuel economy
•Warnings
•Outside air temperature
•Odometer/Twin Trip Odometer
Warnings will only display if there are any present,
for more information on warnings and indicators,
see “Vehicle information display warnings and
indicators” later in this section. To control which
items display in the vehicle information display, see
“Settings” later in this section.
SETTINGS
The setting mode allows you to change the informa-
tion displayed in the vehicle information display:
•[Driver Assistance]
•[Clock]
•[Display Settings]
•[Vehicle Settings]
•[Maintenance]
•[Alert]
•[Tyre Pressures]
•[Units]
•[Language]
•[Factory reset]
[Driver assistance]
Use theorswitches and the ENTER button to
change the status, warnings or turn on or off any of
the systems/warnings displayed in the [Driver As-
sistance] menu. The following menu options are
available:
•[Driving Aids] (where fitted)
•[Driver Attention] (where fitted)
•[Traffic Sign] (where fitted)
•[Parking Aids]
•[Chassis control]:
this allows you to turn [Trace Control] and [En-
gine Brake] on or off.
– [Trace Control]:
(For more information, see “Active trace
control” in the “5. Starting and driving” sec-
tion)
– [Engine Brake]:
(For more information, see “Active engine
brake (for XTRONIC (CVT) models only)” in
the “5. Starting and driving” section)
NIC2204
2-14Instruments and controls
Page 83 of 338
![NISSAN QASHQAI 2015 Owner´s Manual 25. [Reminder turn off headlights]
warning
This warning appears when the driver side door is
opened while the headlight switch is left ON and the
ignition switch is placed in the ACC, “OFF” or
LOC NISSAN QASHQAI 2015 Owner´s Manual 25. [Reminder turn off headlights]
warning
This warning appears when the driver side door is
opened while the headlight switch is left ON and the
ignition switch is placed in the ACC, “OFF” or
LOC](/img/5/40325/w960_40325-82.png)
25. [Reminder turn off headlights]
warning
This warning appears when the driver side door is
opened while the headlight switch is left ON and the
ignition switch is placed in the ACC, “OFF” or
LOCK position. Place the headlight switch in “OFF”
or “AUTO” position. For additional information, see
“Headlight and turn signal switch” later in this sec-
tion.
26. [Time for a driver break?] indicator
This indicator appears when the set “TIMER” indi-
cator activates. You can set the time for up to 6
hours.
27. [Low outside temperature] warning
This warning appears if the outside temperature is
below 3°C (37°F). The warning can be set not to be
displayed. (See “[Clock] and [outside air
temperature]” later in this section or the separate
NissanConnect Owner’s manual.)
28. [Chassis control system fault]
warning
This warning appears if the chassis control module
detects an error in the Chassis Control System
(where fitted). Have the system checked by a
NISSAN dealer or qualified workshop. (See “Chas-
sis control” in the “5. Starting and driving” section.)
29. Cruise control indicator
This indicator shows the cruise control system sta-
tus. The status is shown by the colour.
See “Cruise control (where fitted)” in the “5. Start-
ing and driving” section for details.
30. Speed limiter indicator
This indicator shows the status of the speed limiter
system . If the system is in turned on and in use, the
speed that the speed limiter is set to is also dis-
played.
See “Speed limiter (where fitted)” in the “5. Starting
and driving” section for details.
31. Shift lever position indicator
This indicator shows the shift lever position.
See “Shift lever indicator (where fitted)” in the
“5. Starting and driving” section for further details.
32. [Tyre Pressure System Fault]
warning
This warning illuminates when there is a problem
with the Tyre Pressure Monitoring System (TPMS).
If this warning comes on, have the system checked
by a NISSAN dealer or qualified workshop. See
“Tyre Pressure Monitoring System (TPMS)” in the
“5. Starting and driving” section for further details.
33. [Resetting Tyre Pressure System]
indicator
This warning illuminates when the TPMS tempera-
ture calibration is in progress. See “TPMS tempera-
ture calibration” in the “5. Starting and driving” sec-
tion for further details.
34. [Parking Sensor System Fault]
warning (where fitted)
This warning illuminates when there is a problem
with the parking sensor system. If this warning
comes on, have the system checked by a NISSAN
dealer or qualified workshop.
35. [Vehicle Overheating Stop Vehicle]
warning
This warning illuminates is the engine coolant tem-
perature is too high, indicating that the engine is
overheating. See “Engine overheat” in the “6. In
case of emergency” section for further details.
36. [CVT System Fault] warning
(where fitted)
This warning illuminates when there is a problem
with the XTRONIC transmission (CVT) system. If
this warning comes on, have the system checked by
a NISSAN dealer or qualified workshop.
Instruments and controls2-25
Page 87 of 338

For more details, see “Blind Spot Warning (BSW)
system (where fitted)” in the “5. Starting and driving”
section, “Lane Departure Warning (LDW) system
(where fitted)” in the “5. Starting and driving” sec-
tion, and/or “Forward emergency braking system
(where fitted)” in the “5. Starting and driving” sec-
tion.
8. [Tyre pressures] (where fitted)
The tyre pressure mode shows the pressure of all
four tyres. The displayed values are only available
while the vehicle is being driven.
When the [Low Tyre Pressure] warning appears,
the display can be switched to the tyre pressure
mode by pushing the ENTER switch to reveal addi-
tional details on the displayed warning.
9. [Chassis control]
When either the Active Trace Control (where fitted),
Active Engine Brake (where fitted), Hill start Assist
(where fitted) or the Active Ride Control system is
operated, it shows the operating condition. See
“Chassis control” in the “5. Starting and driving”
section and “Hill Start Assist (HSA) system” in the
“5. Starting and driving” section for more details.
10. [Stop/Start] system (where fitted)
The Stop/Start system mode shows the CO2 sav-
ings and the engine stop time. (See “Stop/Start Sys-
tem (where fitted)” in the “5. Starting and driving”
section.)[Trip CO2 saving] and engine stop time:
The trip CO2 saving and engine stop time mode
shows the CO2 saving and engine stop time since
the last reset.
The CO2 saving and engine stop time can be reset
by pushing the ENTER switch for longer than 1 sec-
ond.
[Total CO2 saving] and engine stop time:
The total CO2 saving and engine stop time mode
shows:
•The estimated CO2 exhaust emissions
prevented.
•The engine stop time that the engine has been
stopped by the Stop/Start System.
NOTE
The Total CO2 saving and engine stop time val-
ues cannot be reset and show accumulated
Stop/Start System information since the vehicle
was built.
11. Warning check
The current warnings are displayed. If no warning is
present, “No Warnings” is displayed.
[CLOCK] AND [OUTSIDE AIR
TEMPERATURE]
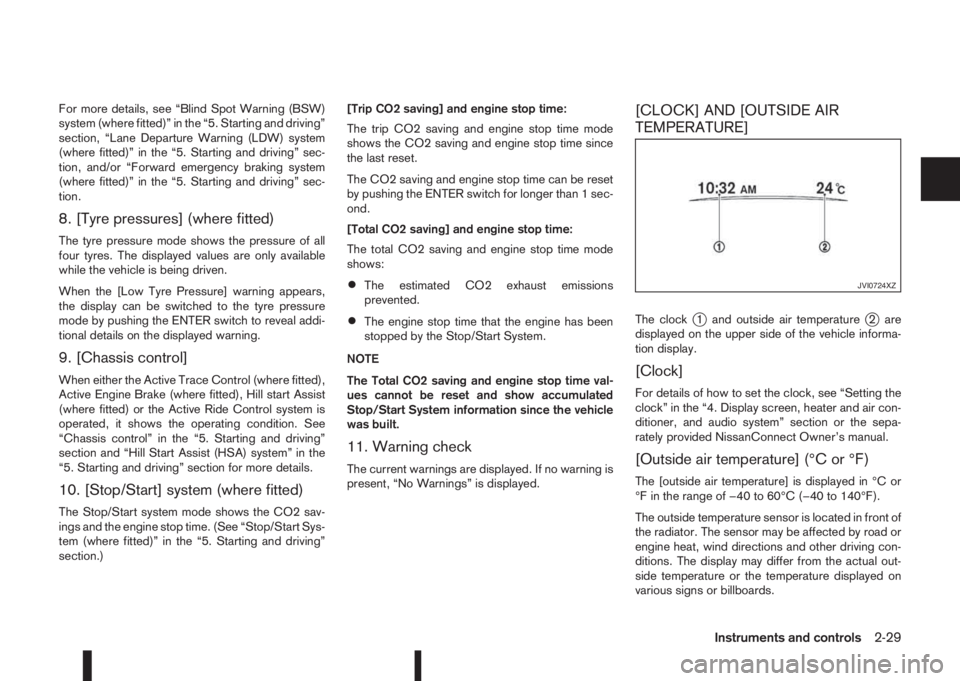
The clockj1 and outside air temperaturej2 are
displayed on the upper side of the vehicle informa-
tion display.
[Clock]
For details of how to set the clock, see “Setting the
clock” in the “4. Display screen, heater and air con-
ditioner, and audio system” section or the sepa-
rately provided NissanConnect Owner’s manual.
[Outside air temperature] (°C or °F)
The [outside air temperature] is displayed in °C or
°F in the range of −40 to 60°C (−40 to 140°F).
The outside temperature sensor is located in front of
the radiator. The sensor may be affected by road or
engine heat, wind directions and other driving con-
ditions. The display may differ from the actual out-
side temperature or the temperature displayed on
various signs or billboards.
JVI0724XZ
Instruments and controls2-29
Page 155 of 338

AUDIO MAIN OPERATION
The audio unit operates when the ignition switch is
in Acc or ON position.
mPower ON/OFF button
Press thebutton to switch on the audio unit. If
the audio unit was switched off using the ignition
switch, it can also be switched on with the ignition
switch. The source that was playing immediately
before the unit was switched off will resume playing
and the volume will be set to the previous volume
level.
The audio unit can be switched off by pressing
,
or by turning the ignition switch to the “OFF” or
LOCK position.
mVolume (VOL) level control
Turn the
adjust the volume level.
The audio unit is equipped with a speed control vol-
ume function, this means that the audio system au-
tomatically adjusts the volume level in relation to
vehicle speed. For details, see “[Speed Volume]
menu” later in this section.
RADIO OPERATION
When the(power ON/OFF) button is pressed,
the audio unit will switch on with the last received
radio station, if the audio unit was previously
switched off in radio mode.The radio is able to receive multiple kinds of audio
transmissions:
–FM
–AM
Radio band select buttons
Press the
transmission source as follows:
FM1→FM2→AM→FM1
When
come on at the last received radio station. If audio is
already playing using one of the other input sources
(iPod, Bluetooth, CD, USB, AUX-in) pressing the
mode and the last received radio station will be se-
lected.
Setting preset stations
Auto populating the [FM List]:
When the
1.5 seconds the six stations with the strongest sig-
nals are stored in the preset (1 to 6) buttons of the
band. During the search, a notification message
[Updating FM List] appears in the display and the
sound is muted until the operation is complete. Once
completed, the radio reverts to the previously se-
lected radio station.
Manual tuning
When adjusting the broadcasting station frequency
manually access the [FM List] and turn the
Page 156 of 338
![NISSAN QASHQAI 2015 Owner´s Manual Pressing a preset button for more than 2 seconds
while in the [FM list] or radio main screen will cause
the station currently being received to be stored
against that preset button.
•Twelve stations NISSAN QASHQAI 2015 Owner´s Manual Pressing a preset button for more than 2 seconds
while in the [FM list] or radio main screen will cause
the station currently being received to be stored
against that preset button.
•Twelve stations](/img/5/40325/w960_40325-155.png)
Pressing a preset button for more than 2 seconds
while in the [FM list] or radio main screen will cause
the station currently being received to be stored
against that preset button.
•Twelve stations (if available) can be stored in the
FM bands. (Six each for FM1 and FM2)
•Six stations (if available) can be set for the AM
band.
If the battery is disconnected, or if the fuse blows,
the radio memory will be erased. In that case, reset
the desired stations after battery connection or fuse
replacement.
Radio Data System (RDS) operation
(where fitted)
The RDS is a system through which encoded digital
information is transmitted by FM radio stations in
addition to the normal FM radio broadcasting. The
RDS provides information services such as station
name, traffic information, or news.
NOTE
•In some countries or regions, some of these
services may not be available.
Alternative Frequency (AF) mode:
The AF mode operates in the FM (radio) mode.
•The AF mode operates in the FM (radio), AUX or
CD mode (if FM was previously selected in the
radio mode).
•The AF function compares signal strengths and
selects the station with the optimum reception
conditions for the currently tuned-in station.
RDS functions
Programme Service (PS) function (station name
display function):
– FM:
When an RDS station is tuned in with seek or
manual tuning, the RDS data is received and the
PS name is displayed.
TA Traffic announcement
This function operates in FM (Radio) mode. This
function will still operate in the background if any
media source is selected (CD, USB or MEDIA
mode).
•Pressing the
The TA indicator is displayed while TA mode is
on.
•When
switched off and the TA indicator will disappear
from the display.
Traffic announcement interrupt function:
When a traffic announcement is received, the an-
nouncement is tuned in and the display shows a
notification message with the radio station name e.g.
[TA: Radio 1].
Once the traffic announcement has finished, the unit
returns to the source that was active before the traf-
fic announcement started.If
the traffic announcement interrupt mode is can-
celled. The TA mode returns to the standby mode
and the audio unit returns to the previous source.
SETUP BUTTON
To configure [Audio], [Clock], [Radio], and [Lan-
guage] settings, perform the following procedure:
1. Press the
2. Turn the
Page 157 of 338
![NISSAN QASHQAI 2015 Owner´s Manual [Sound] menu:
Submenus in the sound menu:
[Bass] Use this control to enhance or
attenuate bass response sound.
Turn the<MENU>dial clockwise
or anticlockwise to adjust the bass
settings then press<ENTE NISSAN QASHQAI 2015 Owner´s Manual [Sound] menu:
Submenus in the sound menu:
[Bass] Use this control to enhance or
attenuate bass response sound.
Turn the<MENU>dial clockwise
or anticlockwise to adjust the bass
settings then press<ENTE](/img/5/40325/w960_40325-156.png)
[Sound] menu:
Submenus in the sound menu:
[Bass] Use this control to enhance or
attenuate bass response sound.
Turn the
or anticlockwise to adjust the bass
settings then press
confirm.
[Treble] Use this control to enhance or
attenuate the treble.
Turn the
or anticlockwise to adjust the
treble settings then press
[Balance] Use this control to adjust the bal-
ance of the volume between the
left and right speakers.
Turn the
anticlockwise or clockwise to
adjust the left/right balance then
press
[Fade] Use this control to adjust the bal-
ance of the volume between the
front and rear speakers.
Turn the
anticlockwise or clockwise to
adjust the front/rear balance then
press
Use this control to adjust the volume output from the
auxiliary source.
Turn the
to select [Low], [Medium], or [High] mode then
press
Set the AUX-in volume. Select one of the submenus
in the [AUX in] menu:
– [Low]
– [Medium]
– [High]
[Speed Volume] menu:
Set the audio system to automatically adjust the vol-
ume level in relation to vehicle speed.
Turn the
to adjust the volume, higher (more) bars mean the
volume level relatively changes more when the ve-
hicle speed increase or decreases. Press
to confirm.
This mode controls the volume output from the
speakers automatically in relation to vehicle speed.
When [Speed Volume] is displayed, turn the
the volume level.
Adjusting the setting to 0 (zero) turns off the speed
volume feature. Increasing the speed volume setting
results in the audio volume increasing more rapidly
with vehicle speed. Once chosen, press
to save the setting.[Bass Boost] menu:
Switch [Bass boost] [ON] or [OFF]
[Audio default] menu:
The audio unit has a saved preset settings as a fac-
tory default. Select [Yes] to change all settings back
to the factory preset settings. Select [No] to exit the
menu keeping the current settings.
Setting the clock
The clock menu screen set up screen will appear
when selecting the [Clock] item from the set up
menu.
[Set Time]:
Select [Set Time] then adjust the clock as follows:
1. The hour display will start flashing. Turn the
2. Press the
will start flashing.
3. Turn the
4. Press
[On/Off]:
Set the clock display between on or off when the
audio unit is turned off.
If set in the [ON] position, the clock will be dis-
played when the audio unit is turned off either by
pressing the
button or when the ignition switch
is placed in the “OFF” position.
Display screen, heater and air conditioner, and audio system4-27
Page 158 of 338
![NISSAN QASHQAI 2015 Owner´s Manual [Format]:
Set the clock display between 24-hour mode and
12-hour clock mode.
[Radio] menu
For activation or deactivation details, see “SETUP
button” later in this section.
Language settings
Select NISSAN QASHQAI 2015 Owner´s Manual [Format]:
Set the clock display between 24-hour mode and
12-hour clock mode.
[Radio] menu
For activation or deactivation details, see “SETUP
button” later in this section.
Language settings
Select](/img/5/40325/w960_40325-157.png)
[Format]:
Set the clock display between 24-hour mode and
12-hour clock mode.
[Radio] menu
For activation or deactivation details, see “SETUP
button” later in this section.
Language settings
Select the appropriate language and press the
automatically adapt the language setting.
•[AUTO]
(Factory preset language connected with the
meter language)
•[Chinese]
•[Chinese Simplified]
•[Deutsch]
•[Español]
•[Français]
•[Italiano]
•[Nederlands]
•[Polski]
•[Português]
•[Türkçe]
•[UK English]
•[русский]
COMPACT DISC (CD) OPERATION
The CD player can play a music CD or an encoded
MP3/WMA CD and while listening to those CD’s
music information tags (track and artist information)
can be displayed (when CD encoded with text is
being used).
Press the
will start to play.
When
source mode is already operating, it will automati-
cally turn off the playing source and the CD play
mode will start.
CAUTION
•Do not force the CD into the slot. This could
damage the player.
•Do not use 8 cm (3.1 in) discs.
CD insert (CD player)
Insert the CD disc into the slot with the label side
facing up. The disc will be guided automatically into
the slot and will start playing. After loading the disc,
track information will be displayed.
NOTE
•The CD player accepts normal audio CD or
CD recorded with MP3/WMA files.
•Inserting a CD recorded with MP3/WMA files,
the audio unit will automatically detect and
[MP3CD] will be indicated.
•An error notification message will be
displayed when inserting a wrong disc type
(e.g. DVD), or the player cannot read the CD
disc. Eject the disc and insert another disc.
MEDIA button
Load a CD disc. After a short loading period the CD
starts playing.
If the disc was already loaded:
Press the
connected audio sources if necessary multiple
times) to select CD. Playing starts from the track
that was being played when the CD play mode was
switched off.
Audio main operation
List view:
While the track is being played, either press the
the available tracks in a listed view mode. To select
a track from the list, or a track to start listening from,
turn the
Press the
button to return to the song.
Fast Forward (Cue), Fast
Reverse (Review) buttons:
When the
(Cue) or(Review) button is
pressed continuously, the track will be played at
high speed. When the button is released, the track
will be played at normal playing speed.
4-28Display screen, heater and air conditioner, and audio system
Page 285 of 338

Battery (Type A)
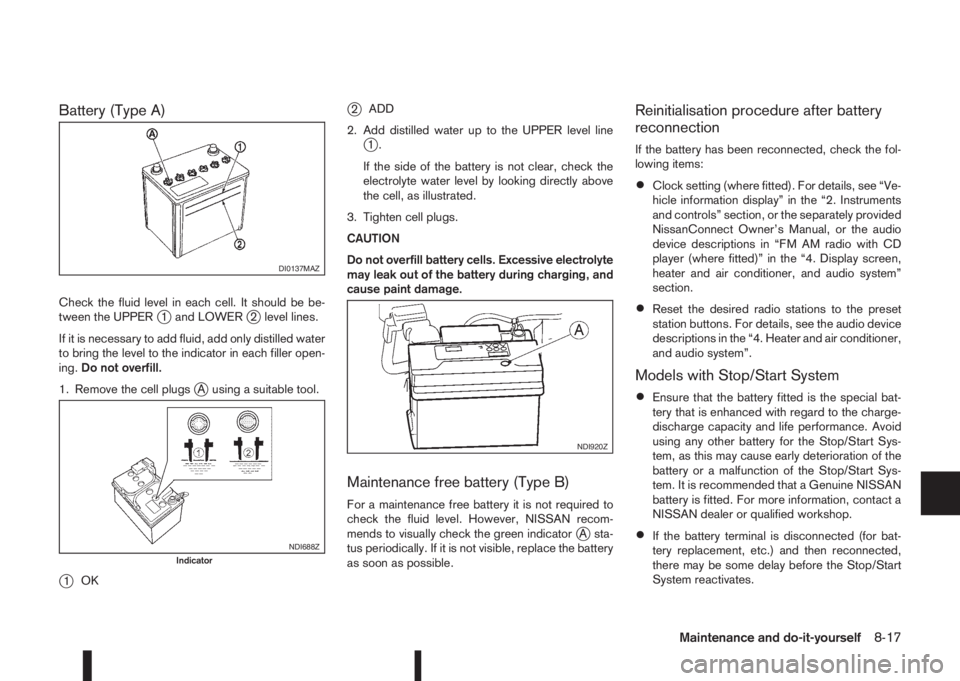
Check the fluid level in each cell. It should be be-
tween the UPPERj1 and LOWERj2 level lines.
If it is necessary to add fluid, add only distilled water
to bring the level to the indicator in each filler open-
ing.Do not overfill.
1. Remove the cell plugs
jA using a suitable tool.
j1OK
j2ADD
2. Add distilled water up to the UPPER level line
j1.
If the side of the battery is not clear, check the
electrolyte water level by looking directly above
the cell, as illustrated.
3. Tighten cell plugs.
CAUTION
Do not overfill battery cells. Excessive electrolyte
may leak out of the battery during charging, and
cause paint damage.
Maintenance free battery (Type B)
For a maintenance free battery it is not required to
check the fluid level. However, NISSAN recom-
mends to visually check the green indicator
jA sta-
tus periodically. If it is not visible, replace the battery
as soon as possible.
Reinitialisation procedure after battery
reconnection
If the battery has been reconnected, check the fol-
lowing items:
•Clock setting (where fitted). For details, see “Ve-
hicle information display” in the “2. Instruments
and controls” section, or the separately provided
NissanConnect Owner’s Manual, or the audio
device descriptions in “FM AM radio with CD
player (where fitted)” in the “4. Display screen,
heater and air conditioner, and audio system”
section.
•Reset the desired radio stations to the preset
station buttons. For details, see the audio device
descriptions in the “4. Heater and air conditioner,
and audio system”.
Models with Stop/Start System
•Ensure that the battery fitted is the special bat-
tery that is enhanced with regard to the charge-
discharge capacity and life performance. Avoid
using any other battery for the Stop/Start Sys-
tem, as this may cause early deterioration of the
battery or a malfunction of the Stop/Start Sys-
tem. It is recommended that a Genuine NISSAN
battery is fitted. For more information, contact a
NISSAN dealer or qualified workshop.
•If the battery terminal is disconnected (for bat-
tery replacement, etc.) and then reconnected,
there may be some delay before the Stop/Start
System reactivates.
DI0137MAZ
NDI688ZIndicator
NDI920Z
Maintenance and do-it-yourself8-17