door lock NISSAN QASHQAI 2017 Owner´s Manual
[x] Cancel search | Manufacturer: NISSAN, Model Year: 2017, Model line: QASHQAI, Model: NISSAN QASHQAI 2017Pages: 508, PDF Size: 2.68 MB
Page 173 of 508
3-26Pre-driving checks and adjustments
CAUTION
Do not use accessory carriers that
attach to the liftgate. Doing so will
cause damage to the vehicle.
JVP0396X
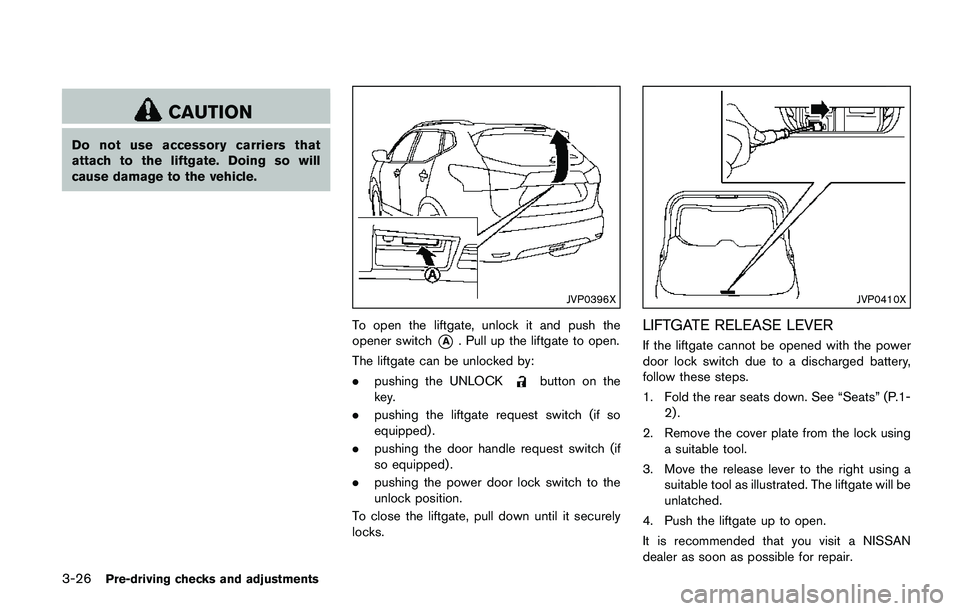
To open the liftgate, unlock it and push the
opener switch
*A. Pull up the liftgate to open.
The liftgate can be unlocked by:
.pushing the UNLOCK
button on the
key.
.pushing the liftgate request switch (if so
equipped) .
.pushing the door handle request switch (if
so equipped) .
.pushing the power door lock switch to the
unlock position.
To close the liftgate, pull down until it securely
locks.
JVP0410X
LIFTGATE RELEASE LEVER
If the liftgate cannot be opened with the power
door lock switch due to a discharged battery,
follow these steps.
1. Fold the rear seats down. See “Seats” (P.1-
2) .
2. Remove the cover plate from the lock using
a suitable tool.
3. Move the release lever to the right using a
suitable tool as illustrated. The liftgate will be
unlatched.
4. Push the liftgate up to open.
It is recommended that you visit a NISSAN
dealer as soon as possible for repair.
Page 174 of 508
WARNING
.Fuel is extremely flammable and
highly explosive under certain con-
ditions. You could be burned or
seriously injured if it is misused or
mishandled. Always stop the engine
and do not smoke or allow open
flames or sparks near the vehicle
when refueling.
.Fuel may be under pressure. Turn
the cap a half of a turn, and wait for
any“hissing”sound to stop to pre-
vent fuel from spraying out and
possibly causing personal injury.
Then remove the cap.
.Use only an original equipment type
fuel-filler cap as a replacement. It
has a built-in safety valve needed
for proper operation of the fuel
system and emission control sys-
tem. An incorrect cap can result in a
serious malfunction and possible
injury.
JVP0540X
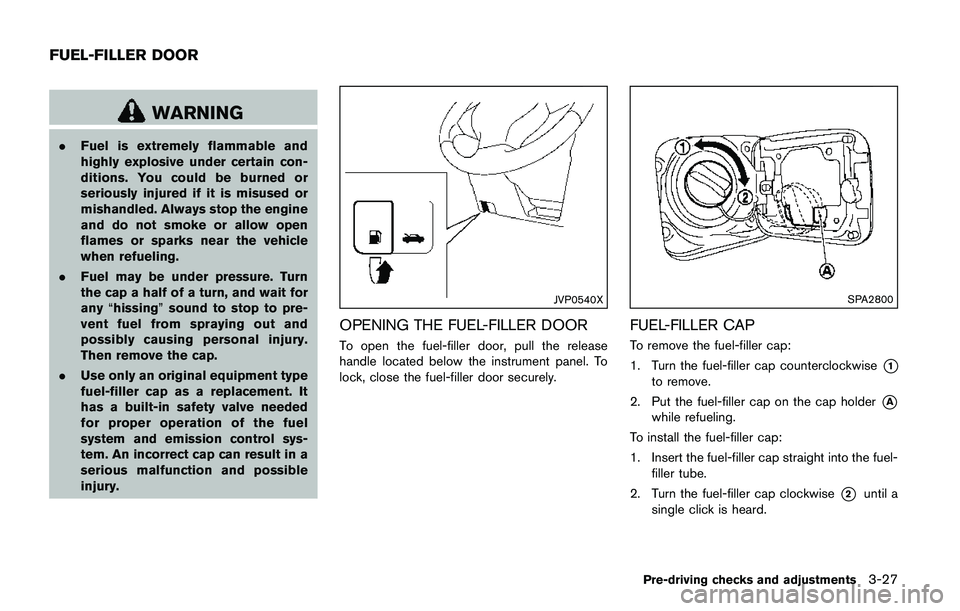
OPENING THE FUEL-FILLER DOOR
To open the fuel-filler door, pull the release
handle located below the instrument panel. To
lock, close the fuel-filler door securely.
SPA2800
FUEL-FILLER CAP
To remove the fuel-filler cap:
1. Turn the fuel-filler cap counterclockwise
*1
to remove.
2. Put the fuel-filler cap on the cap holder
*A
while refueling.
To install the fuel-filler cap:
1. Insert the fuel-filler cap straight into the fuel-
filler tube.
2. Turn the fuel-filler cap clockwise
*2until a
single click is heard.
Pre-driving checks and adjustments3-27
FUEL-FILLER DOOR
Page 288 of 508
Active Engine Brake (Continuously Variable
Transmission (CVT) models) ...................................... 5-107
Active Ride Control ...................................................... 5-108
Hill Start Assist system ..................................................... 5-109
Cold weather driving .......................................................... 5-110
Freeing a frozen door lock .......................................... 5-110
Anti-freeze ....................................................................... 5-110Battery ............................................................................ 5-110
Draining of coolant water .......................................... 5-110
Tire equipment ............................................................. 5-110
Special winter equipment ......................................... 5-110
Driving on snow or ice .............................................. 5-110
Page 300 of 508
.The cargo room area is not included in the
operating range but the Intelligent Key may
function.
.If the Intelligent Key is placed on the
instrument panel, inside the glove box or
door pocket, the Intelligent Key may not
function.
.If the Intelligent Key is placed near the door
or window outside the vehicle, the Intelligent
Key may function.
PUSH-BUTTON IGNITION SWITCH
OPERATION
CAUTION
.Do not leave the vehicle for ex-
tended periods of time when the
ignition switch is in the ON position
and the engine is not running. This
can discharge the battery.
.Use electrical accessories with the
engine running to avoid discharging
the vehicle battery. If you must use
accessories while the engine is not
running, do not use them for ex-
tended periods of time and do not
use multiple electrical accessories
at the same time.
JVS0937X
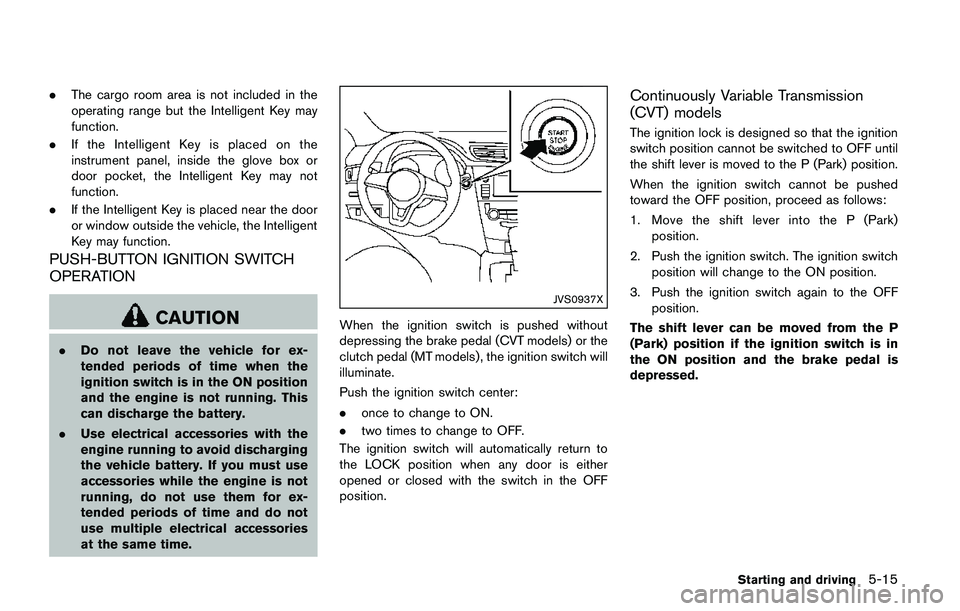
When the ignition switch is pushed without
depressing the brake pedal (CVT models) or the
clutch pedal (MT models) , the ignition switch will
illuminate.
Push the ignition switch center:
.once to change to ON.
.two times to change to OFF.
The ignition switch will automatically return to
the LOCK position when any door is either
opened or closed with the switch in the OFF
position.
Continuously Variable Transmission
(CVT) models
The ignition lock is designed so that the ignition
switch position cannot be switched to OFF until
the shift lever is moved to the P (Park) position.
When the ignition switch cannot be pushed
toward the OFF position, proceed as follows:
1. Move the shift lever into the P (Park)
position.
2. Push the ignition switch. The ignition switch
position will change to the ON position.
3. Push the ignition switch again to the OFF
position.
The shift lever can be moved from the P
(Park) position if the ignition switch is in
the ON position and the brake pedal is
depressed.
Starting and driving5-15
Page 301 of 508
5-16Starting and driving
PUSH-BUTTON IGNITION SWITCH
POSITIONS
LOCK (Normal parking position)
The ignition switch can only be locked at this
position.
The ignition switch will lock when any door is
opened or closed with the ignition switched off.
ON (Normal operating position)
The ignition system and the electrical accessory
power activate at this position without the
engine turned on.
The ON position has a battery saver feature that
will place the ignition switch in the OFF position,
if the vehicle is not running, after some time
under the following conditions:
.all doors are closed.
.shift lever is in P (Park) position (CVT model)
or N (Neutral) position (MT model) .
The battery saver feature will be cancelled if any
of the following occur:
.any door is opened.
.shift lever is moved out of the P (Park)
position (CVT model) .
.ignition switch changes position.
OFF position
The engine is turned off in this position.
Auto ACC position
With the vehicle in the P (Park) position (CVT
models) or the N (Neutral) position (MT models) ,
the Intelligent Key with you and the ignition
placed from ON to OFF, the radio can still be
used for a period of time, or until the driver’s
door is opened. After a period of time, functions
such as radio, navigation (if so equipped) , and
Bluetooth
�ŠHands-Free Phone System may be
restarted by turning on the audio system (See
“Audio system” (P.4-38) in this manual) , or by
the UNLOCK button on the Intelligent Key for up
to a total of 30 minutes.
EMERGENCY ENGINE SHUT OFF
To shut off the engine in an emergency situation
while driving, perform the following procedure:
.Rapidly push the push-button ignition switch
3 consecutive times in less than 1.5
seconds, or
.Push and hold the push-button ignition
switch for more than 2 seconds.
JVS0404X
INTELLIGENT KEY BATTERY DIS-
CHARGE
If the battery of the Intelligent Key is discharged,
or environmental conditions interfere with the
Intelligent Key operation, start the engine
according to the following procedure:
1. Move the shift lever to the P (Park) position
(for CVT models) or the shift lever to the N
(Neutral) position (for MT models) .
2. Firmly apply the foot brake.
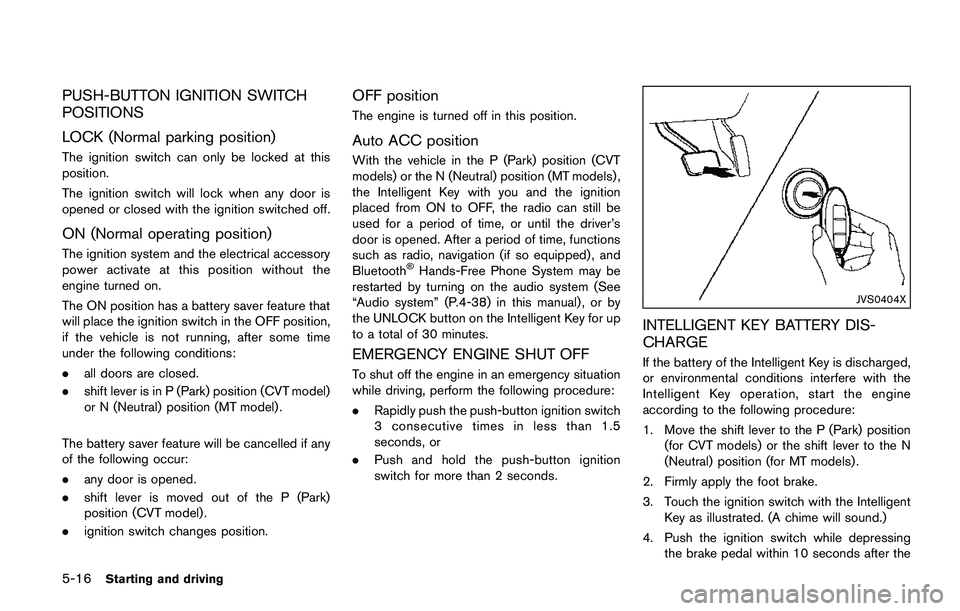
3. Touch the ignition switch with the Intelligent
Key as illustrated. (A chime will sound.)
4. Push the ignition switch while depressing
the brake pedal within 10 seconds after the
Page 302 of 508
chime sounds. The engine will start.
After step 3 is performed, when the ignition
switch is pushed without depressing the brake
pedal, the ignition switch position will change to
ACC.
NOTE:
.When the ignition switch is pushed to
the ON position or the engine is started
by the above procedures, the“Key
Battery Low”warning appears (on the
Vehicle information display) even if the
Intelligent Key is inside the vehicle.
This is not a malfunction. To turn off the
warning, touch the ignition switch with
the Intelligent Key again.
.If the“Key Battery Low”warning ap-
pears (on the Vehicle information dis-
play) , replace the battery as soon as
possible. (See“Intelligent Key battery
replacement”(P.8-23) .).Make sure the area around the vehicle is
clear.
.Check fluid levels such as engine oil, cool-
ant, brake fluid, and window washer fluid as
frequently as possible, or at least whenever
you refuel.
.Check that all windows and lights are clean.
.Visually inspect tires for their appearance
and condition. Also check tires for proper
inflation.
.Lock all doors.
.Position seat and adjust head restraints.
.Adjust inside and outside mirrors.
.Fasten seat belts and ask all passengers to
do likewise.
.Check the operation of warning lights when
the ignition switch is placed in the ON
position. (See “Warning lights, indicator
lights and audible reminders” (P.2-10) .)1. Apply the parking brake.
2.Continuously Variable Transmission
(CVT) model:
Move the shift lever to the P (Park) or N
(Neutral) position. (P is recommended.)
The starter is designed so that it does not
operate unless the shift lever is in either of
the above positions.
Manual Transmission (MT) model:
Move the shift lever to the N (Neutral)
position, and depress the clutch pedal to
the floor while starting the engine.
3. Crank the enginewith your foot off the
accelerator pedalby turning the ignition
switch to START. Release the switch when
the engine starts. If the engine starts, but
fails to run, repeat the above procedure.
.If the engine is very hard to start in
extremely cold weather or when restart-
ing, depress the accelerator pedal a little
(approximately 1/3 to the floor) and hold
it and then crank the engine. Release the
accelerator pedal when the engine starts.
.If the engine is very hard to start because
it is flooded, depress the accelerator
pedal all the way to the floor and hold it.
Crank the engine for 5 - 6 seconds. After
cranking the engine, release the accel-
Starting and driving5-17
BEFORE STARTING THE ENGINESTARTING THE ENGINE (model
without Intelligent Key system)
Page 312 of 508
SPA2331
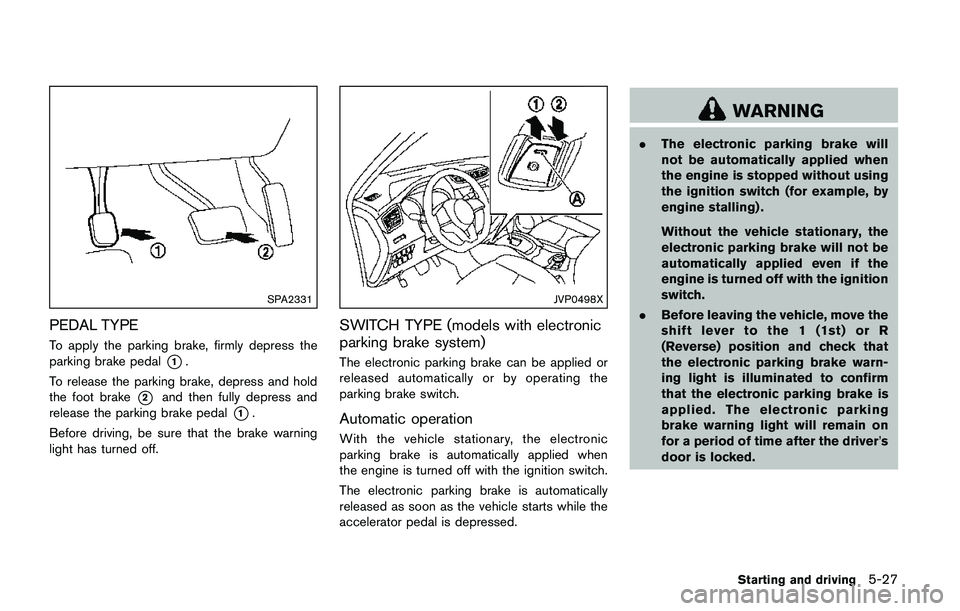
PEDAL TYPE
To apply the parking brake, firmly depress the
parking brake pedal
*1.
To release the parking brake, depress and hold
the foot brake
*2and then fully depress and
release the parking brake pedal
*1.
Before driving, be sure that the brake warning
light has turned off.
JVP0498X
SWITCH TYPE (models with electronic
parking brake system)
The electronic parking brake can be applied or
released automatically or by operating the
parking brake switch.
Automatic operation
With the vehicle stationary, the electronic
parking brake is automatically applied when
the engine is turned off with the ignition switch.
The electronic parking brake is automatically
released as soon as the vehicle starts while the
accelerator pedal is depressed.
WARNING
.The electronic parking brake will
not be automatically applied when
the engine is stopped without using
the ignition switch (for example, by
engine stalling) .
Without the vehicle stationary, the
electronic parking brake will not be
automatically applied even if the
engine is turned off with the ignition
switch.
.Before leaving the vehicle, move the
shift lever to the 1 (1st) or R
(Reverse) position and check that
the electronic parking brake warn-
ing light is illuminated to confirm
that the electronic parking brake is
applied. The electronic parking
brake warning light will remain on
for a period of time after the driver’s
door is locked.
Starting and driving5-27
Page 313 of 508
5-28Starting and driving
CAUTION
When parking in an area where the
outside temperature is below 328F
(08C) , do not apply the parking brake
to prevent it from freezing.
For safe parking, place the shift lever in
the 1 (1st) or R (Reverse) position and
securely block the wheels.
NOTE:
.To keep the electronic parking brake
released after the engine is turned off,
place the ignition switch in the OFF
position, depress the brake pedal and
push down the parking brake switch
before opening the driver’s door.
.If a malfunction occurs in the electric
parking brake system (for example, due
to battery discharge) , it is recom-
mended to contact a NISSAN dealer.
Manual operation
The electronic parking brake will not be auto-
matically applied if the engine is stopped without
using the ignition switch (for example, by engine
stalling) . In such a case, you have to apply the
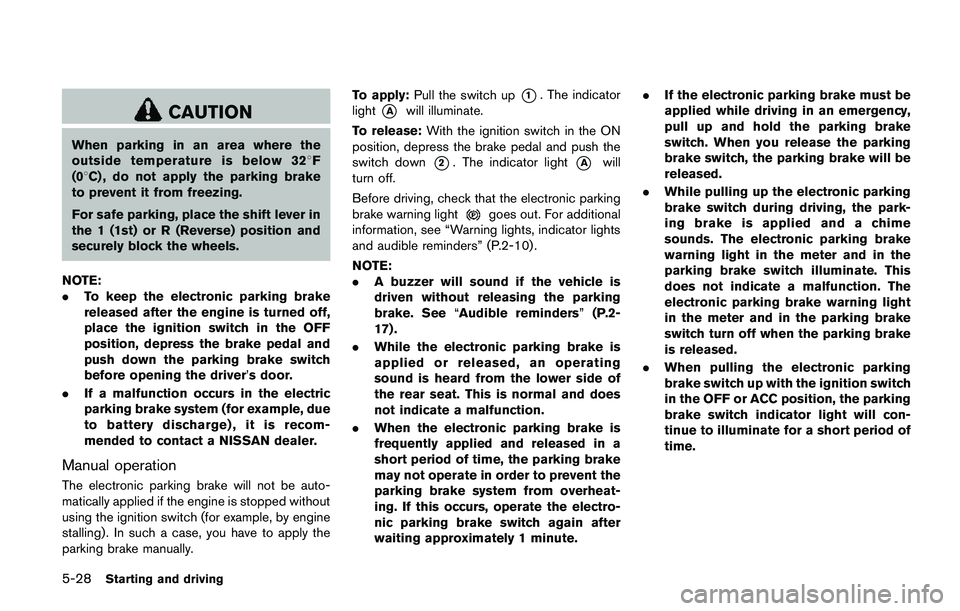
parking brake manually.To apply:Pull the switch up
*1. The indicator
light
*Awill illuminate.
To release:With the ignition switch in the ON
position, depress the brake pedal and push the
switch down
*2. The indicator light*Awill
turn off.
Before driving, check that the electronic parking
brake warning light
goes out. For additional
information, see “Warning lights, indicator lights
and audible reminders” (P.2-10) .
NOTE:
.A buzzer will sound if the vehicle is
driven without releasing the parking
brake. See“Audible reminders”(P.2-
17) .
.While the electronic parking brake is
applied or released, an operating
sound is heard from the lower side of
the rear seat. This is normal and does
not indicate a malfunction.
.When the electronic parking brake is
frequently applied and released in a
short period of time, the parking brake
may not operate in order to prevent the
parking brake system from overheat-
ing. If this occurs, operate the electro-
nic parking brake switch again after
waiting approximately 1 minute..If the electronic parking brake must be
applied while driving in an emergency,
pull up and hold the parking brake
switch. When you release the parking
brake switch, the parking brake will be
released.
.While pulling up the electronic parking
brake switch during driving, the park-
ing brake is applied and a chime
sounds. The electronic parking brake
warning light in the meter and in the
parking brake switch illuminate. This
does not indicate a malfunction. The
electronic parking brake warning light
in the meter and in the parking brake
switch turn off when the parking brake
is released.
.When pulling the electronic parking
brake switch up with the ignition switch
in the OFF or ACC position, the parking
brake switch indicator light will con-
tinue to illuminate for a short period of
time.
Page 395 of 508
5-110Starting and driving
FREEING A FROZEN DOOR LOCK
To prevent a door lock from freezing, apply
deicer through the key hole. If the lock becomes
frozen, heat the key before inserting it into the
key hole, or use the Intelligent Key system or the
remote keyless entry key fob.
ANTI-FREEZE
In the winter when it is anticipated that the
outside temperature will drop below 328F(08C) ,
check the anti-freeze to assure proper winter
protection. For additional information, see “En-
gine cooling system” (P.8-4) .
BATTERY
If the battery is not fully charged during
extremely cold weather conditions, the battery
fluid may freeze and damage the battery. To
maintain maximum efficiency, the battery should
be checked regularly. For additional information,
see “Battery” (P.8-11) .
DRAINING OF COOLANT WATER
If the vehicle is to be left outside without anti-
freeze, drain the cooling system, including the
engine block. Refill before operating the vehicle.
For details, see “Engine cooling system” (P.8-4) .
TIRE EQUIPMENT
SUMMER tires have a tread designed to provide
superior performance on dry pavement. How-
ever, the performance of these tires will be
substantially reduced in snowy and icy condi-
tions. If you operate your vehicle on snowy or icy
roads, NISSAN recommends the use of MUD &
SNOW or ALL SEASON tires on all four wheels.
It is recommended you consult a NISSAN dealer
for the tire type, size, speed rating and
availability information.
For additional traction on icy roads, studded
tires may be used. However, some U.S. states
and Canadian provinces prohibit their use.
Check local, state and provincial laws before
installing studded tires.
Skid and traction capabilities of studded
snow tires, on wet or dry surfaces, may be
poorer than that of non-studded snow
tires.
Tire chains may be used. For details, see “Tire
chains” (P.8-36) of this manual.
All-Wheel Drive (AWD) model
If you install snow tires, they must also be the
same size, brand, construction and tread pattern
on all four wheels.
SPECIAL WINTER EQUIPMENT
It is recommended that the following items be
carried in the vehicle during winter:
.A scraper and stiff-bristled brush to remove
ice and snow from the windows and wiper
blades.
.A sturdy, flat board to be placed under the
jack to give it firm support.
.A shovel to dig the vehicle out of snow-
drifts.
.Extra window washer fluid to refill the
reservoir tank.
DRIVING ON SNOW OR ICE
WARNING
.Wet ice (328F, 08C and freezing rain) ,
very cold snow or ice can be slick
and very hard to drive on. The
vehicle will have much less traction
or“grip”under these conditions. Try
to avoid driving on wet ice until the
road is salted or sanded.
.Whatever the condition, drive with
caution. Accelerate and slow down
with care. If accelerating or down-
shifting too fast, the drive wheels
will lose even more traction.
COLD WEATHER DRIVING
Page 465 of 508
9-2Maintenance and schedules
Some day-to-day and regular maintenance is
essential to maintain your vehicle good mechan-
ical condition, as well as its emission and engine
performance.
It is the owner’s responsibility to make sure that
the scheduled maintenance, as well as general
maintenance, is performed.
As the vehicle owner, you are the only one who
can ensure that your vehicle receives the proper
maintenance care. You are a vital link in the
maintenance chain.
GENERAL MAINTENANCE
General maintenance includes those items
which should be checked during normal day-
to-day operation. They are essential for proper
vehicle operation. It is your responsibility to
perform these procedures regularly as pre-
scribed.
Performing general maintenance checks re-
quires minimal mechanical skill and only a few
general automotive tools.
These checks or inspections can be done by
yourself, a qualified technician or, if you prefer, a
NISSAN dealer.
SCHEDULED MAINTENANCE
The maintenance items listed in this section are
required to be serviced at regular intervals.
However, under severe driving conditions, addi-
tional or more frequent maintenance will be
required.
WHERE TO GO FOR SERVICE
If maintenance service is required or your vehicle
appears to malfunction, have the systems
checked and serviced. It is recommended you
visit a NISSAN dealer for this service.
NISSAN technicians are well-trained specialists
and are kept up-to-date with the latest service
information through technical bulletins, service
tips, and training programs. They are completely
qualified to work on NISSAN vehiclesbefore
work begins.
You can be confident that a NISSAN dealer’s
service department performs the best job to
meet the maintenance requirements on your
vehicle.During the normal day-to-day operation of the
vehicle, general maintenance should be per-
formed regularly as prescribed in this section. If
you detect any unusual sounds, vibrations or
smells, be sure to check for the cause or have a
NISSAN dealer do it promptly. In addition, it is
recommended that you visit a NISSAN dealer if
you think that repairs are required.
When performing any checks or maintenance
work, see “Maintenance precautions” (P.8-2) .
EXPLANATION OF GENERAL MAIN-
TENANCE ITEMS
Additional information on the following
items with “*” is found in the “8. Do-it
yourself” section of this manual.
Outside the vehicle
The maintenance items listed here should be
performed from time to time, unless otherwise
specified.
Doors and engine hood:Check that all doors
and the engine hood operate properly. Also
ensure that all latches lock securely. Lubricate
hinges, latches, latch pins, rollers and links if
necessary. Make sure that the secondary latch
keeps the hood from opening when the primary
latch is released.
When driving in areas using road salt or other
corrosive materials, check lubrication frequently.
MAINTENANCE REQUIREMENT GENERAL MAINTENANCE