check oil NISSAN QASHQAI 2017 Owner´s Manual
[x] Cancel search | Manufacturer: NISSAN, Model Year: 2017, Model line: QASHQAI, Model: NISSAN QASHQAI 2017Pages: 508, PDF Size: 2.68 MB
Page 93 of 508
2-14Instruments and controls
TPMS will not function and the low
tire pressure warning light will flash
for approximately 1 minute. The
light will remain on after 1 minute.
Have your tires replaced and/or
TPMS system reset as soon as
possible. It is recommended you
visit a NISSAN dealer for these
services.
.Replacing tires with those not ori-
ginally specified by NISSAN could
affect the proper operation of the
TPMS.
CAUTION
.The TPMS is not a substitute for the
regular tire pressure check. Be sure
to check the tire pressure regularly.
.If the vehicle is being driven at
speeds of less than 16 MPH (25
km/h) , the TPMS may not operate
correctly.
.Be sure to install the specified size
of tires to the four wheels correctly.
Master warning light
When the ignition switch is in the ON position,
the master warning light illuminates if any of the
following are displayed on the vehicle informa-
tion display.
.No Key detected warning (if so equipped)
.Shift to Park warning (Continuously Variable
Transmission (CVT) models) (if so
equipped)
.Key battery low warning (if so equipped)
.Engine start operation for Intelligent Key
system indicator (if so equipped)
.Key ID incorrect warning (if so equipped)
.Release Parking Brake warning
.Low fuel level warning
.Low Washer Fluid (if so equipped)
.Door/liftgate open warning
.Key System Error: See Owner’s Manual
warning (if so equipped)
.Loose Fuel Cap
.Tire Pressure Low - Add Air warning
.Low oil pressure Stop vehicle warning
.AWD Error: See Owner’s Manual warning (if
so equipped)
.AWD High Temp. Stop vehicle warning (if so
equipped).Tire Size Incorrect: See Owner’s Manual
warning (if so equipped)
.Battery Voltage Low Charge Battery warn-
ing
.Shipping Mode On Push Storage Fuse
warning
.Power will turn off to save the battery
warning
.Power turned off to save the battery warning
.Reminder: Turn OFF Headlights warning
.Headlight System Error: See Owner’s Man-
ual warning (if so equipped)
.Timer Alert - Time for a driver break?
indicator (if so equipped)
.Chassis Control System Error: See Owner’s
Manual warning
.CVT Error: See Owner’s Manual warning
(for Continuously Variable Transmission
(CVT) models)
.Malfunction warning (if so equipped)
.Unavailable: High Cabin Temperature warn-
ing (if so equipped)
.Not Available: Poor Road Conditions warn-
ing (if so equipped)
.Currently unavailable warning (if so
equipped)
.Unavailable: Front Radar Obstruction warn-
ing (if so equipped)
Page 103 of 508
2-24Instruments and controls
checking or replacing these items. For sched-
uled maintenance items and intervals, refer to
the “9. Maintenance and schedules” section.
Tire:
This indicator appears when the customer set
distance comes for replacing tires. You can set
or reset the distance for replacing tires.
WARNING
The tire replacement indicator is not a
substitute for regular tire checks, in-
cluding tire pressure checks. See
“Changing wheels and tires”(P.8-37) .
Many factors including tire inflation,
alignment, driving habits and road con-
ditions affect tire wear and when tires
should be replaced. Setting the tire
replacement indicator for a certain
driving distance does not mean your
tires will last that long. Use the tire
replacement indicator as a guide only
and always perform regular tire checks.
Failure to perform regular tire checks,
including tire pressure checks could
result in tire failure. Serious vehicle
damage could occur and may lead to a
collision, which could result in serious
personal injury or death.Other:
This indicator appears when the customer set
distance comes for checking or replacing
maintenance items other than the engine oil, oil
filter and tires. Other maintenance items can
include such things as air filter or tire rotation.
You can set or reset the distance for checking or
replacing the items.
Alarm (if so equipped)
This setting allows the customer to set alarms.
Select “Alarm” using the
button*2and
press OK button
*1.
Timer Alert (if so equipped):
This setting allows the customer to set an alert
to notify the driver that the set time has been
reached.
1. Use the
button*2to select “Timer
Alert”.
2. Press the OK button
*1.
3. To change the timer amount, use the
button*2and the OK button*1to save
the selected time amount.
Navigation (if so equipped):
This setting allows the customer to enable/
disable the alert for navigation in the vehicle
information display.1. Use the
button*2to select “Naviga-
tion”.
2. Press the OK button
*1to turn ON/OFF
the alert.
Phone (if so equipped):
This setting allows the customer to enable/
disable the alert for an incoming call in the
vehicle information display.
1. Use the
button*2to select “Phone”.
2. Press the OK button
*1to turn ON/OFF
the alert.
Mail (if so equipped):
This setting allows the customer to enable/
disable the alert for navigation in the vehicle
information display.
1. Use the
button*2to select “Mail”.
2. Press the OK button
*1to turn ON/OFF
the alert.
Page 108 of 508
10. Low Washer Fluid warning (if so
equipped)
This warning appears when the window washer
fluid is at a low level. Add window washer fluid
as necessary. For additional information, refer to
“Window washer fluid” (P.8-10) .
11. Door/liftgate open warning
This warning appears if any of the doors and/or
the liftgate are open or not closed securely. The
vehicle icon indicates which door or the liftgate
is open on the display.
12. Key System Error: See Owner’s
Manual warning (if so equipped)
This warning appears if there is a malfunction in
the Intelligent Key system.
If this warning appears while the engine is
stopped, the engine cannot be started. If this
warning appears while the engine is running, the
vehicle can be driven. However, it is recom-
mended that you visit a NISSAN dealer for repair
as soon as possible.
13. Loose Fuel Cap warning
This warning appears when the fuel-filler cap is
not tightened correctly after the vehicle has
been refueled. For additional information, refer to
“Fuel-filler cap” (P.3-27) .
14. Tire Pressure Low — Add Air
warning
This warning appears when the low tire pressure
warning light in the meter illuminates and low tire
pressure is detected. The warning appears each
time the ignition switch is placed in the ON
position as long as the low tire pressure warning
light remains illuminated. If this warning appears,
stop the vehicle and adjust the pressure to the
recommended COLD tire pressure shown on
the Tire and Loading Information label. (See
“Low tire pressure warning light” (P.2-13) and
“Tire Pressure Monitoring System (TPMS)” (P.5-
5) .)
15. Low Oil Pressure Stop Vehicle
warning
This warning appears if low engine oil pressure
is detected. If the warning appears during
normal driving, pull off the road in a safe area
and stop the engine immediately. It is recom-
mended that you call a NISSAN dealer.
The low oil pressure warning is not designed to
indicate a low oil level. Use the dipstick to checkthe oil level. (See “Engine oil” (P.8-6) .)
CAUTION
Running the engine with the engine oil
pressure warning displayed could
cause serious damage to the engine.
16. AWD Error: See Owner’s Manual
warning (if so equipped)
This warning appears when the All-Wheel Drive
(AWD) system is not functioning properly while
the engine is running. Reduce vehicle speed and
have the system checked. It is recommended
that you visit a NISSAN dealer for this service.
See “All-Wheel Drive (AWD)” (P.5-96) .
17. AWD High Temp. Stop vehicle
warning (if so equipped)
This warning may appear while trying to free a
stuck vehicle due to increased oil temperature.
The driving mode may change to Two-Wheel
Drive (2WD) . If this warning is displayed, stop
the vehicle with the engine idling, as soon as it is
safe to do so. Then if the warning turns off, you
can continue driving. See “All-Wheel Drive
(AWD)” (P.5-96) .
Instruments and controls2-29
Page 302 of 508
chime sounds. The engine will start.
After step 3 is performed, when the ignition
switch is pushed without depressing the brake
pedal, the ignition switch position will change to
ACC.
NOTE:
.When the ignition switch is pushed to
the ON position or the engine is started
by the above procedures, the“Key
Battery Low”warning appears (on the
Vehicle information display) even if the
Intelligent Key is inside the vehicle.
This is not a malfunction. To turn off the
warning, touch the ignition switch with
the Intelligent Key again.
.If the“Key Battery Low”warning ap-
pears (on the Vehicle information dis-
play) , replace the battery as soon as
possible. (See“Intelligent Key battery
replacement”(P.8-23) .).Make sure the area around the vehicle is
clear.
.Check fluid levels such as engine oil, cool-
ant, brake fluid, and window washer fluid as
frequently as possible, or at least whenever
you refuel.
.Check that all windows and lights are clean.
.Visually inspect tires for their appearance
and condition. Also check tires for proper
inflation.
.Lock all doors.
.Position seat and adjust head restraints.
.Adjust inside and outside mirrors.
.Fasten seat belts and ask all passengers to
do likewise.
.Check the operation of warning lights when
the ignition switch is placed in the ON
position. (See “Warning lights, indicator
lights and audible reminders” (P.2-10) .)1. Apply the parking brake.
2.Continuously Variable Transmission
(CVT) model:
Move the shift lever to the P (Park) or N
(Neutral) position. (P is recommended.)
The starter is designed so that it does not
operate unless the shift lever is in either of
the above positions.
Manual Transmission (MT) model:
Move the shift lever to the N (Neutral)
position, and depress the clutch pedal to
the floor while starting the engine.
3. Crank the enginewith your foot off the
accelerator pedalby turning the ignition
switch to START. Release the switch when
the engine starts. If the engine starts, but
fails to run, repeat the above procedure.
.If the engine is very hard to start in
extremely cold weather or when restart-
ing, depress the accelerator pedal a little
(approximately 1/3 to the floor) and hold
it and then crank the engine. Release the
accelerator pedal when the engine starts.
.If the engine is very hard to start because
it is flooded, depress the accelerator
pedal all the way to the floor and hold it.
Crank the engine for 5 - 6 seconds. After
cranking the engine, release the accel-
Starting and driving5-17
BEFORE STARTING THE ENGINESTARTING THE ENGINE (model
without Intelligent Key system)
Page 308 of 508
High fluid temperature protection mode
This transmission has a high fluid temperature
protection mode. If the fluid temperature be-
comes too high (for example, when climbing
steep grades in high temperature with heavy
loads) , engine power and, under some condi-
tions, vehicle speed will be decreased auto-
matically to reduce the chance of transmission
damage. Vehicle speed can be controlled with
the accelerator pedal, but the engine and vehicle
speed may be limited.
Fail-safe
If the vehicle is driven under extreme
conditions, such as excessive wheel spin-
ning and subsequent hard braking, the
fail-safe system may be activated. The MIL
may illuminate to indicate the fail-safe
mode is activated. (See “Malfunction In-
dicator Light (MIL)” (P.2-16) .) This will
occur even if all electrical circuits are
functioning properly. In this case, place
the ignition switch in the OFF position and
wait for 10 seconds. Then turn the switch
back to the ON position. The vehicle
should return to its normal operating
condition. If it does not return to its normal
operating condition, have the transmission
checked and repaired, if necessary. It is
recommended you visit a NISSAN dealerfor this service.
WARNING
When the high fluid temperature pro-
tection mode or fail-safe operation
occurs, vehicle speed may be gradually
reduced. The reduced speed may be
lower than other traffic, which could
increase the chance of a collision. Be
especially careful when driving. If ne-
cessary, pull to the side of the road at a
safe place and allow the transmission
to return to normal operation, or have it
repaired if necessary.
Adaptive Shift Control (ASC)
The Adaptive Shift Control automatically oper-
ates when the transmission is in the “D” (Drive)
position and selects an appropriate gear de-
pending on the road conditions such as uphill or
downhill.
Control on uphill and curving roads:
A low gear is maintained that suits the degree of
the slope to allow smooth driving with a small
number of shifts.Control on downhill roads:
The Adaptive Shift Control shifts to a low gear
that suits the degree of the slope when the
accelerator pedal is depressed, and uses the
engine braking to help driving in the downhill.
Control on winding roads:
A low gear is maintained on continuous curves
that involve repeated acceleration and decelera-
tion, so that smooth acceleration is available
instantly when the accelerator pedal is de-
pressed.
NOTE:
.Adaptive Shift Control may not operate
when the transmission oil temperature
is low immediately after the start of
driving or when it is very hot.
.During some driving situations, hard
braking for example, the Adaptive Shift
Control may automatically operate. The
transmission may automatically shift to
a lower gear for engine braking. This
increases engine speed but not vehicle
speed. Vehicle speed is controlled by
the accelerator pedal when the vehicle
is in the Adaptive Shift Control mode.
.When the Adaptive Shift Control oper-
ates, the transmission sometimes
maintains a lower gear for a longer
period of time than when Adaptive
Starting and driving5-23
Page 382 of 508
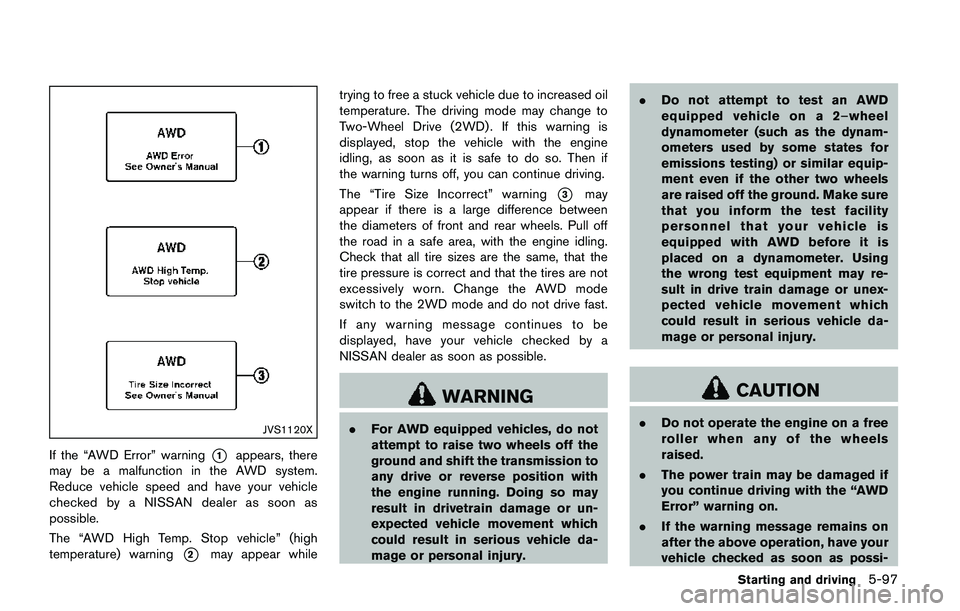
JVS1120X
If the “AWD Error” warning*1appears, there
may be a malfunction in the AWD system.
Reduce vehicle speed and have your vehicle
checked by a NISSAN dealer as soon as
possible.
The “AWD High Temp. Stop vehicle” (high
temperature) warning
*2may appear whiletrying to free a stuck vehicle due to increased oil
temperature. The driving mode may change to
Two-Wheel Drive (2WD) . If this warning is
displayed, stop the vehicle with the engine
idling, as soon as it is safe to do so. Then if
the warning turns off, you can continue driving.
The “Tire Size Incorrect” warning
*3may
appear if there is a large difference between
the diameters of front and rear wheels. Pull off
the road in a safe area, with the engine idling.
Check that all tire sizes are the same, that the
tire pressure is correct and that the tires are not
excessively worn. Change the AWD mode
switch to the 2WD mode and do not drive fast.
If any warning message continues to be
displayed, have your vehicle checked by a
NISSAN dealer as soon as possible.
WARNING
.For AWD equipped vehicles, do not
attempt to raise two wheels off the
ground and shift the transmission to
any drive or reverse position with
the engine running. Doing so may
result in drivetrain damage or un-
expected vehicle movement which
could result in serious vehicle da-
mage or personal injury..Do not attempt to test an AWD
equipped vehicle on a 2–wheel
dynamometer (such as the dynam-
ometers used by some states for
emissions testing) or similar equip-
ment even if the other two wheels
are raised off the ground. Make sure
that you inform the test facility
personnel that your vehicle is
equipped with AWD before it is
placed on a dynamometer. Using
the wrong test equipment may re-
sult in drive train damage or unex-
pected vehicle movement which
could result in serious vehicle da-
mage or personal injury.
CAUTION
.Do not operate the engine on a free
roller when any of the wheels
raised.
.The power train may be damaged if
you continue driving with the “AWD
Error” warning on.
.If the warning message remains on
after the above operation, have your
vehicle checked as soon as possi-
Starting and driving5-97
Page 384 of 508
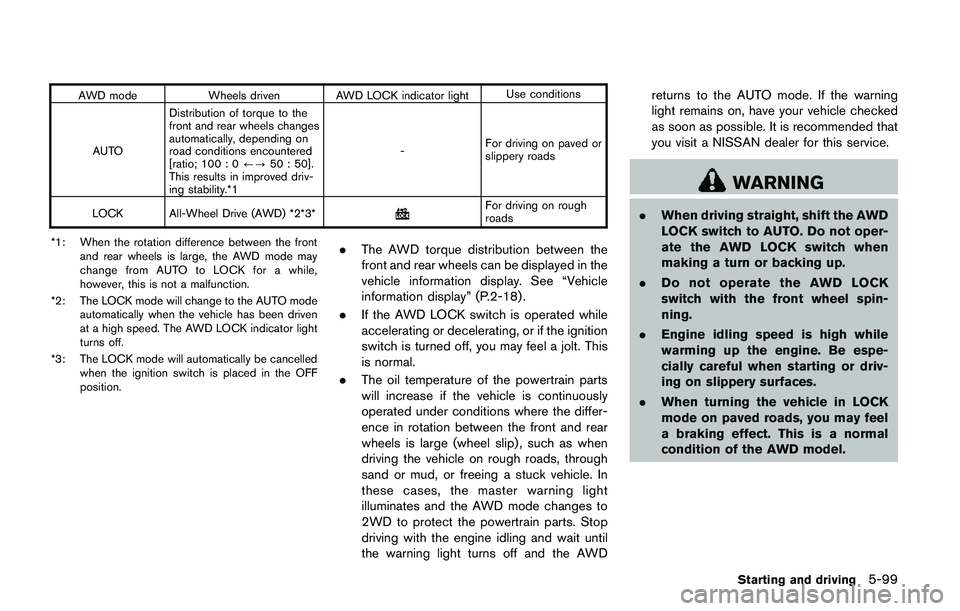
AWD mode Wheels driven AWD LOCK indicator lightUse conditions
AUTODistribution of torque to the
front and rear wheels changes
automatically, depending on
road conditions encountered
[ratio; 100 : 0/?50 : 50].
This results in improved driv-
ing stability.*1-For driving on paved or
slippery roads
LOCK All-Wheel Drive (AWD) *2*3*
For driving on rough
roads
*1: When the rotation difference between the front
and rear wheels is large, the AWD mode may
change from AUTO to LOCK for a while,
however, this is not a malfunction.
*2: The LOCK mode will change to the AUTO mode
automatically when the vehicle has been driven
at a high speed. The AWD LOCK indicator light
turns off.
*3: The LOCK mode will automatically be cancelled
when the ignition switch is placed in the OFF
position.
.The AWD torque distribution between the
front and rear wheels can be displayed in the
vehicle information display. See “Vehicle
information display” (P.2-18) .
.If the AWD LOCK switch is operated while
accelerating or decelerating, or if the ignition
switch is turned off, you may feel a jolt. This
is normal.
.The oil temperature of the powertrain parts
will increase if the vehicle is continuously
operated under conditions where the differ-
ence in rotation between the front and rear
wheels is large (wheel slip) , such as when
driving the vehicle on rough roads, through
sand or mud, or freeing a stuck vehicle. In
these cases, the master warning light
illuminates and the AWD mode changes to
2WD to protect the powertrain parts. Stop
driving with the engine idling and wait until
the warning light turns off and the AWDreturns to the AUTO mode. If the warning
light remains on, have your vehicle checked
as soon as possible. It is recommended that
you visit a NISSAN dealer for this service.
WARNING
.When driving straight, shift the AWD
LOCK switch to AUTO. Do not oper-
ate the AWD LOCK switch when
making a turn or backing up.
.Do not operate the AWD LOCK
switch with the front wheel spin-
ning.
.Engine idling speed is high while
warming up the engine. Be espe-
cially careful when starting or driv-
ing on slippery surfaces.
.When turning the vehicle in LOCK
mode on paved roads, you may feel
a braking effect. This is a normal
condition of the AWD model.
Starting and driving5-99
Page 405 of 508
6-8In case of emergency
SCE0933
Installing the spare tire
The spare tire is designed for emergency
use. (See specific instructions under the
heading “Wheels and tires” (P.8-29) .)
1. Clean any mud or dirt from the surface
between the wheel and hub.
2. Carefully put the spare tire on and tighten
the wheel nuts finger tight. Check that all the
wheel nuts contact the wheel surface
horizontally.
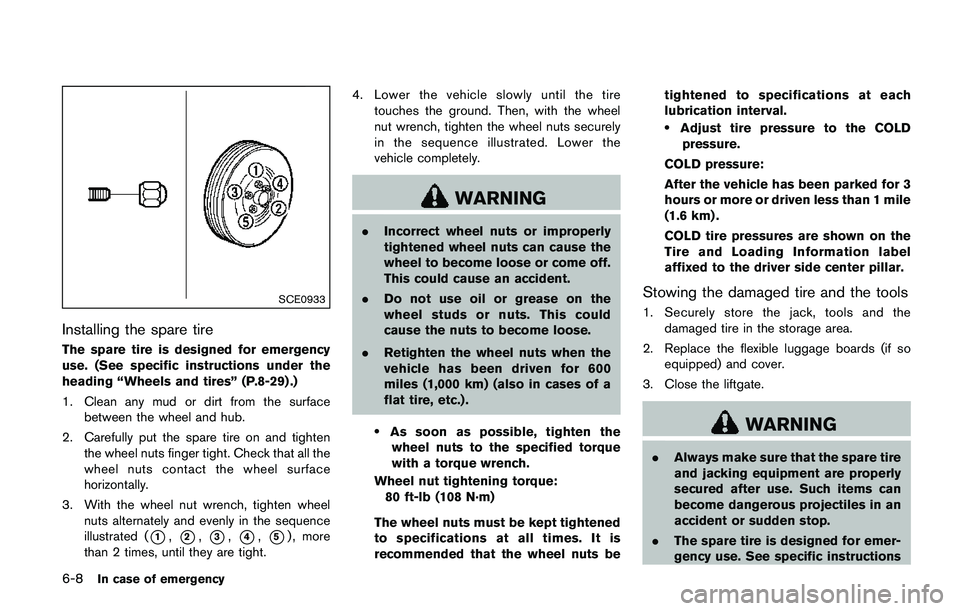
3. With the wheel nut wrench, tighten wheel
nuts alternately and evenly in the sequence
illustrated (
*1,*2,*3,*4,*5) , more
than 2 times, until they are tight.4. Lower the vehicle slowly until the tire
touches the ground. Then, with the wheel
nut wrench, tighten the wheel nuts securely
in the sequence illustrated. Lower the
vehicle completely.
WARNING
.Incorrect wheel nuts or improperly
tightened wheel nuts can cause the
wheel to become loose or come off.
This could cause an accident.
.Do not use oil or grease on the
wheel studs or nuts. This could
cause the nuts to become loose.
.Retighten the wheel nuts when the
vehicle has been driven for 600
miles (1,000 km) (also in cases of a
flat tire, etc.) .
.As soon as possible, tighten the
wheel nuts to the specified torque
with a torque wrench.
Wheel nut tightening torque:
80 ft-lb (108 N·m)
The wheel nuts must be kept tightened
to specifications at all times. It is
recommended that the wheel nuts betightened to specifications at each
lubrication interval.
.Adjust tire pressure to the COLD
pressure.
COLD pressure:
After the vehicle has been parked for 3
hours or more or driven less than 1 mile
(1.6 km) .
COLD tire pressures are shown on the
Tire and Loading Information label
affixed to the driver side center pillar.
Stowing the damaged tire and the tools
1. Securely store the jack, tools and the
damaged tire in the storage area.
2. Replace the flexible luggage boards (if so
equipped) and cover.
3. Close the liftgate.
WARNING
.Always make sure that the spare tire
and jacking equipment are properly
secured after use. Such items can
become dangerous projectiles in an
accident or sudden stop.
.The spare tire is designed for emer-
gency use. See specific instructions
Page 418 of 508
finish or leave swirl marks.
REMOVING SPOTS
Remove tar and oil spots, industrial dust,
insects, and tree sap as quickly as possible
from the paint surface to avoid lasting damage
or staining. Special cleaning products are
available at a NISSAN dealer or any automotive
accessory stores. It is recommended that you
visit a NISSAN dealer for these products.
UNDERBODY
In areas where road salt is used in winter, the
underbody must be cleaned regularly. This will
prevent dirt and salt from building up and
causing the acceleration of corrosion on the
underbody and suspension. Before the winter
period and again in the spring, the underseal
must be checked and, if necessary, re-treated.
GLASS
Use glass cleaner to remove smoke and dust
film from the glass surfaces. It is normal for glass
to become coated with a film after the vehicle is
parked in the hot sun. Glass cleaner and a soft
cloth will easily remove this film.
CAUTION
When cleaning the inside of the win-
dows, do not use sharp-edged tools,
abrasive cleaners or chlorine-based
disinfectant cleaners. They could da-
mage the electrical conductors, radio
antenna elements or rear window
defroster elements.
WHEELS
Wash the wheels when washing the vehicle to
maintain their appearance.
.Clean the inner side of the wheels when the
wheel is changed or the underside of the
vehicle is washed.
.Inspect wheel rims regularly for dents or
corrosion. Such damage may cause loss of
pressure or poor seal at the tire bead.
.NISSAN recommends that the road wheels
be waxed to protect against road salt in
areas where it is used during winter.
CAUTION
Do not use abrasive cleaners when
washing the wheels.
ALUMINUM ALLOY WHEELS
Wash regularly with a sponge dampened in a
mild soap solution, especially during winter
months in areas where road salt is used. Salt
could discolor the wheels if not removed.
CAUTION
Follow the directions below to avoid
staining or discoloring the wheels:
.Do not use a cleaner that uses
strong acid or alkali contents to
clean the wheels.
.Do not apply wheel cleaners to the
wheels when they are hot. The
wheel temperature should be the
same as ambient temperature.
.Rinse the wheel to completely re-
move the cleaner within 15 minutes
after the cleaner is applied.
CHROME PARTS
Clean chrome parts regularly with a non-
abrasive chrome polish to maintain the finish.
Appearance and care7-3
Page 424 of 508
8 Do-it-yourself
Maintenance precautions ........................................................ 8-2
Engine compartment check locations .................................. 8-3
MR20DD engine model ..................................................... 8-4
Engine cooling system ............................................................. 8-4
Checking engine coolant level ......................................... 8-5
Changing engine coolant .................................................. 8-6
Engine oil .................................................................................... 8-6
Checking engine oil level .................................................. 8-6
Changing engine oil and filter .......................................... 8-6
Continuously Variable Transmission (CVT) fluid ............... 8-9
Brake and clutch (if so equipped) fluid ............................... 8-9
Window washer fluid ............................................................ 8-10
Battery ....................................................................................... 8-11
Jump starting ..................................................................... 8-12
Variable voltage control system .......................................... 8-13
Drive belt .................................................................................. 8-13
Spark plugs ............................................................................. 8-14
Replacing spark plugs .................................................... 8-14
Air cleaner ................................................................................ 8-14Windshield wiper blades ..................................................... 8-15
Cleaning ........................................................................... 8-15
Replacing ......................................................................... 8-16
Rear window wiper blade ................................................... 8-17
Brakes ...................................................................................... 8-17
Self-adjusting brakes .................................................... 8-17
Brake pad wear warning .............................................. 8-17
Fuses ........................................................................................ 8-18
Engine compartment ..................................................... 8-18
Passenger compartment .............................................. 8-20
Key fob battery replacement .............................................. 8-21
Intelligent Key battery replacement ................................... 8-23
Lights ........................................................................................ 8-25
Headlights ........................................................................ 8-25
Exterior and interior lights ............................................ 8-27
Wheels and tires ................................................................... 8-29
Tire pressure ................................................................... 8-29
Tire labeling ..................................................................... 8-33
Types of tires ................................................................... 8-35
Tire chains ....................................................................... 8-36
Changing wheels and tires .......................................... 8-37