oil dipstick NISSAN QASHQAI 2017 Owner´s Manual
[x] Cancel search | Manufacturer: NISSAN, Model Year: 2017, Model line: QASHQAI, Model: NISSAN QASHQAI 2017Pages: 508, PDF Size: 2.68 MB
Page 18 of 508
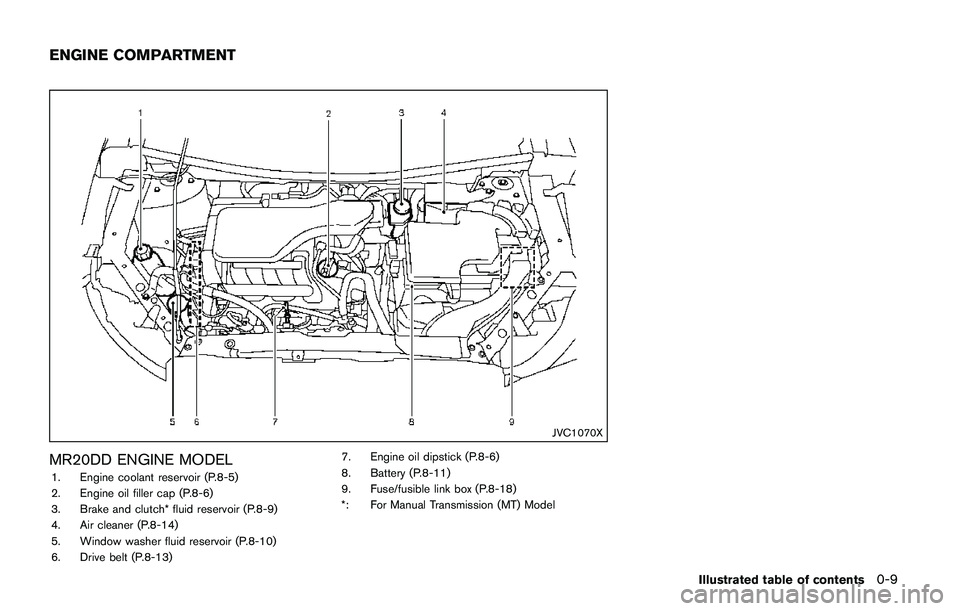
JVC1070X
MR20DD ENGINE MODEL
1. Engine coolant reservoir (P.8-5)
2. Engine oil filler cap (P.8-6)
3. Brake and clutch* fluid reservoir (P.8-9)
4. Air cleaner (P.8-14)
5. Window washer fluid reservoir (P.8-10)
6. Drive belt (P.8-13)7. Engine oil dipstick (P.8-6)
8. Battery (P.8-11)
9. Fuse/fusible link box (P.8-18)
*: For Manual Transmission (MT) Model
Illustrated table of contents0-9
ENGINE COMPARTMENT
Page 108 of 508
10. Low Washer Fluid warning (if so
equipped)
This warning appears when the window washer
fluid is at a low level. Add window washer fluid
as necessary. For additional information, refer to
“Window washer fluid” (P.8-10) .
11. Door/liftgate open warning
This warning appears if any of the doors and/or
the liftgate are open or not closed securely. The
vehicle icon indicates which door or the liftgate
is open on the display.
12. Key System Error: See Owner’s
Manual warning (if so equipped)
This warning appears if there is a malfunction in
the Intelligent Key system.
If this warning appears while the engine is
stopped, the engine cannot be started. If this
warning appears while the engine is running, the
vehicle can be driven. However, it is recom-
mended that you visit a NISSAN dealer for repair
as soon as possible.
13. Loose Fuel Cap warning
This warning appears when the fuel-filler cap is
not tightened correctly after the vehicle has
been refueled. For additional information, refer to
“Fuel-filler cap” (P.3-27) .
14. Tire Pressure Low — Add Air
warning
This warning appears when the low tire pressure
warning light in the meter illuminates and low tire
pressure is detected. The warning appears each
time the ignition switch is placed in the ON
position as long as the low tire pressure warning
light remains illuminated. If this warning appears,
stop the vehicle and adjust the pressure to the
recommended COLD tire pressure shown on
the Tire and Loading Information label. (See
“Low tire pressure warning light” (P.2-13) and
“Tire Pressure Monitoring System (TPMS)” (P.5-
5) .)
15. Low Oil Pressure Stop Vehicle
warning
This warning appears if low engine oil pressure
is detected. If the warning appears during
normal driving, pull off the road in a safe area
and stop the engine immediately. It is recom-
mended that you call a NISSAN dealer.
The low oil pressure warning is not designed to
indicate a low oil level. Use the dipstick to checkthe oil level. (See “Engine oil” (P.8-6) .)
CAUTION
Running the engine with the engine oil
pressure warning displayed could
cause serious damage to the engine.
16. AWD Error: See Owner’s Manual
warning (if so equipped)
This warning appears when the All-Wheel Drive
(AWD) system is not functioning properly while
the engine is running. Reduce vehicle speed and
have the system checked. It is recommended
that you visit a NISSAN dealer for this service.
See “All-Wheel Drive (AWD)” (P.5-96) .
17. AWD High Temp. Stop vehicle
warning (if so equipped)
This warning may appear while trying to free a
stuck vehicle due to increased oil temperature.
The driving mode may change to Two-Wheel
Drive (2WD) . If this warning is displayed, stop
the vehicle with the engine idling, as soon as it is
safe to do so. Then if the warning turns off, you
can continue driving. See “All-Wheel Drive
(AWD)” (P.5-96) .
Instruments and controls2-29
Page 427 of 508
8-4Do-it-yourself
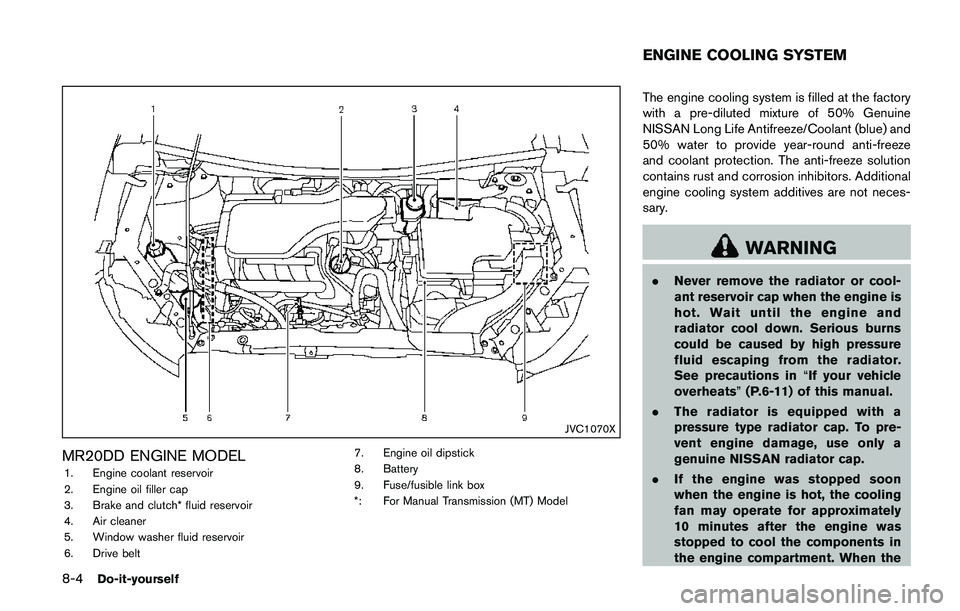
JVC1070X
MR20DD ENGINE MODEL
1. Engine coolant reservoir
2. Engine oil filler cap
3. Brake and clutch* fluid reservoir
4. Air cleaner
5. Window washer fluid reservoir
6. Drive belt7. Engine oil dipstick
8. Battery
9. Fuse/fusible link box
*: For Manual Transmission (MT) Model
The engine cooling system is filled at the factory
with a pre-diluted mixture of 50% Genuine
NISSAN Long Life Antifreeze/Coolant (blue) and
50% water to provide year-round anti-freeze
and coolant protection. The anti-freeze solution
contains rust and corrosion inhibitors. Additional
engine cooling system additives are not neces-
sary.
WARNING
.Never remove the radiator or cool-
ant reservoir cap when the engine is
hot. Wait until the engine and
radiator cool down. Serious burns
could be caused by high pressure
fluid escaping from the radiator.
See precautions in“If your vehicle
overheats”(P.6-11) of this manual.
.The radiator is equipped with a
pressure type radiator cap. To pre-
vent engine damage, use only a
genuine NISSAN radiator cap.
.If the engine was stopped soon
when the engine is hot, the cooling
fan may operate for approximately
10 minutes after the engine was
stopped to cool the components in
the engine compartment. When the
ENGINE COOLING SYSTEM
Page 429 of 508
8-6Do-it-yourself
service.
CHANGING ENGINE COOLANT
A NISSAN dealer can change the engine
coolant. The service procedure can be found
in the NISSAN Service Manual.
Improper servicing can result in reduced
heater performance and engine overheat-
ing.
WARNING
.To avoid being scalded, never
change the coolant when the engine
is hot.
.Never remove the radiator or cool-
ant reservoir cap when the engine is
hot. Serious burns could be caused
by high pressure fluid escaping from
the radiator.
.Avoid direct skin contact with used
coolant. If skin contact is made,
wash thoroughly with soap or hand
cleaner as soon as possible.
.Keep coolant out of the reach of
children and pets.
Engine coolant must be disposed of properly.
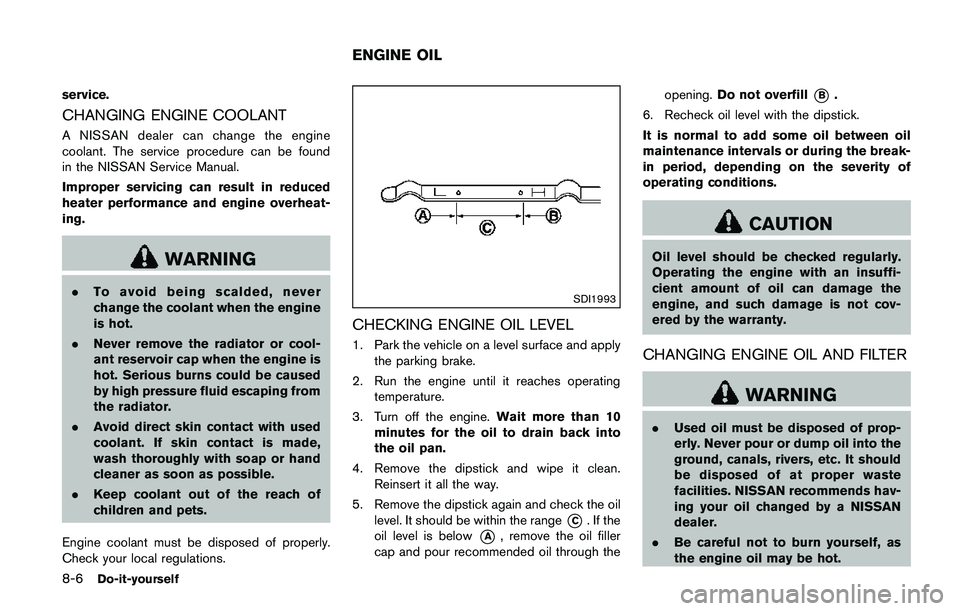
Check your local regulations.SDI1993
CHECKING ENGINE OIL LEVEL
1. Park the vehicle on a level surface and apply
the parking brake.
2. Run the engine until it reaches operating
temperature.
3. Turn off the engine.Wait more than 10
minutes for the oil to drain back into
the oil pan.
4. Remove the dipstick and wipe it clean.
Reinsert it all the way.
5. Remove the dipstick again and check the oil
level. It should be within the range
*C. If the
oil level is below
*A, remove the oil filler
cap and pour recommended oil through theopening.Do not overfill
*B.
6. Recheck oil level with the dipstick.
It is normal to add some oil between oil
maintenance intervals or during the break-
in period, depending on the severity of
operating conditions.
CAUTION
Oil level should be checked regularly.
Operating the engine with an insuffi-
cient amount of oil can damage the
engine, and such damage is not cov-
ered by the warranty.
CHANGING ENGINE OIL AND FILTER
WARNING
.Used oil must be disposed of prop-
erly. Never pour or dump oil into the
ground, canals, rivers, etc. It should
be disposed of at proper waste
facilities. NISSAN recommends hav-
ing your oil changed by a NISSAN
dealer.
.Be careful not to burn yourself, as
the engine oil may be hot.
ENGINE OIL
Page 431 of 508
8-8Do-it-yourself
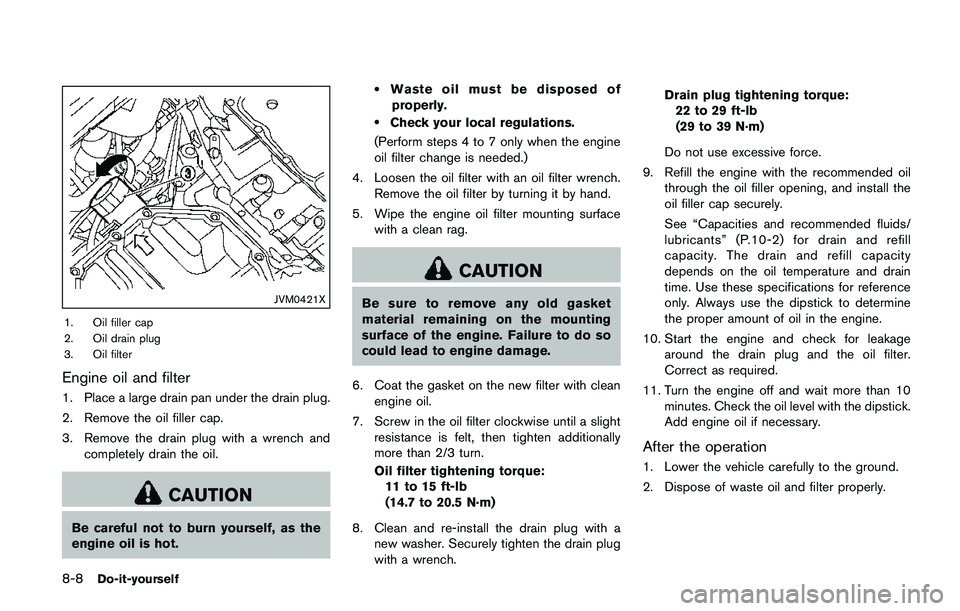
JVM0421X
1. Oil filler cap
2. Oil drain plug
3. Oil filter
Engine oil and filter
1. Place a large drain pan under the drain plug.
2. Remove the oil filler cap.
3. Remove the drain plug with a wrench and
completely drain the oil.
CAUTION
Be careful not to burn yourself, as the
engine oil is hot.
.Waste oil must be disposed of
properly.
.Check your local regulations.
(Perform steps 4 to 7 only when the engine
oil filter change is needed.)
4. Loosen the oil filter with an oil filter wrench.
Remove the oil filter by turning it by hand.
5. Wipe the engine oil filter mounting surface
with a clean rag.
CAUTION
Be sure to remove any old gasket
material remaining on the mounting
surface of the engine. Failure to do so
could lead to engine damage.
6. Coat the gasket on the new filter with clean
engine oil.
7. Screw in the oil filter clockwise until a slight
resistance is felt, then tighten additionally
more than 2/3 turn.
Oil filter tightening torque:
11 to 15 ft-lb
(14.7 to 20.5 N·m)
8. Clean and re-install the drain plug with a
new washer. Securely tighten the drain plug
with a wrench.Drain plug tightening torque:
22 to 29 ft-lb
(29 to 39 N·m)
Do not use excessive force.
9. Refill the engine with the recommended oil
through the oil filler opening, and install the
oil filler cap securely.
See “Capacities and recommended fluids/
lubricants” (P.10-2) for drain and refill
capacity. The drain and refill capacity
depends on the oil temperature and drain
time. Use these specifications for reference
only. Always use the dipstick to determine
the proper amount of oil in the engine.
10. Start the engine and check for leakage
around the drain plug and the oil filter.
Correct as required.
11. Turn the engine off and wait more than 10
minutes. Check the oil level with the dipstick.
Add engine oil if necessary.
After the operation
1. Lower the vehicle carefully to the ground.
2. Dispose of waste oil and filter properly.