key fob NISSAN QASHQAI 2017 Owner´s Manual
[x] Cancel search | Manufacturer: NISSAN, Model Year: 2017, Model line: QASHQAI, Model: NISSAN QASHQAI 2017Pages: 508, PDF Size: 2.68 MB
Page 116 of 508
prevent it, nor can it prevent the theft of interior
or exterior vehicle components in all situations.
Always secure your vehicle even if parking for a
brief period. Never leave your keys in the vehicle,
and always lock it when unattended. Be aware
of your surroundings, and park in secure, well-lit
areas whenever possible.
Many devices offering additional protection,
such as component locks, identification markers,
and tracking systems, are available at auto
supply stores and specialty shops. Your
NISSAN dealer may also offer such equipment.
Check with your insurance company to see if
you may be eligible for discounts for various
theft protection features.
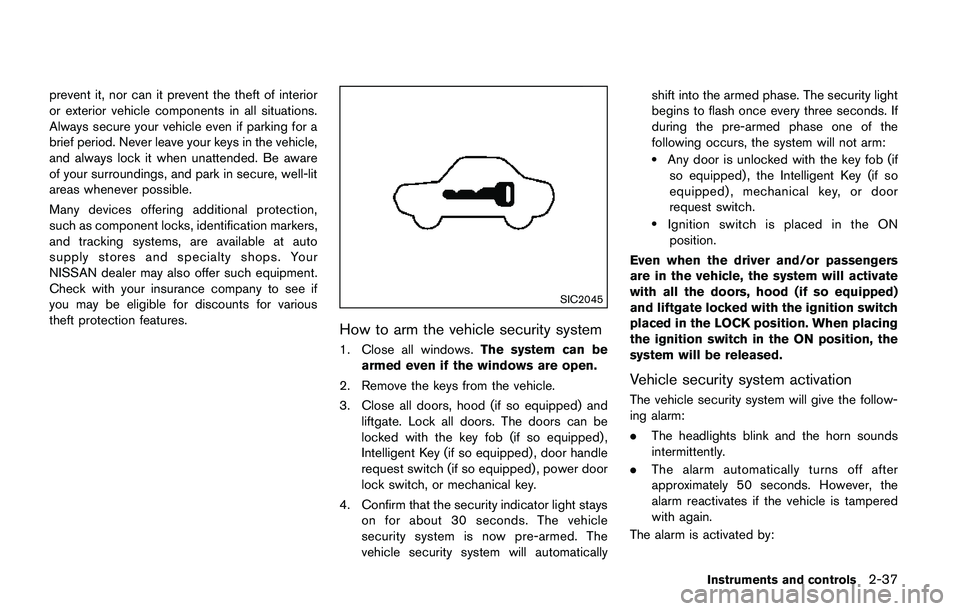
SIC2045
How to arm the vehicle security system
1. Close all windows.The system can be
armed even if the windows are open.
2. Remove the keys from the vehicle.
3. Close all doors, hood (if so equipped) and
liftgate. Lock all doors. The doors can be
locked with the key fob (if so equipped) ,
Intelligent Key (if so equipped) , door handle
request switch (if so equipped) , power door
lock switch, or mechanical key.
4. Confirm that the security indicator light stays
on for about 30 seconds. The vehicle
security system is now pre-armed. The
vehicle security system will automaticallyshift into the armed phase. The security light
begins to flash once every three seconds. If
during the pre-armed phase one of the
following occurs, the system will not arm:
.Any door is unlocked with the key fob (if
so equipped) , the Intelligent Key (if so
equipped) , mechanical key, or door
request switch.
.Ignition switch is placed in the ON
position.
Even when the driver and/or passengers
are in the vehicle, the system will activate
with all the doors, hood (if so equipped)
and liftgate locked with the ignition switch
placed in the LOCK position. When placing
the ignition switch in the ON position, the
system will be released.
Vehicle security system activation
The vehicle security system will give the follow-
ing alarm:
.The headlights blink and the horn sounds
intermittently.
.The alarm automatically turns off after
approximately 50 seconds. However, the
alarm reactivates if the vehicle is tampered
with again.
The alarm is activated by:
Instruments and controls2-37
Page 117 of 508
2-38Instruments and controls
.opening any doors, the hood (if so
equipped) or liftgate without using the key
or Intelligent Key (even if the door is
unlocked by releasing the door inside lock
knob) .
How to stop an activated alarm
The alarm stops only by unlocking a door or the
liftgate with the mechanical key, pressing the
UNLOCK
button on the key fob (if so
equipped) or the Intelligent Key (if so equipped) ,
or pushing the request switch (if so equipped)
on the driver’s or passenger’s door in range of
the door handle.
NISSAN VEHICLE IMMOBILIZER SYS-
TEM
The NISSAN Vehicle Immobilizer System will not
allow the engine to start without the use of the
registered key.
If the engine fails to start using the registered
key, it may be due to interference caused by
another registered key, an automated toll road
device or automated payment device on the key
ring. Restart the engine using the following
procedures:
1. Leave the ignition switch in the ON position
for approximately 5 seconds.
2. Place the ignition switch in the OFF or
LOCK position and wait approximately 10seconds.
3. Repeat step 1 and 2 again.
4. Restart the engine while holding the device
(which may have caused the interference)
separate from the registered key.
If this procedure allows the engine to start,
NISSAN recommends placing the regis-
tered key on a separate key ring to avoid
interference from other devices.
Statement related to section 15 of FCC
rules for NISSAN Vehicle Immobilizer
System (CONT ASSY-BCM. ANT ASSY-
IMMOBILISER)
FCC Notice:
For USA:
This device complies with Part 15 of the
FCC Rules. Operation is subject to the
following two conditions: (1) This device
may not cause harmful interference, and
(2) this device must accept any interfer-
ence received, including interference that
may cause undesired operation.
Note: Changes or modifications not ex-
pressly approved by the party responsible
for compliance could void the user’s
authority to operate the equipment.For Canada:
This device complies with Industry Canada
licence-exempt RSS standard(s) . Opera-
tion is subject to the following two condi-
tions: (1) this device may not cause
interference, and (2) this device must
accept any interference, including interfer-
ence that may cause undesired operation
of the device.
Page 150 of 508
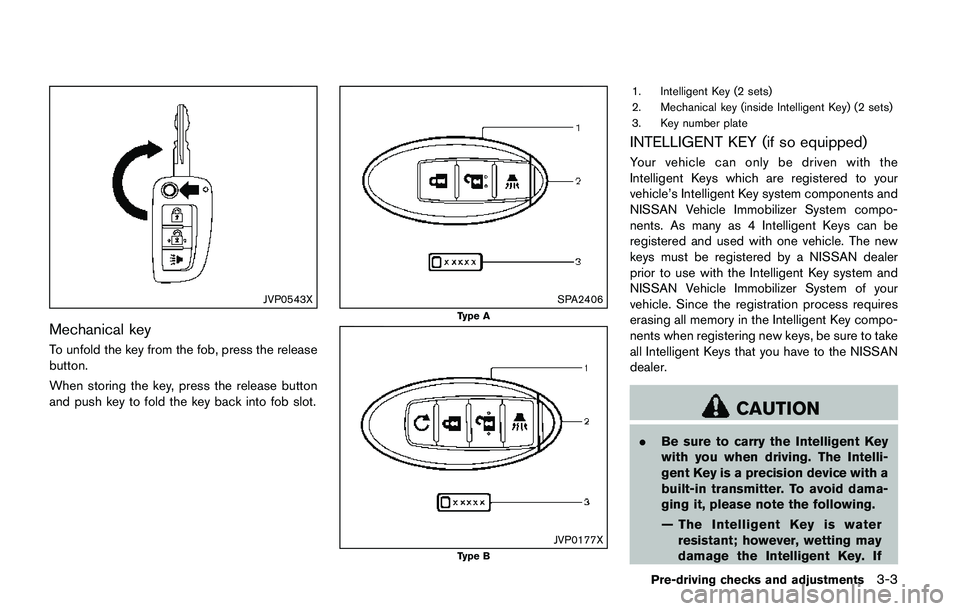
JVP0543X
Mechanical key
To unfold the key from the fob, press the release
button.
When storing the key, press the release button
and push key to fold the key back into fob slot.
SPA2406
Type A
JVP0177XType B
1. Intelligent Key (2 sets)
2. Mechanical key (inside Intelligent Key) (2 sets)
3. Key number plate
INTELLIGENT KEY (if so equipped)
Your vehicle can only be driven with the
Intelligent Keys which are registered to your
vehicle’s Intelligent Key system components and
NISSAN Vehicle Immobilizer System compo-
nents. As many as 4 Intelligent Keys can be
registered and used with one vehicle. The new
keys must be registered by a NISSAN dealer
prior to use with the Intelligent Key system and
NISSAN Vehicle Immobilizer System of your
vehicle. Since the registration process requires
erasing all memory in the Intelligent Key compo-
nents when registering new keys, be sure to take
all Intelligent Keys that you have to the NISSAN
dealer.
CAUTION
.Be sure to carry the Intelligent Key
with you when driving. The Intelli-
gent Key is a precision device with a
built-in transmitter. To avoid dama-
ging it, please note the following.
— The Intelligent Key is water
resistant; however, wetting may
damage the Intelligent Key. If
Pre-driving checks and adjustments3-3
Page 155 of 508
3-8Pre-driving checks and adjustments
It is possible to lock/unlock all doors (including
the liftgate) , and activate the panic alarm by
using the key fob from outside the vehicle.
Before locking the doors, make sure the
key is not left in the vehicle.
The key fob can operate at a distance of
approximately 33 ft (10 m) from the vehicle.
(The effective distance depends upon the
conditions around the vehicle.)
As many as 4 key fobs can be used with one
vehicle. For information concerning the pur-
chase and use of additional key fobs, contact a
NISSAN dealer.
The key fob will not function:
.When the key fob is not within the opera-
tional range.
.When the doors are open or not closed
securely.
.When the key is in the ignition switch.
.When the battery is discharged.
WARNING
The remote keyless entry key fob trans-
mits radio waves when the buttons are
pushed. The FAA advises that the radio
waves may affect aircraft navigation
and communication systems. Do notoperate the key fob while on an air-
plane. Make sure the buttons are not
operated unintentionally when the unit
is stored during a flight.
CAUTION
The following conditions or occur-
rences will damage the key fob.
.Do not allow the key fob to become
wet.
.Do not drop the key fob.
.Do not strike the key fob sharply
against another object.
.If the outside temperature is below
148F (-108C) degrees, the battery of
key fob may not function properly.
.Do not place the key fob for an
extended period in an area where
temperatures exceed 1408F (608C) .
If a key fob is lost or stolen, NISSAN
recommends erasing the ID code of that
key fob. This will prevent the key fob
from unauthorized use to unlock the
vehicle. For information regarding the
erasing procedure, it is recommendedthat you visit a NISSAN dealer.
For information regarding the replacement of a
battery, see “Key fob battery replacement” (P.8-
21) .
REMOTE KEYLESS ENTRY SYSTEM
(if so equipped)
Page 156 of 508
JVP0308X
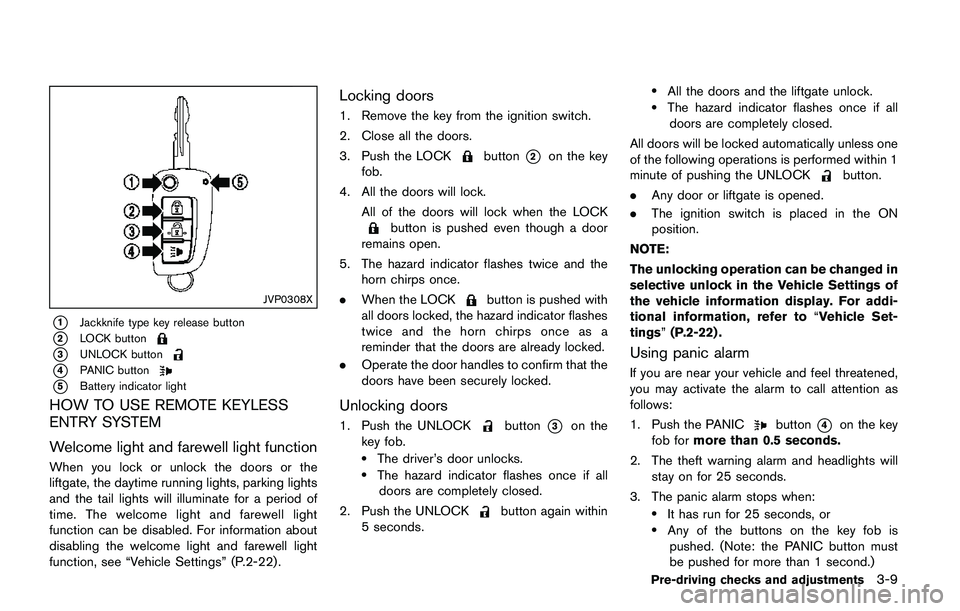
*1Jackknife type key release button
*2LOCK button
*3UNLOCK button
*4PANIC button
*5Battery indicator light
HOW TO USE REMOTE KEYLESS
ENTRY SYSTEM
Welcome light and farewell light function
When you lock or unlock the doors or the
liftgate, the daytime running lights, parking lights
and the tail lights will illuminate for a period of
time. The welcome light and farewell light
function can be disabled. For information about
disabling the welcome light and farewell light
function, see “Vehicle Settings” (P.2-22).
Locking doors
1. Remove the key from the ignition switch.
2. Close all the doors.
3. Push the LOCK
button*2on the key
fob.
4. All the doors will lock.
All of the doors will lock when the LOCK
button is pushed even though a door
remains open.
5. The hazard indicator flashes twice and the
horn chirps once.
.When the LOCK
button is pushed with
all doors locked, the hazard indicator flashes
twice and the horn chirps once as a
reminder that the doors are already locked.
.Operate the door handles to confirm that the
doors have been securely locked.
Unlocking doors
1. Push the UNLOCKbutton*3on the
key fob.
.The driver’s door unlocks..The hazard indicator flashes once if all
doors are completely closed.
2. Push the UNLOCK
button again within
5 seconds.
.All the doors and the liftgate unlock..The hazard indicator flashes once if all
doors are completely closed.
All doors will be locked automatically unless one
of the following operations is performed within 1
minute of pushing the UNLOCK
button.
.Any door or liftgate is opened.
.The ignition switch is placed in the ON
position.
NOTE:
The unlocking operation can be changed in
selective unlock in the Vehicle Settings of
the vehicle information display. For addi-
tional information, refer to“Vehicle Set-
tings”(P.2-22) .
Using panic alarm
If you are near your vehicle and feel threatened,
you may activate the alarm to call attention as
follows:
1. Push the PANIC
button*4on the key
fob formore than 0.5 seconds.
2. The theft warning alarm and headlights will
stay on for 25 seconds.
3. The panic alarm stops when:
.It has run for 25 seconds, or.Any of the buttons on the key fob is
pushed. (Note: the PANIC button must
be pushed for more than 1 second.)
Pre-driving checks and adjustments3-9
Page 157 of 508
3-10Pre-driving checks and adjustments
Battery indicator light
The battery indicator light*5illuminates when
you push any button. If the light does not
illuminate, the battery is weak or needs replace-
ment. For information regarding replacement of
a battery, see “Key fob battery replacement”
(P.8-21) .
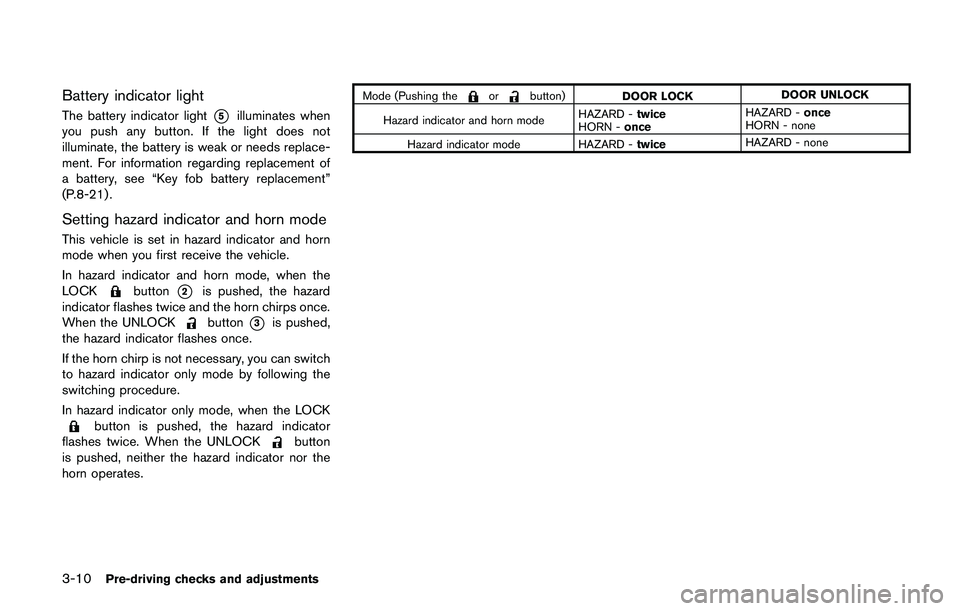
Setting hazard indicator and horn mode
This vehicle is set in hazard indicator and horn
mode when you first receive the vehicle.
In hazard indicator and horn mode, when the
LOCK
button*2is pushed, the hazard
indicator flashes twice and the horn chirps once.
When the UNLOCK
button*3is pushed,
the hazard indicator flashes once.
If the horn chirp is not necessary, you can switch
to hazard indicator only mode by following the
switching procedure.
In hazard indicator only mode, when the LOCK
button is pushed, the hazard indicator
flashes twice. When the UNLOCKbutton
is pushed, neither the hazard indicator nor the
horn operates.
Mode (Pushing theorbutton)
DOOR LOCKDOOR UNLOCK
Hazard indicator and horn modeHAZARD -twice
HORN -onceHAZARD -once
HORN - none
Hazard indicator mode HAZARD -twiceHAZARD - none
Page 158 of 508
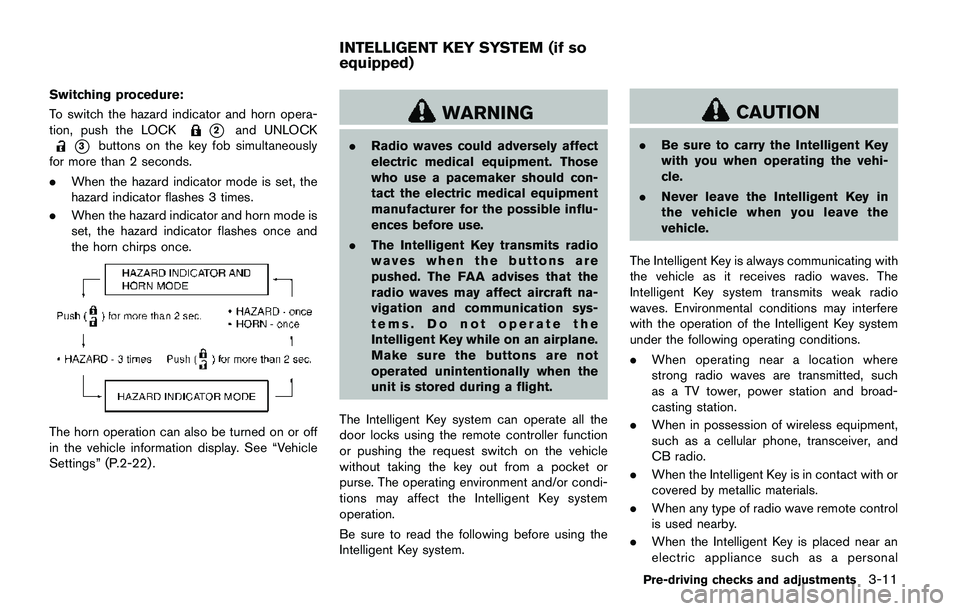
Switching procedure:
To switch the hazard indicator and horn opera-
tion, push the LOCK
*2and UNLOCK
*3buttons on the key fob simultaneously
for more than 2 seconds.
.When the hazard indicator mode is set, the
hazard indicator flashes 3 times.
.When the hazard indicator and horn mode is
set, the hazard indicator flashes once and
the horn chirps once.
The horn operation can also be turned on or off
in the vehicle information display. See “Vehicle
Settings” (P.2-22) .
WARNING
.Radio waves could adversely affect
electric medical equipment. Those
who use a pacemaker should con-
tact the electric medical equipment
manufacturer for the possible influ-
ences before use.
.The Intelligent Key transmits radio
waves when the buttons are
pushed. The FAA advises that the
radio waves may affect aircraft na-
vigation and communication sys-
tems. Do not operate the
Intelligent Key while on an airplane.
Make sure the buttons are not
operated unintentionally when the
unit is stored during a flight.
The Intelligent Key system can operate all the
door locks using the remote controller function
or pushing the request switch on the vehicle
without taking the key out from a pocket or
purse. The operating environment and/or condi-
tions may affect the Intelligent Key system
operation.
Be sure to read the following before using the
Intelligent Key system.
CAUTION
.Be sure to carry the Intelligent Key
with you when operating the vehi-
cle.
.Never leave the Intelligent Key in
the vehicle when you leave the
vehicle.
The Intelligent Key is always communicating with
the vehicle as it receives radio waves. The
Intelligent Key system transmits weak radio
waves. Environmental conditions may interfere
with the operation of the Intelligent Key system
under the following operating conditions.
.When operating near a location where
strong radio waves are transmitted, such
as a TV tower, power station and broad-
casting station.
.When in possession of wireless equipment,
such as a cellular phone, transceiver, and
CB radio.
.When the Intelligent Key is in contact with or
covered by metallic materials.
.When any type of radio wave remote control
is used nearby.
.When the Intelligent Key is placed near an
electric appliance such as a personal
Pre-driving checks and adjustments3-11
INTELLIGENT KEY SYSTEM (if so
equipped)
Page 395 of 508
5-110Starting and driving
FREEING A FROZEN DOOR LOCK
To prevent a door lock from freezing, apply
deicer through the key hole. If the lock becomes
frozen, heat the key before inserting it into the
key hole, or use the Intelligent Key system or the
remote keyless entry key fob.
ANTI-FREEZE
In the winter when it is anticipated that the
outside temperature will drop below 328F(08C) ,
check the anti-freeze to assure proper winter
protection. For additional information, see “En-
gine cooling system” (P.8-4) .
BATTERY
If the battery is not fully charged during
extremely cold weather conditions, the battery
fluid may freeze and damage the battery. To
maintain maximum efficiency, the battery should
be checked regularly. For additional information,
see “Battery” (P.8-11) .
DRAINING OF COOLANT WATER
If the vehicle is to be left outside without anti-
freeze, drain the cooling system, including the
engine block. Refill before operating the vehicle.
For details, see “Engine cooling system” (P.8-4) .
TIRE EQUIPMENT
SUMMER tires have a tread designed to provide
superior performance on dry pavement. How-
ever, the performance of these tires will be
substantially reduced in snowy and icy condi-
tions. If you operate your vehicle on snowy or icy
roads, NISSAN recommends the use of MUD &
SNOW or ALL SEASON tires on all four wheels.
It is recommended you consult a NISSAN dealer
for the tire type, size, speed rating and
availability information.
For additional traction on icy roads, studded
tires may be used. However, some U.S. states
and Canadian provinces prohibit their use.
Check local, state and provincial laws before
installing studded tires.
Skid and traction capabilities of studded
snow tires, on wet or dry surfaces, may be
poorer than that of non-studded snow
tires.
Tire chains may be used. For details, see “Tire
chains” (P.8-36) of this manual.
All-Wheel Drive (AWD) model
If you install snow tires, they must also be the
same size, brand, construction and tread pattern
on all four wheels.
SPECIAL WINTER EQUIPMENT
It is recommended that the following items be
carried in the vehicle during winter:
.A scraper and stiff-bristled brush to remove
ice and snow from the windows and wiper
blades.
.A sturdy, flat board to be placed under the
jack to give it firm support.
.A shovel to dig the vehicle out of snow-
drifts.
.Extra window washer fluid to refill the
reservoir tank.
DRIVING ON SNOW OR ICE
WARNING
.Wet ice (328F, 08C and freezing rain) ,
very cold snow or ice can be slick
and very hard to drive on. The
vehicle will have much less traction
or“grip”under these conditions. Try
to avoid driving on wet ice until the
road is salted or sanded.
.Whatever the condition, drive with
caution. Accelerate and slow down
with care. If accelerating or down-
shifting too fast, the drive wheels
will lose even more traction.
COLD WEATHER DRIVING
Page 424 of 508
8 Do-it-yourself
Maintenance precautions ........................................................ 8-2
Engine compartment check locations .................................. 8-3
MR20DD engine model ..................................................... 8-4
Engine cooling system ............................................................. 8-4
Checking engine coolant level ......................................... 8-5
Changing engine coolant .................................................. 8-6
Engine oil .................................................................................... 8-6
Checking engine oil level .................................................. 8-6
Changing engine oil and filter .......................................... 8-6
Continuously Variable Transmission (CVT) fluid ............... 8-9
Brake and clutch (if so equipped) fluid ............................... 8-9
Window washer fluid ............................................................ 8-10
Battery ....................................................................................... 8-11
Jump starting ..................................................................... 8-12
Variable voltage control system .......................................... 8-13
Drive belt .................................................................................. 8-13
Spark plugs ............................................................................. 8-14
Replacing spark plugs .................................................... 8-14
Air cleaner ................................................................................ 8-14Windshield wiper blades ..................................................... 8-15
Cleaning ........................................................................... 8-15
Replacing ......................................................................... 8-16
Rear window wiper blade ................................................... 8-17
Brakes ...................................................................................... 8-17
Self-adjusting brakes .................................................... 8-17
Brake pad wear warning .............................................. 8-17
Fuses ........................................................................................ 8-18
Engine compartment ..................................................... 8-18
Passenger compartment .............................................. 8-20
Key fob battery replacement .............................................. 8-21
Intelligent Key battery replacement ................................... 8-23
Lights ........................................................................................ 8-25
Headlights ........................................................................ 8-25
Exterior and interior lights ............................................ 8-27
Wheels and tires ................................................................... 8-29
Tire pressure ................................................................... 8-29
Tire labeling ..................................................................... 8-33
Types of tires ................................................................... 8-35
Tire chains ....................................................................... 8-36
Changing wheels and tires .......................................... 8-37
Page 444 of 508
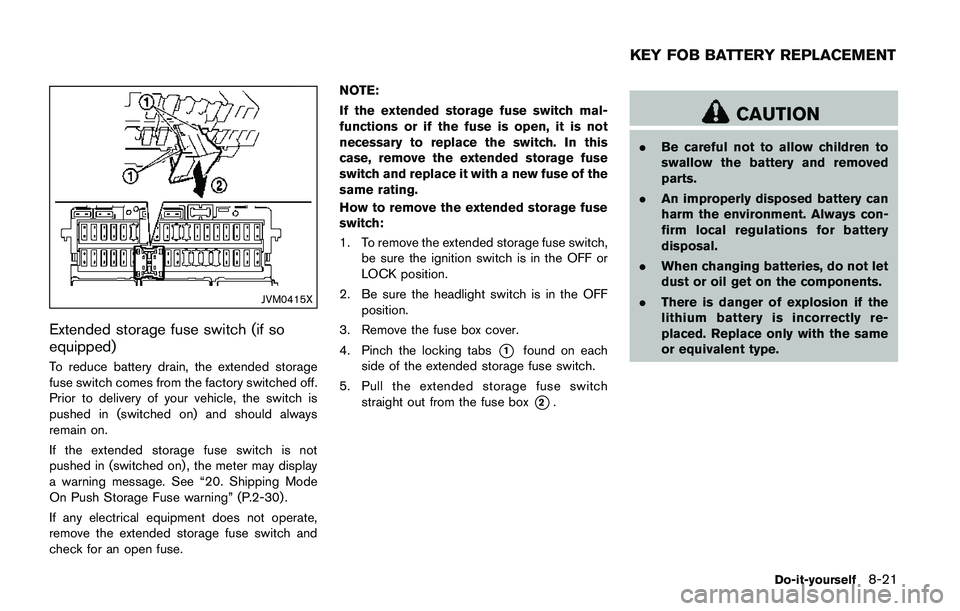
JVM0415X
Extended storage fuse switch (if so
equipped)
To reduce battery drain, the extended storage
fuse switch comes from the factory switched off.
Prior to delivery of your vehicle, the switch is
pushed in (switched on) and should always
remain on.
If the extended storage fuse switch is not
pushed in (switched on) , the meter may display
a warning message. See “20. Shipping Mode
On Push Storage Fuse warning” (P.2-30) .
If any electrical equipment does not operate,
remove the extended storage fuse switch and
check for an open fuse.NOTE:
If the extended storage fuse switch mal-
functions or if the fuse is open, it is not
necessary to replace the switch. In this
case, remove the extended storage fuse
switch and replace it with a new fuse of the
same rating.
How to remove the extended storage fuse
switch:
1. To remove the extended storage fuse switch,
be sure the ignition switch is in the OFF or
LOCK position.
2. Be sure the headlight switch is in the OFF
position.
3. Remove the fuse box cover.
4. Pinch the locking tabs*1found on each
side of the extended storage fuse switch.
5. Pull the extended storage fuse switch
straight out from the fuse box
*2.
CAUTION
.Be careful not to allow children to
swallow the battery and removed
parts.
.An improperly disposed battery can
harm the environment. Always con-
firm local regulations for battery
disposal.
.When changing batteries, do not let
dust or oil get on the components.
.There is danger of explosion if the
lithium battery is incorrectly re-
placed. Replace only with the same
or equivalent type.
Do-it-yourself8-21
KEY FOB BATTERY REPLACEMENT