manual transmission NISSAN QASHQAI 2019 Owner´s Manual
[x] Cancel search | Manufacturer: NISSAN, Model Year: 2019, Model line: QASHQAI, Model: NISSAN QASHQAI 2019Pages: 500, PDF Size: 2.38 MB
Page 246 of 500
5-18Starting and driving
1. Apply the parking brake.
2.Continuously Variable Transmission
(CVT) model:
Move the shift lever to the P (Park) or N
(Neutral) position. (P is recommended.)
The starter is designed so that it does
not operate unless the shift lever is in
either of the above positions.
Manual Transmission (MT) model:
Move the shift lever to the N (Neutral)
position, and depress the clutch pedal
to the floor while starting the engine.
3. Crank the engine with your foot off
the accelerator pedal by turning the
ignition switch to START. Release the
switch when the engine starts. If the
engine starts, but fails to run, repeat
the above procedure.
.If the engine is very hard to start in
extremely cold weather or when
restarting, depress the accelerator
pedal a little (approximately 1/3 to
the floor) and hold it and then
crank the engine. Release the ac-
celerator pedal when the engine
starts.
.If the engine is very hard to startbecause it is flooded, depress the
accelerator pedal all the way to the
floor and hold it. Crank the engine
for 5 - 6 seconds. After cranking the engine, release the accelerator
pedal. Crank the engine
with your
foot off the accelerator pedal by
turning the ignition switch to
START. Release the ignition switch
when the engine starts. If the
engine starts, but fails to run, re-
peat the above procedure.
CAUTION
Do not operate the starter for more
than 15 seconds at a time. If the
engine does not start, turn the igni-
tion switch off and wait 10 seconds
before cranking again, otherwise the
starter could be damaged.
Do not turn the ignition switch to the
START position unless the engine
and starter have stopped moving.
Attempting to start the engine while
the engine or starter is moving may
cause damage.
4. Warm-up
Allow the engine to idle for at least 30
seconds after starting. Do not race the
engine while warming it up. Drive at
moderate speed for a short distance
first, especially in cold weather. In cold
weather, keep the engine running for a minimum of 2 - 3 minutes before
shutting it off. Starting and stopping
the engine over a short period of time
may make the vehicle more difficult to
start.
5. To stop the engine, shift the shift lever to the P (Park) position (CVT model) or
N (Neutral) position (MT model) and
turn the ignition switch to the OFF
position.
NOTE:
Care should be taken to avoid situations
that can lead to potential battery dis-
charge and potential no-start condi-
tions such as:
1. Installation or extended use of elec-
tronic accessories that consume
battery power when the engine is
not running (Phone chargers, GPS,
DVD players, etc.)
2. Vehicle is not driven regularly and/
or only driven short distances.
In these cases, the battery may need to
be charged to maintain battery health.
STARTING THE ENGINE (model
without Intelligent Key system)
Page 247 of 500
1. Apply the parking brake.
2.Continuously Variable Transmission
(CVT) model:
Move the shift lever to the P (Park) or N
(Neutral) position. (P is recommended.)
The starter is designed not to operate
unless the shift lever is in either of the
above positions.
Manual Transmission (MT) model:
Move the shift lever to the N (Neutral)
position. Depress the clutch pedal fully
to the floor.
The starter is designed not to operate
unless the clutch pedal is fully de-
pressed.
The Intelligent Key must be carried
when operating the ignition switch.
3. Push the ignition switch to the ON position. Depress the brake pedal (CVT
models) or the clutch pedal (MT mod-
els) and push the ignition switch to
start the engine.
To start the engine immediately, push
and release the ignition switch while
depressing the brake pedal (CVT mod-
els) or the clutch pedal (MT models)
with the ignition switch in any posi-
tion.
.If the engine is very hard to start in
extremely cold weather or when restarting, depress the accelerator
pedal a little (approximately 1/3 to
the floor) and while holding, crank
the engine. Release the accelerator
pedal when the engine starts.
.If the engine is very hard to start
because it is flooded, depress the
accelerator pedal all the way to the
floor and hold it. Push the ignition
switch to the ON position to start
cranking the engine. After 5 or 6
seconds, stop cranking by pushing
the ignition switch to OFF. After
cranking the engine, release the
accelerator pedal. Crank the engine
with your foot off the accelerator
pedal by depressing the brake
pedal and pushing the push-button
ignition switch to start the engine.
If the engine starts, but fails to run,
repeat the above procedure.
CAUTION
Do not operate the starter for more
than 15 seconds at a time. If the
engine does not start, push the
ignition switch to OFF and wait 10
seconds before cranking again,
otherwise the starter could be da-
maged. 4.
Warm-up
Allow the engine to idle for at least 30
seconds after starting. Do not race the
engine while warming it up. Drive at
moderate speed for a short distance
first, especially in cold weather. In cold
weather, keep the engine running for
a minimum of 2 - 3 minutes before
shutting it off. Starting and stopping
the engine over a short period of time
may make the vehicle more difficult to
start.
When racing the engine up to 4,000
rpm or more under no load condition,
the engine will enter the fuel cut
mode.
5. To stop the engine, move the shift lever to the P (Park) position (CVT
models) or move the shift lever to
the N (Neutral) position (MT models),
and push the ignition switch to the
OFF position.
NOTE:
Care should be taken to avoid situations
that can lead to potential battery dis-
charge and potential no-start condi-
tions such as:
1. Installation or extended use of elec-
tronic accessories that consume
battery power when the engine is
not running (Phone chargers, GPS,
DVD players, etc.)
Starting and driving5-19
STARTING THE ENGINE (model
with Intelligent Key system)
Page 248 of 500
5-20Starting and driving
2.Vehicle is not driven regularly and/
or only driven short distances.
In these cases, the battery may need to
be charged to maintain battery health.
REMOTE ENGINE START (if so
equipped)
Vehicles started with the remote engine
start function require the ignition switch
to be placed in the ON position before the
shift lever can be moved from the P (Park)
position. To place the ignition switch in
the ON position, perform the following
steps:
1. Make sure that the Intelligent Key is carried with you.
2. Depress the brake pedal.
3. Push the ignition switch once to the ON position.
For additional information about the
remote engine start function, see “Re-
mote engine start” (P.3-23).
CONTINUOUSLY VARIABLE TRANS-
MISSION (CVT)
The Continuously Variable Transmission
(CVT) in your vehicle is electronically
controlled to produce maximum power
and smooth operation.
The recommended operating procedures
for this transmission are shown on the
following pages. Follow these procedures
for maximum vehicle performance and
driving enjoyment.
Engine power may be automatically
reduced to protect the CVT if the engine
speed increases quickly when driving
on slippery roads or while being tested
on some dynamometers.
Starting the vehicle
1. After starting the engine, fully depress the foot brake pedal before moving
the shift lever out of the P (Park)
position.
This CVT is designed so that the foot
brake pedal must be depressed
before shifting from P (Park) to any
driving position while the ignition
switch is in the ON position.
The shift lever cannot be moved out
of the P (Park) position and into any
of the other positions if the ignition
switch is placed in the LOCK or OFF position.
2. Keep the foot brake pedal depressed and move the shift lever to a driving
position.
3. Release the parking brake and foot brake pedal, and then gradually start
the vehicle in motion.
WARNING
.Do not depress the accelerator
pedal while shifting from P (Park)
or N (Neutral) to R (Reverse), D
(Drive), or manual shift mode. Al-
ways depress the brake pedal
until shifting is completed. Failure
to do so could cause you to lose
control and have an accident.
. Cold engine idle speed is high, so
use caution when shifting into a
forward or reverse gear before
the engine has warmed up.
. Never shift to either the P (Park)
or R (Reverse) position while ve-
hicle is moving forward and P
(Park) or D (Drive) while the vehi-
cle is reversing. This could cause
an accident or damage the trans-
mission.
DRIVING THE VEHICLE
Page 250 of 500
5-22Starting and driving
brake pedal.
3. Move the shift lever to the P (Park) position.
4. Place the ignition switch in the LOCK position.
CAUTION
To prevent transmission damage,
move the shift lever to the P (Park)
or R (Reverse) position only when the
vehicle is completely stopped.
P (Park):
Use this position when the vehicle is
parked or when starting the engine. Make
sure the vehicle is completely stopped.
The brake pedal must be depressed and
the shift lever button pushed in to move
the shift lever from N (Neutral) or any
drive position to P (Park). Apply the
parking brake. When parking on a hill,
apply the parking brake first, then move
the shift lever to the P (Park) position.
R (Reverse):
Use this position to back up. Make sure
the vehicle is completely stopped before
selecting the R (Reverse) position. The
brake pedal must be depressed and the
shift lever button pushed in to move the shift lever from P (Park), N (Neutral) or
any driving position to R (Reverse).
N (Neutral):
Neither forward nor reverse gear is en-
gaged. The engine can be started in this
position. You may shift to N (Neutral) and
restart a stalled engine while the vehicle
is moving.
D (Drive):
Use this position for all normal forward
driving.
Manual shift mode
When the shift lever is shifted from the D
(Drive) position to the manual shift gate,
the transmission enters the manual shift
mode. Shift ranges can be selected
manually by moving the shift lever up or
down.
In the manual shift mode, the shift range
is displayed on the position indicator in
the meter. Shift ranges up or down one by one as
follows:
M1
?
M2?
M3?
M4?
M5 ?
M6 ?
M7
///// /
.
When shifting up, move the shift lever
to the + (up) side. The transmission
shifts to a higher range.
. When shifting down, move the shift
lever to the − (down) side. The trans-
mission shifts to a lower range.
. Moving the shift lever to the same side
twice will shift the ranges in succes-
sion. However, if this motion is rapidly
done, the second shifting may not be
completed properly.
. When canceling the manual shift
mode, return the shift lever to the D
(Drive) position. The transmission re-
turns to the normal driving mode.
M7 (7th):
Use this position for all normal forward
driving.
However, you need to shift down the
gears manually when accelerating or
passing another vehicle.
M6 (6th) and M5 (5th):
Use these positions when driving up long
slopes, or for engine braking when driving
down long slopes.
Page 251 of 500
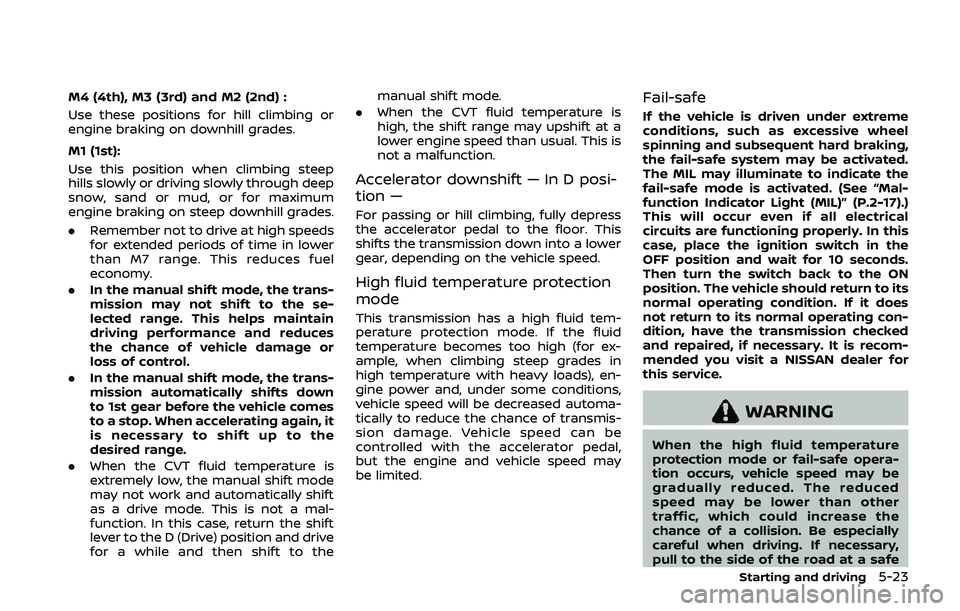
M4 (4th), M3 (3rd) and M2 (2nd) :
Use these positions for hill climbing or
engine braking on downhill grades.
M1 (1st):
Use this position when climbing steep
hills slowly or driving slowly through deep
snow, sand or mud, or for maximum
engine braking on steep downhill grades.
.Remember not to drive at high speeds
for extended periods of time in lower
than M7 range. This reduces fuel
economy.
. In the manual shift mode, the trans-
mission may not shift to the se-
lected range. This helps maintain
driving performance and reduces
the chance of vehicle damage or
loss of control.
. In the manual shift mode, the trans-
mission automatically shifts down
to 1st gear before the vehicle comes
to a stop. When accelerating again, it
is necessary to shift up to the
desired range.
. When the CVT fluid temperature is
extremely low, the manual shift mode
may not work and automatically shift
as a drive mode. This is not a mal-
function. In this case, return the shift
lever to the D (Drive) position and drive
for a while and then shift to the manual shift mode.
. When the CVT fluid temperature is
high, the shift range may upshift at a
lower engine speed than usual. This is
not a malfunction.
Accelerator downshift — In D posi-
tion —
For passing or hill climbing, fully depress
the accelerator pedal to the floor. This
shifts the transmission down into a lower
gear, depending on the vehicle speed.
High fluid temperature protection
mode
This transmission has a high fluid tem-
perature protection mode. If the fluid
temperature becomes too high (for ex-
ample, when climbing steep grades in
high temperature with heavy loads), en-
gine power and, under some conditions,
vehicle speed will be decreased automa-
tically to reduce the chance of transmis-
sion damage. Vehicle speed can be
controlled with the accelerator pedal,
but the engine and vehicle speed may
be limited.
Fail-safe
If the vehicle is driven under extreme
conditions, such as excessive wheel
spinning and subsequent hard braking,
the fail-safe system may be activated.
The MIL may illuminate to indicate the
fail-safe mode is activated. (See “Mal-
function Indicator Light (MIL)” (P.2-17).)
This will occur even if all electrical
circuits are functioning properly. In this
case, place the ignition switch in the
OFF position and wait for 10 seconds.
Then turn the switch back to the ON
position. The vehicle should return to its
normal operating condition. If it does
not return to its normal operating con-
dition, have the transmission checked
and repaired, if necessary. It is recom-
mended you visit a NISSAN dealer for
this service.
WARNING
When the high fluid temperature
protection mode or fail-safe opera-
tion occurs, vehicle speed may be
gradually reduced. The reduced
speed may be lower than other
traffic, which could increase the
chance of a collision. Be especially
careful when driving. If necessary,
pull to the side of the road at a safe
Starting and driving5-23
Page 253 of 500
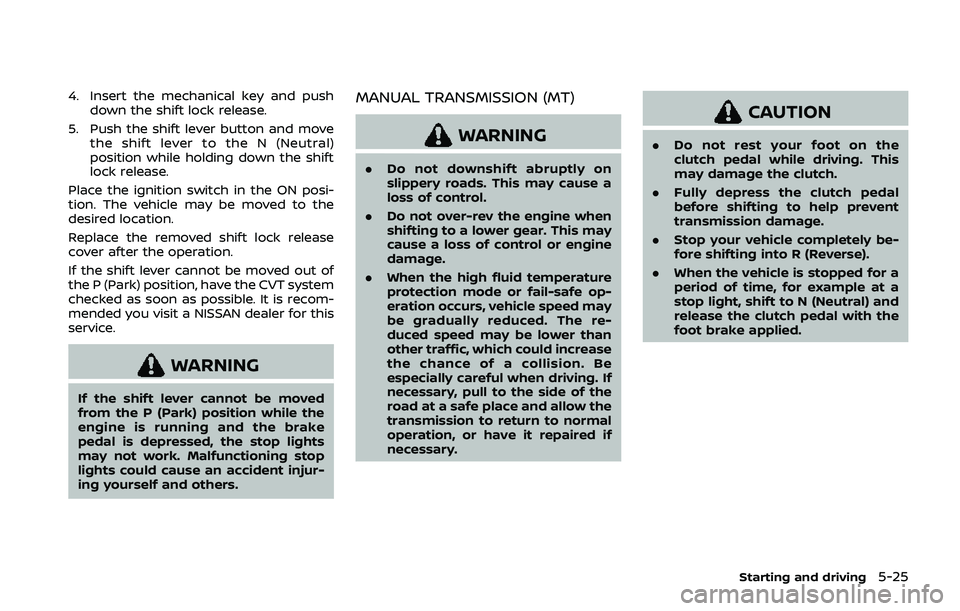
4. Insert the mechanical key and pushdown the shift lock release.
5. Push the shift lever button and move the shift lever to the N (Neutral)
position while holding down the shift
lock release.
Place the ignition switch in the ON posi-
tion. The vehicle may be moved to the
desired location.
Replace the removed shift lock release
cover after the operation.
If the shift lever cannot be moved out of
the P (Park) position, have the CVT system
checked as soon as possible. It is recom-
mended you visit a NISSAN dealer for this
service.
WARNING
If the shift lever cannot be moved
from the P (Park) position while the
engine is running and the brake
pedal is depressed, the stop lights
may not work. Malfunctioning stop
lights could cause an accident injur-
ing yourself and others.
MANUAL TRANSMISSION (MT)
WARNING
. Do not downshift abruptly on
slippery roads. This may cause a
loss of control.
. Do not over-rev the engine when
shifting to a lower gear. This may
cause a loss of control or engine
damage.
. When the high fluid temperature
protection mode or fail-safe op-
eration occurs, vehicle speed may
be gradually reduced. The re-
duced speed may be lower than
other traffic, which could increase
the chance of a collision. Be
especially careful when driving. If
necessary, pull to the side of the
road at a safe place and allow the
transmission to return to normal
operation, or have it repaired if
necessary.
CAUTION
.Do not rest your foot on the
clutch pedal while driving. This
may damage the clutch.
. Fully depress the clutch pedal
before shifting to help prevent
transmission damage.
. Stop your vehicle completely be-
fore shifting into R (Reverse).
. When the vehicle is stopped for a
period of time, for example at a
stop light, shift to N (Neutral) and
release the clutch pedal with the
foot brake applied.
Starting and driving5-25
Page 293 of 500
— When it is not possible to keepthe vehicle at a constant
speed
— When driving in heavy traffic
— When driving in traffic that varies speed
— When driving in windy areas
— When driving on winding or hilly roads
— When driving on slippery (rain, snow, ice, etc.) roads
CAUTION
On Manual Transmission (MT) model,
do not shift to the N (Neutral) posi-
tion without depressing the clutch
pedal when the cruise control is
operated. Should this occur, depress
the clutch pedal and turn the Cruise
ON/OFF switch off immediately. Fail-
ure to do so may cause engine
damage.
PRECAUTIONS ON CRUISE CON-
TROL
. If the cruise control system malfunc-
tions, it will cancel automatically. The
CRUISE indicator in the vehicle infor-
mation display will then blink to warn
the driver.
. If the CRUISE indicator blinks, turn the
Cruise ON/OFF switch off and have
the system checked. It is recom-
mended that you visit a NISSAN dealer
for this service.
. The CRUISE indicator may blink when
the Cruise ON/OFF switch is turned
ON while pushing the RES/+, SET/-, or
CANCEL switch. To properly set the
cruise control system, perform the
following procedures.
CRUISE CONTROL OPERATIONS
The cruise control allows driving at
speeds above 25 MPH (40 km/h) without
keeping your foot on the accelerator
pedal.
The cruise control will automatically be
canceled if the vehicle slows down more
than approximately 8 MPH (13 km/h)
below the set speed.
Moving the shift lever to the N (Neutral)
position will cancel the cruise control.
Turning on cruise control
Push the Cruise ON/OFF switch. The
CRUISE indicator in the vehicle informa-
tion display will appear.
Setting cruising speed
1. Accelerate to the desired speed.
2. Push the SET/- switch and release it.
3. Take your foot off the accelerator
pedal.
The vehicle will maintain the set speed.
Passing another vehicle:
Depress the accelerator pedal to accel-
erate. After releasing the accelerator
pedal, the vehicle will return to the pre-
viously set speed.
The vehicle may not maintain the set
speed when going up or down steep hills.
In such cases, drive without the cruise
control.
Resetting to slower speed:
Use any one of the following methods to
reset to a slower speed.
. Lightly tap the foot brake pedal. When
the vehicle reaches the desired speed,
push and release the SET/- switch.
. Push and hold the SET/- switch. When
the vehicle reaches the desired speed,
release the SET- switch.
Starting and driving5-65
Page 371 of 500
SSD0488
WARNING
.Do not stop or park the vehicle
over flammable materials such as
dry grass, waste paper or rags.
They may ignite and cause a fire.
. Never leave the engine running
while the vehicle is unattended.
. Do not leave children unattended
inside the vehicle. They could
unknowingly activate switches
or controls. Unattended children
could become involved in serious
accidents. .
To help avoid risk of injury or
death through unintended opera-
tion of the vehicle and/or its
systems, do not leave children,
people who require the assis-
tance of others or pets unat-
tended in your vehicle.
Additionally, the temperature in-
side a closed vehicle on a warm
day can quickly become high
enough to cause a significant risk
of injury or death to people and
pets.
. Safe parking procedures require
that both the parking brake be
applied and the transmission placed into P (Park) for Continu-
ously Variable Transmission (CVT)
model or in an appropriate gear
for Manual Transmission (MT)
model. Failure to do so could
cause the vehicle to move unex-
pectedly or roll away and result in
an accident.
. Make sure the CVT shift lever has
been pushed as far forward as it
can go and cannot be moved
without depressing the foot
brake pedal.
1. Firmly apply the parking brake.
2. Continuously Variable Transmission
(CVT) models:
Move the shift lever to the P (Park)
position.
Manual Transmission (MT) models:
Move the shift lever to the R (Reverse)
gear. When parking on an uphill grade,
place the shift lever in the 1st gear.
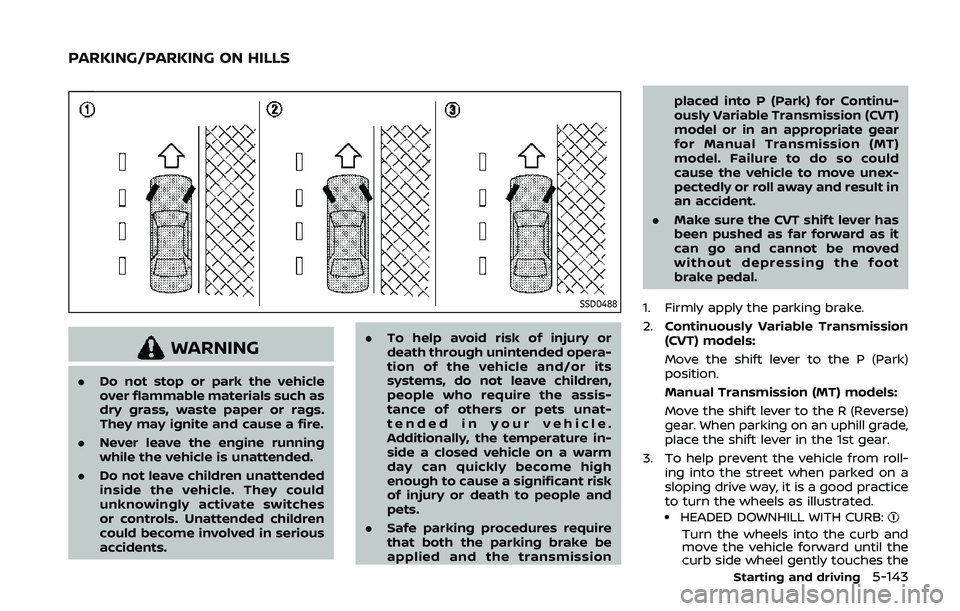
3. To help prevent the vehicle from roll- ing into the street when parked on a
sloping drive way, it is a good practice
to turn the wheels as illustrated.
.HEADED DOWNHILL WITH CURB:
Turn the wheels into the curb and
move the vehicle forward until the
curb side wheel gently touches the
Starting and driving5-143
PARKING/PARKING ON HILLS
Page 390 of 500
6-4In case of emergency
of the TPMS.
. Do not inject any tire liquid or
aerosol tire sealant into the tires,
as this may cause a malfunction
of the tire pressure sensors.
CHANGING A FLAT TIRE
If you have a flat tire, follow the instruc-
tions below.
Stopping the vehicle
1. Safely move the vehicle off the road
and away from traffic.
2. Turn on the hazard warning flashers.
3. Park on a level surface and apply the parking brake.
4. Continuously Variable Transmission
(CVT) models:
Move the shift lever to the P (Park)
position.
Manual Transmission (MT) models:
Move the shift lever to the R (Reverse)
position.
5. Turn off the engine.
6. Raise the hood to warn other traffic, and to signal professional road assis-
tance personnel that you need assis-
tance. 7. Have all passengers get out of the
vehicle and stand in a safe place, away
from traffic and clear of the vehicle.
WARNING
.Make sure the parking brake is
securely applied and the Manual
Transmission is shifted into R
(Reverse), or the CVT into P (Park).
. Never change tires when the ve-
hicle is on a slope, ice or slippery
areas. This is hazardous.
. Never change tires if oncoming
traffic is close to your vehicle.
Wait for professional road assis-
tance.
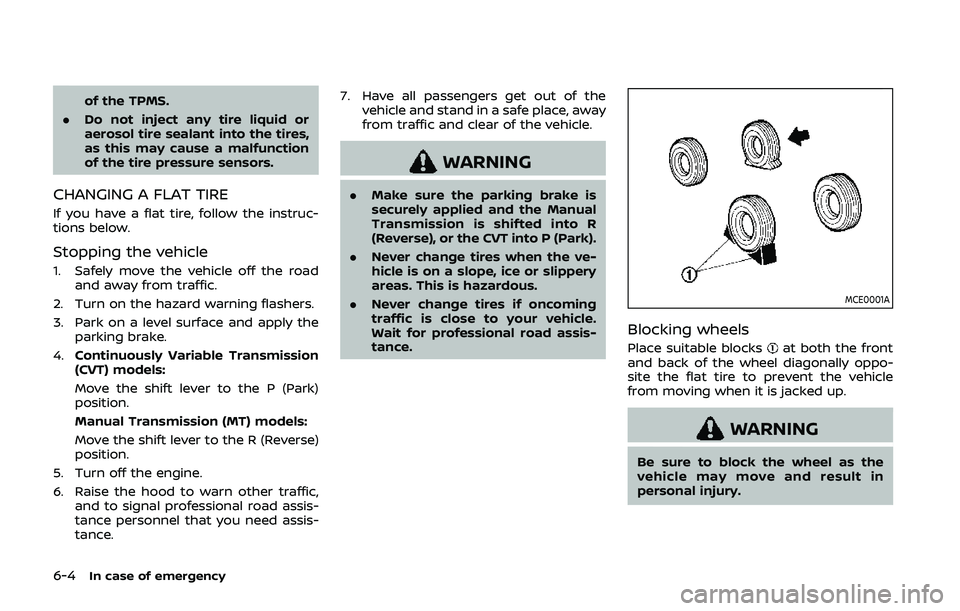
MCE0001A
Blocking wheels
Place suitable blocksat both the front
and back of the wheel diagonally oppo-
site the flat tire to prevent the vehicle
from moving when it is jacked up.
WARNING
Be sure to block the wheel as the
vehicle may move and result in
personal injury.
Page 396 of 500
6-10In case of emergency
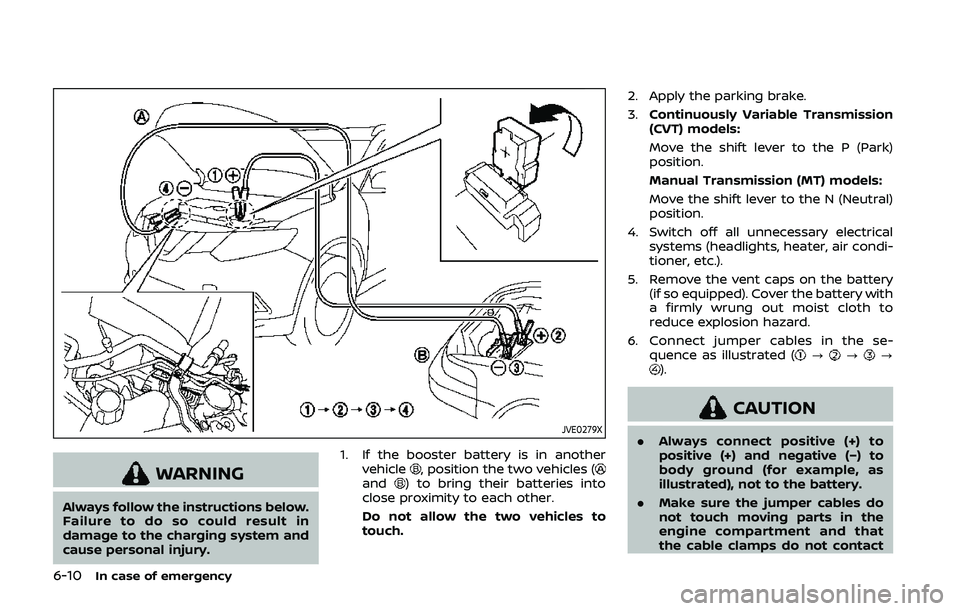
JVE0279X
WARNING
Always follow the instructions below.
Failure to do so could result in
damage to the charging system and
cause personal injury.1. If the booster battery is in another
vehicle
, position the two vehicles (and) to bring their batteries into
close proximity to each other.
Do not allow the two vehicles to
touch. 2. Apply the parking brake.
3.
Continuously Variable Transmission
(CVT) models:
Move the shift lever to the P (Park)
position.
Manual Transmission (MT) models:
Move the shift lever to the N (Neutral)
position.
4. Switch off all unnecessary electrical systems (headlights, heater, air condi-
tioner, etc.).
5. Remove the vent caps on the battery (if so equipped). Cover the battery with
a firmly wrung out moist cloth to
reduce explosion hazard.
6. Connect jumper cables in the se- quence as illustrated (
???).
CAUTION
.Always connect positive (+) to
positive (+) and negative (−) to
body ground (for example, as
illustrated), not to the battery.
. Make sure the jumper cables do
not touch moving parts in the
engine compartment and that
the cable clamps do not contact