ECU NISSAN QASHQAI 2019 Owner´s Manual
[x] Cancel search | Manufacturer: NISSAN, Model Year: 2019, Model line: QASHQAI, Model: NISSAN QASHQAI 2019Pages: 500, PDF Size: 2.38 MB
Page 11 of 500
JVC1065X
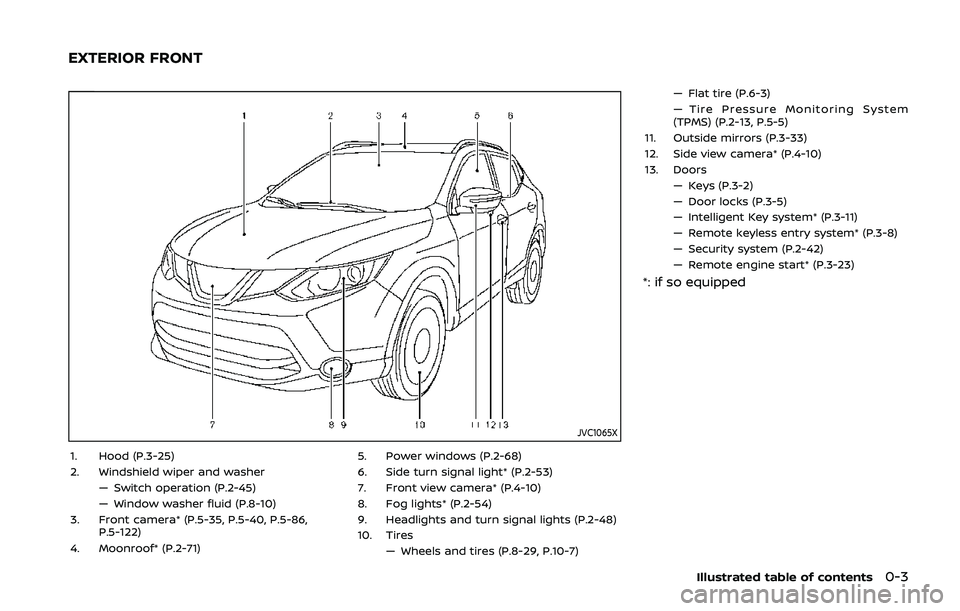
1. Hood (P.3-25)
2. Windshield wiper and washer— Switch operation (P.2-45)
— Window washer fluid (P.8-10)
3. Front camera* (P.5-35, P.5-40, P.5-86, P.5-122)
4. Moonroof* (P.2-71) 5. Power windows (P.2-68)
6. Side turn signal light* (P.2-53)
7. Front view camera* (P.4-10)
8. Fog lights* (P.2-54)
9. Headlights and turn signal lights (P.2-48)
10. Tires
— Wheels and tires (P.8-29, P.10-7) — Flat tire (P.6-3)
— Tire Pressure Monitoring System
(TPMS) (P.2-13, P.5-5)
11. Outside mirrors (P.3-33)
12. Side view camera* (P.4-10)
13. Doors — Keys (P.3-2)
— Door locks (P.3-5)
— Intelligent Key system* (P.3-11)
— Remote keyless entry system* (P.3-8)
— Security system (P.2-42)
— Remote engine start* (P.3-23)
*: if so equipped
Illustrated table of contents0-3
EXTERIOR FRONT
Page 19 of 500
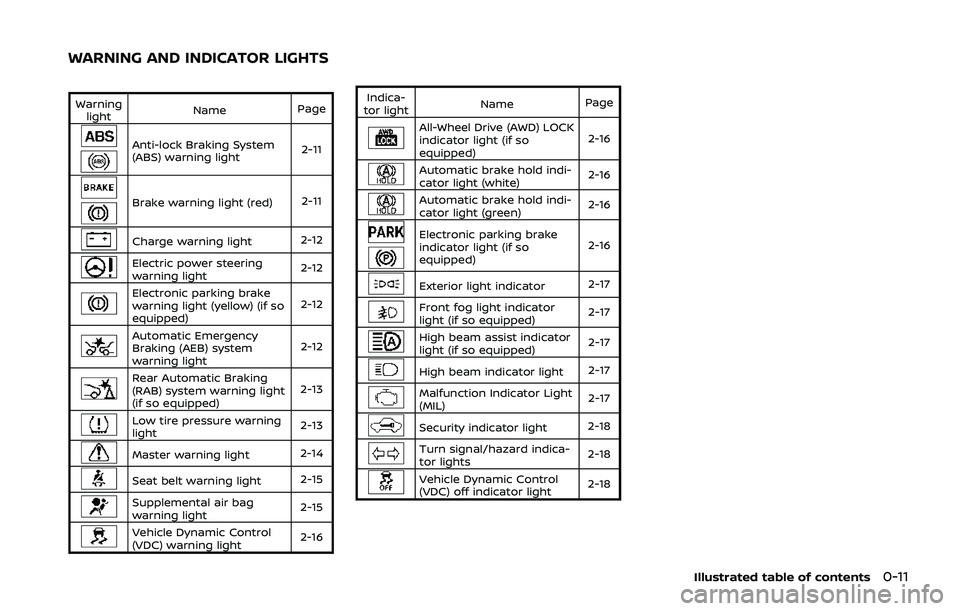
Warninglight Name
Page
Anti-lock Braking System
(ABS) warning light 2-11
Brake warning light (red)
2-11
Charge warning light2-12
Electric power steering
warning light2-12
Electronic parking brake
warning light (yellow) (if so
equipped)2-12
Automatic Emergency
Braking (AEB) system
warning light2-12
Rear Automatic Braking
(RAB) system warning light
(if so equipped)2-13
Low tire pressure warning
light
2-13
Master warning light
2-14
Seat belt warning light 2-15
Supplemental air bag
warning light2-15
Vehicle Dynamic Control
(VDC) warning light
2-16Indica-
tor light Name
Page
All-Wheel Drive (AWD) LOCK
indicator light (if so
equipped) 2-16
Automatic brake hold indi-
cator light (white)
2-16
Automatic brake hold indi-
cator light (green)2-16
Electronic parking brake
indicator light (if so
equipped)2-16
Exterior light indicator
2-17
Front fog light indicator
light (if so equipped)2-17
High beam assist indicator
light (if so equipped)
2-17
High beam indicator light
2-17
Malfunction Indicator Light
(MIL)2-17
Security indicator light
2-18
Turn signal/hazard indica-
tor lights2-18
Vehicle Dynamic Control
(VDC) off indicator light2-18
Illustrated table of contents0-11
WARNING AND INDICATOR LIGHTS
Page 26 of 500
1-6Safety — Seats, seat belts and supplemental restraint system
SSS1053
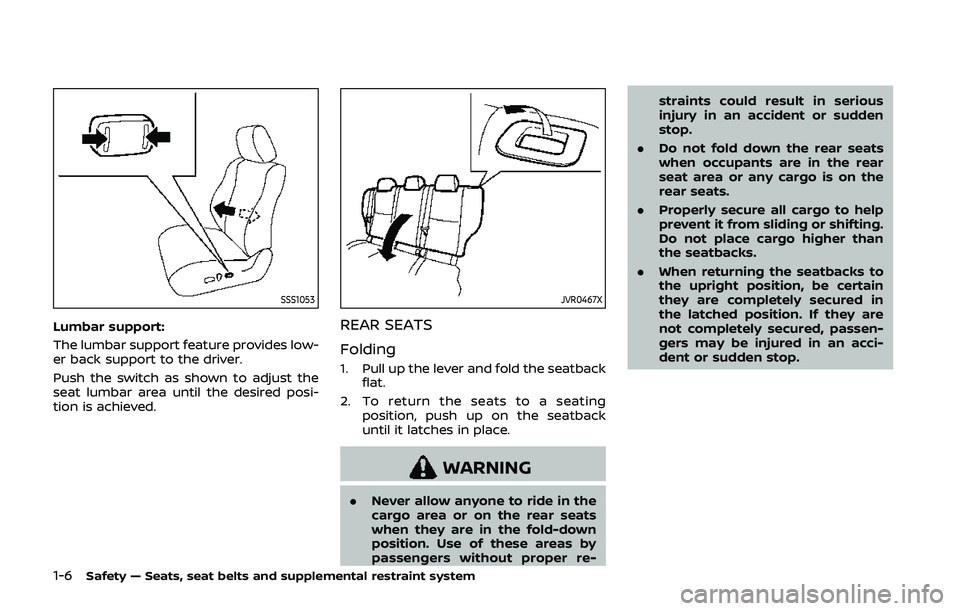
Lumbar support:
The lumbar support feature provides low-
er back support to the driver.
Push the switch as shown to adjust the
seat lumbar area until the desired posi-
tion is achieved.
JVR0467X
REAR SEATS
Folding
1. Pull up the lever and fold the seatbackflat.
2. To return the seats to a seating position, push up on the seatback
until it latches in place.
WARNING
.Never allow anyone to ride in the
cargo area or on the rear seats
when they are in the fold-down
position. Use of these areas by
passengers without proper re- straints could result in serious
injury in an accident or sudden
stop.
. Do not fold down the rear seats
when occupants are in the rear
seat area or any cargo is on the
rear seats.
. Properly secure all cargo to help
prevent it from sliding or shifting.
Do not place cargo higher than
the seatbacks.
. When returning the seatbacks to
the upright position, be certain
they are completely secured in
the latched position. If they are
not completely secured, passen-
gers may be injured in an acci-
dent or sudden stop.
Page 28 of 500
1-8Safety — Seats, seat belts and supplemental restraint system
position.
. The non-adjustable head restraints/
headrests have a single locking notch
to secure them to the seat frame.
. Proper Adjustment:
— For the adjustable type, align the
head restraint/headrest so the
center of your ear is approximately
level with the center of the head
restraint/headrest.
— If your ear position is still higher than the recommended alignment,
place the head restraint/headrest
at the highest position.
. If the head restraint/headrest has
been removed, ensure that it is re-
installed and locked in place before
riding in that designated seating posi-
tion.
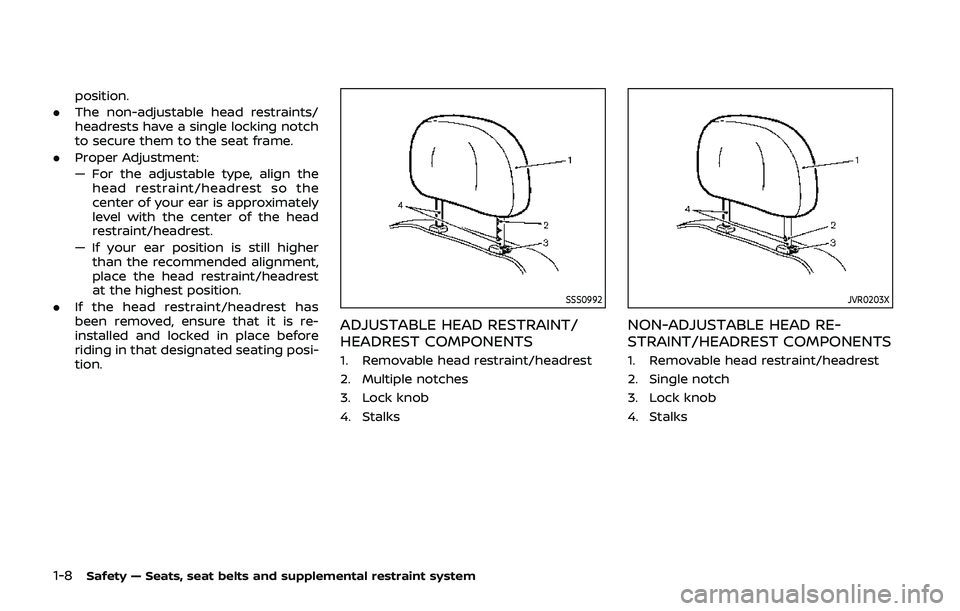
SSS0992
ADJUSTABLE HEAD RESTRAINT/
HEADREST COMPONENTS
1. Removable head restraint/headrest
2. Multiple notches
3. Lock knob
4. Stalks
JVR0203X
NON-ADJUSTABLE HEAD RE-
STRAINT/HEADREST COMPONENTS
1. Removable head restraint/headrest
2. Single notch
3. Lock knob
4. Stalks
Page 29 of 500
SSS1037
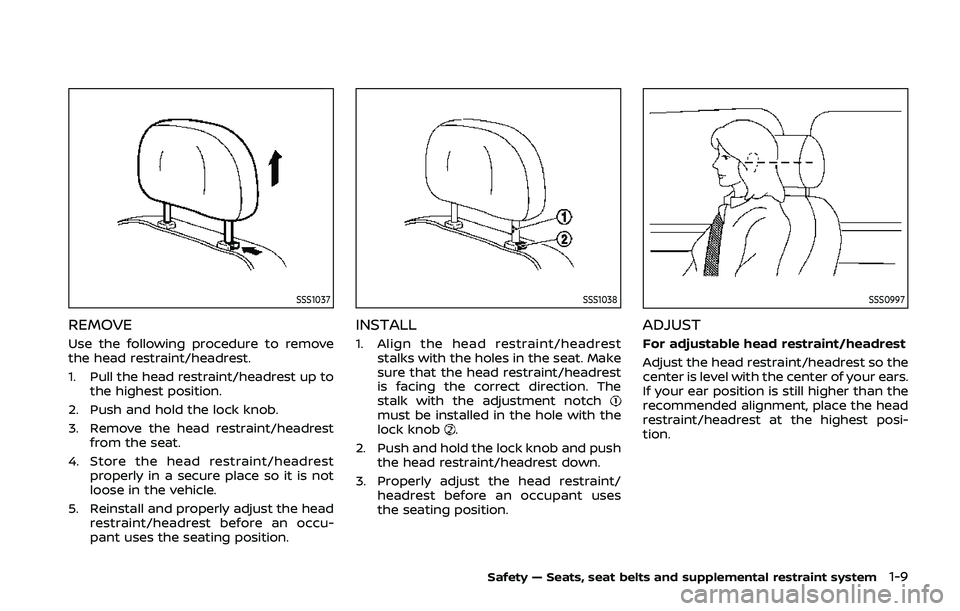
REMOVE
Use the following procedure to remove
the head restraint/headrest.
1. Pull the head restraint/headrest up tothe highest position.
2. Push and hold the lock knob.
3. Remove the head restraint/headrest from the seat.
4. Store the head restraint/headrest properly in a secure place so it is not
loose in the vehicle.
5. Reinstall and properly adjust the head restraint/headrest before an occu-
pant uses the seating position.
SSS1038
INSTALL
1. Align the head restraint/headreststalks with the holes in the seat. Make
sure that the head restraint/headrest
is facing the correct direction. The
stalk with the adjustment notch
must be installed in the hole with the
lock knob.
2. Push and hold the lock knob and push the head restraint/headrest down.
3. Properly adjust the head restraint/ headrest before an occupant uses
the seating position.
SSS0997
ADJUST
For adjustable head restraint/headrest
Adjust the head restraint/headrest so the
center is level with the center of your ears.
If your ear position is still higher than the
recommended alignment, place the head
restraint/headrest at the highest posi-
tion.
Safety — Seats, seat belts and supplemental restraint system1-9
Page 32 of 500
1-12Safety — Seats, seat belts and supplemental restraint system
SSS0016
SSS0014
WARNING
.Every person who drives or rides
in this vehicle should use a seat
belt at all times. Children should
be properly restrained in the rear
seat and, if appropriate, in a child
restraint.
. The seat belt should be properly
adjusted to a snug fit. Failure to
do so may reduce the effective-
ness of the entire restraint sys-
tem and increase the chance or
severity of injury in an accident.
Serious injury or death can occur
if the seat belt is not worn prop-
erly.
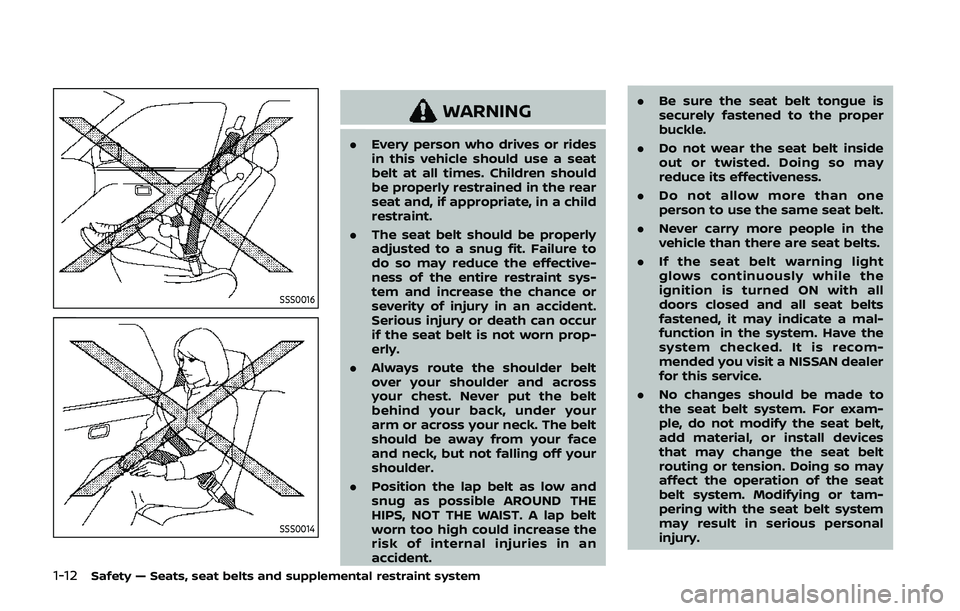
. Always route the shoulder belt
over your shoulder and across
your chest. Never put the belt
behind your back, under your
arm or across your neck. The belt
should be away from your face
and neck, but not falling off your
shoulder.
. Position the lap belt as low and
snug as possible AROUND THE
HIPS, NOT THE WAIST. A lap belt
worn too high could increase the
risk of internal injuries in an
accident. .
Be sure the seat belt tongue is
securely fastened to the proper
buckle.
. Do not wear the seat belt inside
out or twisted. Doing so may
reduce its effectiveness.
. Do not allow more than one
person to use the same seat belt.
. Never carry more people in the
vehicle than there are seat belts.
. If the seat belt warning light
glows continuously while the
ignition is turned ON with all
doors closed and all seat belts
fastened, it may indicate a mal-
function in the system. Have the
system checked. It is recom-
mended you visit a NISSAN dealer
for this service.
. No changes should be made to
the seat belt system. For exam-
ple, do not modify the seat belt,
add material, or install devices
that may change the seat belt
routing or tension. Doing so may
affect the operation of the seat
belt system. Modifying or tam-
pering with the seat belt system
may result in serious personal
injury.
Page 35 of 500
JVR0573X
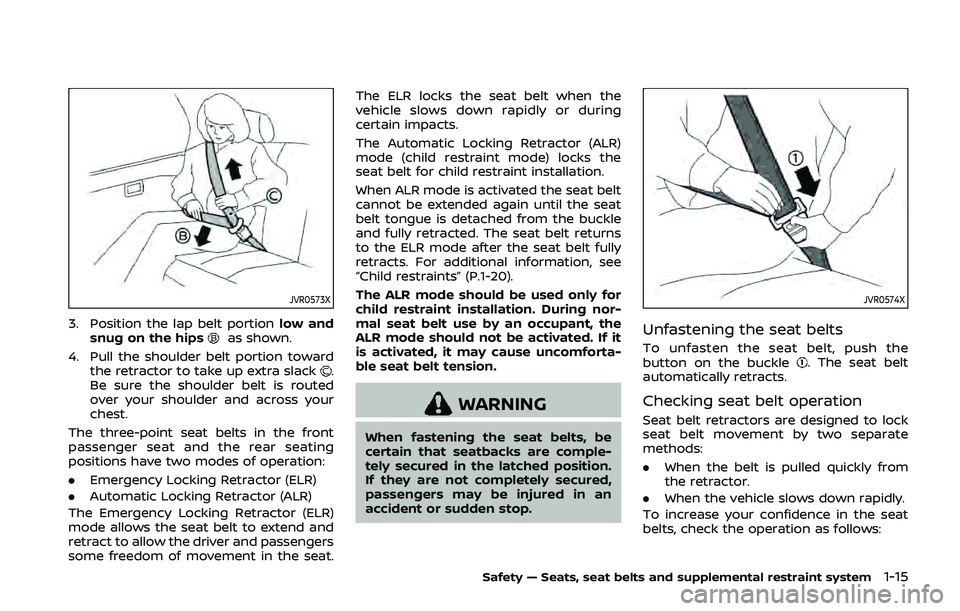
3. Position the lap belt portionlow and
snug on the hipsas shown.
4. Pull the shoulder belt portion toward the retractor to take up extra slack
.
Be sure the shoulder belt is routed
over your shoulder and across your
chest.
The three-point seat belts in the front
passenger seat and the rear seating
positions have two modes of operation:
. Emergency Locking Retractor (ELR)
. Automatic Locking Retractor (ALR)
The Emergency Locking Retractor (ELR)
mode allows the seat belt to extend and
retract to allow the driver and passengers
some freedom of movement in the seat. The ELR locks the seat belt when the
vehicle slows down rapidly or during
certain impacts.
The Automatic Locking Retractor (ALR)
mode (child restraint mode) locks the
seat belt for child restraint installation.
When ALR mode is activated the seat belt
cannot be extended again until the seat
belt tongue is detached from the buckle
and fully retracted. The seat belt returns
to the ELR mode after the seat belt fully
retracts. For additional information, see
“Child restraints” (P.1-20).
The ALR mode should be used only for
child restraint installation. During nor-
mal seat belt use by an occupant, the
ALR mode should not be activated. If it
is activated, it may cause uncomforta-
ble seat belt tension.
WARNING
When fastening the seat belts, be
certain that seatbacks are comple-
tely secured in the latched position.
If they are not completely secured,
passengers may be injured in an
accident or sudden stop.
JVR0574X
Unfastening the seat belts
To unfasten the seat belt, push the
button on the buckle. The seat belt
automatically retracts.
Checking seat belt operation
Seat belt retractors are designed to lock
seat belt movement by two separate
methods:
. When the belt is pulled quickly from
the retractor.
. When the vehicle slows down rapidly.
To increase your confidence in the seat
belts, check the operation as follows:
Safety — Seats, seat belts and supplemental restraint system1-15
Page 36 of 500
1-16Safety — Seats, seat belts and supplemental restraint system
.Grasp the shoulder belt and pull for-
ward quickly. The retractor should
lock and restrict further belt move-
ment.
If the retractor does not lock during this
check, get the system checked. It is
recommended you visit a NISSAN dealer
for this service, or to learn more about
seat belt operation.
SSS0351A
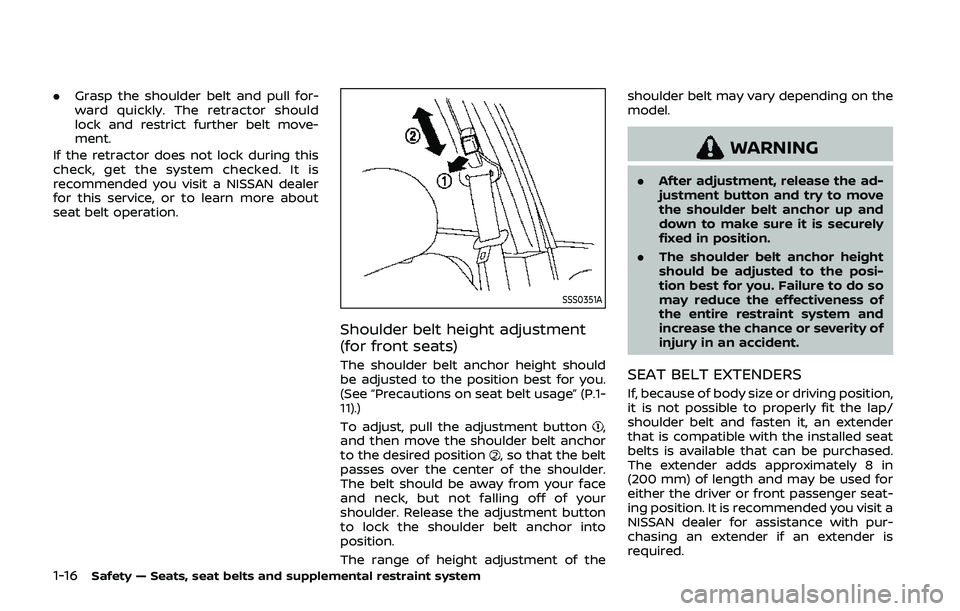
Shoulder belt height adjustment
(for front seats)
The shoulder belt anchor height should
be adjusted to the position best for you.
(See “Precautions on seat belt usage” (P.1-
11).)
To adjust, pull the adjustment button
,
and then move the shoulder belt anchor
to the desired position
, so that the belt
passes over the center of the shoulder.
The belt should be away from your face
and neck, but not falling off of your
shoulder. Release the adjustment button
to lock the shoulder belt anchor into
position.
The range of height adjustment of the shoulder belt may vary depending on the
model.
WARNING
.
After adjustment, release the ad-
justment button and try to move
the shoulder belt anchor up and
down to make sure it is securely
fixed in position.
. The shoulder belt anchor height
should be adjusted to the posi-
tion best for you. Failure to do so
may reduce the effectiveness of
the entire restraint system and
increase the chance or severity of
injury in an accident.
SEAT BELT EXTENDERS
If, because of body size or driving position,
it is not possible to properly fit the lap/
shoulder belt and fasten it, an extender
that is compatible with the installed seat
belts is available that can be purchased.
The extender adds approximately 8 in
(200 mm) of length and may be used for
either the driver or front passenger seat-
ing position. It is recommended you visit a
NISSAN dealer for assistance with pur-
chasing an extender if an extender is
required.
Page 37 of 500
WARNING
.It is recommended that only
NISSAN seat belt extenders, made
by the same company which
made the original equipment seat
belts, be used with NISSAN seat
belts.
. Adults and children who can use
the standard seat belt should not
use an extender. Such unneces-
sary use could result in serious
personal injury in the event of an
accident.
. Never use seat belt extenders to
install child restraints. If the child
restraint is not secured properly,
the child could be seriously in-
jured or killed in a collision or a
sudden stop.
SEAT BELT MAINTENANCE
.To clean the seat belt webbing, apply
a mild soap solution or any solution
recommended for cleaning upholstery
or carpets. Then wipe with a cloth and
allow the seat belts to dry in the
shade. Do not allow the seat belts to
retract until they are completely dry. .
If dirt builds up in the shoulder belt
guide of the seat belt anchors, the
seat belts may retract slowly. Wipe the
shoulder belt guide with a clean, dry
cloth.
. Periodically check to see that the
seat belt and the metal components,
such as buckles, tongues, retractors,
flexible wires and anchors, work prop-
erly. If loose parts, deterioration, cuts
or other damage on the webbing is
found, the entire seat belt assembly
should be replaced.
WARNING
Do not allow children to play with the
seat belts. Most seating positions are
equipped with Automatic Locking
Retractor (ALR) mode seat belts. If
the seat belt becomes wrapped
around a child’s neck with the ALR
mode activated, the child can be
seriously injured or killed if the seat
belt retracts and becomes tight. This
can occur even if the vehicle is
parked. Unbuckle the seat belt to
release the child. If the seat belt can
not be unbuckled or is already un-
buckled, release the child by cutting
the seat belt with a suitable tool
(such as a knife or scissors) to
release the seat belt.
Children need adults to help protect
them.
They need to be properly restrained.
In addition to the general information in
this manual, child safety information is
available from many other sources, in-
cluding doctors, teachers, government
traffic safety offices, and community or-
ganizations. Every child is different, so be
sure to learn the best way to transport
your child.
Safety — Seats, seat belts and supplemental restraint system1-17
CHILD SAFETY
Page 38 of 500
1-18Safety — Seats, seat belts and supplemental restraint system
There are three basic types of child
restraint systems:
.Rear-facing child restraint
. Forward-facing child restraint
. Booster seat
The proper restraint depends on the
child’s size. Generally, infants up to about
1 year and less than 20 lbs (9 kg) should
be placed in rear-facing child restraints.
Forward-facing child restraints are avail-
able for children who outgrow rear-facing
child restraints and are at least 1 year old.
Booster seats are used to help position a
vehicle lap/shoulder belt on a child who
can no longer use a forward-facing child
restraint.
WARNING
Infants and children need special
protection. The vehicle’s seat belts
may not fit them properly. The
shoulder belt may come too close
to the face or neck. The lap belt may
not fit over their small hip bones. In
an accident, an improperly fitting
seat belt could cause serious or fatal
injury. Always use appropriate child
restraints.
All U.S. states and Canadian provinces or territories require the use of approved
child restraints for infants and small
children. See “Child restraints” (P.1-20).
A child restraint may be secured in the
vehicle by using either the LATCH (Lower
Anchors and Tethers for CHildren) system
or with the vehicle seat belt. See “Child
restraints” (P.1-20) for more information.
NISSAN recommends that all pre-teens
and children be restrained in the rear
seat. Studies show that children are
safer when properly restrained in the
rear seat than in the front seat.
This is especially important because
your vehicle has a supplemental re-
straint system (Air bag system) for the
front passenger. See “Supplemental
Restraint System (SRS)” (P.1-40).
INFANTS
Infants up to at least 1 year old should be
placed in a rear-facing child restraint.
NISSAN recommends that infants be
placed in child restraints that comply with
Federal Motor Vehicle Safety Standards
or Canadian Motor Vehicle Safety Stan-
dards. You should choose a child restraint
that fits your vehicle and always follow
the manufacturer’s instructions for instal-
lation and use.
SMALL CHILDREN
Children that are over 1 year old and
weigh at least 20 lbs (9 kg) should remain
in a rear-facing child restraint as long as
possible up to the height or weight limit
of the child restraint. Children who out-
grow the height or weight limit of the
rear-facing child restraint and are at least
1 year old should be secured in a forward-
facing child restraint with a harness. Refer
to the manufacturer’s instructions for
minimum and maximum weight and
height recommendations. NISSAN recom-
mends that small children be placed in
child restraints that comply with Federal
Motor Vehicle Safety Standards or Cana-
dian Motor Vehicle Safety Standards. You
should choose a child restraint that fits
your vehicle and always follow the man-
ufacturer’s instructions for installation
and use.
LARGER CHILDREN
Children should remain in a forward-
facing child restraint with a harness until
they reach the maximum height or
weight limit allowed by the child restraint
manufacturer.
Once a child outgrows the height or
weight limit of the harness-equipped
forward-facing child restraint, NISSAN
recommends that the child be placed in
a commercially available booster seat to