tires NISSAN QASHQAI 2020 Owner´s Manual
[x] Cancel search | Manufacturer: NISSAN, Model Year: 2020, Model line: QASHQAI, Model: NISSAN QASHQAI 2020Pages: 492, PDF Size: 2.02 MB
Page 364 of 492
5-128Starting and driving
BRAKE ASSIST
When the force applied to the brake pedal
exceeds a certain level, the Brake Assist is
activated generating greater braking
force than a conventional brake booster
even with light pedal force.
WARNING
The Brake Assist is only an aid to
assist braking operation and is not a
collision warning or avoidance de-
vice. It is the driver’s responsibility to
stay alert, drive safely and be in
control of the vehicle at all times.
ANTI-LOCK BRAKING SYSTEM (ABS)
WARNING
.The Anti-lock Braking System
(ABS) is a sophisticated device,
but it cannot prevent accidents
resulting from careless or dan-
gerous driving techniques. It can
help maintain vehicle control dur-
ing braking on slippery surfaces.
Remember that stopping dis-
tances on slippery surfaces will
be longer than on normal sur- faces even with ABS. Stopping
distances may also be longer on
rough, gravel or snow covered
roads, or if you are using tire
chains. Always maintain a safe
distance from the vehicle in front
of you. Ultimately, the driver is
responsible for safety.
. Tire type and condition may also
affect braking effectiveness.
— When replacing tires, install
the specified size of tires on
all four wheels.
— When installing a spare tire (if so equipped), make sure that
it is the proper size and type
as specified on the Tire and
Loading Information label.
See “Tire and Loading Infor-
mation label” (P.10-10) of this
manual.
— For detailed information, see “Wheels and tires” (P.8-29) of
this manual.
The Anti-lock Braking System (ABS) con-
trols the brakes so the wheels do not lock
during hard braking or when braking on
slippery surfaces. The system detects the
rotation speed at each wheel and varies
the brake fluid pressure to prevent each wheel from locking and sliding. By pre-
venting each wheel from locking, the
system helps the driver maintain steering
control and helps to minimize swerving
and spinning on slippery surfaces.
Using the system
Depress the brake pedal and hold it down.
Depress the brake pedal with firm steady
pressure, but do not pump the brakes.
The ABS will operate to prevent the
wheels from locking up. Steer the vehicle
to avoid obstacles.
WARNING
Do not pump the brake pedal. Doing
so may result in increased stopping
distances.
Self-test feature
The ABS includes electronic sensors, elec-
tric pumps, hydraulic solenoids and a
computer. The computer has a built-in
diagnostic feature that tests the system
each time you start the engine and move
the vehicle at a low speed in forward or
reverse. When the self-test occurs, you
may hear a “clunk” noise and/or feel a
pulsation in the brake pedal. This is
normal and does not indicate a malfunc-
BRAKE ASSIST
Page 366 of 492
5-130Starting and driving
The computer has a built-in diagnostic
feature that tests the system each time
you start the engine and move the vehicle
forward or in reverse at a slow speed.
When the self-test occurs, you may hear a
“clunk” noise and/or feel a pulsation in the
brake pedal. This is normal and is not an
indication of a malfunction.
WARNING
.The VDC system is designed to
help improve driving stability but
does not prevent accidents due
to abrupt steering operation at
high speeds or by careless or
dangerous driving techniques.
Reduce vehicle speed and be
especially careful when driving
and cornering on slippery sur-
faces and always drive carefully.
. Do not modify the vehicle’s sus-
pension. If suspension parts such
as shock absorbers, struts,
springs, stabilizer bars, bushings
and wheels are not NISSAN re-
commended for your vehicle or
are extremely deteriorated, the
VDC system may not operate
properly. This could adversely
affect vehicle handling perfor-
mance, and the VDC warning light
may illuminate.
. If brake related parts such as
brake pads, rotors and calipers
are not NISSAN recommended or
are extremely deteriorated, the
VDC system may not operate
properly and the VDC warning
light
may illuminate.
. If engine control related parts are
not NISSAN recommended or are
extremely deteriorated, the VDC
warning light
may illuminate.
. When driving on extremely in-
clined surfaces such as higher
banked corners, the VDC system
may not operate properly and the
VDC warning light
may illumi-
nate. Do not drive on these types
of roads.
. When driving on an unstable sur-
face such as a turntable, ferry,
elevator or ramp, the VDC warn-
ing light
may illuminate. This
is not a malfunction. Restart the
engine after driving onto a stable
surface.
. If wheels or tires other than the
NISSAN recommended ones are
used, the VDC system may not
operate properly and the VDC
warning light
may illuminate. .
The VDC system is not a substi-
tute for winter tires or tire chains
on a snow covered road.
Page 375 of 492

apply additional paint near the sonar
sensors.
Do not strike or damage the area around
the sonar sensors. It is recommended
that you visit a NISSAN dealer if the area
around the sonar sensors is damaged
due to a collision.FREEING A FROZEN DOOR LOCK
To prevent a door lock from freezing,
apply deicer through the key hole. If the
lock becomes frozen, heat the key before
inserting it into the key hole, or use the
Intelligent Key system or the remote
keyless entry key fob.
ANTI-FREEZE
In the winter when it is anticipated that
the outside temperature will drop below
32°F (0°C), check the anti-freeze to assure
proper winter protection. For additional
information, see “Engine cooling system”
(P.8-4).
BATTERY
If the battery is not fully charged during
extremely cold weather conditions, the
battery fluid may freeze and damage the
battery. To maintain maximum efficiency,
the battery should be checked regularly.
For additional information, see “Battery”
(P.8-11).
DRAINING OF COOLANT WATER
If the vehicle is to be left outside without
anti-freeze, drain the cooling system,
including the engine block. Refill before
operating the vehicle. For details, see
“Engine cooling system” (P.8-4).
TIRE EQUIPMENT
SUMMER tires have a tread designed to
provide superior performance on dry
pavement. However, the performance of
these tires will be substantially reduced in
snowy and icy conditions. If you operate
your vehicle on snowy or icy roads,
NISSAN recommends the use of MUD &
SNOW or ALL SEASON tires on all four
wheels. It is recommended you consult a
NISSAN dealer for the tire type, size, speed
rating and availability information.
For additional traction on icy roads,
studded tires may be used. However,
some U.S. states and Canadian provinces
prohibit their use. Check local, state and
provincial laws before installing studded
tires.
Skid and traction capabilities of
studded snow tires, on wet or dry
surfaces, may be poorer than that of
non-studded snow tires.
Tire chains may be used. For details, see
“Tire chains” (P.8-36) of this manual.
Starting and driving5-139
COLD WEATHER DRIVING
Page 376 of 492
5-140Starting and driving
All-Wheel Drive (AWD) model
If you install snow tires, they must also be
the same size, brand, construction and
tread pattern on all four wheels.
SPECIAL WINTER EQUIPMENT
It is recommended that the following
items be carried in the vehicle during
winter:
.A scraper and stiff-bristled brush to
remove ice and snow from the win-
dows and wiper blades.
. A sturdy, flat board to be placed under
the jack to give it firm support.
. A shovel to dig the vehicle out of
snow-drifts.
. Extra window washer fluid to refill the
reservoir tank.
DRIVING ON SNOW OR ICE
WARNING
.Wet ice (32°F, 0°C and freezing
rain), very cold snow or ice can be
slick and very hard to drive on.
The vehicle will have much less
traction or “grip” under these
conditions. Try to avoid driving
on wet ice until the road is salted
or sanded. .
Whatever the condition, drive
with caution. Accelerate and slow
down with care. If accelerating or
downshifting too fast, the drive
wheels will lose even more trac-
tion.
. Allow more stopping distance
under these conditions. Braking
should be started sooner than on
dry pavement.
. Allow greater following distances
on slippery roads.
. Watch for slippery spots (glare
ice). These may appear on an
otherwise clear road in shaded
areas. If a patch of ice is seen
ahead, brake before reaching it.
Try not to brake while on the ice,
and avoid any sudden steering
maneuvers.
. Do not use cruise control on
slippery roads.
. Snow can trap dangerous ex-
haust gases under your vehicle.
Keep snow clear of the exhaust
pipe and from around your vehi-
cle.
Page 379 of 492
To shut off the engine in an emergency
situation while driving, perform the fol-
lowing procedure:
.Rapidly push the push-button ignition
switch 3 consecutive times in less
than 1.5 seconds, or
. Push and hold the push-button igni-
tion switch for more than 2 seconds.TIRE PRESSURE MONITORING SYS-
TEM (TPMS)
This vehicle is equipped with the Tire
Pressure Monitoring System (TPMS). It
monitors tire pressure of all tires except
the spare (if so equipped). When the low
tire pressure warning light is lit, and the
“Tire Pressure Low - Add Air” warning
message is displayed in the vehicle in-
formation display, one or more of your
tires is significantly under-inflated. If the
vehicle is being driven with low tire
pressure, the TPMS will activate and warn
you of it by the low tire pressure warning
light. This system will activate only when
the vehicle is driven at speeds above 16
MPH (25 km/h). For more details, see
“Warning lights, indicator lights and audi-
ble reminders” (P.2-10) and “Tire Pressure
Monitoring System (TPMS)” (P.5-5).
WARNING
.If the low tire pressure warning
light illuminates while driving,
avoid sudden steering maneu-
vers or abrupt braking, reduce
vehicle speed, pull off the road
to a safe location and stop the
vehicle as soon as possible. Driv-
ing with under-inflated tires may
permanently damage the tires and increase the likelihood of tire
failure. Serious vehicle damage
could occur and may lead to an
accident and could result in ser-
ious personal injury. Check the
tire pressure for all four tires.
Adjust the tire pressure to the
recommended COLD tire pressure
shown on the Tire and Loading
Information label to turn the low
tire pressure warning light OFF. If
the light still illuminates while
driving after adjusting the tire
pressure, a tire may be flat. If
you have a flat tire, replace it with
a spare tire (if so equipped) or
repair it using the emergency tire
puncture repair kit (if so
equipped) as soon as possible.
. Since the spare tire (if so
equipped) is not equipped with
the TPMS, when a spare tire is
mounted or a wheel is replaced,
the TPMS will not function and
the low tire pressure warning
light will flash for approximately
1 minute. The light will remain on
after 1 minute. Have your tires
replaced and/or TPMS system
reset as soon as possible. It is
recommended you visit a NISSAN
dealer for these services.
In case of emergency6-3
EMERGENCY ENGINE SHUT OFF (models
with push-button ignition switch)FLAT TIRE
Page 380 of 492
6-4In case of emergency
.Replacing tires with those not
originally specified by NISSAN
could affect the proper operation
of the TPMS.
. Do not inject any tire liquid or
aerosol tire sealant into the tires,
as this may cause a malfunction
of the tire pressure sensors
(models without emergency tire
puncture repair kit).
. NISSAN recommends using only
Genuine NISSAN Emergency Tire
Sealant provided with your vehi-
cle. Other tire sealants may da-
mage the valve stem seal which
can cause the tire to lose air
pressure. Visit a NISSAN dealer
as soon as possible after using
tire repair sealant (models with
emergency tire puncture repair
kit).
CHANGING A FLAT TIRE (models
with spare tire)
If you have a flat tire, follow the instruc-
tions below.
Stopping the vehicle
1. Safely move the vehicle off the road
and away from traffic.
2. Turn on the hazard warning flashers.
3. Park on a level surface and apply the parking brake.
4. Continuously Variable Transmission
(CVT) models:
Move the shift lever to the P (Park)
position.
Manual Transmission (MT) models:
Move the shift lever to the R (Reverse)
position.
5. Turn off the engine.
6. Raise the hood to warn other traffic, and to signal professional road assis-
tance personnel that you need assis-
tance.
7. Have all passengers get out of the vehicle and stand in a safe place, away
from traffic and clear of the vehicle.
WARNING
.Make sure the parking brake is
securely applied and the Manual
Transmission is shifted into R
(Reverse), or the CVT into P (Park). .
Never change tires when the ve-
hicle is on a slope, ice or slippery
areas. This is hazardous.
. Never change tires if oncoming
traffic is close to your vehicle.
Wait for professional road assis-
tance.
Page 384 of 492

6-8In case of emergency
SCE0504
2. Loosen each wheel nut one or twoturns by turning it counterclockwise
with the wheel nut wrench. Do not
remove the wheel nuts until the tire
is off the ground.
3. To lift the vehicle, securely hold the jack lever and rod with both hands as
shown above. Carefully raise the ve-
hicle until the tire clears the ground.
Remove the wheel nuts, and then
remove the tire.
SCE0933
Installing the spare tire
The spare tire is designed for emer-
gency use. (See specific instructions
under the heading “Wheels and tires”
(P.8-29).)
1. Clean any mud or dirt from the sur-face between the wheel and hub.
2. Carefully put the spare tire on and tighten the wheel nuts finger tight.
Check that all the wheel nuts contact
the wheel surface horizontally.
3. With the wheel nut wrench, tighten wheel nuts alternately and evenly in
the sequence illustrated (
,,,,),
more than 2 times, until they are tight.
Page 385 of 492
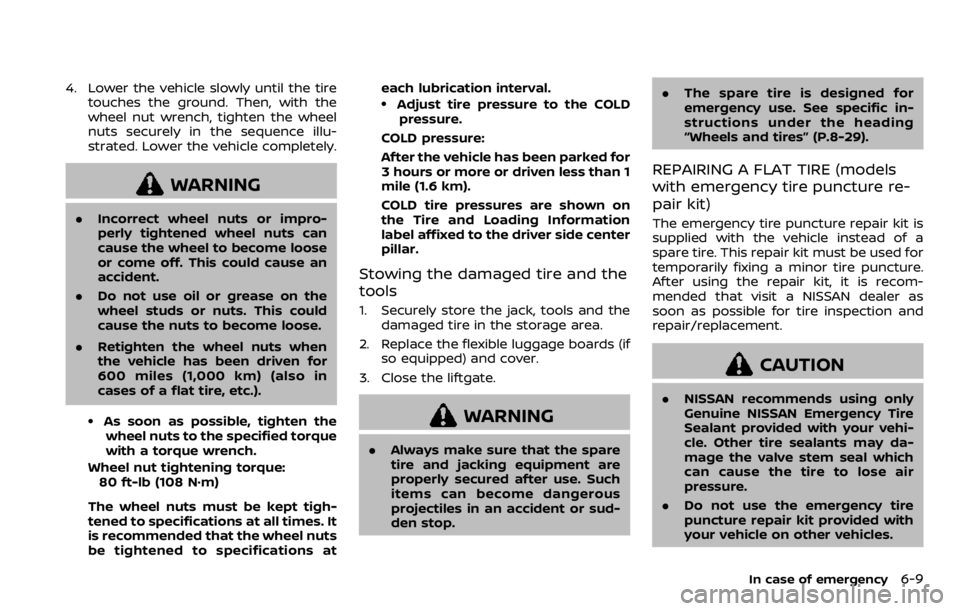
4. Lower the vehicle slowly until the tiretouches the ground. Then, with the
wheel nut wrench, tighten the wheel
nuts securely in the sequence illu-
strated. Lower the vehicle completely.
WARNING
.Incorrect wheel nuts or impro-
perly tightened wheel nuts can
cause the wheel to become loose
or come off. This could cause an
accident.
. Do not use oil or grease on the
wheel studs or nuts. This could
cause the nuts to become loose.
. Retighten the wheel nuts when
the vehicle has been driven for
600 miles (1,000 km) (also in
cases of a flat tire, etc.).
.As soon as possible, tighten the
wheel nuts to the specified torque
with a torque wrench.
Wheel nut tightening torque: 80 ft-lb (108 N·m)
The wheel nuts must be kept tigh-
tened to specifications at all times. It
is recommended that the wheel nuts
be tightened to specifications at each lubrication interval.
.Adjust tire pressure to the COLD
pressure.
COLD pressure:
After the vehicle has been parked for
3 hours or more or driven less than 1
mile (1.6 km).
COLD tire pressures are shown on
the Tire and Loading Information
label affixed to the driver side center
pillar.
Stowing the damaged tire and the
tools
1. Securely store the jack, tools and the damaged tire in the storage area.
2. Replace the flexible luggage boards (if so equipped) and cover.
3. Close the liftgate.
WARNING
. Always make sure that the spare
tire and jacking equipment are
properly secured after use. Such
items can become dangerous
projectiles in an accident or sud-
den stop. .
The spare tire is designed for
emergency use. See specific in-
structions under the heading
“Wheels and tires” (P.8-29).
REPAIRING A FLAT TIRE (models
with emergency tire puncture re-
pair kit)
The emergency tire puncture repair kit is
supplied with the vehicle instead of a
spare tire. This repair kit must be used for
temporarily fixing a minor tire puncture.
After using the repair kit, it is recom-
mended that visit a NISSAN dealer as
soon as possible for tire inspection and
repair/replacement.
CAUTION
.NISSAN recommends using only
Genuine NISSAN Emergency Tire
Sealant provided with your vehi-
cle. Other tire sealants may da-
mage the valve stem seal which
can cause the tire to lose air
pressure.
. Do not use the emergency tire
puncture repair kit provided with
your vehicle on other vehicles.
In case of emergency6-9
Page 386 of 492
6-10In case of emergency
.Do not use the emergency tire
puncture repair kit for a purpose
other than to inflate and check
the tire pressure for the vehicle.
. Use the emergency tire puncture
repair kit only on DC12V.
. Keep water and dust off the
emergency tire puncture repair
kit.
. Do not disassemble or modify the
emergency tire puncture repair
kit.
. Do not drop the kit or allow hard
impacts to the kit.
. Do not use the emergency tire
puncture repair kit under the
following conditions. It is recom-
mended that contact a NISSAN
dealer or professional road assis-
tance.
— when the sealant has passed
its expiration date (shown on
the label attached to the bot-
tle)
— when the cut or the puncture is approximately 0.2 in (5 mm)
or longer
— when the side of the tire is damaged — when the vehicle has been
driven with a considerable
loss of air from the tire
— when the tire is completely displaced inside or outside
the rim
— when the tire rim is damaged
— when two or more tires are flat
WAG0040X
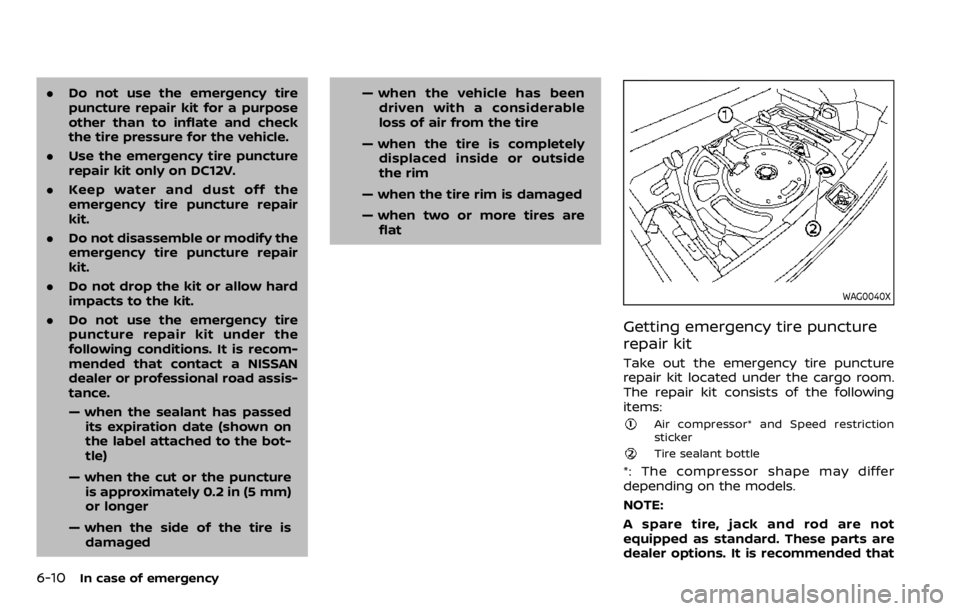
Getting emergency tire puncture
repair kit
Take out the emergency tire puncture
repair kit located under the cargo room.
The repair kit consists of the following
items:
Air compressor* and Speed restriction
sticker
Tire sealant bottle
*: The compressor shape may differ
depending on the models.
NOTE:
A spare tire, jack and rod are not
equipped as standard. These parts are
dealer options. It is recommended that
Page 397 of 492
Manual Transmission (MT) model:
1. Place the ignition switch in the OFFposition.
2. Secure the steering wheel in a straight-ahead position with rope or
a similar device.
3. Move the shift lever to the N (Neutral) position.
4. Release the parking brake.
5. Attach the safety chains whenever towing.
Rear wheels on the ground:
1. Place the ignition switch in the OFF position.
2. Move the shift lever to the N (Neutral) position.
3. Release the parking brake.
4. Attach safety chains whenever tow- ing.
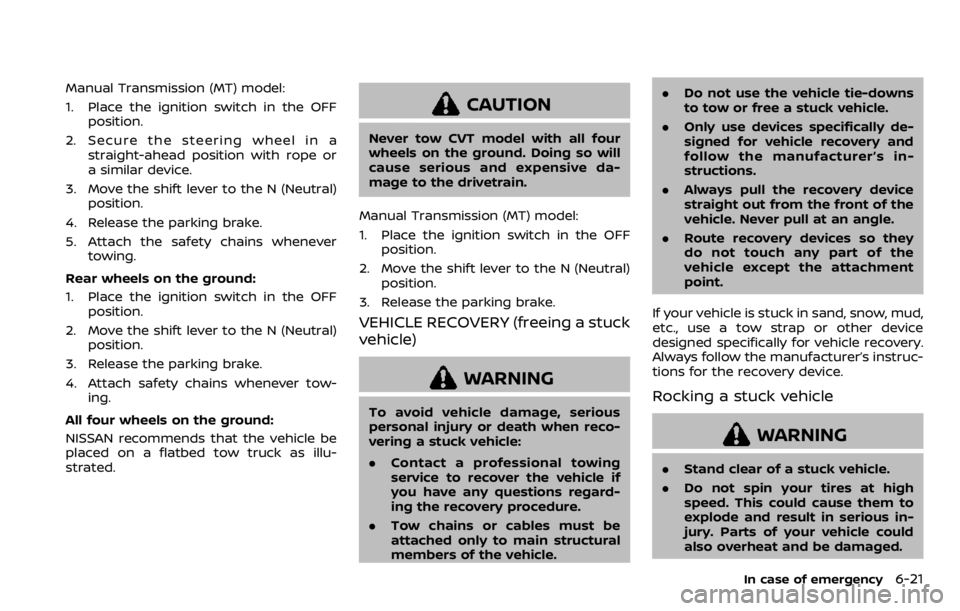
All four wheels on the ground:
NISSAN recommends that the vehicle be
placed on a flatbed tow truck as illu-
strated.
CAUTION
Never tow CVT model with all four
wheels on the ground. Doing so will
cause serious and expensive da-
mage to the drivetrain.
Manual Transmission (MT) model:
1. Place the ignition switch in the OFF position.
2. Move the shift lever to the N (Neutral) position.
3. Release the parking brake.
VEHICLE RECOVERY (freeing a stuck
vehicle)
WARNING
To avoid vehicle damage, serious
personal injury or death when reco-
vering a stuck vehicle:
. Contact a professional towing
service to recover the vehicle if
you have any questions regard-
ing the recovery procedure.
. Tow chains or cables must be
attached only to main structural
members of the vehicle. .
Do not use the vehicle tie-downs
to tow or free a stuck vehicle.
. Only use devices specifically de-
signed for vehicle recovery and
follow the manufacturer’s in-
structions.
. Always pull the recovery device
straight out from the front of the
vehicle. Never pull at an angle.
. Route recovery devices so they
do not touch any part of the
vehicle except the attachment
point.
If your vehicle is stuck in sand, snow, mud,
etc., use a tow strap or other device
designed specifically for vehicle recovery.
Always follow the manufacturer’s instruc-
tions for the recovery device.Rocking a stuck vehicle
WARNING
. Stand clear of a stuck vehicle.
. Do not spin your tires at high
speed. This could cause them to
explode and result in serious in-
jury. Parts of your vehicle could
also overheat and be damaged.
In case of emergency6-21