engine NISSAN QUEST 1999 V41 / 2.G User Guide
[x] Cancel search | Manufacturer: NISSAN, Model Year: 1999, Model line: QUEST, Model: NISSAN QUEST 1999 V41 / 2.GPages: 286, PDF Size: 2.46 MB
Page 99 of 286
Push the headlight switch again to turn the
interior lights off.
DAYTIME RUNNING LIGHT
SYSTEM (Canada only)
The headlights automatically illuminate at a
reduced intensity when the engine is started
with the parking brake released. The day-
time running lights operate with the head-
light switch in the OFF position or in the
position. Turn the headlight switch to
theposition for full illumination when
driving at night.
If the parking brake is applied before the
engine is started, the daytime running lights
do not illuminate. The daytime running lights
illuminate once the parking brake is released.
The daytime running lights will remain on until
the ignition switch is turned OFF.
WARNING
When the daytime running light system
is active, tail lights on your vehicle will
not be on. It is necessary at dusk to
turn on your headlights. Failure to do
so could cause an accident injuring
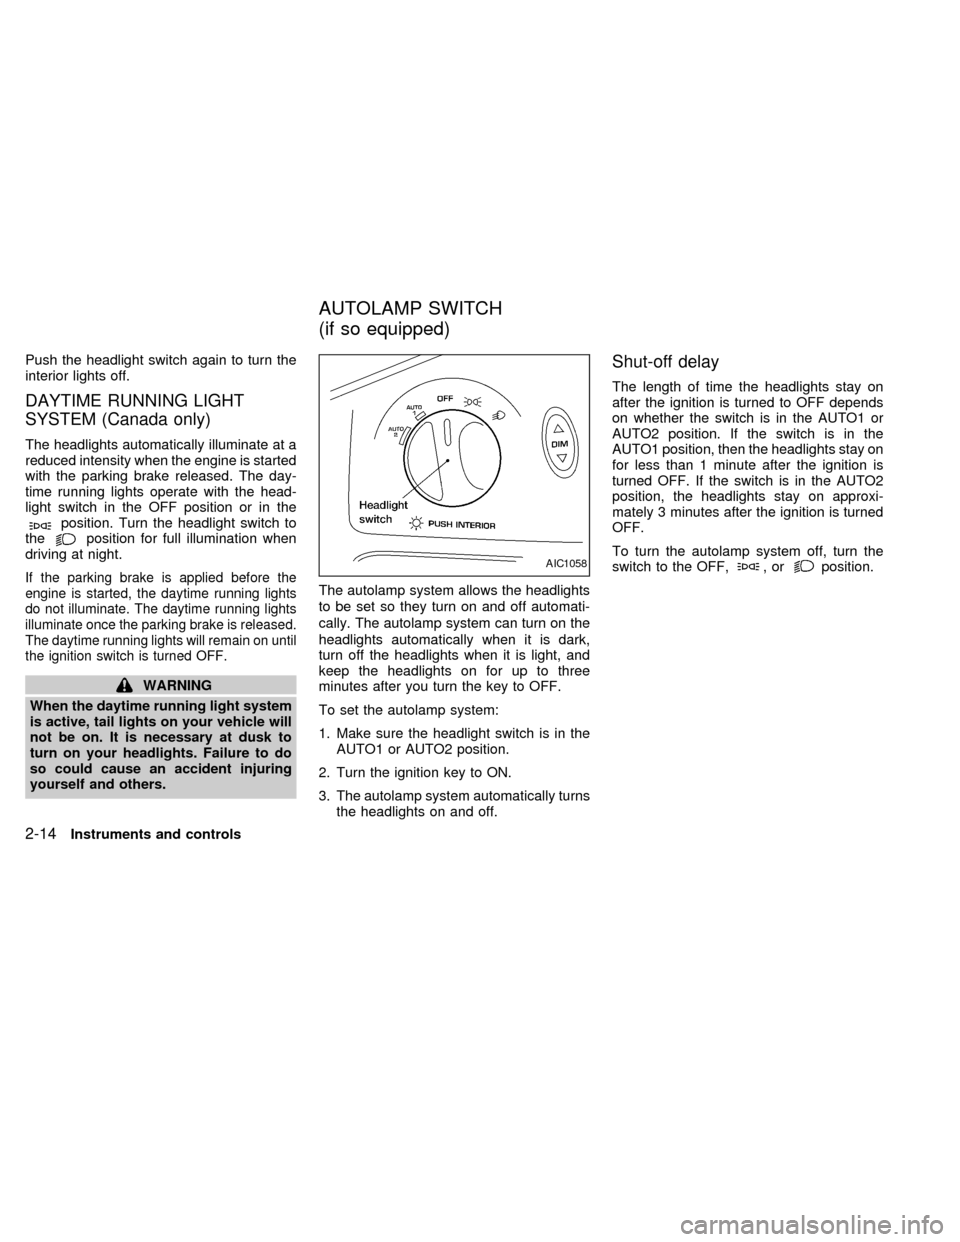
yourself and others.The autolamp system allows the headlights
to be set so they turn on and off automati-
cally. The autolamp system can turn on the
headlights automatically when it is dark,
turn off the headlights when it is light, and
keep the headlights on for up to three
minutes after you turn the key to OFF.
To set the autolamp system:
1. Make sure the headlight switch is in the
AUTO1 or AUTO2 position.
2. Turn the ignition key to ON.
3. The autolamp system automatically turns
the headlights on and off.
Shut-off delay
The length of time the headlights stay on
after the ignition is turned to OFF depends
on whether the switch is in the AUTO1 or
AUTO2 position. If the switch is in the
AUTO1 position, then the headlights stay on
for less than 1 minute after the ignition is
turned OFF. If the switch is in the AUTO2
position, the headlights stay on approxi-
mately 3 minutes after the ignition is turned
OFF.
To turn the autolamp system off, turn the
switch to the OFF,
,orposition.AIC1058
AUTOLAMP SWITCH
(if so equipped)
2-14Instruments and controls
ZX
Page 113 of 286
Your vehicle's engine should be turned
off while programming your transmit-
ter. The Integrated HomeLinkTUniver-
sal Transceiver may not work with
older garage door openers that do not
meet current Federal Consumer Safety
Standards.
1. Test the Integrated HomeLinkTUniversal
Transceiver by pressing any button. The
red indicator light should come on. If you
have previously programmed a button
proceed to step 3.
2. Clear all channels on the Integrated
HomeLinkTUniversal Transceiver by
holding down both outside buttons (#1 &
#3) until the red light begins to flash
rapidly (approximately 20 seconds).
Then release both buttons.
3. Select which of the three Integrated
HomeLinkTUniversal Transceiver but-
tons you want to program.
4. Hold your hand-held transmitter against
the bottom surface of the Integrated
HomeLinkTUniversal Transceiver so
that you can still see the red indicator
light.5. Press the desired button until the red
indicator light flashes slowly. Do not re-
lease the button. Continue holding and
press the hand-held transmitter button
through step 6.
6. Hold down both buttons until the red
indicator light on the Integrated
HomeLinkTUniversal Transceiver
flashes rapidly (This may take 1 to 90
seconds). Then release both buttons.
The rapid flashing means that the trans-
ceiver has been successfully pro-
grammed to match your hand-held trans-
mitter. You can now use the Integrated
HomeLinkTUniversal Transceiver in-
stead of your hand-held transmitter.
Note to Canadian users:
Prior to 1992, D.O.C. regulations required
many hand-held transmitters to stop trans-
mitting after one or two seconds, even
though you continue to hold down the but-
ton. If you think you have one of these
hand-held transmitters, you should press
and re-press the transmitter button every 2
seconds without ever releasing the Inte-
grated HomeLinkTUniversal Transceiver
button. The indicator light on the Integrated
HomeLinkTUniversal Transceiver shouldblink rapidly indicating a successful pro-
gramming procedure. If it returns to the slow
blink of program mode, continue to periodi-
cally reactivate your hand-held transmitter
until a successful programming procedure
is indicated by the rapidly flashing indicator
light.
OPERATING THE TRANSCEIVER
To operate, simply press the appropriate
button on the Integrated HomeLinkTUniver-
sal Transceiver. The red indicator light illu-
minates while the signal is being transmit-
ted. The effective transmission range of the
Integrated HomeLinkTUniversal Trans-
ceiver may differ from your hand-held trans-
mitter.
PROGRAMMING PROBLEM
DIAGNOSIS
Be sure to keep your original hand-held
transmitter for possible reprogramming if
necessary.
cMake sure batteries in the hand-held
transmitter are fully charged.
cHold your hand-held transmitter against
the bottom surface of the Integrated
HomeLinkTUniversal Transceiver so
2-28Instruments and controls
ZX
Page 128 of 286

WARNING
cMake sure the hood is completely
closed and latched before driving.
Failure to do so could cause the
hood to fly open and result in an
accident.
cIf you see steam or smoke coming
from the engine compartment, to
avoid injury do not open the hood.
Open the glove box by pulling the handle.
CAUTION
Keep glove box lid closed while driving
to prevent injury in an accident or a
sudden stop.
APD0601
GLOVE BOX
Pre-driving checks and adjustments3-13
ZX
Page 135 of 286
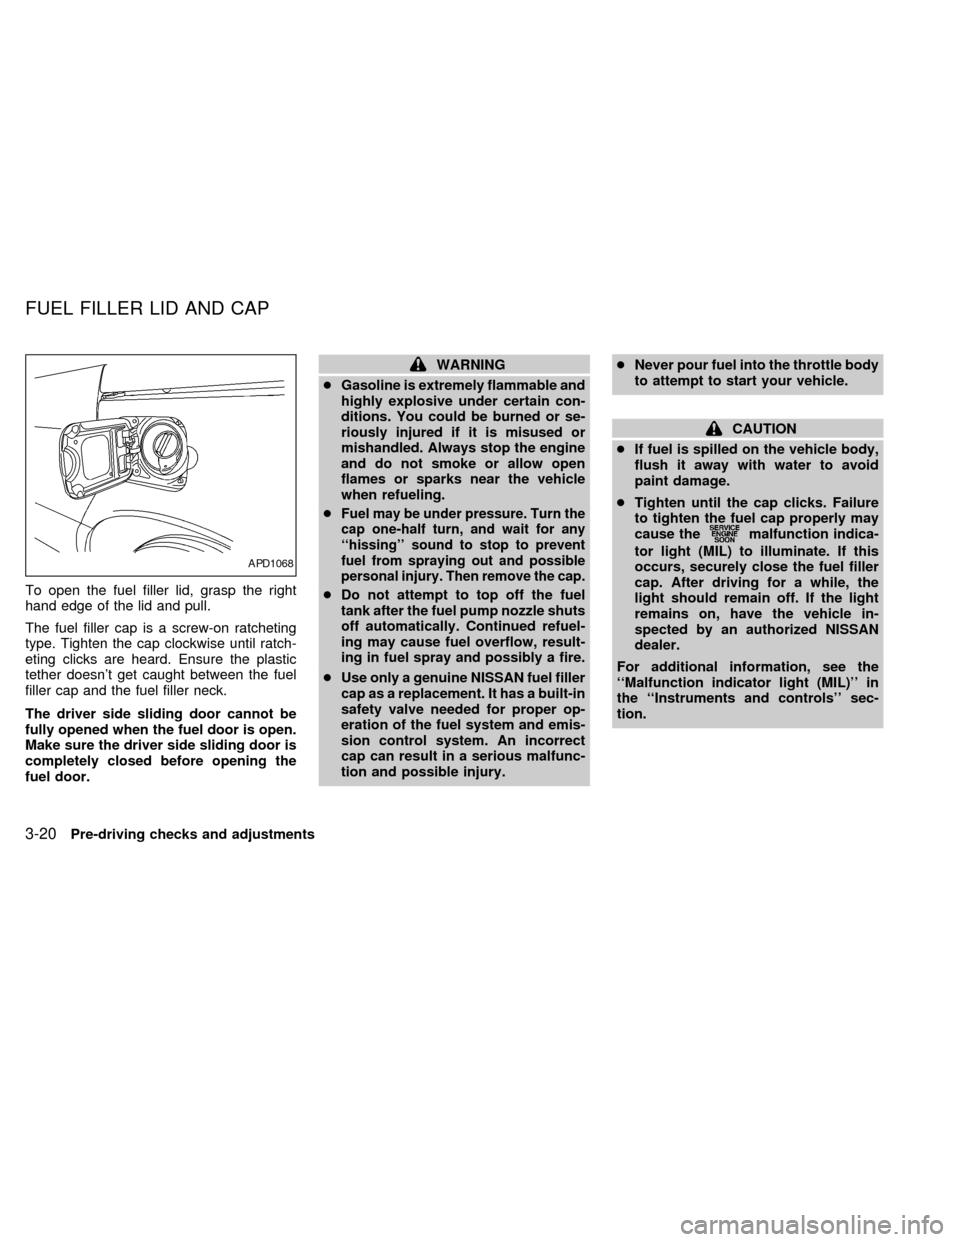
To open the fuel filler lid, grasp the right
hand edge of the lid and pull.
The fuel filler cap is a screw-on ratcheting
type. Tighten the cap clockwise until ratch-
eting clicks are heard. Ensure the plastic
tether doesn't get caught between the fuel
filler cap and the fuel filler neck.
The driver side sliding door cannot be
fully opened when the fuel door is open.
Make sure the driver side sliding door is
completely closed before opening the
fuel door.
WARNING
cGasoline is extremely flammable and
highly explosive under certain con-
ditions. You could be burned or se-
riously injured if it is misused or
mishandled. Always stop the engine
and do not smoke or allow open
flames or sparks near the vehicle
when refueling.
c
Fuel may be under pressure. Turn the
cap one-half turn, and wait for any
``hissing'' sound to stop to prevent
fuel from spraying out and possible
personal injury. Then remove the cap.
cDo not attempt to top off the fuel
tank after the fuel pump nozzle shuts
off automatically. Continued refuel-
ing may cause fuel overflow, result-
ing in fuel spray and possibly a fire.
cUse only a genuine NISSAN fuel filler
cap as a replacement. It has a built-in
safety valve needed for proper op-
eration of the fuel system and emis-
sion control system. An incorrect
cap can result in a serious malfunc-
tion and possible injury.cNever pour fuel into the throttle body
to attempt to start your vehicle.
CAUTION
cIf fuel is spilled on the vehicle body,
flush it away with water to avoid
paint damage.
cTighten until the cap clicks. Failure
to tighten the fuel cap properly may
cause the
malfunction indica-
tor light (MIL) to illuminate. If this
occurs, securely close the fuel filler
cap. After driving for a while, the
light should remain off. If the light
remains on, have the vehicle in-
spected by an authorized NISSAN
dealer.
For additional information, see the
``Malfunction indicator light (MIL)'' in
the ``Instruments and controls'' sec-
tion.
APD1068
FUEL FILLER LID AND CAP
3-20Pre-driving checks and adjustments
ZX
Page 142 of 286
WARNING
cThe air conditioner cooling function
operates only when the engine is
running.
cDo not leave children, unreliable
adults, or pets alone in your vehicle.
On hot, sunny days, temperatures in
a closed vehicle could quickly be-
come high enough to cause severe
or possibly fatal injuries to people or
animals.
cDo not use the MAX (recirculation)
mode for long periods as it may
cause the interior air to become stale
and the windows to fog up.
cPositioning of the heater and air con-
ditioner controls should not be done
while driving, in order that full atten-
tion may be given to the driving
operation.
The cabin air filter (if so equipped) requires
periodic maintenance. See the ``Do it your-
self'' section for additional information.
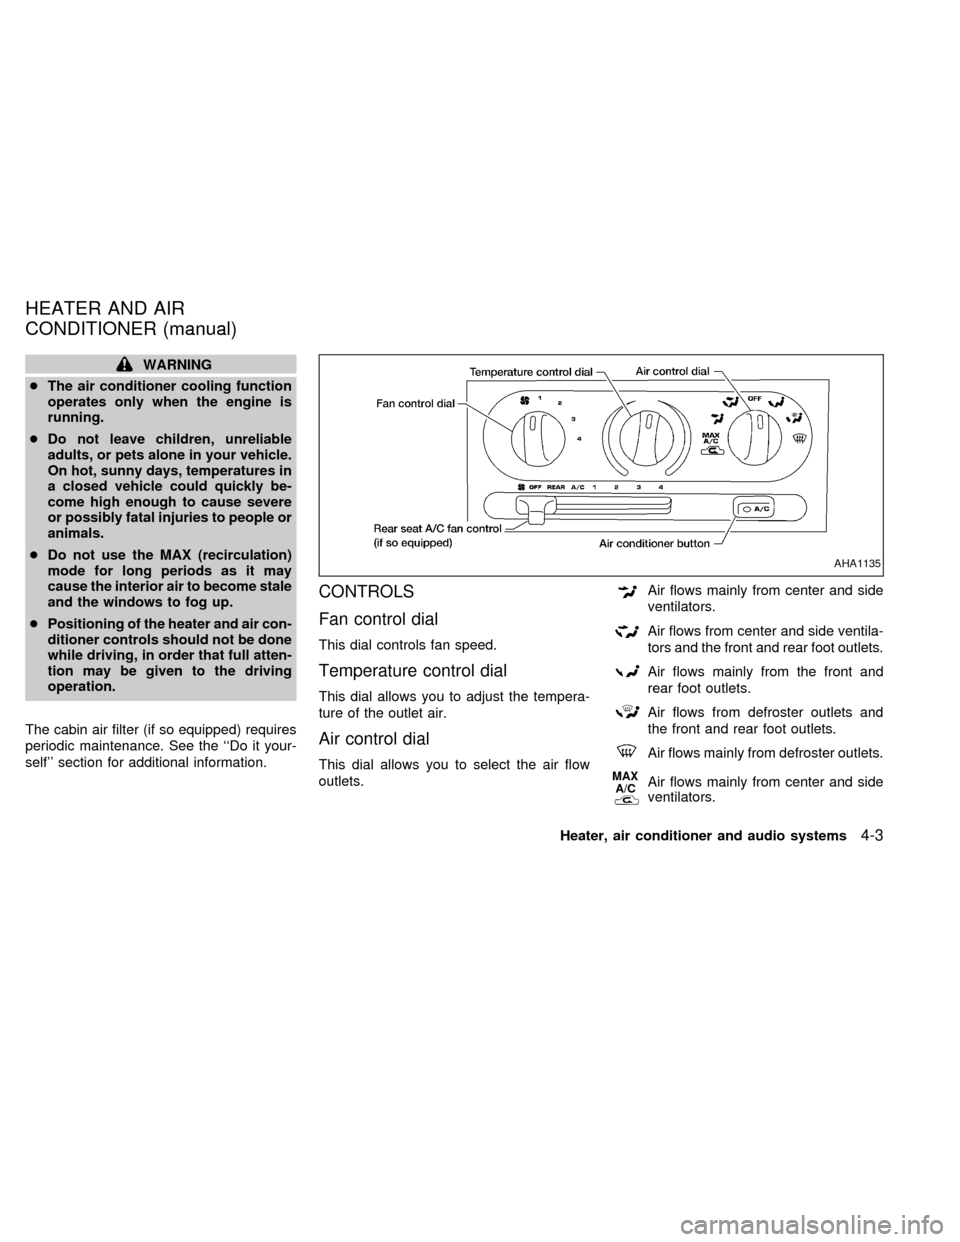
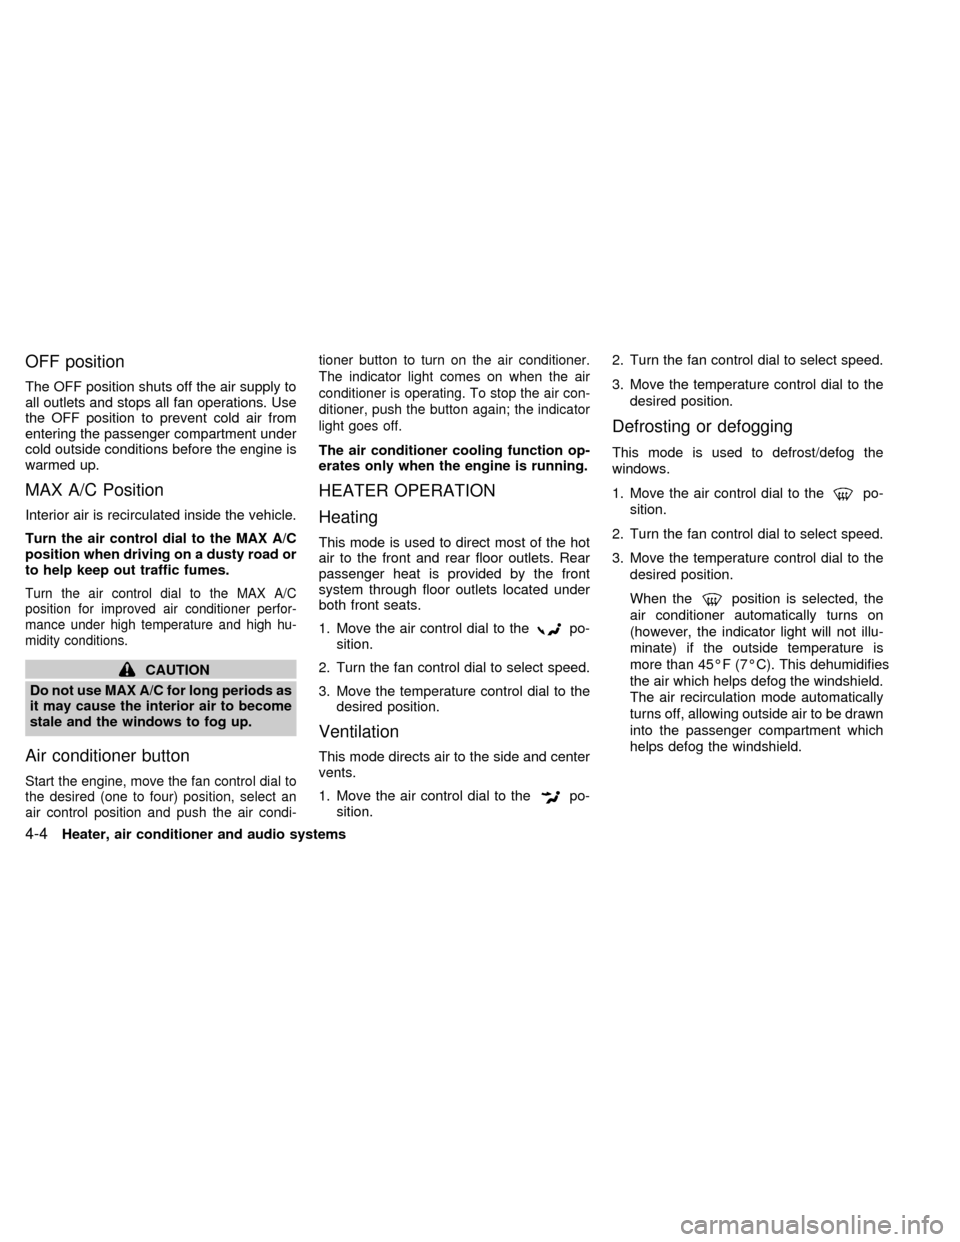
CONTROLS
Fan control dial
This dial controls fan speed.
Temperature control dial
This dial allows you to adjust the tempera-
ture of the outlet air.
Air control dial
This dial allows you to select the air flow
outlets.
Air flows mainly from center and side
ventilators.
Air flows from center and side ventila-
tors and the front and rear foot outlets.
Air flows mainly from the front and
rear foot outlets.
Air flows from defroster outlets and
the front and rear foot outlets.
Air flows mainly from defroster outlets.
MAX
A/CAir flows mainly from center and side
ventilators.
AHA1135
HEATER AND AIR
CONDITIONER (manual)
Heater, air conditioner and audio systems4-3
ZX
Page 143 of 286
OFF position
The OFF position shuts off the air supply to
all outlets and stops all fan operations. Use
the OFF position to prevent cold air from
entering the passenger compartment under
cold outside conditions before the engine is
warmed up.
MAX A/C Position
Interior air is recirculated inside the vehicle.
Turn the air control dial to the MAX A/C
position when driving on a dusty road or
to help keep out traffic fumes.
Turn the air control dial to the MAX A/C
position for improved air conditioner perfor-
mance under high temperature and high hu-
midity conditions.
CAUTION
Do not use MAX A/C for long periods as
it may cause the interior air to become
stale and the windows to fog up.
Air conditioner button
Start the engine, move the fan control dial to
the desired (one to four) position, select an
air control position and push the air condi-tioner button to turn on the air conditioner.
The indicator light comes on when the air
conditioner is operating. To stop the air con-
ditioner, push the button again; the indicator
light goes off.
The air conditioner cooling function op-
erates only when the engine is running.
HEATER OPERATION
Heating
This mode is used to direct most of the hot
air to the front and rear floor outlets. Rear
passenger heat is provided by the front
system through floor outlets located under
both front seats.
1. Move the air control dial to the
po-
sition.
2. Turn the fan control dial to select speed.
3. Move the temperature control dial to the
desired position.
Ventilation
This mode directs air to the side and center
vents.
1. Move the air control dial to the
po-
sition.2. Turn the fan control dial to select speed.
3. Move the temperature control dial to the
desired position.
Defrosting or defogging
This mode is used to defrost/defog the
windows.
1. Move the air control dial to the
po-
sition.
2. Turn the fan control dial to select speed.
3. Move the temperature control dial to the
desired position.
When the
position is selected, the
air conditioner automatically turns on
(however, the indicator light will not illu-
minate) if the outside temperature is
more than 45ÉF (7ÉC). This dehumidifies
the air which helps defog the windshield.
The air recirculation mode automatically
turns off, allowing outside air to be drawn
into the passenger compartment which
helps defog the windshield.
4-4Heater, air conditioner and audio systems
ZX
Page 144 of 286

Operating Tips
Clear snow and ice from the wiper blades
and air inlet in front of the windshield.
This improves defrosting/defogging op-
eration.
Bi-level heating/cooling
The bi-level mode directs air to the side and
center vents and to the front and rear floor
outlets.
Bi-level is also a cooling mode when high
sun load conditions are present with cool
temperatures.
With the A/C system in operation, this mode
can be used to cool the passenger's or
driver's feet under high temperature condi-
tions.
With the A/C system in operation under high
temperature conditions, improved cooling
can be obtained by moving the air control
dial to the MAX A/C position.
1. Move the air control dial to the
po-
sition.
2. Turn the fan control dial to the desired
position.3. Move the temperature control dial to the
desired position.
Heating and defogging
This mode heats the interior and defogs the
windshield. This mode directs air to the
defroster and the front and rear floor outlets.
Rear passenger heat is provided by the
front system through floor outlets located
under both front seats.
1. Move the air control dial to the
po-
sition.
2. Turn the fan control dial to the desired
position.
3. Move the temperature control dial to the
desired position.
When the
position is selected, the
air conditioner automatically turns on
(however, the indicator light will not illu-
minate) if the outside temperature is
more than 45ÉF (7ÉC). This dehumidifies
the air which helps defog the windshield.
The air recirculation mode automatically
turns off, allowing outside air to be drawn
into the passenger compartment which
helps defog the windshield.
Operating tips
cClear snow and ice from the wiper
blades and air inlet in front of the
windshield. This improves heater op-
eration.
cTo defog the side windows more effec-
tively when in bi-level or ventilation
mode, close the center vent and direct
the side vents toward the side windows.
cA slight delay may be experienced when
changing air control buttons. This is not a
problem, it is only the system motors and
solenoids switching from one outlet to
another.
AIR CONDITIONER OPERATION
Start the engine, move the fan control dial to
the desired (one to four) position, and select
an air control position before pushing in the
air conditioner button to activate the air
conditioner. When the air conditioner is on,
cooling and dehumidifying functions are
added to the heater operation.
WARNING
The air conditioner cooling function op-
erates only when the engine is running.
Heater, air conditioner and audio systems4-5
ZX
Page 145 of 286

NOTE: When switching air flow outlets, the
A/C system remains activated unless the
A/C button is pressed to the OFF position.
The indicator light on the A/C button re-
mains illuminated unless the button is
pressed to the OFF position, or the OFF air
control position is selected.
Cooling
This mode is used to cool and dehumidify.
1. Move the air control dial to the
po-
sition.
2. Turn the fan control dial to select speed.
3. Push the air conditioner button. The indi-
cator light comes on.
4. Move the temperature control dial to the
desired position.
cFor quick cooling when the outside tem-
perature is high, move the air control dial
to the MAX A/C position. Be sure to
return the air control dial to the
po-
sition for normal cooling.
cOpening the windows helps to vent heat
buildup when parked in the sun.
Dehumidified heating
This mode is used to heat and dehumidify.
1. Move the air control dial to the
po-
sition.
2. Turn the fan control dial to select speed.
3. Push the air conditioner button. The indi-
cator light comes on.
4. Move the temperature control dial to the
desired position.
Dehumidified defogging
This mode is used to defog the windows
and dehumidify.
1. Move the air control dial to the
po-
sition.
2. Turn the fan control dial to the desired
speed.
3. Move the temperature control dial to the
desired position.
When the
position is selected, the
air conditioner automatically turns on
(however, the indicator light will not illu-
minate) if the outside temperature is
more than 45ÉF (7ÉC). This dehumidifies
the air which helps defog the windshield.The air recirculation mode automatically
turns off, allowing outside air to be drawn
into the passenger compartment which
helps defog the windshield.
Operating tips
cKeep windows and sun roof closed while
the air conditioner is in operation.
cAfter parking in the sun, drive for two or
three minutes with the windows open to
vent hot air from the passenger compart-
ment. Then, close the windows. This
allows the air conditioner to cool the
interior more quickly.
cThe air conditioning system should be
operated for about ten minutes at
least once a month. This helps pre-
vent damage to the system due to lack
of lubrication.
cIf the engine coolant temperature gauge
exceeds the H (hot) position, turn the air
conditioner off. See ``If your vehicle over-
heats'' in the ``In case of emergency''
section for additional information.
4-6Heater, air conditioner and audio systems
ZX
Page 150 of 286
WARNING
cThe air conditioner cooling function
operates only when the engine is
running.
cDo not leave children, unreliable
adults, or pets alone in your vehicle.
On hot, sunny days, temperatures in
a closed vehicle could quickly be-
come high enough to cause severe
or possibly fatal injuries to people or
animals.
cDo not use the MAX mode for long
periods as it may cause the interiorair to become stale and the windows
to fog up.
cPositioning of the heater and air con-
ditioner controls should not be done
while driving, in order that full atten-
tion may be given to the driving
operation.
The cabin air filter (if so equipped) requires
periodic maintenance. See the ``Do it your-
self'' section for additional information.
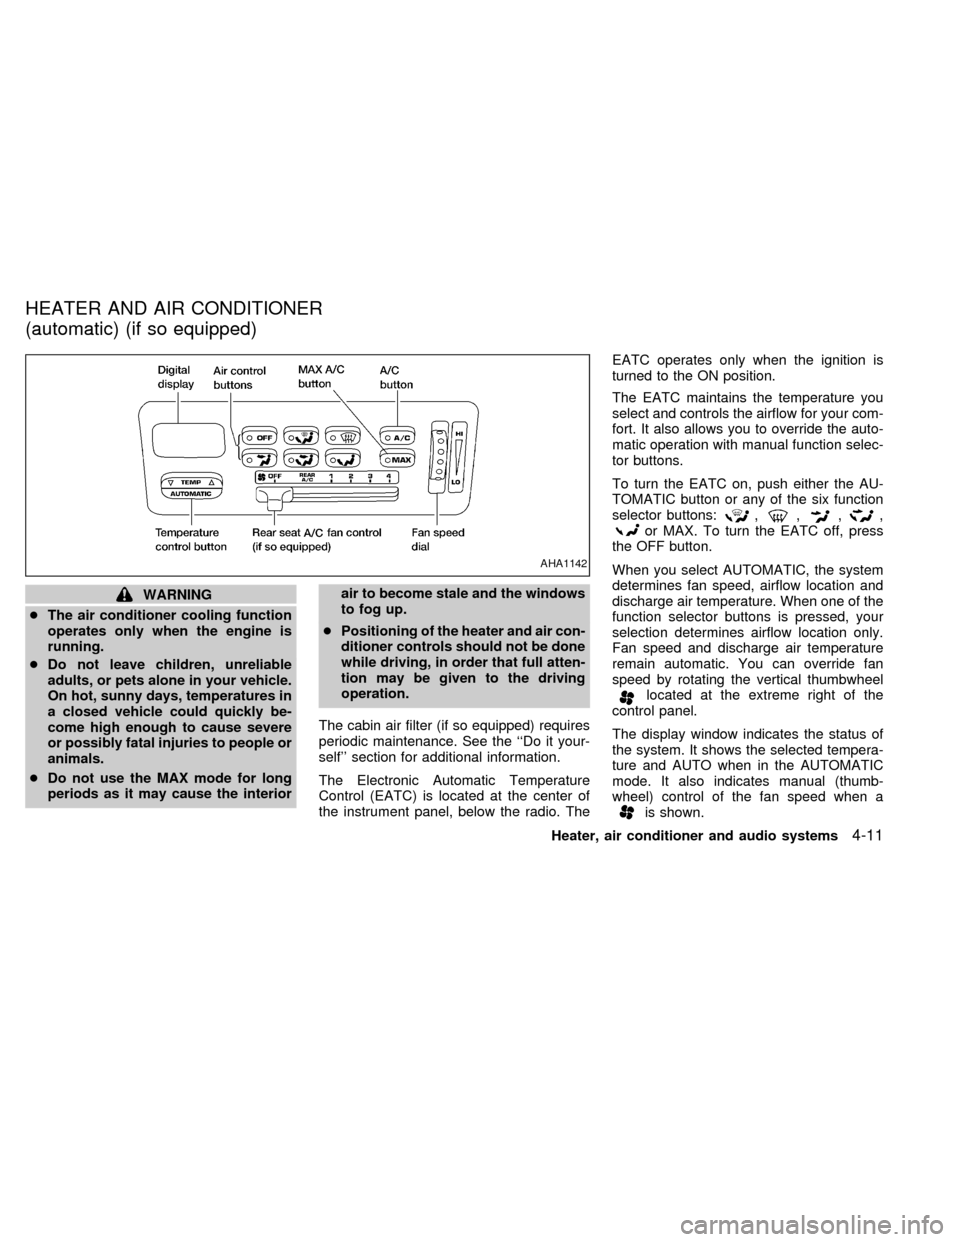
The Electronic Automatic Temperature
Control (EATC) is located at the center of
the instrument panel, below the radio. TheEATC operates only when the ignition is
turned to the ON position.
The EATC maintains the temperature you
select and controls the airflow for your com-
fort. It also allows you to override the auto-
matic operation with manual function selec-
tor buttons.
To turn the EATC on, push either the AU-
TOMATIC button or any of the six function
selector buttons:
,,,,or MAX. To turn the EATC off, press
the OFF button.
When you select AUTOMATIC, the system
determines fan speed, airflow location and
discharge air temperature. When one of the
function selector buttons is pressed, your
selection determines airflow location only.
Fan speed and discharge air temperature
remain automatic. You can override fan
speed by rotating the vertical thumbwheel
located at the extreme right of the
control panel.
The display window indicates the status of
the system. It shows the selected tempera-
ture and AUTO when in the AUTOMATIC
mode. It also indicates manual (thumb-
wheel) control of the fan speed when a
is shown.
AHA1142
HEATER AND AIR CONDITIONER
(automatic) (if so equipped)
Heater, air conditioner and audio systems4-11
ZX
Page 151 of 286

AUTOMATIC OPERATION
Push the AUTOMATIC button and select the
desired temperature. The selected tempera-
ture and AUTO show in the display window.
The EATC heats or cools to achieve the set
temperature.
When in AUTOMATIC and weather conditions
require heat, air is sent to the floor. However,
a feature is included in the EATC to prevent
blowing cold air to the floor if the engine
coolant is not warm enough to allow heating.
In three or four minutes the fan speed gradu-
ally increases and airflow changes to the floor.
If unique conditions exist, such as window
fogging, the five override buttons allow spe-
cific airflow selection. The thumbwheel al-
lows you to adjust the fan speed to suit your
needs.
Temperature selection
TheTEMPbutton on the left side of
the control panel is for temperature selec-
tion. The
side lowers the set tempera-
ture, and theside raises the set tem-
perature. Press and hold either side of the
button to rapidly change the temperature
setting in one degree increments to either
65ÉF (18ÉC) or 85ÉF (29ÉC). If you wantcontinuous maximum cooling, push the
side of the TEMP button until 60ÉF
(16ÉC) shows in the display window. The
EATC cools at maximum and disregards the
60ÉF (16ÉC) setting until a warmer tempera-
ture is selected. If you want continuous
maximum heating, push the
side of the
TEMP button until 90ÉF (32ÉC) shows in the
display window. The EATC provides maxi-
mum heat regardless of the 90ÉF (32ÉC)
setting until a cooler temperature is se-
lected.
Fan speed and thumbwheel
Your EATC automatically adjusts the fan
speed to the existing conditions. To control
the fan speed yourself, use the thumbwheel
located at the extreme right side of the
EATC control panel. Using the thumbwheel
cancels the automatic fan speed control,
and causes a
to appear in the display
window. Rotate the thumbwheel up for HI
speeds and down for LO speeds.
To return to auto fan control, press the
AUTOMATIC button.
AIR CONTROL BUTTONS
Your EATC has five buttons which allow you
to make special selections. The buttons aregrouped in the middle of the EATC panel
and allow you to determine airflow location.
Pressing any of the air control buttons
changes airflow location only, and does not
affect the ability of the system to control
temperature or fan speed. Return to fully
automatic operation by pushing the AUTO-
MATIC button.
Push this button for airflow to the front and
rear floor outlets and windshield at the same
time. The
indicator light comes on,
and the display window shows the set tem-
perature.
Press this button to obtain maximum airflow
to the windshield. Adjust the temperature
setting as required for defrosting. The
indicator light comes on, and the
display window shows the set temperature.
When the outside temperature is about
45ÉF (7ÉC) or above, the air is dehumidified
to prevent window fogging.
Push this button to select airflow through
4-12Heater, air conditioner and audio systems
ZX