audio NISSAN QUEST 2014 RE52 / 4.G Quick Reference Guide
[x] Cancel search | Manufacturer: NISSAN, Model Year: 2014, Model line: QUEST, Model: NISSAN QUEST 2014 RE52 / 4.GPages: 32, PDF Size: 1.9 MB
Page 2 of 32
*See your Owner’s Manual for information.
01
03
04
02
20
2122
23
05
08
06
13
24
151807
1619
17
12
25
11
24
14
09
10
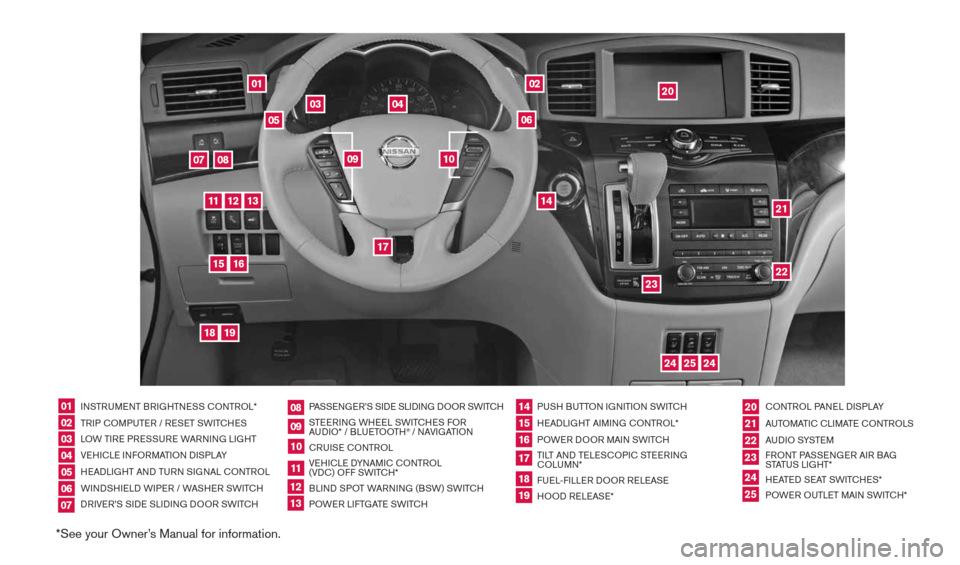
INSTRUMENT BRIGHTNESS cONTROL*
TRIP c OMPUTER / RESET SWIT cHES
LOW TIRE PRESSURE WARNING LIGHT
VEHIcLE INFORMATION DISPLAY
HEADLIGHT AND TURN SIGNAL c ONTROL
WINDSHIELD WIPER / WASHER SWIT cH
DRIVER’S SIDE SLIDING DOOR SWIT cH PASSENGER’S SIDE SLIDING DOOR SWIT
cH
STEERING WHEEL SWIT cHES FOR
AUDIO* / BLUETOOTH
® / NAVIGATION
cRUISE cONTROL
VEHI cLE DYNAMI c cONTROL
(VD c) OFF SWIT cH*
BLIND SPOT WARNING (BSW) SWIT cH
POWER LIFTGATE SWIT cH PUSH BUTTON IGNITION SWIT
cH
HEADLIGHT AIMING c ONTROL*
POWER DOOR MAIN SWIT cH
TILT AND TELES cOPI c STEERING
c OLUMN*
FUEL-FILLER DOOR RELEASE
HOOD RELEASE* cONTROL PANEL DISPLAY
AUTOMATI c cLIMATE c ONTROLS
AU D I O SYSTE M
FRONT PASSENGER AIR BAG
STATUS LIGHT*
HEATED SEAT SWIT cHES*
POWER OUTLET MAIN SWIT cH*
0102030405
0910
2124
18
06
11
2225
07
141916
08
15
2023
17
1213
1490690_14_Quest_QRG_072513.indd 47/25/13 9:23 AM
Page 3 of 32
TABLE OF cONTENTS
New SYSTe M FeaTureS
Around View® Monitor (if so equipped) ............................. 2
Blind Spot Warning (BSW) System (if so equipped) ................. 3
Advanced climate control System (if so equipped) .................. 4
e SS eNTIaL INFOr MaTION
Tire Pressure Monitoring System (TPMS) with Easy Fill Tire Alert ...... 5
Loose Fuel cap ................................................ 6
Fuel-Filler Door ................................................ 6
FI rST D rIVe Fea TureS
NISSAN Intelligent k ey
® System ................................. 7
Power Sliding Door Release (if so equipped) ....................... 8
Power Liftgate Release (if so equipped) ............................9
Front Power Seat Adjustments (if so equipped) ......................9
2
nd Row Seat Adjustments ...................................... 10
Folding the 2nd Row Seats ...................................... 10
Enter/Exit the 3rd Row Seats .................................... 10
3rd Row Seat Adjustments ...................................... 11
Automatic Drive Positioner (if so equipped) ........................ 11
Outside Mirror control Switch ................................... 12
Starting/Stopping the Engine .................................... 12
Headlight control Switch ....................................... 13
Windshield Wiper and Washer Switch ............................14
Automatic climate controls (if so equipped) ....................... 15
FM/AM/SiriusXM Satellite Radio with c D/DVD Player (if so equipped) ..17
USB/iPod
® Interface (if so equipped) ............................. 18
cruise control ................................................ 18
Power Outlets ................................................ 19
SYST eM GuIDe
Trip computer ................................................ 20
Bluetooth
® Hands-free Phone System (if so equipped) .............. 20
System Operating Tips ...................................... 20
Bluetooth
® System with Navigation (if so equipped) ..............21
Bluetooth® System without Navigation (if so equipped) ...........23
Navigation System (if so equipped) ............................... 24
NISSAN Mobile Entertainment System (MES) (if so equipped) ....... 26
HomeLink
® Universal Transceiver (if so equipped) .................. 27
Please see your Owner’s Manual for important safety
information, and system operation limitations.
• A cellular telephone should not be used for any purpose while
driving so full attention may be given to vehicle operation.
• Always wear your seat belt.
• Supplemental air bags do not replace proper seat belt usage.
• children 12 and under should always ride in the rear seat properly secured in child restraints or seat belts according to
their age and weight.
• Do not drink and drive.
For more information, refer to the “Safety –– Seats, seat belts and
supplemental restraint system (section 1)”, the “Monitor, heater, air
conditioner, audio, phone and voice recognition systems (section
4)” and the “Starting and driving (section 5)” of your Owner’s Manual.
Additional information about your vehicle is also available in
your Owner’s Manual, Navigation System Owner’s Manual and at www.nissanusa.com.
To view detailed
instructional videos, go to
www.nissanownersinfo.mobi/2014/quest or snap this barcode with an appropriate barcode reader.
1490690_14_Quest_QRG_072513.indd 57/25/13 9:23 AM
Page 5 of 32
3
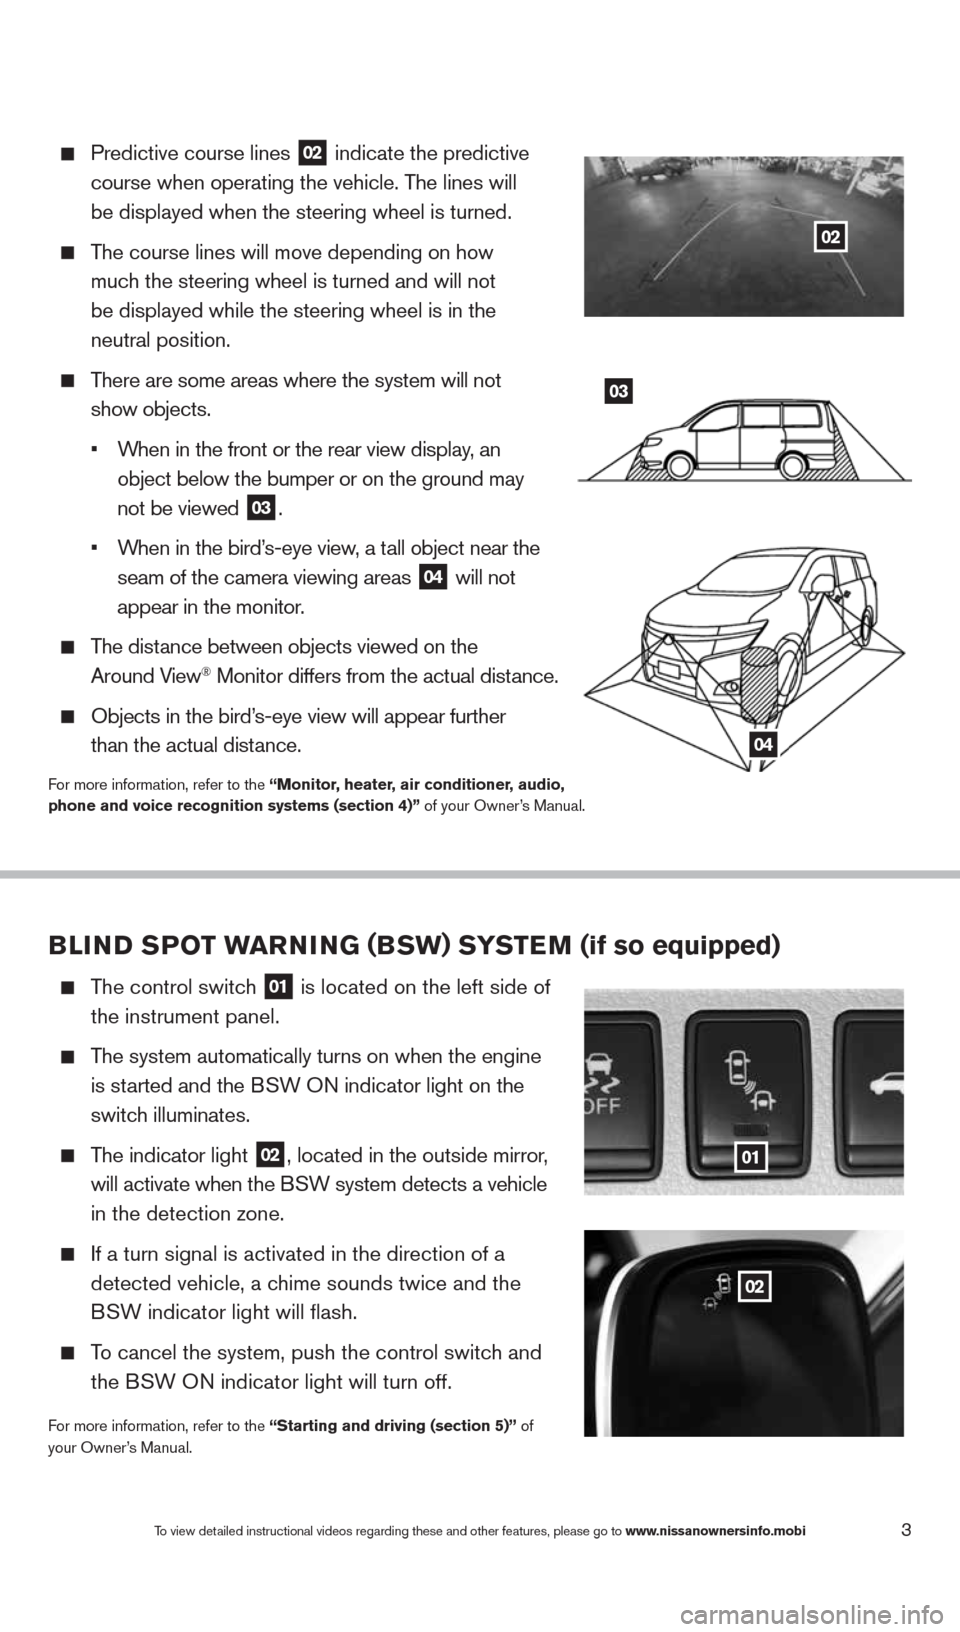
Predictive course lines
02 indicate the predictive
course when operating the vehicle. The lines will
be displayed when the steering wheel is turned.
The course lines will move depending on how
much the steering wheel is turned and will not
be displayed while the steering wheel is in the
neutral position.
There are some areas where the system will not
show objects.
•
When in the front or the rear view display, an
object below the bumper or on the ground may
not be viewed
03.
•
When in the bird’s-eye view, a tall object near the
seam of the camera viewing areas
04 will not
appear in the monitor.
The distance between objects viewed on the
Around View® Monitor differs from the actual distance.
Objects in the bird’s-eye view will appear further
than the actual distance.
For more information, refer to the “Monitor, heater, air conditioner, audio,
phone and voice recognition systems (section 4)” of your Owner’s Manual.
03
04
BLIND SPOT warNING (BSw) S YST eM (if so equipped)
The control switch
01 is located on the left side of
the instrument panel.
The system automatically turns on when the engine
is started and the BSW ON indicator light
on the
switch illuminates.
The indicator light
02, located in the outside mirror,
will activate when the BSW system detects a vehicle
in the detection zone.
If a turn signal is activated in the direction of a
detected vehicle, a chime sounds twice and the
BSW indicator light will flash.
To cancel the system, push the control switch and
the BSW ON indicator light will turn off.
For more information, refer to the “Starting and driving (section 5)” of
your Owner’s Manual.
01
02
To view detailed instructional videos regarding these and other features, please go\
to www.nissanownersinfo.mobi
02
1490690_14_Quest_QRG_072513.indd 37/25/13 9:23 AM
Page 6 of 32
4
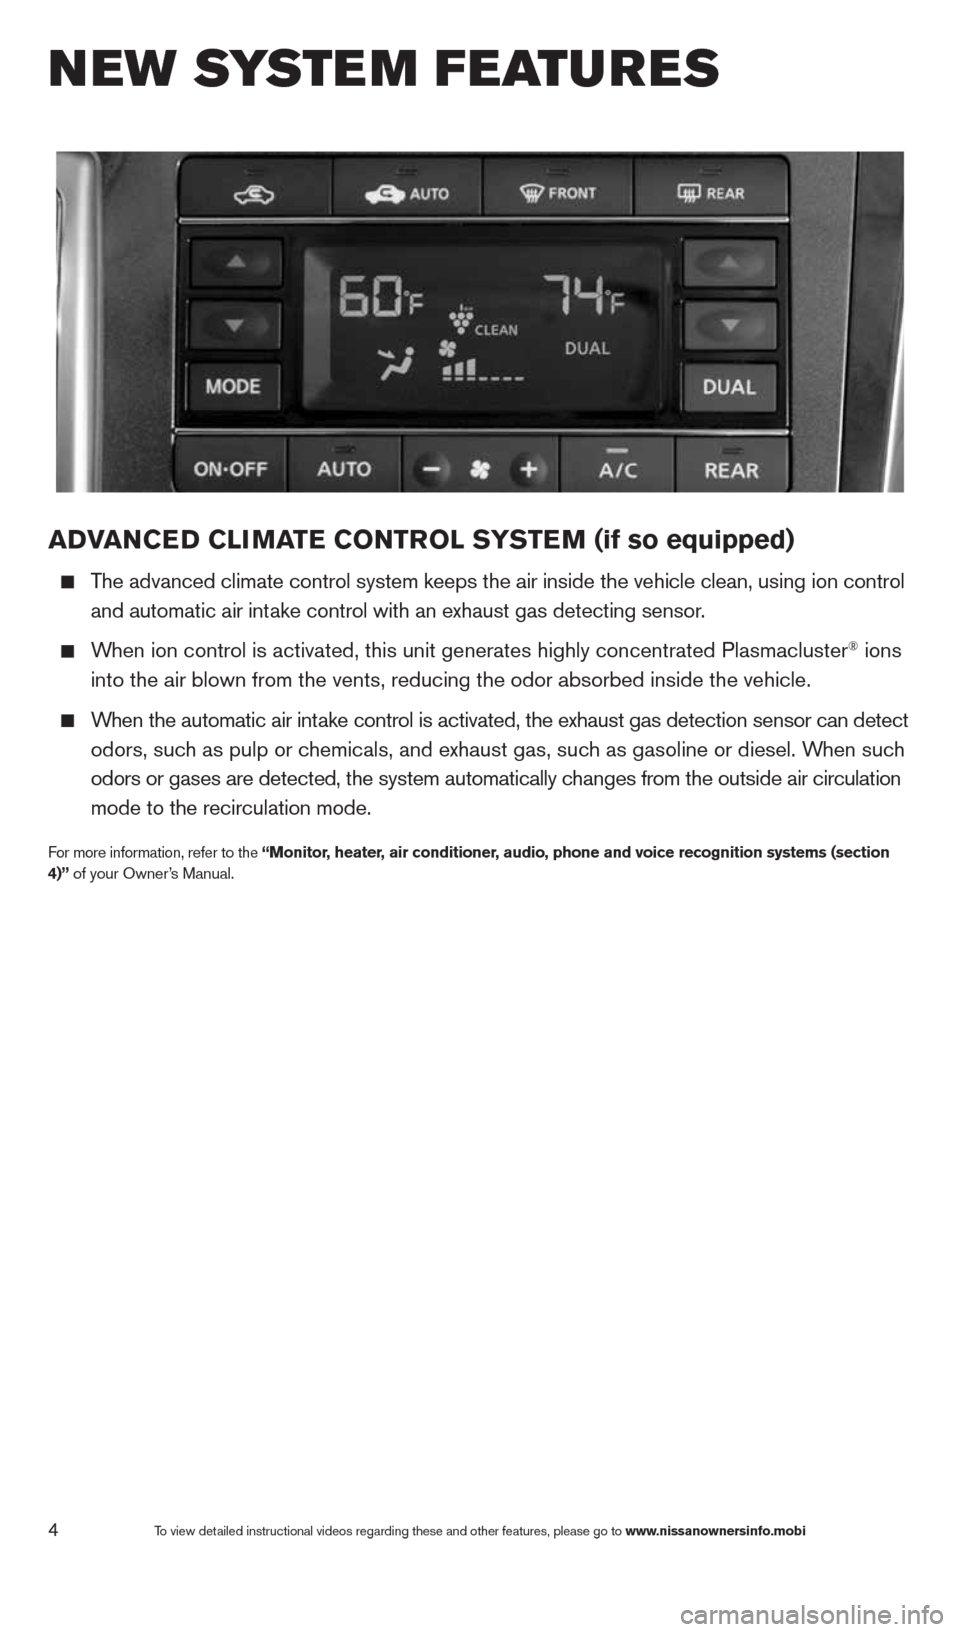
aDVaNCe D CLIMa Te CONTr OL SYSTe M (if so equipped)
The advanced climate control system keeps the air inside the vehicle clea\
n, using ion control
and automatic air intake control with an exhaust gas detecting sensor.
When ion control is activated, this unit generates highly concentrated Pl\
asmacluster® ions
into the air blown from the vents, reducing the odor absorbed inside the\
vehicle.
When the automatic air intake control is activated, the exhaust gas detection sensor can detect
odors, such as pulp or chemicals, and exhaust gas, such as gasoline or diesel. When such
odors or gases are detected, the system automatically changes from the outside air circulation
mode to the recirculation mode.
For more information, refer to the “Monitor, heater, air conditioner, audio, phone and voice recognition systems (section
4)” of your Owner’s Manual.
New system features
To view detailed instructional videos regarding these and other features, please go\
to www.nissanownersinfo.mobi
1490690_14_Quest_QRG_072513.indd 47/25/13 9:23 AM
Page 18 of 32
16
07 aI
r re CIrCu LaTION B uTTON
Press the air recirculation button to recirculate interior air inside the vehicle. The
indicator light on the button will illuminate. This system is used to avoid certain outside
odors and helps to adjust the inside vehicle temperature more effectivel\
y.
The air recirculation mode cannot be activated when the air conditioner i\
s in the front
defroster mode
Fr
ONT or in the front defroster and foot vent mode .
08 auTO-re
CIrCu LaTION B uTTON
Press the auto-recirculation button
au
TO
to switch to the automatic air intake
control mode. The indicator light on the button will illuminate.
In this mode, the sensor detects certain odors and gasses to automatically switch
between the air recirculation mode and the outside air circulation mode.\
The auto-recirculation mode cannot be activated when the air flow contr\
ol mode is in
the front defroster mode
Fr
ONT or in the front defroster and foot vent mode .
09 D
eFr OSTING/D eFOGGING Fr ONT aND SID e wINDOwS
Press the front defroster control button
Fr
ONT to turn the system on. The A/c
automatically turns on when the defroster mode is selected. This feature removes humidity
from the air.
Press the temperature control buttons
or
to set the desired temperature.
To defrost the front and side windows quickly, set the temperature controls and fan speed
controls to their maximum settings.
10 D
eFr OSTING rear wINDO w aND OuTSIDe MIrrOr S (if so equipped)
Push the rear window defroster switch
rear
to turn the system on or off.
This function automatically turns off after approximately 15 minutes.
11 a/C B
uTTON
Press the a/C button to turn the air conditioner system on or off. This system helps cool
and dehumidify the air inside the cabin and defog the windows.
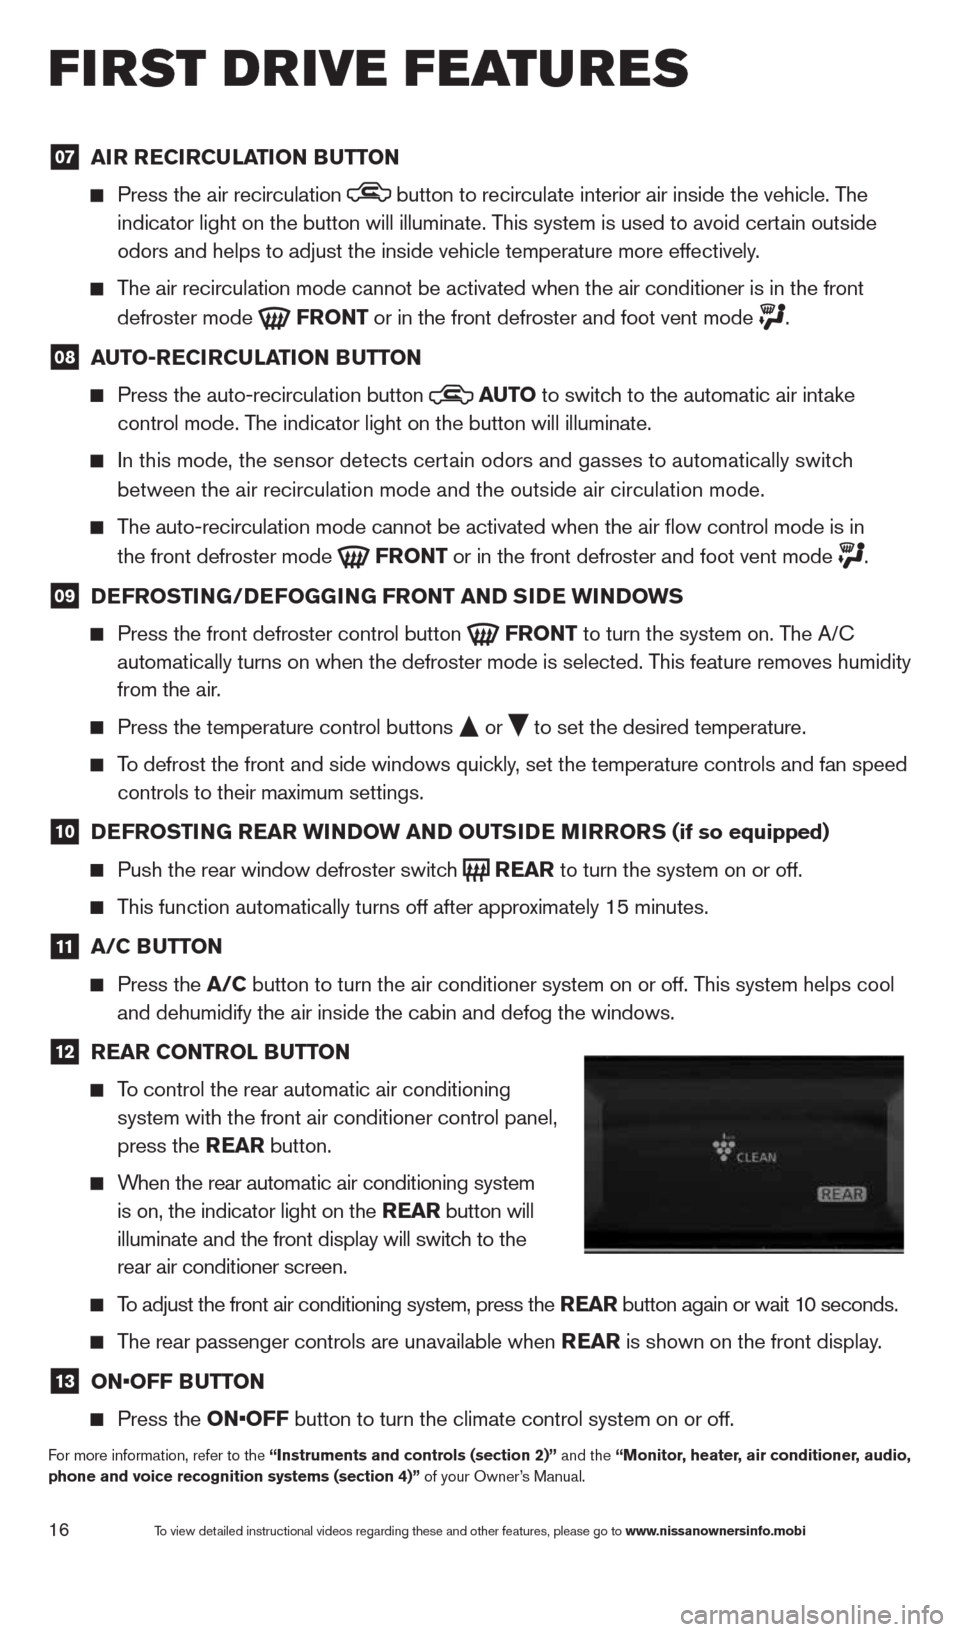
12 rear CONTr
OL BuTTON
To control the rear automatic air conditioning
system with the front air conditioner control panel,
press the rear button.
When the rear automatic air conditioning system
is on, the indicator light on the rear button will
illuminate and the front display will switch to the
rear air conditioner screen.
To adjust the front air conditioning system, press the rear button again or wait 10 seconds.
The rear passenger controls are unavailable when rear is shown on the front display.
13 ON•OFF B
uTTON
Press the ON•OFF button to turn the climate control system on or off.
For more information, refer to the “Instruments and controls (section 2)” and the “Monitor, heater, air conditioner, audio,
phone and voice recognition systems (section 4)” of your Owner’s Manual.
first drive features
To view detailed instructional videos regarding these and other features, please go\
to www.nissanownersinfo.mobi
1490690_14_Quest_QRG_072513.indd 167/25/13 9:24 AM
Page 19 of 32
17
01
0605
03
02
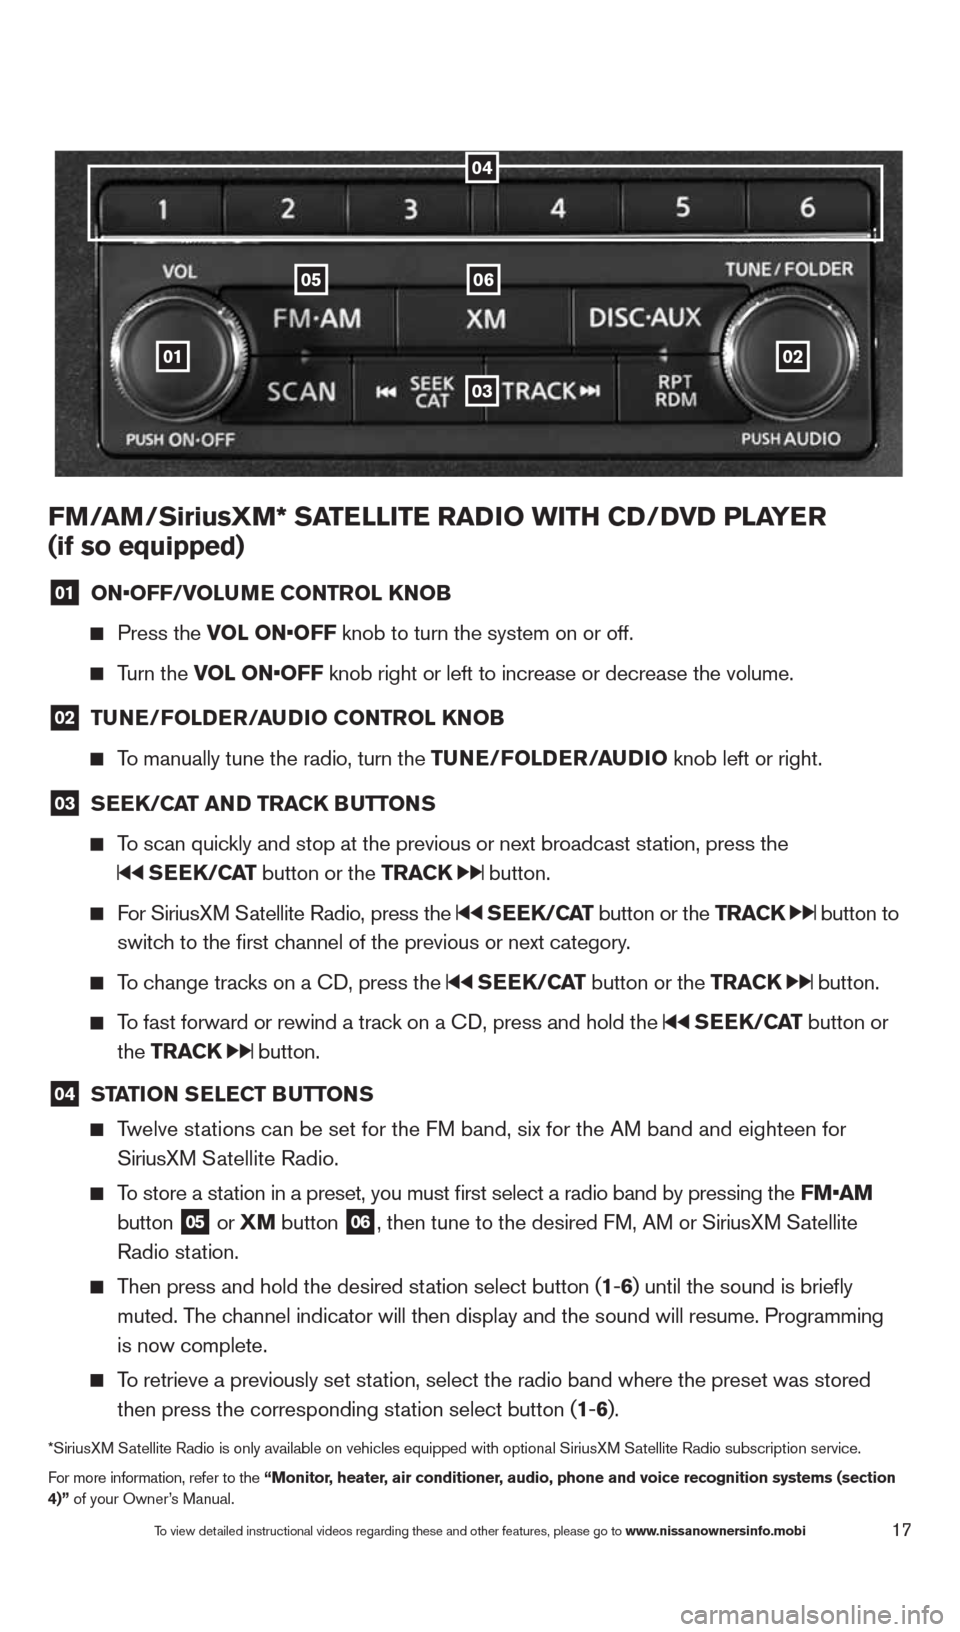
FM/aM/SiriusXM* Sa TeLLITe raDIO wITH CD/DVD PLa Yer
(if so equipped)
01 ON•OFF/VOLu
Me CONTr OL KNOB
Press the VOL ON•OFF knob to turn the system on or off.
Turn the VOL ON•OFF knob right or left to increase or decrease the volume.
02 Tu
Ne/FOLD er/au DIO CONTr OL KNOB
To manually tune the radio, turn the T uNe/FOLDer/auDIO knob left or right.
03 S
ee K/C aT aND Tra CK BuTTONS
To scan quickly and stop at the previous or next broadcast station, press the
SeeK/C aT button or the Tra CK button.
For SiriusXM Satellite Radio, press the SeeK/C aT button or the Tra CK button to
switch to the first channel of the previous or next category.
To change tracks on a c D, press the SeeK/C aT button or the Tra CK button.
To fast forward or rewind a track on a c D, press and hold the SeeK/C aT button or
the Tra CK
button.
04 ST
aTION S eLe CT B uTTONS
Twelve stations can be set for the FM band, six for the AM band and eighteen for
SiriusXM Satellite Radio.
To store a station in a preset, you must first select a radio band by pressing the \
FM•aM
button
05 or
XM button 06, then tune to the desired FM, AM or SiriusXM Satellite
Radio station.
Then press and hold the desired station select button (1 -6 ) until the sound is briefly
muted. The channel indicator will then display and the sound will resume. Programmin\
g
is now complete.
To retrieve a previously set station, select the radio band where the preset was stored
then press the corresponding station select button (1 -6 ).
*SiriusXM Satellite Radio is only available on vehicles equipped with optional Siri\
usXM Satellite Radio subscription service.
For more information, refer to the “Monitor, heater, air conditioner, audio, phone and voice recognition systems (section
4)” of your Owner’s Manual.
04
To view detailed instructional videos regarding these and other features, please go\
to www.nissanownersinfo.mobi
1490690_14_Quest_QRG_072513.indd 177/25/13 9:24 AM
Page 20 of 32
18
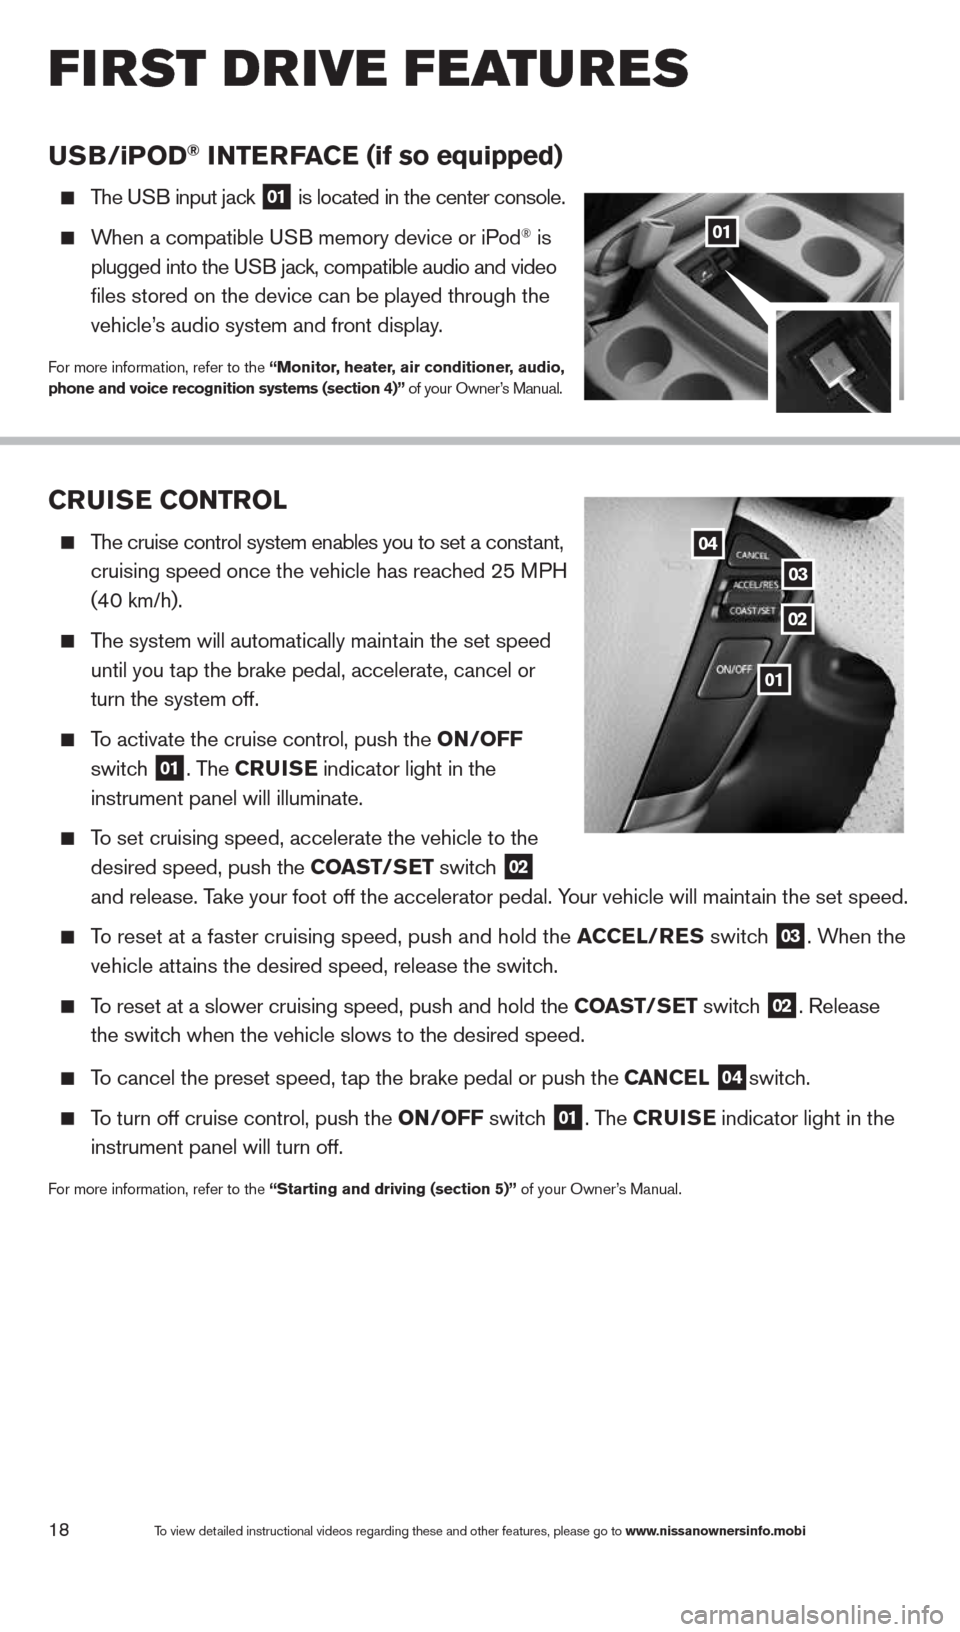
CruISe CONTr OL
The cruise control system enables you to set a constant,
cruising speed once the vehicle has reached 25 MPH
(40 km/h).
The system will automatically maintain the set speed
until you tap the brake pedal, accelerate, cancel or
turn the system off.
To activate the cruise control, push the ON/OFF
switch
01. The C ruISe indicator light in the
instrument panel will illuminate.
To set cruising speed, accelerate the vehicle to the
desired speed, push the CO aST/SeT switch
02
and release. Take your foot off the accelerator pedal. Your vehicle will maintain the set speed.
To reset at a faster cruising speed, push and hold the a CCeL/reS switch 03. When the
vehicle attains the desired speed, release the switch.
To reset at a slower cruising speed, push and hold the CO aST/SeT switch 02. Release
the switch when the vehicle slows to the desired speed.
To cancel the preset speed, tap the brake pedal or push the C aNCeL 04switch.
To turn off cruise control, push the ON/OFF switch 01. The C ruISe indicator light
in the
instrument panel will turn off.
For more information, refer to the “Starting and driving (section 5)” of your Owner’s Manual.
uSB/ iP OD® INTer Fa Ce (if so equipped)
The USB input jack 01 is located in the center console.
When a compatible USB memory device or iPod® is
plugged into the USB jack, compatible audio and video
files stored on the device can be played through the
vehicle’s audio system and front display.
For more information, refer to the “Monitor, heater, air conditioner, audio,
phone and voice recognition systems (section 4)” of your Owner’s Manual.
01
02
03
04
To view detailed instructional videos regarding these and other features, please go\
to www.nissanownersinfo.mobi
first drive features
01
1490690_14_Quest_QRG_072513.indd 187/25/13 9:24 AM
Page 23 of 32
21
When speaking Phonebook names, please be aware some phones require the la\
st name
to be spoken before the first name. For example, “Michael Smith” may be spoken as
“Smith Michael”.
To cancel a voice recognition session, say “Exit” or press and hold the
or
button.
To decrease or increase the volume of the voice prompts, push the volume \
control switches
or
on the steering wheel or turn the VOL/ON•OFF control knob on the audio system
while the system is responding.
Voice commands can be used to operate various Bluetooth System features u\
sing the
NISSAN Voice Recognition system. See your Owner’s Manual for detailed information.
If the Voice Recognition system does not recognize your voice commands, train th\
e system
using the Speaker Adaptation Mode.
For more detailed information and instructions, refer to your cellular phone’s Owner’s Manual
and visit www.nissanusa.com/bluetooth.
Bluetooth® System with Navigation* (if so equipped)
Bluetooth Streaming Audio (available with Navigation System only) allo\
ws you to use a
compatible Bluetooth phone to play audio files on your device. Your compatible cellular
phone can be connected to the vehicle’s audio system, allowing audio files to play through
the vehicle’s speakers.
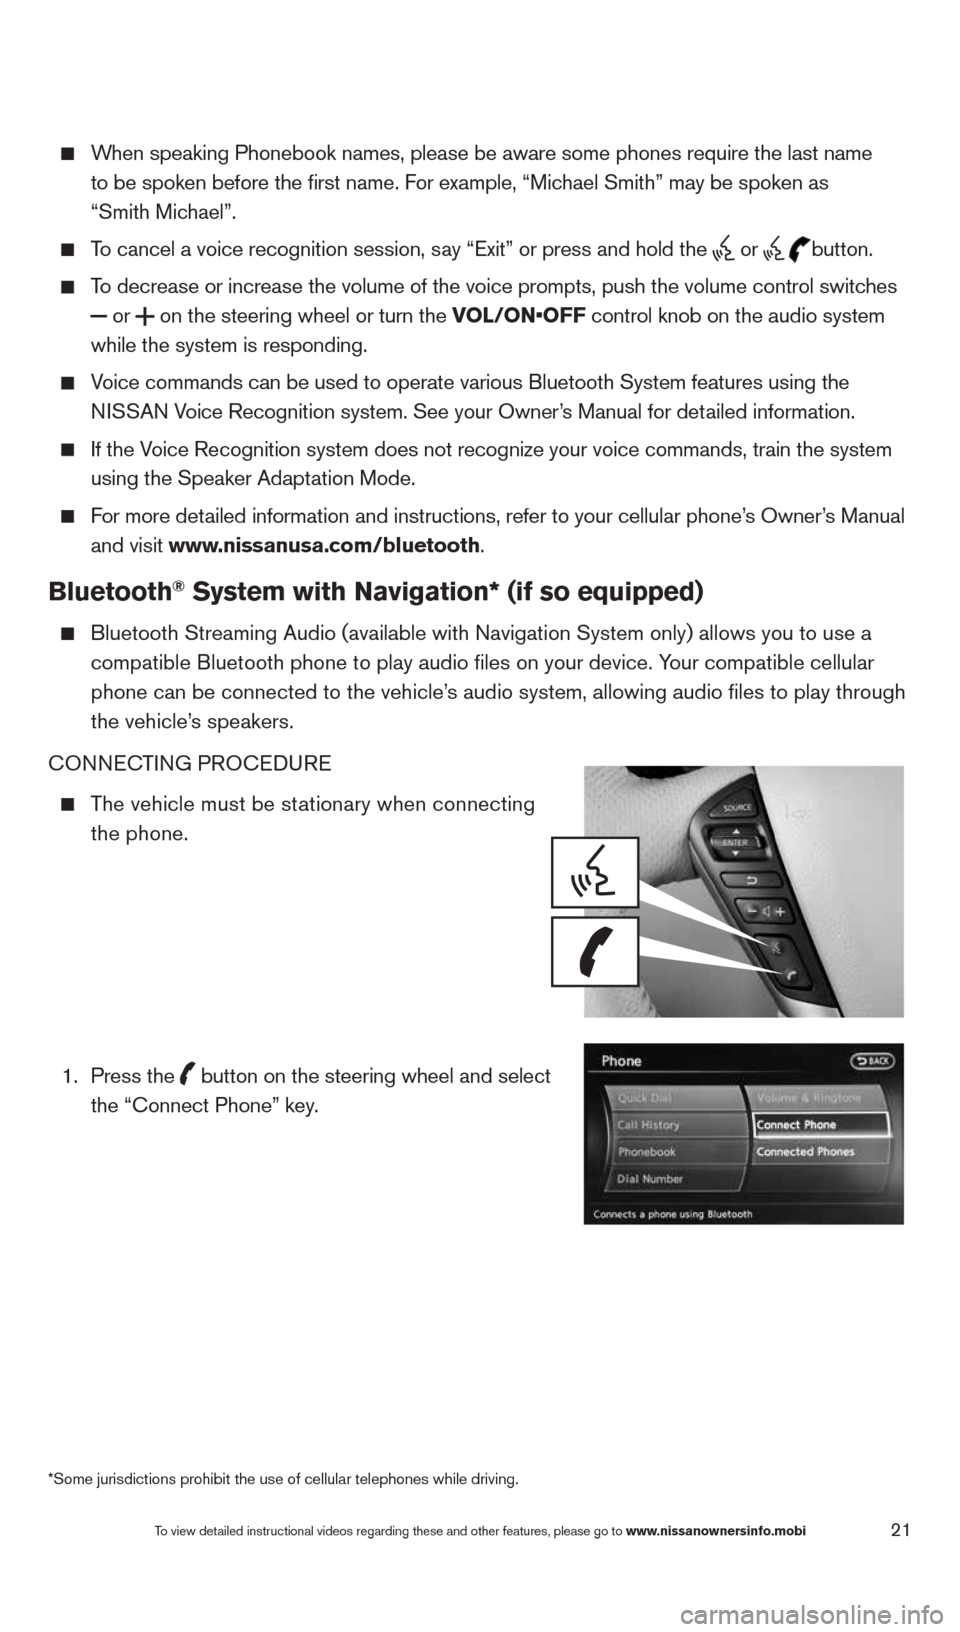
cONNEc TING PROcEDURE
The vehicle must be stationary when connecting
the phone.
1.
Press the
button on the steering wheel and select
the “connect Phone” key.
*Some jurisdictions prohibit the use of cellular telephones while drivin\
g.
To view detailed instructional videos regarding these and other features, please go\
to www.nissanownersinfo.mobi
1490690_14_Quest_QRG_072513.indd 217/25/13 9:24 AM
Page 26 of 32
24To view detailed instructional videos regarding these and other features, please go\
to www.nissanownersinfo.mobi
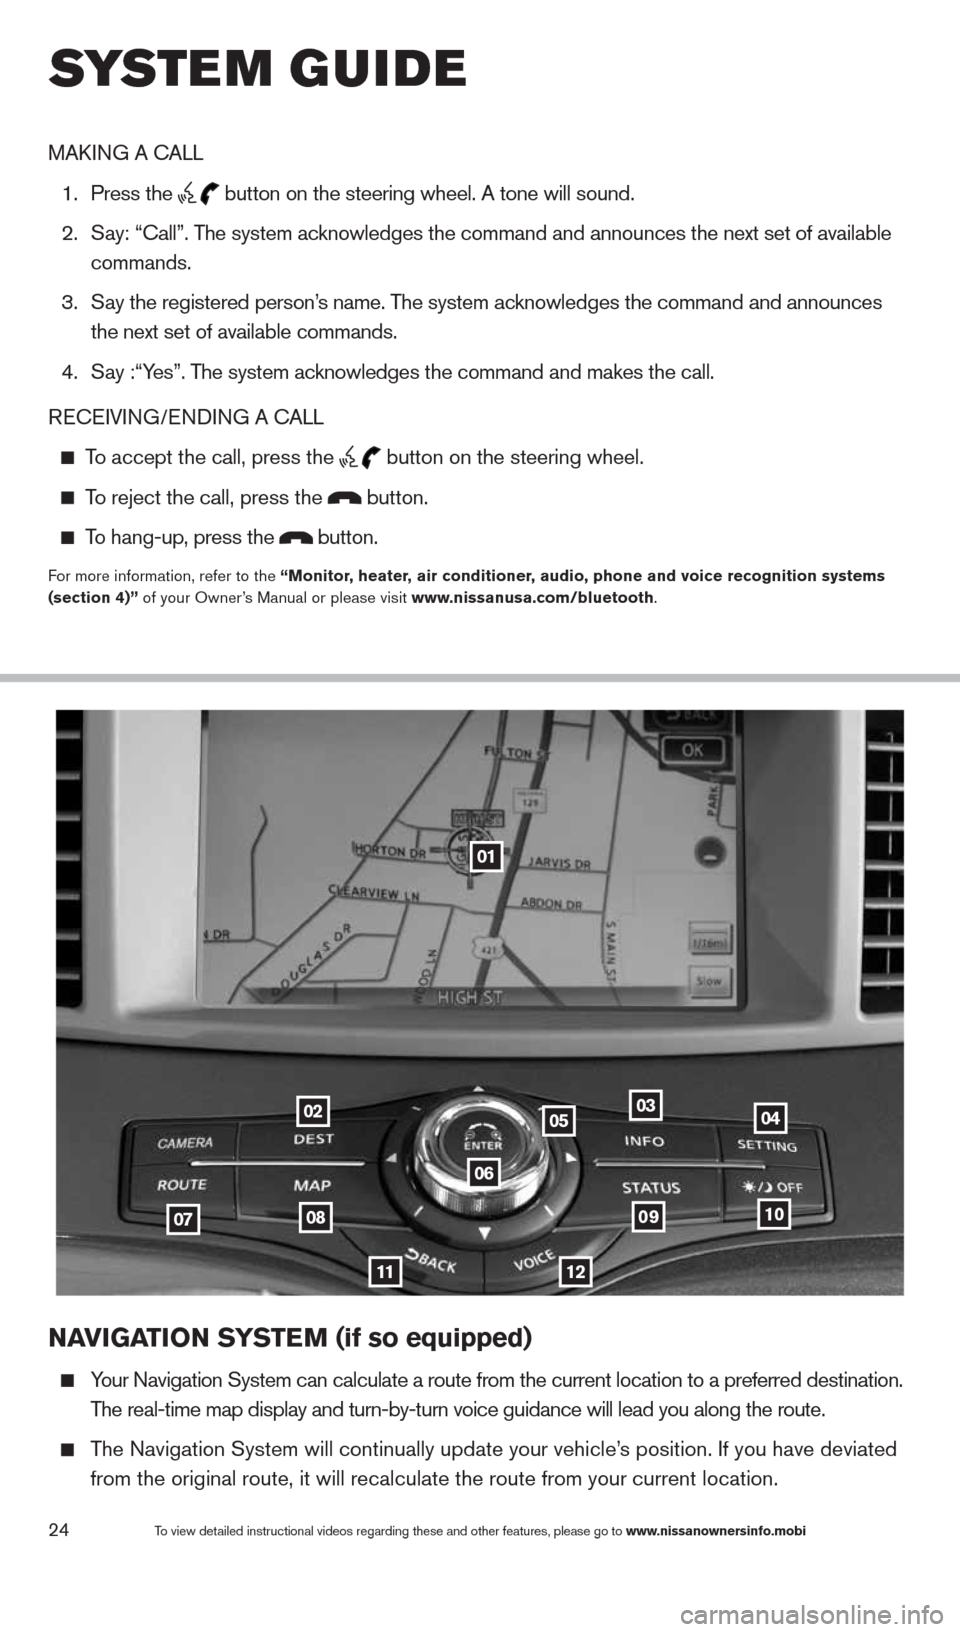
NaVIGa TION SYSTe M (if so equipped)
Your Navigation System can calculate a route from the current location to\
a preferred destination.
The real-time map display and turn-by-turn voice guidance will lead you a\
long the route.
The Navigation System will continually update your vehicle’s position. If you have deviated
from the original route, it will recalculate the route from your current\
location.
01
02
0708
11
0910
040305
06
12
MAk ING A c ALL
1. Press the
button on the steering wheel. A tone will sound.
2. Say: “call”. The system acknowledges the command and announces the next set of available
commands.
3. Say the registered person’s name. The system acknowledges the command and announces
the next set of available commands.
4. Say :“Yes”. The system acknowledges the command and makes the call.
RE cEIVING/ENDING A c ALL
To accept the call, press the
button on the steering wheel.
To reject the call, press the button.
To hang-up, press the button.
For more information, refer to the “Monitor, heater, air conditioner, audio, phone and voice recognition systems
(section 4)” of your Owner’s Manual or please visit www.nissanusa.com/bluetooth.
system guide
1490690_14_Quest_QRG_072513.indd 247/25/13 9:24 AM
Page 27 of 32
25
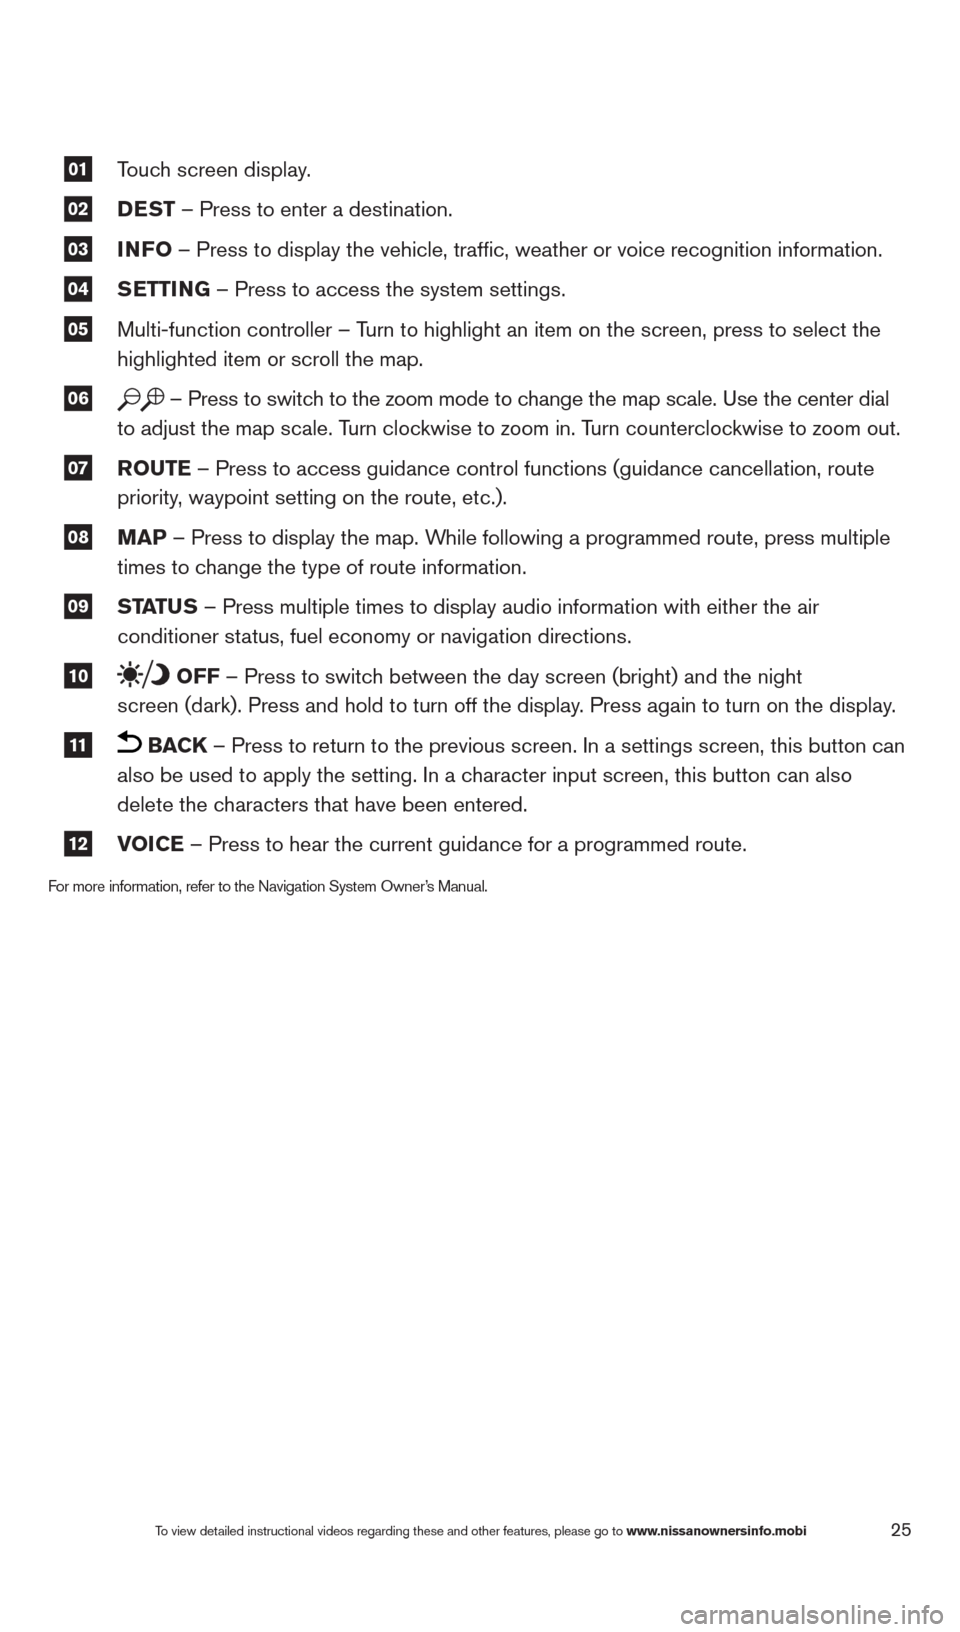
01 Touch screen display.
02 DeST
– Press to enter a destination.
03 INFO
– Press to display the vehicle, traffic, weather or voice recognit\
ion information.
04 S
eTTING – Press to access the system settings.
05 Multi-function controller – Turn to highlight an item on the screen, press to select the
highlighted item or scroll the map.
06 – Press to switch to the zoom mode to change the map scale. Use the center dial
to adjust the map scale. Turn clockwise to zoom in. Turn counterclockwise to zoom out.
07 r
OuTe – Press to access guidance control functions (guidance cancellation\
, route
priority, waypoint setting on the route, etc.).
08 MaP – Press to display the map. While following a programmed route, press multiple
times to change the type of route information.
09 ST
aTu S – Press multiple times to display audio information with either the \
air
conditioner status, fuel economy or navigation directions.
10 OFF – Press to switch between the day screen (bright) and the night
screen (dark). Press and hold to turn off the display. Press again to turn on the display.
11 BaCK – Press to return to the previous screen. In a settings screen, this\
button can
also be used to apply the setting. In a character input screen, this button can also
delete the characters that have been entered.
12 VOICe – Press to hear the current guidance for a programmed route.
For more information, refer to the Navigation System Owner’s Manual.
To view detailed instructional videos regarding these and other features, please go\
to www.nissanownersinfo.mobi
1490690_14_Quest_QRG_072513.indd 257/25/13 9:24 AM