tow NISSAN QUEST 2017 RE52 / 4.G Owner's Manual
[x] Cancel search | Manufacturer: NISSAN, Model Year: 2017, Model line: QUEST, Model: NISSAN QUEST 2017 RE52 / 4.GPages: 520, PDF Size: 2.5 MB
Page 389 of 520
5-20Starting and driving
BSW SYSTEM LIMITATIONS
WARNING
Listed below are the system limitations
for the BSW system. Failure to operate
the vehicle in accordance with these
system limitations could result in ser-
ious injury or death.
.The BSW system cannot detect all
vehicles under all conditions.
. The radar sensors may not be able
to detect and activate BSW when
certain objects are present such as:
— Pedestrians, bicycles, animals.
— Vehicles such as motorcycles,
low height vehicles, or high
ground clearance vehicles.
— Oncoming vehicles.
— Vehicles remaining in the detec- tion zone when you accelerate
from a stop.
— A vehicle merging into an adja- cent lane at a speed approxi-
mately the same as your vehicle. — A vehicle approaching rapidly
from behind.
— A vehicle which your vehicle overtakes rapidly.
— A vehicle that passes through the detection zone quickly.
— When overtaking several vehi- cles in a row, the vehicles after
the first vehicle may not be
detected if they are traveling
close together.
. The radar sensor’s detection zone is
designed based on a standard lane
width. When driving in a wider lane,
the radar sensors may not detect
vehicles in an adjacent lane. When
driving in a narrow lane, the radar
sensors may detect vehicles driving
two lanes away.
. The radar sensors are designed to
ignore most stationary objects,
however objects such as guardrails,
walls, foliage and parked vehicles
may occasionally be detected. This
is a normal operating condition.
. The following conditions may re-
duce the ability of the radar to
detect other vehicles: — Severe weather
— Road spray
— Ice/frost/snow build-up on the
vehicle
— Dirt build-up on the vehicle
. Do not attach stickers (including
transparent material) , install acces-
sories or apply additional paint near
the radar sensors. These conditions
may reduce the ability of the radar
to detect other vehicles.
. Do not use the BSW system when
towing a trailer because the system
may not function properly.
. Excessive noise (for example, audio
system volume, open vehicle win-
dow) will interfere with the chime
sound, and it may not be heard.
Page 396 of 520
To reset at a faster cruising speed,use one
of the following methods:
. Depress the accelerator pedal. When the
vehicle attains the desired speed, push and
release the COAST/SET switch.
. Push and hold the ACCELERATE/RESUME
switch. When the vehicle attains the desired
speed, release the switch.
. Push, then quickly release the ACCELER-
ATE/RESUME switch. Each time you do
this, the set speed will increase by about 1
MPH (1.6 km/h) .
To reset at a slower cruising speed, use one
of the following methods:
. Lightly tap the brake pedal. When the
vehicle attains the desired speed, push the
COAST/SET switch and release it.
. Push and hold the COAST/SET switch.
Release the switch when the vehicle slows
down to the desired speed.
. Push, then quickly release the COAST/SET
switch. Each time you do this, the set speed
will decrease by about 1 MPH (1.6 km/h) .
To resume the preset speed, push and
release the ACCELERATE/RESUME switch.
The vehicle will resume the last set cruising
speed when the vehicle speed is over 25 MPH
(40 km/h) .
CAUTION
During the first 1,200 miles (2,000 km) ,
follow these recommendations to ob-
tain maximum engine performance and
ensure the future reliability and econo-
my of your new vehicle. Failure to
follow these recommendations may
result in shortened engine life and
reduced engine performance.
. Avoid driving for long periods at constant
speed, either fast or slow. Do not run the
engine over 4,000 rpm.
. Do not accelerate at full throttle in any gear.
. Avoid quick starts.
. Avoid hard braking as much as possible.
. Do not tow a trailer for the first 500 miles
(800 km) . Your engine, axle or other parts
could be damaged. Follow these easy-to-use Fuel Efficient Driving
Tips to help you achieve the most fuel economy
from your vehicle.
1. Use smooth accelerator and brake pedal
application.
.Avoid rapid starts and stops..Use smooth, gentle accelerator andbrake application whenever possible.
.Maintain constant speed while commut-
ing and coast whenever possible.
2. Maintain constant speed.
.Look ahead to try and anticipate and minimize stops.
.Synchronizing your speed with traffic
lights allows you to reduce your number
of stops.
.Maintaining a steady speed can minimize red light stops and improve fuel effi-
ciency.
3. Use air conditioning (A/C) at higher vehicle speeds.
.Below 40 MPH (64 km/h) , it is moreefficient to open windows to cool the
vehicle due to reduced engine load.
.Above 40 MPH (64 km/h) , it is moreefficient to use A/C to cool the vehicle
due to increased aerodynamic drag.
Starting and driving5-27
BREAK-IN SCHEDULE FUEL EFFICIENT DRIVING TIPS
Page 398 of 520
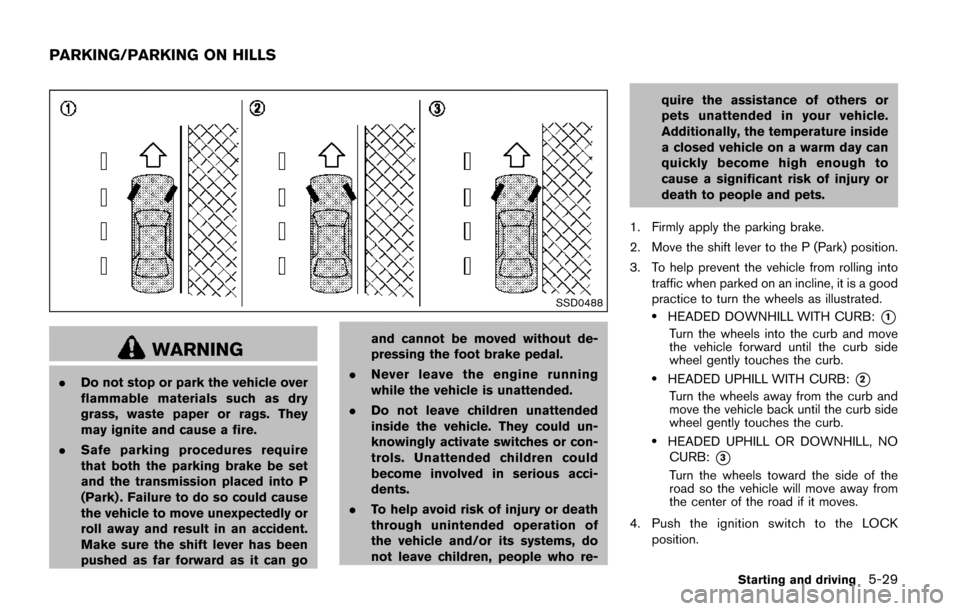
SSD0488
WARNING
.Do not stop or park the vehicle over
flammable materials such as dry
grass, waste paper or rags. They
may ignite and cause a fire.
. Safe parking procedures require
that both the parking brake be set
and the transmission placed into P
(Park) . Failure to do so could cause
the vehicle to move unexpectedly or
roll away and result in an accident.
Make sure the shift lever has been
pushed as far forward as it can go and cannot be moved without de-
pressing the foot brake pedal.
. Never leave the engine running
while the vehicle is unattended.
. Do not leave children unattended
inside the vehicle. They could un-
knowingly activate switches or con-
trols. Unattended children could
become involved in serious acci-
dents.
. To help avoid risk of injury or death
through unintended operation of
the vehicle and/or its systems, do
not leave children, people who re- quire the assistance of others or
pets unattended in your vehicle.
Additionally, the temperature inside
a closed vehicle on a warm day can
quickly become high enough to
cause a significant risk of injury or
death to people and pets.
1. Firmly apply the parking brake.
2. Move the shift lever to the P (Park) position.
3. To help prevent the vehicle from rolling into traffic when parked on an incline, it is a good
practice to turn the wheels as illustrated.
.HEADED DOWNHILL WITH CURB:*1
Turn the wheels into the curb and move
the vehicle forward until the curb side
wheel gently touches the curb.
.HEADED UPHILL WITH CURB:*2
Turn the wheels away from the curb and
move the vehicle back until the curb side
wheel gently touches the curb.
.HEADED UPHILL OR DOWNHILL, NO
CURB:
*3
Turn the wheels toward the side of the
road so the vehicle will move away from
the center of the road if it moves.
4. Push the ignition switch to the LOCK position.
Starting and driving5-29
PARKING/PARKING ON HILLS
Page 406 of 520
6 In case of emergency
Hazard warning flasher switch .............................................. 6-2
Roadside assistance program ............................................... 6-2
Emergency engine shut off ..................................................... 6-3
Flat tire ........................................................................\
................. 6-3Tire Pressure Monitoring System (TPMS) .................... 6-3
Changing a flat tire ............................................................. 6-4 Jump starting ........................................................................\
.. 6-10
Push starting ........................................................................\
... 6-12
If your vehicle overheats ...................................................... 6-12
Towing your vehicle .............................................................. 6-14
Towing recommended by NISSAN ........................... 6-15
Vehicle recovery (freeing a stuck vehicle) ............... 6-15
Page 414 of 520
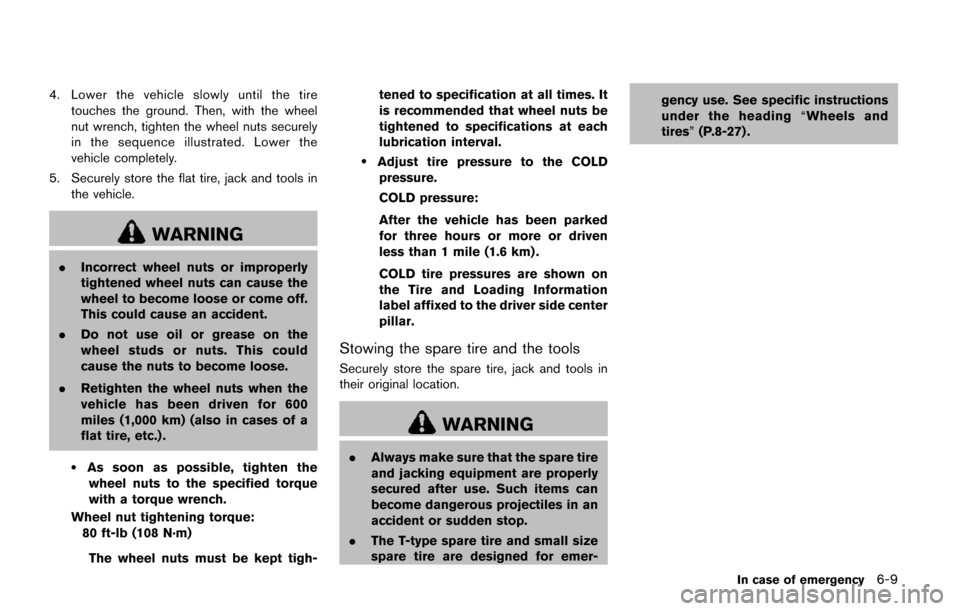
4. Lower the vehicle slowly until the tiretouches the ground. Then, with the wheel
nut wrench, tighten the wheel nuts securely
in the sequence illustrated. Lower the
vehicle completely.
5. Securely store the flat tire, jack and tools in the vehicle.
WARNING
.Incorrect wheel nuts or improperly
tightened wheel nuts can cause the
wheel to become loose or come off.
This could cause an accident.
. Do not use oil or grease on the
wheel studs or nuts. This could
cause the nuts to become loose.
. Retighten the wheel nuts when the
vehicle has been driven for 600
miles (1,000 km) (also in cases of a
flat tire, etc.) .
.As soon as possible, tighten the
wheel nuts to the specified torque
with a torque wrench.
Wheel nut tightening torque: 80 ft-lb (108 N·m)
The wheel nuts must be kept tigh- tened to specification at all times. It
is recommended that wheel nuts be
tightened to specifications at each
lubrication interval.
.Adjust tire pressure to the COLD
pressure.
COLD pressure:
After the vehicle has been parked
for three hours or more or driven
less than 1 mile (1.6 km) .
COLD tire pressures are shown on
the Tire and Loading Information
label affixed to the driver side center
pillar.
Stowing the spare tire and the tools
Securely store the spare tire, jack and tools in
their original location.
WARNING
. Always make sure that the spare tire
and jacking equipment are properly
secured after use. Such items can
become dangerous projectiles in an
accident or sudden stop.
. The T-type spare tire and small size
spare tire are designed for emer- gency use. See specific instructions
under the heading
“Wheels and
tires” (P.8-27) .
In case of emergency6-9
Page 417 of 520
6-12In case of emergency
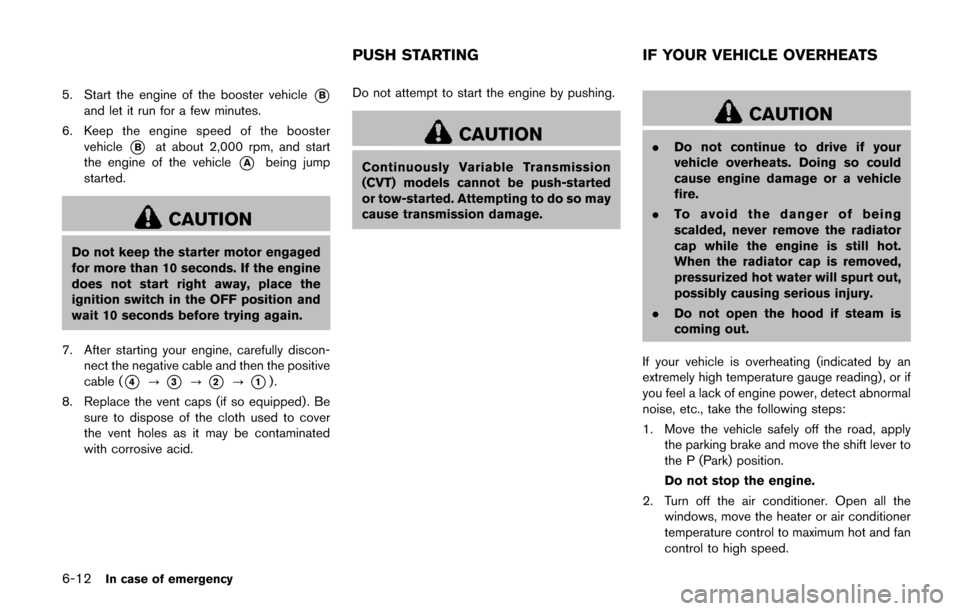
5. Start the engine of the booster vehicle*B
and let it run for a few minutes.
6. Keep the engine speed of the booster vehicle
*Bat about 2,000 rpm, and start
the engine of the vehicle
*Abeing jump
started.
CAUTION
Do not keep the starter motor engaged
for more than 10 seconds. If the engine
does not start right away, place the
ignition switch in the OFF position and
wait 10 seconds before trying again.
7. After starting your engine, carefully discon- nect the negative cable and then the positive
cable (
*4?*3?*2?*1).
8. Replace the vent caps (if so equipped) . Be sure to dispose of the cloth used to cover
the vent holes as it may be contaminated
with corrosive acid. Do not attempt to start the engine by pushing.
CAUTION
Continuously Variable Transmission
(CVT) models cannot be push-started
or tow-started. Attempting to do so may
cause transmission damage.
CAUTION
.
Do not continue to drive if your
vehicle overheats. Doing so could
cause engine damage or a vehicle
fire.
. To avoid the danger of being
scalded, never remove the radiator
cap while the engine is still hot.
When the radiator cap is removed,
pressurized hot water will spurt out,
possibly causing serious injury.
. Do not open the hood if steam is
coming out.
If your vehicle is overheating (indicated by an
extremely high temperature gauge reading) , or if
you feel a lack of engine power, detect abnormal
noise, etc., take the following steps:
1. Move the vehicle safely off the road, apply the parking brake and move the shift lever to
the P (Park) position.
Do not stop the engine.
2. Turn off the air conditioner. Open all the windows, move the heater or air conditioner
temperature control to maximum hot and fan
control to high speed.
PUSH STARTING IF YOUR VEHICLE OVERHEATS
Page 419 of 520
6-14In case of emergency
When towing your vehicle, all State (Provincial in
Canada) and local regulations for towing must
be followed. Incorrect towing equipment could
damage your vehicle. Towing instructions are
available from a NISSAN dealer. Local service
operators are familiar with the applicable laws
and procedures for towing. To assure proper
towing and to prevent accidental damage to
your vehicle, NISSAN recommends that you
have a service operator tow your vehicle. It is
advisable to have the service operator carefully
read the following precautions.
WARNING
.Never ride in a vehicle that is being
towed.
. Never get under your vehicle after it
has been lifted by a tow truck.
CAUTION
.When towing, make sure that the
transmission, axles, steering system
and drivetrain are in working condi-
tion. If any unit is damaged, dollies
must be used. .
Always attach safety chains before
towing.
For information about towing your vehicle behind
a recreational vehicle (RV) , see “Flat towing”
(P.10-23) of this manual.
TOWING YOUR VEHICLE
Page 420 of 520
SCE0976
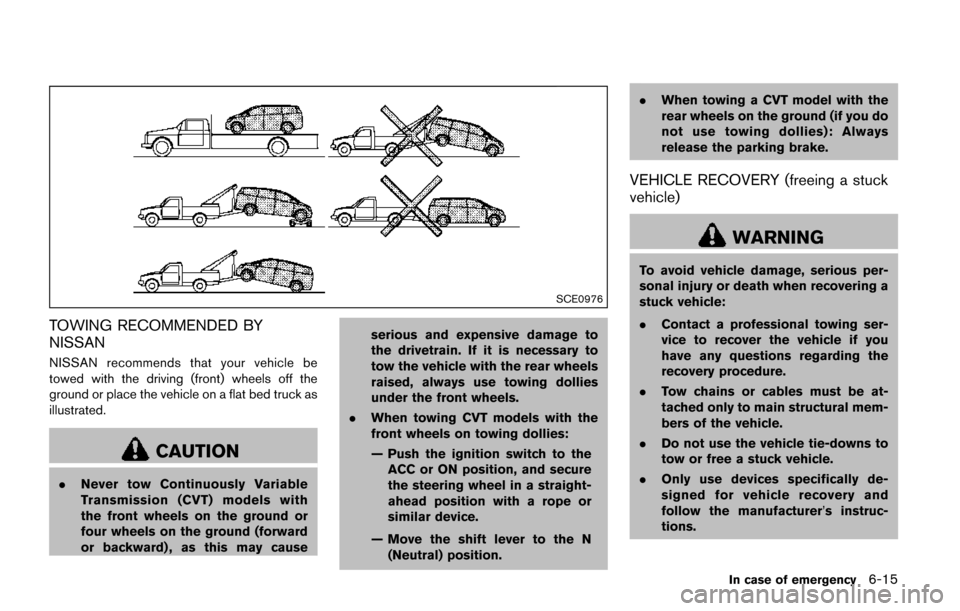
TOWING RECOMMENDED BY
NISSAN
NISSAN recommends that your vehicle be
towed with the driving (front) wheels off the
ground or place the vehicle on a flat bed truck as
illustrated.
CAUTION
.Never tow Continuously Variable
Transmission (CVT) models with
the front wheels on the ground or
four wheels on the ground (forward
or backward) , as this may cause serious and expensive damage to
the drivetrain. If it is necessary to
tow the vehicle with the rear wheels
raised, always use towing dollies
under the front wheels.
. When towing CVT models with the
front wheels on towing dollies:
— Push the ignition switch to the
ACC or ON position, and secure
the steering wheel in a straight-
ahead position with a rope or
similar device.
— Move the shift lever to the N (Neutral) position. .
When towing a CVT model with the
rear wheels on the ground (if you do
not use towing dollies): Always
release the parking brake.
VEHICLE RECOVERY (freeing a stuck
vehicle)
WARNING
To avoid vehicle damage, serious per-
sonal injury or death when recovering a
stuck vehicle:
.Contact a professional towing ser-
vice to recover the vehicle if you
have any questions regarding the
recovery procedure.
. Tow chains or cables must be at-
tached only to main structural mem-
bers of the vehicle.
. Do not use the vehicle tie-downs to
tow or free a stuck vehicle.
. Only use devices specifically de-
signed for vehicle recovery and
follow the manufacturer’s instruc-
tions.
In case of emergency6-15
Page 421 of 520
6-16In case of emergency
.Always pull the recovery device
straight out from the front of the
vehicle. Never pull at an angle.
. Route recovery devices so they do
not touch any part of the vehicle
except the attachment point.
If your vehicle is stuck in sand, snow, mud, etc.,
use a tow strap or other device designed
specifically for vehicle recovery. Always follow
the manufacturer’s instructions for the recovery
device.
Rocking a stuck vehicle
If your vehicle is stuck in sand, snow, mud, etc.,
use the following procedure:
1. Turn off the Vehicle Dynamic Control (VDC) system.
2. Make sure the area in front and behind the vehicle is clear of obstructions.
3. Turn the steering wheel right and left to clear an area around the front tires.
4. Slowly rock the vehicle forward and back- ward.
.Shift back and forth between R (Reverse)
and D (Drive) .
.Apply the accelerator as little as possibleto maintain the rocking motion.
.Release the accelerator pedal beforeshifting between R and D.
.Do not spin the tires above 35 MPH (55 km/h) .
5. If the vehicle cannot be freed after a few tries, contact a professional towing service
to remove the vehicle.
WARNING
.Stand clear of a stuck vehicle.
. Do not spin your tires at high speed.
This could cause them to explode
and result in serious injury. Parts of
your vehicle could also overheat
and be damaged.
Page 425 of 520
7-4Appearance and care
TIRE DRESSING
NISSAN does not recommend the use of tire
dressings. Tire manufacturers apply a coating to
the tires to help reduce discoloration of the
rubber. If a tire dressing is applied to the tires, it
may react with the coating and form a com-
pound. This compound may come off the tire
while driving and stain the vehicle paint.
If you choose to use a tire dressing, take the
following precautions:
.Use a water-based tire dressing. The coat-
ing on the tire dissolves more easily with an
oil-based tire dressing.
. Apply a light coat of tire dressing to help
prevent it from entering the tire tread/
grooves (where it would be difficult to
remove) .
. Wipe off excess tire dressing using a dry
towel. Make sure the tire dressing is
completely removed from the tire tread/
grooves.
. Allow the tire dressing to dry as recom-
mended by tire dressing manufacturer. Occasionally remove loose dust from the interior
trim, plastic parts and seats using a vacuum
cleaner or soft bristled brush. Wipe the vinyl and
leather surfaces with a clean, soft cloth dam-
pened in mild soap solution, then wipe clean
with a dry soft cloth.
Regular care and cleaning is required in order to
maintain the appearance of the leather.
Before using any fabric protector, read the
manufacturer’s recommendations. Some fabric
protectors contain chemicals that may stain or
bleach the seat material.
Use a cloth dampened only with water, to clean
the meter and gauge lens.
WARNING
Do not use water or acidic cleaners (hot
steam cleaners) on the seat. This can
damage the seat or occupant classifica-
tion sensor. This can also affect the
operation of the air bag system and
result in serious personal injury.
CAUTION
.
Never use benzine, thinner, or any
similar material.
. For cleaning, use a soft cloth, dam-
pened with water. Never use a rough
cloth, alcohol, benzine, thinner or
any kind of solvent or paper towel
with a chemical cleaning agent.
They will scratch or cause discolora-
tion to the lens.
. Do not spray any liquid such as
water on the meter lens. Spraying
liquid may cause the system to
malfunction.
. Small dirt particles can be abrasive
and damaging to the leather sur-
faces and should be removed
promptly. Do not use saddle soap,
car waxes, polishes, oils, cleaning
fluids, solvents, detergents or am-
monia-based cleaners as they may
damage the leather’s natural finish.
. Never use fabric protectors unless
recommended by the manufacturer.
. Do not use glass or plastic cleaner
on meter or gauge lens covers. It
CLEANING INTERIOR