key NISSAN ROGUE 2010 Owner´s Manual
[x] Cancel search | Manufacturer: NISSAN, Model Year: 2010, Model line: ROGUE, Model: NISSAN ROGUE 2010Pages: 328, PDF Size: 2.84 MB
Page 94 of 328
Black plate (90,1)
Model "S35-D" EDITED: 2009/ 9/ 4
service as soon as possible. Please bring
all registered keys that you have when
visiting a NISSAN dealer for service.
WARNING
In freezing temperatures the washer
solution may freeze on the windshield
and obscure your vision which may lead
to an accident. Warm windshield with
the defroster before you wash the
windshield.
CAUTION
.Do not operate the washer continu-
ously for more than 30 seconds.
. Do not operate the washer if the
reservoir tank is empty.
. Do not fill the window washer
reservoir tank with washer fluid
concentrates at full strength. Some
methyl alcohol based washer fluid
concentrates may permanently stain
the grille if spilled while filling the
window washer reservoir tank.
. Pre-mix washer fluid concentrates
with water to the manufacturer’s
recommended levels before pouring
the fluid into the window washer
reservoir tank. Do not use the
window washer reservoir tank to mix the washer fluid concentrate
and water.
If the windshield wiper operation is inter-
rupted by snow or ice, the wiper may stop
moving to protect its motor. If this occurs,
turn the wiper switch to the OFF position
and remove the snow or ice that is on and
around the wiper arms. In approximately 1
minute, turn the switch on again to operate
the wiper.WINDSHIELD WIPER AND WASHER
SWITCH
2-22
Instruments and controls
Page 117 of 328
Black plate (113,1)
Model "S35-D" EDITED: 2009/ 9/ 4
SIC3511
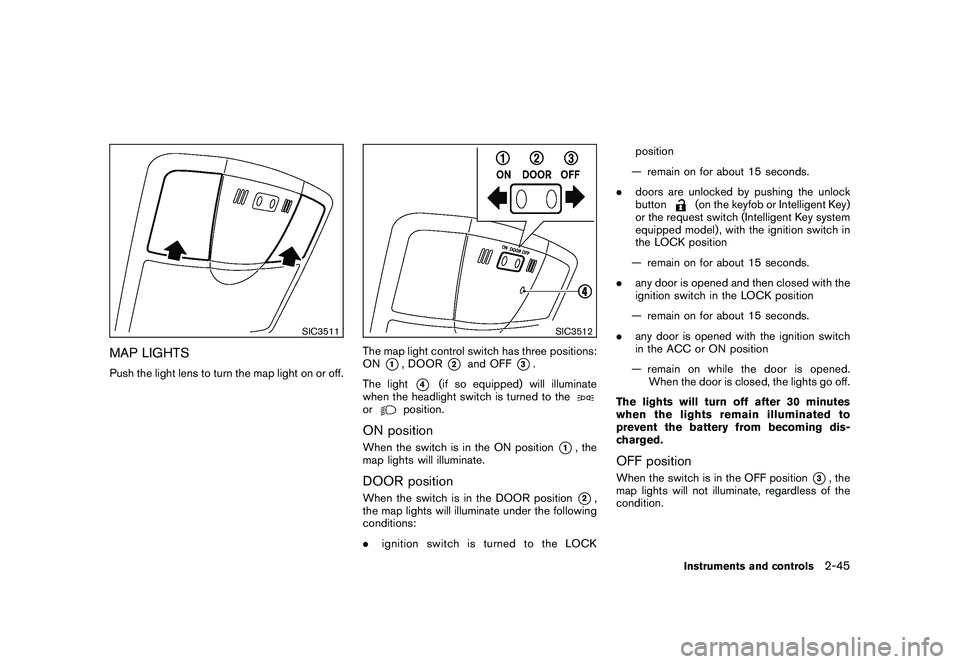
MAP LIGHTSPush the light lens to turn the map light on or off.
SIC3512
The map light control switch has three positions:
ON
*1, DOOR
*2
and OFF
*3.
The light
*4
(if so equipped) will illuminate
when the headlight switch is turned to the
or
position.
ON positionWhen the switch is in the ON position
*1, the
map lights will illuminate.
DOOR positionWhen the switch is in the DOOR position
*2,
the map lights will illuminate under the following
conditions:
. ignition switch is turned to the LOCK position
— remain on for about 15 seconds.
. doors are unlocked by pushing the unlock
button
(on the keyfob or Intelligent Key)
or the request switch (Intelligent Key system
equipped model) , with the ignition switch in
the LOCK position
— remain on for about 15 seconds.
. any door is opened and then closed with the
ignition switch in the LOCK position
— remain on for about 15 seconds.
. any door is opened with the ignition switch
in the ACC or ON position
— remain on while the door is opened. When the door is closed, the lights go off.
The lights will turn off after 30 minutes
when the lights remain illuminated to
prevent the battery from becoming dis-
charged.
OFF positionWhen the switch is in the OFF position
*3, the
map lights will not illuminate, regardless of the
condition.
Instruments and controls
2-45
Page 118 of 328
Black plate (114,1)
Model "S35-D" EDITED: 2009/ 9/ 4
SIC3513
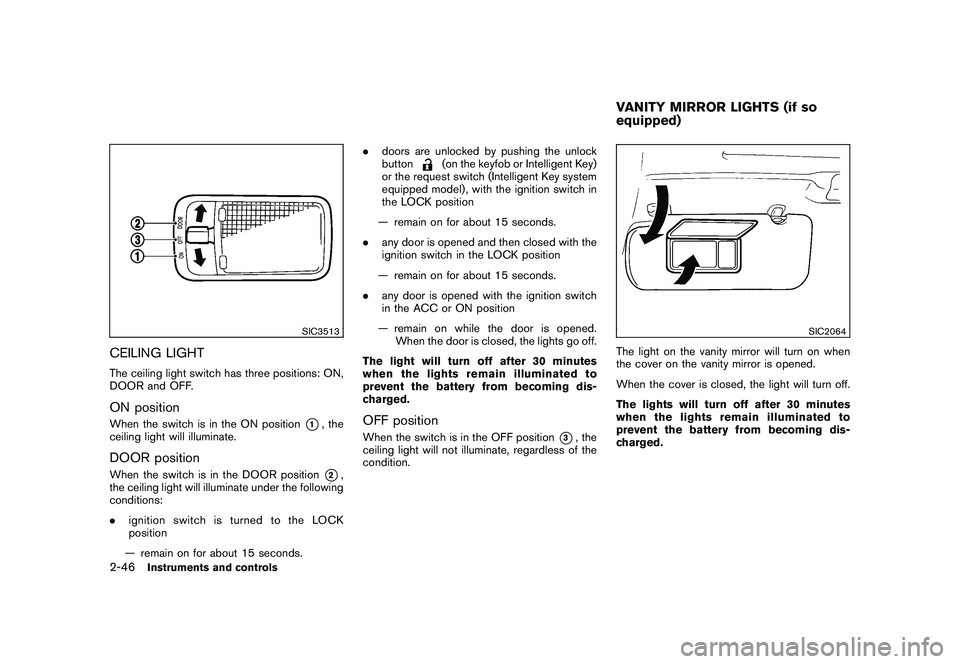
CEILING LIGHTThe ceiling light switch has three positions: ON,
DOOR and OFF.ON positionWhen the switch is in the ON position
*1, the
ceiling light will illuminate.
DOOR positionWhen the switch is in the DOOR position
*2,
the ceiling light will illuminate under the following
conditions:
. ignition switch is turned to the LOCK
position
— remain on for about 15 seconds. .
doors are unlocked by pushing the unlock
button
(on the keyfob or Intelligent Key)
or the request switch (Intelligent Key system
equipped model) , with the ignition switch in
the LOCK position
— remain on for about 15 seconds.
. any door is opened and then closed with the
ignition switch in the LOCK position
— remain on for about 15 seconds.
. any door is opened with the ignition switch
in the ACC or ON position
— remain on while the door is opened. When the door is closed, the lights go off.
The light will turn off after 30 minutes
when the lights remain illuminated to
prevent the battery from becoming dis-
charged.
OFF positionWhen the switch is in the OFF position
*3, the
ceiling light will not illuminate, regardless of the
condition.
SIC2064
The light on the vanity mirror will turn on when
the cover on the vanity mirror is opened.
When the cover is closed, the light will turn off.
The lights will turn off after 30 minutes
when the lights remain illuminated to
prevent the battery from becoming dis-
charged.VANITY MIRROR LIGHTS (if so
equipped)
2-46
Instruments and controls
Page 123 of 328
Black plate (10,1)
3 Pre-driving checks and adjustments
Model "S35-D" EDITED: 2009/ 9/ 4
Keys ............................................................... 3-2NISSAN Vehicle Immobilizer System keys ............ 3-2
Intelligent Keys (if so equipped) ......................... 3-3
Doors .............................................................. 3-4
Locking with key ............................................ 3-4
Locking with inside lock knob ........................... 3-4
Locking with power door lock switch .................. 3-5
Automatic door locks ...................................... 3-5
Child safety rear door lock ............................... 3-6
Remote keyless entry system (if so equipped) ........... 3-6
How to use remote keyless entry system ............. 3-7
Intelligent Key system (if so equipped) .................. 3-10
Intelligent Key operating range ........................ 3-12
Door locks/unlocks precaution ........................ 3-12
Intelligent Key operation ................................. 3-13
Warning lights and audible reminders ............... 3-15Troubleshooting guide
................................... 3-16
How to use remote keyless entry function .......... 3-18
Hood ............................................................ 3-22
Lift gate ......................................................... 3-23
Lift gate release ........................................... 3-24
Bumpers and exhaust pipes (Kro ¯
m models) ............ 3-24
Fuel-filler door ................................................. 3-25
Opening the fuel-filler door ............................. 3-25
Fuel-filler cap .............................................. 3-25
Steering wheel ................................................ 3-27
Tilt operation ............................................... 3-27
Sun visors ...................................................... 3-27
Mirrors ........................................................... 3-28
Inside mirror ................................................ 3-28
Outside mirrors ............................................ 3-30
Page 124 of 328
Black plate (122,1)
Model "S35-D" EDITED: 2009/ 9/ 4
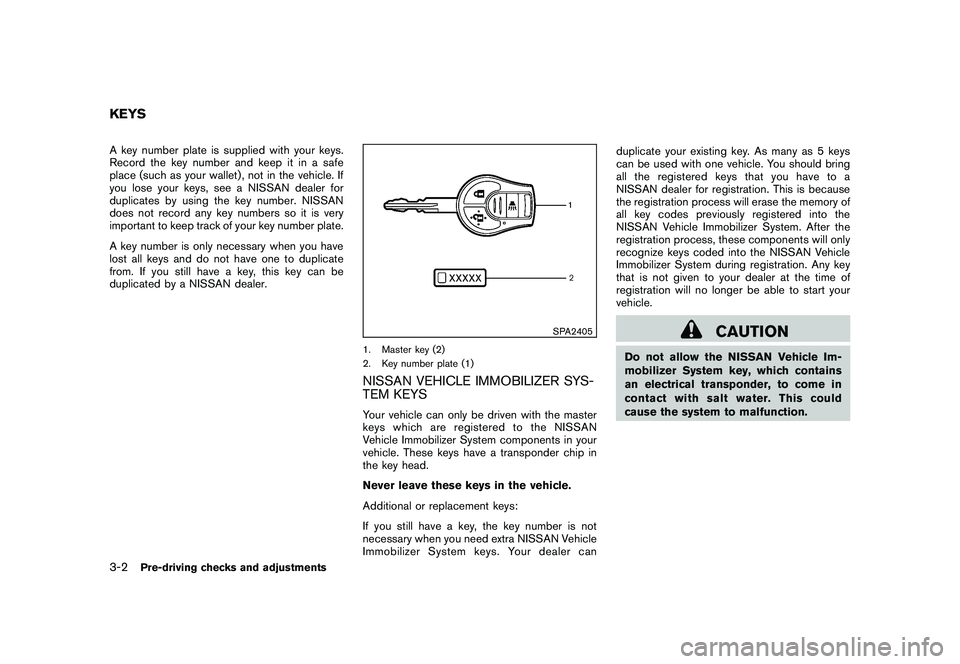
A key number plate is supplied with your keys.
Record the key number and keep it in a safe
place (such as your wallet) , not in the vehicle. If
you lose your keys, see a NISSAN dealer for
duplicates by using the key number. NISSAN
does not record any key numbers so it is very
important to keep track of your key number plate.
A key number is only necessary when you have
lost all keys and do not have one to duplicate
from. If you still have a key, this key can be
duplicated by a NISSAN dealer.
SPA2405
1. Master key (2)
2. Key number plate (1)NISSAN VEHICLE IMMOBILIZER SYS-
TEM KEYSYour vehicle can only be driven with the master
keys which are registered to the NISSAN
Vehicle Immobilizer System components in your
vehicle. These keys have a transponder chip in
the key head.
Never leave these keys in the vehicle.
Additional or replacement keys:
If you still have a key, the key number is not
necessary when you need extra NISSAN Vehicle
Immobilizer System keys. Your dealer canduplicate your existing key. As many as 5 keys
can be used with one vehicle. You should bring
all the registered keys that you have to a
NISSAN dealer for registration. This is because
the registration process will erase the memory of
all key codes previously registered into the
NISSAN Vehicle Immobilizer System. After the
registration process, these components will only
recognize keys coded into the NISSAN Vehicle
Immobilizer System during registration. Any key
that is not given to your dealer at the time of
registration will no longer be able to start your
vehicle.
CAUTION
Do not allow the NISSAN Vehicle Im-
mobilizer System key, which contains
an electrical transponder, to come in
contactwithsaltwater.Thiscould
cause the system to malfunction.
KEYS3-2
Pre-driving checks and adjustments
Page 125 of 328
Black plate (123,1)
Model "S35-D" EDITED: 2009/ 9/ 4
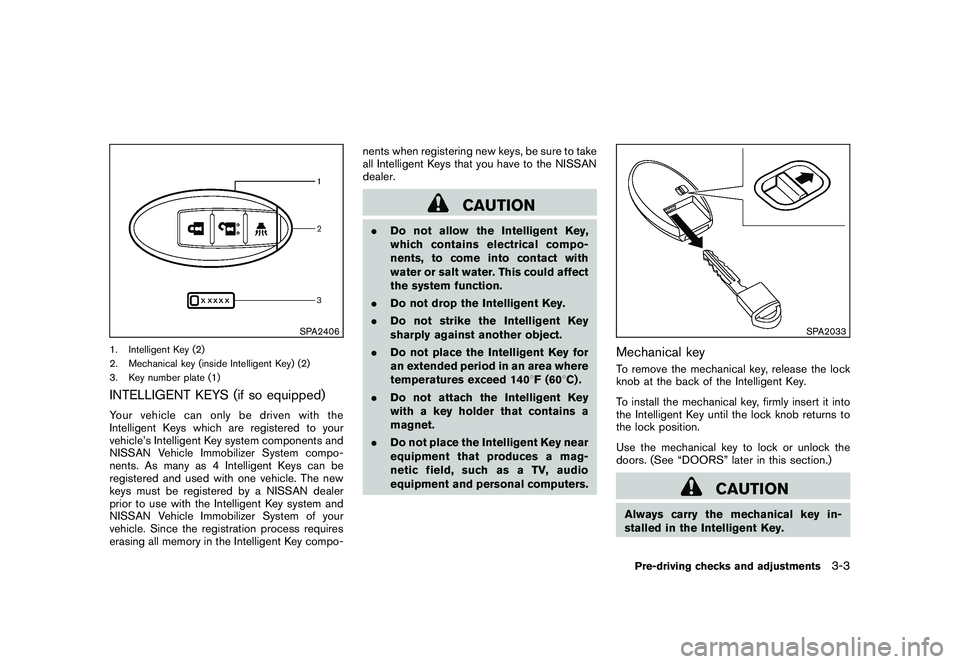
SPA2406
1. Intelligent Key (2)
2. Mechanical key (inside Intelligent Key) (2)
3. Key number plate (1)INTELLIGENT KEYS (if so equipped)Your vehicle can only be driven with the
Intelligent Keys which are registered to your
vehicle’s Intelligent Key system components and
NISSAN Vehicle Immobilizer System compo-
nents. As many as 4 Intelligent Keys can be
registered and used with one vehicle. The new
keys must be registered by a NISSAN dealer
prior to use with the Intelligent Key system and
NISSAN Vehicle Immobilizer System of your
vehicle. Since the registration process requires
erasing all memory in the Intelligent Key compo-nents when registering new keys, be sure to take
all Intelligent Keys that you have to the NISSAN
dealer.
CAUTION
.
Do not allow the Intelligent Key,
which contains electrical compo-
nents, to come into contact with
water or salt water. This could affect
the system function.
. Do not drop the Intelligent Key.
. Do not strike the Intelligent Key
sharply against another object.
. Do not place the Intelligent Key for
an extended period in an area where
temperatures exceed 140 8F (60 8C) .
. Do not attach the Intelligent Key
with a key holder that contains a
magnet.
. Do not place the Intelligent Key near
equipment that produces a mag-
netic field, such as a TV, audio
equipment and personal computers.
SPA2033
Mechanical keyTo remove the mechanical key, release the lock
knob at the back of the Intelligent Key.
To install the mechanical key, firmly insert it into
the Intelligent Key until the lock knob returns to
the lock position.
Use the mechanical key to lock or unlock the
doors. (See “DOORS” later in this section.)
CAUTION
Always carry the mechanical key in-
stalled in the Intelligent Key.Pre-driving checks and adjustments
3-3
Page 126 of 328
Black plate (124,1)
Model "S35-D" EDITED: 2009/ 9/ 4
WARNING
.Always have the doors locked while
driving. Along with the use of seat
belts, this provides greater safety in
the event of an accident by helping
to prevent persons from being
thrown from the vehicle. This also
helps keep children and others from
unintentionally opening the doors,
and will help keep out intruders.
. Before opening any door, always
look for and avoid oncoming traffic.
. Do not leave children unattended
inside the vehicle. They could un-
knowingly activate switches or con-
trols. Unattended children could
become involved in serious acci-
dents.
SPA2394
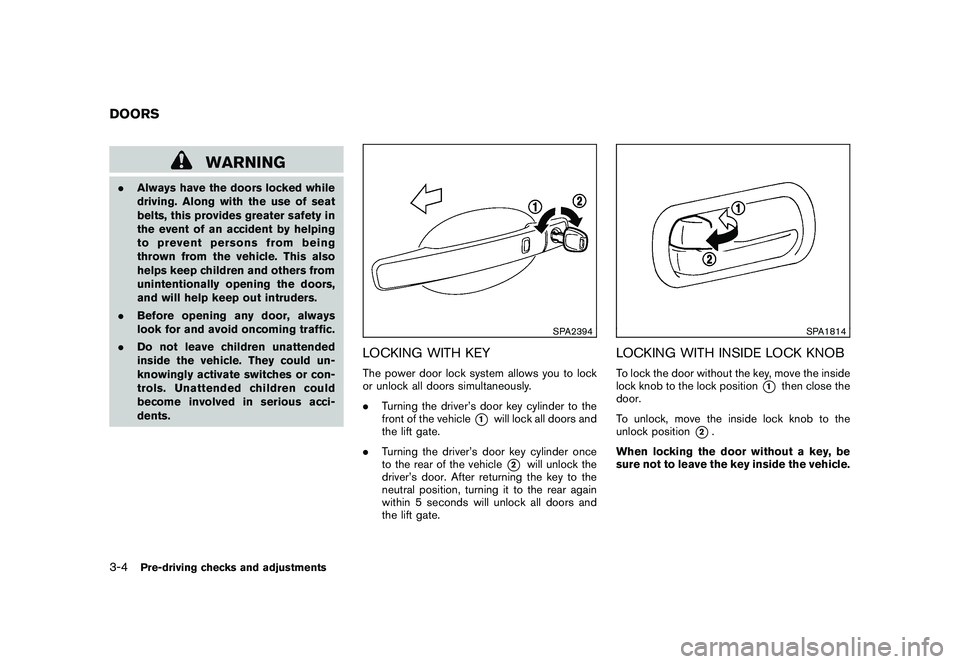
LOCKING WITH KEYThe power door lock system allows you to lock
or unlock all doors simultaneously.
.Turning the driver’s door key cylinder to the
front of the vehicle
*1
will lock all doors and
the lift gate.
. Turning the driver’s door key cylinder once
to the rear of the vehicle*2
will unlock the
driver’s door. After returning the key to the
neutral position, turning it to the rear again
within 5 seconds will unlock all doors and
the lift gate.
SPA1814
LOCKING WITH INSIDE LOCK KNOBTo lock the door without the key, move the inside
lock knob to the lock position
*1
then close the
door.
To unlock, move the inside lock knob to the
unlock position
*2.
When locking the door without a key, be
sure not to leave the key inside the vehicle.
DOORS3-4
Pre-driving checks and adjustments
Page 127 of 328
Black plate (125,1)
Model "S35-D" EDITED: 2009/ 9/ 4
SPA2300
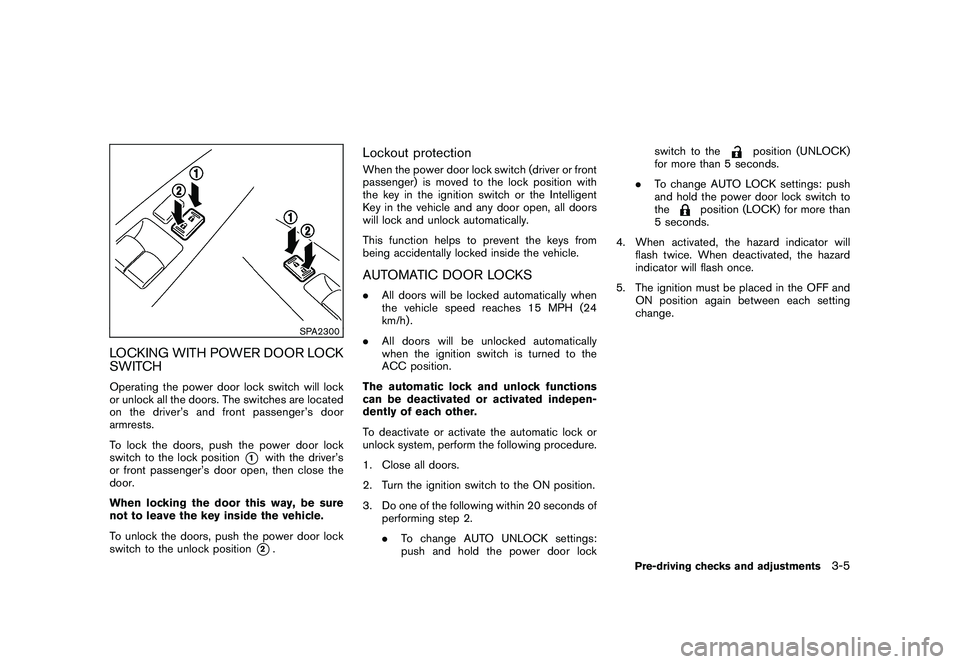
LOCKING WITH POWER DOOR LOCK
SWITCHOperating the power door lock switch will lock
or unlock all the doors. The switches are located
on the driver’s and front passenger’s door
armrests.
To lock the doors, push the power door lock
switch to the lock position
*1
with the driver’s
or front passenger’s door open, then close the
door.
When locking the door this way, be sure
not to leave the key inside the vehicle.
To unlock the doors, push the power door lock
switch to the unlock position*2.
Lockout protectionWhen the power door lock switch (driver or front
passenger) is moved to the lock position with
the key in the ignition switch or the Intelligent
Key in the vehicle and any door open, all doors
will lock and unlock automatically.
This function helps to prevent the keys from
being accidentally locked inside the vehicle.AUTOMATIC DOOR LOCKS. All doors will be locked automatically when
the vehicle speed reaches 15 MPH (24
km/h) .
. All doors will be unlocked automatically
when the ignition switch is turned to the
ACC position.
The automatic lock and unlock functions
can be deactivated or activated indepen-
dently of each other.
To deactivate or activate the automatic lock or
unlock system, perform the following procedure.
1. Close all doors.
2. Turn the ignition switch to the ON position.
3. Do one of the following within 20 seconds of performing step 2.
.To change AUTO UNLOCK settings:
push and hold the power door lock switch to the
position (UNLOCK)
for more than 5 seconds.
. To change AUTO LOCK settings: push
and hold the power door lock switch to
the
position (LOCK) for more than
5 seconds.
4. When activated, the hazard indicator will flash twice. When deactivated, the hazard
indicator will flash once.
5. The ignition must be placed in the OFF and ON position again between each setting
change.
Pre-driving checks and adjustments
3-5
Page 128 of 328
Black plate (126,1)
Model "S35-D" EDITED: 2009/ 9/ 4
SPA2037
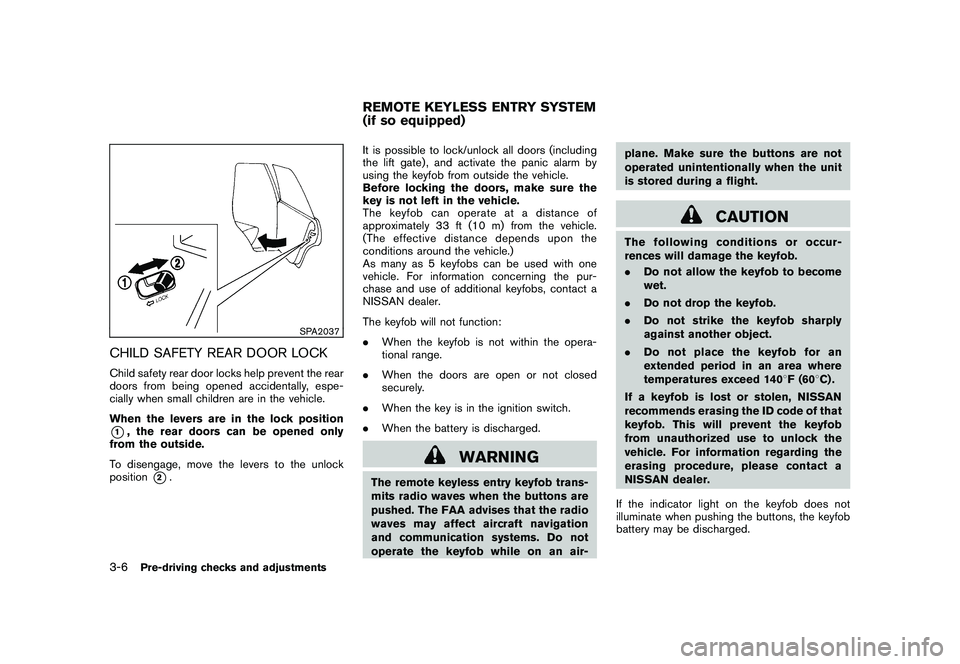
CHILD SAFETY REAR DOOR LOCKChild safety rear door locks help prevent the rear
doors from being opened accidentally, espe-
cially when small children are in the vehicle.
When the levers are in the lock position*1, the rear doors can be opened only
from the outside.
To disengage, move the levers to the unlock
position
*2. It is possible to lock/unlock all doors (including
the lift gate) , and activate the panic alarm by
using the keyfob from outside the vehicle.
Before locking the doors, make sure the
key is not left in the vehicle.
The keyfob can operate at a distance of
approximately 33 ft (10 m) from the vehicle.
(The effective distance depends upon the
conditions around the vehicle.)
As many as 5 keyfobs can be used with one
vehicle. For information concerning the pur-
chase and use of additional keyfobs, contact a
NISSAN dealer.
The keyfob will not function:
.
When the keyfob is not within the opera-
tional range.
. When the doors are open or not closed
securely.
. When the key is in the ignition switch.
. When the battery is discharged.
WARNING
The remote keyless entry keyfob trans-
mits radio waves when the buttons are
pushed. The FAA advises that the radio
waves may affect aircraft navigation
and communication systems. Do not
operate the keyfob while on an air- plane. Make sure the buttons are not
operated unintentionally when the unit
is stored during a flight.
CAUTION
The following conditions or occur-
rences will damage the keyfob.
.
Do not allow the keyfob to become
wet.
. Do not drop the keyfob.
. Do not strike the keyfob sharply
against another object.
. Do not place the keyfob for an
extended period in an area where
temperatures exceed 140 8F (60 8C) .
If a keyfob is lost or stolen, NISSAN
recommends erasing the ID code of that
keyfob. This will prevent the keyfob
from unauthorized use to unlock the
vehicle. For information regarding the
erasing procedure, please contact a
NISSAN dealer.
If the indicator light on the keyfob does not
illuminate when pushing the buttons, the keyfob
battery may be discharged.
REMOTE KEYLESS ENTRY SYSTEM
(if so equipped)
3-6
Pre-driving checks and adjustments
Page 129 of 328
Black plate (127,1)
Model "S35-D" EDITED: 2009/ 9/ 4
For information regarding the replacement of a
battery, see “BATTERY REPLACEMENT” in the
“8. Maintenance and do-it-yourself” section.
SPA2416
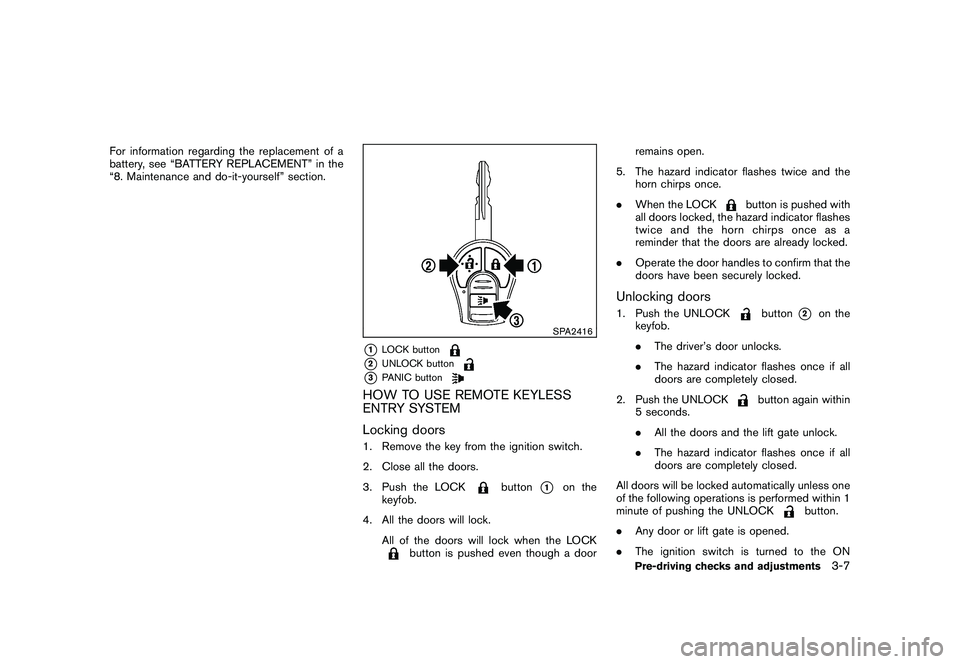
*1
LOCK button
*2
UNLOCK button
*3
PANIC button
HOW TO USE REMOTE KEYLESS
ENTRY SYSTEM
Locking doors1. Remove the key from the ignition switch.
2. Close all the doors.
3. Push the LOCK
button
*1
on the
keyfob.
4. All the doors will lock. All of the doors will lock when the LOCK
button is pushed even though a door remains open.
5. The hazard indicator flashes twice and the horn chirps once.
. When the LOCK
button is pushed with
all doors locked, the hazard indicator flashes
twice and the horn chirps once as a
reminder that the doors are already locked.
. Operate the door handles to confirm that the
doors have been securely locked.
Unlocking doors1. Push the UNLOCK
button
*2
on the
keyfob.
. The driver’s door unlocks.
. The hazard indicator flashes once if all
doors are completely closed.
2. Push the UNLOCK
button again within
5 seconds.
. All the doors and the lift gate unlock.
. The hazard indicator flashes once if all
doors are completely closed.
All doors will be locked automatically unless one
of the following operations is performed within 1
minute of pushing the UNLOCK
button.
. Any door or lift gate is opened.
. The ignition switch is turned to the ON
Pre-driving checks and adjustments
3-7