clock NISSAN ROGUE 2010 Owner´s Manual
[x] Cancel search | Manufacturer: NISSAN, Model Year: 2010, Model line: ROGUE, Model: NISSAN ROGUE 2010Pages: 328, PDF Size: 2.84 MB
Page 13 of 328
Black plate (9,1)
Model "S35-D" EDITED: 2009/ 9/ 4
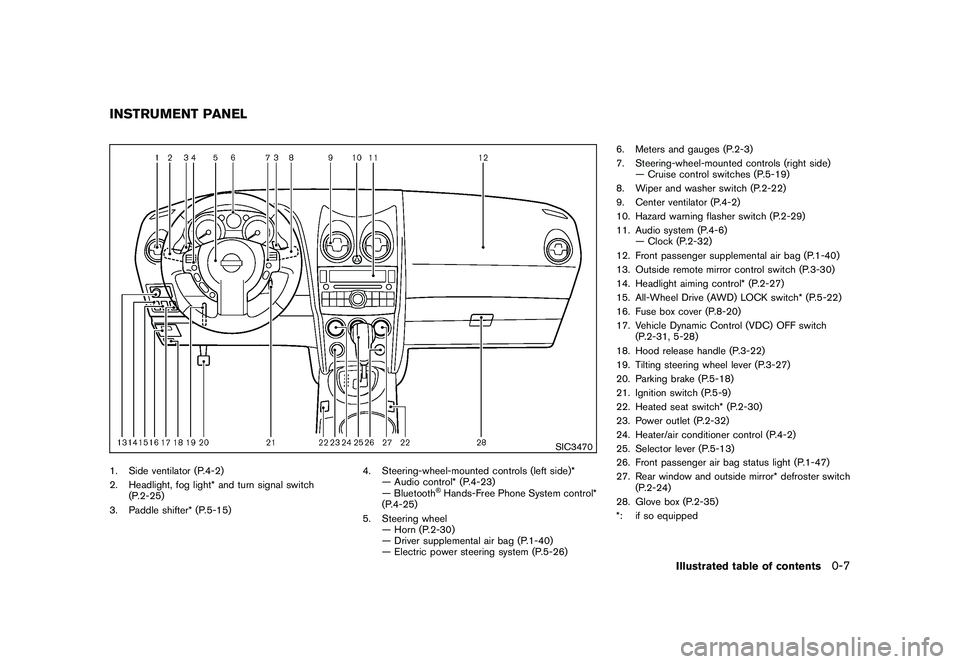
SIC3470
1. Side ventilator (P.4-2)
2. Headlight, fog light* and turn signal switch(P.2-25)
3. Paddle shifter* (P.5-15) 4. Steering-wheel-mounted controls (left side)*
— Audio control* (P.4-23)
— Bluetooth
®Hands-Free Phone System control*
(P.4-25)
5. Steering wheel — Horn (P.2-30)
— Driver supplemental air bag (P.1-40)
— Electric power steering system (P.5-26) 6. Meters and gauges (P.2-3)
7. Steering-wheel-mounted controls (right side)
— Cruise control switches (P.5-19)
8. Wiper and washer switch (P.2-22)
9. Center ventilator (P.4-2)
10. Hazard warning flasher switch (P.2-29)
11. Audio system (P.4-6) — Clock (P.2-32)
12. Front passenger supplemental air bag (P.1-40)
13. Outside remote mirror control switch (P.3-30)
14. Headlight aiming control* (P.2-27)
15. All-Wheel Drive (AWD) LOCK switch* (P.5-22)
16. Fuse box cover (P.8-20)
17. Vehicle Dynamic Control (VDC) OFF switch (P.2-31, 5-28)
18. Hood release handle (P.3-22)
19. Tilting steering wheel lever (P.3-27)
20. Parking brake (P.5-18)
21. Ignition switch (P.5-9)
22. Heated seat switch* (P.2-30)
23. Power outlet (P.2-32)
24. Heater/air conditioner control (P.4-2)
25. Selector lever (P.5-13)
26. Front passenger air bag status light (P.1-47)
27. Rear window and outside mirror* defroster switch (P.2-24)
28. Glove box (P.2-35)
*: if so equipped
INSTRUMENT PANEL
Illustrated table of contents
0-7
Page 72 of 328
Black plate (7,1)
2 Instruments and controls
Model "S35-D" EDITED: 2009/ 9/ 4
Instrument panel................................................ 2-2
Meters and gauges ............................................. 2-3
Speedometer and odometer ............................. 2-4
Tachometer ................................................... 2-5
Engine coolant temperature gauge ..................... 2-5
Fuel gauge ................................................... 2-6
Vehicle information display ................................ 2-6
Outside air temperature (if so equipped) .............. 2-6
Continuously Variable Transmission (CVT)
position indicator ............................................ 2-7
Trip computer (if so equipped) .......................... 2-7
Compass (if so equipped) .................................... 2-8
Zone variation change procedure ....................... 2-9
Warning/indicator lights and audible reminders ....... 2-11
Checking bulbs ........................................... 2-11
Warning lights ............................................. 2-12
Indicator lights ............................................. 2-16
Audible reminders ........................................ 2-18
Security systems .............................................. 2-19
Vehicle security system .................................. 2-19
NISSAN Vehicle Immobilizer System ................. 2-20
Windshield wiper and washer switch .................... 2-22
Rear window wiper and washer switch .................. 2-23
Rear window and outside mirror defroster switch ..... 2-24
Headlight and turn signal switch .......................... 2-25
Xenon headlights (if so equipped) .................... 2-25Headlight switch
.......................................... 2-26
Turn signal switch ........................................ 2-28
Fog light switch (if so equipped) ...................... 2-29
Hazard warning flasher switch ............................. 2-29
Horn ............................................................. 2-30
Heated seats (if so equipped) ............................. 2-30
Vehicle Dynamic Control (VDC) OFF switch ........... 2-31
Clock ............................................................ 2-32
Adjusting the time ........................................ 2-32
Power outlet ................................................... 2-32
Storage ......................................................... 2-33
Cup holders ................................................ 2-33
Sunglasses holder ........................................ 2-34
Glove box .................................................. 2-35
Console box ............................................... 2-36
Luggage floor box (if so equipped) ................... 2-36
Luggage side box ......................................... 2-37
Cargo cover (if so equipped) .......................... 2-37
Luggage hooks (if so equipped) ...................... 2-38
Coat hooks (if so equipped) ........................... 2-39
Utility hook ................................................. 2-39
Roof rack (if so equipped) .............................. 2-39
Windows ....................................................... 2-40
Power windows ........................................... 2-40
Moonroof (if so equipped) .................................. 2-43
Automatic moonroof ...................................... 2-43
Page 74 of 328
Black plate (70,1)
Model "S35-D" EDITED: 2009/ 9/ 4
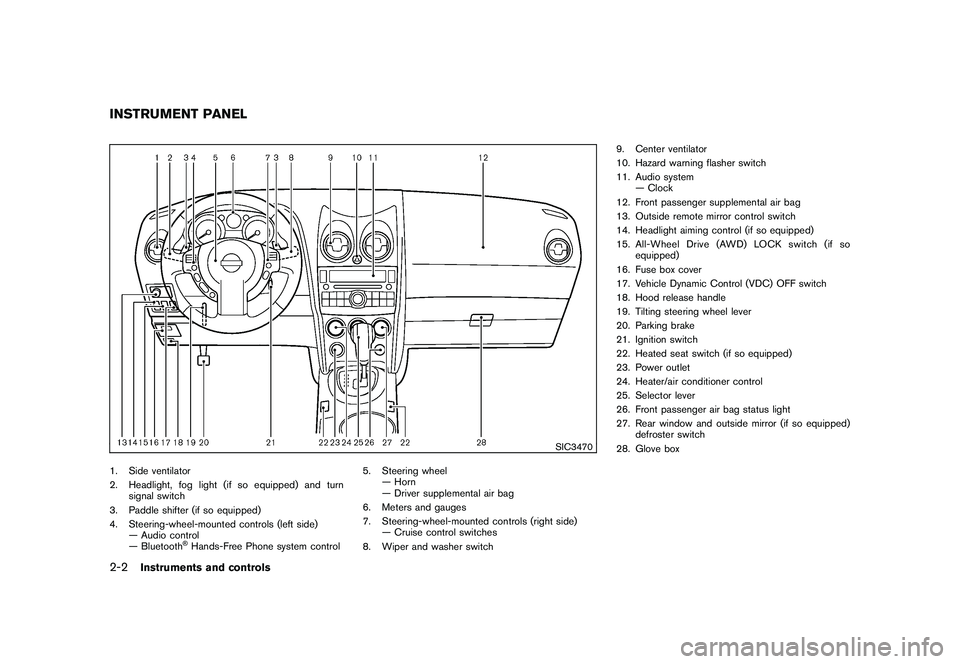
SIC3470
1. Side ventilator
2. Headlight, fog light (if so equipped) and turnsignal switch
3. Paddle shifter (if so equipped)
4. Steering-wheel-mounted controls (left side) — Audio control
— Bluetooth
®Hands-Free Phone system control 5. Steering wheel
— Horn
— Driver supplemental air bag
6. Meters and gauges
7. Steering-wheel-mounted controls (right side) — Cruise control switches
8. Wiper and washer switch 9. Center ventilator
10. Hazard warning flasher switch
11. Audio system
— Clock
12. Front passenger supplemental air bag
13. Outside remote mirror control switch
14. Headlight aiming control (if so equipped)
15. All-Wheel Drive (AWD) LOCK switch (if so equipped)
16. Fuse box cover
17. Vehicle Dynamic Control (VDC) OFF switch
18. Hood release handle
19. Tilting steering wheel lever
20. Parking brake
21. Ignition switch
22. Heated seat switch (if so equipped)
23. Power outlet
24. Heater/air conditioner control
25. Selector lever
26. Front passenger air bag status light
27. Rear window and outside mirror (if so equipped) defroster switch
28. Glove box
INSTRUMENT PANEL2-2
Instruments and controls
Page 96 of 328
Black plate (92,1)
Model "S35-D" EDITED: 2009/ 9/ 4
and water.
If the rear window wiper operation is
interrupted by snow or ice, the wiper may
stop moving to protect its motor. If this
occurs, turn the wiper switch to the OFF
position and remove the snow or ice that is
on and around the wiper arms. In approxi-
mately 1 minute, turn the switch on again
to operate the wiper.
SIC3480
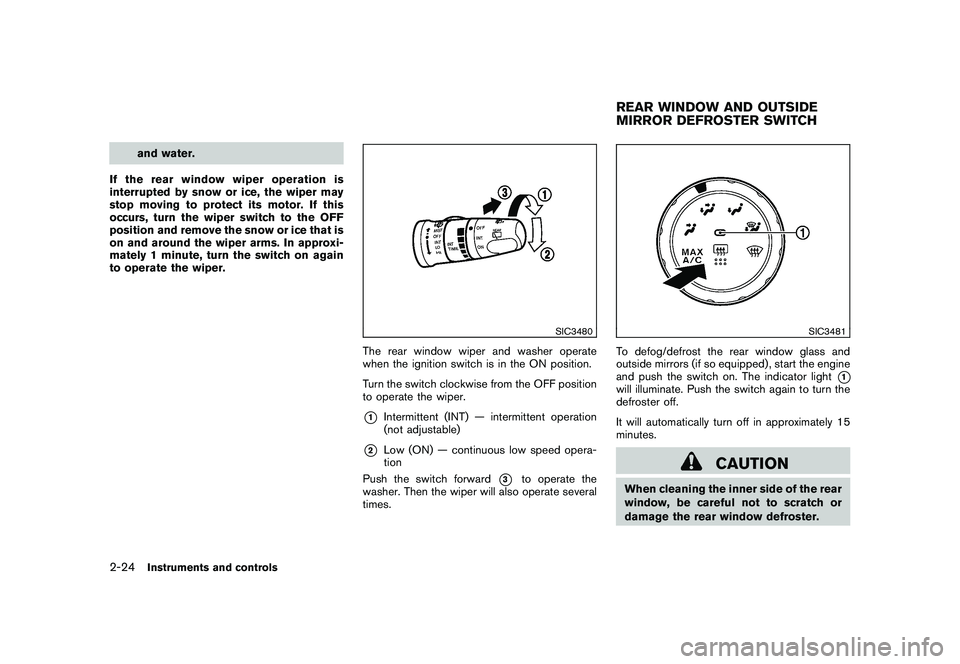
The rear window wiper and washer operate
when the ignition switch is in the ON position.
Turn the switch clockwise from the OFF position
to operate the wiper.*1
Intermittent (INT) — intermittent operation
(not adjustable)
*2
Low (ON) — continuous low speed opera-
tion
Push the switch forward
*3
to operate the
washer. Then the wiper will also operate several
times.
SIC3481
To defog/defrost the rear window glass and
outside mirrors (if so equipped) , start the engine
and push the switch on. The indicator light
*1
will illuminate. Push the switch again to turn the
defroster off.
It will automatically turn off in approximately 15
minutes.
CAUTION
When cleaning the inner side of the rear
window, be careful not to scratch or
damage the rear window defroster.REAR WINDOW AND OUTSIDE
MIRROR DEFROSTER SWITCH
2-24
Instruments and controls
Page 104 of 328
Black plate (100,1)
Model "S35-D" EDITED: 2009/ 9/ 4
SIC3548
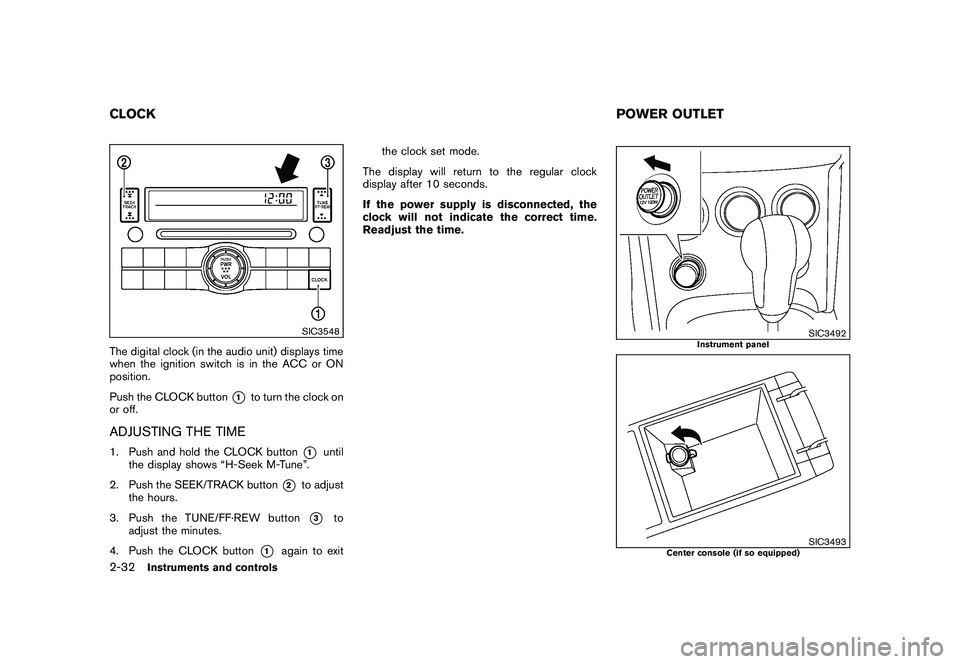
The digital clock (in the audio unit) displays time
when the ignition switch is in the ACC or ON
position.
Push the CLOCK button
*1
to turn the clock on
or off.
ADJUSTING THE TIME1. Push and hold the CLOCK button
*1
until
the display shows “H-Seek M-Tune”.
2. Push the SEEK/TRACK button
*2
to adjust
the hours.
3. Push the TUNE/ FF·REW button*3
to
adjust the minutes.
4. Push the CLOCK button
*1
again to exit the clock set mode.
The display will return to the regular clock
display after 10 seconds.
If the power supply is disconnected, the
clock will not indicate the correct time.
Readjust the time.
SIC3492
Instrument panel
SIC3493
Center console (if so equipped)
CLOCK POWER OUTLET2-32
Instruments and controls
Page 147 of 328
Black plate (145,1)
Model "S35-D" EDITED: 2009/ 9/ 4
SPA2714
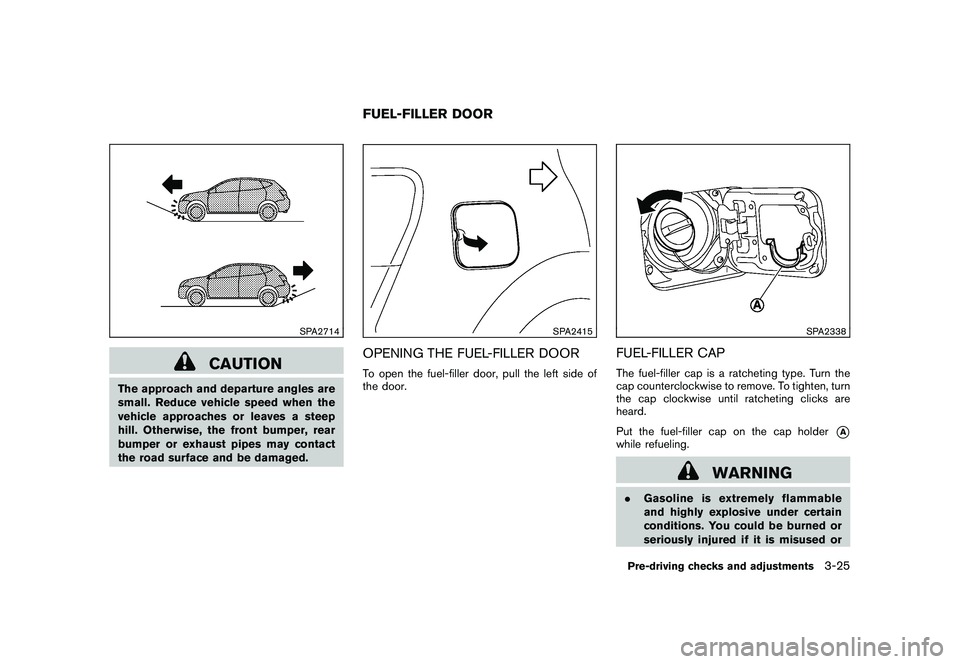
CAUTION
The approach and departure angles are
small. Reduce vehicle speed when the
vehicle approaches or leaves a steep
hill. Otherwise, the front bumper, rear
bumper or exhaust pipes may contact
the road surface and be damaged.
SPA2415
OPENING THE FUEL-FILLER DOORTo open the fuel-filler door, pull the left side of
the door.
SPA2338
FUEL-FILLER CAPThe fuel-filler cap is a ratcheting type. Turn the
cap counterclockwise to remove. To tighten, turn
the cap clockwise until ratcheting clicks are
heard.
Put the fuel-filler cap on the cap holder
*A
while refueling.
WARNING
.Gasoline is extremely flammable
and highly explosive under certain
conditions. You could be burned or
seriously injured if it is misused or
FUEL-FILLER DOOR
Pre-driving checks and adjustments
3-25
Page 155 of 328
Black plate (155,1)
Model "S35-D" EDITED: 2009/ 9/ 4
SAA1776
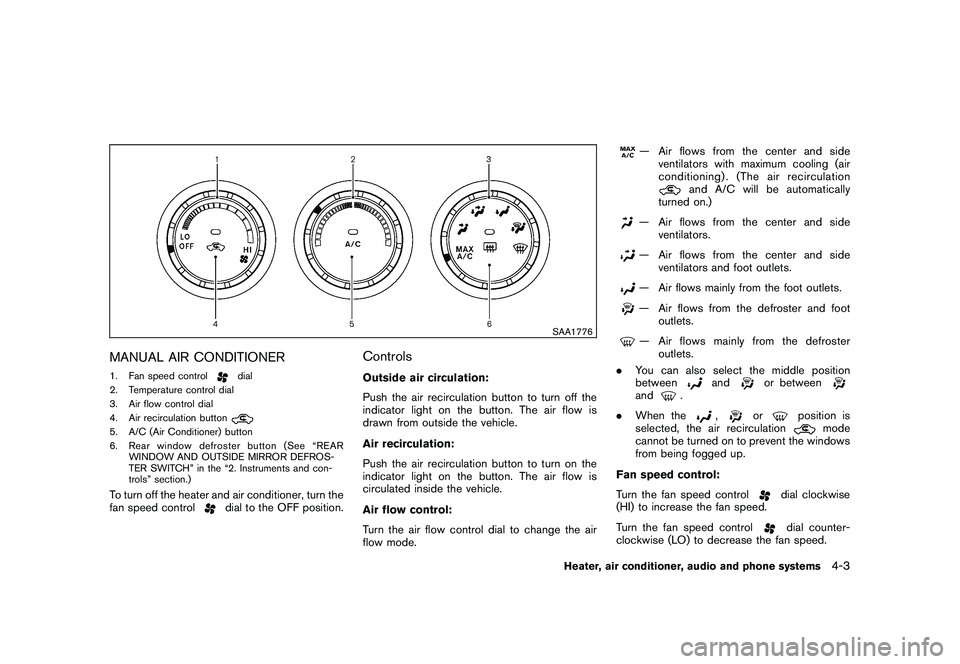
MANUAL AIR CONDITIONER1. Fan speed control
dial
2. Temperature control dial
3. Air flow control dial
4. Air recirculation button
5. A/C (Air Conditioner) button
6. Rear window defroster button (See “REAR WINDOW AND OUTSIDE MIRROR DEFROS-
TER SWITCH” in the “2. Instruments and con-
trols” section.)To turn off the heater and air conditioner, turn the
fan speed control
dial to the OFF position.
ControlsOutside air circulation:
Push the air recirculation button to turn off the
indicator light on the button. The air flow is
drawn from outside the vehicle.
Air recirculation:
Push the air recirculation button to turn on the
indicator light on the button. The air flow is
circulated inside the vehicle.
Air flow control:
Turn the air flow control dial to change the air
flow mode.
— Air flows from the center and side
ventilators with maximum cooling (air
conditioning) . (The air recirculation
and A/C will be automatically
turned on.)
— Air flows from the center and side ventilators.— Air flows from the center and side
ventilators and foot outlets.— Air flows mainly from the foot outlets.— Air flows from the defroster and footoutlets.— Air flows mainly from the defrosteroutlets.
. You can also select the middle position
between
and
or between
and
.
. When the
,
or
position is
selected, the air recirculation
mode
cannot be turned on to prevent the windows
from being fogged up.
Fan speed control:
Turn the fan speed control
dial clockwise
(HI) to increase the fan speed.
Turn the fan speed controldial counter-
clockwise (LO) to decrease the fan speed.
Heater, air conditioner, audio and phone systems
4-3
Page 165 of 328
Black plate (165,1)
Model "S35-D" EDITED: 2009/ 9/ 4
SAA1777
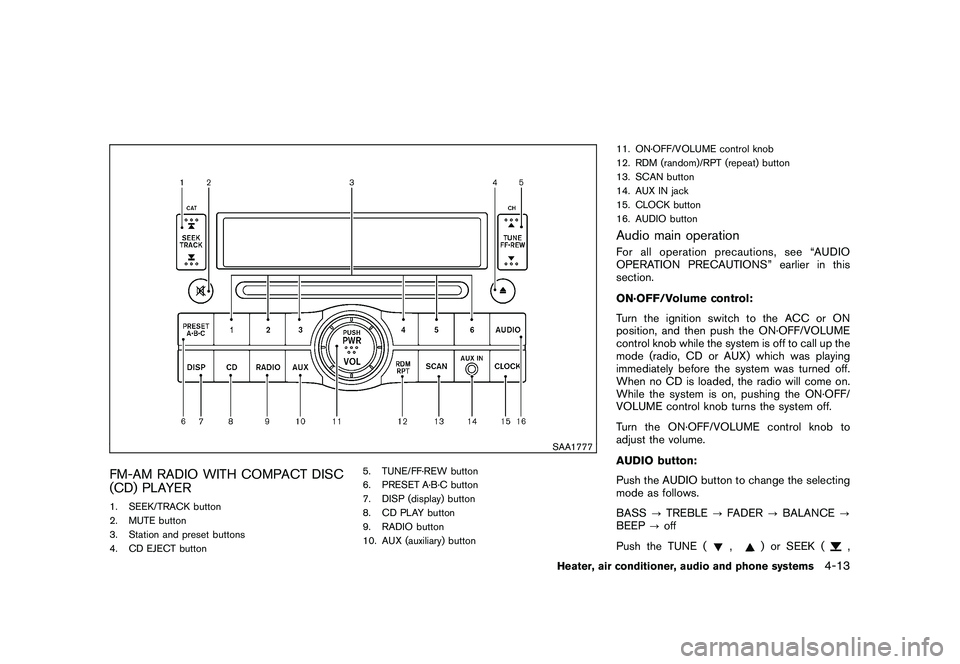
FM-AM RADIO WITH COMPACT DISC
(CD) PLAYER1. SEEK/TRACK button
2. MUTE button
3. Station and preset buttons
4. CD EJECT button5. TUNE/FF·REW button
6. PRESET A·B·C button
7. DISP (display) button
8. CD PLAY button
9. RADIO button
10. AUX (auxiliary) button11. ON·OFF/VOLUME control knob
12. RDM (random)/RPT (repeat) button
13. SCAN button
14. AUX IN jack
15. CLOCK button
16. AUDIO button
Audio main operationFor all operation precautions, see “AUDIO
OPERATION PRECAUTIONS” earlier in this
section.
ON·OFF/Volume control:
Turn the ignition switch to the ACC or ON
position, and then push the ON·OFF/VOLUME
control knob while the system is off to call up the
mode (radio, CD or AUX) which was playing
immediately before the system was turned off.
When no CD is loaded, the radio will come on.
While the system is on, pushing the ON·OFF/
VOLUME control knob turns the system off.
Turn the ON·OFF/VOLUME control knob to
adjust the volume.
AUDIO button:
Push the AUDIO button to change the selecting
mode as follows.
BASS
?TREBLE ?FADER ?BALANCE ?
BEEP ?off
Push the TUNE (
,
) or SEEK (
,
Heater, air conditioner, audio and phone systems
4-13
Page 166 of 328
Black plate (166,1)
Model "S35-D" EDITED: 2009/ 9/ 4
) button to adjust Bass and Treble to the
desired level. Use the TUNE or SEEK button
also to adjust Fader or Balance modes. Fader
adjusts the sound level between the front and
rear speakers and Balance adjusts the sound
between the right and left speakers.
To turn the Beep sound off or on, push the
TUNE button until the desired mode is dis-
played. This turns on or off the beep sound when
audio buttons are pushed.
Once the sound quality is set to the desired
level, push the AUDIO button repeatedly until
the radio or CD display appears. After 10
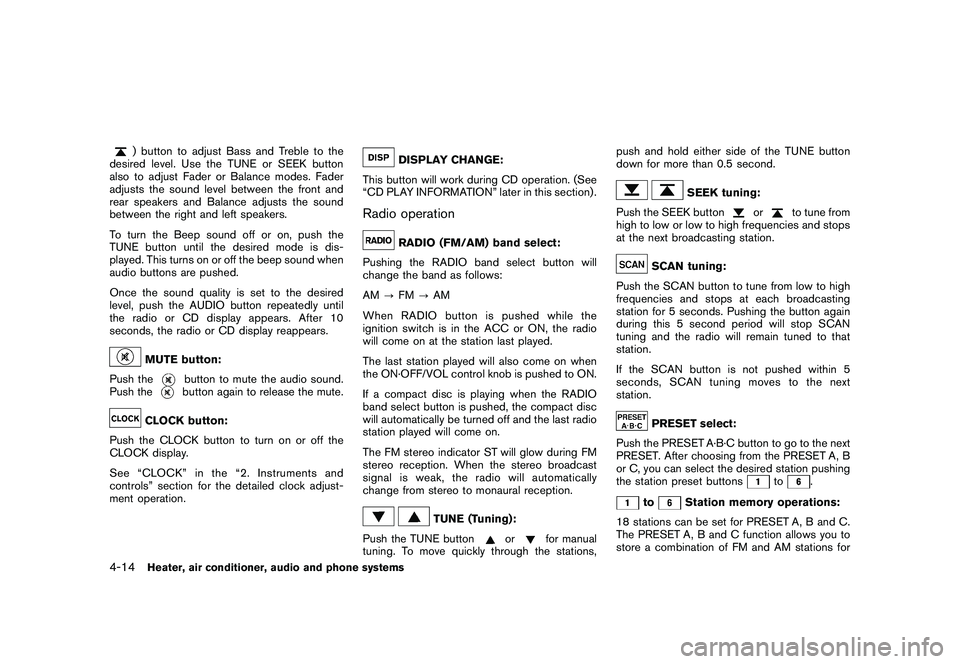
seconds, the radio or CD display reappears.MUTE button:
Push the
button to mute the audio sound.
Push thebutton again to release the mute.
CLOCK button:
Push the CLOCK button to turn on or off the
CLOCK display.
See “CLOCK” in the “2. Instruments and
controls” section for the detailed clock adjust-
ment operation.
DISPLAY CHANGE:
This button will work during CD operation. (See
“CD PLAY INFORMATION” later in this section) .
Radio operation
RADIO (FM/AM) band select:
Pushing the RADIO band select button will
change the band as follows:
AM ?FM ?AM
When RADIO button is pushed while the
ignition switch is in the ACC or ON, the radio
will come on at the station last played.
The last station played will also come on when
the ON·OFF/VOL control knob is pushed to ON.
If a compact disc is playing when the RADIO
band select button is pushed, the compact disc
will automatically be turned off and the last radio
station played will come on.
The FM stereo indicator ST will glow during FM
stereo reception. When the stereo broadcast
signal is weak, the radio will automatically
change from stereo to monaural reception.
TUNE (Tuning):
Push the TUNE button
or
for manual
tuning. To move quickly through the stations, push and hold either side of the TUNE button
down for more than 0.5 second.
SEEK tuning:
Push the SEEK button
or
to tune from
high to low or low to high frequencies and stops
at the next broadcasting station.
SCAN tuning:
Push the SCAN button to tune from low to high
frequencies and stops at each broadcasting
station for 5 seconds. Pushing the button again
during this 5 second period will stop SCAN
tuning and the radio will remain tuned to that
station.
If the SCAN button is not pushed within 5
seconds, SCAN tuning moves to the next
station.PRESET select:
Push the PRESET A·B·C button to go to the next
PRESET. After choosing from the PRESET A, B
or C, you can select the desired station pushing
the station preset buttons
to
.
to
Station memory operations:
18 stations can be set for PRESET A, B and C.
The PRESET A, B and C function allows you to
store a combination of FM and AM stations for
4-14
Heater, air conditioner, audio and phone systems
Page 169 of 328
Black plate (169,1)
Model "S35-D" EDITED: 2009/ 9/ 4
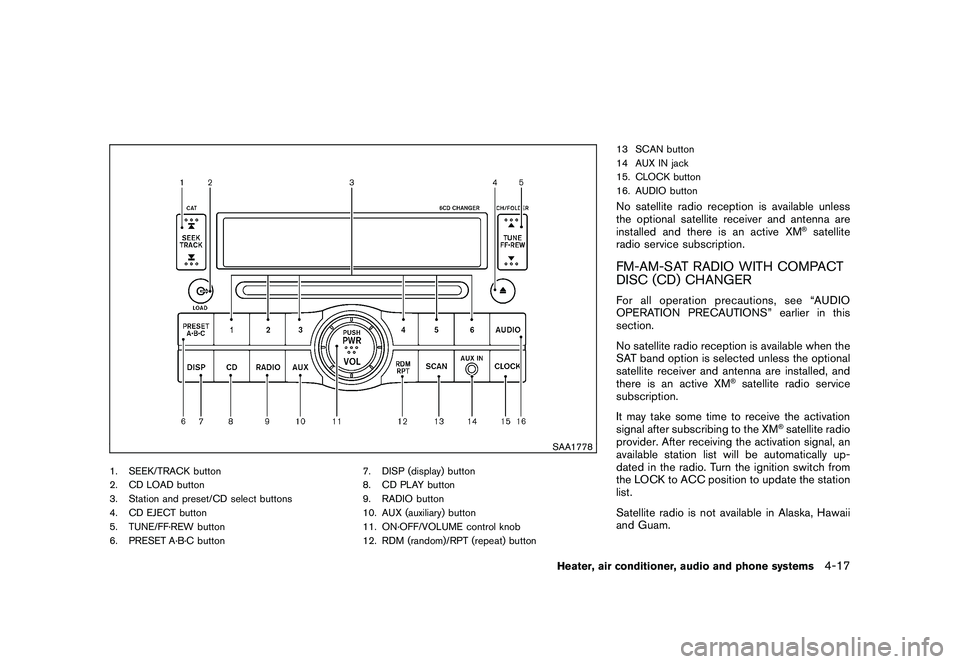
SAA1778
1. SEEK/TRACK button
2. CD LOAD button
3. Station and preset/CD select buttons
4. CD EJECT button
5. TUNE/FF·REW button
6. PRESET A·B·C button7. DISP (display) button
8. CD PLAY button
9. RADIO button
10. AUX (auxiliary) button
11. ON·OFF/VOLUME control knob
12. RDM (random)/RPT (repeat) button13 SCAN button
14 AUX IN jack
15. CLOCK button
16. AUDIO button
No satellite radio reception is available unless
the optional satellite receiver and antenna are
installed and there is an active XM
®satellite
radio service subscription.
FM-AM-SAT RADIO WITH COMPACT
DISC (CD) CHANGERFor all operation precautions, see “AUDIO
OPERATION PRECAUTIONS” earlier in this
section.
No satellite radio reception is available when the
SAT band option is selected unless the optional
satellite receiver and antenna are installed, and
there is an active XM
®satellite radio service
subscription.
It may take some time to receive the activation
signal after subscribing to the XM
®satellite radio
provider. After receiving the activation signal, an
available station list will be automatically up-
dated in the radio. Turn the ignition switch from
the LOCK to ACC position to update the station
list.
Satellite radio is not available in Alaska, Hawaii
and Guam.
Heater, air conditioner, audio and phone systems
4-17