horn NISSAN ROGUE 2010 Owner´s Manual
[x] Cancel search | Manufacturer: NISSAN, Model Year: 2010, Model line: ROGUE, Model: NISSAN ROGUE 2010Pages: 328, PDF Size: 2.84 MB
Page 13 of 328
Black plate (9,1)
Model "S35-D" EDITED: 2009/ 9/ 4
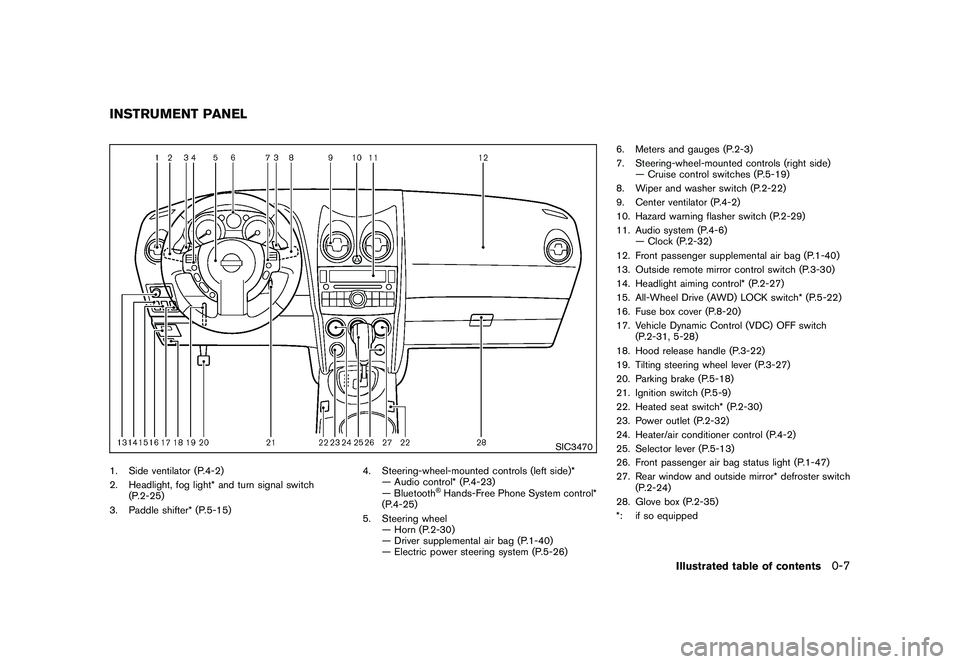
SIC3470
1. Side ventilator (P.4-2)
2. Headlight, fog light* and turn signal switch(P.2-25)
3. Paddle shifter* (P.5-15) 4. Steering-wheel-mounted controls (left side)*
— Audio control* (P.4-23)
— Bluetooth
®Hands-Free Phone System control*
(P.4-25)
5. Steering wheel — Horn (P.2-30)
— Driver supplemental air bag (P.1-40)
— Electric power steering system (P.5-26) 6. Meters and gauges (P.2-3)
7. Steering-wheel-mounted controls (right side)
— Cruise control switches (P.5-19)
8. Wiper and washer switch (P.2-22)
9. Center ventilator (P.4-2)
10. Hazard warning flasher switch (P.2-29)
11. Audio system (P.4-6) — Clock (P.2-32)
12. Front passenger supplemental air bag (P.1-40)
13. Outside remote mirror control switch (P.3-30)
14. Headlight aiming control* (P.2-27)
15. All-Wheel Drive (AWD) LOCK switch* (P.5-22)
16. Fuse box cover (P.8-20)
17. Vehicle Dynamic Control (VDC) OFF switch (P.2-31, 5-28)
18. Hood release handle (P.3-22)
19. Tilting steering wheel lever (P.3-27)
20. Parking brake (P.5-18)
21. Ignition switch (P.5-9)
22. Heated seat switch* (P.2-30)
23. Power outlet (P.2-32)
24. Heater/air conditioner control (P.4-2)
25. Selector lever (P.5-13)
26. Front passenger air bag status light (P.1-47)
27. Rear window and outside mirror* defroster switch (P.2-24)
28. Glove box (P.2-35)
*: if so equipped
INSTRUMENT PANEL
Illustrated table of contents
0-7
Page 72 of 328
Black plate (7,1)
2 Instruments and controls
Model "S35-D" EDITED: 2009/ 9/ 4
Instrument panel................................................ 2-2
Meters and gauges ............................................. 2-3
Speedometer and odometer ............................. 2-4
Tachometer ................................................... 2-5
Engine coolant temperature gauge ..................... 2-5
Fuel gauge ................................................... 2-6
Vehicle information display ................................ 2-6
Outside air temperature (if so equipped) .............. 2-6
Continuously Variable Transmission (CVT)
position indicator ............................................ 2-7
Trip computer (if so equipped) .......................... 2-7
Compass (if so equipped) .................................... 2-8
Zone variation change procedure ....................... 2-9
Warning/indicator lights and audible reminders ....... 2-11
Checking bulbs ........................................... 2-11
Warning lights ............................................. 2-12
Indicator lights ............................................. 2-16
Audible reminders ........................................ 2-18
Security systems .............................................. 2-19
Vehicle security system .................................. 2-19
NISSAN Vehicle Immobilizer System ................. 2-20
Windshield wiper and washer switch .................... 2-22
Rear window wiper and washer switch .................. 2-23
Rear window and outside mirror defroster switch ..... 2-24
Headlight and turn signal switch .......................... 2-25
Xenon headlights (if so equipped) .................... 2-25Headlight switch
.......................................... 2-26
Turn signal switch ........................................ 2-28
Fog light switch (if so equipped) ...................... 2-29
Hazard warning flasher switch ............................. 2-29
Horn ............................................................. 2-30
Heated seats (if so equipped) ............................. 2-30
Vehicle Dynamic Control (VDC) OFF switch ........... 2-31
Clock ............................................................ 2-32
Adjusting the time ........................................ 2-32
Power outlet ................................................... 2-32
Storage ......................................................... 2-33
Cup holders ................................................ 2-33
Sunglasses holder ........................................ 2-34
Glove box .................................................. 2-35
Console box ............................................... 2-36
Luggage floor box (if so equipped) ................... 2-36
Luggage side box ......................................... 2-37
Cargo cover (if so equipped) .......................... 2-37
Luggage hooks (if so equipped) ...................... 2-38
Coat hooks (if so equipped) ........................... 2-39
Utility hook ................................................. 2-39
Roof rack (if so equipped) .............................. 2-39
Windows ....................................................... 2-40
Power windows ........................................... 2-40
Moonroof (if so equipped) .................................. 2-43
Automatic moonroof ...................................... 2-43
Page 74 of 328
Black plate (70,1)
Model "S35-D" EDITED: 2009/ 9/ 4
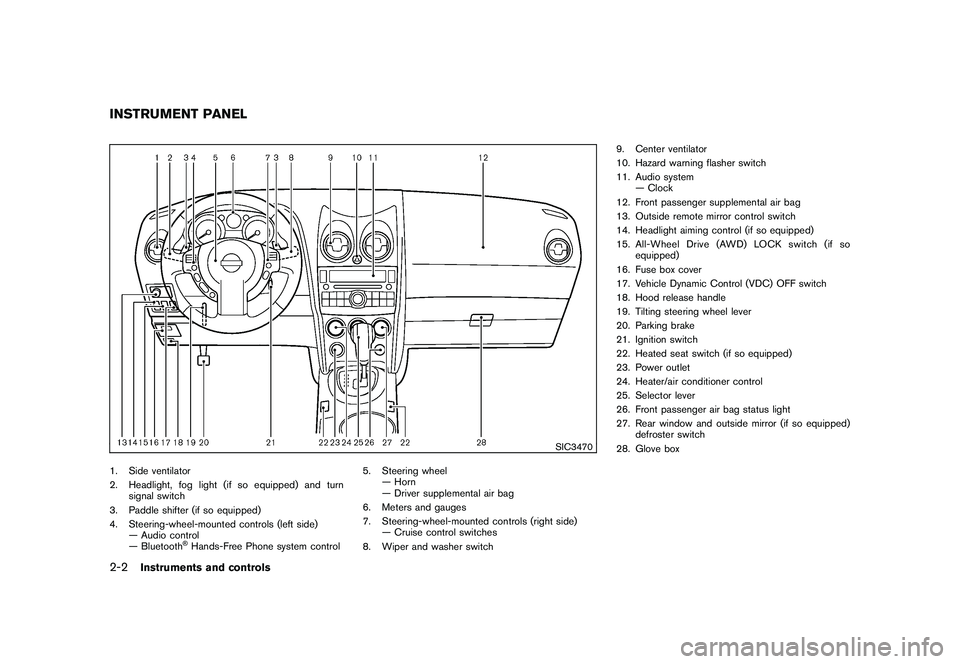
SIC3470
1. Side ventilator
2. Headlight, fog light (if so equipped) and turnsignal switch
3. Paddle shifter (if so equipped)
4. Steering-wheel-mounted controls (left side) — Audio control
— Bluetooth
®Hands-Free Phone system control 5. Steering wheel
— Horn
— Driver supplemental air bag
6. Meters and gauges
7. Steering-wheel-mounted controls (right side) — Cruise control switches
8. Wiper and washer switch 9. Center ventilator
10. Hazard warning flasher switch
11. Audio system
— Clock
12. Front passenger supplemental air bag
13. Outside remote mirror control switch
14. Headlight aiming control (if so equipped)
15. All-Wheel Drive (AWD) LOCK switch (if so equipped)
16. Fuse box cover
17. Vehicle Dynamic Control (VDC) OFF switch
18. Hood release handle
19. Tilting steering wheel lever
20. Parking brake
21. Ignition switch
22. Heated seat switch (if so equipped)
23. Power outlet
24. Heater/air conditioner control
25. Selector lever
26. Front passenger air bag status light
27. Rear window and outside mirror (if so equipped) defroster switch
28. Glove box
INSTRUMENT PANEL2-2
Instruments and controls
Page 92 of 328
Black plate (88,1)
Model "S35-D" EDITED: 2009/ 9/ 4
SIC2045
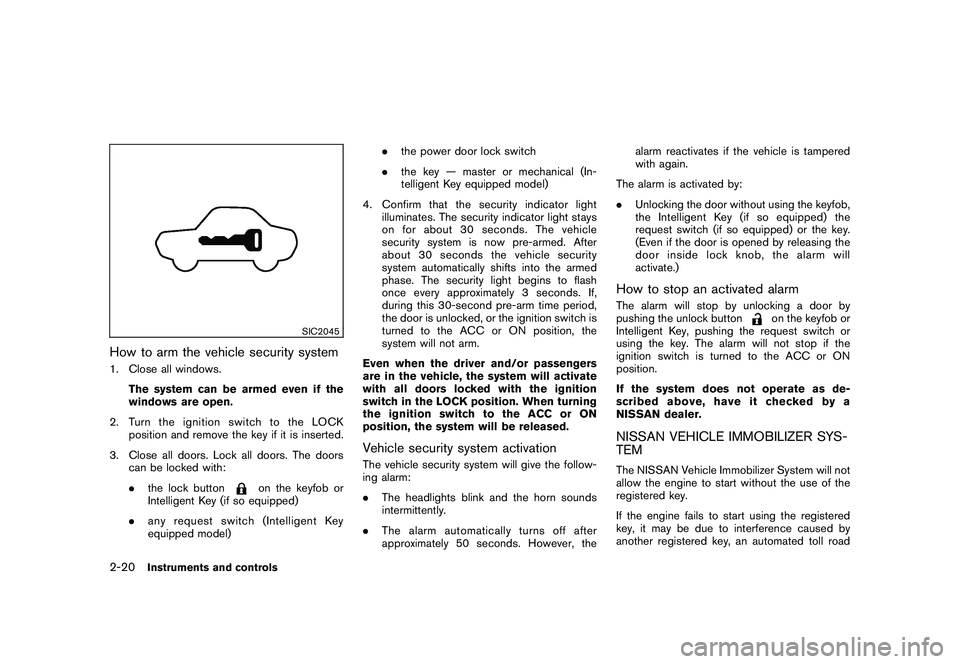
How to arm the vehicle security system1. Close all windows.The system can be armed even if the
windows are open.
2. TurntheignitionswitchtotheLOCK position and remove the key if it is inserted.
3. Close all doors. Lock all doors. The doors can be locked with:
.the lock button
on the keyfob or
Intelligent Key (if so equipped)
. any request switch (Intelligent Key
equipped model) .
the power door lock switch
. the key — master or mechanical (In-
telligent Key equipped model)
4. Confirm that the security indicator light illuminates. The security indicator light stays
on for about 30 seconds. The vehicle
security system is now pre-armed. After
about 30 seconds the vehicle security
system automatically shifts into the armed
phase. The security light begins to flash
once every approximately 3 seconds. If,
during this 30-second pre-arm time period,
the door is unlocked, or the ignition switch is
turned to the ACC or ON position, the
system will not arm.
Even when the driver and/or passengers
are in the vehicle, the system will activate
with all doors locked with the ignition
switch in the LOCK position. When turning
the ignition switch to the ACC or ON
position, the system will be released.
Vehicle security system activationThe vehicle security system will give the follow-
ing alarm:
. The headlights blink and the horn sounds
intermittently.
. The alarm automatica lly turns off after
approximately 50 seconds. However, the alarm reactivates if the vehicle is tampered
with again.
The alarm is activated by:
. Unlocking the door without using the keyfob,
the Intelligent Key (if so equipped) the
request switch (if so equipped) or the key.
(Even if the door is opened by releasing the
door inside lock knob, the alarm will
activate.)
How to stop an activated alarmThe alarm will stop by unlocking a door by
pushing the unlock button
on the keyfob or
Intelligent Key, pushing the request switch or
using the key. The alarm will not stop if the
ignition switch is turned to the ACC or ON
position.
If the system does not operate as de-
scribed above, have it checked by a
NISSAN dealer.
NISSAN VEHICLE IMMOBILIZER SYS-
TEMThe NISSAN Vehicle Immobilizer System will not
allow the engine to start without the use of the
registered key.
If the engine fails to start using the registered
key, it may be due to interference caused by
another registered key, an automated toll road
2-20
Instruments and controls
Page 102 of 328
Black plate (98,1)
Model "S35-D" EDITED: 2009/ 9/ 4
SIC3404
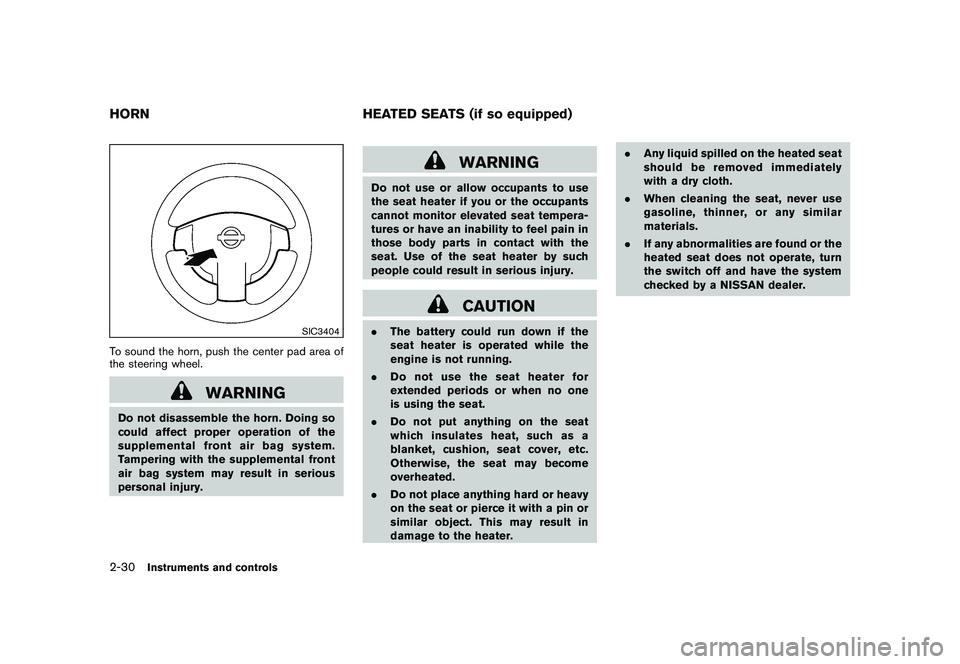
To sound the horn, push the center pad area of
the steering wheel.
WARNING
Do not disassemble the horn. Doing so
could affect proper operation of the
supplemental front air bag system.
Tampering with the supplemental front
air bag system may result in serious
personal injury.
WARNING
Do not use or allow occupants to use
the seat heater if you or the occupants
cannot monitor elevated seat tempera-
tures or have an inability to feel pain in
those body parts in contact with the
seat. Use of the seat heater by such
people could result in serious injury.
CAUTION
.The battery could run down if the
seat heater is operated while the
engine is not running.
. Do not use the seat heater for
extended periods or when no one
is using the seat.
. Do not put anything on the seat
which insulates heat, such as a
blanket, cushion, seat cover, etc.
Otherwise, the seat may become
overheated.
. Do not place anything hard or heavy
on the seat or pierce it with a pin or
similar object. This may result in
damage to the heater. .
Any liquid spilled on the heated seat
should be removed immediately
with a dry cloth.
. When cleaning the seat, never use
gasoline, thinner, or any similar
materials.
. If any abnormalities are found or the
heated seat does not operate, turn
the switch off and have the system
checked by a NISSAN dealer.
HORN HEATED SEATS (if so equipped)2-30
Instruments and controls
Page 129 of 328
Black plate (127,1)
Model "S35-D" EDITED: 2009/ 9/ 4
For information regarding the replacement of a
battery, see “BATTERY REPLACEMENT” in the
“8. Maintenance and do-it-yourself” section.
SPA2416
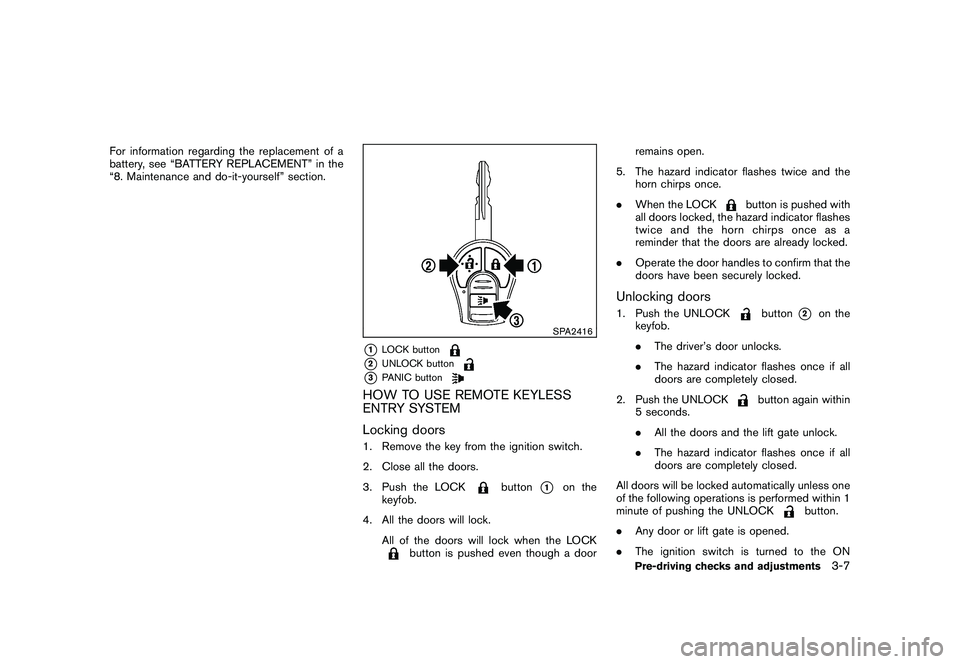
*1
LOCK button
*2
UNLOCK button
*3
PANIC button
HOW TO USE REMOTE KEYLESS
ENTRY SYSTEM
Locking doors1. Remove the key from the ignition switch.
2. Close all the doors.
3. Push the LOCK
button
*1
on the
keyfob.
4. All the doors will lock. All of the doors will lock when the LOCK
button is pushed even though a door remains open.
5. The hazard indicator flashes twice and the horn chirps once.
. When the LOCK
button is pushed with
all doors locked, the hazard indicator flashes
twice and the horn chirps once as a
reminder that the doors are already locked.
. Operate the door handles to confirm that the
doors have been securely locked.
Unlocking doors1. Push the UNLOCK
button
*2
on the
keyfob.
. The driver’s door unlocks.
. The hazard indicator flashes once if all
doors are completely closed.
2. Push the UNLOCK
button again within
5 seconds.
. All the doors and the lift gate unlock.
. The hazard indicator flashes once if all
doors are completely closed.
All doors will be locked automatically unless one
of the following operations is performed within 1
minute of pushing the UNLOCK
button.
. Any door or lift gate is opened.
. The ignition switch is turned to the ON
Pre-driving checks and adjustments
3-7
Page 130 of 328
Black plate (128,1)
Model "S35-D" EDITED: 2009/ 9/ 4
position.
Using panic alarmIf you are near your vehicle and feel threatened,
you may activate the alarm to call attention as
follows:
1. Push the PANIC
button
*3
on the
keyfob for more than 1 second.
2. The theft warning alarm and headlights will stay on for 25 seconds.
3. The panic alarm stops when: .It has run for 25 seconds, or
. Any of the buttons on the keyfob is
pushed. (Note: the PANIC button must
be pushed for more than 1 second.)
Setting hazard indicator and horn modeThis vehicle is set in hazard indicator and horn
mode when you first receive the vehicle.
In hazard indicator and horn mode, when the
LOCK
button
*1
is pushed, the hazard
indicator flashes twice and the horn chirps once.
When the UNLOCKbutton
*2
is pushed,
the hazard indicator flashes once.
If the horn chirp is not necessary, you can switch
to hazard indicator only mode by following the
switching procedure. In hazard indicator only mode, when the LOCK
button is pushed, the hazard indicator
flashes twice. When the UNLOCK
button
is pushed, neither the hazard indicator nor the
horn operates.
3-8
Pre-driving checks and adjustments
Page 131 of 328
Black plate (129,1)
Model "S35-D" EDITED: 2009/ 9/ 4
Mode (Pushing the
or
button)
DOOR LOCKDOOR UNLOCK
Hazard indicator and horn mode HAZARD -
twice
HORN -
once
HAZARD -
once
HORN - none
Hazard indicator mode HAZARD -
twice
HAZARD - none
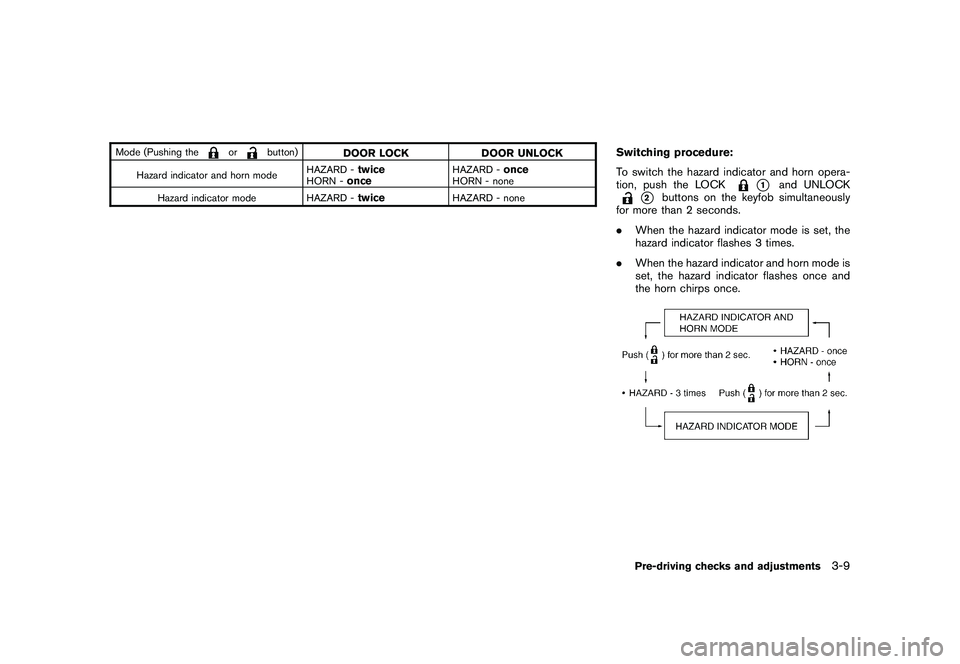
Switching procedure:
To switch the hazard indicator and horn opera-
tion, push the LOCK
*1
and UNLOCK
*2
buttons on the keyfob simultaneously
for more than 2 seconds.
. When the hazard indicator mode is set, the
hazard indicator flashes 3 times.
. When the hazard indicator and horn mode is
set, the hazard indicator flashes once and
the horn chirps once.
Pre-driving checks and adjustments
3-9
Page 136 of 328
Black plate (134,1)
Model "S35-D" EDITED: 2009/ 9/ 4
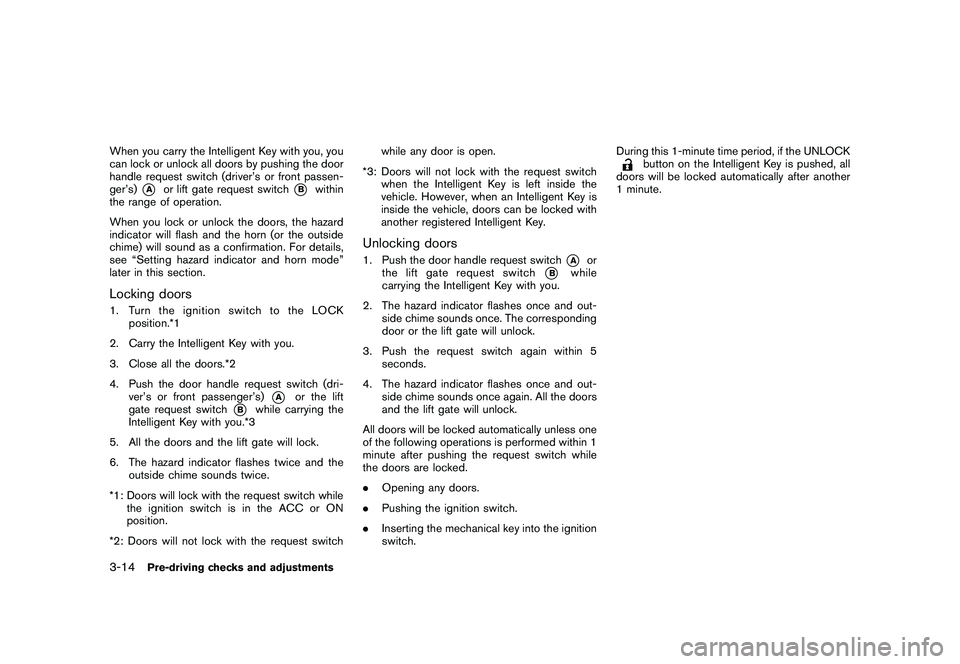
When you carry the Intelligent Key with you, you
can lock or unlock all doors by pushing the door
handle request switch (driver’s or front passen-
ger’s)
*A
or lift gate request switch
*B
within
the range of operation.
When you lock or unlock the doors, the hazard
indicator will flash and the horn (or the outside
chime) will sound as a confirmation. For details,
see “Setting hazard indicator and horn mode”
later in this section.
Locking doors1. TurntheignitionswitchtotheLOCK position.*1
2. Carry the Intelligent Key with you.
3. Close all the doors.*2
4. Push the door handle request switch (dri- ver’s or front passenger’s)
*A
or the lift
gate request switch
*B
while carrying the
Intelligent Key with you.*3
5. All the doors and the lift gate will lock.
6. The hazard indicator flashes twice and the outside chime sounds twice.
*1: Doors will lock with the request switch while the ignition switch is in the ACC or ON
position.
*2: Doors will not lock with the request switch while any door is open.
*3: Doors will not lock with the request switch when the Intelligent Key is left inside the
vehicle. However, when an Intelligent Key is
inside the vehicle, doors can be locked with
another registered Intelligent Key.
Unlocking doors1. Push the door handle request switch
*A
or
the lift gate request switch
*B
while
carrying the Intelligent Key with you.
2. The hazard indicator flashes once and out- side chime sounds once. The corresponding
door or the lift gate will unlock.
3. Push the request switch again within 5 seconds.
4. The hazard indicator flashes once and out- side chime sounds once again. All the doors
and the lift gate will unlock.
All doors will be locked automatically unless one
of the following operations is performed within 1
minute after pushing the request switch while
the doors are locked.
. Opening any doors.
. Pushing the ignition switch.
. Inserting the mechanical key into the ignition
switch. During this 1-minute time period, if the UNLOCK
button on the Intelligent Key is pushed, all
doors will be locked automatically after another
1 minute.
3-14
Pre-driving checks and adjustments
Page 141 of 328
Black plate (139,1)
Model "S35-D" EDITED: 2009/ 9/ 4
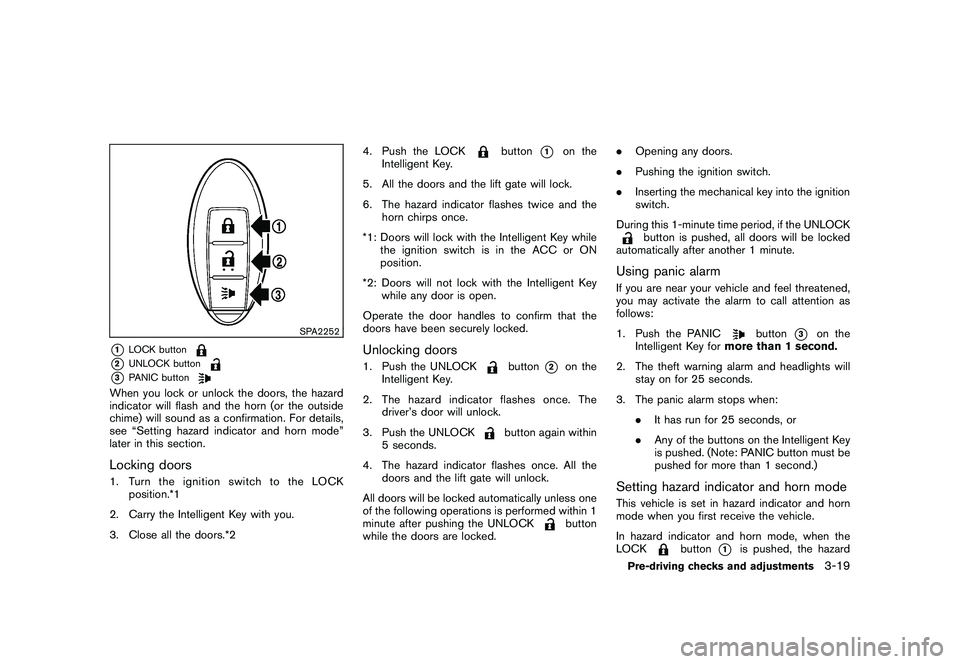
SPA2252
*1
LOCK button
*2
UNLOCK button
*3
PANIC button
When you lock or unlock the doors, the hazard
indicator will flash and the horn (or the outside
chime) will sound as a confirmation. For details,
see “Setting hazard indicator and horn mode”
later in this section.Locking doors1. TurntheignitionswitchtotheLOCKposition.*1
2. Carry the Intelligent Key with you.
3. Close all the doors.*2 4. Push the LOCK
button
*1
on the
Intelligent Key.
5. All the doors and the lift gate will lock.
6. The hazard indicator flashes twice and the horn chirps once.
*1: Doors will lock with the Intelligent Key while the ignition switch is in the ACC or ON
position.
*2: Doors will not lock with the Intelligent Key while any door is open.
Operate the door handles to confirm that the
doors have been securely locked.
Unlocking doors1. Push the UNLOCK
button
*2
on the
Intelligent Key.
2. The hazard indicator flashes once. The driver’s door will unlock.
3. Push the UNLOCK
button again within
5 seconds.
4. The hazard indicator flashes once. All the doors and the lift gate will unlock.
All doors will be locked automatically unless one
of the following operations is performed within 1
minute after pushing the UNLOCK
button
while the doors are locked. .
Opening any doors.
. Pushing the ignition switch.
. Inserting the mechanical key into the ignition
switch.
During this 1-minute time period, if the UNLOCK
button is pushed, all doors will be locked
automatically after another 1 minute.
Using panic alarmIf you are near your vehicle and feel threatened,
you may activate the alarm to call attention as
follows:
1. Push the PANIC
button
*3
on the
Intelligent Key for more than 1 second.
2. The theft warning alarm and headlights will stay on for 25 seconds.
3. The panic alarm stops when: .It has run for 25 seconds, or
. Any of the buttons on the Intelligent Key
is pushed. (Note: PANIC button must be
pushed for more than 1 second.)
Setting hazard indicator and horn modeThis vehicle is set in hazard indicator and horn
mode when you first receive the vehicle.
In hazard indicator and horn mode, when the
LOCK
button
*1
is pushed, the hazard
Pre-driving checks and adjustments
3-19