warning light NISSAN ROGUE 2021 Owner´s Manual
[x] Cancel search | Manufacturer: NISSAN, Model Year: 2021, Model line: ROGUE, Model: NISSAN ROGUE 2021Pages: 556, PDF Size: 2.7 MB
Page 262 of 556
5-8Starting and driving
a spare tire as soon as possible.
(See “Flat tire” (P.6-3) for chan-
ging a flat tire.)
. Since the spare tire is not
equipped with the TPMS, when a
spare tire is mounted or a wheel
is replaced, the TPMS will not
function and the low tire pressure
warning light will flash for ap-
proximately 1 minute. The light
will remain on after 1 minute.
Have your tires replaced and/or
TPMS system reset as soon as
possible. It is recommended you
visit a NISSAN dealer for these
services.
. Replacing tires with those not
originally specified by NISSAN
could affect the proper operation
of the TPMS.
. Do not inject any tire liquid or
aerosol tire sealant into the tires,
as this may cause a malfunction
of the tire pressure sensors.
CAUTION
.The TPMS may not function prop-
erly when the wheels are
equipped with tire chains or the wheels are buried in snow.
. Do not place metalized film or
any metal parts (antenna, etc.) on
the windows. This may cause
poor reception of the signals
from the tire pressure sensors,
and the TPMS will not function
properly.
Some devices and transmitters may tem-
porarily interfere with the operation of
the TPMS and cause the low tire pressure
warning light to illuminate. Some exam-
ples are:
. Facilities or electric devices using
similar radio frequencies are near the
vehicle.
. If a transmitter set to similar frequen-
cies is being used in or near the
vehicle.
. If a computer (or similar equipment) or
a DC/AC converter is being used in or
near the vehicle.
Low tire pressure warning light may
illuminate in the following cases.
. If the vehicle is equipped with a wheel
and tire without TPMS.
. If the TPMS has been replaced and the
ID has not been registered. .
If the wheel is not originally specified
by NISSAN.
FCC Notice:
For USA:
Tire Pressure Monitoring System (TPMS)
transmitter
FCC ID: KR5TIS-10DL
Body Control Module (BCM)
40406556
Continental
This device complies with Part 15 of the
FCC Rules. Operation is subject to the
following two conditions: (1) This device
may not cause harmful interference,
and (2) this device must accept any
interference received, including inter-
ference that may cause undesired op-
eration.
Note: Changes or modifications not
expressly approved by the party re-
sponsible for compliance could void
the user’s authority to operate the
equipment.
For Canada:
Tire Pressure Monitoring System (TPMS)
transmitter
Continental
Page 265 of 556
.If you decide that it is not safe toreturn the vehicle to the road sur-
face based on vehicle, road or
traffic conditions, gradually slow
the vehicle to a stop in a safe place
off the road.
RAPID AIR PRESSURE LOSS
Rapid air pressure loss or a “blow-out” can
occur if the tire is punctured or is
damaged due to hitting a curb or pothole.
Rapid air pressure loss can also be caused
by driving on under-inflated tires.
Rapid air pressure loss can affect the
handling and stability of the vehicle,
especially at highway speeds.
Help prevent rapid air pressure loss by
maintaining the correct air pressure and
visually inspect the tires for wear and
damage. See “Wheels and tires” (P.8-25) of
this manual.
If a tire rapidly loses air pressure or
“blows-out” while driving, maintain con-
trol of the vehicle by following the proce-
dure below. Please note that this
procedure is only a general guide. The
vehicle must be driven as appropriate
based on the conditions of the vehicle,
road and traffic.
WARNING
The following actions can increase
the chance of losing control of the
vehicle if there is a sudden loss of tire
air pressure. Losing control of the
vehicle may cause a collision and
result in personal injury.
. The vehicle generally moves or
pulls in the direction of the flat
tire.
. Do not rapidly apply the brakes.
. Do not rapidly release the accel-
erator pedal.
. Do not rapidly turn the steering
wheel.
1. Remain calm and do not overreact.
2. Maintain a firm grip on the steering wheel with both hands and try to hold
a straight course.
3. When appropriate, slowly release the accelerator pedal to gradually slow
the vehicle.
4. Gradually steer the vehicle to a safe location off the road and away from
traffic if possible. 5. Lightly apply the brake pedal to gra-
dually stop the vehicle.
6. Turn on the hazard warning flashers and either contact a roadside emer-
gency service to change the tire or see
“Changing a flat tire” (P.6-4) of this
Owner’s Manual.
DRINKING ALCOHOL/DRUGS AND
DRIVING
WARNING
Never drive under the influence of
alcohol or drugs. Alcohol in the
bloodstream reduces coordination,
delays reaction time and impairs
judgement. Driving after drinking
alcohol increases the likelihood of
being involved in an accident injuring
yourself and others. Additionally, if
you are injured in an accident, alco-
hol can increase the severity of the
injury.
NISSAN is committed to safe driving.
However, you must choose not to drive
under the influence of alcohol. Every year
thousands of people are injured or killed
in alcohol-related accidents. Although the
local laws vary on what is considered to
be legally intoxicated, the fact is that
Starting and driving5-11
Page 266 of 556
5-12Starting and driving
alcohol affects all people differently and
most people underestimate the effects of
alcohol.
Remember, drinking and driving don’t
mix! And that is true for drugs, too (over-
the-counter, prescription, and illegal
drugs). Don’t drive if your ability to oper-
ate your vehicle is impaired by alcohol,
drugs, or some other physical condition.
DRIVING SAFETY PRECAUTIONS
Your vehicle is designed for both normal
and off-road use. However, avoid driving
in deep water or mud as your vehicle is
mainly designed for leisure use, unlike a
conventional off-road vehicle.
Remember that Two-Wheel Drive (2WD)
models are less capable than All-Wheel
Drive (AWD) models for rough road driving
and extrication when stuck in deep snow,
mud, or the like.
Please observe the following precautions:
WARNING
.Drive carefully when off the road
and avoid dangerous areas. Every
person who drives or rides in this
vehicle should be seated with
their seat belt fastened. This will
keep you and your passengers in position when driving over rough
terrain.
. Do not drive across steep slopes.
Instead drive either straight up or
straight down the slopes. Off-
road vehicles can tip over side-
ways much more easily than they
can forward or backward.
. Many hills are too steep for any
vehicle. If you drive up them, you
may stall. If you drive down them,
you may not be able to control
your speed. If you drive across
them, you may roll over.
. Do not shift ranges while driving
on downhill grades as this could
cause loss of control of the vehi-
cle.
. Stay alert when driving to the top
of a hill. At the top there could be
a drop-off or other hazard that
could cause an accident.
. If your engine stalls or you cannot
make it to the top of a steep hill,
never attempt to turn around.
Your vehicle could tip or roll over.
Always back straight down in R
(Reverse) range. Never back down
in N (Neutral), using only the
brake, as this could cause loss of
control. .
Heavy braking going down a hill
could cause your brakes to over-
heat and fade, resulting in loss of
control and an accident. Apply
brakes lightly and use a low
range to control your speed.
. Unsecured cargo can be thrown
around when driving over rough
terrain. Properly secure all cargo
so it will not be thrown forward
and cause injury to you or your
passengers.
. To avoid raising the center of
gravity excessively, do not exceed
the rated capacity of the roof rack
(if so equipped) and evenly dis-
tribute the load. Secure heavy
loads in the cargo area as far
forward and as low as possible.
Do not equip the vehicle with tires
larger than specified in this man-
ual. This could cause your vehicle
to roll over.
. Do not grip the inside or spokes
of the steering wheel when driv-
ing off-road. The steering wheel
could move suddenly and injure
your hands. Instead drive with
your fingers and thumbs on the
outside of the rim.
Page 271 of 556
onds after the chime sounds. The
engine will start.
After step 3 is performed, when the
ignition switch is pushed without depres-
sing the brake pedal, the ignition switch
position will change to ON.
NOTE:
. When the ignition switch is pushed
to the ON position or the engine is
started by the above procedures, the
“Key Battery Low” warning appears
(on the vehicle information display)
even if the Intelligent Key is inside
the vehicle. This is not a malfunction.
To turn off the warning, touch the
ignition switch with the Intelligent
Key again.
. If the “Key Battery Low” warning
appears, replace the battery as soon
as possible. (See “Intelligent Key
battery replacement” (P.8-20).) .
Make sure the area around the vehicle
is clear.
. Check fluid levels such as engine oil,
coolant, brake fluid, and window
washer fluid as frequently as possible,
or at least whenever you refuel.
. Check that all windows and lights are
clean.
. Visually inspect tires for their appear-
ance and condition. Also check tires
for proper inflation.
. Lock all doors.
. Position seat and adjust head re-
straints/headrests.
. Adjust inside and outside mirrors.
. Fasten seat belts and ask all passen-
gers to do likewise.
. Check the operation of warning lights
when the ignition switch is placed in
the ON position. (See “Warning lights,
indicator lights and audible remin-
ders” (P.2-13).) 1. Apply the parking brake.
2. Confirm that the vehicle is in the P
(Park) position.
The Intelligent Key must be carried
when operating the ignition switch.
3. Push the ignition switch to the ON position. Depress the brake pedal and
push the ignition switch to start the
engine.
To start the engine immediately, push
and release the ignition switch while
depressing the brake pedal with the
ignition switch in any position.
.If the engine is very hard to start inextremely cold weather or when
restarting, depress the accelerator
pedal a little (approximately 1/3 to
the floor) and while holding, crank
the engine. Release the accelerator
pedal when the engine starts.
.If the engine is very hard to startbecause it is flooded, depress the
accelerator pedal all the way to the
floor and hold it. Push the ignition
switch to the ON position to start
cranking the engine. After 5 or 6
seconds, stop cranking by pushing
the ignition switch to OFF. After
cranking the engine, release the
accelerator pedal. Crank the engine
with your foot off the accelerator
pedal by depressing the brake
Starting and driving5-17
BEFORE STARTING THE ENGINE STARTING THE ENGINE
Page 279 of 556
WARNING
When the high fluid temperature
protection mode or fail-safe opera-
tion occurs, vehicle speed may be
gradually reduced. The reduced
speed may be lower than other
traffic, which could increase the
chance of a collision. Be especially
careful when driving. If necessary,
pull to the side of the road at a safe
place and allow the transmission to
return to normal operation, or have it
repaired if necessary.
WARNING
.Never drive the vehicle with the
parking brake applied. The brake
will overheat and fail to operate
and will lead to an accident.
. Never release the parking brake
from outside the vehicle. If the
vehicle moves, it will be impossi-
ble to push the foot brake pedal
and will lead to an accident.
. Never use the shift lever in place
of the parking brake. When park-
ing, be sure the parking brake is
fully applied.
. To help avoid risk of injury or
death through unintended opera-
tion of the vehicle and/or its
systems, do not leave children,
people who require the assis-
tance of others or pets unat-
tended in your vehicle.
Additionally, the temperature in-
side a closed vehicle on a warm
day can quickly become high
enough to cause a significant risk
of injury or death to people and
pets.
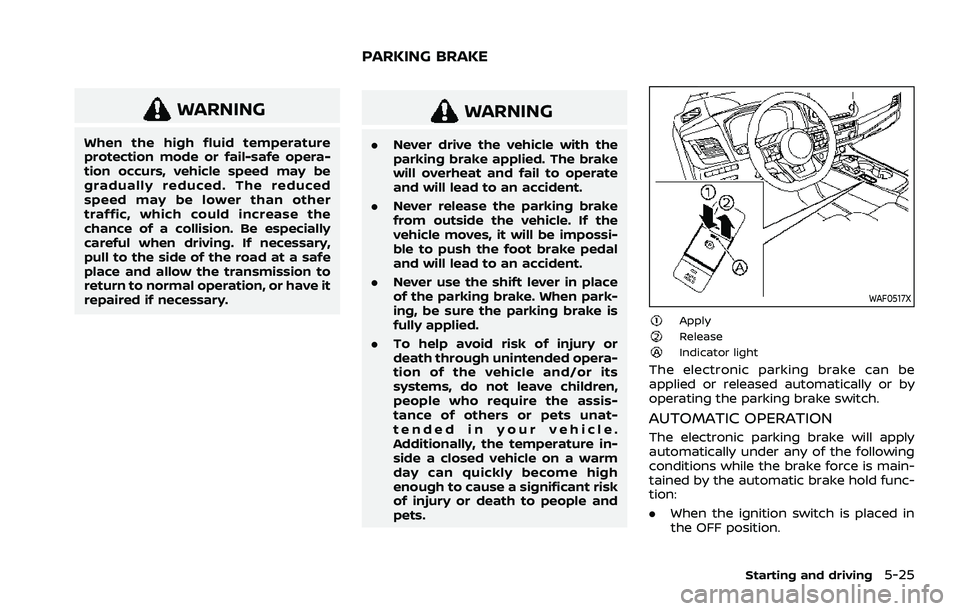
WAF0517X
ApplyReleaseIndicator light
The electronic parking brake can be
applied or released automatically or by
operating the parking brake switch.
AUTOMATIC OPERATION
The electronic parking brake will apply
automatically under any of the following
conditions while the brake force is main-
tained by the automatic brake hold func-
tion:
.When the ignition switch is placed in
the OFF position.
Starting and driving5-25
PARKING BRAKE
Page 280 of 556
5-26Starting and driving
.When the shift position is placed in the
P (Park) position.
. When the driver’s door is opened.
. When the driver’s seat belt is unfas-
tened.
The electronic parking brake is automati-
cally released as soon as the vehicle
starts while the accelerator pedal is
depressed under the following condi-
tions.
. While the engine is running.
. When the shift position is in the D
(Drive) or R (Reverse) position.
. When the driver’s door is closed.
The electronic parking brake is automati-
cally released within 5 seconds after the
shift position is placed in the D (Drive) or R
(Reverse) position even if the driver’s door
is opened. Be sure to close the door
before starting the vehicle.
WARNING
. When the automatic brake hold
function is activated, the electro-
nic parking brake will not be
automatically applied when the
engine is stopped without using
the ignition switch (for example,
by engine stalling). Without the vehicle stationary,
the electronic parking brake will
not be automatically applied
even if the engine is turned off
with the ignition switch.
. Before leaving the vehicle, place
the shift position in the P (Park)
position and check that the elec-
tronic parking brake warning
light is illuminated to confirm
that the electronic parking brake
is applied. The electronic parking
brake warning light will remain
on for a period of time after the
driver’s door is locked.
CAUTION
When parking in an area where the
outside temperature is below 32°F
(0°C), the electronic parking brake, if
applied, may freeze in place and may
be difficult to release.
For safe parking, it is recommended
that you place the shift position in
the P (Park) position and securely
block the wheels. NOTE:
.
To keep the electronic parking brake
released after the engine is turned
off, place the ignition switch in the
OFF position, depress the brake
pedal and push down the parking
brake switch before opening the
driver’s door.
. If a malfunction occurs in the elec-
tronic parking brake system (for
example, due to battery discharge),
it is recommended to contact a
NISSAN dealer.
. Under the following conditions, the
electronic parking brake will auto-
matically be applied and the brake
force of the automatic brake hold
will be released.
—The braking force is applied by
the automatic brake hold function
for 3 minutes or longer.
— The vehicle is placed in the P
(Park) position.
— The driver’s seat belt is unfas-
tened.
— The driver’s door is opened.
— The ignition switch is placed in
the OFF position.
— The electronic parking brake is
applied manually.
Page 281 of 556
—If a malfunction occurs in the
automatic brake hold function.
. Make sure that the electronic park-
ing brake system warning light (yel-
low) is OFF before starting the
vehicle.
MANUAL OPERATION
To apply: When the vehicle is stopped,
pull the parking brake switchup. (The
electronic parking brake will apply even if
the ignition switch is placed in the OFF
position.) The indicator light
on the
switch and the electronic parking brake
warning light PARK or
(red) will
illuminate.
To release: With the ignition switch in the
ON position, depress the brake pedal and
push the parking brake switch down
.
The indicator lightand the electronic
parking brake warning light (red) will turn
off.
Before driving, check that the electronic
parking brake warning light (red) turns
off. For additional information, see “Warn-
ing lights, indicator lights and audible
reminders” (P.2-13).
NOTE:
. While the electronic parking brake is
applied or released, an operating
sound is heard from the lower side
of the rear seat. This is normal and does not indicate a malfunction.
. When the electronic parking brake is
frequently applied and released in a
short period of time, the electronic
parking brake system warning light
(yellow) may blink and the electronic
parking brake may not operate in
order to prevent the electronic park-
ing brake system from overheating.
If this occurs, operate the parking
brake switch again after waiting
approximately 1 minute.
. If the electronic parking brake must
be applied while driving in an emer-
gency, pull up and hold the parking
brake switch. When you release the
parking brake switch, the electronic
parking brake will be released.
. While pulling up the parking brake
switch during driving, the electronic
parking brake is applied and a chime
sounds. The electronic parking
brake warning light (red) and the
indicator light on the parking brake
switch illuminate. This does not in-
dicate a malfunction. The electronic
parking brake warning light (red)
and the indicator light on the park-
ing brake switch will turn off when
the electronic parking brake is re-
leased. .
When pulling the parking brake
switch up with the ignition switch
in the OFF position, the indicator
light on the parking brake switch
will continue to illuminate for a short
period of time.
When towing a trailer
Depending on the weight of the vehicle
and trailer and the steepness of the slope,
there may be a tendency for the vehicle
to move backwards when starting from a
standstill. When this occurs, you can use
the parking brake switch in the same way
as a conventional lever type parking
brake.
Before starting on sloping roads when
towing a trailer, be sure to read the
following to prevent the vehicle from
moving backward unintentionally.
.Release the parking brake switch as
soon as the engine is delivering en-
ough torque to the wheels.
Starting and driving5-27
Page 282 of 556
5-28Starting and driving
The automatic brake hold function main-
tains the braking force without the driver
having to depress the brake pedal when
the vehicle is stopped at a traffic light or
intersection. As soon as the driver de-
presses the accelerator pedal again, the
automatic brake hold function is deacti-
vated and the braking force is released.
The operating status of the automatic
brake hold can be displayed on the
vehicle information display.
WARNING
.The automatic brake hold func-
tion is not designed to hold the
vehicle on a steep hill or slippery
road. Never use the automatic
brake hold when the vehicle is
stopped on a steep hill or slippery
road. Failure to do so may cause
the vehicle to move.
. The automatic brake hold warn-
ing may appear in the vehicle
information display to request
that the driver retake control by
depressing the brake pedal.
. When the automatic brake hold
function is activated but fails to
maintain the vehicle at a stand-
still, depress the brake pedal to
stop the vehicle. If the vehicle unexpectedly moves due to out-
side conditions, the chime may
sound and automatic brake hold
warning may illuminate in the
vehicle information display.
. Be sure to deactivate the auto-
matic brake hold function when
using a car wash or towing your
vehicle.
. Make sure to push the park but-
ton to shift to the P (Park) posi-
tion and apply the electronic
parking brake when parking your
vehicle, riding on or off the vehi-
cle, or loading luggage. Failure to
do so could cause the vehicle to
move or roll away unexpectedly
and result in serious personal
injury or property damage.
. If any of the following conditions
occur, the automatic brake hold
function may not function. Have
the system checked promptly. It
is recommended that you visit a
NISSAN dealer for this service.
Failure to operate the vehicle in
accordance with these conditions
could cause the vehicle to move
or roll away unexpectedly and
result in serious personal injury
or property damage. — A warning message appears
in the vehicle information dis-
play.
— The indicator light on the automatic brake hold switch
does not illuminate when the
switch is pushed.
. The automatic brake hold func-
tion will not be activated if the
slip indicator light, electronic
parking brake system warning
light or master warning light illu-
minates and the Chassis Control
System Error warning message
appears in the vehicle informa-
tion display.
. To maintain the braking force to
keep the vehicle to a standstill, a
noise may be heard. This is not a
malfunction.
AUTOMATIC BRAKE HOLD
Page 283 of 556
WAF0516X
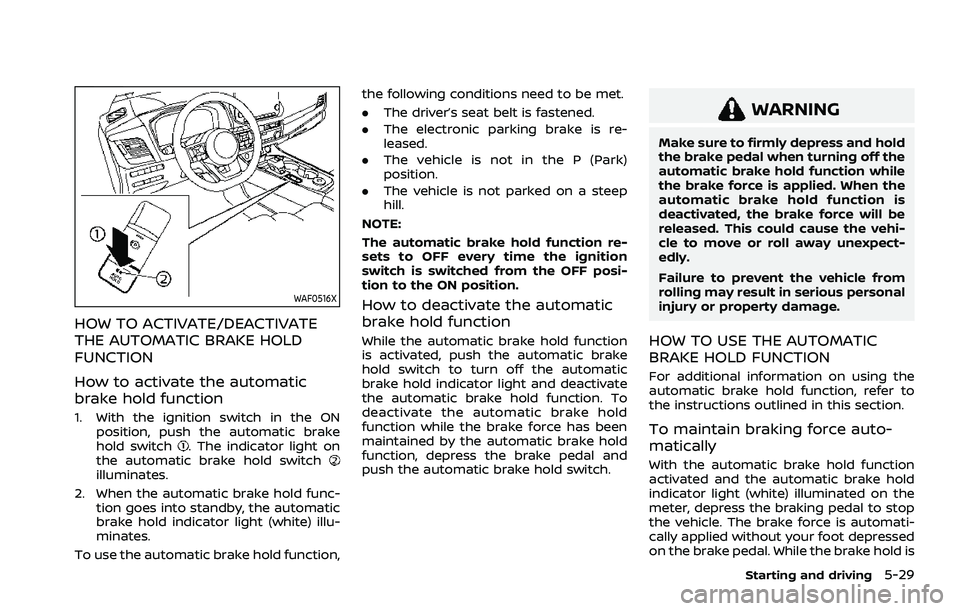
HOW TO ACTIVATE/DEACTIVATE
THE AUTOMATIC BRAKE HOLD
FUNCTION
How to activate the automatic
brake hold function
1. With the ignition switch in the ONposition, push the automatic brake
hold switch
. The indicator light on
the automatic brake hold switch
illuminates.
2. When the automatic brake hold func- tion goes into standby, the automatic
brake hold indicator light (white) illu-
minates.
To use the automatic brake hold function, the following conditions need to be met.
.
The driver’s seat belt is fastened.
. The electronic parking brake is re-
leased.
. The vehicle is not in the P (Park)
position.
. The vehicle is not parked on a steep
hill.
NOTE:
The automatic brake hold function re-
sets to OFF every time the ignition
switch is switched from the OFF posi-
tion to the ON position.
How to deactivate the automatic
brake hold function
While the automatic brake hold function
is activated, push the automatic brake
hold switch to turn off the automatic
brake hold indicator light and deactivate
the automatic brake hold function. To
deactivate the automatic brake hold
function while the brake force has been
maintained by the automatic brake hold
function, depress the brake pedal and
push the automatic brake hold switch.
WARNING
Make sure to firmly depress and hold
the brake pedal when turning off the
automatic brake hold function while
the brake force is applied. When the
automatic brake hold function is
deactivated, the brake force will be
released. This could cause the vehi-
cle to move or roll away unexpect-
edly.
Failure to prevent the vehicle from
rolling may result in serious personal
injury or property damage.
HOW TO USE THE AUTOMATIC
BRAKE HOLD FUNCTION
For additional information on using the
automatic brake hold function, refer to
the instructions outlined in this section.
To maintain braking force auto-
matically
With the automatic brake hold function
activated and the automatic brake hold
indicator light (white) illuminated on the
meter, depress the braking pedal to stop
the vehicle. The brake force is automati-
cally applied without your foot depressed
on the brake pedal. While the brake hold is
Starting and driving5-29
Page 293 of 556
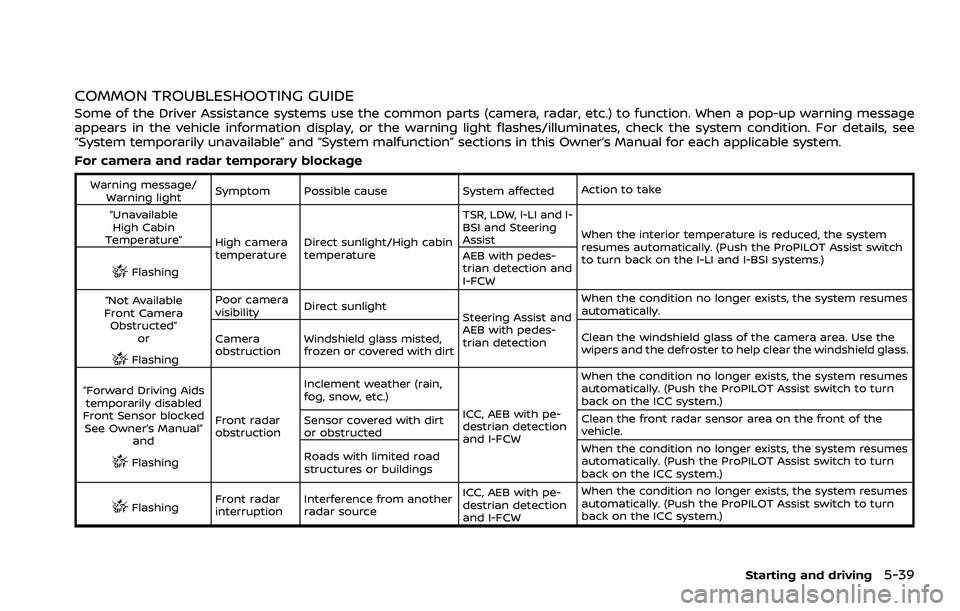
COMMON TROUBLESHOOTING GUIDE
Some of the Driver Assistance systems use the common parts (camera, radar, etc.) to function. When a pop-up warning message
appears in the vehicle information display, or the warning light flashes/illuminates, check the system condition. For details, see
“System temporarily unavailable” and “System malfunction” sections in this Owner’s Manual for each applicable system.
For camera and radar temporary blockage
Warning message/Warning light Symptom Possible cause System affected
Action to take
“Unavailable High Cabin
Temperature” High camera
temperatureDirect sunlight/High cabin
temperature TSR, LDW, I-LI and I-
BSI and Steering
Assist
When the interior temperature is reduced, the system
resumes automatically. (Push the ProPILOT Assist switch
to turn back on the I-LI and I-BSI systems.)
Flashing AEB with pedes-
trian detection and
I-FCW
“Not Available
Front Camera Obstructed”
or
Flashing Poor camera
visibility
Direct sunlight
Steering Assist and
AEB with pedes-
trian detectionWhen the condition no longer exists, the system resumes
automatically.
Camera
obstruction Windshield glass misted,
frozen or covered with dirt Clean the windshield glass of the camera area. Use the
wipers and the defroster to help clear the windshield glass.
“Forward Driving Aids temporarily disabled
Front Sensor blocked See Owner’s Manual” and
Flashing Front radar
obstruction Inclement weather (rain,
fog, snow, etc.)
ICC, AEB with pe-
destrian detection
and I-FCWWhen the condition no longer exists, the system resumes
automatically. (Push the ProPILOT Assist switch to turn
back on the ICC system.)
Sensor covered with dirt
or obstructed Clean the front radar sensor area on the front of the
vehicle.
Roads with limited road
structures or buildings When the condition no longer exists, the system resumes
automatically. (Push the ProPILOT Assist switch to turn
back on the ICC system.)
Flashing
Front radar
interruption Interference from another
radar source ICC, AEB with pe-
destrian detection
and I-FCWWhen the condition no longer exists, the system resumes
automatically. (Push the ProPILOT Assist switch to turn
back on the ICC system.)
Starting and driving5-39