low oil pressure NISSAN ROGUE 2021 Owner´s Manual
[x] Cancel search | Manufacturer: NISSAN, Model Year: 2021, Model line: ROGUE, Model: NISSAN ROGUE 2021Pages: 556, PDF Size: 2.7 MB
Page 19 of 556
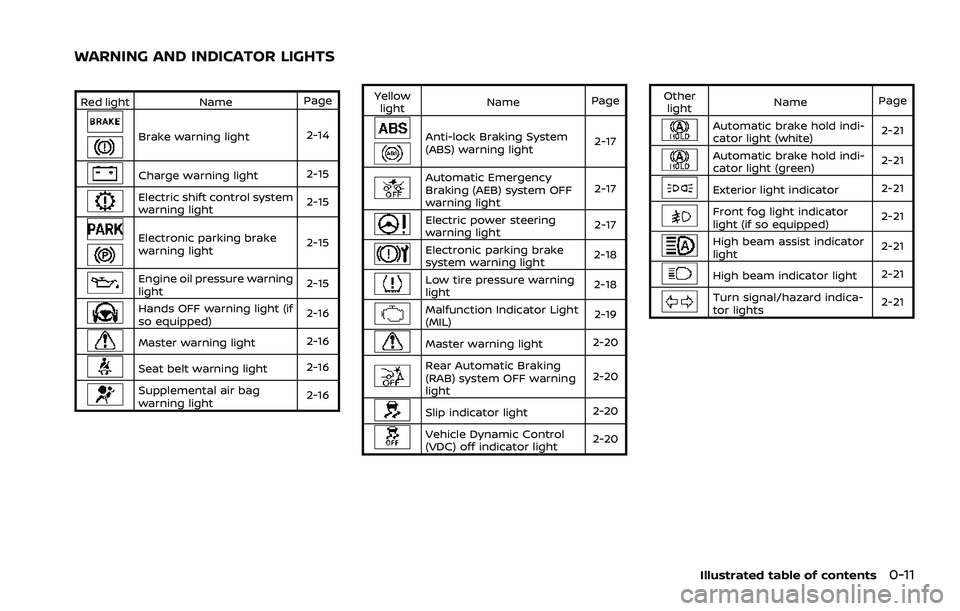
Red lightNamePage
Brake warning light 2-14
Charge warning light 2-15
Electric shift control system
warning light2-15
Electronic parking brake
warning light2-15
Engine oil pressure warning
light
2-15
Hands OFF warning light (if
so equipped)2-16
Master warning light
2-16
Seat belt warning light2-16
Supplemental air bag
warning light2-16Yellow
light Name
Page
Anti-lock Braking System
(ABS) warning light 2-17
Automatic Emergency
Braking (AEB) system OFF
warning light2-17
Electric power steering
warning light
2-17
Electronic parking brake
system warning light2-18
Low tire pressure warning
light
2-18
Malfunction Indicator Light
(MIL) 2-19
Master warning light
2-20
Rear Automatic Braking
(RAB) system OFF warning
light2-20
Slip indicator light
2-20
Vehicle Dynamic Control
(VDC) off indicator light2-20Other
light Name
Page
Automatic brake hold indi-
cator light (white) 2-21
Automatic brake hold indi-
cator light (green)
2-21
Exterior light indicator
2-21
Front fog light indicator
light (if so equipped)2-21
High beam assist indicator
light2-21
High beam indicator light
2-21
Turn signal/hazard indica-
tor lights2-21
Illustrated table of contents0-11
WARNING AND INDICATOR LIGHTS
Page 101 of 556
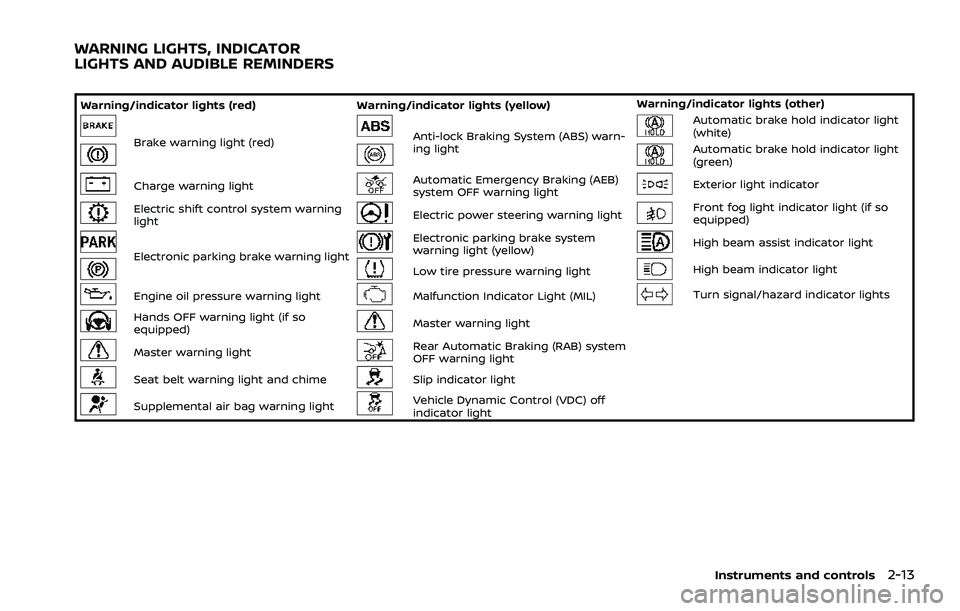
Warning/indicator lights (red)Warning/indicator lights (yellow) Warning/indicator lights (other)
Brake warning light (red)Anti-lock Braking System (ABS) warn-
ing lightAutomatic brake hold indicator light
(white)
Automatic brake hold indicator light
(green)
Charge warning lightAutomatic Emergency Braking (AEB)
system OFF warning lightExterior light indicator
Electric shift control system warning
lightElectric power steering warning lightFront fog light indicator light (if so
equipped)
Electronic parking brake warning light
Electronic parking brake system
warning light (yellow)High beam assist indicator light
Low tire pressure warning lightHigh beam indicator light
Engine oil pressure warning lightMalfunction Indicator Light (MIL)Turn signal/hazard indicator lights
Hands OFF warning light (if so
equipped)Master warning light
Master warning lightRear Automatic Braking (RAB) system
OFF warning light
Seat belt warning light and chimeSlip indicator light
Supplemental air bag warning lightVehicle Dynamic Control (VDC) off
indicator light
Instruments and controls2-13
WARNING LIGHTS, INDICATOR
LIGHTS AND AUDIBLE REMINDERS
Page 103 of 556

Charge warning light
When the ignition switch is in the ON
position, the charge warning light illumi-
nates and then turns off.
If the light illuminates while the engine is
running, it may indicate the charging
system is not functioning properly. Turn
the engine off and check the alternator
belt. If the belt is loose, broken, missing or
if the light remains on, have your vehicle
serviced immediately. It is recommended
you visit a NISSAN dealer for this service.
CAUTION
Do not continue driving if the alter-
nator belt is loose, broken or miss-
ing.
Electric shift control system
warning light
When the ignition switch is in the ON
position, the electric shift control system
warning light illuminates, and then turns
off. This indicates the electric shift control
system is operational.
The electric shift control system warning
light illuminates when a malfunction oc- curs in the electric shift control system.
When the master warning light illumi-
nates, the chime sounds and the follow-
ing message is displayed in the vehicle
information display: “When parked apply
parking brake”.
When the ignition switch is placed in the
OFF position, the chime sounds continu-
ously. Ensure the parking brake is applied.
Have the system checked by a NISSAN
dealer.
orElectronic parking
brake warning light
The electronic parking brake warning
light indicates that the electronic parking
brake system is operating.
When the ignition switch is placed in the
ON position, the electronic parking brake
warning light illuminates. When the en-
gine is started and the parking brake is
released, the warning light turns off.
If the parking brake is not released, the
electronic parking brake warning light
remains on. Be sure that the electronic
parking brake warning light has turned
off before driving. (See “Parking brake”
(P.5-25).)
If the electronic parking brake warning
light illuminates or flashes while the
electronic parking brake system warning light
(yellow) illuminates, it may
indicate that the electronic parking brake
system is not functioning properly. Have
the system checked, and if necessary
repaired. It is recommended you visit a
NISSAN dealer for this service.
Engine oil pressure warning
light
This light warns of low engine oil pres-
sure. When the ignition switch is in the ON
position, the engine oil pressure warning
light illuminates. After starting the engine,
the engine oil pressure warning light
turns off. This indicates that the oil
pressure sensors in the engine are opera-
tional.
If the engine oil pressure warning light
illuminates or blinks while the engine is
running, it may indicate that the engine
oil pressure is low.
Stop the vehicle safely as soon as possi-
ble. Stop the engine immediately and call
a NISSAN dealer.
CAUTION
. Running the engine with the en-
gine oil pressure warning light
illuminated could cause serious
damage to the engine.
Instruments and controls2-15
Page 104 of 556

2-16Instruments and controls
.The engine oil pressure warning
light is not designed to indicate a
low oil level. The oil level should
be checked using the dipstick.
(See “Engine oil” (P.8-5).)
Hands OFF warning light (if so
equipped)
When the Steering Assist is activated, it
monitors the driver’s steering wheel op-
eration. If the steering wheel is not
operated or the driver takes his/her
hands off the steering wheel for a period
of time, the warning light illuminates. If
the driver does not operate the steering
wheel after the warning light has been
illuminated, an audible alert sounds and
the warning flashes in the vehicle infor-
mation display, followed by a quick brake
application to request the driver to take
control of the vehicle again. If the driver
remains unresponsive, the vehicle will
automatically turn on the hazard lights
and slow to a complete stop. (See “Steer-
ing Assist” (P.5-113).)
Master warning light
When the ignition switch is in the ON
position, the master warning light illumi-
nates if a warning message appears in
the vehicle information display.
See “Vehicle information display” (P.2-22).
Seat belt warning light and
chime
The light and chime remind you to fasten
the seat belts.
The light illuminates whenever the igni-
tion switch is placed in the ON position,
and will remain illuminated until the seat
belts are fastened.
The seat belt warning light for the front
passenger will illuminate if the seat belt is
not fastened when the front passenger’s
seat is occupied.
When the vehicle speed exceeds 10 MPH
(15 km/h), the light will continue to blink
for about 95 seconds until the driver’s
seat belt is fastened and the light will
blink unless the front passenger’s seat
belts is securely fastened and the chime
will sound for about 95 seconds unless
the front passenger’s seat belt is securely
fastened.
When the ignition switch is placed in the
ON position, the chime will sound for about 6 seconds unless the driver’s seat
belt is securely fastened.
When the vehicle speed exceeds 10 MPH
(15 km/h), the chime will sound unless the
rear passenger’s seat belts are securely
fastened. The chime will continue to
sound for about 35 seconds until the rear
passenger’s seat belts are fastened.
For additional information, refer to “Seat
belt warning light and chime” (P.1-15).Supplemental air bag warning
light
After placing the ignition switch in the ON
position, the supplemental air bag warn-
ing light will illuminate. The supplemental
air bag warning light will turn off after
about 7 seconds if the supplemental front
air bag and supplemental side air bag,
curtain air bag systems and/or preten-
sioner seat belt are operational.
If any of the following conditions occur,
the front air bag, side air bag, curtain air
bag and pretensioner systems need ser-
vicing.
. The supplemental air bag warning
light remains on after approximately
7 seconds.
. The supplemental air bag warning
light flashes intermittently.
Page 118 of 556
2-30Instruments and controls
and intervals, refer to the “9. Maintenance
and schedules” section.
Tire:
This indicator appears when the user set
distance comes for replacing tires. You
can set or reset the distance for replacing
tires.
WARNING
The tire replacement indicator is not
a substitute for regular tire checks,
including tire pressure checks. (See
“Changing wheels and tires” (P.8-
33).) Many factors including tire in-
flation, alignment, driving habits and
road conditions affect tire wear and
when tires should be replaced.
Setting the tire replacement indica-
tor for a certain driving distance
does not mean your tires will last
that long. Use the tire replacement
indicator as a guide only and always
perform regular tire checks. Failure
to perform regular tire checks, in-
cluding tire pressure checks could
result in tire failure. Serious vehicle
damage could occur and may lead to
a collision, which could result in
serious personal injury or death.Other:
This indicator appears when the user set
distance comes for checking or replacing
maintenance items other than the engine
oil, oil filter and tires. Other maintenance
items can include such things as air filter
or tire rotation. You can set or reset the
distance for checking or replacing the
items.
Customize Display
The display settings allows user to
choose from the various meter selections.
The display settings can be changed
using the scroll dial
.
Main Menu Selection:
Displays available screens that can be
shown in the vehicle information display.
Route Guidance (if so equipped):
To change the setting, use the scroll dial
to select and push it.
. Alerts
The “Alerts” allows user to turn the
Navigation Settings alerts on or off.
Transition (Cruise) (if so equipped):
The ”Transition (Cruise)” allows user to
turn the cruise screen transition on or off. Welcome Effect:
The “Welcome Effect” displays the avail-
able welcome effect settings.
. Gauges (if so equipped)
. Animation
Operation guidance:
The “Operation guidance” displays the
available operation guidance settings.
. Lights
. Wiper
. Seat Memory (if so equipped)
. Cruise Control (if so equipped)
Unit/Language
The units that are shown in the vehicle
information display can be changed:
.Mileage/Fuel
. Tire Pressure
. Temperature
. Language
Use the scroll dial
to select and change
the units of the vehicle information dis-
play.
Mileage/Fuel:
The unit for the mileage that is shown in
the vehicle information display can be
changed.
Page 404 of 556
5-150Starting and driving
.Recirculating the cool air in thecabin when the A/C is on reduces
cooling load.
4. Drive at economical speeds and dis- tances.
.Observing the speed limit and notexceeding 60 MPH (97 km/h)
(where legally allowed) can improve
fuel efficiency due to reduced aero-
dynamic drag.
.Maintaining a safe following dis-tance behind other vehicles re-
duces unnecessary braking.
.Safely monitoring traffic to antici- pate changes in speed permits
reduced braking and smooth accel-
eration changes.
.Select a gear range suitable to roadconditions.
5. Use cruise control.
.Using cruise control during highway driving helps maintain a steady
speed.
.Cruise control is particularly effec-tive in providing fuel savings when
driving on flat terrains.
6. Plan for the shortest route.
.Utilize a map or navigation system to determine the best route to save
time. 7. Avoid idling.
.Shutting off your engine when safe
for stops exceeding 30-60 seconds
saves fuel and reduces emissions.
8. Buy an automated pass for toll roads.
.Automated passes permit drivers to use special lanes to maintain cruis-
ing speed through the toll and
avoid stopping and starting.
9. Winter warm up.
.Limit idling time to minimize impact to fuel economy.
.Vehicles typically need no morethan 30 seconds of idling at start-
up to effectively circulate the en-
gine oil before driving.
.Your vehicle will reach its ideal
operating temperature more
quickly while driving versus idling.
10. Keeping your vehicle cool.
.Park your vehicle in a covered parking area or in the shade when-
ever possible.
.When entering a hot vehicle, open- ing the windows will help to reduce
the inside temperature faster, re-
sulting in reduced demand on your
A/C system. .
Keep your engine tuned up.
. Follow the recommended scheduled
maintenance.
. Keep the tires inflated to the correct
pressure. Low tire pressure increases
tire wear and lowers fuel economy.
. Keep the wheels in correct alignment.
Improper alignment increases tire
wear and lowers fuel economy.
. Use the recommended viscosity en-
gine oil. (See “Engine oil and oil filter
recommendation” (P.10-6).)
INCREASING FUEL ECONOMY
Page 438 of 556
6-10In case of emergency
4. Lower the vehicle slowly until the tiretouches the ground. Then, with the
wheel nut wrench, tighten the wheel
nuts securely in the sequence illu-
strated. Lower the vehicle completely.
WARNING
.Incorrect wheel nuts or impro-
perly tightened wheel nuts can
cause the wheel to become loose
or come off. This could cause an
accident.
. Do not use oil or grease on the
wheel studs or nuts. This could
cause the nuts to become loose.
. Retighten the wheel nuts when
the vehicle has been driven for
600 miles (1,000 km) (also in
cases of a flat tire, etc.).
.As soon as possible, tighten the
wheel nuts to the specified torque
with a torque wrench.
Wheel nut tightening torque: 83 ft-lb (113 N·m)
The wheel nuts must be kept tigh-
tened to specifications at all times. It
is recommended that the wheel nuts
be tightened to specifications at each lubrication interval.
.Adjust tire pressure to the COLD
pressure.
COLD pressure:
After the vehicle has been parked for
3 hours or more or driven less than 1
mile (1.6 km).
COLD tire pressures are shown on
the Tire and Loading Information
label affixed to the driver side center
pillar.
Stowing the damaged tire and the
tools
1. Securely store the jack, tools and the damaged tire in the storage area.
2. Replace the luggage boards and cov- er.
3. Close the liftgate.
WARNING
. Always make sure that the spare
tire and jacking equipment are
properly secured after use. Such
items can become dangerous
projectiles in an accident or sud-
den stop. .
The spare tire is designed for
emergency use. See specific in-
structions under the heading
“Wheels and tires” (P.8-25).
Page 449 of 556
WAXING
Regular waxing protects the paint surface
and helps retain new vehicle appearance.
Polishing is recommended to remove
built-up wax residue and to avoid a
weathered appearance before reapplying
wax.
A NISSAN dealer can assist you in choos-
ing the proper product.
.Wax your vehicle only after a thorough
washing. Follow the instructions sup-
plied with the wax.
. Do not use a wax containing any
abrasives, cutting compounds or clea-
ners that may damage the vehicle
finish.
Machine compound or aggressive polish-
ing on a base coat/clear coat paint finish
may dull the finish or leave swirl marks.
REMOVING SPOTS
Remove tar and oil spots, industrial dust,
insects, and tree sap as quickly as possi-
ble from the paint surface to avoid lasting
damage or staining. Special cleaning
products are available at a NISSAN dealer
or any automotive accessory stores. It is
recommended that you visit a NISSAN
dealer for these products.
UNDERBODY
In areas where road salt is used in winter,
the underbody must be cleaned regularly.
This will prevent dirt and salt from build-
ing up and causing the acceleration of
corrosion on the underbody and suspen-
sion. Before the winter period and again
in the spring, the underseal must be
checked and, if necessary, re-treated.
GLASS
Use glass cleaner to remove smoke and
dust film from the glass surfaces. It is
normal for glass to become coated with a
film after the vehicle is parked in the hot
sun. Glass cleaner and a soft cloth will
easily remove this film.
CAUTION
When cleaning the inside of the
windows, do not use sharp-edged
tools, abrasive cleaners or chlorine-
based disinfectant cleaners. They
could damage the electrical conduc-
tors or rear window defroster ele-
ments.
WHEELS
Wash the wheels when washing the
vehicle to maintain their appearance.
. Clean the inner side of the wheels
when the wheel is changed or the
underside of the vehicle is washed.
. Inspect wheel rims regularly for dents
or corrosion. Such damage may cause
loss of pressure or poor seal at the tire
bead.
. NISSAN recommends that the road
wheels be waxed to protect against
road salt in areas where it is used
during winter.
CAUTION
Do not use abrasive cleaners when
washing the wheels.
ALUMINUM ALLOY WHEELS
Wash regularly with a sponge dampened
in a mild soap solution, especially during
winter months in areas where road salt is
used. Salt could discolor the wheels if not
removed.
Appearance and care7-3
Page 456 of 556
8-2Do-it-yourself
When performing any inspection or main-
tenance work on your vehicle, always
take care to prevent serious accidental
injury to yourself or damage to the
vehicle. The following are general precau-
tions which should be closely observed.
WARNING
.Park the vehicle on a level sur-
face, apply the parking brake
securely and block the wheels to
prevent the vehicle from moving.
Push the park button to shift to
the P (Park) position.
. Be sure the ignition switch is in
the OFF position when perform-
ing any parts replacement or
repairs.
. If you must work with the engine
running, keep your hands, cloth-
ing, hair and tools away from
moving fans, belts and any other
moving parts.
. It is advisable to secure or re-
move any loose clothing and
remove any jewelry, such as
rings, watches, etc. before work-
ing on your vehicle. .
Always wear eye protection
whenever you work on your ve-
hicle.
. If you must run the engine in an
enclosed space such as a garage,
be sure there is proper ventilation
for exhaust gases to escape.
. Never get under the vehicle while
it is supported only by a jack. If it
is necessary to work under the
vehicle, support it with safety
stands.
. Because the fuel lines are under
high pressure even when the
engine is off, it is recommended
you visit a NISSAN dealer for
service of the fuel filter or fuel
lines.
. Keep smoking materials, flame
and sparks away from fuel and
the battery.
. On gasoline engine models with
the Multiport Fuel Injection (MFI)
system, the fuel filter and fuel
lines should be serviced because
the fuel lines are under high
pressure even when the engine
is turned off. It is recommended
that you visit a NISSAN dealer for
this service. .
Your vehicle is equipped with an
automatic engine cooling fan. It
may come on at any time without
warning, even if the ignition
switch is in the OFF position and
the engine is not running. To
avoid injury, always disconnect
the negative battery cable before
working near the fan.
CAUTION
.Do not work under the hood while
the engine is hot. Turn the engine
off and wait until it cools down.
. Avoid direct contact with used
engine oil and coolant. Impro-
perly disposed engine oil, and
engine coolant and/or other ve-
hicle fluids can damage the en-
vironment. Always conform to
local regulations for disposal of
vehicle fluid.
. Never leave the engine or the CVT
related component harnesses
disconnected while the ignition
switch is in the ON position.
. Never connect or disconnect the
battery or any transistorized
component while the ignition
MAINTENANCE PRECAUTIONS
Page 459 of 556
WAI0190X
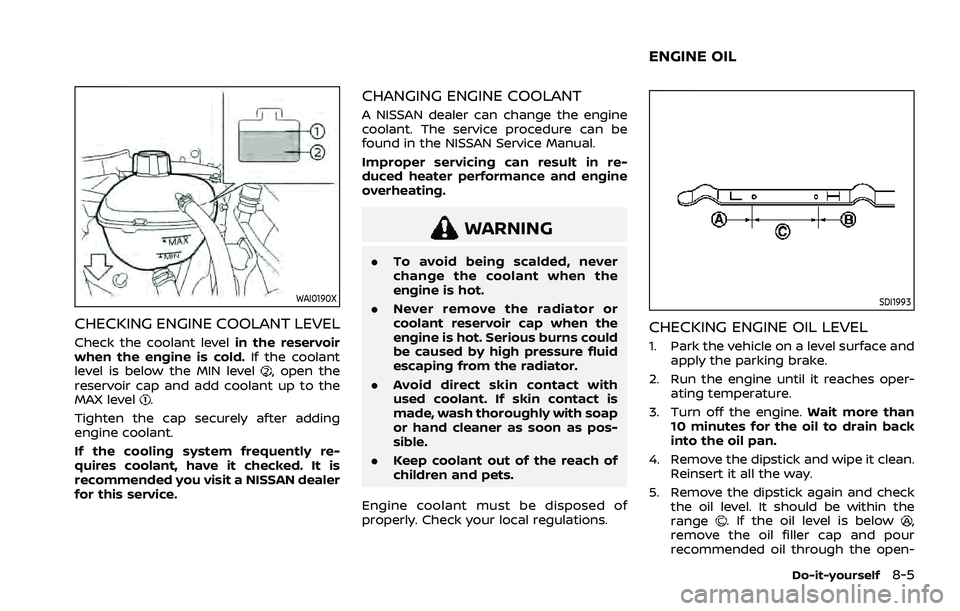
CHECKING ENGINE COOLANT LEVEL
Check the coolant levelin the reservoir
when the engine is cold. If the coolant
level is below the MIN level
, open the
reservoir cap and add coolant up to the
MAX level
.
Tighten the cap securely after adding
engine coolant.
If the cooling system frequently re-
quires coolant, have it checked. It is
recommended you visit a NISSAN dealer
for this service.
CHANGING ENGINE COOLANT
A NISSAN dealer can change the engine
coolant. The service procedure can be
found in the NISSAN Service Manual.
Improper servicing can result in re-
duced heater performance and engine
overheating.
WARNING
. To avoid being scalded, never
change the coolant when the
engine is hot.
. Never remove the radiator or
coolant reservoir cap when the
engine is hot. Serious burns could
be caused by high pressure fluid
escaping from the radiator.
. Avoid direct skin contact with
used coolant. If skin contact is
made, wash thoroughly with soap
or hand cleaner as soon as pos-
sible.
. Keep coolant out of the reach of
children and pets.
Engine coolant must be disposed of
properly. Check your local regulations.
SDI1993
CHECKING ENGINE OIL LEVEL
1. Park the vehicle on a level surface and apply the parking brake.
2. Run the engine until it reaches oper- ating temperature.
3. Turn off the engine. Wait more than
10 minutes for the oil to drain back
into the oil pan.
4. Remove the dipstick and wipe it clean. Reinsert it all the way.
5. Remove the dipstick again and check the oil level. It should be within the
range
. If the oil level is below,
remove the oil filler cap and pour
recommended oil through the open-
Do-it-yourself8-5
ENGINE OIL