tire pressure reset NISSAN ROGUE 2021 Owner´s Manual
[x] Cancel search | Manufacturer: NISSAN, Model Year: 2021, Model line: ROGUE, Model: NISSAN ROGUE 2021Pages: 556, PDF Size: 2.7 MB
Page 100 of 556
2-12Instruments and controls
: The average fuel economy since the
last reset will be displayed.
: The best fuel economy of the past
history will be displayed.
When the “See Tire Pressure” message
appears in the ECO Drive Report, the
display can be switched to the Tire
Pressures display by pushing the scroll
dial on the steering wheel to show an
additional message.
Page 107 of 556
accident and could result in ser-
ious personal injury. Check the
tire pressure for all four tires.
Adjust the tire pressure to the
recommended COLD tire pressure
shown on the Tire and Loading
Information label to turn the low
tire pressure warning light OFF. If
the light still illuminates while
driving after adjusting the tire
pressure, a tire may be flat or
the TPMS may be malfunctioning.
If you have a flat tire, replace it
with a spare tire as soon as
possible. If no tire is flat and all
tires are properly inflated, it is
recommended you consult a
NISSAN dealer.
. Since the spare tire is not
equipped with the TPMS, when a
spare tire is mounted or a wheel
is replaced, the TPMS will not
function and the low tire pressure
warning light will flash for ap-
proximately 1 minute. The light
will remain on after 1 minute.
Have your tires replaced and/or
TPMS system reset as soon as
possible. It is recommended you
visit a NISSAN dealer for these
services. .
Replacing tires with those not
originally specified by NISSAN
could affect the proper operation
of the TPMS.
CAUTION
.The TPMS is not a substitute for
the regular tire pressure check.
Be sure to check the tire pressure
regularly.
. If the vehicle is being driven at
speeds of less than 16 MPH (25
km/h), the TPMS may not operate
correctly.
. Be sure to install the specified
size of tires to the four wheels
correctly.
Malfunction Indicator Light
(MIL)
If the malfunction indicator light comes
on steady or blinks while the engine is
running, it may indicate a potential emis-
sion control and/or Continuously Variable
Transmission (CVT) malfunction.
The malfunction indicator light may also
illuminate steady if the vehicle runs out of
fuel. Check to make sure that the vehicle
has at least 3 US gallons (11.4 liters) of fuel
in the fuel tank.
After a few driving trips, the
light
should turn off if no other potential
emission control system malfunction ex-
ists.
If this indicator light remains on for 20
seconds and then blinks for 10 seconds
when the engine is not running, it indi-
cates that the vehicle is not ready for an
emission control system inspection/
maintenance test. (See “Readiness for
Inspection/Maintenance (I/M) test” (P.10-
29).)
Operation:
The malfunction indicator light will come
on in one of two ways:
. Malfunction indicator light on steady
— An emission control system and/or
CVT malfunction has been detected. It
Instruments and controls2-19
Page 118 of 556
2-30Instruments and controls
and intervals, refer to the “9. Maintenance
and schedules” section.
Tire:
This indicator appears when the user set
distance comes for replacing tires. You
can set or reset the distance for replacing
tires.
WARNING
The tire replacement indicator is not
a substitute for regular tire checks,
including tire pressure checks. (See
“Changing wheels and tires” (P.8-
33).) Many factors including tire in-
flation, alignment, driving habits and
road conditions affect tire wear and
when tires should be replaced.
Setting the tire replacement indica-
tor for a certain driving distance
does not mean your tires will last
that long. Use the tire replacement
indicator as a guide only and always
perform regular tire checks. Failure
to perform regular tire checks, in-
cluding tire pressure checks could
result in tire failure. Serious vehicle
damage could occur and may lead to
a collision, which could result in
serious personal injury or death.Other:
This indicator appears when the user set
distance comes for checking or replacing
maintenance items other than the engine
oil, oil filter and tires. Other maintenance
items can include such things as air filter
or tire rotation. You can set or reset the
distance for checking or replacing the
items.
Customize Display
The display settings allows user to
choose from the various meter selections.
The display settings can be changed
using the scroll dial
.
Main Menu Selection:
Displays available screens that can be
shown in the vehicle information display.
Route Guidance (if so equipped):
To change the setting, use the scroll dial
to select and push it.
. Alerts
The “Alerts” allows user to turn the
Navigation Settings alerts on or off.
Transition (Cruise) (if so equipped):
The ”Transition (Cruise)” allows user to
turn the cruise screen transition on or off. Welcome Effect:
The “Welcome Effect” displays the avail-
able welcome effect settings.
. Gauges (if so equipped)
. Animation
Operation guidance:
The “Operation guidance” displays the
available operation guidance settings.
. Lights
. Wiper
. Seat Memory (if so equipped)
. Cruise Control (if so equipped)
Unit/Language
The units that are shown in the vehicle
information display can be changed:
.Mileage/Fuel
. Tire Pressure
. Temperature
. Language
Use the scroll dial
to select and change
the units of the vehicle information dis-
play.
Mileage/Fuel:
The unit for the mileage that is shown in
the vehicle information display can be
changed.
Page 119 of 556
.miles, MPG
. km, km/l
. km, l/100km
Use the scroll dial
to select and change
the unit.
Tire Pressure:
The unit for tire pressures that is shown
in the vehicle information display can be
changed to:
. psi
. kPa
. bar
. kgf/cm
2
(See “TPMS Setting” (P.2-26).)
Temperature:
The temperature that is shown in the
vehicle information display can be chan-
ged from:
.°C
. °F
Use the scroll dial
to toggle choices.
Language:
The language of the vehicle information
display can be changed.
Use the scroll dial
to select and change
the language of the vehicle information
display.
Key-Linked Settings (if so equipped)
The Key-Linked Settings can be turned
ON/OFF using the scroll dial. It will
display the key synchronized and in use
for this vehicle.
Factory Reset
The settings in the vehicle information
display can be reset back to the factory
default. To reset the vehicle information
display:
1. Select “Factory Reset” using the scroll
dial
and push it.
2. Select “Yes” to return all settings back to default by pushing the scroll dial
.
Instruments and controls2-31
Page 133 of 556
each time when refueling.
4. Fuel economy display
Current fuel consumption:
The Fuel economy display mode shows
the current fuel consumption.
Average fuel consumption:
The Fuel economy display mode shows
the average fuel consumption since the
last reset.
The Fuel economy display mode have
three modes of operation. You can switch
between Manual Reset1, Manual Reset2 or
Auto Refuel by pushing the scroll dial
.
Manual Reset1 can be reset manually by
using the scroll dial
.
Manual Reset2 can be reset manually by
using the scroll dial
, or will be reset
automatically each time the ignition
switch is placed in the OFF position (if so
equipped).
Auto Refuel will be reset automatically
each time when refueling.
5. ECO Pedal Guide
When the ECO mode is selected, you can
view the ECO Pedal Guide function for
improving fuel economy.
The ECO Pedal Guide mode have three
modes of operation. You can switch
between Manual Reset1, Manual Reset2
or Auto Refuel by pushing the scroll dial
.
Manual Reset1 can be reset manually by
using the scroll dial
.
Manual Reset2 can be reset manually by
using the scroll dial
, or will be reset
automatically each time the ignition
switch is placed in the OFF position (if so
equipped).
Auto Refuel will be reset automatically
each time when refueling.
(See “ECO Pedal Guide function” (P.5-33).)
6. Tire Pressures
The tire pressure mode shows the pres-
sure of all four tires while the vehicle is
driven.
With the “Tire Pres ECO advice” function
ON, when the tire pressure is getting low,
”Check Tire Pressures for Best Fuel Econ-
omy” or ”Add air for Best Fuel Economy”
appears. (See “ECO Mode Setting” (P.2-26)
and “Tire Pres ECO advice” (P.5-33).) When the Tire Pressure Low — Add Air
warning appears, the display can be
switched to the tire pressure mode by
pushing the scroll dial
to reveal addi-
tional details on the displayed warning.
7. Intelligent 4x4 torque distribution
display (if so equipped)
When the Intelligent 4x4 torque distribu-
tion display is selected, you can view the
distribution ratio of the transmission
torque to the front and rear wheels
during driving.
8. Compass (if so equipped)
This display indicates the heading direc-
tion of the vehicle.
9. Navigation (if so equipped)
When the route guidance is set in the
navigation system, this item shows the
navigation route information.
10. Audio
The audio mode shows the status of
audio information.
Instruments and controls2-45
Page 262 of 556
5-8Starting and driving
a spare tire as soon as possible.
(See “Flat tire” (P.6-3) for chan-
ging a flat tire.)
. Since the spare tire is not
equipped with the TPMS, when a
spare tire is mounted or a wheel
is replaced, the TPMS will not
function and the low tire pressure
warning light will flash for ap-
proximately 1 minute. The light
will remain on after 1 minute.
Have your tires replaced and/or
TPMS system reset as soon as
possible. It is recommended you
visit a NISSAN dealer for these
services.
. Replacing tires with those not
originally specified by NISSAN
could affect the proper operation
of the TPMS.
. Do not inject any tire liquid or
aerosol tire sealant into the tires,
as this may cause a malfunction
of the tire pressure sensors.
CAUTION
.The TPMS may not function prop-
erly when the wheels are
equipped with tire chains or the wheels are buried in snow.
. Do not place metalized film or
any metal parts (antenna, etc.) on
the windows. This may cause
poor reception of the signals
from the tire pressure sensors,
and the TPMS will not function
properly.
Some devices and transmitters may tem-
porarily interfere with the operation of
the TPMS and cause the low tire pressure
warning light to illuminate. Some exam-
ples are:
. Facilities or electric devices using
similar radio frequencies are near the
vehicle.
. If a transmitter set to similar frequen-
cies is being used in or near the
vehicle.
. If a computer (or similar equipment) or
a DC/AC converter is being used in or
near the vehicle.
Low tire pressure warning light may
illuminate in the following cases.
. If the vehicle is equipped with a wheel
and tire without TPMS.
. If the TPMS has been replaced and the
ID has not been registered. .
If the wheel is not originally specified
by NISSAN.
FCC Notice:
For USA:
Tire Pressure Monitoring System (TPMS)
transmitter
FCC ID: KR5TIS-10DL
Body Control Module (BCM)
40406556
Continental
This device complies with Part 15 of the
FCC Rules. Operation is subject to the
following two conditions: (1) This device
may not cause harmful interference,
and (2) this device must accept any
interference received, including inter-
ference that may cause undesired op-
eration.
Note: Changes or modifications not
expressly approved by the party re-
sponsible for compliance could void
the user’s authority to operate the
equipment.
For Canada:
Tire Pressure Monitoring System (TPMS)
transmitter
Continental
Page 431 of 556
To shut off the engine in an emergency
situation while driving, perform the fol-
lowing procedure:
.Rapidly push the push-button ignition
switch 3 consecutive times in less
than 1.5 seconds, or
. Push and hold the push-button igni-
tion switch for more than 2 seconds.TIRE PRESSURE MONITORING SYS-
TEM (TPMS)
This vehicle is equipped with the Tire
Pressure Monitoring System (TPMS). It
monitors tire pressure of all tires except
the spare. When the low tire pressure
warning light is lit, and the “Tire Pressure
Low - Add Air” warning message is
displayed in the vehicle information dis-
play, one or more of your tires is sig-
nificantly under-inflated. If the vehicle is
being driven with low tire pressure, the
TPMS will activate and warn you of it by
the low tire pressure warning light. This
system will activate only when the vehicle
is driven at speeds above 16 MPH (25
km/h). For more details, see “Warning
lights, indicator lights and audible remin-
ders” (P.2-13) and “Tire Pressure Monitor-
ing System (TPMS)” (P.5-6).
WARNING
.If the low tire pressure warning
light illuminates while driving,
avoid sudden steering maneu-
vers or abrupt braking, reduce
vehicle speed, pull off the road
to a safe location and stop the
vehicle as soon as possible. Driv-
ing with under-inflated tires may
permanently damage the tires and increase the likelihood of tire
failure. Serious vehicle damage
could occur and may lead to an
accident and could result in ser-
ious personal injury. Check the
tire pressure for all four tires.
Adjust the tire pressure to the
recommended COLD tire pressure
shown on the Tire and Loading
Information label to turn the low
tire pressure warning light OFF. If
the light still illuminates while
driving after adjusting the tire
pressure, a tire may be flat. If
you have a flat tire, replace it with
a spare tire as soon as possible.
. Since the spare tire is not
equipped with the TPMS, when a
spare tire is mounted or a wheel
is replaced, the TPMS will not
function and the low tire pressure
warning light will flash for ap-
proximately 1 minute. The light
will remain on after 1 minute.
Have your tires replaced and/or
TPMS system reset as soon as
possible. It is recommended you
visit a NISSAN dealer for these
services.
. Replacing tires with those not
originally specified by NISSAN
could affect the proper operation
In case of emergency6-3
EMERGENCY ENGINE SHUT OFF FLAT TIRE
Page 488 of 556
8-34Do-it-yourself
adjust the tires to the cor-
rect pressure in accordance
with Tire and Loading Infor-
mation label.
.To ensure proper operation
of the Easy-Fill Tire Alert
system after a tire rotation,
reset and register the sensor
to their new installed loca-
tions. It is recommended
that you visit a NISSAN deal-
er for this service.
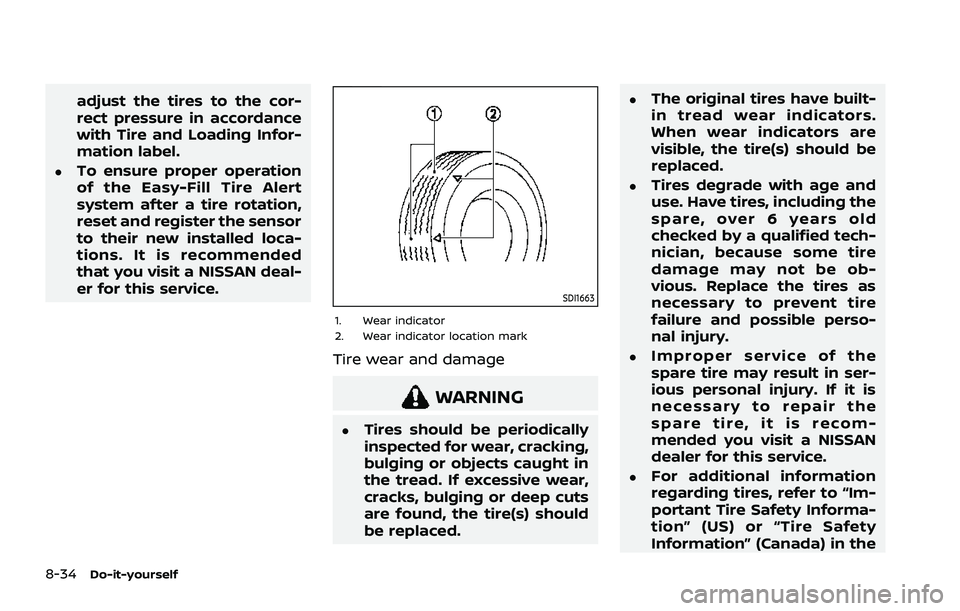
SDI1663
1. Wear indicator
2. Wear indicator location mark
Tire wear and damage
WARNING
.Tires should be periodically
inspected for wear, cracking,
bulging or objects caught in
the tread. If excessive wear,
cracks, bulging or deep cuts
are found, the tire(s) should
be replaced.
.The original tires have built-
in tread wear indicators.
When wear indicators are
visible, the tire(s) should be
replaced.
.Tires degrade with age and
use. Have tires, including the
spare, over 6 years old
checked by a qualified tech-
nician, because some tire
damage may not be ob-
vious. Replace the tires as
necessary to prevent tire
failure and possible perso-
nal injury.
.Improper service of the
spare tire may result in ser-
ious personal injury. If it is
necessary to repair the
spare tire, it is recom-
mended you visit a NISSAN
dealer for this service.
.For additional information
regarding tires, refer to “Im-
portant Tire Safety Informa-
tion” (US) or “Tire Safety
Information” (Canada) in the
Page 489 of 556
Warranty Information Book-
let.
Replacing wheels and tires
When replacing a tire, use the same size,
tread design, speed rating and load
carrying capacity as originally equipped.
(See “Specifications” (P.10-8) for recom-
mended types and sizes of tires and
wheels.)
WARNING
. The use of tires other than those
recommended or the mixed use
of tires of different brands, con-
struction (bias, bias-belted or ra-
dial), or tread patterns can
adversely affect the ride, braking,
handling, VDC system, ground
clearance, body-to-tire clearance,
tire chain clearance, speed-
ometer calibration, headlight
aim and bumper height. Some of
these effects may lead to acci-
dents and could result in serious
personal injury.
. For Two-Wheel Drive (2WD) mod-
els, if your vehicle was originally
equipped with 4 tires that were the same size and you are only
replacing 2 of the 4 tires, install
the new tires on the rear axle.
Placing new tires on the front
axle may cause loss of vehicle
control in some driving condi-
tions and cause an accident and
personal injury.
. If the wheels are changed for any
reason, always replace with
wheels which have the same off-
set dimension. Wheels of a differ-
ent off-set could cause prema-
ture tire wear, degrade vehicle
handling characteristics and/or
interference with the brake
discs/drums. Such interference
can lead to decreased braking
efficiency and/or early brake
pad/shoe wear. See “Wheels and
tires” (P.10-8) of this manual for
wheel off-set dimensions.
. Since the spare tire is not
equipped with the TPMS, when a
spare tire is mounted or a wheel
is replaced, the TPMS will not
function and the low tire pressure
warning light will flash for ap-
proximately 1 minute. The light
will remain on after 1 minute.
Have your tires replaced and/or
TPMS system reset as soon as possible. It is recommended you
visit a NISSAN dealer for these
services.
. Replacing tires with those not
originally specified by NISSAN
could affect the proper operation
of the TPMS.
. The TPMS sensor may be da-
maged if it is not handled cor-
rectly. Be careful when handling
the TPMS sensor.
. When replacing the TPMS sensor,
the ID registration may be re-
quired. It is recommended you
visit a NISSAN dealer for ID regis-
tration.
. Do not use a valve stem cap that
is not specified by NISSAN. The
valve stem cap may become
stuck.
. Be sure that the valve stem caps
are correctly fitted. Otherwise the
valve may be clogged up with dirt
and cause a malfunction or loss
of pressure.
. Do not install a damaged or
deformed wheel or tire even if it
has been repaired. Such wheels
or tires could have structural
damage and could fail without
warning.
Do-it-yourself8-35