cargo NISSAN ROGUE 2023 Owners Manual
[x] Cancel search | Manufacturer: NISSAN, Model Year: 2023, Model line: ROGUE, Model: NISSAN ROGUE 2023Pages: 508, PDF Size: 2.44 MB
Page 13 of 508
JVC1067X
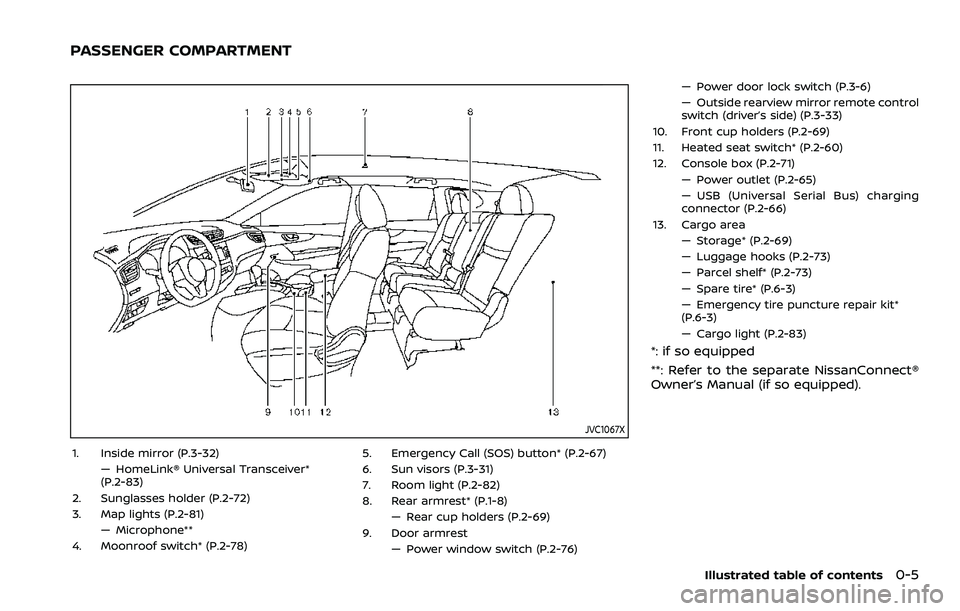
1. Inside mirror (P.3-32)— HomeLink® Universal Transceiver*
(P.2-83)
2. Sunglasses holder (P.2-72)
3. Map lights (P.2-81) — Microphone**
4. Moonroof switch* (P.2-78) 5. Emergency Call (SOS) button* (P.2-67)
6. Sun visors (P.3-31)
7. Room light (P.2-82)
8. Rear armrest* (P.1-8)
— Rear cup holders (P.2-69)
9. Door armrest — Power window switch (P.2-76) — Power door lock switch (P.3-6)
— Outside rearview mirror remote control
switch (driver’s side) (P.3-33)
10. Front cup holders (P.2-69)
11. Heated seat switch* (P.2-60)
12. Console box (P.2-71) — Power outlet (P.2-65)
— USB (Universal Serial Bus) charging
connector (P.2-66)
13. Cargo area — Storage* (P.2-69)
— Luggage hooks (P.2-73)
— Parcel shelf* (P.2-73)
— Spare tire* (P.6-3)
— Emergency tire puncture repair kit*
(P.6-3)
— Cargo light (P.2-83)
*: if so equipped
**: Refer to the separate NissanConnect®
Owner’s Manual (if so equipped).
Illustrated table of contents0-5
PASSENGER COMPARTMENT
Page 25 of 508
SSS1053
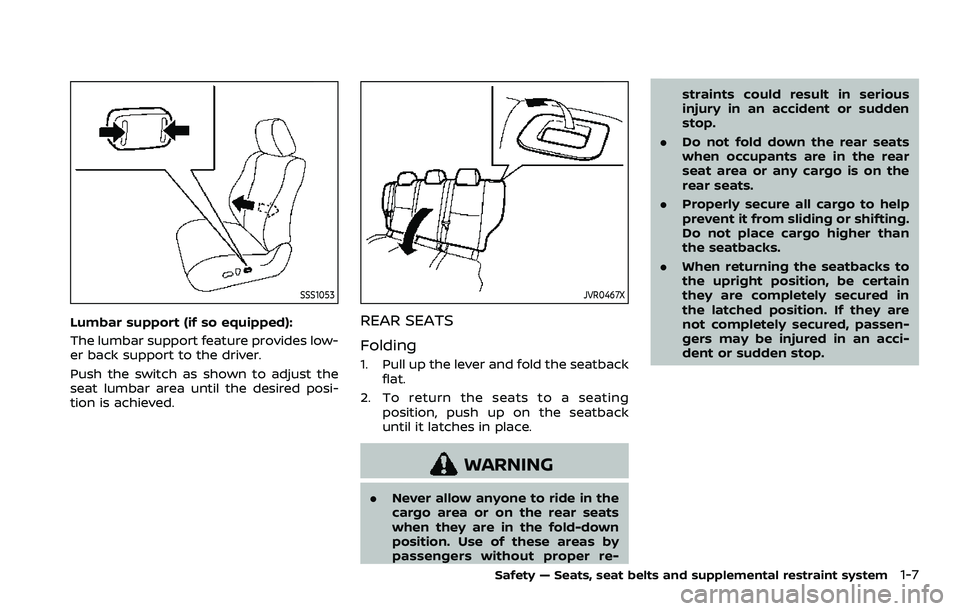
Lumbar support (if so equipped):
The lumbar support feature provides low-
er back support to the driver.
Push the switch as shown to adjust the
seat lumbar area until the desired posi-
tion is achieved.
JVR0467X
REAR SEATS
Folding
1. Pull up the lever and fold the seatbackflat.
2. To return the seats to a seating position, push up on the seatback
until it latches in place.
WARNING
. Never allow anyone to ride in the
cargo area or on the rear seats
when they are in the fold-down
position. Use of these areas by
passengers without proper re- straints could result in serious
injury in an accident or sudden
stop.
. Do not fold down the rear seats
when occupants are in the rear
seat area or any cargo is on the
rear seats.
. Properly secure all cargo to help
prevent it from sliding or shifting.
Do not place cargo higher than
the seatbacks.
. When returning the seatbacks to
the upright position, be certain
they are completely secured in
the latched position. If they are
not completely secured, passen-
gers may be injured in an acci-
dent or sudden stop.
Safety — Seats, seat belts and supplemental restraint system1-7
Page 39 of 508
JVR0473X
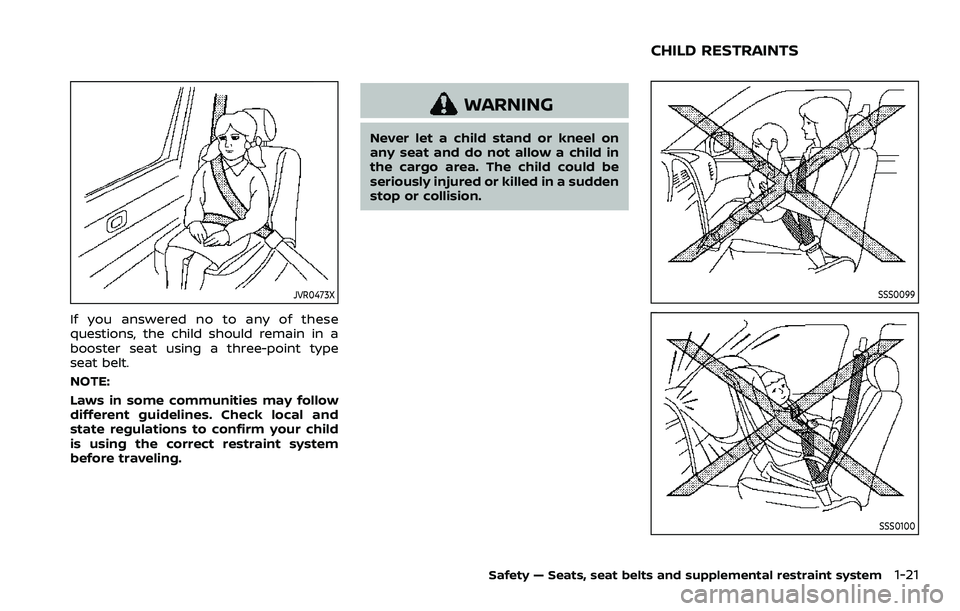
If you answered no to any of these
questions, the child should remain in a
booster seat using a three-point type
seat belt.
NOTE:
Laws in some communities may follow
different guidelines. Check local and
state regulations to confirm your child
is using the correct restraint system
before traveling.
WARNING
Never let a child stand or kneel on
any seat and do not allow a child in
the cargo area. The child could be
seriously injured or killed in a sudden
stop or collision.
SSS0099
SSS0100
Safety — Seats, seat belts and supplemental restraint system1-21
CHILD RESTRAINTS
Page 43 of 508
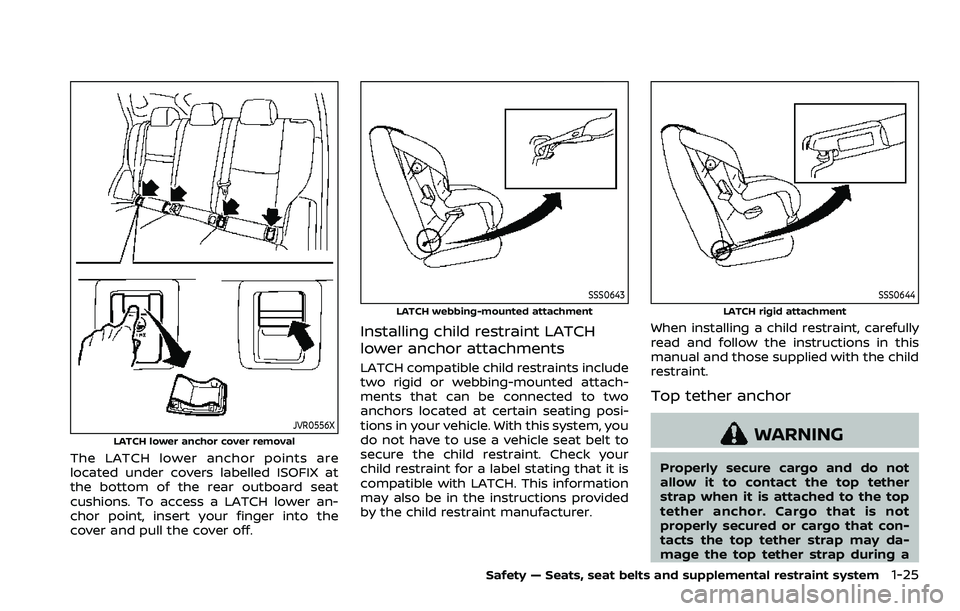
JVR0556XLATCH lower anchor cover removal
The LATCH lower anchor points are
located under covers labelled ISOFIX at
the bottom of the rear outboard seat
cushions. To access a LATCH lower an-
chor point, insert your finger into the
cover and pull the cover off.
SSS0643
LATCH webbing-mounted attachment
Installing child restraint LATCH
lower anchor attachments
LATCH compatible child restraints include
two rigid or webbing-mounted attach-
ments that can be connected to two
anchors located at certain seating posi-
tions in your vehicle. With this system, you
do not have to use a vehicle seat belt to
secure the child restraint. Check your
child restraint for a label stating that it is
compatible with LATCH. This information
may also be in the instructions provided
by the child restraint manufacturer.
SSS0644
LATCH rigid attachment
When installing a child restraint, carefully
read and follow the instructions in this
manual and those supplied with the child
restraint.
Top tether anchor
WARNING
Properly secure cargo and do not
allow it to contact the top tether
strap when it is attached to the top
tether anchor. Cargo that is not
properly secured or cargo that con-
tacts the top tether strap may da-
mage the top tether strap during a
Safety — Seats, seat belts and supplemental restraint system1-25
Page 44 of 508
1-26Safety — Seats, seat belts and supplemental restraint system
collision. If the parcel shelf (if so
equipped) contacts the top tether
strap when it is attached to the top
tether anchor, remove the parcel
shelf from the vehicle or secure it
on the cargo floor below its attach-
ment location. If the parcel shelf is
not removed, it may damage the top
tether strap during a collision. Your
child could be seriously injured or
killed in a collision if the child re-
straint top tether strap is damaged.
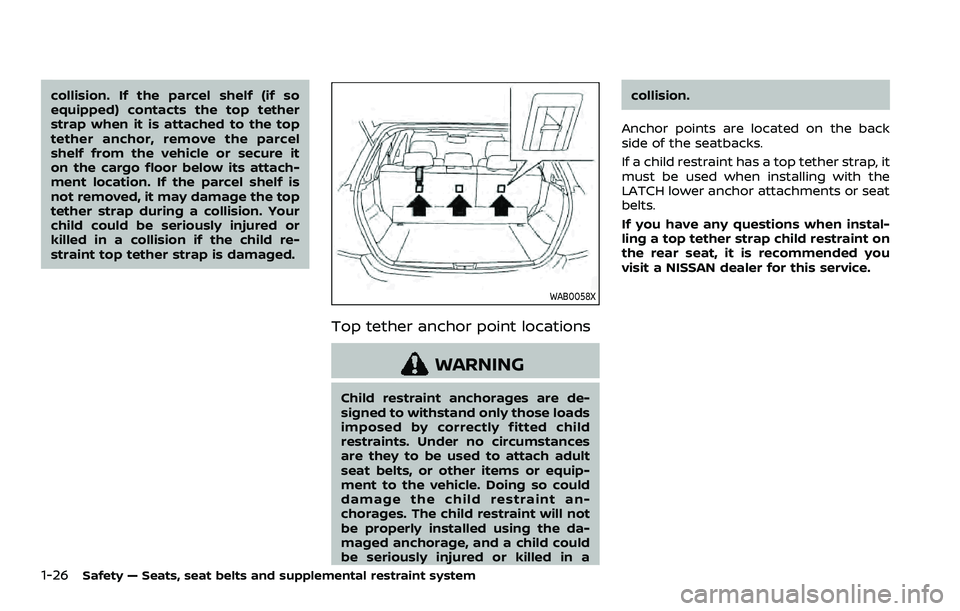
WAB0058X
Top tether anchor point locations
WARNING
Child restraint anchorages are de-
signed to withstand only those loads
imposed by correctly fitted child
restraints. Under no circumstances
are they to be used to attach adult
seat belts, or other items or equip-
ment to the vehicle. Doing so could
damage the child restraint an-
chorages. The child restraint will not
be properly installed using the da-
maged anchorage, and a child could
be seriously injured or killed in acollision.
Anchor points are located on the back
side of the seatbacks.
If a child restraint has a top tether strap, it
must be used when installing with the
LATCH lower anchor attachments or seat
belts.
If you have any questions when instal-
ling a top tether strap child restraint on
the rear seat, it is recommended you
visit a NISSAN dealer for this service.
Page 84 of 508
Power outlet ........................................................................\
.......... 2-65USB (Universal Serial Bus)
charging connector .......................................................... 2-66
Emergency Call (SOS) button (if
so equipped) ........................................................................\
.......... 2-67 Emergency support .......................................................... 2-67
Storage ........................................................................\
...................... 2-69 Cup holders ........................................................................\
..... 2-69
Soft bottle holders ............................................................. 2-70
Flexible luggage boards (if so equipped) ......... 2-70
Glove box ........................................................................\
........... 2-71
Console box ........................................................................\
..... 2-71
Sunglasses holder .............................................................. 2-72
Card holder (driver’s side) ............................................ 2-72
Luggage hooks ..................................................................... 2-73
Parcel shelf (if so equipped) ....................................... 2-73
Roof rack (if so equipped) .................................................. 2-75
Windows ........................................................................\
.................... 2-76
Power windows .................................................................... 2-76
Moonroof (if so equipped) .................................................. 2-78 Power moonroof ................................................................. 2-78 Interior lights ........................................................................\
...... 2-80
Interior light switch ........................................................ 2-81
Console light (if so equipped) ................................. 2-81
Map lights ........................................................................\
....... 2-81
Room light ........................................................................\
.... 2-82
Vanity mirror light (if so equipped) .................... 2-82
Cargo light ........................................................................\
..... 2-83
HomeLink® Universal Transceiver (if
so equipped) ........................................................................\
......... 2-83 Programming HomeLink® ......................................... 2-84
Programming HomeLink® for Canadian
customers and gate openers ................................. 2-85
Operating the HomeLink®
Universal Transceiver .................................................... 2-85
Programming troubleshooting ............................. 2-86
Clearing the programmed information .......... 2-86
Reprogramming a single
HomeLink® button ........................................................... 2-86
If your vehicle is stolen ................................................ 2-86
Page 98 of 508
2-16Instruments and controls
CAUTION
.The TPMS is not a substitute for
the regular tire pressure check.
Be sure to check the tire pressure
regularly.
. If the vehicle is being driven at
speeds of less than 16 MPH (25
km/h), the TPMS may not operate
correctly.
. Be sure to install the specified
size of tires to the four wheels
correctly.
Master warning light
When the ignition switch is in the ON
position, the master warning light illumi-
nates if a warning message appears in
the vehicle information display.
See “Vehicle information display” (P.2-19).
Malfunction Indicator Light
(MIL)
If the malfunction indicator light comes
on steady or blinks while the engine is
running, it may indicate a potential emis-
sion control and/or Continuously Variable
Transmission (CVT) malfunction.
The malfunction indicator light may also
illuminate steady if the fuel-filler cap is
loose or missing, or if the vehicle runs out
of fuel. Check to make sure the fuel-filler
cap is installed and closed tightly, and
that the vehicle has at least 3 US gallons
(11.4 liters) of fuel in the fuel tank.
After a few driving trips, the
light
should turn off if no other potential
emission control system malfunction ex-
ists.
If this indicator light remains on for 20
seconds and then blinks for 10 seconds
when the engine is not running, it indi-
cates that the vehicle is not ready for an
emission control system inspection/
maintenance test. (See “Readiness for
Inspection/Maintenance (I/M) test” (P.10-
19).)
Operation:
The malfunction indicator light will come
on in one of two ways: .
Malfunction indicator light on steady
— An emission control system and/or
CVT malfunction has been detected.
Check the fuel-filler cap if the LOOSE
FUEL CAP warning appears in the
vehicle information display. If the
fuel-filler cap is loose or missing, tight-
en or install the cap and continue to
drive the vehicle. The
light should
turn off after a few driving trips. If the
light does not turn off after a few
driving trips, have the vehicle in-
spected. It is recommended you visit
a NISSAN dealer for this service. You
do not need to have your vehicle
towed to the dealer.
. Malfunction indicator light blinking —
An engine misfire has been detected
which may damage the emission
control system.
To reduce or avoid emission control
system damage:
1) Do not drive at speeds above 45
MPH (72 km/h).
2) Avoid hard acceleration or decel- eration.
3) Avoid steep uphill grades.
4) If possible, reduce the amount of cargo being hauled or towed.
The malfunction indicator light may
stop blinking and remain on.
Have the vehicle inspected. It is re-
Page 138 of 508
2-56Instruments and controls
.The timing of switching the low
beam and high beam may
change under the following situa-
tions.
— The brightness of the head-
lights of the oncoming vehicle
or leading vehicle.
— The movement and direction of the oncoming vehicle and
the leading vehicle.
— When only one light on the oncoming vehicle or the lead-
ing vehicle is illuminated.
— When the oncoming vehicle or the leading vehicle is a two-
wheeled vehicle.
— Road conditions (incline, curve, the road surface, etc.).
— The number of passengers and the amount of cargo.
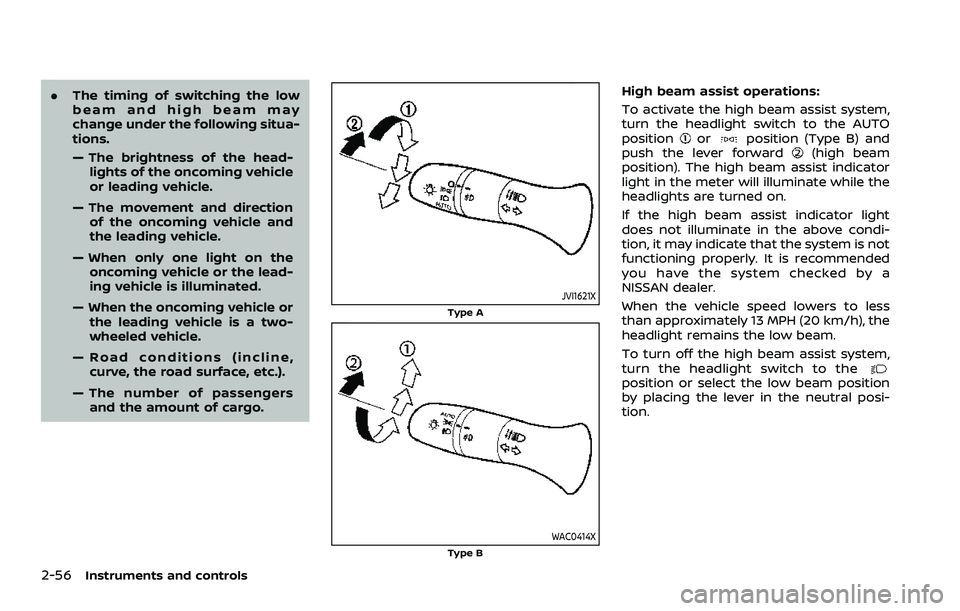
JVI1621X
Type A
WAC0414XType B
High beam assist operations:
To activate the high beam assist system,
turn the headlight switch to the AUTO
position
orposition (Type B) and
push the lever forward(high beam
position). The high beam assist indicator
light in the meter will illuminate while the
headlights are turned on.
If the high beam assist indicator light
does not illuminate in the above condi-
tion, it may indicate that the system is not
functioning properly. It is recommended
you have the system checked by a
NISSAN dealer.
When the vehicle speed lowers to less
than approximately 13 MPH (20 km/h), the
headlight remains the low beam.
To turn off the high beam assist system,
turn the headlight switch to the
position or select the low beam position
by placing the lever in the neutral posi-
tion.
Page 147 of 508

system.
. The ECO mode system will turn off
automatically if a malfunction occurs
in the system.
. Turn off the ECO mode system when
acceleration is required such as when:
— driving with a heavy load of pas-
sengers or cargo in the vehicle
— driving on a steep uphill slope
WAC0077X
Instrument Panel
WAC0233XCenter Console Box
The power outlet is located in the instru-
ment panel and center console box.
CAUTION
. The outlet and plug may be hot
during or immediately after use.
. Do not use with accessories that
exceed a 12 volt, 120W (10A)
power draw. Do not use double
adapters or more than one elec-
trical accessory.
. Use power outlet with the engine
running to avoid discharging the
vehicle battery.
. Avoid using power outlet when
the air conditioner, headlights or
rear window defroster is on.
. This power outlet is not designed
for use with a cigarette lighter
unit.
. Push the plug in as far as it will
go. If good contact is not made,
the plug may overheat or the
internal temperature fuse may
open.
. Before inserting or disconnecting
a plug, be sure the electrical
accessory being used is turned
OFF.
Instruments and controls2-65
POWER OUTLET
Page 152 of 508
2-70Instruments and controls
JVI0873X
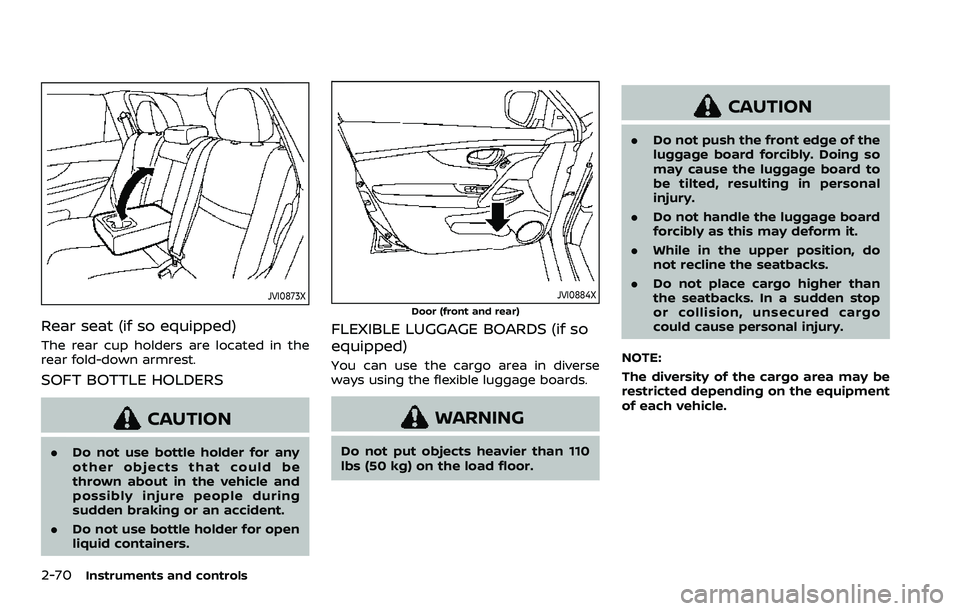
Rear seat (if so equipped)
The rear cup holders are located in the
rear fold-down armrest.
SOFT BOTTLE HOLDERS
CAUTION
.Do not use bottle holder for any
other objects that could be
thrown about in the vehicle and
possibly injure people during
sudden braking or an accident.
. Do not use bottle holder for open
liquid containers.
JVI0884X
Door (front and rear)
FLEXIBLE LUGGAGE BOARDS (if so
equipped)
You can use the cargo area in diverse
ways using the flexible luggage boards.
WARNING
Do not put objects heavier than 110
lbs (50 kg) on the load floor.
CAUTION
.Do not push the front edge of the
luggage board forcibly. Doing so
may cause the luggage board to
be tilted, resulting in personal
injury.
. Do not handle the luggage board
forcibly as this may deform it.
. While in the upper position, do
not recline the seatbacks.
. Do not place cargo higher than
the seatbacks. In a sudden stop
or collision, unsecured cargo
could cause personal injury.
NOTE:
The diversity of the cargo area may be
restricted depending on the equipment
of each vehicle.