stop NISSAN ROGUE 2023 Owners Manual
[x] Cancel search | Manufacturer: NISSAN, Model Year: 2023, Model line: ROGUE, Model: NISSAN ROGUE 2023Pages: 508, PDF Size: 2.44 MB
Page 12 of 508

0-4Illustrated table of contents
WAA0053X
1. Rear window defroster (P.2-51)
2. Rear window wiper and washer— Switch operation (P.2-50)
— Window washer fluid (P.8-10)
3. High-mounted stop light (P.8-25)
4. Antenna (P.4-33)
5. Roof rack* (P.2-75) 6. Rear sonar
— Rear Sonar System (RSS) (P.5-136)
— Rear Automatic Braking (RAB) (P.5-116)
7. Liftgate (P.3-26) — Intelligent Key system* (P.3-11)
— Remote keyless entry system* (P.3-7)
— Rear view camera* (P.4-3, P.4-10) 8. Rear combination light (P.8-25)
9. Fuel-filler door (P.3-28)
— Fuel information (P.10-3)
10. Child safety rear door locks (P.3-7)
*: if so equipped
EXTERIOR REAR
Page 23 of 508

JVR0333X
Seat lifter (if so equipped):
Pull up or push down the adjusting lever
to adjust the seat height until the desired
position is achieved.
Front power seat adjustment
Operating tips:
.The power seat motor has an auto-
reset overload protection circuit. If the
motor stops during the seat adjust-
ment, wait 30 seconds, then reacti-
vate the switch.
. To avoid discharge of the battery, do
not operate the power seats for a long
period of time when the engine is not
running.
See “Memory Seat” (P.3-34).
Safety — Seats, seat belts and supplemental restraint system1-5
Page 25 of 508
SSS1053
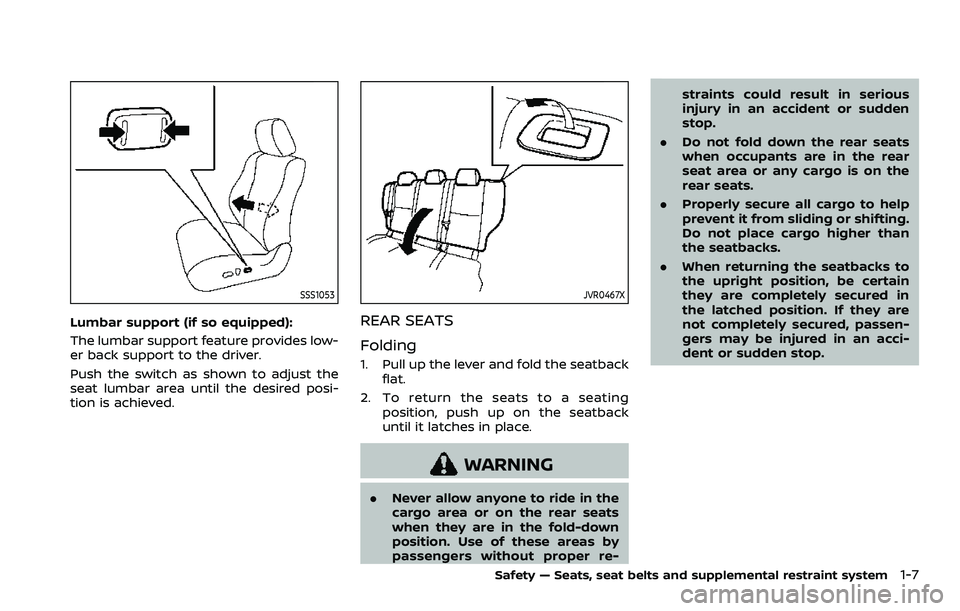
Lumbar support (if so equipped):
The lumbar support feature provides low-
er back support to the driver.
Push the switch as shown to adjust the
seat lumbar area until the desired posi-
tion is achieved.
JVR0467X
REAR SEATS
Folding
1. Pull up the lever and fold the seatbackflat.
2. To return the seats to a seating position, push up on the seatback
until it latches in place.
WARNING
. Never allow anyone to ride in the
cargo area or on the rear seats
when they are in the fold-down
position. Use of these areas by
passengers without proper re- straints could result in serious
injury in an accident or sudden
stop.
. Do not fold down the rear seats
when occupants are in the rear
seat area or any cargo is on the
rear seats.
. Properly secure all cargo to help
prevent it from sliding or shifting.
Do not place cargo higher than
the seatbacks.
. When returning the seatbacks to
the upright position, be certain
they are completely secured in
the latched position. If they are
not completely secured, passen-
gers may be injured in an acci-
dent or sudden stop.
Safety — Seats, seat belts and supplemental restraint system1-7
Page 34 of 508
1-16Safety — Seats, seat belts and supplemental restraint system
JVR0572X
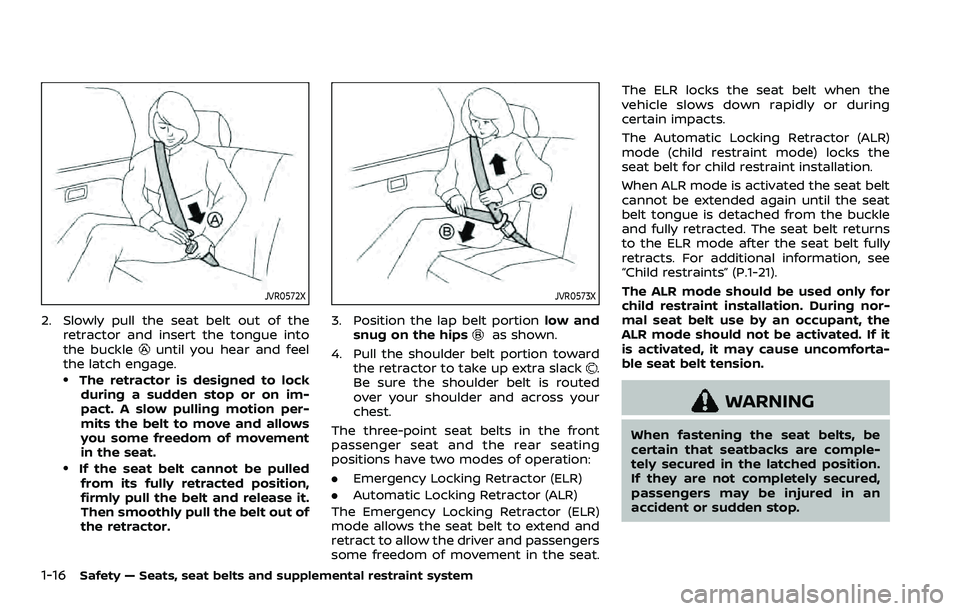
2. Slowly pull the seat belt out of theretractor and insert the tongue into
the buckle
until you hear and feel
the latch engage.
.The retractor is designed to lock
during a sudden stop or on im-
pact. A slow pulling motion per-
mits the belt to move and allows
you some freedom of movement
in the seat.
.If the seat belt cannot be pulledfrom its fully retracted position,
firmly pull the belt and release it.
Then smoothly pull the belt out of
the retractor.
JVR0573X
3. Position the lap belt portion low and
snug on the hipsas shown.
4. Pull the shoulder belt portion toward the retractor to take up extra slack
.
Be sure the shoulder belt is routed
over your shoulder and across your
chest.
The three-point seat belts in the front
passenger seat and the rear seating
positions have two modes of operation:
. Emergency Locking Retractor (ELR)
. Automatic Locking Retractor (ALR)
The Emergency Locking Retractor (ELR)
mode allows the seat belt to extend and
retract to allow the driver and passengers
some freedom of movement in the seat. The ELR locks the seat belt when the
vehicle slows down rapidly or during
certain impacts.
The Automatic Locking Retractor (ALR)
mode (child restraint mode) locks the
seat belt for child restraint installation.
When ALR mode is activated the seat belt
cannot be extended again until the seat
belt tongue is detached from the buckle
and fully retracted. The seat belt returns
to the ELR mode after the seat belt fully
retracts. For additional information, see
“Child restraints” (P.1-21).
The ALR mode should be used only for
child restraint installation. During nor-
mal seat belt use by an occupant, the
ALR mode should not be activated. If it
is activated, it may cause uncomforta-
ble seat belt tension.
WARNING
When fastening the seat belts, be
certain that seatbacks are comple-
tely secured in the latched position.
If they are not completely secured,
passengers may be injured in an
accident or sudden stop.
Page 36 of 508

1-18Safety — Seats, seat belts and supplemental restraint system
shoulder belt may vary depending on the
model.
WARNING
.After adjustment, release the ad-
justment button and try to move
the shoulder belt anchor up and
down to make sure it is securely
fixed in position.
. The shoulder belt anchor height
should be adjusted to the posi-
tion best for you. Failure to do so
may reduce the effectiveness of
the entire restraint system and
increase the chance or severity of
injury in an accident.
SEAT BELT EXTENDERS
If, because of body size or driving position,
it is not possible to properly fit the lap/
shoulder belt and fasten it, an extender
that is compatible with the installed seat
belts is available that can be purchased.
The extender adds approximately 8 in
(200 mm) of length and may be used for
either the driver or front passenger seat-
ing position. It is recommended you visit a
NISSAN dealer for assistance with pur-
chasing an extender if an extender is
required.
WARNING
.It is recommended that only
NISSAN seat belt extenders, made
by the same company which
made the original equipment seat
belts, be used with NISSAN seat
belts.
. Adults and children who can use
the standard seat belt should not
use an extender. Such unneces-
sary use could result in serious
personal injury in the event of an
accident.
. Never use seat belt extenders to
install child restraints. If the child
restraint is not secured properly, the child could be seriously in-
jured or killed in a collision or a
sudden stop.
SEAT BELT MAINTENANCE
.
To clean the seat belt webbing, apply
a mild soap solution or any solution
recommended for cleaning upholstery
or carpets. Then wipe with a cloth and
allow the seat belts to dry in the
shade. Do not allow the seat belts to
retract until they are completely dry.
. If dirt builds up in the shoulder belt
guide of the seat belt anchors, the
seat belts may retract slowly. Wipe the
shoulder belt guide with a clean, dry
cloth.
. Periodically check to see that the
seat belt and the metal components,
such as buckles, tongues, retractors,
flexible wires and anchors, work prop-
erly. If loose parts, deterioration, cuts
or other damage on the webbing is
found, the entire seat belt assembly
should be replaced.
Page 39 of 508
JVR0473X
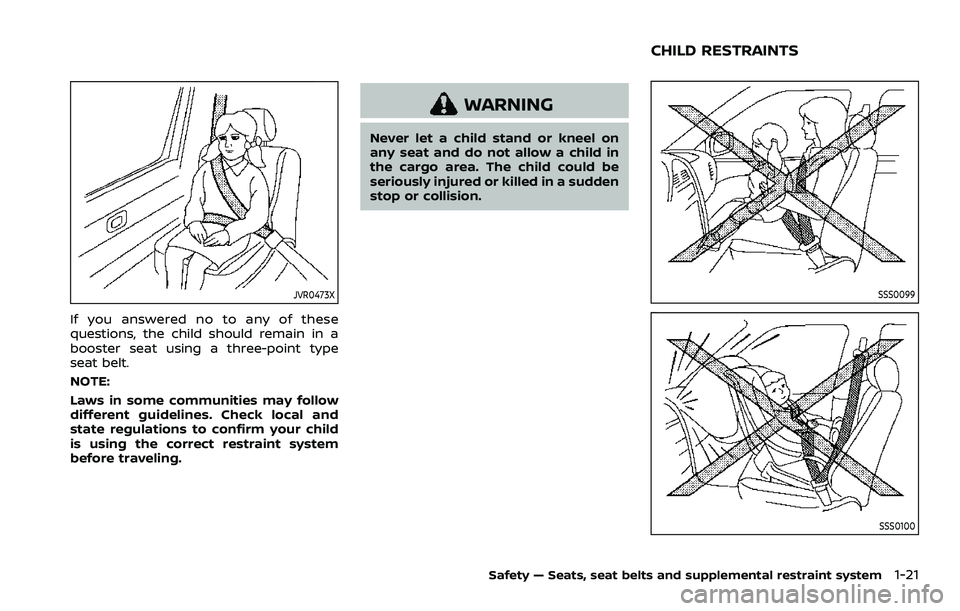
If you answered no to any of these
questions, the child should remain in a
booster seat using a three-point type
seat belt.
NOTE:
Laws in some communities may follow
different guidelines. Check local and
state regulations to confirm your child
is using the correct restraint system
before traveling.
WARNING
Never let a child stand or kneel on
any seat and do not allow a child in
the cargo area. The child could be
seriously injured or killed in a sudden
stop or collision.
SSS0099
SSS0100
Safety — Seats, seat belts and supplemental restraint system1-21
CHILD RESTRAINTS
Page 40 of 508

1-22Safety — Seats, seat belts and supplemental restraint system
PRECAUTIONS ON CHILD RE-
STRAINTS
WARNING
.Failure to follow the warnings
and instructions for proper use
and installation of child restraints
could result in serious injury or
death of a child or other passen-
gers in a sudden stop or collision:
— The child restraint must be
used and installed properly.
Always follow all of the child
restraint manufacturer’s in-
structions for installation and
use.
— Infants and children should never be held on anyone’s
lap. Even the strongest adult
cannot resist the forces of a
collision.
— Do not put a seat belt around both a child and another pas-
senger.
— NISSAN recommends that all child restraints be installed in
the rear seat. Studies show
that children are safer when
properly restrained in the rear seat than in the front seat. If
you must install a forward-
facing child restraint in the
front seat, see “Forward-fa-
cing child restraint installation
using the seat belts” (P.1-34).
— Even with the NISSAN Ad- vanced Air Bag System, never
install a rear-facing child re-
straint in the front seat. An
inflating air bag could ser-
iously injure or kill a child. A
rear-facing child restraint
must only be used in the rear
seat.
— Be sure to purchase a child restraint that will fit the child
and vehicle. Some child re-
straints may not fit properly
in your vehicle.
— Child restraint anchorages are designed to withstand only
those loads imposed by cor-
rectly fitted child restraints.
Under no circumstances are
they to be used to attach
adult seat belts, or other
items or equipment to the
vehicle. Doing so could da-
mage the child restraint an-
chorages. The child restraint will not be properly installed
using the damaged ancho-
rage, and a child could be
seriously injured or killed in a
collision.
— Never use the anchor points for adult seat belts or har-
nesses.
— A child restraint with a top tether strap should not be
used in the front passenger
seat.
— Keep seatbacks as upright as possible after fitting the child
restraint.
— Infants and children should always be placed in an appro-
priate child restraint while in
the vehicle.
. When the child restraint is not in
use, keep it secured with the
LATCH system or a seat belt. In a
sudden stop or collision, loose
objects can injure occupants or
damage the vehicle.
Page 42 of 508

1-24Safety — Seats, seat belts and supplemental restraint system
JVR0555X
LATCH system anchor location
Lower Anchors and Tethers for
CHildren (LATCH) SYSTEM
Your vehicle is equipped with special
anchor points that are used with LATCH
system compatible child restraints. This
system may also be referred to as the
ISOFIX or ISOFIX compatible system. With
this system, you do not have to use a
vehicle seat belt to secure the child
restraint unless the combined weight of
the child and child restraint exceeds 65
lbs (29.5 kg). If the combined weight of the
child and child restraint is greater than 65
lbs (29.5 kg), use the vehicle’s seat belt
(not the lower anchors) to install the child
restraint. Be sure to follow the childrestraint manufacturer’s instructions for
installation.
CAUTION
Store the loose LATCH covers (for
example, in the console box) where
they will not get damaged to avoid
losing them. (See “Console box” (P.2-
71).)
LATCH lower anchor
WARNING
Failure to follow the warnings and
instructions for proper use and in-
stallation of child restraints could
result in serious injury or death of a
child or other passengers in a sud-
den stop or collision:
.
Attach LATCH system compatible
child restraints only at the loca-
tions shown in the illustration.
. Do not secure a child restraint in
the center rear seating position
using the LATCH lower anchors.
The child restraint will not be
secured properly. .
Inspect the lower anchors by in-
serting your fingers into the low-
er anchor area. Feel to make sure
there are no obstructions over
the anchors such as seat belt
webbing or seat cushion material.
The child restraint will not be
secured properly if the lower
anchors are obstructed.
. Child restraint anchorages are
designed to withstand only those
loads imposed by correctly fitted
child restraints. Under no circum-
stances are they to be used to
attach adult seat belts, or other
items or equipment to the vehi-
cle. Doing so could damage the
child restraint anchorages. The
child restraint will not be properly
installed using the damaged an-
chorage, and a child could be
seriously injured or killed in a
collision.
LATCH lower anchor location
The LATCH lower anchor points are
provided to install child restraints in the
rear outboard seating positions only. Do
not attempt to install a child restraint in
the center seating position using the
LATCH lower anchors.
Page 47 of 508

REAR-FACING CHILD RESTRAINT
INSTALLATION USING THE SEAT
BELTS
WARNING
The three-point seat belt with Auto-
matic Locking Retractor (ALR) must
be used when installing a child re-
straint. Failure to use the ALR mode
will result in the child restraint not
being properly secured. The restraint
could tip over or be loose and cause
injury to a child in a sudden stop or
collision.
SSS0100
Rear-facing — step 1
Refer to all Warnings and Cautions in the
“Child safety” (P.1-19) and “Child restraints”
(P.1-21) before installing a child restraint.
Do not use the lower anchors if the
combined weight of the child and the
child restraint exceeds 65 lbs (29.5 kg). If
the combined weight of the child and the
child restraint is greater than 65 lbs (29.5
kg), use the vehicle’s seat belt (not the
lower anchors) to install the child re-
straint. Be sure to follow the child re-
straint manufacturer’s instructions for
installation.Follow these steps to install a rear-facing
child restraint using the vehicle seat belts
in the rear seats:
1.
Child restraints for infants must be
used in the rear-facing direction and
therefore must not be used in the
front seat. Position the child restraint
on the seat. Always follow the re-
straint manufacturer’s instructions.
Safety — Seats, seat belts and supplemental restraint system1-29
Page 52 of 508
1-34Safety — Seats, seat belts and supplemental restraint system
WAB0058X
Installing top tether strap
WARNING
Child restraint anchorages are de-
signed to withstand only those loads
imposed by correctly fitted child
restraints. Under no circumstances
are they to be used to attach adult
seat belts, or other items or equip-
ment to the vehicle. Doing so could
damage the child restraint an-
chorages. The child restraint will not
be properly installed using the da-
maged anchorage, and a child could
be seriously injured or killed in acollision.
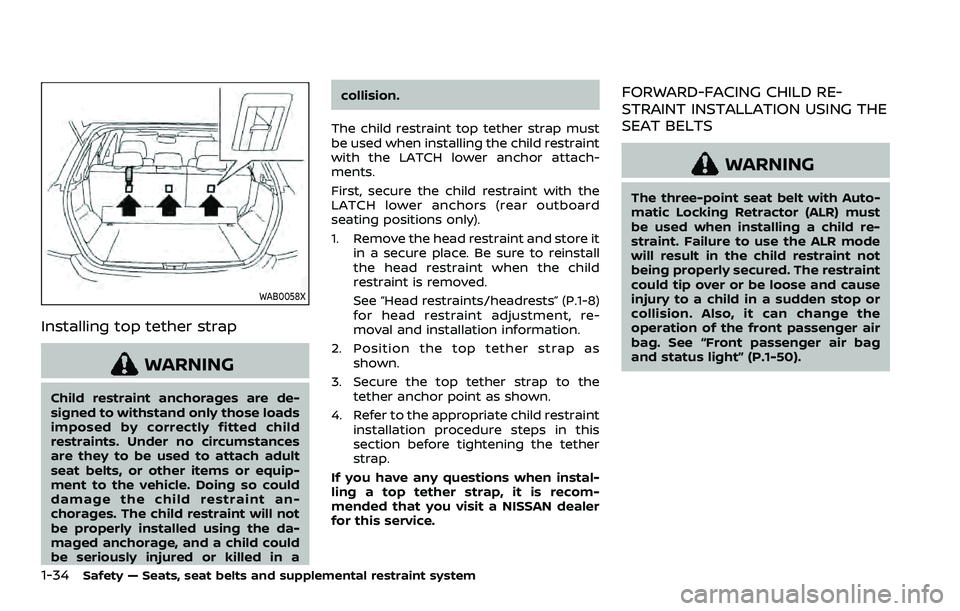
The child restraint top tether strap must
be used when installing the child restraint
with the LATCH lower anchor attach-
ments.
First, secure the child restraint with the
LATCH lower anchors (rear outboard
seating positions only).
1. Remove the head restraint and store it in a secure place. Be sure to reinstall
the head restraint when the child
restraint is removed.
See “Head restraints/headrests” (P.1-8)
for head restraint adjustment, re-
moval and installation information.
2. Position the top tether strap as shown.
3. Secure the top tether strap to the tether anchor point as shown.
4. Refer to the appropriate child restraint installation procedure steps in this
section before tightening the tether
strap.
If you have any questions when instal-
ling a top tether strap, it is recom-
mended that you visit a NISSAN dealer
for this service.
FORWARD-FACING CHILD RE-
STRAINT INSTALLATION USING THE
SEAT BELTS
WARNING
The three-point seat belt with Auto-
matic Locking Retractor (ALR) must
be used when installing a child re-
straint. Failure to use the ALR mode
will result in the child restraint not
being properly secured. The restraint
could tip over or be loose and cause
injury to a child in a sudden stop or
collision. Also, it can change the
operation of the front passenger air
bag. See “Front passenger air bag
and status light” (P.1-50).