radio NISSAN ROGUE SPORT 2017 Owners Manual
[x] Cancel search | Manufacturer: NISSAN, Model Year: 2017, Model line: ROGUE SPORT, Model: NISSAN ROGUE SPORT 2017Pages: 512, PDF Size: 3.33 MB
Page 153 of 512
3-8Pre-driving checks and adjustments
It is possible to lock/unlock all doors
(including the liftgate), and activate the
panic alarm by using the key fob from
outside the vehicle.
Before locking the doors, make sure the
key is not left in the vehicle.
The key fob can operate at a distance of
approximately 33 ft (10 m) from the
vehicle. (The effective distance depends
upon the conditions around the vehicle.)
As many as 4 key fobs can be used with
one vehicle. For information concerning
the purchase and use of additional key
fobs, contact a NISSAN dealer.
The key fob will not function:
.When the key fob is not within the
operational range.
. When the doors are open or not
closed securely.
. When the key is in the ignition switch.
. When the battery is discharged.
WARNING
The remote keyless entry key fob
transmits radio waves when the
buttons are pushed. The FAA advises
that the radio waves may affect
aircraft navigation and communica-
tion systems. Do not operate the key fob while on an airplane. Make sure
the buttons are not operated unin-
tentionally when the unit is stored
during a flight.
CAUTION
The following conditions or occur-
rences will damage the key fob.
.
Do not allow the key fob to
become wet.
. Do not drop the key fob.
. Do not strike the key fob sharply
against another object.
. If the outside temperature is be-
low 14°F (-10°C) degrees, the bat-
tery of key fob may not function
properly.
. Do not place the key fob for an
extended period in an area where
temperatures exceed 140°F
(60°C).
If a key fob is lost or stolen, NISSAN
recommends erasing the ID code of
that key fob. This will prevent the key
fob from unauthorized use to unlock
the vehicle. For information regard-
ing the erasing procedure, it is re-
commended that you visit a NISSAN dealer.
For information regarding the replace-
ment of a battery, see “Key fob battery
replacement” (P.8-21).
REMOTE KEYLESS ENTRY SYSTEM
(if so equipped)
Page 156 of 512
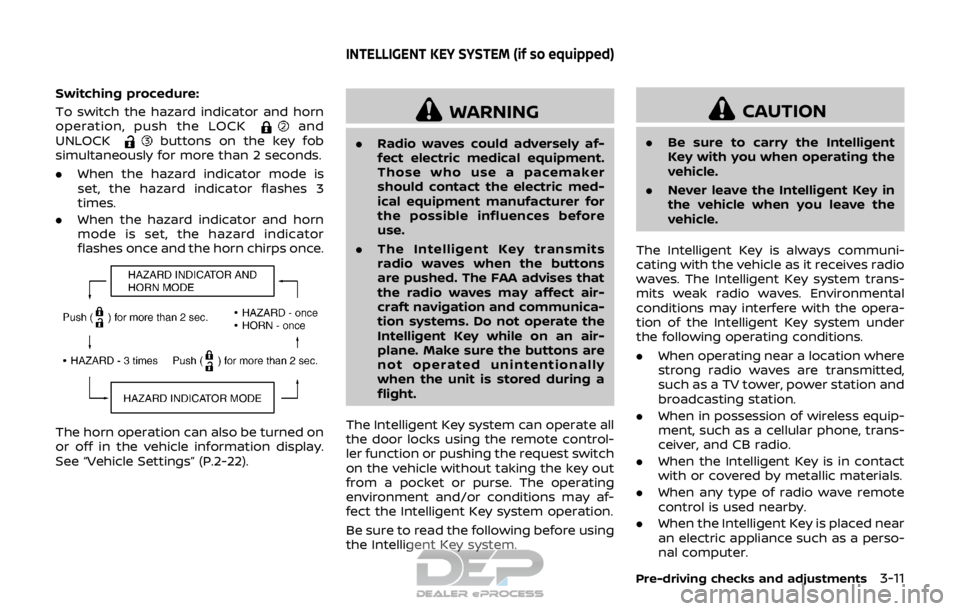
Switching procedure:
To switch the hazard indicator and horn
operation, push the LOCK
and
UNLOCKbuttons on the key fob
simultaneously for more than 2 seconds.
. When the hazard indicator mode is
set, the hazard indicator flashes 3
times.
. When the hazard indicator and horn
mode is set, the hazard indicator
flashes once and the horn chirps once.
The horn operation can also be turned on
or off in the vehicle information display.
See “Vehicle Settings” (P.2-22).
WARNING
.Radio waves could adversely af-
fect electric medical equipment.
Those who use a pacemaker
should contact the electric med-
ical equipment manufacturer for
the possible influences before
use.
. The Intelligent Key transmits
radio waves when the buttons
are pushed. The FAA advises that
the radio waves may affect air-
craft navigation and communica-
tion systems. Do not operate the
Intelligent Key while on an air-
plane. Make sure the buttons are
not operated unintentionally
when the unit is stored during a
flight.
The Intelligent Key system can operate all
the door locks using the remote control-
ler function or pushing the request switch
on the vehicle without taking the key out
from a pocket or purse. The operating
environment and/or conditions may af-
fect the Intelligent Key system operation.
Be sure to read the following before using
the Intelligent Key system.
CAUTION
. Be sure to carry the Intelligent
Key with you when operating the
vehicle.
. Never leave the Intelligent Key in
the vehicle when you leave the
vehicle.
The Intelligent Key is always communi-
cating with the vehicle as it receives radio
waves. The Intelligent Key system trans-
mits weak radio waves. Environmental
conditions may interfere with the opera-
tion of the Intelligent Key system under
the following operating conditions.
. When operating near a location where
strong radio waves are transmitted,
such as a TV tower, power station and
broadcasting station.
. When in possession of wireless equip-
ment, such as a cellular phone, trans-
ceiver, and CB radio.
. When the Intelligent Key is in contact
with or covered by metallic materials.
. When any type of radio wave remote
control is used nearby.
. When the Intelligent Key is placed near
an electric appliance such as a perso-
nal computer.
Pre-driving checks and adjustments3-11
INTELLIGENT KEY SYSTEM (if so equipped)
Page 157 of 512
3-12Pre-driving checks and adjustments
.When the vehicle is parked near a
parking meter.
In such cases, correct the operating
conditions before using the Intelligent
Key function or use the mechanical key.
Although the life of the battery varies
depending on the operating conditions,
the battery’s life is approximately 2 years.
If the battery is discharged, replace it with
a new one.
Since the Intelligent Key is continuously
receiving radio waves, if the key is left
near equipment which transmits strong
radio waves, such as signals from a TV
and personal computer, the battery life
may become shorter.
For information regarding replacement of
a battery, see “Intelligent Key battery
replacement” (P.8-23).
As many as 4 Intelligent Keys can be
registered and used with one vehicle. For
information about the purchase and use
of additional Intelligent Keys, it is recom-
mended that you contact a NISSAN deal-
er.
CAUTION
. Do not allow the Intelligent Key,
which contains electrical compo-
nents, to come into contact with water or salt water. This could
affect the system function.
. Do not drop the Intelligent Key.
. Do not strike the Intelligent Key
sharply against another object.
. Do not change or modify the
Intelligent Key.
. Wetting may damage the Intelli-
gent Key. If the Intelligent Key
gets wet, immediately wipe until
it is completely dry.
. If the outside temperature is be-
low 14°F (−10°C) degrees, the bat-
tery of the Intelligent Key may not
function properly.
. Do not place the Intelligent Key
for an extended period in an area
where temperatures exceed
140°F (60°C).
. Do not attach the Intelligent Key
with a key holder that contains a
magnet.
. Do not place the Intelligent Key
near equipment that produces a
magnetic field, such as a TV,
audio equipment, personal com-
puters or cellular phone.
If an Intelligent Key is lost or stolen,
NISSAN recommends erasing the ID code of that Intelligent Key from the vehicle.
This may prevent the unauthorized use of
the Intelligent Key to operate the vehicle.
For information regarding the erasing
procedure, it is recommended that you
contact a NISSAN dealer.
The Intelligent Key function can be dis-
abled. For information about disabling
the Intelligent Key function, it is recom-
mended that you contact a NISSAN deal-
er.
Page 158 of 512

SPA2074
INTELLIGENT KEY OPERATING
RANGE
The Intelligent Key functions can only be
used when the Intelligent Key is within
the specified operating range from the
request switch
.
When the Intelligent Key battery is dis-
charged or strong radio waves are pre-
sent near the operating location, the
Intelligent Key system’s operating range
becomes narrower, and the Intelligent
Key may not function properly.
The operating range is within 31.50 in (80
cm) from each request switch
.
If the Intelligent Key is too close to the door glass, handle or rear bumper, the
request switches may not function.
When the Intelligent Key is within the
operating range, it is possible for anyone
who does not carry the Intelligent Key to
push the request switch to lock/unlock
the doors including the liftgate.
SPA2407
DOOR LOCKS/UNLOCKS PRECAU-
TION
.
Do not push the door handle request
switch with the Intelligent Key held in
your hand as illustrated. The close
distance to the door handle will cause
the Intelligent Key system to have
difficulty recognizing that the Intelli-
gent Key is outside the vehicle.
. After locking with the door handle
request switch, verify the doors are
securely locked by testing them.
. To prevent the Intelligent Key from
being left inside the vehicle, make sure
you carry the key with you and then
lock the doors.
Pre-driving checks and adjustments3-13
Page 163 of 512
3-18Pre-driving checks and adjustments
HOW TO USE REMOTE KEYLESS
ENTRY FUNCTION
WARNING
.Radio waves could adversely af-
fect electric medical equipment.
Those who use a pacemaker
should contact the electric med-
ical equipment manufacturer for
the possible influences before
use.
. The Intelligent Key transmits
radio waves when the buttons
are pushed. The FAA advises that
the radio waves may affect air-
craft navigation and communica-
tion systems. Do not operate the
Intelligent Key while on an air-
plane. Make sure the buttons are
not operated unintentionally
when the unit is stored during a
flight.
CAUTION
.Do not allow the Intelligent Key,
which contains electrical compo-
nents, to come into contact with
water or salt water. This could affect the system function.
. Do not drop the Intelligent Key.
. Do not strike the Intelligent Key
sharply against another object.
. Do not change or modify the
Intelligent Key.
. Wetting may damage the Intelli-
gent Key. If the Intelligent Key
gets wet, immediately wipe until
it is completely dry.
. If the outside temperature is be-
low 14°F (-10°C) degrees, the bat-
tery of the Intelligent Key may not
function properly.
. Do not place the Intelligent Key
for an extended period in an area
where temperatures exceed
140°F (60°C).
. Do not attach the Intelligent Key
with a key holder that contains a
magnet.
. Do not place the Intelligent Key
near equipment that produces a
magnetic field, such as a TV,
audio equipment, personal com-
puters or cellular phone.
The remote keyless entry function can
operate all door locks using the remote
keyless entry function of the Intelligent Key. The remote keyless entry function
can operate at a distance of approxi-
mately 33 ft (10 m) from the vehicle. (The
operating distance depends upon the
conditions around the vehicle.)
The remote keyless entry function will not
operate:
.
When the Intelligent Key is not within
the operational range.
. When the doors are open or not
closed securely.
. When the Intelligent Key battery is
discharged.
The remote keyless entry function can
also operate the vehicle alarm.
Page 167 of 512
3-22Pre-driving checks and adjustments
WARNING
To avoid risk of injury or death, do
not use the remote engine start
function when the vehicle is in an
enclosed area such as a garage.
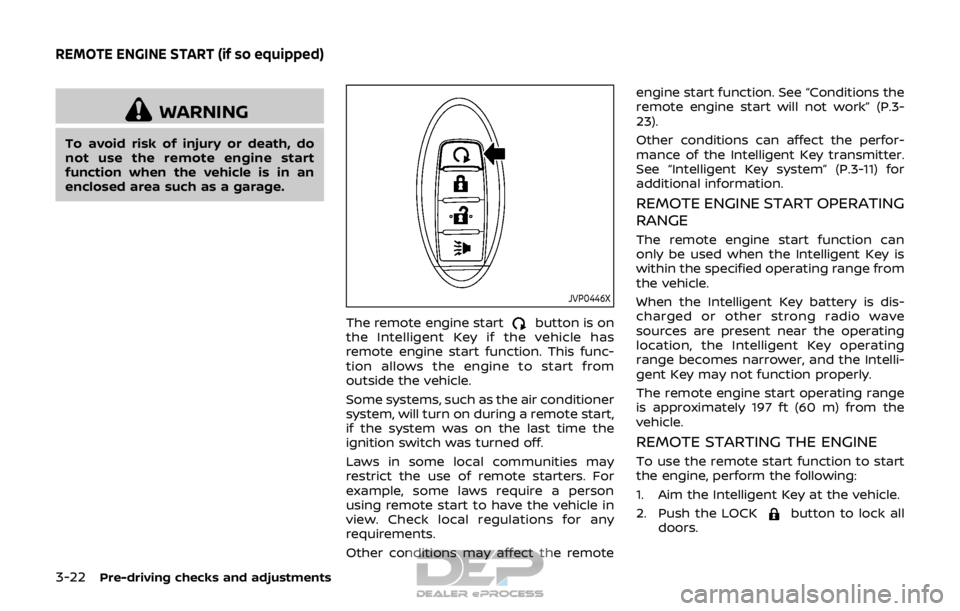
JVP0446X
The remote engine startbutton is on
the Intelligent Key if the vehicle has
remote engine start function. This func-
tion allows the engine to start from
outside the vehicle.
Some systems, such as the air conditioner
system, will turn on during a remote start,
if the system was on the last time the
ignition switch was turned off.
Laws in some local communities may
restrict the use of remote starters. For
example, some laws require a person
using remote start to have the vehicle in
view. Check local regulations for any
requirements.
Other conditions may affect the remote engine start function. See “Conditions the
remote engine start will not work” (P.3-
23).
Other conditions can affect the perfor-
mance of the Intelligent Key transmitter.
See “Intelligent Key system” (P.3-11) for
additional information.
REMOTE ENGINE START OPERATING
RANGE
The remote engine start function can
only be used when the Intelligent Key is
within the specified operating range from
the vehicle.
When the Intelligent Key battery is dis-
charged or other strong radio wave
sources are present near the operating
location, the Intelligent Key operating
range becomes narrower, and the Intelli-
gent Key may not function properly.
The remote engine start operating range
is approximately 197 ft (60 m) from the
vehicle.
REMOTE STARTING THE ENGINE
To use the remote start function to start
the engine, perform the following:
1. Aim the Intelligent Key at the vehicle.
2. Push the LOCK
button to lock all
doors.
REMOTE ENGINE START (if so equipped)
Page 180 of 512

4 Heater, air conditioner, audio and phonesystems
Safety note ........................................................................\
................ 4-3
Control buttons and functions (models with
navigation system) ...................................................................... 4-3
How to use touch screen ................................................ 4-4
How to use the BACK button ...................................... 4-5
How to use the APPS·i button ..................................... 4-5
How to use brightness control button ................ 4-8
How to use the POWER/VOLUME dial ................... 4-8
How to use the ENTER
AUDIO/TUNE·SCROLL dial ................................................ 4-8
RearView Monitor (if so equipped) ................................. 4-8 RearView Monitor system operation ..................... 4-9
How to read the displayed lines ................................ 4-9
Difference between predictive and
actual distances ................................................................... 4-10
Adjusting the screen ........................................................ 4-12
RearView Monitor system limitations ................. 4-12
System maintenance ....................................................... 4-13
Intelligent Around View® Monitor (if
so equipped) ........................................................................\
.......... 4-14 Intelligent Around View® Monitor
system operation ................................................................ 4-15
Difference between predictive and
actual distances ................................................................... 4-18
How to park with predictive course lines ....... 4-20
How to switch the display ........................................... 4-21 Adjusting the screen ...................................................... 4-21
Intelligent Around View® Monitor
system limitations ............................................................ 4-22
System maintenance .................................................... 4-24
Moving Object Detection (MOD) (if
so equipped) ........................................................................\
......... 4-25
MOD system operation ................................................ 4-25
Turning MOD on and off ............................................ 4-27
MOD system limitations .............................................. 4-27
System maintenance .................................................... 4-28
Ventilators ........................................................................\
.............. 4-29 Center ventilators ............................................................ 4-29
Side ventilators .................................................................. 4-29
Rear ventilators (if so equipped) .......................... 4-29
Heater and air conditioner ................................................ 4-30 Manual air conditioner and heater .................... 4-31
Automatic air conditioner and heater ............ 4-35
Operating tips (for automatic
air conditioner) ................................................................... 4-37
Servicing air conditioner ............................................. 4-37
Audio system ........................................................................\
....... 4-38 Audio operation precautions .................................. 4-38
FM-AM radio with Compact Disc
(CD) player ........................................................................\
...... 4-48
FM-AM-SAT radio with Compact Disc (CD)
player (Type A) (if so equipped) ............................ 4-55
Page 181 of 512

FM-AM-SAT radio with Compact Disc (CD)
player (Type B) (if so equipped) ............................... 4-63
USB (Universal Serial Bus)
connection port ................................................................... 4-74
AUX (Auxiliary) input jack .............................................. 4-75
Steering wheel switch for audio control ......... 4-75
Antenna ........................................................................\
.............. 4-77
CD/USB memory care and cleaning ................... 4-77
NissanConnect
SMMobile Apps smartphone
integration (if so equipped) ............................................... 4-78
Registering with NissanConnect
SM
Mobile Apps ........................................................................\
..... 4-78
Connect phone ..................................................................... 4-78
Application download ..................................................... 4-78
NissanConnect
SMServices (if so equipped) .......... 4-79
Siri® Eyes Free ........................................................................\
...... 4-79 General Information .......................................................... 4-79
Requirements ........................................................................\
. 4-79
Siri® Eyes Free Activation ............................................. 4-80
Operating Siri® Eyes Free ............................................. 4-80
Changing Siri® Eyes Free Settings
(models with navigation system) ........................... 4-80
Changing Siri® Eyes Free Settings
(models without navigation system) .................. 4-81
Troubleshooting guide ................................................... 4-82
Car phone or CB radio .......................................................... 4-83 Bluetooth® Hands-Free Phone System
(models without navigation system) ........................ 4-83
Regulatory information ............................................... 4-84
Using the system .............................................................. 4-85
Bluetooth® Hands-Free Phone System
(models with navigation system) ................................. 4-93 Regulatory information ............................................... 4-94
Control buttons and microphone ....................... 4-95
Voice command ................................................................ 4-95
Connecting procedure ................................................. 4-96
Vehicle phonebook ......................................................... 4-96
Making a call ........................................................................\
4-97
Receiving a call ................................................................... 4-97
During a call ........................................................................\
.. 4-97
Ending a call ........................................................................\
. 4-97
Text messaging (if so equipped) .......................... 4-97
Phone and Bluetooth® settings ............................ 4-99
NISSAN Voice Recognition system
(models with navigation system) ............................. 4-100 Using the system .......................................................... 4-101
System features ............................................................ 4-102
Phone voice commands ......................................... 4-103
Navigation system voice commands ........... 4-103
Audio system voice commands ....................... 4-104
Information voice commands ............................ 4-104
My APPS voice commands ................................... 4-104
Help voice commands .............................................. 4-104
Troubleshooting guide ............................................ 4-104
Page 187 of 512
4-8Heater, air conditioner, audio and phone systems
HOW TO USE BRIGHTNESS CON-
TROL BUTTON
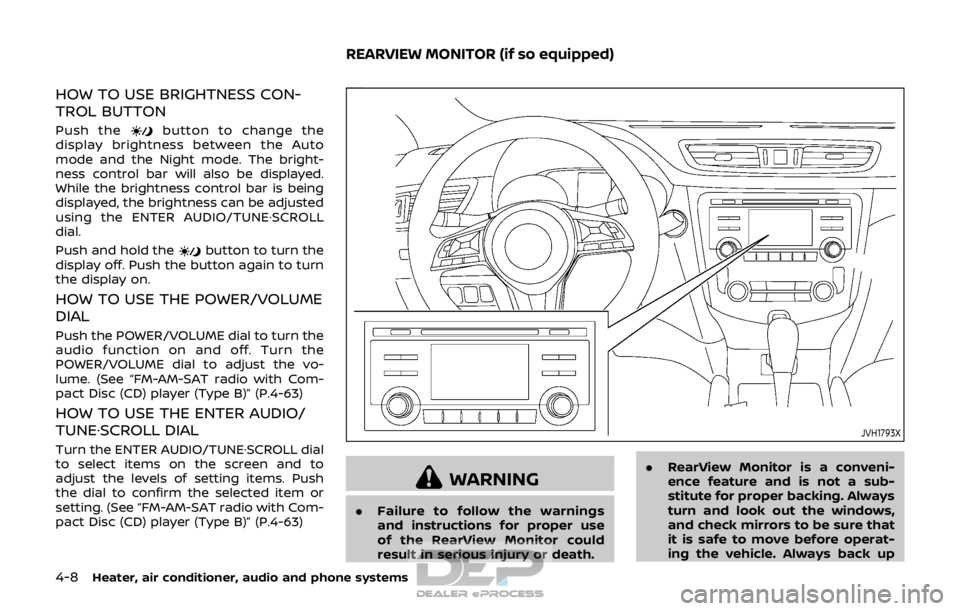
Push thebutton to change the
display brightness between the Auto
mode and the Night mode. The bright-
ness control bar will also be displayed.
While the brightness control bar is being
displayed, the brightness can be adjusted
using the ENTER AUDIO/TUNE·SCROLL
dial.
Push and hold the
button to turn the
display off. Push the button again to turn
the display on.
HOW TO USE THE POWER/VOLUME
DIAL
Push the POWER/VOLUME dial to turn the
audio function on and off. Turn the
POWER/VOLUME dial to adjust the vo-
lume. (See “FM-AM-SAT radio with Com-
pact Disc (CD) player (Type B)” (P.4-63)
HOW TO USE THE ENTER AUDIO/
TUNE·SCROLL DIAL
Turn the ENTER AUDIO/TUNE·SCROLL dial
to select items on the screen and to
adjust the levels of setting items. Push
the dial to confirm the selected item or
setting. (See “FM-AM-SAT radio with Com-
pact Disc (CD) player (Type B)” (P.4-63)
JVH1793X
WARNING
. Failure to follow the warnings
and instructions for proper use
of the RearView Monitor could
result in serious injury or death. .
RearView Monitor is a conveni-
ence feature and is not a sub-
stitute for proper backing. Always
turn and look out the windows,
and check mirrors to be sure that
it is safe to move before operat-
ing the vehicle. Always back up
REARVIEW MONITOR (if so equipped)
Page 188 of 512
slowly.
. The system is designed as an aid
to the driver in showing large
stationary objects directly behind
the vehicle, to help avoid dama-
ging the vehicle.
. The distance guide line and the
vehicle width line should be used
as a reference only when the
vehicle is on a level paved sur-
face. The distance viewed on the
monitor is for reference only and
may be different than the actual
distance between the vehicle and
displayed objects.
CAUTION
Do not scratch the camera lens when
cleaning dirt or snow from the front
of the camera.
The RearView Monitor system automati-
cally shows a rear view of the vehicle
when the shift lever is placed in the R
(Reverse) position.
The radio can still be heard while the
RearView Monitor is active.
JVH1585X
To display the rear view, the RearView
Monitor system uses a camera located
just above the vehicle’s license plate
.
REARVIEW MONITOR SYSTEM OP-
ERATION
When the ignition switch is placed in the
ACC or ON position, move the shift lever
to the R (Reverse) position to operate the
RearView Monitor.
SAA2776
HOW TO READ THE DISPLAYED
LINES
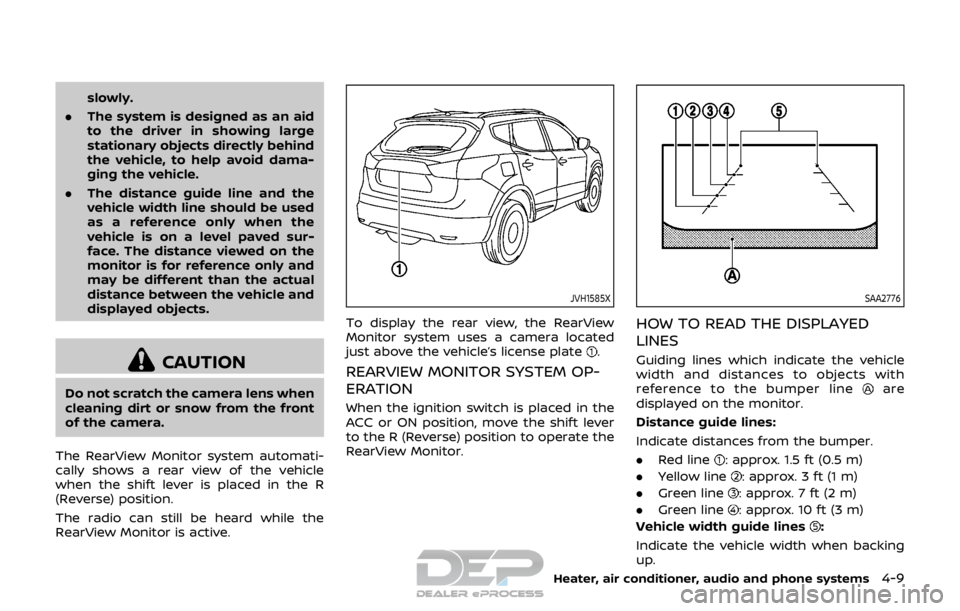
Guiding lines which indicate the vehicle
width and distances to objects with
reference to the bumper line
are
displayed on the monitor.
Distance guide lines:
Indicate distances from the bumper.
. Red line
: approx. 1.5 ft (0.5 m)
. Yellow line
: approx. 3 ft (1 m)
. Green line
: approx. 7 ft (2 m)
. Green line
: approx. 10 ft (3 m)
Vehicle width guide lines
:
Indicate the vehicle width when backing
up.
Heater, air conditioner, audio and phone systems4-9