coolant level NISSAN ROGUE SPORT 2018 Owners Manual
[x] Cancel search | Manufacturer: NISSAN, Model Year: 2018, Model line: ROGUE SPORT, Model: NISSAN ROGUE SPORT 2018Pages: 512, PDF Size: 3.33 MB
Page 85 of 512
2-8Instruments and controls
CAUTION
.If the gauge indicates the engine
coolant temperature is near the
hot (H) end of the normal range,
reduce vehicle speed to decrease
the temperature.
. If the gauge is over the normal
range, stop the vehicle as soon as
safely possible and let the engine
idle.
. If the engine is overheated, con-
tinued operation of the vehicle
may seriously damage the en-
gine. (See “If your vehicle over-
heats” (P.6-11) for immediate
action required.)
JVI0640X
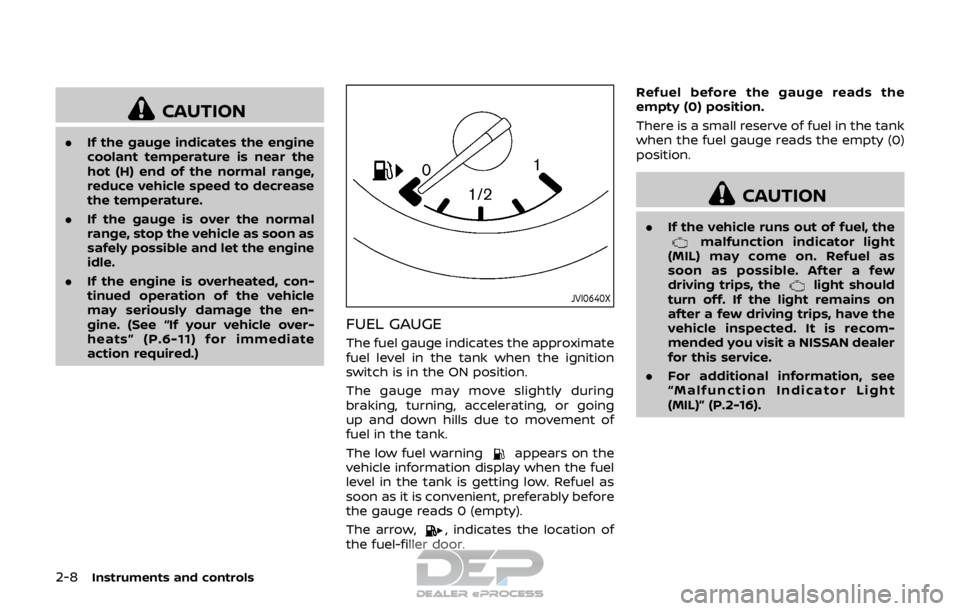
FUEL GAUGE
The fuel gauge indicates the approximate
fuel level in the tank when the ignition
switch is in the ON position.
The gauge may move slightly during
braking, turning, accelerating, or going
up and down hills due to movement of
fuel in the tank.
The low fuel warning
appears on the
vehicle information display when the fuel
level in the tank is getting low. Refuel as
soon as it is convenient, preferably before
the gauge reads 0 (empty).
The arrow,
, indicates the location of
the fuel-filler door. Refuel before the gauge reads the
empty (0) position.
There is a small reserve of fuel in the tank
when the fuel gauge reads the empty (0)
position.
CAUTION
.
If the vehicle runs out of fuel, themalfunction indicator light
(MIL) may come on. Refuel as
soon as possible. After a few
driving trips, the
light should
turn off. If the light remains on
after a few driving trips, have the
vehicle inspected. It is recom-
mended you visit a NISSAN dealer
for this service.
. For additional information, see
“Malfunction Indicator Light
(MIL)” (P.2-16).
Page 215 of 512

4-36Heater, air conditioner, audio and phone systems
maximum levels.
. After the windshield is cleared, push
the AUTO button (the AUTO indicator
light will turn on).
. When the front defroster
button is
pushed, the air conditioner will turn on
when the outside air temperature is
above approximately 36°F (2°C) to
defog the windshield. The air recircu-
lation mode will automatically turn off.
The outside air circulation mode will
be selected to improve the defogging
performance.
Do not set the temperature too low when
the front defroster mode is on (the
indicator light is illuminated), because
doing so may fog up the windshield.
Manual operation
The manual mode can be used to control
the heater and air conditioner to your
desired settings.
Fan speed control:
Push the fan speed control button (
side orside) to manually control the
fan speed.
Push the AUTO button to change the fan
speed to the automatic mode.
Air flow control:
Push the MODE button to select the
desired mode:
— Air flows mainly from the center and
side ventilators.
— Air flows mainly from the center andside ventilators and foot outlets.
— Air flows mainly from the foot outletand partly from the defroster.
— Air flows mainly from the frontdefroster outlets and foot outlets.
Temperature control:
Turn the temperature control dial to set
the desired temperature.
.When the DUAL indicator light is not
illuminated, pushing the DUAL button
(the indicator light will turn on) allows
the user to independently change the
driver and passenger side tempera-
tures with the corresponding tem-
perature control dial.
Also turning the passenger’s side
temperature control dial changes only
the front passenger’s side tempera-
ture. (The DUAL indicator light will
illuminate and DUAL will appear on
the display.)
. To cancel the separate temperature
setting, push the DUAL button (the
indicator light will turn off) and the
driver’s side temperature setting will
be applied to both the driver and
passenger sides. Air intake control:
.
Push the air recirculation
button
to recirculate interior air inside the
vehicle. The indicator light on the
button will come on.
The air recirculation cannot be acti-
vated when the air conditioner is in
the front defrosting mode.
. Push the outside air circulation
button to draw outside air into the
passenger compartment. The indica-
tor light on the button will come on.
. To control the air intake automatically,
push and hold either the air recircula-
tion
button or the outside air
circulationbutton (whichever but-
ton with the indicator light illumi-
nated). The indicator lights (both air
recirculation
and outside air cir-
culationbuttons) will flash twice,
and then the air intake will switch to
automatic control. When the auto-
matic control is set, the system auto-
matically alternates between the
outside air circulation and the air
recirculation modes. (The indicator
light of the active mode will turn on.)
NOTE:
Even if the system is manually set to the
air recirculation mode, when both out-
side temperature and coolant tempera-
ture are low, the system may
Page 302 of 512

JVS0404X
INTELLIGENT KEY BATTERY DIS-
CHARGE
If the battery of the Intelligent Key is
discharged, or environmental conditions
interfere with the Intelligent Key opera-
tion, start the engine according to the
following procedure:
1. Move the shift lever to the P (Park)position (for CVT models) or the shift
lever to the N (Neutral) position (for MT
models).
2. Firmly apply the foot brake.
3. Touch the ignition switch with the Intelligent Key as illustrated. (A chime
will sound.) 4. Push the ignition switch while depres-
sing the brake pedal within 10 sec-
onds after the chime sounds. The
engine will start.
After step 3 is performed, when the
ignition switch is pushed without depres-
sing the brake pedal, the ignition switch
position will change to ACC.
NOTE:
. When the ignition switch is pushed
to the ON position or the engine is
started by the above procedures, the
“Key Battery Low” warning appears
(on the Vehicle information display)
even if the Intelligent Key is inside
the vehicle. This is not a malfunction.
To turn off the warning, touch the
ignition switch with the Intelligent
Key again.
. If the “Key Battery Low” warning
appears (on the Vehicle information
display), replace the battery as soon
as possible. (See “Intelligent Key
battery replacement” (P.8-23).) .
Make sure the area around the vehicle
is clear.
. Check fluid levels such as engine oil,
coolant, brake fluid, and window
washer fluid as frequently as possible,
or at least whenever you refuel.
. Check that all windows and lights are
clean.
. Visually inspect tires for their appear-
ance and condition. Also check tires
for proper inflation.
. Lock all doors.
. Position seat and adjust head re-
straints.
. Adjust inside and outside mirrors.
. Fasten seat belts and ask all passen-
gers to do likewise.
. Check the operation of warning lights
when the ignition switch is placed in
the ON position. (See “Warning lights,
indicator lights and audible remin-
ders” (P.2-10).)
Starting and driving5-17
BEFORE STARTING THE ENGINE
Page 398 of 512
WARNING
.Never rely solely on the hill start
assist system to prevent the ve-
hicle from moving backward on a
hill. Always drive carefully and
attentively. Depress the brake
pedal when the vehicle is stopped
on a steep hill. Be especially care-
ful when stopped on a hill on
frozen or muddy roads. Failure
to prevent the vehicle from rolling
backwards may result in a loss of
control of the vehicle and possi-
ble serious injury or death.
. The hill start assist system is not
designed to hold the vehicle at a
standstill on a hill. Depress the
brake pedal when the vehicle is
stopped on a steep hill. Failure to
do so may cause the vehicle to
roll backwards and may result in
a collision or serious personal
injury.
. The hill start assist system may
not prevent the vehicle from roll-
ing backwards on a hill under all
load or road conditions. Always
be prepared to depress the brake
pedal to prevent the vehicle from
rolling backwards. Failure to do so may result in a collision or
serious personal injury.
The hill start assist system automatically
keeps the brakes applied to help prevent
the vehicle from rolling backwards in the
time it takes the driver to release the
brake pedal and apply the accelerator
when the vehicle is stopped on a hill.
The hill start assist system will operate
automatically under the following condi-
tions:
. The transmission is shifted to a for-
ward or reverse gear.
. The vehicle is stopped completely on a
hill by applying the brake.
The maximum holding time is 2 seconds.
After 2 seconds the vehicle will begin to
roll back and the hill start assist system
will stop operating completely.
The hill start assist system will not
operate when the transmission is shifted
to the N (Neutral) or P (Park) position (CVT
models) or on a flat and level road.
When the Vehicle Dynamic Control (VDC)
warning light illuminates in the meter, the
hill start assist system will not operate.
(See “Vehicle Dynamic Control (VDC)
warning light” (P.2-15).)
FREEING A FROZEN DOOR LOCK
To prevent a door lock from freezing,
apply deicer through the key hole. If the
lock becomes frozen, heat the key before
inserting it into the key hole, or use the
Intelligent Key system or the remote
keyless entry key fob.
ANTI-FREEZE
In the winter when it is anticipated that
the outside temperature will drop below
32°F (0°C), check the anti-freeze to assure
proper winter protection. For additional
information, see “Engine cooling system”
(P.8-4).
BATTERY
If the battery is not fully charged during
extremely cold weather conditions, the
battery fluid may freeze and damage the
battery. To maintain maximum efficiency,
the battery should be checked regularly.
For additional information, see “Battery”
(P.8-11).
DRAINING OF COOLANT WATER
If the vehicle is to be left outside without
anti-freeze, drain the cooling system,
including the engine block. Refill before
operating the vehicle. For details, see
“Engine cooling system” (P.8-4).
Starting and driving5-113
HILL START ASSIST SYSTEM COLD WEATHER DRIVING
Page 411 of 512
6-12In case of emergency
an extremely high temperature gauge
reading), or if you feel a lack of engine
power, detect abnormal noise, etc., take
the following steps:
1. Move the vehicle safely off the roadand apply the parking brake.
2. Continuously Variable Transmission
(CVT) models:
Move the shift lever to the P (Park)
position.
Manual Transmission (MT) models:
Move the shift lever to the N (Neutral)
position.
Do not stop the engine.
3. Turn off the air conditioner (if so equipped). Open all the windows,
move the heater or air conditioner
temperature control to maximum hot
and fan control to high speed.
4. Get out of the vehicle. Look and listen for steam or coolant escaping from
the radiator before opening the hood.
(If steam or coolant is escaping, turn
off the engine.) Do not open the hood
further until no steam or coolant can
be seen.
5. Open the engine hood.
WARNING
If steam or water is coming from the
engine, stand clear to prevent get-
ting burned.
6. Visually check the drive belt for da- mage or looseness. Also check if the
cooling fan is running. The radiator
hoses and radiator should not leak
water. If coolant is leaking or the
cooling fan does not run, stop the
engine.
WARNING
Be careful not to allow your hands,
hair, jewelry or clothing to come into
contact with, or get caught in, engine
belts or the engine cooling fan. The
engine cooling fan can start at any
time. 7. After the engine cools down, check
the coolant level in the reservoir with
the engine running. Add coolant to
the reservoir if necessary. Have your
vehicle repaired. It is recommended
you visit a NISSAN dealer for this
service.
Page 426 of 512

8 Do-it-yourself
Maintenance precautions ...................................................... 8-2
Engine compartment check locations ........................ 8-3MR20DD engine model ..................................................... 8-4
Engine cooling system ............................................................. 8-4 Checking engine coolant level .................................... 8-5
Changing engine coolant ................................................ 8-6
Engine oil ........................................................................\
..................... 8-6 Checking engine oil level ................................................. 8-6
Changing engine oil and filter ..................................... 8-6
Continuously Variable Transmission
(CVT) fluid ........................................................................\
.................... 8-9
Brake and clutch (if so equipped) fluid ....................... 8-9
Window washer fluid .............................................................. 8-10
Battery ........................................................................\
........................ 8-11 Jump starting ........................................................................\
. 8-12
Variable voltage control system ................................... 8-13
Drive belt ........................................................................\
.................. 8-13
Spark plugs ........................................................................\
............. 8-14 Replacing spark plugs ..................................................... 8-14
Air cleaner ........................................................................\
............... 8-15 Windshield wiper blades ..................................................... 8-16
Cleaning ........................................................................\
........... 8-16
Replacing ........................................................................\
........ 8-16
Rear window wiper blade .................................................. 8-17
Brakes ........................................................................\
........................ 8-17 Self-adjusting brakes ..................................................... 8-17
Brake pad wear warning ............................................ 8-17
Fuses ........................................................................\
........................... 8-18 Engine compartment .................................................... 8-18
Passenger compartment ........................................... 8-20
Key fob battery replacement .......................................... 8-21
Intelligent Key battery replacement .......................... 8-23
Lights ........................................................................\
.......................... 8-25 Headlights ........................................................................\
...... 8-25
Exterior and interior lights ........................................ 8-27
Wheels and tires ........................................................................\
8-29
Tire pressure ........................................................................\
8-29
Tire labeling ........................................................................\
.. 8-33
Types of tires ....................................................................... 8-35
Tire chains ........................................................................\
...... 8-36
Changing wheels and tires ...................................... 8-37
Page 427 of 512
8-2Do-it-yourself
When performing any inspection or main-
tenance work on your vehicle, always
take care to prevent serious accidental
injury to yourself or damage to the
vehicle. The following are general precau-
tions which should be closely observed.
WARNING
.Park the vehicle on a level sur-
face, apply the parking brake
securely and block the wheels to
prevent the vehicle from moving.
Move the shift lever to the P
(Park) position (CVT model) or
the shift lever to the N (Neutral)
position (MT model).
. Be sure the ignition switch is in
the OFF or LOCK position when
performing any parts replace-
ment or repairs.
. If you must work with the engine
running, keep your hands, cloth-
ing, hair and tools away from
moving fans, belts and any other
moving parts.
. It is advisable to secure or re-
move any loose clothing and
remove any jewelry, such as
rings, watches, etc. before work-
ing on your vehicle. .
Always wear eye protection
whenever you work on your ve-
hicle.
. If you must run the engine in an
enclosed space such as a garage,
be sure there is proper ventilation
for exhaust gases to escape.
. Never get under the vehicle while
it is supported only by a jack. If it
is necessary to work under the
vehicle, support it with safety
stands.
. Because the fuel lines are under
high pressure even when the
engine is off, it is recommended
you visit a NISSAN dealer for
service of the fuel filter or fuel
lines.
. Do not work under the hood while
the engine is hot. Always turn off
the engine and wait until it cools
down.
. If you must work with the engine
running, keep your hands, cloth-
ing, hair and tools away from
moving fans, belts and any other
moving parts.
. Keep smoking materials, flame
and sparks away from fuel and
the battery. .
On gasoline engine models with
the Multiport Fuel Injection (MFI)
system, the fuel filter and fuel
lines should be serviced because
the fuel lines are under high
pressure even when the engine
is turned off. It is recommended
that you visit a NISSAN dealer for
this service.
. Your vehicle is equipped with an
automatic engine cooling fan. It
may come on at any time without
warning, even if the ignition
switch is in the OFF position and
the engine is not running. To
avoid injury, always disconnect
the negative battery cable before
working near the fan.
. Avoid direct contact with used
engine oil and coolant. Impro-
perly disposed engine oil, engine
coolant, and/or other vehicle
fluids can hurt the environment.
Always conform to local regula-
tions for disposal of vehicle fluids.
CAUTION
.Do not work under the hood while
the engine is hot. Turn the engine
MAINTENANCE PRECAUTIONS
Page 430 of 512
partment. When the cooling fan is
operating, be sure that hands or
other items do not get caught in
it.
CAUTION
.Never use any cooling system
additives such as radiator sealer.
Additives may clog the cooling
system and cause damage to
the engine, transmission and/or
cooling system.
. When adding or replacing cool-
ant, be sure to use only Genuine
NISSAN Long Life Antifreeze/
Coolant (blue) or equivalent. Gen-
uine NISSAN Long Life Antifreeze/
Coolant (blue) is pre-diluted to
provide antifreeze protection to
-34°F(-37°C). If additional freeze
protection is needed due to
weather where you operate your
vehicle, add Genuine NISSAN Long
Life Antifreeze/Coolant (blue)
concentrate following the direc-
tions on the container. If an
equivalent coolant other than
Genuine NISSAN Long Life Anti-
freeze/Coolant (blue) is used, fol- low the coolant manufacture’s
instructions to maintain mini-
mum antifreeze protection to
-34°F (-37°C). The use of other
types of coolant solutions other
than Genuine NISSAN Long Life
Antifreeze/Coolant (blue) or
equivalent may damage the en-
gine cooling system.
. The life expectancy of the fac-
tory-fill coolant is 105,000 miles
(168,000 km) or 7 years. Mixing
any other type of coolant other
than Genuine NISSAN Long Life
Antifreeze/Coolant (blue), includ-
ing Genuine NISSAN Long Life
Antifreeze/Coolant (green), or
the use of non-distilled water will
reduce the life expectancy of the
factory-fill coolant. Refer to the
“9. Maintenance and schedules”
section of this manual for more
details.
JVM0438X
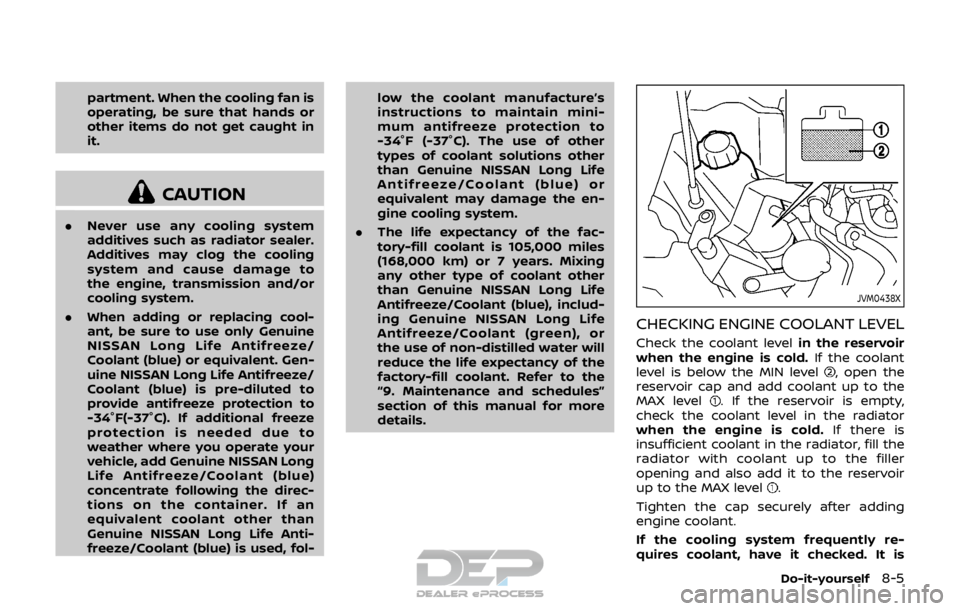
CHECKING ENGINE COOLANT LEVEL
Check the coolant level in the reservoir
when the engine is cold. If the coolant
level is below the MIN level
, open the
reservoir cap and add coolant up to the
MAX level
. If the reservoir is empty,
check the coolant level in the radiator
when the engine is cold. If there is
insufficient coolant in the radiator, fill the
radiator with coolant up to the filler
opening and also add it to the reservoir
up to the MAX level
.
Tighten the cap securely after adding
engine coolant.
If the cooling system frequently re-
quires coolant, have it checked. It is
Do-it-yourself8-5
Page 431 of 512
8-6Do-it-yourself
recommended you visit a NISSAN dealer
for this service.
CHANGING ENGINE COOLANT
A NISSAN dealer can change the engine
coolant. The service procedure can be
found in the NISSAN Service Manual.
Improper servicing can result in re-
duced heater performance and engine
overheating.
WARNING
.To avoid being scalded, never
change the coolant when the
engine is hot.
. Never remove the radiator or
coolant reservoir cap when the
engine is hot. Serious burns could
be caused by high pressure fluid
escaping from the radiator.
. Avoid direct skin contact with
used coolant. If skin contact is
made, wash thoroughly with soap
or hand cleaner as soon as pos-
sible.
. Keep coolant out of the reach of
children and pets.
Engine coolant must be disposed of
properly. Check your local regulations.SDI1993
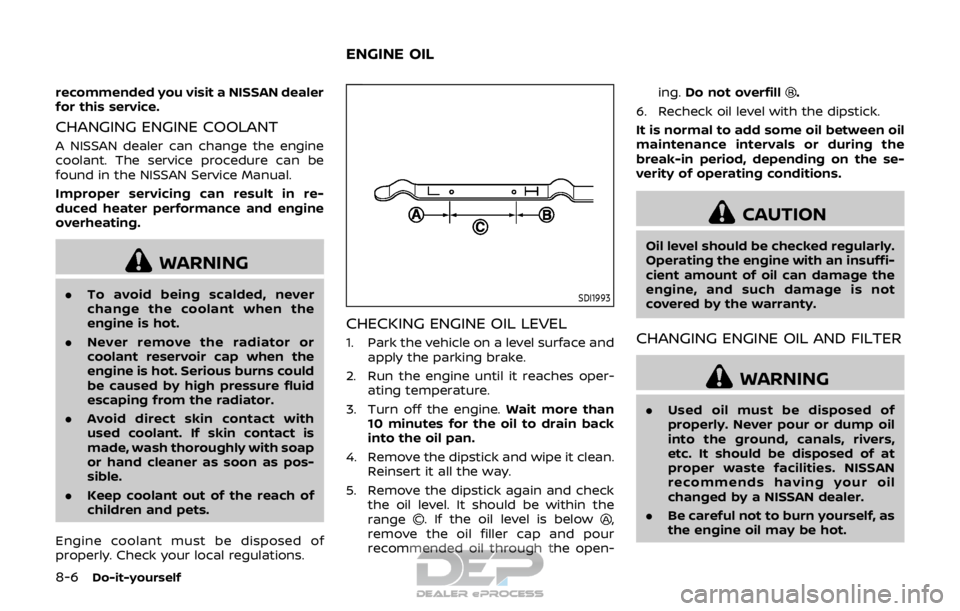
CHECKING ENGINE OIL LEVEL
1. Park the vehicle on a level surface and apply the parking brake.
2. Run the engine until it reaches oper- ating temperature.
3. Turn off the engine. Wait more than
10 minutes for the oil to drain back
into the oil pan.
4. Remove the dipstick and wipe it clean. Reinsert it all the way.
5. Remove the dipstick again and check the oil level. It should be within the
range
. If the oil level is below,
remove the oil filler cap and pour
recommended oil through the open- ing.
Do not overfill
.
6. Recheck oil level with the dipstick.
It is normal to add some oil between oil
maintenance intervals or during the
break-in period, depending on the se-
verity of operating conditions.
CAUTION
Oil level should be checked regularly.
Operating the engine with an insuffi-
cient amount of oil can damage the
engine, and such damage is not
covered by the warranty.
CHANGING ENGINE OIL AND FILTER
WARNING
. Used oil must be disposed of
properly. Never pour or dump oil
into the ground, canals, rivers,
etc. It should be disposed of at
proper waste facilities. NISSAN
recommends having your oil
changed by a NISSAN dealer.
. Be careful not to burn yourself, as
the engine oil may be hot.
ENGINE OIL
Page 435 of 512
8-10Do-it-yourself
JVM0789X
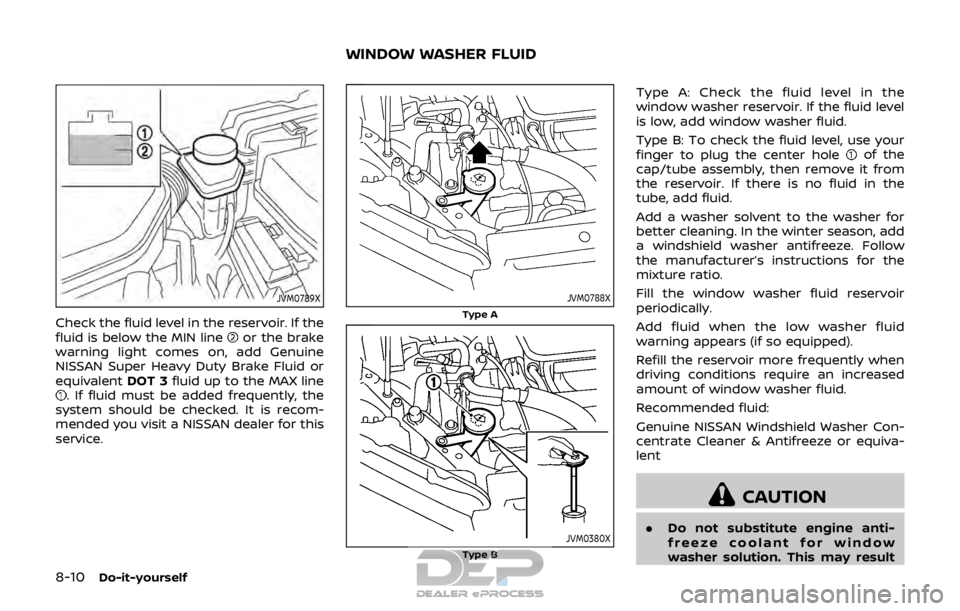
Check the fluid level in the reservoir. If the
fluid is below the MIN lineor the brake
warning light comes on, add Genuine
NISSAN Super Heavy Duty Brake Fluid or
equivalent DOT 3fluid up to the MAX line
. If fluid must be added frequently, the
system should be checked. It is recom-
mended you visit a NISSAN dealer for this
service.
JVM0788X
Type A
JVM0380XType B
Type A: Check the fluid level in the
window washer reservoir. If the fluid level
is low, add window washer fluid.
Type B: To check the fluid level, use your
finger to plug the center hole
of the
cap/tube assembly, then remove it from
the reservoir. If there is no fluid in the
tube, add fluid.
Add a washer solvent to the washer for
better cleaning. In the winter season, add
a windshield washer antifreeze. Follow
the manufacturer’s instructions for the
mixture ratio.
Fill the window washer fluid reservoir
periodically.
Add fluid when the low washer fluid
warning appears (if so equipped).
Refill the reservoir more frequently when
driving conditions require an increased
amount of window washer fluid.
Recommended fluid:
Genuine NISSAN Windshield Washer Con-
centrate Cleaner & Antifreeze or equiva-
lent
CAUTION
. Do not substitute engine anti-
freeze coolant for window
washer solution. This may result
WINDOW WASHER FLUID