heater NISSAN ROGUE SPORT 2018 Owners Manual
[x] Cancel search | Manufacturer: NISSAN, Model Year: 2018, Model line: ROGUE SPORT, Model: NISSAN ROGUE SPORT 2018Pages: 512, PDF Size: 3.33 MB
Page 8 of 512

Illustrated table of contents0
Safety — Seats, seat belts and supplemental restraint
system1
Instruments and controls
Pre-driving checks and adjustments
Heater, air conditioner, audio and phone systems
Starting and driving
In case of emergency
Appearance and care
Do-it-yourself
Maintenance and schedules
Technical and consumer information
2
3
4
5
6
7
8
9
10
Table of
Contents
Index11
Page 16 of 512

JVC1090X
1. Side ventilator (P.4-29)
2. Meters and gauges (P.2-5)/Clock (P.2-36)
3. Center ventilator (P.4-29)
4. Audio system* (P.4-38) or Navigation sys-tem**
— RearView Monitor* (P.4-8)
— Intelligent Around View® Monitor*
(P.4-14) — Bluetooth® Hands-Free Phone System*
(P.4-83, P.4-93)
5. Front passenger supplemental air bag (P.1-40)
6. Fuse box cover (P.8-20)
7. Fuel-filler door release handle (P.3-27)
8. Hood release handle (P.3-24) 9. Steering wheel lock lever (P.3-29)
10. Driver’s front-impact air bag (P.1-40)/Horn
(P.2-49)
11. Heater/air conditioner control (P.4-30)
12. Auxiliary input jack (P.4-62) and USB con- nection port (P.4-59, P.4-69)
13. Power outlet (P.2-53)
14. Defroster switch (P.2-42)
15. Glove box (P.2-56)
*: if so equipped
**: See the separate Navigation System Owner’s Manual (if so equipped).
Illustrated table of contents0-7
INSTRUMENT PANEL
Page 81 of 512

2-4Instruments and controls
JVC1090X
1. Side ventilator
2. Meters and gauges/Clock
3. Center ventilator
4. Audio system* or Navigation system**— RearView Monitor*
— Intelligent Around View® Monitor*
— Bluetooth® Hands-Free Phone System* 5. Front passenger supplemental air bag
6. Fuse box cover
7. Fuel-filler door release handle
8. Hood release handle
9. Steering wheel lock lever
10. Driver’s front-impact air bag/Horn
11. Heater/air conditioner control 12. Auxiliary input jack and USB connection
port
13. Power outlet
14. Defroster switch
15. Glove box
*: if so equipped
**: See the separate Navigation System Owner’s Manual (if so equipped).
INSTRUMENT PANEL
Page 127 of 512

2-50Instruments and controls
WARNING
Do not use or allow occupants to use
the seat heater if you or the occu-
pants cannot monitor elevated seat
temperatures or have an inability to
feel pain in body parts that contact
the seat. Use of the seat heater by
such people could result in serious
injury.
CAUTION
.The battery could run down if the
seat heater is operated while the
engine is not running.
. Do not use the seat heater for
extended periods or when no one
is using the seat.
. Do not put anything on the seat
which insulates heat, such as a
blanket, cushion, seat cover, etc.
Otherwise, the seat may become
overheated.
. Do not place anything hard or
heavy on the seat or pierce it with
a pin or similar object. This may
result in damage to the heater. .
Any liquid spilled on the heated
seat should be removed immedi-
ately with a dry cloth.
. When cleaning the seat, never use
gasoline, thinner, or any similar
materials.
. If any malfunctions are found or
the heated seat does not operate,
turn the switch off and have the
system checked. It is recom-
mended you visit a NISSAN dealer
for this service.
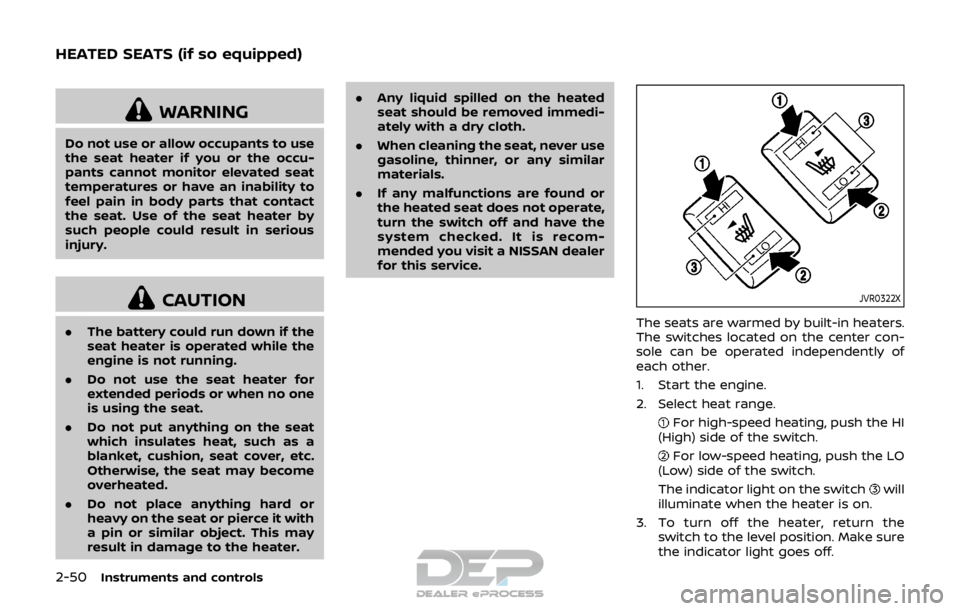
JVR0322X
The seats are warmed by built-in heaters.
The switches located on the center con-
sole can be operated independently of
each other.
1. Start the engine.
2. Select heat range.
For high-speed heating, push the HI
(High) side of the switch.
For low-speed heating, push the LO
(Low) side of the switch.
The indicator light on the switch
will
illuminate when the heater is on.
3. To turn off the heater, return the switch to the level position. Make sure
the indicator light goes off.
HEATED SEATS (if so equipped)
Page 128 of 512

The heater is controlled by a thermo-
stat, automatically turning the heater
on and off. The indicator light will
remain on as long as the switch is on.
When the vehicle’s interior is warmed,
or before you leave the vehicle, be
sure to turn off the switch.
JVI1593X
The Intelligent Lane Intervention (I-LI)
switch is used to turn on and off the I-LI
system.
The I-LI system must be turned on with
the I-LI switch every time the ignition is
placed in the ON position.
When the I-LI switch is turned off, the
indicator
on the switch is off.
The I-LI system warns the driver with a
warning indicator and a chime, and helps
assist the driver to return the vehicle to
the center of the traveling lane by apply-
ing the brakes to the left or right wheels
individually (for a short period of time). For
additional information, see “Intelligent
Lane Intervention (I-LI)” (P.5-37).
JVI1594X
The Blind Spot Warning (BSW) switch is
used to temporarily turn on and off the
BSW system that is activated using the
settings menu of the vehicle information
display.
When the BSW switch is turned off, the
indicator
on the switch is off. The
indicator will also be off if the BSW system
is deactivated using the vehicle informa-
tion display.
The BSW system helps alert the driver of
other vehicles in adjacent lanes when
changing lanes. For additional informa-
tion, see “Blind Spot Warning (BSW)” (P.5-
42).
Instruments and controls2-51
INTELLIGENT LANE INTERVENTION
(I-LI) SWITCH (if so equipped) BLIND SPOT WARNING (BSW)
SWITCH (if so equipped)
Page 180 of 512

4 Heater, air conditioner, audio and phonesystems
Safety note ........................................................................\
................ 4-3
Control buttons and functions (models with
navigation system) ...................................................................... 4-3
How to use touch screen ................................................ 4-4
How to use the BACK button ...................................... 4-5
How to use the APPS·i button ..................................... 4-5
How to use brightness control button ................ 4-8
How to use the POWER/VOLUME dial ................... 4-8
How to use the ENTER
AUDIO/TUNE·SCROLL dial ................................................ 4-8
RearView Monitor (if so equipped) ................................. 4-8 RearView Monitor system operation ..................... 4-9
How to read the displayed lines ................................ 4-9
Difference between predictive and
actual distances ................................................................... 4-10
Adjusting the screen ........................................................ 4-12
RearView Monitor system limitations ................. 4-12
System maintenance ....................................................... 4-13
Intelligent Around View® Monitor (if
so equipped) ........................................................................\
.......... 4-14 Intelligent Around View® Monitor
system operation ................................................................ 4-15
Difference between predictive and
actual distances ................................................................... 4-18
How to park with predictive course lines ....... 4-20
How to switch the display ........................................... 4-21 Adjusting the screen ...................................................... 4-21
Intelligent Around View® Monitor
system limitations ............................................................ 4-22
System maintenance .................................................... 4-24
Moving Object Detection (MOD) (if
so equipped) ........................................................................\
......... 4-25
MOD system operation ................................................ 4-25
Turning MOD on and off ............................................ 4-27
MOD system limitations .............................................. 4-27
System maintenance .................................................... 4-28
Ventilators ........................................................................\
.............. 4-29 Center ventilators ............................................................ 4-29
Side ventilators .................................................................. 4-29
Rear ventilators (if so equipped) .......................... 4-29
Heater and air conditioner ................................................ 4-30 Manual air conditioner and heater .................... 4-31
Automatic air conditioner and heater ............ 4-35
Operating tips (for automatic
air conditioner) ................................................................... 4-37
Servicing air conditioner ............................................. 4-37
Audio system ........................................................................\
....... 4-38 Audio operation precautions .................................. 4-38
FM-AM radio with Compact Disc
(CD) player ........................................................................\
...... 4-48
FM-AM-SAT radio with Compact Disc (CD)
player (Type A) (if so equipped) ............................ 4-55
Page 182 of 512

WARNING
.Do not disassemble or modify
this system. If you do, it may
result in accidents, fire, or electric
shock.
. Do not use this system if you
notice any abnormality, such as
a frozen screen or lack of sound.
Continued use of the system may
result in accident, fire or electric
shock.
. In case you notice any foreign
object in the system hardware,
spill liquid on it, or notice smoke
or smell coming from it, stop
using the system immediately. It
is recommended you visit a
NISSAN dealer for servicing.
Ignoring such conditions may
lead to accidents, fire, or electric
shock.
Do not attempt to operate the system in
extreme temperature conditions [below
−4°F (−20°C) and above 158°F (70°C)].
Operating this system under these con-
ditions may result in system malfunc-
tions.
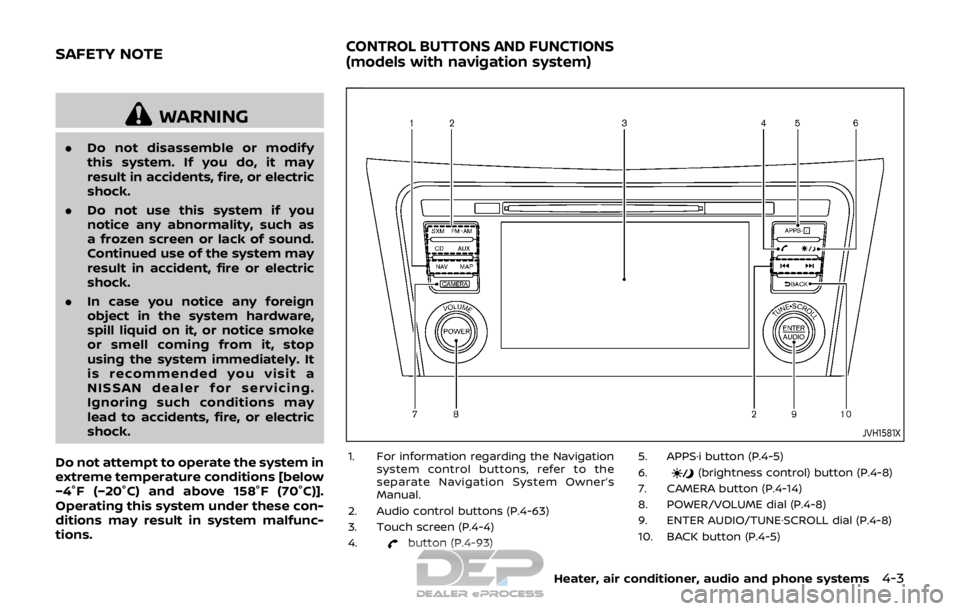
JVH1581X
1. For information regarding the Navigation system control buttons, refer to the
separate Navigation System Owner’s
Manual.
2. Audio control buttons (P.4-63)
3. Touch screen (P.4-4)
4.
button (P.4-93) 5. APPS·i button (P.4-5)
6.
(brightness control) button (P.4-8)
7. CAMERA button (P.4-14)
8. POWER/VOLUME dial (P.4-8)
9. ENTER AUDIO/TUNE·SCROLL dial (P.4-8)
10. BACK button (P.4-5)
Heater, air conditioner, audio and phone systems4-3
SAFETY NOTECONTROL BUTTONS AND FUNCTIONS
(models with navigation system)
Page 183 of 512

4-4Heater, air conditioner, audio and phone systems
When you use this system, make sure the
engine is running.
If you use the system with the engine
not running for a long time, it will
discharge the battery, and the engine
will not start.
Reference symbols:
“Example” — Words marked in quotes
refer to a key shown only on the display.
These keys can be selected by touching
the screen.
HOW TO USE TOUCH SCREEN
CAUTION
.The glass screen on the liquid
crystal display may break if it is
hit with a hard or sharp object. If
the glass screen breaks, do not
touch it. Doing so could result in
an injury.
. To clean the display, never use a
rough cloth, alcohol, benzine,
thinner or any kind of solvent or
paper towel with a chemical
cleaning agent. They will scratch
or deteriorate the panel.
. Do not splash any liquid such as
water or car fragrance on the
display. Contact with liquid will cause the system to malfunction.
To help ensure safe driving, some func-
tions cannot be operated while driving.
The on-screen functions that are not
available while driving will be “grayed
out” or muted.
Park the vehicle in a safe location and
then operate the navigation system.
WARNING
. ALWAYS give your full attention to
driving.
. Avoid using vehicle features that
could distract you. If distracted,
you could lose control of your
vehicle and cause an accident.JVH1582X
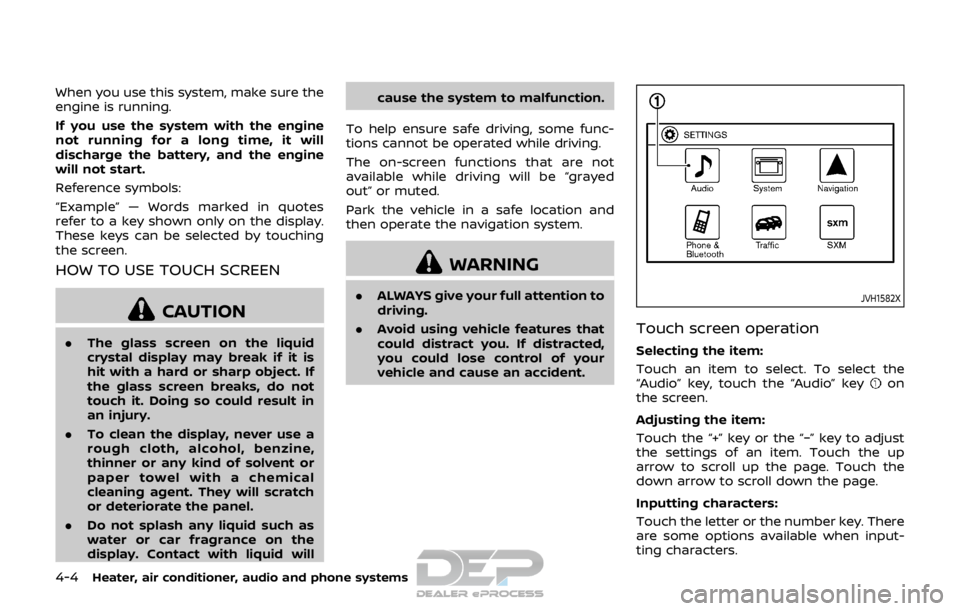
Touch screen operation
Selecting the item:
Touch an item to select. To select the
“Audio” key, touch the “Audio” key
on
the screen.
Adjusting the item:
Touch the “+” key or the “−” key to adjust
the settings of an item. Touch the up
arrow to scroll up the page. Touch the
down arrow to scroll down the page.
Inputting characters:
Touch the letter or the number key. There
are some options available when input-
ting characters.
Page 184 of 512

.123/ABC:
Changes the keyboard between num-
bers and alphabets.
. Space:
Inserts a space.
. Delete:
Deletes the last inputted character
with one touch. Touch and hold the
“Delete” key to delete all of the char-
acters.
. OK:
Completes the character input.
Touch screen maintenance
If you clean the touch screen, use a dry,
soft cloth. If additional cleaning is neces-
sary, use a small amount of neutral
detergent with a soft cloth. Never spray
the screen with water or detergent.
Dampen the cloth first and then wipe
the screen.
HOW TO USE THE BACK BUTTON
Push the BACK button to return to the
previous screen.
JVH1583X
Example
HOW TO USE THE APPS·i BUTTON
For information about the “SiriusXM Tra-
vel Link”, “SiriusXM Traffic” and “Nissan-
Connect Services” (if so equipped)
features, see the separate Navigation
System Owner’s Manual.
For information about the “My Apps” key,
see “NissanConnect
SMMobile Apps smart-
phone integration” (P.4-78).
For information about the “Voice Com-
mands” key, see “NISSAN Voice Recogni-
tion system (models with navigation
system)” (P.4-100).
JVH1584X
Displaying settings menu
To select and/or adjust several functions,
features and modes that are available for
your vehicle:
1. Push the APPS·i button.
2. Touch the “Settings” key.
3. Touch the desired item.
Available setting items may vary depend-
ing on models and specifications.
Heater, air conditioner, audio and phone systems4-5
Page 185 of 512

4-6Heater, air conditioner, audio and phone systems
Menu ItemResult
Audio For more details, see “Audio main operation” (P.4-63).
System Display Brightness Adjusts the brightness of the display.
Display Mode Adjusts to fit the level of lighting in the vehicle. Touch key to cycle through
options. “Day” and “Night” modes are suited for the respective times of day
while “Auto” controls the display automatically.
Scroll Direction Adjust the scroll direction of ENTER AUDIO/TUNE·SCROLL dial. Choose to
either move up or down.
Clock/Date Time Format The clock can be set to 12 hours or 24 hours.
Date Format The format of the day, month and year display can be selected.
Clock Mode Adjust the mode for the clock. “Auto” uses the system’s GPS to automatically
maintain the time. “Manual” allows you to set the clock using the “Set Clock/
Date Manually” key. Select “Time Zone” to have the time set to a specific time
zone.
Set Clock/Date Manually Adjust the clock manually. Touch the “+” or “-” keys to adjust the hours, minutes, day, month and year up or down. “Clock Mode” must be set to
“Manual” for this option to be available. When the “Time Format” is set to
“12h”, switching between “AM” and “PM” can be done by touching “MODE”.
Daylight Savings Time Adjusts the daylight savings time on or off. “Clock Mode” must be set to “Time Zone” for this option to be available.
Time Zone Choose the applicable time zone from the list.
Language Touch this key to change the language on the display.
NissanConnect Services Settings See the separate Navigation System Owner’s Manual for detail information.
Camera Settings Display Mode Touch this key to select the camera screen display mode (day, night, or
automatic).
Brightness Adjust camera screen brightness.
Contrast Adjust camera screen contrast.
Color Adjust camera screen color.