load capacity NISSAN ROGUE SPORT 2018 Owners Manual
[x] Cancel search | Manufacturer: NISSAN, Model Year: 2018, Model line: ROGUE SPORT, Model: NISSAN ROGUE SPORT 2018Pages: 512, PDF Size: 3.33 MB
Page 136 of 512
JVI1335X
CAUTION
Make sure the parcel shelf is care-
fully stored when not in use in order
to prevent any damage.
Installation
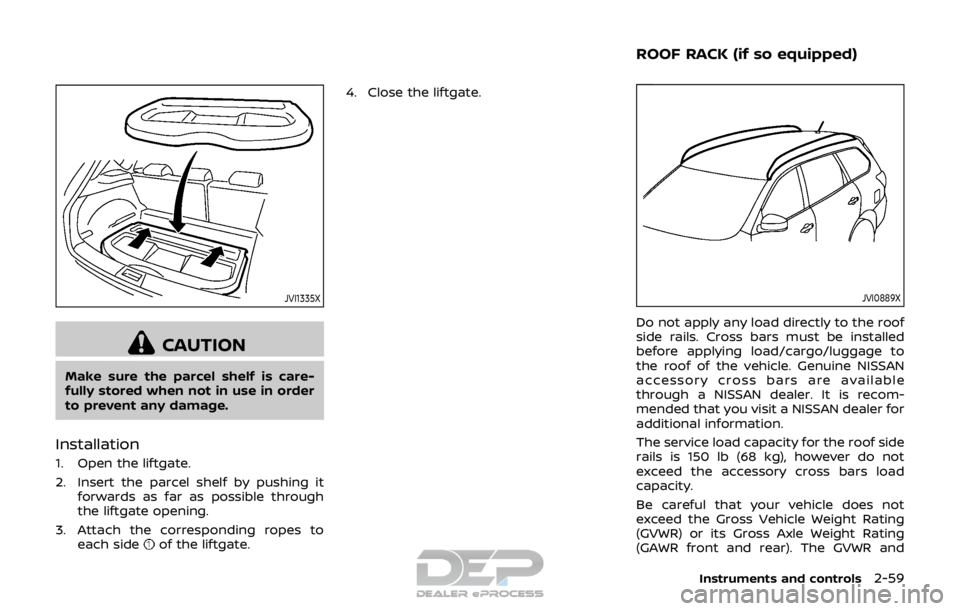
1. Open the liftgate.
2. Insert the parcel shelf by pushing itforwards as far as possible through
the liftgate opening.
3. Attach the corresponding ropes to each side
of the liftgate. 4. Close the liftgate.
JVI0889X
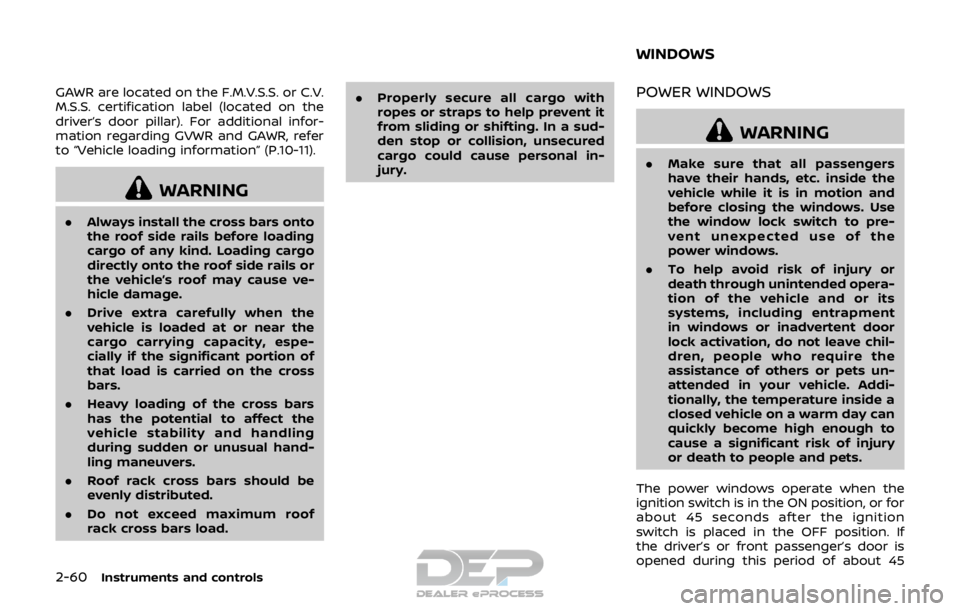
Do not apply any load directly to the roof
side rails. Cross bars must be installed
before applying load/cargo/luggage to
the roof of the vehicle. Genuine NISSAN
accessory cross bars are available
through a NISSAN dealer. It is recom-
mended that you visit a NISSAN dealer for
additional information.
The service load capacity for the roof side
rails is 150 lb (68 kg), however do not
exceed the accessory cross bars load
capacity.
Be careful that your vehicle does not
exceed the Gross Vehicle Weight Rating
(GVWR) or its Gross Axle Weight Rating
(GAWR front and rear). The GVWR and
Instruments and controls2-59
ROOF RACK (if so equipped)
Page 137 of 512
2-60Instruments and controls
GAWR are located on the F.M.V.S.S. or C.V.
M.S.S. certification label (located on the
driver’s door pillar). For additional infor-
mation regarding GVWR and GAWR, refer
to “Vehicle loading information” (P.10-11).
WARNING
.Always install the cross bars onto
the roof side rails before loading
cargo of any kind. Loading cargo
directly onto the roof side rails or
the vehicle’s roof may cause ve-
hicle damage.
. Drive extra carefully when the
vehicle is loaded at or near the
cargo carrying capacity, espe-
cially if the significant portion of
that load is carried on the cross
bars.
. Heavy loading of the cross bars
has the potential to affect the
vehicle stability and handling
during sudden or unusual hand-
ling maneuvers.
. Roof rack cross bars should be
evenly distributed.
. Do not exceed maximum roof
rack cross bars load. .
Properly secure all cargo with
ropes or straps to help prevent it
from sliding or shifting. In a sud-
den stop or collision, unsecured
cargo could cause personal in-
jury.
POWER WINDOWS
WARNING
.Make sure that all passengers
have their hands, etc. inside the
vehicle while it is in motion and
before closing the windows. Use
the window lock switch to pre-
vent unexpected use of the
power windows.
. To help avoid risk of injury or
death through unintended opera-
tion of the vehicle and or its
systems, including entrapment
in windows or inadvertent door
lock activation, do not leave chil-
dren, people who require the
assistance of others or pets un-
attended in your vehicle. Addi-
tionally, the temperature inside a
closed vehicle on a warm day can
quickly become high enough to
cause a significant risk of injury
or death to people and pets.
The power windows operate when the
ignition switch is in the ON position, or for
about 45 seconds after the ignition
switch is placed in the OFF position. If
the driver’s or front passenger’s door is
opened during this period of about 45
WINDOWS
Page 296 of 512

.If your engine stalls or you cannot
make it to the top of a steep hill,
never attempt to turn around.
Your vehicle could tip or roll over.
Always back straight down in R
(Reverse) range. Never back down
in N (Neutral), using only the
brake, as this could cause loss of
control.
. Heavy braking going down a hill
could cause your brakes to over-
heat and fade, resulting in loss of
control and an accident. Apply
brakes lightly and use a low
range to control your speed.
. Unsecured cargo can be thrown
around when driving over rough
terrain. Properly secure all cargo
so it will not be thrown forward
and cause injury to you or your
passengers.
. To avoid raising the center of
gravity excessively, do not exceed
the rated capacity of the roof rack
(if so equipped) and evenly dis-
tribute the load. Secure heavy
loads in the cargo area as far
forward and as low as possible.
Do not equip the vehicle with tires
larger than specified in this man-
ual. This could cause your vehicle
to roll over. .
Do not grip the inside or spokes
of the steering wheel when driv-
ing off-road. The steering wheel
could move suddenly and injure
your hands. Instead drive with
your fingers and thumbs on the
outside of the rim.
. Before operating the vehicle, en-
sure that the driver and all pas-
sengers have their seat belts
fastened.
. Always drive with the floor mats
in place as the floor may became
hot.
. Lower your speed when encoun-
tering strong crosswinds. With a
higher center of gravity, your
vehicle is more affected by strong
side winds. Slower speeds ensure
better vehicle control.
. Do not drive beyond the perfor-
mance capability of the tires,
even with AWD engaged.
. For AWD equipped vehicles, do
not attempt to raise two wheels
off the ground and shift the
transmission to any drive or re-
verse position with the engine
running. Doing so may result in
drivetrain damage or unexpected
vehicle movement which could result in serious vehicle damage
or personal injury.
. Do not attempt to test an AWD
equipped vehicle on a 2-wheel
dynamometer (such as the dy-
namometers used by some
states for emissions testing), or
similar equipment even if the
other two wheels are raised off
the ground. Make sure you inform
test facility personnel that your
vehicle is equipped with AWD
before it is placed on a dynam-
ometer. Using the wrong test
equipment may result in drive-
train damage or unexpected ve-
hicle movement which could
result in serious vehicle damage
or personal injury.
. When a wheel is off the ground
due to an unlevel surface, do not
spin the wheel excessively (AWD
model).
. Accelerating quickly, sharp steer-
ing maneuvers or sudden braking
may cause loss of control.
. If at all possible, avoid sharp
turning maneuvers, particularly
at high speeds. Your vehicle has
a higher center of gravity than a
conventional passenger car. The
Starting and driving5-11
Page 454 of 512
If you have a flat tire, see “Flat tire” (P.6-
3).
TIRE PRESSURE
Tire Pressure Monitoring System
(TPMS)
This vehicle is equipped with the Tire
Pressure Monitoring System (TPMS). It
monitors tire pressure of all tires except
the spare. When the low tire pressure
warning light is lit, and the “Tire Pressure
Low - Add Air” warning message is
displayed in the vehicle information dis-
play, one or more of your tires is sig-
nificantly under-inflated.
The TPMS will activate only when the
vehicle is driven at speeds above 16 MPH
(25 km/h). Also, this system may not
detect a sudden drop in tire pressure
(for example a flat tire while driving).
For more details, see “Low tire pressure
warning light” (P.2-13), “Tire Pressure Mon-
itoring System (TPMS)” (P.5-5) and “Tire
Pressure Monitoring System (TPMS)” (P.6-
3).
Tire inflation pressure
Check the pressure of the tires
(including the spare) often and al-
ways prior to long distance trips.
The recommended tire pressure
specifications are shown on the
Tire and Loading Information label
under the “Cold Tire Pressure”
heading. The Tire and Loading In-
formation label is affixed to the
driver side center pillar. Tire pres-
sures should be checked regularly
because:
.Most tires naturally lose air over
time.
.Tires can lose air suddenly when
driven over potholes or other
objects or if the vehicle strikes
a curb while parking.
The tire pressures should be
checked when the tires are cold.
The tires are considered COLD after
the vehicle has been parked for 3 or
more hours, or driven less than 1
mile (1.6 km) at moderate speeds.
TPMS with Easy Fill Tire Alert pro-
vides visual and audible signals outside the vehicle for inflating the
tires to the recommended COLD
tire pressure. (See “TPMS with Easy
Fill Tire Alert” (P.5-7).)
Incorrect tire pressure, including
under inflation, may adversely
affect tire life and vehicle hand-
ling.
WARNING
.Improperly inflated tires can
fail suddenly and cause an
accident.
.The Gross Vehicle Weight
rating (GVWR) is located on
the F.M.V.S.S./C.M.V.S.S. cer-
tification label. The vehicle
weight capacity is indicated
on the Tire and Loading In-
formation label. Do not load
your vehicle beyond this ca-
pacity. Overloading your ve-
hicle may result in reduced
tire life, unsafe operating
conditions due to premature
tire failure, or unfavorable
Do-it-yourself8-29
WHEELS AND TIRES
Page 455 of 512
8-30Do-it-yourself
handling characteristics and
could also lead to a serious
accident. Loading beyond
the specified capacity may
also result in failure of other
vehicle components.
.Before taking a long trip, or
whenever you heavily load
your vehicle, use a tire pres-
sure gauge to ensure that
the tire pressures are at the
specified level.
.For additional information
regarding tires, refer to “Im-
portant Tire Safety Informa-
tion” (US) or “Tire Safety
Information” (Canada) in the
Warranty Information Book-
let.
Page 456 of 512

SDI2503
Tire and Loading Information label
Seating capacity: The max-
imum number of occu-
pants that can be seated
in the vehicle.
Vehicle load limit: See “Ve-hicle loading information”
(P.10-11).
Original size: The size of
the tires originally installed
on the vehicle at the fac-
tory.
Cold tire pressure: Inflate
the tires to this pressure
when the tires are cold.
Tires are considered COLD
after the vehicle has been
parked for 3 or more hours,
or driven less than 1 mile
(1.6 km) at moderate
speeds. The recommended
cold tire inflation is set by
the manufacturer to pro-
vide the best balance of
tire wear, vehicle handling,
driveability, tire noise, etc.,
up to the vehicle’s GVWR.
Tire size — see “Tire label-
ing” (P.8-33).
Spare tire size or compact
spare tire size (if so
equipped)
Do-it-yourself8-31
Page 463 of 512
8-38Do-it-yourself
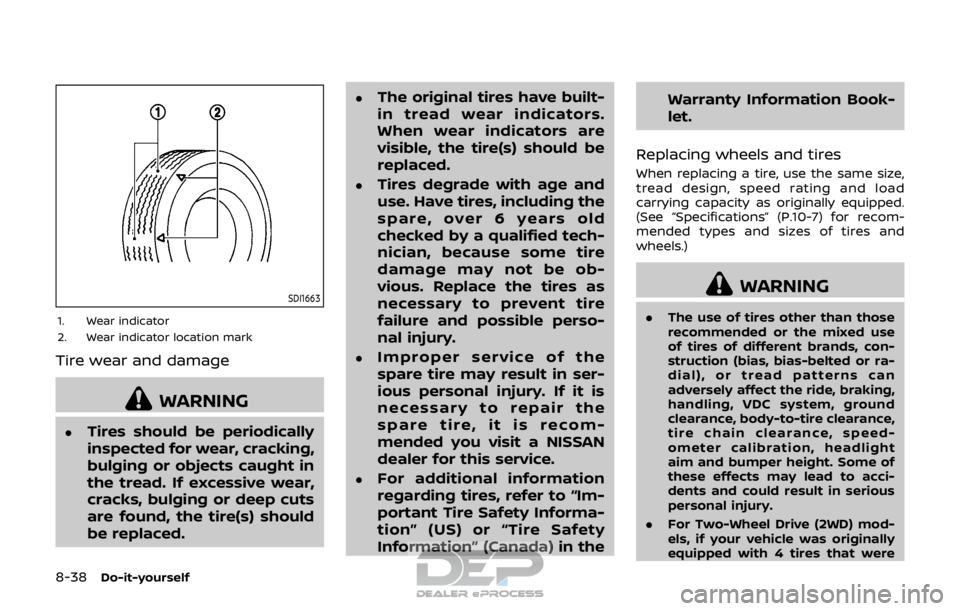
SDI1663
1. Wear indicator
2. Wear indicator location mark
Tire wear and damage
WARNING
.Tires should be periodically
inspected for wear, cracking,
bulging or objects caught in
the tread. If excessive wear,
cracks, bulging or deep cuts
are found, the tire(s) should
be replaced.
.The original tires have built-
in tread wear indicators.
When wear indicators are
visible, the tire(s) should be
replaced.
.Tires degrade with age and
use. Have tires, including the
spare, over 6 years old
checked by a qualified tech-
nician, because some tire
damage may not be ob-
vious. Replace the tires as
necessary to prevent tire
failure and possible perso-
nal injury.
.Improper service of the
spare tire may result in ser-
ious personal injury. If it is
necessary to repair the
spare tire, it is recom-
mended you visit a NISSAN
dealer for this service.
.For additional information
regarding tires, refer to “Im-
portant Tire Safety Informa-
tion” (US) or “Tire Safety
Information” (Canada) in theWarranty Information Book-
let.
Replacing wheels and tires
When replacing a tire, use the same size,
tread design, speed rating and load
carrying capacity as originally equipped.
(See “Specifications” (P.10-7) for recom-
mended types and sizes of tires and
wheels.)
WARNING
. The use of tires other than those
recommended or the mixed use
of tires of different brands, con-
struction (bias, bias-belted or ra-
dial), or tread patterns can
adversely affect the ride, braking,
handling, VDC system, ground
clearance, body-to-tire clearance,
tire chain clearance, speed-
ometer calibration, headlight
aim and bumper height. Some of
these effects may lead to acci-
dents and could result in serious
personal injury.
. For Two-Wheel Drive (2WD) mod-
els, if your vehicle was originally
equipped with 4 tires that were
Page 484 of 512

10 Technical and consumer information
Capacities and
recommended fluids/lubricants .................................... 10-2Fuel information .................................................................. 10-3
Engine oil and oil filter recommendation ........ 10-5
Air conditioning system refrigerant and
lubricant recommendations ...................................... 10-6
Specifications ........................................................................\
........ 10-7 Engine ........................................................................\
.................. 10-7
Wheels and tires .................................................................. 10-7
Dimensions and weights .............................................. 10-8
When traveling or registering in
another country ........................................................................\
. 10-8
Vehicle identification .............................................................. 10-8 Vehicle Identification Number (VIN) plate ....... 10-8
Vehicle identification number
(chassis number) ................................................................. 10-9
Engine serial number ....................................................... 10-9
F.M.V.S.S./C.M.V.S.S. certification label ................. 10-9
Emission control information label .................. 10-10
Tire and Loading Information label ................. 10-10
Air conditioner specification label ..................... 10-10
Installing front license plate ......................................... 10-11 Vehicle loading information ......................................... 10-11
Terms ........................................................................\
............. 10-11
Vehicle load capacity ................................................ 10-12
Securing the load ......................................................... 10-13
Loading tips ...................................................................... 10-13
Measurement of weights ....................................... 10-14
Towing a trailer ...................................................................... 10-14
Flat towing ........................................................................\
......... 10-15 Flat towing for All–Wheel Drive vehicle (if
so equipped) ..................................................................... 10-15
Flat towing for Front-Wheel Drive vehicle
(if so equipped) ............................................................... 10-15
Uniform tire quality grading ........................................ 10-16
Treadwear ........................................................................\
.. 10-16
Traction AA, A, B and C ........................................... 10-16
Temperature A, B and C ......................................... 10-16
Emission control system warranty ......................... 10-17
Reporting safety defects ................................................ 10-17
Readiness for Inspection/Maintenance
(I/M) test ........................................................................\
............... 10-18
Event Data Recorders (EDR) ......................................... 10-19
Owner’s manual/service manual
order information ................................................................. 10-19
Page 494 of 512
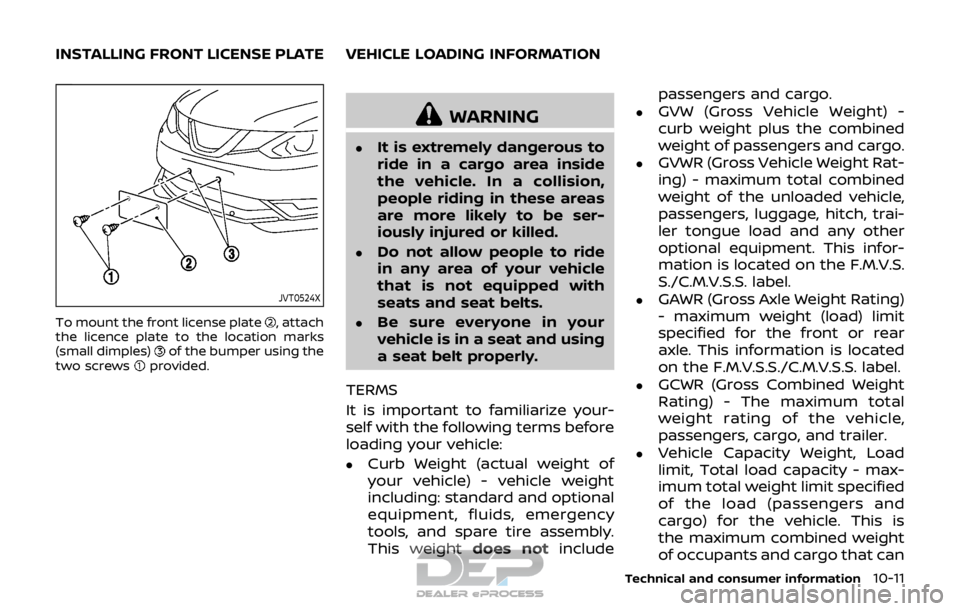
JVT0524X
To mount the front license plate, attach
the licence plate to the location marks
(small dimples)
of the bumper using the
two screwsprovided.
WARNING
.It is extremely dangerous to
ride in a cargo area inside
the vehicle. In a collision,
people riding in these areas
are more likely to be ser-
iously injured or killed.
.Do not allow people to ride
in any area of your vehicle
that is not equipped with
seats and seat belts.
.Be sure everyone in your
vehicle is in a seat and using
a seat belt properly.
TERMS
It is important to familiarize your-
self with the following terms before
loading your vehicle:
.Curb Weight (actual weight of
your vehicle) - vehicle weight
including: standard and optional
equipment, fluids, emergency
tools, and spare tire assembly.
This weight does notinclude passengers and cargo.
.GVW (Gross Vehicle Weight) -
curb weight plus the combined
weight of passengers and cargo.
.GVWR (Gross Vehicle Weight Rat-
ing) - maximum total combined
weight of the unloaded vehicle,
passengers, luggage, hitch, trai-
ler tongue load and any other
optional equipment. This infor-
mation is located on the F.M.V.S.
S./C.M.V.S.S. label.
.GAWR (Gross Axle Weight Rating)
- maximum weight (load) limit
specified for the front or rear
axle. This information is located
on the F.M.V.S.S./C.M.V.S.S. label.
.GCWR (Gross Combined Weight
Rating) - The maximum total
weight rating of the vehicle,
passengers, cargo, and trailer.
.Vehicle Capacity Weight, Load
limit, Total load capacity - max-
imum total weight limit specified
of the load (passengers and
cargo) for the vehicle. This is
the maximum combined weight
of occupants and cargo that can
Technical and consumer information10-11
INSTALLING FRONT LICENSE PLATE VEHICLE LOADING INFORMATION
Page 495 of 512

10-12Technical and consumer information
be loaded into the vehicle. If the
vehicle is used to tow a trailer,
the trailer tongue weight must
be included as part of the cargo
load. This information is located
on the Tire and Loading Infor-
mation label.
.Cargo capacity - permissible
weight of cargo, the subtracted
weight of occupants from the
load limit.
VEHICLE LOAD CAPACITY
Do not exceed the load limit of your
vehicle shown as “The combined
weight of occupants and cargo” on
the Tire and Loading Information
label. Do not exceed the number of
occupants shown as “Seating Ca-
pacity” on the Tire and Loading
Information label.
To get “the combined weight of
occupants and cargo”, add the
weight of all occupants, then add
the total luggage weight. Examples
are shown in the following illustra-
tion.
STI0447
Steps for determining correct load
limit
1.Locate the statement “The com-
bined weight of occupants and
cargo should never exceed XXX
kg or XXX lbs” on your vehicle’s
placard.
2.Determine the combined weight
of the driver and passengers
that will be riding in your vehicle.
3.Subtract the combined weight
of the driver and passengers
from XXX kg or XXX lbs.