wheel size NISSAN ROGUE SPORT 2018 Owners Manual
[x] Cancel search | Manufacturer: NISSAN, Model Year: 2018, Model line: ROGUE SPORT, Model: NISSAN ROGUE SPORT 2018Pages: 512, PDF Size: 3.33 MB
Page 91 of 512
2-14Instruments and controls
.Since the spare tire is not
equipped with the TPMS, when a
spare tire is mounted or a wheel
is replaced, the TPMS will not
function and the low tire pressure
warning light will flash for ap-
proximately 1 minute. The light
will remain on after 1 minute.
Have your tires replaced and/or
TPMS system reset as soon as
possible. It is recommended you
visit a NISSAN dealer for these
services.
. Replacing tires with those not
originally specified by NISSAN
could affect the proper operation
of the TPMS.
CAUTION
.The TPMS is not a substitute for
the regular tire pressure check.
Be sure to check the tire pressure
regularly.
. If the vehicle is being driven at
speeds of less than 16 MPH (25
km/h), the TPMS may not operate
correctly. .
Be sure to install the specified
size of tires to the four wheels
correctly.
Master warning light
When the ignition switch is in the ON
position, the master warning light illumi-
nates if any of the following are displayed
on the vehicle information display.
.No Key detected warning (if so
equipped)
. Shift to Park warning (Continuously
Variable Transmission (CVT) models)
(if so equipped)
. Key battery low warning (if so
equipped)
. Engine start operation for Intelligent
Key system indicator (if so equipped)
. Key ID incorrect warning (if so
equipped)
. Release Parking Brake warning
. Low fuel level warning
. Low Washer Fluid (if so equipped)
. Door/liftgate open warning
. Key System Error: See Owner’s Manual
warning (if so equipped)
. Loose Fuel Cap
. Tire Pressure Low - Add Air warning .
Low oil pressure Stop vehicle warning
. AWD Error: See Owner’s Manual warn-
ing (if so equipped)
. AWD High Temp. Stop vehicle warning
(if so equipped)
. Tire Size Incorrect: See Owner’s Man-
ual warning (if so equipped)
. Battery Voltage Low Charge Battery
warning
. Shipping Mode On Push Storage Fuse
warning (if so equipped)
. Power will turn off to save the battery
warning
. Power turned off to save the battery
warning
. Reminder: Turn OFF Headlights warn-
ing
. Headlight System Error: See Owner’s
Manual warning (if so equipped)
. Timer Alert - Time for a driver break?
indicator (if so equipped)
. Chassis Control System Error: See
Owner’s Manual warning
. CVT Error: See Owner’s Manual warn-
ing (for Continuously Variable Trans-
mission (CVT) models)
. Malfunction warning (if so equipped)
. Unavailable: High Cabin Temperature
warning (if so equipped)
Page 107 of 512

2-30Instruments and controls
17. AWD High Temp. Stop vehicle
warning (if so equipped)
This warning may appear while trying to
free a stuck vehicle due to increased oil
temperature. The driving mode may
change to Two-Wheel Drive (2WD). If this
warning is displayed, stop the vehicle with
the engine idling, as soon as it is safe to
do so. Then if the warning turns off, you
can continue driving. See “Intelligent 4x4”
(P.5-100).
18. Tire Size Incorrect: See Owner’s
Manual warning (if so equipped)
This warning may appear if there is a
large difference between the diameters of
the front and rear wheels and tires. Pull
off the road in a safe area, with the engine
idling. Check that all the tire sizes are the
same, that the tire pressure is correct and
that the tires are not excessively worn.
See “Intelligent 4x4” (P.5-100).
19. Battery Voltage Low Charge
Battery warning
This warning appears when the battery
voltage is low and the battery needs to be
charged.
20. Shipping Mode On Push Sto-
rage Fuse warning (if so equipped)
This warning may appear if the extended
storage fuse switch is not pushed in
(switched on). When this warning ap-
pears, push in (switch on) the extended
storage fuse switch to turn off the warn-
ing. For more information, see “Extended
storage fuse switch” (P.8-21).
21. Power will turn off to save the
battery warning
This warning appears after the ignition
switch is in the ON position for a certain
period of time.
22. Power turned off to save the
battery warning
This warning appears after the ignition
switch is automatically turned OFF to
save the battery.
23. Reminder: Turn OFF Headlights
warning
This warning appears when the driver
side door is opened with the headlight
switch is left ON and the ignition switch is
placed in the OFF or LOCK position. Place
the headlight switch in OFF or AUTO (if so
equipped) position. For additional infor-
mation, see “Headlight and turn signal
switch” (P.2-43).
24. Headlight System Error: See
Owner’s Manual warning (if so
equipped)
This warning appears if the LED head-
lights are malfunctioning. Have the sys-
tem checked. It is recommended that you
visit a NISSAN dealer for this service.
25. Timer Alert — Time for a driver
break? indicator
This indicator appears when the set “Time
for a driver break?” indicator activates.
You can set the time for up to 6 hours.
26. Chassis Control System Error:
See Owner’s Manual warning
This warning appears if the chassis con-
trol module detects an error in the
chassis control system. Have the system
checked. It is recommended that you visit
a NISSAN dealer for this service. (See
“Chassis control” (P.5-110).)
27. Cruise control indicator (if so
equipped)
This indicator shows the cruise control
system status. The status is shown by the
color.
See “Cruise control” (P.5-60) for details.
Page 194 of 512
Available views:
.Front view
An approximately 150–degree view of
the front of the vehicle.
. Rear view
An approximately 150–degree view of
the rear of the vehicle.
. Bird’s-eye view
The surrounding views of the vehicle
from above.
. Front-side view
The view around and ahead of the
front passenger’s side wheel.
JVH1588X
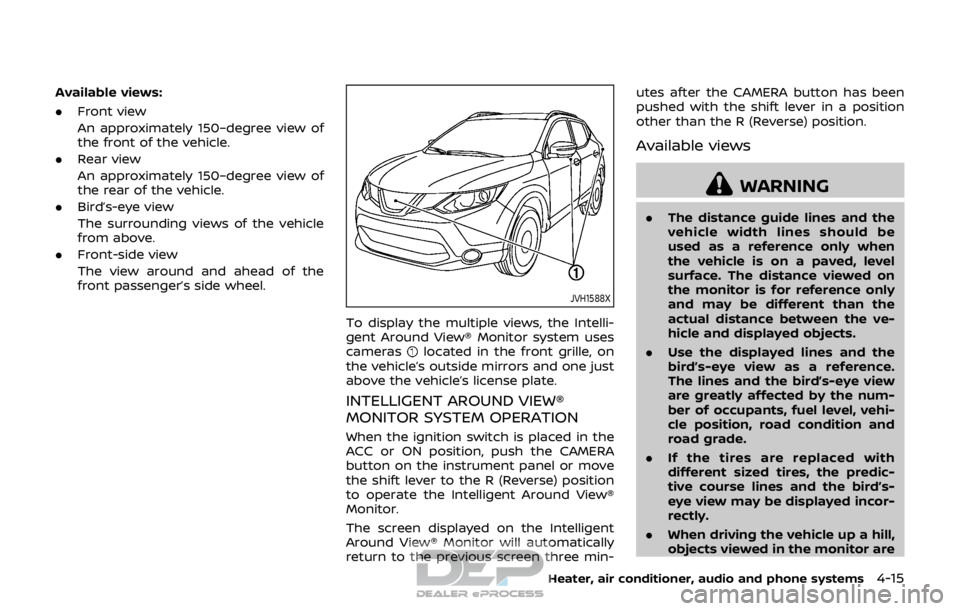
To display the multiple views, the Intelli-
gent Around View® Monitor system uses
cameras
located in the front grille, on
the vehicle’s outside mirrors and one just
above the vehicle’s license plate.
INTELLIGENT AROUND VIEW®
MONITOR SYSTEM OPERATION
When the ignition switch is placed in the
ACC or ON position, push the CAMERA
button on the instrument panel or move
the shift lever to the R (Reverse) position
to operate the Intelligent Around View®
Monitor.
The screen displayed on the Intelligent
Around View® Monitor will automatically
return to the previous screen three min- utes after the CAMERA button has been
pushed with the shift lever in a position
other than the R (Reverse) position.
Available views
WARNING
.
The distance guide lines and the
vehicle width lines should be
used as a reference only when
the vehicle is on a paved, level
surface. The distance viewed on
the monitor is for reference only
and may be different than the
actual distance between the ve-
hicle and displayed objects.
. Use the displayed lines and the
bird’s-eye view as a reference.
The lines and the bird’s-eye view
are greatly affected by the num-
ber of occupants, fuel level, vehi-
cle position, road condition and
road grade.
. If the tires are replaced with
different sized tires, the predic-
tive course lines and the bird’s-
eye view may be displayed incor-
rectly.
. When driving the vehicle up a hill,
objects viewed in the monitor are
Heater, air conditioner, audio and phone systems4-15
Page 199 of 512
4-20Heater, air conditioner, audio and phone systems
positionif the object projects over the
actual moving course.
HOW TO PARK WITH PREDICTIVE
COURSE LINES
WARNING
. If the tires are replaced with
different sized tires, the predic-
tive course lines may be dis-
played incorrectly.
. On a snow-covered or slippery
road, there may be a difference
between the predictive course
line and the actual course line.
SAA1897
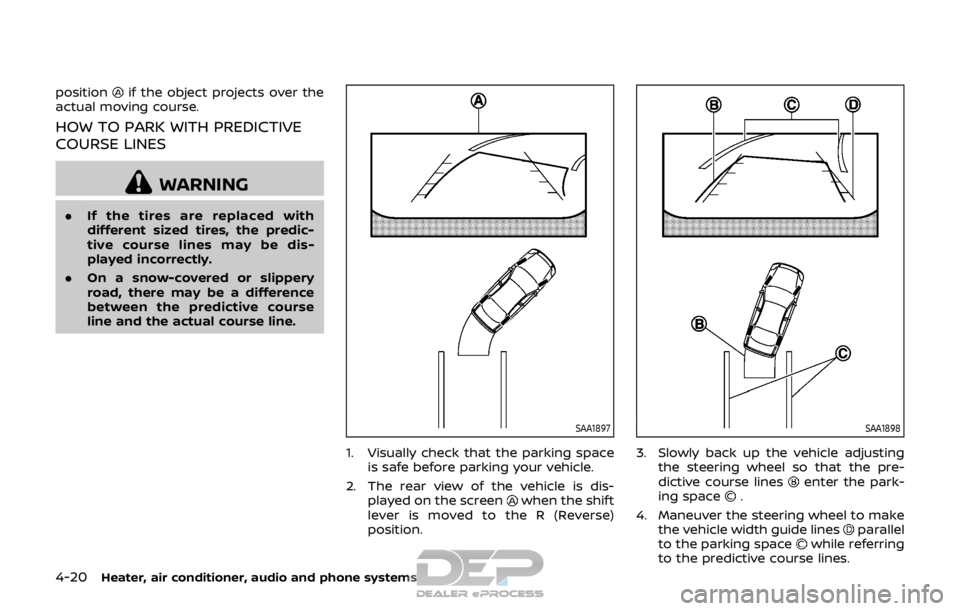
1. Visually check that the parking space
is safe before parking your vehicle.
2. The rear view of the vehicle is dis- played on the screen
when the shift
lever is moved to the R (Reverse)
position.
SAA1898
3. Slowly back up the vehicle adjusting the steering wheel so that the pre-
dictive course lines
enter the park-
ing space.
4. Maneuver the steering wheel to make the vehicle width guide lines
parallel
to the parking spacewhile referring
to the predictive course lines.
Page 290 of 512
away from the exhaust system
components.
. Do not stop or park the vehicle
over flammable materials such as
dry grass, wastepaper or rags.
They may ignite and cause a fire.
CAUTION
.Do not use leaded gasoline. De-
posits from leaded gasoline will
seriously reduce the three-way
catalyst’s ability to help reduce
exhaust pollutants.
. Keep your engine tuned up. Mal-
functions in the ignition, fuel in-
jection, or electrical systems can
cause overrich fuel flow into the
three-way catalyst, causing it to
overheat. Do not keep driving if
the engine misfires, or if notice-
able loss of performance or other
unusual operating conditions are
detected. Have the vehicle in-
spected. It is recommended you
visit a NISSAN dealer for this
service.
. Avoid driving with an extremely
low fuel level. Running out of fuel
could cause the engine to misfire, damaging the three-way catalyst.
. Do not race the engine while
warming it up.
. Do not push or tow your vehicle
to start the engine.
TIRE PRESSURE MONITORING SYS-
TEM (TPMS)
Each tire, including the spare (if provided),
should be checked monthly when cold
and inflated to the inflation pressure
recommended by the vehicle manufac-
turer on the vehicle placard or tire infla-
tion pressure label. (If your vehicle has
tires of a different size than the size
indicated on the vehicle placard or tire
inflation pressure label, you should deter-
mine the proper tire inflation pressure for
those tires.)
As an added safety feature, your vehicle
has been equipped with a Tire Pressure
Monitoring System (TPMS) that illumi-
nates a low tire pressure telltale when
one or more of your tires is significantly
under-inflated. Accordingly, when the low
tire pressure telltale illuminates, you
should stop and check your tires as soon
as possible, and inflate them to the
proper pressure. Driving on a significantly
under-inflated tire causes the tire to
overheat and can lead to tire failure. Under-inflation also reduces fuel effi-
ciency and tire tread life, and may affect
the vehicle’s handling and stopping abil-
ity.
Please note that the TPMS is not a
substitute for proper tire maintenance,
and it is the driver’s responsibility to
maintain correct tire pressure, even if
under-inflation has not reached the level
to trigger illumination of the TPMS low
tire pressure telltale.
Your vehicle has also been equipped with
a TPMS malfunction indicator to indicate
when the system is not operating prop-
erly. The TPMS malfunction indicator is
combined with the low tire pressure tell-
tale. When the system detects a malfunc-
tion, the telltale will flash for
approximately one minute and then re-
main continuously illuminated. This se-
quence will continue upon subsequent
vehicle start-ups as long as the malfunc-
tion exists. When the malfunction indica-
tor is illuminated, the system may not be
able to detect or signal low tire pressure
as intended. TPMS malfunctions may
occur for a variety of reasons, including
the installation of replacement or alter-
nate tires or wheels on the vehicle that
prevent the TPMS from functioning prop-
erly. Always check the TPMS malfunction
telltale after replacing one or more tires
Starting and driving5-5
Page 297 of 512
5-12Starting and driving
vehicle is not designed for cor-
nering at the same speeds as
conventional passenger cars.
Failure to operate this vehicle
correctly could result in loss of
control and/or a rollover acci-
dent.
. Always use tires of the same type,
size, brand, construction (bias,
bias-belted or radial), and tread
pattern on all four wheels. Install
traction devices on the front
wheels when driving on slippery
roads and drive carefully.
. Be sure to check the brakes im-
mediately after driving in mud or
water. See “Brake system” (P.5-
106) for wet brakes.
. Avoid parking your vehicle on
steep hills. If you get out of the
vehicle and it rolls forward, back-
ward or sideways, you could be
injured.
. Whenever you drive off-road
through sand, mud or water as
deep as the wheel hub, more
frequent maintenance may be
required. See the maintenance
schedule shown in the “9. Main-
tenance and schedules” section. .
Spinning the front wheels on
slippery surfaces may cause the
AWD warning message to display
and the AWD system to automa-
tically switch from the AWD mode
to the 2WD mode. This could
reduce traction. (AWD models)
WARNING
Never remove the key or place the
ignition switch in the LOCK position
while driving. The steering wheel will
lock and could cause the driver to
lose control of the vehicle. This could
result in serious vehicle damage or
personal injury.
IGNITION SWITCH (models without
Intelligent Key system)
Page 386 of 512
JVS1120X
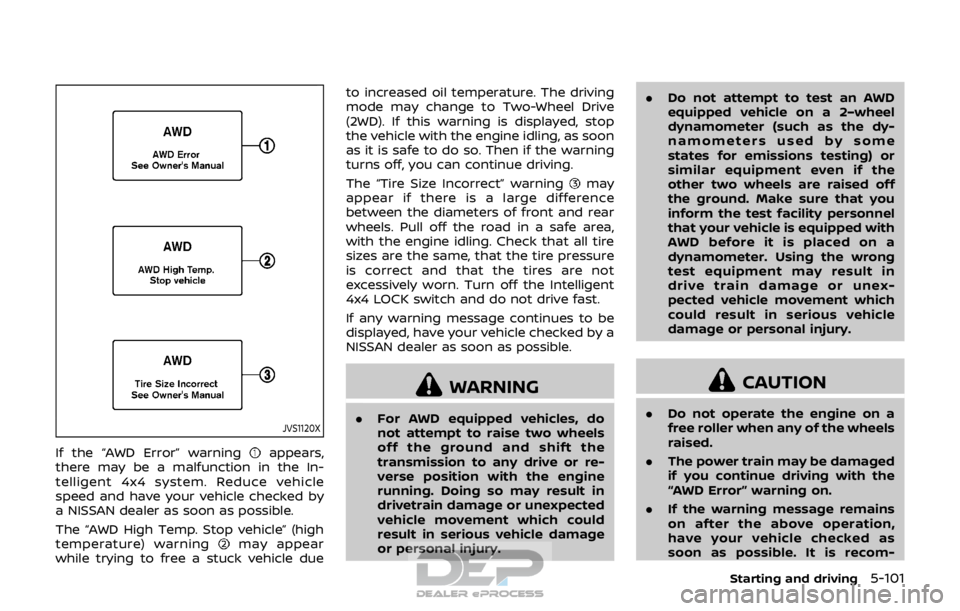
If the “AWD Error” warningappears,
there may be a malfunction in the In-
telligent 4x4 system. Reduce vehicle
speed and have your vehicle checked by
a NISSAN dealer as soon as possible.
The “AWD High Temp. Stop vehicle” (high
temperature) warning
may appear
while trying to free a stuck vehicle due to increased oil temperature. The driving
mode may change to Two-Wheel Drive
(2WD). If this warning is displayed, stop
the vehicle with the engine idling, as soon
as it is safe to do so. Then if the warning
turns off, you can continue driving.
The “Tire Size Incorrect” warning
may
appear if there is a large difference
between the diameters of front and rear
wheels. Pull off the road in a safe area,
with the engine idling. Check that all tire
sizes are the same, that the tire pressure
is correct and that the tires are not
excessively worn. Turn off the Intelligent
4x4 LOCK switch and do not drive fast.
If any warning message continues to be
displayed, have your vehicle checked by a
NISSAN dealer as soon as possible.
WARNING
. For AWD equipped vehicles, do
not attempt to raise two wheels
off the ground and shift the
transmission to any drive or re-
verse position with the engine
running. Doing so may result in
drivetrain damage or unexpected
vehicle movement which could
result in serious vehicle damage
or personal injury. .
Do not attempt to test an AWD
equipped vehicle on a 2–wheel
dynamometer (such as the dy-
namometers used by some
states for emissions testing) or
similar equipment even if the
other two wheels are raised off
the ground. Make sure that you
inform the test facility personnel
that your vehicle is equipped with
AWD before it is placed on a
dynamometer. Using the wrong
test equipment may result in
drive train damage or unex-
pected vehicle movement which
could result in serious vehicle
damage or personal injury.
CAUTION
.Do not operate the engine on a
free roller when any of the wheels
raised.
. The power train may be damaged
if you continue driving with the
“AWD Error” warning on.
. If the warning message remains
on after the above operation,
have your vehicle checked as
soon as possible. It is recom-
Starting and driving5-101
Page 392 of 512
BRAKE ASSIST
When the force applied to the brake pedal
exceeds a certain level, the Brake Assist is
activated generating greater braking
force than a conventional brake booster
even with light pedal force.
WARNING
The Brake Assist is only an aid to
assist braking operation and is not a
collision warning or avoidance de-
vice. It is the driver’s responsibility to
stay alert, drive safely and be in
control of the vehicle at all times.
ANTI-LOCK BRAKING SYSTEM (ABS)
WARNING
.The Anti-lock Braking System
(ABS) is a sophisticated device,
but it cannot prevent accidents
resulting from careless or dan-
gerous driving techniques. It can
help maintain vehicle control dur-
ing braking on slippery surfaces.
Remember that stopping dis-
tances on slippery surfaces will
be longer than on normal sur- faces even with ABS. Stopping
distances may also be longer on
rough, gravel or snow covered
roads, or if you are using tire
chains. Always maintain a safe
distance from the vehicle in front
of you. Ultimately, the driver is
responsible for safety.
. Tire type and condition may also
affect braking effectiveness.
— When replacing tires, install
the specified size of tires on
all four wheels.
— When installing a spare tire, make sure that it is the proper
size and type as specified on
the Tire and Loading Informa-
tion label. See “Tire and Load-
ing Information label” (P.10-
10) of this manual.
— For detailed information, see “Wheels and tires” (P.8-29) of
this manual.
The Anti-lock Braking System (ABS) con-
trols the brakes so the wheels do not lock
during hard braking or when braking on
slippery surfaces. The system detects the
rotation speed at each wheel and varies
the brake fluid pressure to prevent each
wheel from locking and sliding. By pre- venting each wheel from locking, the
system helps the driver maintain steering
control and helps to minimize swerving
and spinning on slippery surfaces.
Using the system
Depress the brake pedal and hold it down.
Depress the brake pedal with firm steady
pressure, but do not pump the brakes.
The ABS will operate to prevent the
wheels from locking up. Steer the vehicle
to avoid obstacles.
WARNING
Do not pump the brake pedal. Doing
so may result in increased stopping
distances.
Self-test feature
The ABS includes electronic sensors, elec-
tric pumps, hydraulic solenoids and a
computer. The computer has a built-in
diagnostic feature that tests the system
each time you start the engine and move
the vehicle at a low speed in forward or
reverse. When the self-test occurs, you
may hear a “clunk” noise and/or feel a
pulsation in the brake pedal. This is
normal and does not indicate a malfunc-
tion. If the computer senses a malfunc-
Starting and driving5-107
BRAKE ASSIST
Page 399 of 512
5-114Starting and driving
TIRE EQUIPMENT
SUMMER tires have a tread designed to
provide superior performance on dry
pavement. However, the performance of
these tires will be substantially reduced in
snowy and icy conditions. If you operate
your vehicle on snowy or icy roads,
NISSAN recommends the use of MUD &
SNOW or ALL SEASON tires on all four
wheels. It is recommended you consult a
NISSAN dealer for the tire type, size, speed
rating and availability information.
For additional traction on icy roads,
studded tires may be used. However,
some U.S. states and Canadian provinces
prohibit their use. Check local, state and
provincial laws before installing studded
tires.
Skid and traction capabilities of
studded snow tires, on wet or dry
surfaces, may be poorer than that of
non-studded snow tires.
Tire chains may be used. For details, see
“Tire chains” (P.8-36) of this manual.
All-Wheel Drive (AWD) model
If you install snow tires, they must also be
the same size, brand, construction and
tread pattern on all four wheels.
SPECIAL WINTER EQUIPMENT
It is recommended that the following
items be carried in the vehicle during
winter:
.A scraper and stiff-bristled brush to
remove ice and snow from the win-
dows and wiper blades.
. A sturdy, flat board to be placed under
the jack to give it firm support.
. A shovel to dig the vehicle out of
snow-drifts.
. Extra window washer fluid to refill the
reservoir tank.
DRIVING ON SNOW OR ICE
WARNING
.Wet ice (32°F, 0°C and freezing
rain), very cold snow or ice can be
slick and very hard to drive on.
The vehicle will have much less
traction or “grip” under these
conditions. Try to avoid driving
on wet ice until the road is salted
or sanded. .
Whatever the condition, drive
with caution. Accelerate and slow
down with care. If accelerating or
downshifting too fast, the drive
wheels will lose even more trac-
tion.
. Allow more stopping distance
under these conditions. Braking
should be started sooner than on
dry pavement.
. Allow greater following distances
on slippery roads.
. Watch for slippery spots (glare
ice). These may appear on an
otherwise clear road in shaded
areas. If a patch of ice is seen
ahead, brake before reaching it.
Try not to brake while on the ice,
and avoid any sudden steering
maneuvers.
. Do not use cruise control on
slippery roads.
. Snow can trap dangerous ex-
haust gases under your vehicle.
Keep snow clear of the exhaust
pipe and from around your vehi-
cle.
Page 459 of 512

8-34Do-it-yourself
SDI1606
Example
Tire size (example: P215/60R16
94H)
1. P: The “P” indicates the tire is designed for passenger vehicles.
(Not all tires have this informa-
tion.)
2. Three-digit number (215): This number gives the width in milli-
meters of the tire from sidewall
edge to sidewall edge.
3. Two-digit number (60): This number, known as the aspect
ratio, gives the tire’s ratio of height to width.
4. R: The “R” stands for radial.
5. Two-digit number (16): This number is the wheel or rim
diameter in inches.
6. Two- or three-digit number (94): This number is the tire’s load
index. It is a measurement of
how much weight each tire can
support. You may not find this
information on all tires because
it is not required by law.
7. H: Tire speed rating. You should not drive the vehicle faster than
the tire speed rating.
JVM0694X
Example
TIN (Tire Identification Number)
for a new tire (example: DOT XX XX
XXX XXXX)
1. DOT: Abbreviation for the “De- partment of Transportation”.
The symbol can be placed
above, below or to the left or
right of the Tire Identification
Number.
2. Two-digit code: Manufacturer’s identification mark
3. Two-digit code: Tire size