fuse NISSAN ROGUE SPORT 2019 Owners Manual
[x] Cancel search | Manufacturer: NISSAN, Model Year: 2019, Model line: ROGUE SPORT, Model: NISSAN ROGUE SPORT 2019Pages: 500, PDF Size: 2.37 MB
Page 16 of 500
0-8Illustrated table of contents
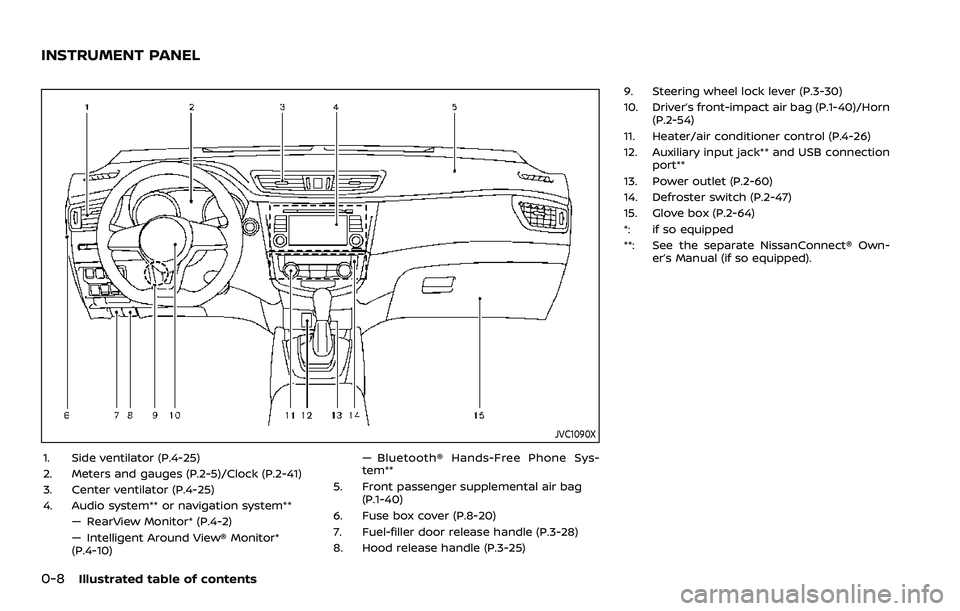
JVC1090X
1. Side ventilator (P.4-25)
2. Meters and gauges (P.2-5)/Clock (P.2-41)
3. Center ventilator (P.4-25)
4. Audio system** or navigation system**— RearView Monitor* (P.4-2)
— Intelligent Around View® Monitor*
(P.4-10) — Bluetooth® Hands-Free Phone Sys-
tem**
5. Front passenger supplemental air bag (P.1-40)
6. Fuse box cover (P.8-20)
7. Fuel-filler door release handle (P.3-28)
8. Hood release handle (P.3-25) 9. Steering wheel lock lever (P.3-30)
10. Driver’s front-impact air bag (P.1-40)/Horn
(P.2-54)
11. Heater/air conditioner control (P.4-26)
12. Auxiliary input jack** and USB connection port**
13. Power outlet (P.2-60)
14. Defroster switch (P.2-47)
15. Glove box (P.2-64)
*: if so equipped
**: See the separate NissanConnect® Own- er’s Manual (if so equipped).
INSTRUMENT PANEL
Page 18 of 500
0-10Illustrated table of contents
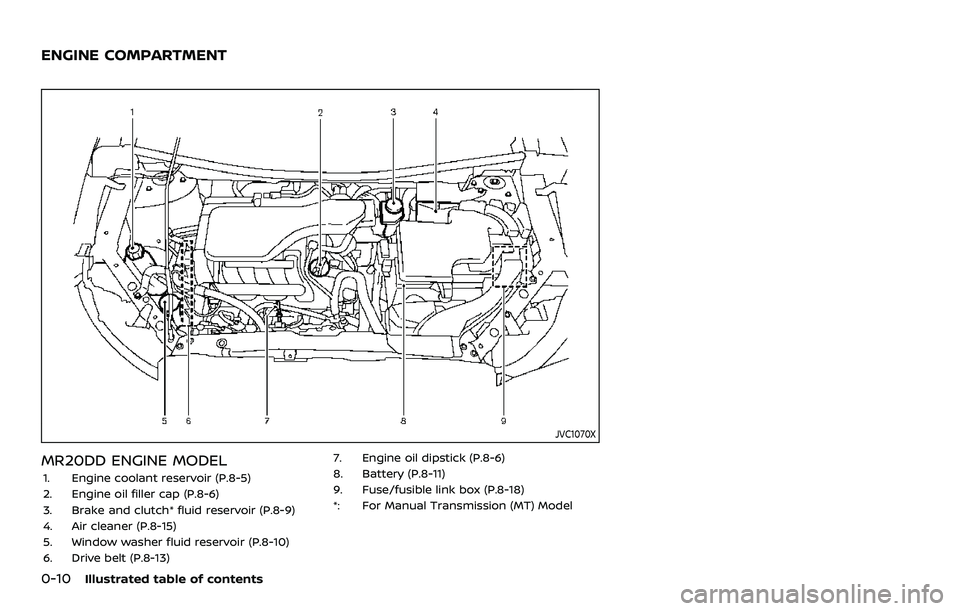
JVC1070X
MR20DD ENGINE MODEL
1. Engine coolant reservoir (P.8-5)
2. Engine oil filler cap (P.8-6)
3. Brake and clutch* fluid reservoir (P.8-9)
4. Air cleaner (P.8-15)
5. Window washer fluid reservoir (P.8-10)
6. Drive belt (P.8-13)7. Engine oil dipstick (P.8-6)
8. Battery (P.8-11)
9. Fuse/fusible link box (P.8-18)
*: For Manual Transmission (MT) Model
ENGINE COMPARTMENT
Page 84 of 500
2-4Instruments and controls
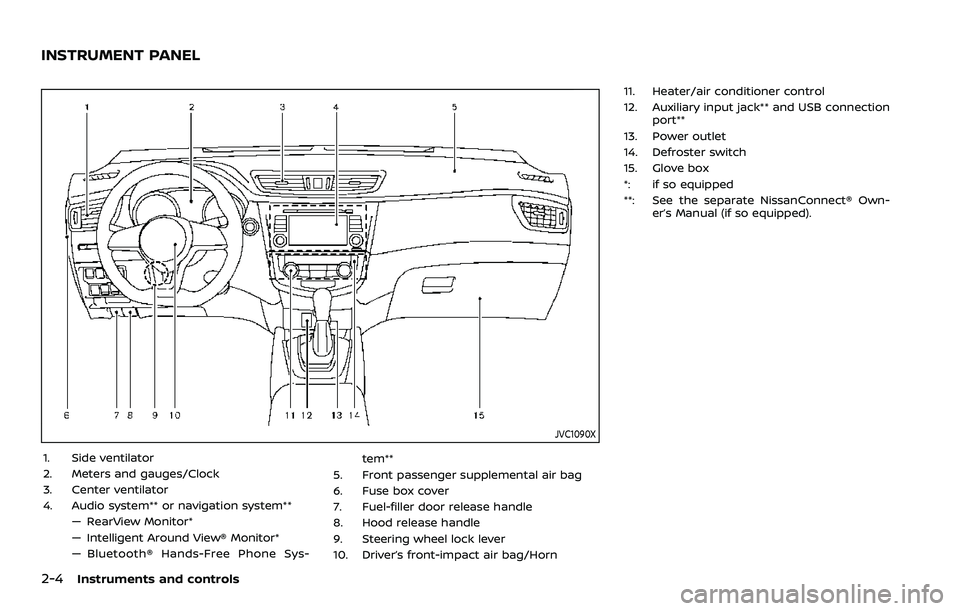
JVC1090X
1. Side ventilator
2. Meters and gauges/Clock
3. Center ventilator
4. Audio system** or navigation system**— RearView Monitor*
— Intelligent Around View® Monitor*
— Bluetooth® Hands-Free Phone Sys- tem**
5. Front passenger supplemental air bag
6. Fuse box cover
7. Fuel-filler door release handle
8. Hood release handle
9. Steering wheel lock lever
10. Driver’s front-impact air bag/Horn 11. Heater/air conditioner control
12. Auxiliary input jack** and USB connection
port**
13. Power outlet
14. Defroster switch
15. Glove box
*: if so equipped
**: See the separate NissanConnect® Own- er’s Manual (if so equipped).
INSTRUMENT PANEL
Page 94 of 500
2-14Instruments and controls
accident and could result in ser-
ious personal injury. Check the
tire pressure for all four tires.
Adjust the tire pressure to the
recommended COLD tire pressure
shown on the Tire and Loading
Information label to turn the low
tire pressure warning light OFF. If
the light still illuminates while
driving after adjusting the tire
pressure, a tire may be flat or
the TPMS may be malfunctioning.
If you have a flat tire, replace it
with a spare tire as soon as
possible. If no tire is flat and all
tires are properly inflated, it is
recommended you consult a
NISSAN dealer.
. Since the spare tire is not
equipped with the TPMS, when a
spare tire is mounted or a wheel
is replaced, the TPMS will not
function and the low tire pressure
warning light will flash for ap-
proximately 1 minute. The light
will remain on after 1 minute.
Have your tires replaced and/or
TPMS system reset as soon as
possible. It is recommended you
visit a NISSAN dealer for these
services. .
Replacing tires with those not
originally specified by NISSAN
could affect the proper operation
of the TPMS.
CAUTION
.The TPMS is not a substitute for
the regular tire pressure check.
Be sure to check the tire pressure
regularly.
. If the vehicle is being driven at
speeds of less than 16 MPH (25
km/h), the TPMS may not operate
correctly.
. Be sure to install the specified
size of tires to the four wheels
correctly.
Master warning light
When the ignition switch is in the ON
position, the master warning light illumi-
nates if any of the following are displayed
on the vehicle information display.
.No Key detected warning (if so
equipped)
. Shift to Park warning (Continuously
Variable Transmission (CVT) models) (if so equipped)
. Key battery low warning (if so
equipped)
. Engine start operation for Intelligent
Key system indicator (if so equipped)
. Key ID incorrect warning (if so
equipped)
. Release Parking Brake warning
. Low fuel level warning
. Low Washer Fluid (if so equipped)
. Door/liftgate open warning
. Key System Error: See Owner’s Manual
warning (if so equipped)
. Loose Fuel Cap
. Tire Pressure Low - Add Air warning
. Low oil pressure Stop vehicle warning
. AWD Error: See Owner’s Manual warn-
ing (if so equipped)
. AWD High Temp. Stop vehicle warning
(if so equipped)
. Tire Size Incorrect: See Owner’s Man-
ual warning (if so equipped)
. Battery Voltage Low Charge Battery
warning
. Shipping Mode On Push Storage Fuse
warning (if so equipped)
. Power will turn off to save the battery
warning
. Power turned off to save the battery
warning
Page 113 of 500
17. AWD High Temp. Stop vehicle
warning (if so equipped)
This warning may appear while trying to
free a stuck vehicle due to increased oil
temperature. The driving mode may
change to Two-Wheel Drive (2WD). If this
warning is displayed, stop the vehicle with
the engine idling, as soon as it is safe to
do so. Then if the warning turns off, you
can continue driving. See “Intelligent 4x4”
(P.5-139).
18. Tire Size Incorrect: See Owner’s
Manual warning (if so equipped)
This warning may appear if there is a
large difference between the diameters of
the front and rear wheels and tires. Pull
off the road in a safe area, with the engine
idling. Check that all the tire sizes are the
same, that the tire pressure is correct and
that the tires are not excessively worn.
See “Intelligent 4x4” (P.5-139).
19. Battery Voltage Low Charge
Battery warning
This warning appears when the battery
voltage is low and the battery needs to be
charged.
20. Shipping Mode On Push Sto-
rage Fuse warning (if so equipped)
This warning may appear if the extended
storage fuse switch is not pushed in
(switched on). When this warning ap-
pears, push in (switch on) the extended
storage fuse switch to turn off the warn-
ing. For more information, see “Extended
storage fuse switch” (P.8-21).
21. Power will turn off to save the
battery warning
This warning appears after the ignition
switch is in the ON position for a certain
period of time.
22. Power turned off to save the
battery warning
This warning appears after the ignition
switch is automatically turned OFF to
save the battery.
23. Reminder: Turn OFF Headlights
warning
This warning appears when the driver
side door is opened with the headlight
switch is left ON and the ignition switch is
placed in the OFF or LOCK position. Place
the headlight switch in OFF or AUTO (if so
equipped) position. For additional infor-
mation, see “Headlight and turn signal
switch” (P.2-48).
24. Headlight System Error: See
Owner’s Manual warning (if so
equipped)
This warning appears if the LED head-
lights are malfunctioning. Have the sys-
tem checked. It is recommended that you
visit a NISSAN dealer for this service.
25. Timer Alert — Time for a driver
break? indicator
This indicator appears when the set “Time
for a driver break?” indicator activates.
You can set the time for up to 6 hours.
26. Chassis Control System Error:
See Owner’s Manual warning
This warning appears if the chassis con-
trol module detects an error in the
chassis control system. Have the system
checked. It is recommended that you visit
a NISSAN dealer for this service. (See
“Chassis control” (P.5-149).)
27. Cruise control indicator (if so
equipped)
This indicator shows the cruise control
system status. The status is shown by the
color.
See “Cruise control” (P.5-64) for details.
Instruments and controls2-33
Page 140 of 500
2-60Instruments and controls
system.
. The ECO mode system will turn off
automatically if a malfunction occurs
in the system.
. Turn off the ECO mode system when
acceleration is required such as when:
— driving with a heavy load of pas-
sengers or cargo in the vehicle
— driving on a steep uphill slope
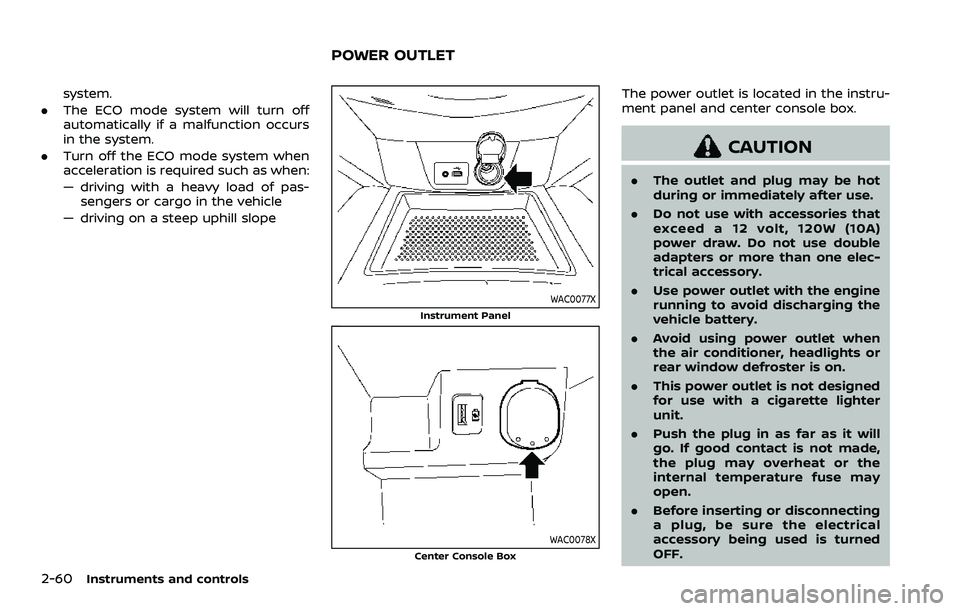
WAC0077X
Instrument Panel
WAC0078XCenter Console Box
The power outlet is located in the instru-
ment panel and center console box.
CAUTION
. The outlet and plug may be hot
during or immediately after use.
. Do not use with accessories that
exceed a 12 volt, 120W (10A)
power draw. Do not use double
adapters or more than one elec-
trical accessory.
. Use power outlet with the engine
running to avoid discharging the
vehicle battery.
. Avoid using power outlet when
the air conditioner, headlights or
rear window defroster is on.
. This power outlet is not designed
for use with a cigarette lighter
unit.
. Push the plug in as far as it will
go. If good contact is not made,
the plug may overheat or the
internal temperature fuse may
open.
. Before inserting or disconnecting
a plug, be sure the electrical
accessory being used is turned
OFF.
POWER OUTLET
Page 413 of 500
8 Do-it-yourself
Maintenance precautions ...................................................... 8-2
Engine compartment check locations ........................ 8-3MR20DD engine model ..................................................... 8-4
Engine cooling system ............................................................. 8-4 Checking engine coolant level .................................... 8-5
Changing engine coolant ................................................ 8-6
Engine oil ........................................................................\
..................... 8-6 Checking engine oil level ................................................. 8-6
Changing engine oil and filter ..................................... 8-6
Continuously Variable Transmission
(CVT) fluid ........................................................................\
.................... 8-9
Brake and clutch (if so equipped) fluid ....................... 8-9
Window washer fluid .............................................................. 8-10
Battery ........................................................................\
........................ 8-11 Jump starting ........................................................................\
. 8-12
Variable voltage control system ................................... 8-13
Drive belt ........................................................................\
.................. 8-13
Spark plugs ........................................................................\
............. 8-14 Replacing spark plugs ..................................................... 8-14
Air cleaner ........................................................................\
............... 8-15 Windshield wiper blades ..................................................... 8-16
Cleaning ........................................................................\
........... 8-16
Replacing ........................................................................\
........ 8-16
Rear window wiper blade .................................................. 8-17
Brakes ........................................................................\
........................ 8-17 Self-adjusting brakes ..................................................... 8-17
Brake pad wear warning ............................................ 8-17
Fuses ........................................................................\
........................... 8-18 Engine compartment .................................................... 8-18
Passenger compartment ........................................... 8-20
Key fob battery replacement .......................................... 8-21
Intelligent Key battery replacement .......................... 8-23
Lights ........................................................................\
.......................... 8-25 Headlights ........................................................................\
...... 8-25
Exterior and interior lights ........................................ 8-27
Wheels and tires ........................................................................\
8-29
Tire pressure ........................................................................\
8-29
Tire labeling ........................................................................\
.. 8-33
Types of tires ....................................................................... 8-35
Tire chains ........................................................................\
...... 8-36
Changing wheels and tires ...................................... 8-37
Page 416 of 500
8-4Do-it-yourself
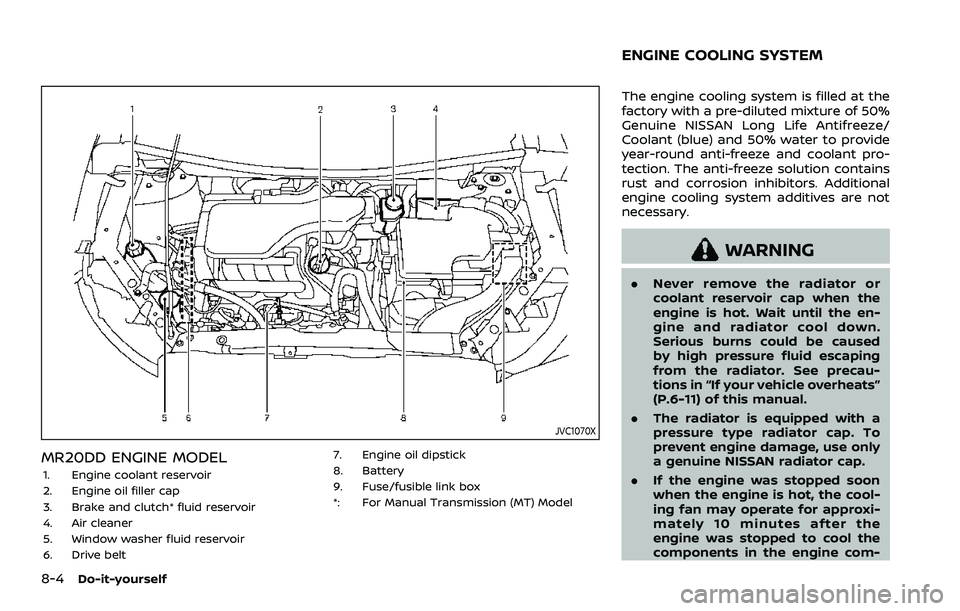
JVC1070X
MR20DD ENGINE MODEL
1. Engine coolant reservoir
2. Engine oil filler cap
3. Brake and clutch* fluid reservoir
4. Air cleaner
5. Window washer fluid reservoir
6. Drive belt7. Engine oil dipstick
8. Battery
9. Fuse/fusible link box
*: For Manual Transmission (MT) Model
The engine cooling system is filled at the
factory with a pre-diluted mixture of 50%
Genuine NISSAN Long Life Antifreeze/
Coolant (blue) and 50% water to provide
year-round anti-freeze and coolant pro-
tection. The anti-freeze solution contains
rust and corrosion inhibitors. Additional
engine cooling system additives are not
necessary.
WARNING
.
Never remove the radiator or
coolant reservoir cap when the
engine is hot. Wait until the en-
gine and radiator cool down.
Serious burns could be caused
by high pressure fluid escaping
from the radiator. See precau-
tions in “If your vehicle overheats”
(P.6-11) of this manual.
. The radiator is equipped with a
pressure type radiator cap. To
prevent engine damage, use only
a genuine NISSAN radiator cap.
. If the engine was stopped soon
when the engine is hot, the cool-
ing fan may operate for approxi-
mately 10 minutes after the
engine was stopped to cool the
components in the engine com-
ENGINE COOLING SYSTEM
Page 430 of 500
8-18Do-it-yourself
occasional brake squeak, squeal or other
noise may be heard. Occasional brake
noise during light to moderate stops is
normal and does not affect the function
or performance of the brake system.
Proper brake inspection intervals
should be followed.For additional infor-
mation, see the maintenance schedule
shown in the “9. Maintenance and sche-
dules” section.
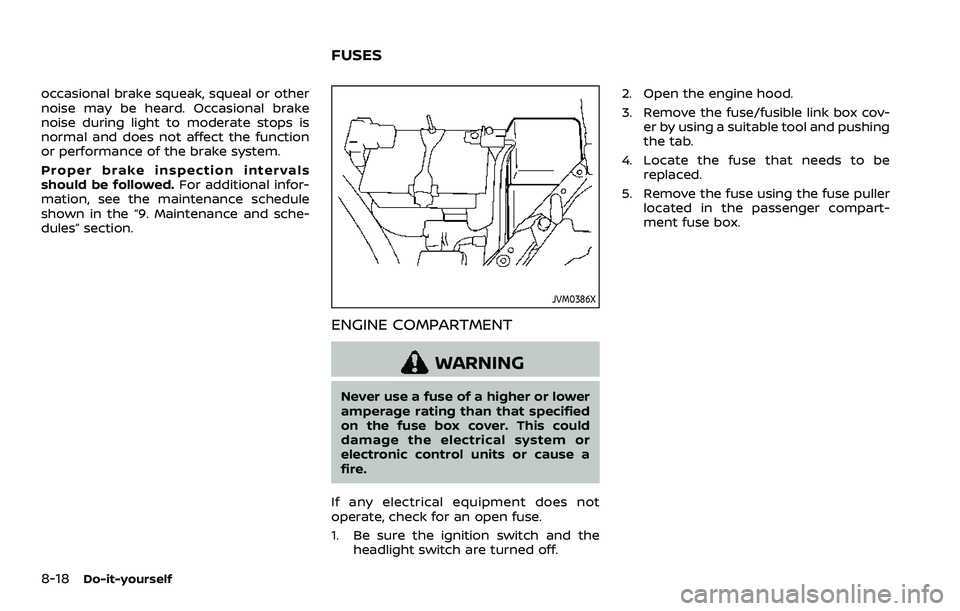
JVM0386X
ENGINE COMPARTMENT
WARNING
Never use a fuse of a higher or lower
amperage rating than that specified
on the fuse box cover. This could
damage the electrical system or
electronic control units or cause a
fire.
If any electrical equipment does not
operate, check for an open fuse.
1. Be sure the ignition switch and the headlight switch are turned off. 2. Open the engine hood.
3. Remove the fuse/fusible link box cov-
er by using a suitable tool and pushing
the tab.
4. Locate the fuse that needs to be replaced.
5. Remove the fuse using the fuse puller located in the passenger compart-
ment fuse box.
FUSES
Page 431 of 500
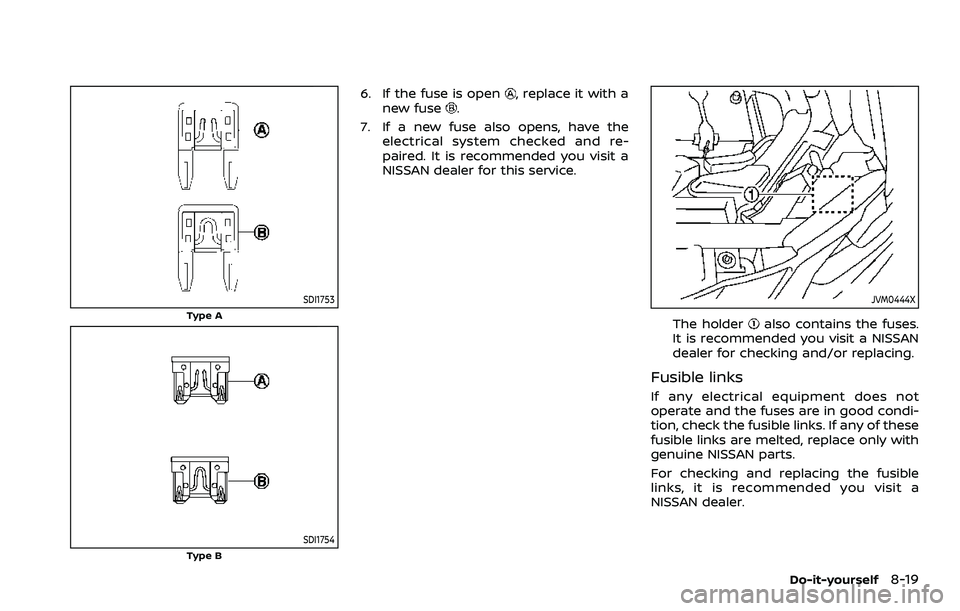
SDI1753
Type A
SDI1754Type B
6. If the fuse is open, replace it with a
new fuse.
7. If a new fuse also opens, have the electrical system checked and re-
paired. It is recommended you visit a
NISSAN dealer for this service.
JVM0444X
The holderalso contains the fuses.
It is recommended you visit a NISSAN
dealer for checking and/or replacing.
Fusible links
If any electrical equipment does not
operate and the fuses are in good condi-
tion, check the fusible links. If any of these
fusible links are melted, replace only with
genuine NISSAN parts.
For checking and replacing the fusible
links, it is recommended you visit a
NISSAN dealer.
Do-it-yourself8-19