ESP NISSAN ROGUE SPORT 2020 Owners Manual
[x] Cancel search | Manufacturer: NISSAN, Model Year: 2020, Model line: ROGUE SPORT, Model: NISSAN ROGUE SPORT 2020Pages: 492, PDF Size: 2.02 MB
Page 37 of 492
WARNING
Do not allow children to play with the
seat belts. Most seating positions are
equipped with Automatic Locking
Retractor (ALR) mode seat belts. If
the seat belt becomes wrapped
around a child’s neck with the ALR
mode activated, the child can be
seriously injured or killed if the seat
belt retracts and becomes tight. This
can occur even if the vehicle is
parked. Unbuckle the seat belt to
release the child. If the seat belt can
not be unbuckled or is already un-
buckled, release the child by cutting
the seat belt with a suitable tool
(such as a knife or scissors) to
release the seat belt.
Children need adults to help protect
them.
They need to be properly restrained.
In addition to the general information in
this manual, child safety information is
available from many other sources, in-
cluding doctors, teachers, government
traffic safety offices, and community or-
ganizations. Every child is different, so be
sure to learn the best way to transport
your child. There are three basic types of child
restraint systems:
.
Rear-facing child restraint
. Forward-facing child restraint
. Booster seat
The proper restraint depends on the
child’s size. Generally, infants up to about
1 year and less than 20 lbs (9 kg) should
be placed in rear-facing child restraints.
Forward-facing child restraints are avail-
able for children who outgrow rear-facing
child restraints and are at least 1 year old.
Booster seats are used to help position a
vehicle lap/shoulder belt on a child who
can no longer use a forward-facing child
restraint.
WARNING
Infants and children need special
protection. The vehicle’s seat belts
may not fit them properly. The
shoulder belt may come too close
to the face or neck. The lap belt may
not fit over their small hip bones. In
an accident, an improperly fitting
seat belt could cause serious or fatal
injury. Always use appropriate child
restraints.
All U.S. states and Canadian provinces or territories require the use of approved
child restraints for infants and small
children. See “Child restraints” (P.1-21).
A child restraint may be secured in the
vehicle by using either the LATCH (Lower
Anchors and Tethers for CHildren) system
or with the vehicle seat belt. See “Child
restraints” (P.1-21) for more information.
NISSAN recommends that all pre-teens
and children be restrained in the rear
seat. Studies show that children are
safer when properly restrained in the
rear seat than in the front seat.
This is especially important because
your vehicle has a supplemental re-
straint system (Air bag system) for the
front passenger. See “Supplemental
Restraint System (SRS)” (P.1-42).
INFANTS
Infants up to at least 1 year old should be
placed in a rear-facing child restraint.
NISSAN recommends that infants be
placed in child restraints that comply with
Federal Motor Vehicle Safety Standards
or Canadian Motor Vehicle Safety Stan-
dards. You should choose a child restraint
that fits your vehicle and always follow
the manufacturer’s instructions for instal-
lation and use.
Safety — Seats, seat belts and supplemental restraint system1-19
CHILD SAFETY
Page 65 of 492
.The curtain air bags ordinarily will
not inflate in the event of a front
impact, rear impact, or lower
severity side collision. Always
wear your seat belts to help
reduce the risk or severity of
injury in various kinds of acci-
dents.
. The seat belts, the side air bags
and curtain air bags are most
effective when you are sitting
well back and upright in the seat.
The side air bags and curtain air
bags inflate with great force. Do
not allow anyone to place their
hand, leg or face near the side air
bags on the side of the seatback
of the front and rear seat or near
the side roof rails. Do not allow
anyone sitting in the front seats
or rear outboard seats to extend
their hand out of the window or
lean against the door. Some ex-
amples of dangerous riding posi-
tions are shown in the previous
illustrations.
. When sitting in the rear seat, do
not hold onto the seatback of the
front seat. If the side air bag
inflates, you may be seriously
injured. Be especially careful with
children, who should always be properly restrained. Some exam-
ples of dangerous riding posi-
tions are shown in the
illustrations.
. Do not use seat covers on the
front and rear seatbacks. They
may interfere with side air bag
inflation.
Safety — Seats, seat belts and supplemental restraint system1-47
Page 94 of 492
2-12Instruments and controls
Anti-lock Braking System (ABS) warning
indicator:
When the parking brake is released and
the brake fluid level is sufficient, if both
the brake warning light and the Anti-lock
Braking System (ABS) warning light illu-
minate, it may indicate the ABS is not
functioning properly. Have the brake
system checked, and if necessary re-
paired. It is recommended you visit a
NISSAN dealer for this service. (See “Anti-
lock Braking System (ABS) warning light”
(P.2-11).)
WARNING
.Your brake system may not be
working properly if the warning
light is on. Driving could be dan-
gerous. If you judge it to be safe,
drive carefully to the nearest
service station for repairs. Other-
wise, have your vehicle towed
because driving it could be dan-
gerous.
. Pressing the brake pedal with the
engine stopped and/or low brake
fluid level may increase your
stopping distance and braking
will require greater pedal effort
as well as pedal travel. .
If the brake fluid level is below the
minimum or MIN mark on the
brake fluid reservoir, do not drive
until the brake system has been
checked. It is recommended you
visit a NISSAN dealer for this
service.
Charge warning light
If the light illuminates while the engine is
running, it may indicate the charging
system is not functioning properly. Turn
the engine off and check the alternator
belt. If the belt is loose, broken, missing or
if the light remains on, have your vehicle
serviced immediately. It is recommended
you visit a NISSAN dealer for this service.
CAUTION
Do not continue driving if the alter-
nator belt is loose, broken or miss-
ing.
Electric power steering warn-
ing light
When the ignition switch is in the ON
position, the electric power steering
warning light illuminates. After starting
the engine, the electric power steering
warning light turns off. This indicates the
electric power steering is operational.
If the electric power steering warning
light illuminates while the engine is run-
ning, it may indicate the electric power
steering is not functioning properly and
may need servicing. Have the system
checked. It is recommended that you visit
a NISSAN dealer for this service.
When the electric power steering warning
light illuminates with the engine running,
the power assist to the steering will cease
operation but you will still have control of
the vehicle. At this time, greater steering
efforts are required to operate the steer-
ing wheel, especially in sharp turns and at
low speeds.
(See “Electric power steering” (P.5-126).)
Page 106 of 492

2-24Instruments and controls
.Selective Unlock
When this item is turned on, and the
door handle request switch on the
driver’s or front passenger’s side door
is pushed, only the corresponding
door is unlocked. All the doors can
be unlocked if the door handle re-
quest switch is pushed again within 1
minute. When this item is turned to off,
all the doors will be unlocked when
the door handle request switch is
pushed once. From the “Locking”
menu, select “Selective Unlock”. Use
the OK
to activate or deactivate this
function.
. Auto Door Unlock
The “Auto Door Unlock” feature allows
the customer to customize the auto
door unlock options.
— Ignition OFF
— Shift to Park (for Continuously Vari-
able Transmission (CVT) models)
— Off
. Answer Bk. Horn (if so equipped)
When the answer back horn is on, the
horn will chirp and the hazard indica-
tors will flash twice when locking the
vehicle with the Intelligent Key or
remote keyless entry function. Wipers:
.
Speed Dependent
The “Speed Dependent” feature can be
activated or deactivated. From the
“Wipers” menu, select “Speed Depen-
dent”. Use the OK
to turn this
feature ON or OFF.
. Reverse Link
The “Reverse Link” wiper feature can
be set to be ON or OFF. From the
“Wipers” menu, select “Reverse Link”.
Use the OK
to turn this feature ON
or OFF.
. Drip wipe
The “Drip wipe” feature can be set to
be ON or OFF. From the “Wipers” menu,
select “Drip wipe”. Use the OK
to turn
this feature ON or OFF.
Driving Position (if so equipped):
. Exit Seat Slide
When this item is turned on, this
feature will move the driver’s seat
backward for an easy exit when the
ignition switch is turned off and the
driver’s door is opened. After getting
into the vehicle and placing the igni-
tion switch in the ON position, the
driver’s seat will move to the previous
set position. See “Automatic drive
positioner” (P.3-34) for more informa-
tion. Rear Door Alert:
.
Horn & Alert
When selected, the alert is displayed
and the horn sounds.
. Alert Only
When selected, only the alert is dis-
played.
. OFF
When selected, no alert or horn will be
active.
For additional information, refer to “Rear
door alert” (P.2-63).
Remote start (if so equipped):
The “Remote start” feature allows user to
turn the remote engine start on or off.
When turned on, the engine can be
restarted remotely. For additional infor-
mation, refer to “Remote engine start”
(P.3-23).
Page 114 of 492

2-32Instruments and controls
9. Low fuel level warning
This warning appears when the fuel level
in the fuel tank is getting low. Refuel as
soon as it is convenient, preferably before
the fuel gauge reaches 0 (Empty). There
will be a small reserve of fuel in the tank
when the fuel gauge needle reaches 0
(Empty).
10. Low Washer Fluid warning (if so
equipped)
This warning appears when the window
washer fluid is at a low level. Add window
washer fluid as necessary. For additional
information, refer to “Window washer
fluid” (P.8-10).
11. Door/liftgate open warning
This warning appears if any of the doors
and/or the liftgate are open or not closed
securely. The vehicle icon indicates which
door or the liftgate is open on the display.
12. Rear seat belt warning
This rear seat belt warning appears after
the ignition switch is placed in the ON
position. If any of the rear passenger’s
seat belts is not fastened, the seat icon
illuminates in red to show which seat belt
is not fastened. The seat icon illuminates
in red until the corresponding rear pas-
senger’s seat belt is fastened. The warn-ing will automatically turn off after
approximately 35 seconds. When the
vehicle speed exceeds 10 MPH (15 km/h),
if a rear passenger’s seat belt is unfas-
tened, a buzzer will sound and the seat
icon illuminates in red. The seat icon
illuminates in red until the corresponding
rear passenger’s seat belt is fastened. The
warning will automatically turn off after
approximately 35 seconds. For precau-
tions on seat belt usage, see “Seat belts”
(P.1-12).
13. Key System Error: See Owner’s
Manual warning (if so equipped)
This warning appears if there is a mal-
function in the Intelligent Key system.
If this warning appears while the engine is
stopped, the engine cannot be started. If
this warning appears while the engine is
running, the vehicle can be driven. How-
ever, it is recommended that you visit a
NISSAN dealer for repair as soon as
possible.
14. Loose Fuel Cap warning
This warning appears when the fuel-filler
cap is not tightened correctly after the
vehicle has been refueled. For additional
information, refer to “Fuel-filler cap” (P.3-
28).
15. Tire Pressure Low — Add Air
warning
This warning appears when the low tire
pressure warning light in the meter
illuminates and low tire pressure is de-
tected. The warning appears each time
the ignition switch is placed in the ON
position as long as the low tire pressure
warning light remains illuminated. If this
warning appears, stop the vehicle and
adjust the pressure to the recommended
COLD tire pressure shown on the Tire and
Loading Information label. (See “Low tire
pressure warning light” (P.2-13) and “Tire
Pressure Monitoring System (TPMS)” (P.5-
5).)
16. Low Oil Pressure Stop Vehicle
warning
This warning appears if low engine oil
pressure is detected. If the warning ap-
pears during normal driving, pull off the
road in a safe area and stop the engine
immediately. It is recommended that you
call a NISSAN dealer.
The low oil pressure warning is not
designed to indicate a low oil level. Use
the dipstick to check the oil level. (See
“Engine oil” (P.8-6).)
Page 126 of 492
2-44Instruments and controls
Turning the Intelligent Driver Alert-
ness system on and off
To activate or deactivate this function,
see “Settings” (P.2-20).
NOTE:
The setting will be retained even if the
engine is restarted.
System Malfunction
If the Intelligent Driver Alertness system
malfunctions, the system warning mes-
sage will appear in the vehicle informa-
tion display and the function will be
stopped automatically.
Action to take:
Stop the vehicle in a safe location, and
then turn off and restart the engine. If the
system warning message continues to
appear, have the system checked by a
NISSAN dealer.
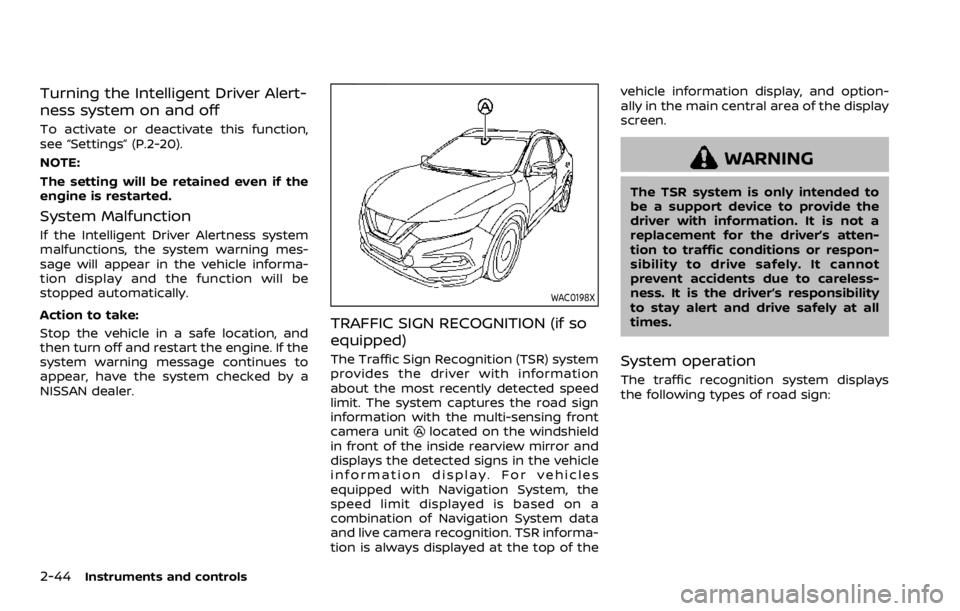
WAC0198X
TRAFFIC SIGN RECOGNITION (if so
equipped)
The Traffic Sign Recognition (TSR) system
provides the driver with information
about the most recently detected speed
limit. The system captures the road sign
information with the multi-sensing front
camera unit
located on the windshield
in front of the inside rearview mirror and
displays the detected signs in the vehicle
information display. For vehicles
equipped with Navigation System, the
speed limit displayed is based on a
combination of Navigation System data
and live camera recognition. TSR informa-
tion is always displayed at the top of the vehicle information display, and option-
ally in the main central area of the display
screen.
WARNING
The TSR system is only intended to
be a support device to provide the
driver with information. It is not a
replacement for the driver’s atten-
tion to traffic conditions or respon-
sibility to drive safely. It cannot
prevent accidents due to careless-
ness. It is the driver’s responsibility
to stay alert and drive safely at all
times.
System operation
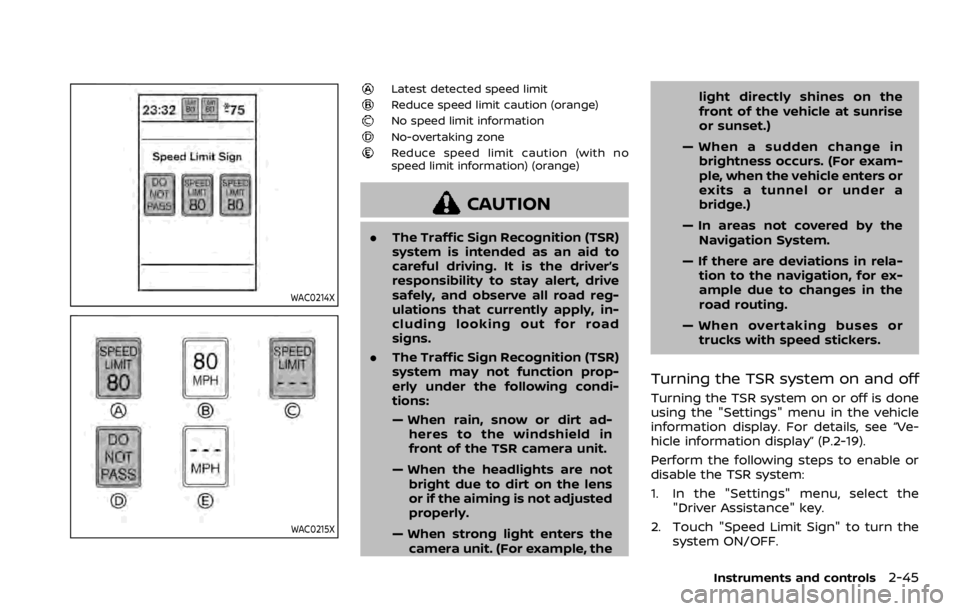
The traffic recognition system displays
the following types of road sign:
Page 127 of 492
WAC0214X
WAC0215X
Latest detected speed limitReduce speed limit caution (orange)No speed limit informationNo-overtaking zoneReduce speed limit caution (with no
speed limit information) (orange)
CAUTION
.The Traffic Sign Recognition (TSR)
system is intended as an aid to
careful driving. It is the driver’s
responsibility to stay alert, drive
safely, and observe all road reg-
ulations that currently apply, in-
cluding looking out for road
signs.
. The Traffic Sign Recognition (TSR)
system may not function prop-
erly under the following condi-
tions:
— When rain, snow or dirt ad-
heres to the windshield in
front of the TSR camera unit.
— When the headlights are not bright due to dirt on the lens
or if the aiming is not adjusted
properly.
— When strong light enters the camera unit. (For example, the light directly shines on the
front of the vehicle at sunrise
or sunset.)
— When a sudden change in brightness occurs. (For exam-
ple, when the vehicle enters or
exits a tunnel or under a
bridge.)
— In areas not covered by the Navigation System.
— If there are deviations in rela- tion to the navigation, for ex-
ample due to changes in the
road routing.
— When overtaking buses or trucks with speed stickers.
Turning the TSR system on and off
Turning the TSR system on or off is done
using the "Settings" menu in the vehicle
information display. For details, see “Ve-
hicle information display” (P.2-19).
Perform the following steps to enable or
disable the TSR system:
1. In the "Settings" menu, select the "Driver Assistance" key.
2. Touch "Speed Limit Sign" to turn the system ON/OFF.
Instruments and controls2-45
Page 153 of 492
JVI1334X
PARCEL SHELF
WARNING
.Never put anything on the parcel
shelf, no matter how small. Any
object on it could cause an injury
in case of an accident or if the
brakes are applied suddenly.
. Do not leave the parcel shelf in
position when it is disengaged
from the grooves.
. Properly secure all cargo to help
prevent it from sliding or shifting.
Do not place cargo higher than the seatbacks. In a sudden stop
or collision, unsecured cargo
could cause personal injury
. The child restraint top tether
strap may be damaged by con-
tact with the parcel shelf or items
in the cargo area. Remove the
parcel shelf from the vehicle or
store it in its storage space. Also,
secure any lose items in the cargo
area. Your child could be seriously
injured or killed in a collision if the
top tether strap is damaged.
Removal
1. Open the liftgate. (See “Liftgate” (P.3-
26).)
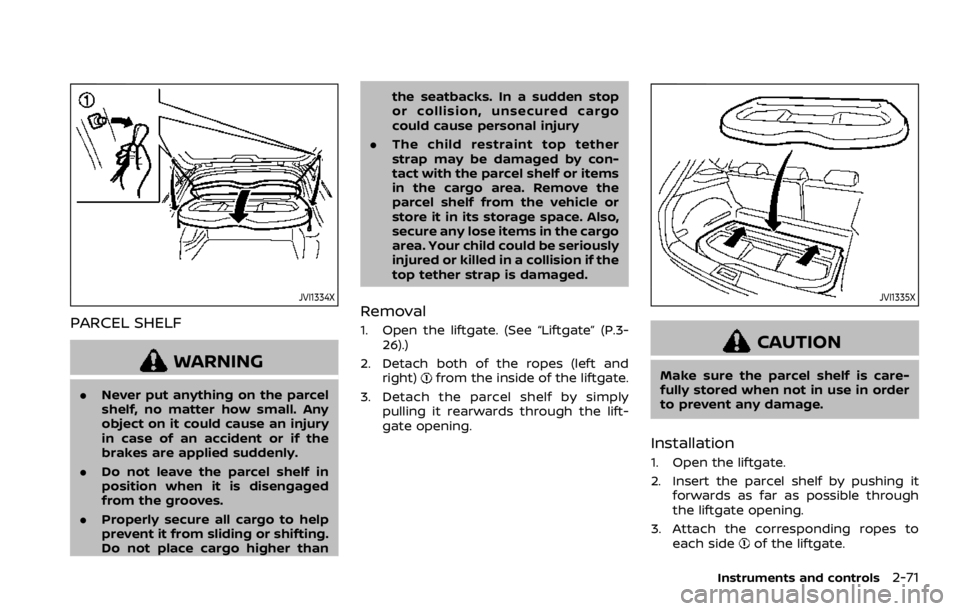
2. Detach both of the ropes (left and right)
from the inside of the liftgate.
3. Detach the parcel shelf by simply pulling it rearwards through the lift-
gate opening.
JVI1335X
CAUTION
Make sure the parcel shelf is care-
fully stored when not in use in order
to prevent any damage.
Installation
1. Open the liftgate.
2. Insert the parcel shelf by pushing itforwards as far as possible through
the liftgate opening.
3. Attach the corresponding ropes to each side
of the liftgate.
Instruments and controls2-71
Page 154 of 492
2-72Instruments and controls
4. Close the liftgate.
JVI0889X
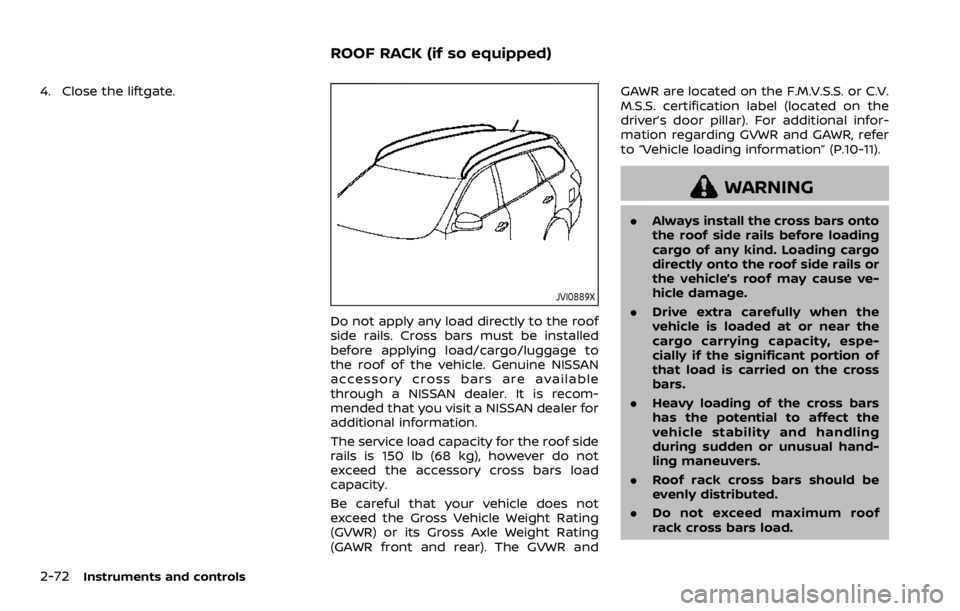
Do not apply any load directly to the roof
side rails. Cross bars must be installed
before applying load/cargo/luggage to
the roof of the vehicle. Genuine NISSAN
accessory cross bars are available
through a NISSAN dealer. It is recom-
mended that you visit a NISSAN dealer for
additional information.
The service load capacity for the roof side
rails is 150 lb (68 kg), however do not
exceed the accessory cross bars load
capacity.
Be careful that your vehicle does not
exceed the Gross Vehicle Weight Rating
(GVWR) or its Gross Axle Weight Rating
(GAWR front and rear). The GVWR andGAWR are located on the F.M.V.S.S. or C.V.
M.S.S. certification label (located on the
driver’s door pillar). For additional infor-
mation regarding GVWR and GAWR, refer
to “Vehicle loading information” (P.10-11).
WARNING
.
Always install the cross bars onto
the roof side rails before loading
cargo of any kind. Loading cargo
directly onto the roof side rails or
the vehicle’s roof may cause ve-
hicle damage.
. Drive extra carefully when the
vehicle is loaded at or near the
cargo carrying capacity, espe-
cially if the significant portion of
that load is carried on the cross
bars.
. Heavy loading of the cross bars
has the potential to affect the
vehicle stability and handling
during sudden or unusual hand-
ling maneuvers.
. Roof rack cross bars should be
evenly distributed.
. Do not exceed maximum roof
rack cross bars load.
ROOF RACK (if so equipped)
Page 156 of 492

2-74Instruments and controls
SIC4533
1. Window lock button
2. Driver side window
3. Rear left passenger side window
4. Front passenger side window
5. Rear right passenger side window
Main power window switch (driver’s
side)
To open or close the window, push downor pull upthe switch and hold it. The
main switch (driver side switches) will
open or close all the windows.
Locking passengers’ windows
When the lock buttonis pushed in, only
the driver side window can be opened or
closed. Push it in again to cancel.
SIC4523
Passenger side power window
switch
The passenger side switch will open or
close only the corresponding window. To
open or close the window, push down or
pull up the switch and hold it.