lock NISSAN SENTRA 1997 B14 / 4.G Owners Manual
[x] Cancel search | Manufacturer: NISSAN, Model Year: 1997, Model line: SENTRA, Model: NISSAN SENTRA 1997 B14 / 4.GPages: 194, PDF Size: 1.62 MB
Page 13 of 194
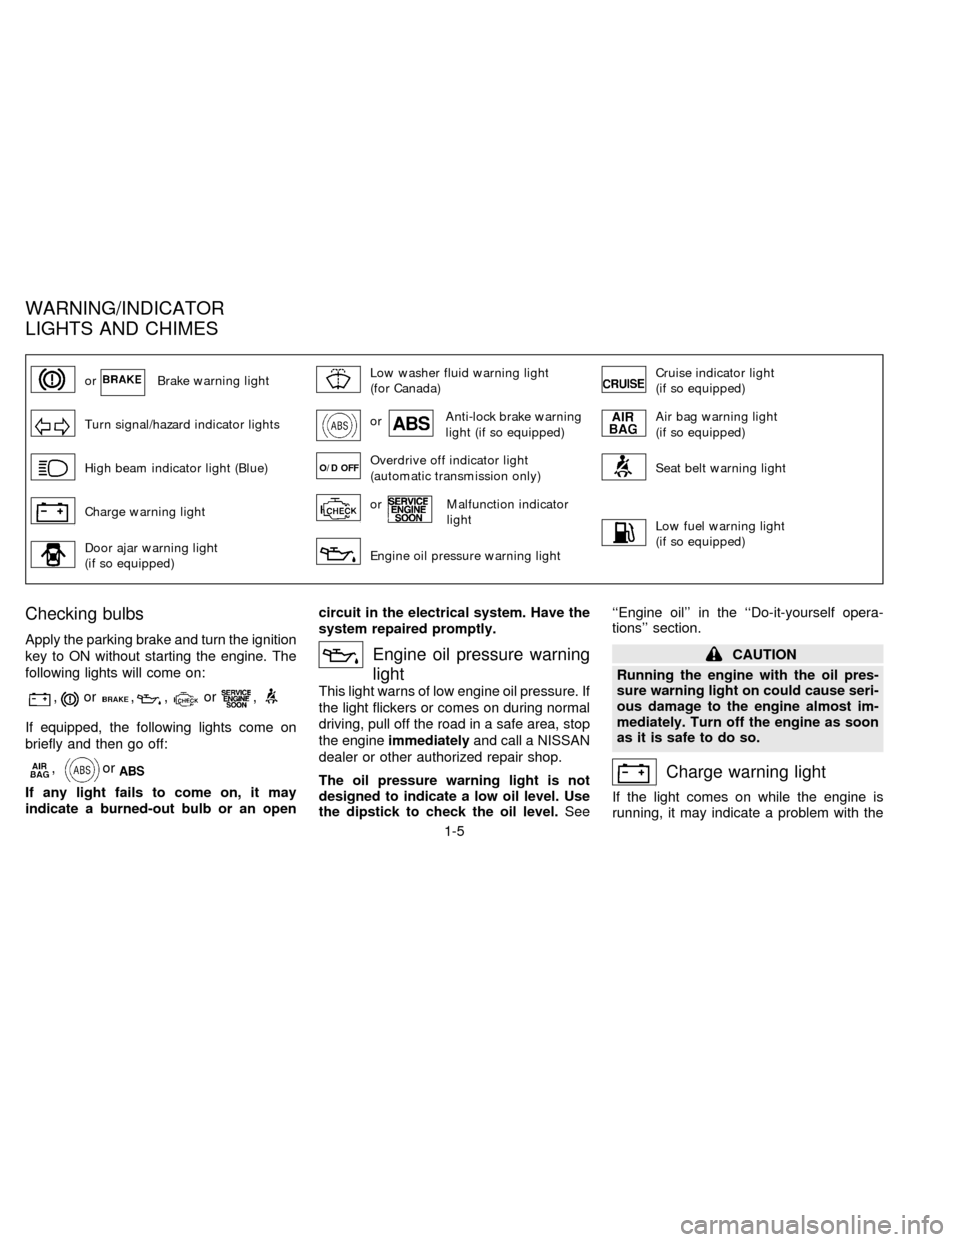
orBrake warning lightLow washer fluid warning light
(for Canada)Cruise indicator light
(if so equipped)
Turn signal/hazard indicator lightsorAnti-lock brake warning
light (if so equipped)Air bag warning light
(if so equipped)
High beam indicator light (Blue)O/D OFFOverdrive off indicator light
(automatic transmission only)Seat belt warning light
Charge warning lightorMalfunction indicator
light
Low fuel warning light
(if so equipped)
Door ajar warning light
(if so equipped)Engine oil pressure warning light
Checking bulbs
Apply the parking brake and turn the ignition
key to ON without starting the engine. The
following lights will come on:
,or,,or,
If equipped, the following lights come on
briefly and then go off:
,or
If any light fails to come on, it may
indicate a burned-out bulb or an opencircuit in the electrical system. Have the
system repaired promptly.
Engine oil pressure warning
light
This light warns of low engine oil pressure. If
the light flickers or comes on during normal
driving, pull off the road in a safe area, stop
the engineimmediatelyand call a NISSAN
dealer or other authorized repair shop.
The oil pressure warning light is not
designed to indicate a low oil level. Use
the dipstick to check the oil level.See``Engine oil'' in the ``Do-it-yourself opera-
tions'' section.
CAUTION
Running the engine with the oil pres-
sure warning light on could cause seri-
ous damage to the engine almost im-
mediately. Turn off the engine as soon
as it is safe to do so.
Charge warning light
If the light comes on while the engine is
running, it may indicate a problem with the
WARNING/INDICATOR
LIGHTS AND CHIMES
1-5
ZX
Page 15 of 194
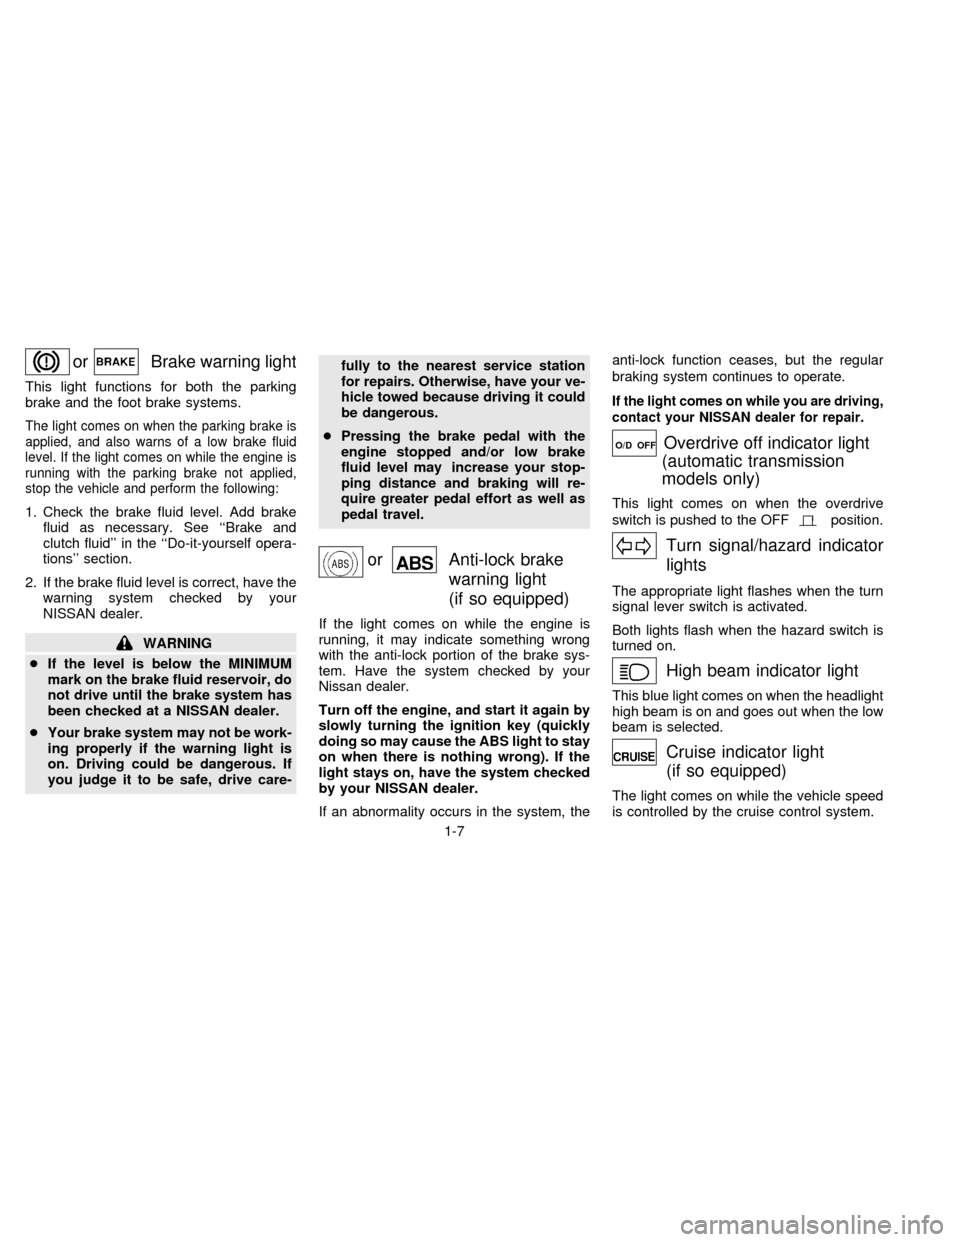
orBrake warning light
This light functions for both the parking
brake and the foot brake systems.
The light comes on when the parking brake is
applied, and also warns of a low brake fluid
level. If the light comes on while the engine is
running with the parking brake not applied,
stop the vehicle and perform the following:
1. Check the brake fluid level. Add brake
fluid as necessary. See ``Brake and
clutch fluid'' in the ``Do-it-yourself opera-
tions'' section.
2. If the brake fluid level is correct, have the
warning system checked by your
NISSAN dealer.
WARNING
cIf the level is below the MINIMUM
mark on the brake fluid reservoir, do
not drive until the brake system has
been checked at a NISSAN dealer.
cYour brake system may not be work-
ing properly if the warning light is
on. Driving could be dangerous. If
you judge it to be safe, drive care-fully to the nearest service station
for repairs. Otherwise, have your ve-
hicle towed because driving it could
be dangerous.
cPressing the brake pedal with the
engine stopped and/or low brake
fluid level may increase your stop-
ping distance and braking will re-
quire greater pedal effort as well as
pedal travel.
orAnti-lock brake
warning light
(if so equipped)
If the light comes on while the engine is
running, it may indicate something wrong
with the anti-lock portion of the brake sys-
tem. Have the system checked by your
Nissan dealer.
Turn off the engine, and start it again by
slowly turning the ignition key (quickly
doing so may cause the ABS light to stay
on when there is nothing wrong). If the
light stays on, have the system checked
by your NISSAN dealer.
If an abnormality occurs in the system, theanti-lock function ceases, but the regular
braking system continues to operate.
If the light comes on while you are driving,
contact your NISSAN dealer for repair.
O/D OFFOverdrive off indicator light
(automatic transmission
models only)
This light comes on when the overdrive
switch is pushed to the OFF
position.
Turn signal/hazard indicator
lights
The appropriate light flashes when the turn
signal lever switch is activated.
Both lights flash when the hazard switch is
turned on.
High beam indicator light
This blue light comes on when the headlight
high beam is on and goes out when the low
beam is selected.
Cruise indicator light
(if so equipped)
The light comes on while the vehicle speed
is controlled by the cruise control system.
1-7
ZX
Page 17 of 194

The theft warning system provides visual
and audio alarm signals if parts of the
vehicle are disturbed.
How to activate the theft warning
system
1. Close all windows.
2. Remove the key from the ignition switch.
3. Close all doors, hood and trunk lid. Lock
all doors by pressing the
buttonon the
multi-remote controller.At this time,
the turn signal lights blink twice, indicat-
ing all doors are locked.The system can be activated even if the
windows are open.
4. Confirm that the SECURITY indicator
light in the instrument cluster illuminates.
The SECURITY light stays on for about
30 seconds and then begins to flash
once every three seconds. The system is
now activated.
c
If the key is turned slowly when lock-
ing the door, the system may not acti-
vate. Furthermore, if the key is turned
excessively to the unlock position, the
system may be deactivated when the
key is removed. If the indicator light
fails to glow for 30 seconds, unlock
the door once and lock it again.
cEven when the driver and/or passen-
gers are in the vehicle, the system will
activate with all doors, hood, trunk lid
and back door locked and ignition key
off. Turn the ignition key to ACC or ON
to turn the system off.
The theft warning system is NOT activated if
one of the following occurs:
cThe door is unlocked or the ignition key is
turned to the ACC or ON position duringthe 30 seconds in which the SECURITY
light stays on.
cThe SECURITY light blinks at a steady
1/2 second on - 1/2 second off rate
because a door, the trunk, or the hood is
open and the key is not in the ACC or ON
position. When the ignition key is turned
to the ACC or ON position, the SECU-
RITY light turns off.
Theft warning system operation
The theft warning system emits the follow-
ing alarm:
cThe headlights blink and the horn sounds
intermittently. In addition, the starter mo-
tor does not operate.
cThe alarm automatically turns off after 2
to 3 minutes. However, the alarm reacti-
vates if the vehicle is tampered with
again. The alarm can be shut off by
unlocking a door or trunk lid with the key
or by pressing the
buttonon the
multi-remote controller.
The alarm is activated by:
copening the door or trunk lid without
using the key (even if the door is un-
IC0005
THEFT WARNING
(if so equipped)
1-9
ZX
Page 18 of 194
locked by releasing the door inside lock
switch) or opening the trunk lid by oper-
ating the opener lever.
copening the hood.
How to stop the alarm
The alarm stops only by unlocking a door or
the trunk lid with the key or by pressing
the
buttonon the multi-remote control-
ler.The alarm does not stop if the ignition
switch is turned to ACC or ON position.
If the system does not operate as de-
scribed above, have it checked by your
NISSAN dealer.
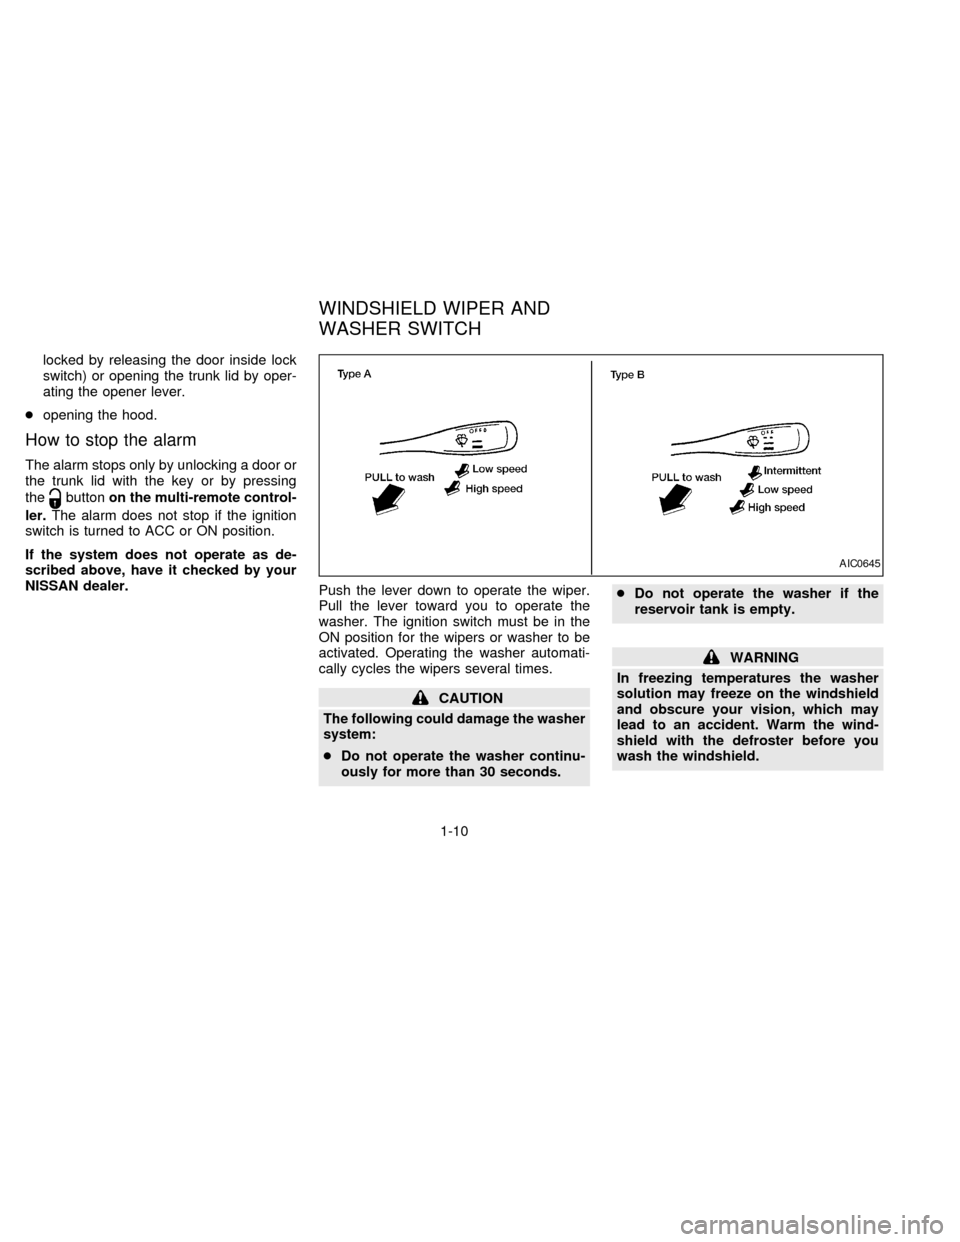
Push the lever down to operate the wiper.
Pull the lever toward you to operate the
washer. The ignition switch must be in the
ON position for the wipers or washer to be
activated. Operating the washer automati-
cally cycles the wipers several times.
CAUTION
The following could damage the washer
system:
cDo not operate the washer continu-
ously for more than 30 seconds.cDo not operate the washer if the
reservoir tank is empty.
WARNING
In freezing temperatures the washer
solution may freeze on the windshield
and obscure your vision, which may
lead to an accident. Warm the wind-
shield with the defroster before you
wash the windshield.
AIC0645
WINDSHIELD WIPER AND
WASHER SWITCH
1-10
ZX
Page 24 of 194
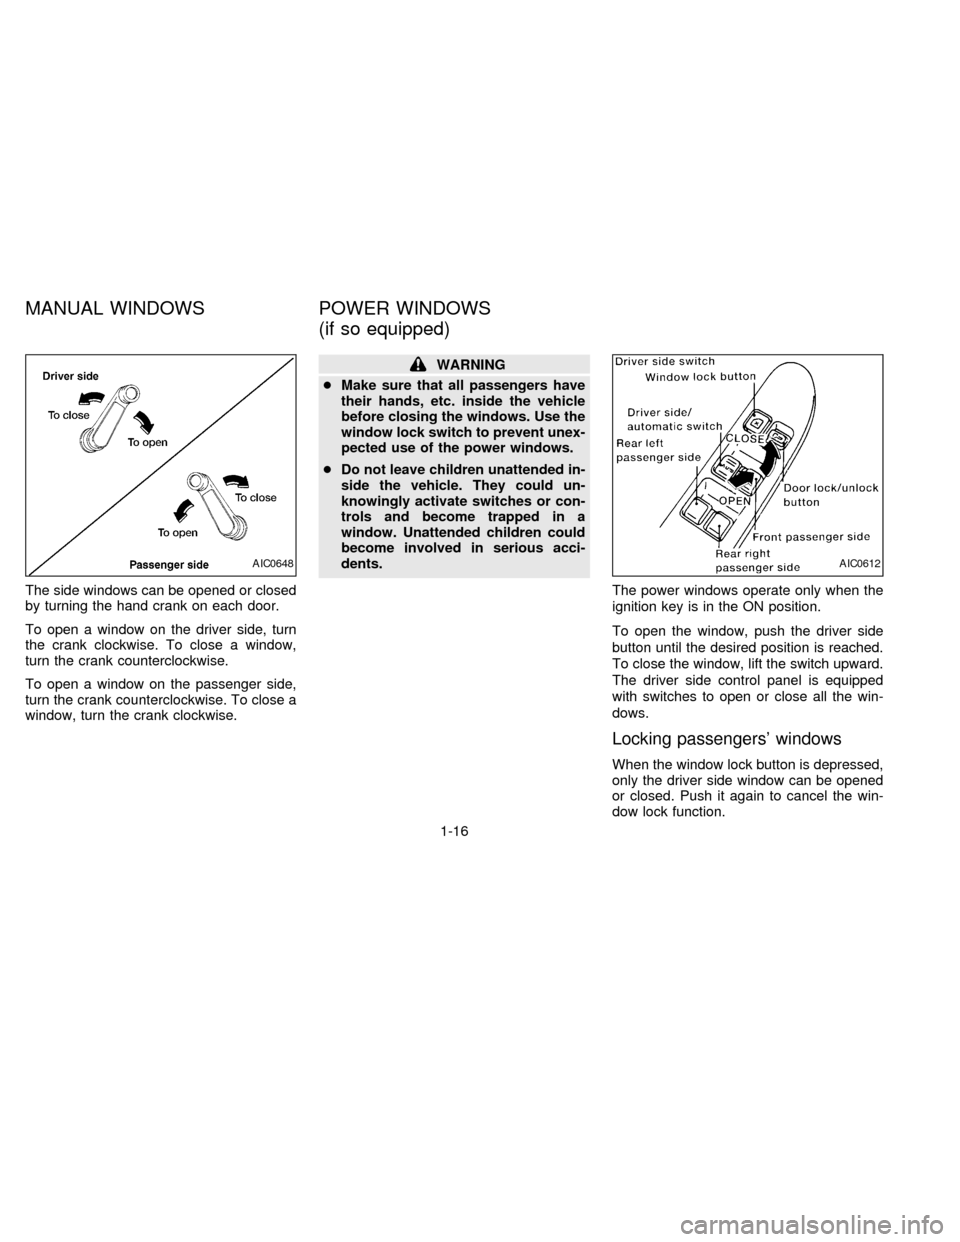
The side windows can be opened or closed
by turning the hand crank on each door.
To open a window on the driver side, turn
the crank clockwise. To close a window,
turn the crank counterclockwise.
To open a window on the passenger side,
turn the crank counterclockwise. To close a
window, turn the crank clockwise.
WARNING
cMake sure that all passengers have
their hands, etc. inside the vehicle
before closing the windows. Use the
window lock switch to prevent unex-
pected use of the power windows.
cDo not leave children unattended in-
side the vehicle. They could un-
knowingly activate switches or con-
trols and become trapped in a
window. Unattended children could
become involved in serious acci-
dents.
The power windows operate only when the
ignition key is in the ON position.
To open the window, push the driver side
button until the desired position is reached.
To close the window, lift the switch upward.
The driver side control panel is equipped
with switches to open or close all the win-
dows.
Locking passengers' windows
When the window lock button is depressed,
only the driver side window can be opened
or closed. Push it again to cancel the win-
dow lock function.
AIC0648AIC0612
MANUAL WINDOWS POWER WINDOWS
(if so equipped)
1-16
ZX
Page 29 of 194

2Pre-driving checks and adjustments
Key .........................................................................2-2
Door locks ..............................................................2-2
Power door lock (if so equipped) ...........................2-3
Multi-remote control system (if so equipped).........2-3
Battery replacement ...............................................2-5
Child safety rear door lock (4-door only) ...............2-6
Hood release ..........................................................2-7................2-7
Glove box ...............................................................2-8
Trunk lid lock operation ..........................................2-8
Opener cancel lever for trunk lid (if so
equipped) ...............................................................2-9
Fuel filler lid lock operation ..................................2-10
Fuel filler cap ........................................................2-10
Front seats ...........................................................2-12
Seat adjustment ...................................................2-12
Tilting front seat (2-door model)...........................2-14
Head restraints .....................................................2-14
Rear seat ..............................................................2-15
Supplemental restraint system (supplemental
air bag system) (if so equipped) ..........................2-16Supplemental air bag system
(if so equipped) ....................................................2-20
Warning labels (if so equipped) ...........................2-22
Supplemental air bag warning light (if so
equipped) .............................................................2-22
Seat belts .............................................................2-24
Precautions on seat belt usage ...........................2-24
Child safety...........................................................2-26
3-point type with retractor ....................................2-27
2-point type without retractor (rear center lap
belt).......................................................................2-29
Seat belt extenders ..............................................2-30
Seat belt maintenance .........................................2-30
Child restraints for infants and small children......2-31
Top strap child restraint .......................................2-34
Tilting steering wheel ...........................................2-37
Outside mirror control...........................................2-38
Inside mirror .........................................................2-39
Vanity mirror (if so equipped)...............................2-39
ZX
Page 30 of 194

A key number plate is supplied with your
key. Record the key number that is on the
key number plate and keep it in a safe place
(such as your wallet), NOT IN THE CAR. If
you lose your keys, see your NISSAN
dealer for duplicates by using the key num-
ber. NISSAN does not record key numbers
so it is very important to keep track of your
key number plate.
A key number is only necessary when you
have lost all keys and do not have one to
duplicate from. If you still have a key, this
key can be duplicated by your NISSAN
dealer or a locksmith shop.
Locking front door with key
To lock the door, turn the key towards the
front of the vehicle.
To unlock, turn it towards the rear.
Locking the door without key
To lock the door from the outside without a
key, move the inside lock knob to the lock
position, then close the door.
When locking the door this way, be certain
not to leave the key inside the vehicle.
APD0619
APD0622
PD1160M
KEY DOOR LOCKS
2-2
ZX
Page 31 of 194
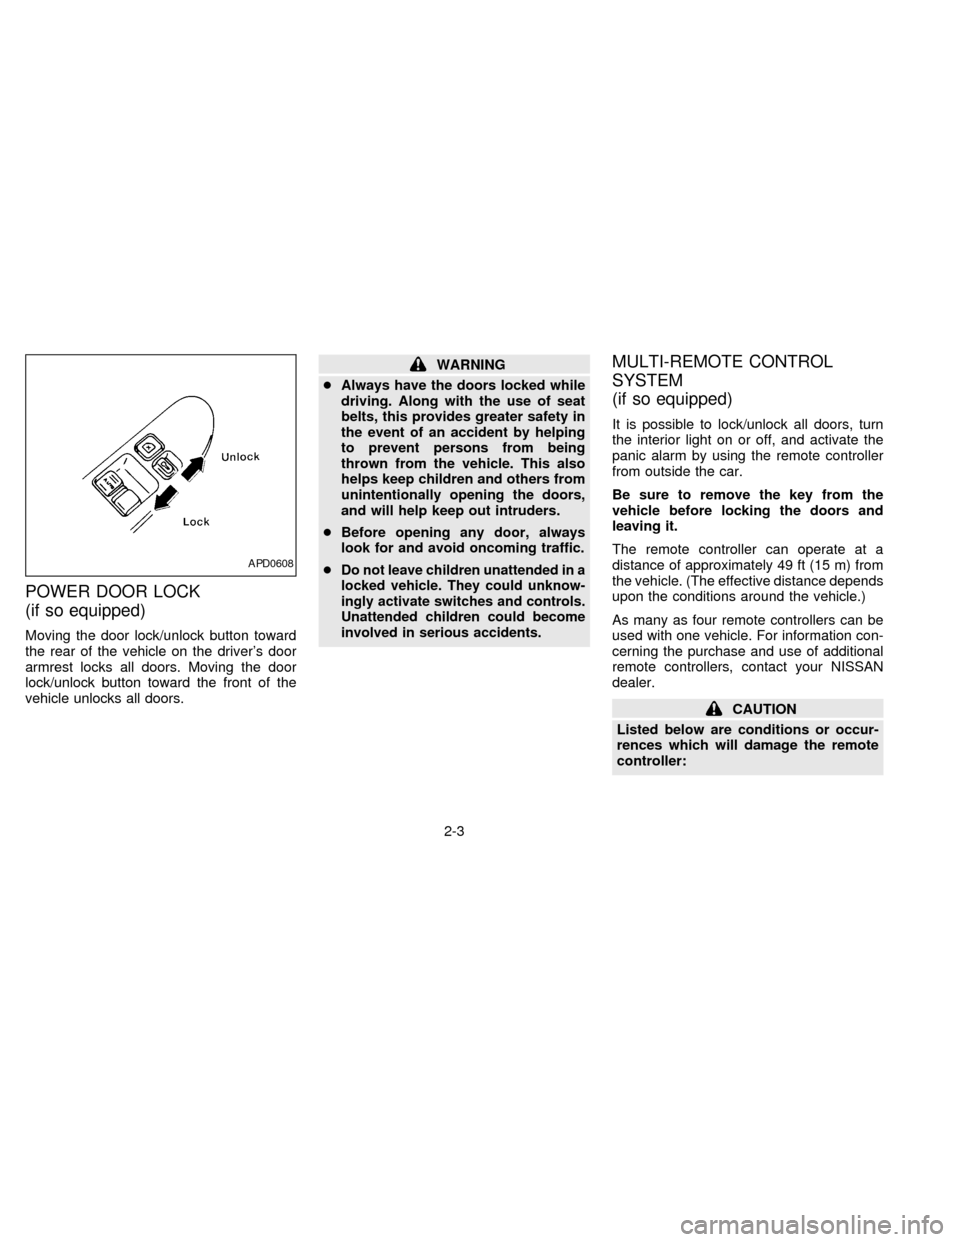
POWER DOOR LOCK
(if so equipped)
Moving the door lock/unlock button toward
the rear of the vehicle on the driver's door
armrest locks all doors. Moving the door
lock/unlock button toward the front of the
vehicle unlocks all doors.
WARNING
cAlways have the doors locked while
driving. Along with the use of seat
belts, this provides greater safety in
the event of an accident by helping
to prevent persons from being
thrown from the vehicle. This also
helps keep children and others from
unintentionally opening the doors,
and will help keep out intruders.
cBefore opening any door, always
look for and avoid oncoming traffic.
c
Do not leave children unattended in a
locked vehicle. They could unknow-
ingly activate switches and controls.
Unattended children could become
involved in serious accidents.
MULTI-REMOTE CONTROL
SYSTEM
(if so equipped)
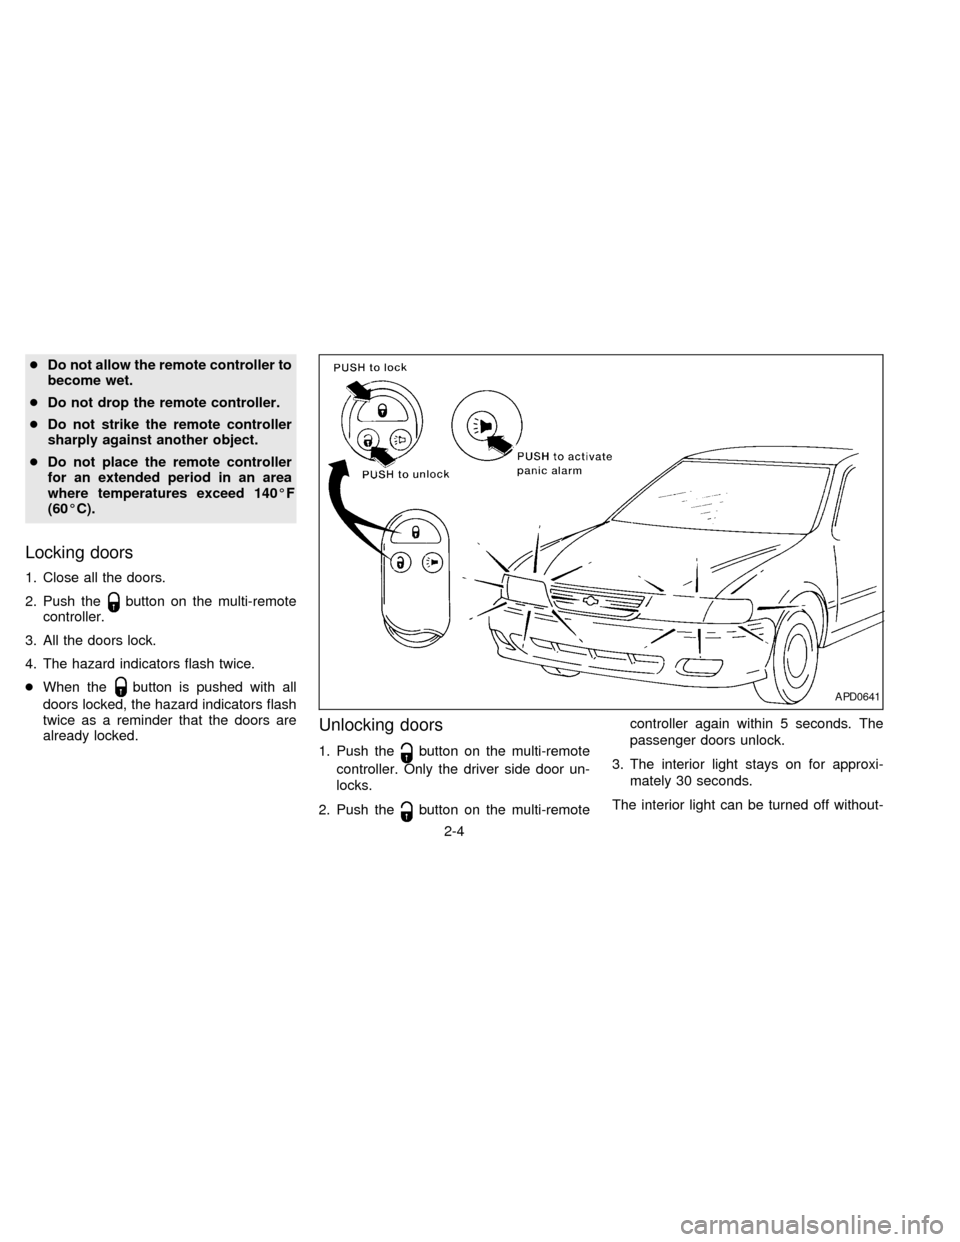
It is possible to lock/unlock all doors, turn
the interior light on or off, and activate the
panic alarm by using the remote controller
from outside the car.
Be sure to remove the key from the
vehicle before locking the doors and
leaving it.
The remote controller can operate at a
distance of approximately 49 ft (15 m) from
the vehicle. (The effective distance depends
upon the conditions around the vehicle.)
As many as four remote controllers can be
used with one vehicle. For information con-
cerning the purchase and use of additional
remote controllers, contact your NISSAN
dealer.
CAUTION
Listed below are conditions or occur-
rences which will damage the remote
controller:
APD0608
2-3
ZX
Page 32 of 194
cDo not allow the remote controller to
become wet.
cDo not drop the remote controller.
cDo not strike the remote controller
sharply against another object.
cDo not place the remote controller
for an extended period in an area
where temperatures exceed 140ÉF
(60ÉC).
Locking doors
1. Close all the doors.
2. Push the
button on the multi-remote
controller.
3. All the doors lock.
4. The hazard indicators flash twice.
cWhen the
button is pushed with all
doors locked, the hazard indicators flash
twice as a reminder that the doors are
already locked.
Unlocking doors
1. Push thebutton on the multi-remote
controller. Only the driver side door un-
locks.
2. Push the
button on the multi-remotecontroller again within 5 seconds. The
passenger doors unlock.
3. The interior light stays on for approxi-
mately 30 seconds.
The interior light can be turned off without-
APD0641
2-4
ZX
Page 33 of 194

waiting for 30 seconds by inserting the key
into the ignition or by locking the doors with
the multi-remote controller.
Using the panic alarm
If you are near your vehicle and feel threat-
ened, you may activate the alarm to call
attention as follows:
1. Push the
button on the remote con-
troller forlonger than 1.5 seconds.
2. The theft warning alarm and headlights
stay on for 30 seconds.
3. The alarm stops when any of the key
functions are used. For example, when
the
or thebutton is pushed, or the
button is pushed for longer than 1.5
seconds on the multi-remote controller,
the panic alarm function is cancelled.
Replace the battery in the multi-remote con-
troller as follows:
1. Open the lid using a coin.
2. Replace the battery with a new one.
Insert the battery as illustrated above.Recommended battery: Sanyo CR2025
or equivalent.
3.
Close the lid securely.
4. Press thebutton, then thebutton
two or three times to check the multi-
remote controller operation.
APD1004
BATTERY REPLACEMENT
2-5
ZX