brake NISSAN SENTRA 2002 B15 / 5.G Owner's Guide
[x] Cancel search | Manufacturer: NISSAN, Model Year: 2002, Model line: SENTRA, Model: NISSAN SENTRA 2002 B15 / 5.GPages: 235, PDF Size: 1.97 MB
Page 169 of 235
6. Clean and reinstall the drain plug and a
new washer. Securely tighten the drain
plug with a wrench.
Drain plug tightening torque:
22 to 29 ft-lb (29 to 39 Nzm)
Do not overtighten.
7. Refill engine with recommended oil
through the oil filler opening then install
the oil filler cap securely.
See the ``Technical and consumer infor-
mation'' section for drain and refill capac-
ity.
The drain and refill capacity depends on
the oil temperature and drain time. Use
these specifications for reference only.
Always use the dipstick to determine
when the proper amount of oil is in the
engine.
8. Start the engine. Check for leakage
around the drain plug and oil filter. Cor-
rect as required.
9. Turn the engine off and wait several
minutes. Check the oil level with the
dipstick. Add engine oil if necessary.WARNING
cProlonged and repeated contact with
used engine oil may cause skin can-
cer.
cTry to avoid direct skin contact with
used oil. If skin contact is made,
wash thoroughly with soap or hand
cleaner as soon as possible.
cKeep used engine oil out of reach of
children.
CHANGING ENGINE OIL FILTER
1. Park the vehicle on a level surface and
apply the parking brake.
2. Turn the engine off.
3. Place a large drain pan under the oil
filter.
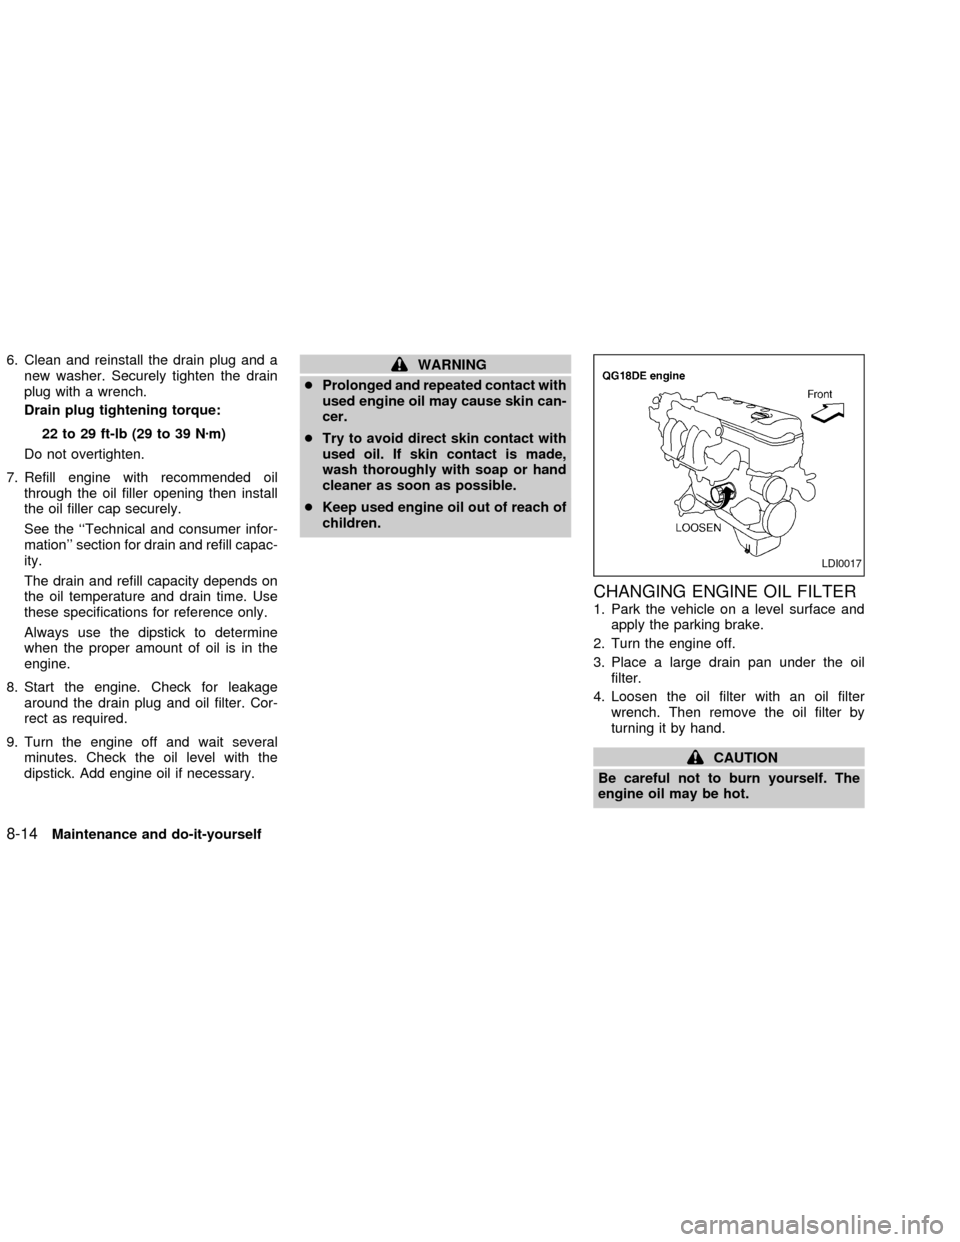
4. Loosen the oil filter with an oil filter
wrench. Then remove the oil filter by
turning it by hand.
CAUTION
Be careful not to burn yourself. The
engine oil may be hot.
LDI0017
8-14Maintenance and do-it-yourself
ZX
Page 171 of 235

TEMPERATURE CONDITIONS
FOR CHECKING
cThe fluid level should be checked using
the HOT range on the dipstick after the
following conditions have been met:
Ð The engine should be warmed up to
operating temperature.
Ð The vehicle should be driven at least 5
minutes.
Ð The automatic transmission fluid should
be warmed to between 122 and 176ÉF
(50 and 80ÉC).cThe fluid can be checked at fluid tem-
peratures of 86 to 122ÉF (30 to 50ÉC)
using the COLD range on the dipstick
after the engine is warmed up and before
driving. However, the fluid should be
re-checked using the HOT range.
1. Park the vehicle on a level surface and
set the parking brake.
2. Start the engine and then move the shift
selector lever through each gear range.
Move the shift selector lever to P (Park)
after you have moved it through all
ranges.3. Check the fluid level with the engine
idling.
4. Remove the dipstick and wipe it clean
with lint-free paper.
5. Reinsert the dipstick into the dipstick
tube as far as it will go.
6. Remove the dipstick and note the read-
ing. If the level is at the low side of either
range, add fluid through the dipstick tube.
WDI0133
8-16Maintenance and do-it-yourself
ZX
Page 173 of 235
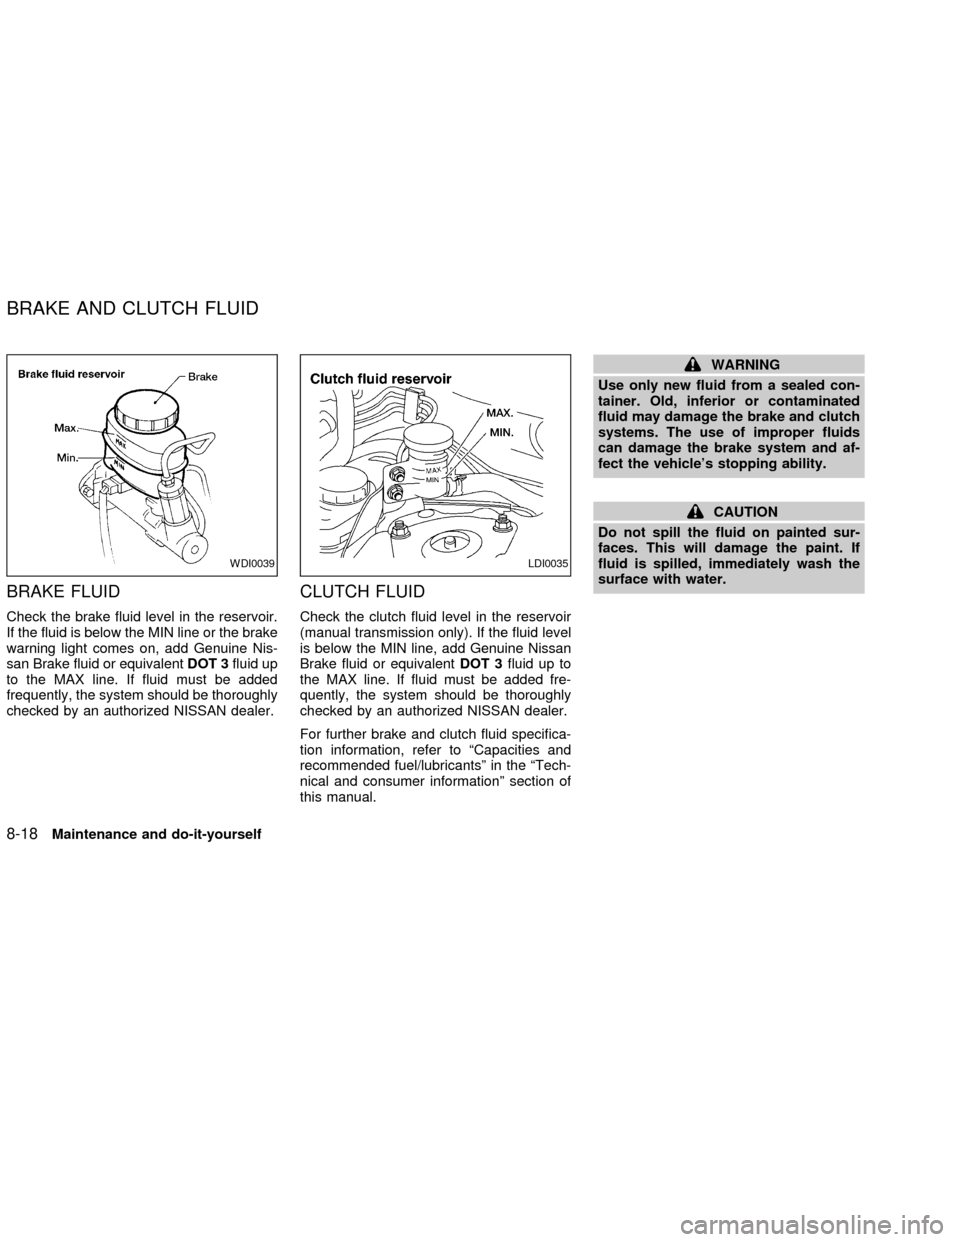
BRAKE FLUID
Check the brake fluid level in the reservoir.
If the fluid is below the MIN line or the brake
warning light comes on, add Genuine Nis-
san Brake fluid or equivalentDOT 3fluid up
to the MAX line. If fluid must be added
frequently, the system should be thoroughly
checked by an authorized NISSAN dealer.
CLUTCH FLUID
Check the clutch fluid level in the reservoir
(manual transmission only). If the fluid level
is below the MIN line, add Genuine Nissan
Brake fluid or equivalentDOT 3fluid up to
the MAX line. If fluid must be added fre-
quently, the system should be thoroughly
checked by an authorized NISSAN dealer.
For further brake and clutch fluid specifica-
tion information, refer to ªCapacities and
recommended fuel/lubricantsº in the ªTech-
nical and consumer informationº section of
this manual.
WARNING
Use only new fluid from a sealed con-
tainer. Old, inferior or contaminated
fluid may damage the brake and clutch
systems. The use of improper fluids
can damage the brake system and af-
fect the vehicle's stopping ability.
CAUTION
Do not spill the fluid on painted sur-
faces. This will damage the paint. If
fluid is spilled, immediately wash the
surface with water.
WDI0039LDI0035
BRAKE AND CLUTCH FLUID
8-18Maintenance and do-it-yourself
ZX
Page 178 of 235

WARNING
Be sure the engine and ignition switch
are off and that the parking brake is
engaged securely.
CAUTION
Be sure to use the correct socket to
remove the spark plugs. An incorrect
socket can damage the spark plugs.
REPLACING SPARK PLUGS
Platinum-tipped spark plugs
It is not necessary to replace platinum-
tipped spark plugs as frequently as conven-
tional type spark plugs because they last
much longer. Follow the maintenance
schedule, but do not reuse the spark plugs
by cleaning or regapping.
cAlways replace spark plugs with rec-
ommended or equivalent ones.1. On the 1.8L engine, disconnect the igni-
tion coil connectors. Remove the ignition
coil bolts.
2. Disconnect the spark plug cables from
the spark plugs.
When disconnecting, always hold the
boots, not the cables. Mark all cables to
identify their original locations.
3. Remove the spark plugs with a spark
plug socket.
The plug socket has a rubber seal that
holds the spark plug so it does not fall
when it is pulled out. Make sure each
spark plug is snugly fitted into the spark
plug socket.
4. Fit the new plugs, one at a time, into the
spark plug socket and install them.Use
only the specified spark plugs.Turn
each plug several full turns by hand, then
tighten with the spark plug socket to the
correct torque. Do not overtighten.
Spark plug tightening torque:
14 to 22 ft-lb (20 to 29 Nzm)
DI1229MADI1100
SPARK PLUG
Maintenance and do-it-yourself8-23
ZX
Page 184 of 235
cMake sure the wiper blades contact
the glass; otherwise the arms may be
damaged from wind pressure.
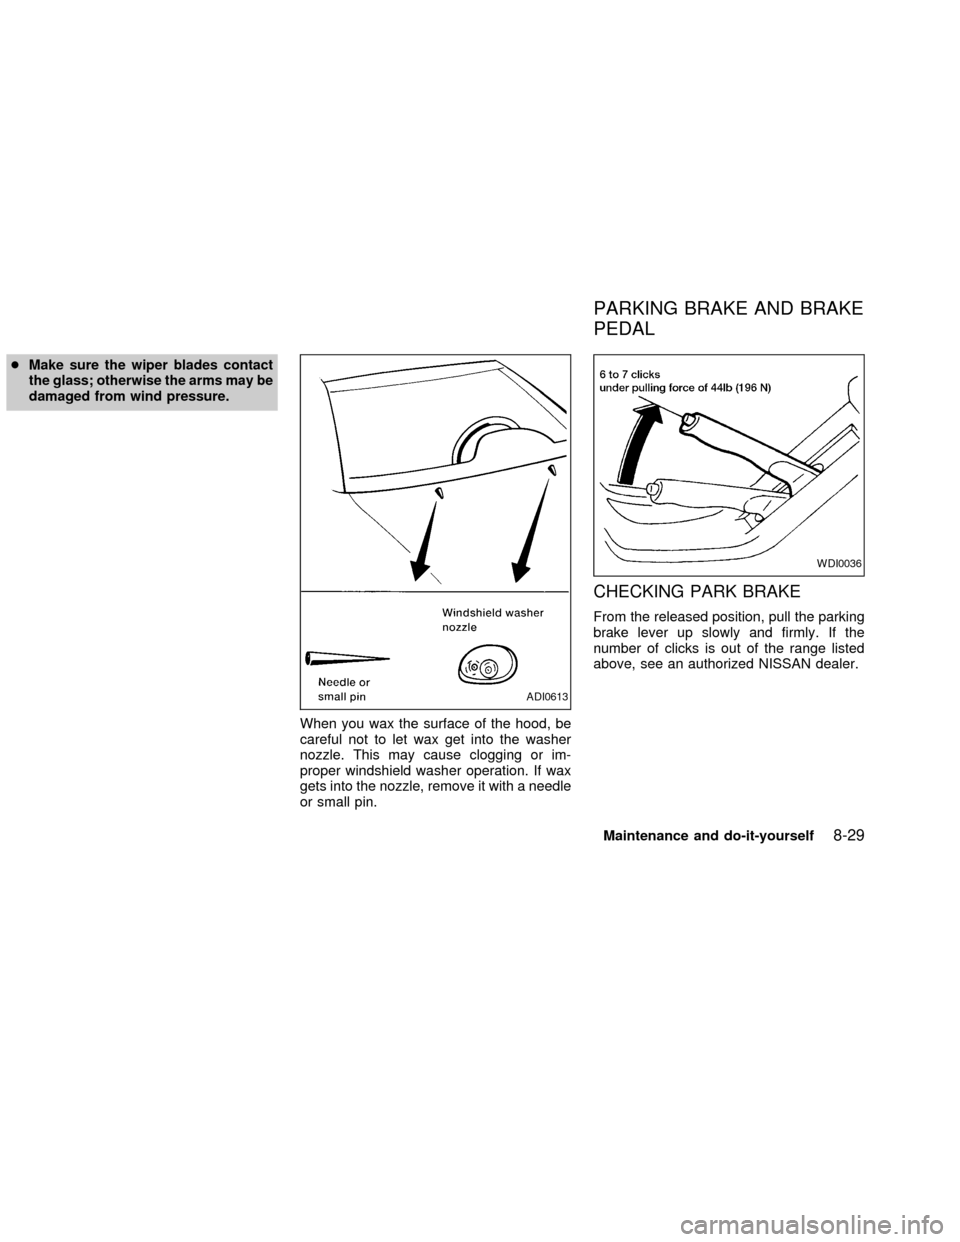
When you wax the surface of the hood, be
careful not to let wax get into the washer
nozzle. This may cause clogging or im-
proper windshield washer operation. If wax
gets into the nozzle, remove it with a needle
or small pin.
CHECKING PARK BRAKE
From the released position, pull the parking
brake lever up slowly and firmly. If the
number of clicks is out of the range listed
above, see an authorized NISSAN dealer.
ADI0613
WDI0036
PARKING BRAKE AND BRAKE
PEDAL
Maintenance and do-it-yourself8-29
ZX
Page 185 of 235
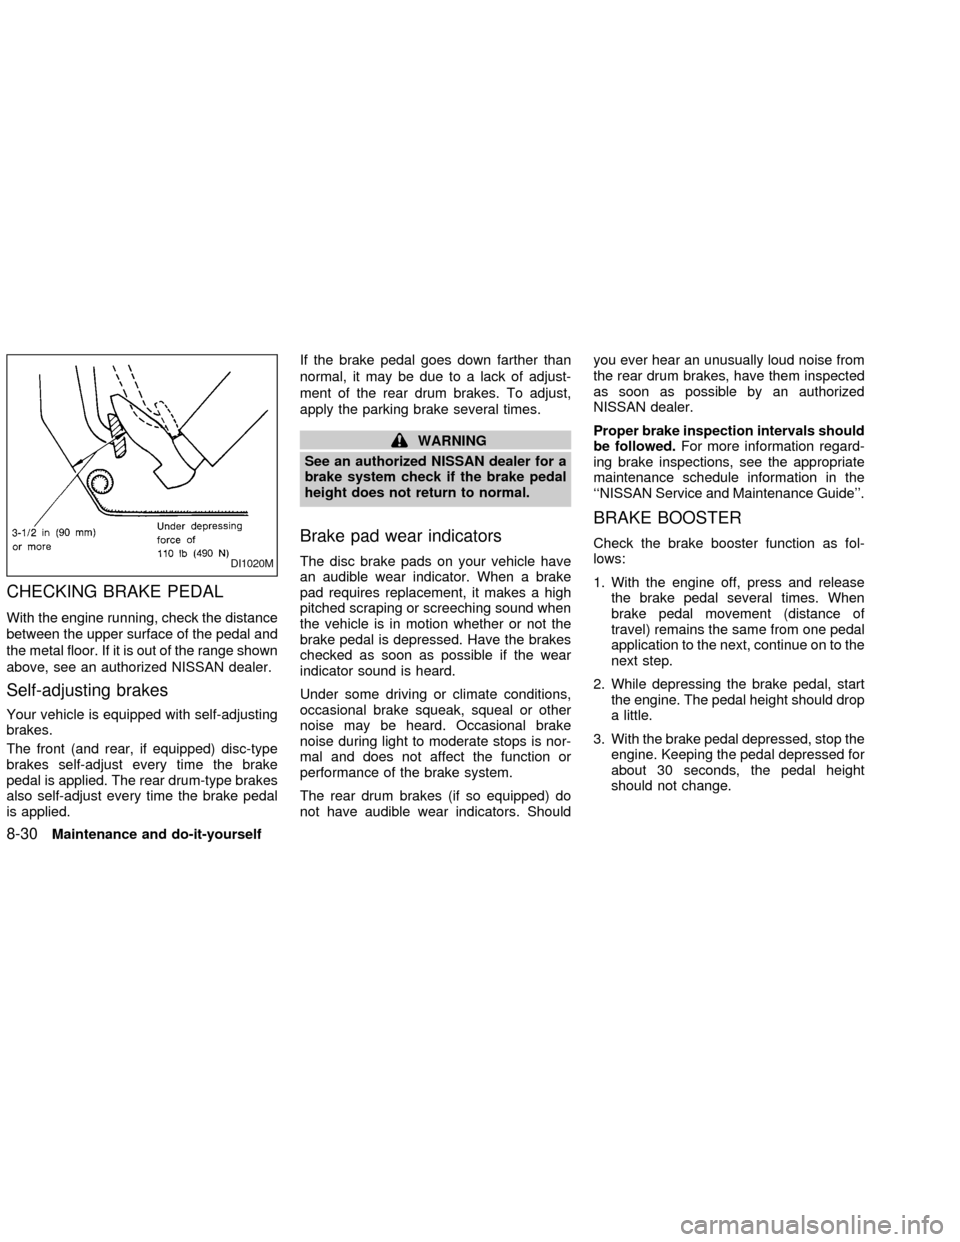
CHECKING BRAKE PEDAL
With the engine running, check the distance
between the upper surface of the pedal and
the metal floor. If it is out of the range shown
above, see an authorized NISSAN dealer.
Self-adjusting brakes
Your vehicle is equipped with self-adjusting
brakes.
The front (and rear, if equipped) disc-type
brakes self-adjust every time the brake
pedal is applied. The rear drum-type brakes
also self-adjust every time the brake pedal
is applied.If the brake pedal goes down farther than
normal, it may be due to a lack of adjust-
ment of the rear drum brakes. To adjust,
apply the parking brake several times.
WARNING
See an authorized NISSAN dealer for a
brake system check if the brake pedal
height does not return to normal.
Brake pad wear indicators
The disc brake pads on your vehicle have
an audible wear indicator. When a brake
pad requires replacement, it makes a high
pitched scraping or screeching sound when
the vehicle is in motion whether or not the
brake pedal is depressed. Have the brakes
checked as soon as possible if the wear
indicator sound is heard.
Under some driving or climate conditions,
occasional brake squeak, squeal or other
noise may be heard. Occasional brake
noise during light to moderate stops is nor-
mal and does not affect the function or
performance of the brake system.
The rear drum brakes (if so equipped) do
not have audible wear indicators. Shouldyou ever hear an unusually loud noise from
the rear drum brakes, have them inspected
as soon as possible by an authorized
NISSAN dealer.
Proper brake inspection intervals should
be followed.For more information regard-
ing brake inspections, see the appropriate
maintenance schedule information in the
``NISSAN Service and Maintenance Guide''.
BRAKE BOOSTER
Check the brake booster function as fol-
lows:
1. With the engine off, press and release
the brake pedal several times. When
brake pedal movement (distance of
travel) remains the same from one pedal
application to the next, continue on to the
next step.
2. While depressing the brake pedal, start
the engine. The pedal height should drop
a little.
3. With the brake pedal depressed, stop the
engine. Keeping the pedal depressed for
about 30 seconds, the pedal height
should not change.
DI1020M
8-30Maintenance and do-it-yourself
ZX
Page 186 of 235
4. Run the engine for one minute without
depressing the brake pedal, then turn it
off. Depress the brake pedal several
times. The pedal travel distance will de-
crease gradually with each depression
as the vacuum is released from the
booster.
If the brakes do not operate properly, see an
authorized NISSAN dealer.
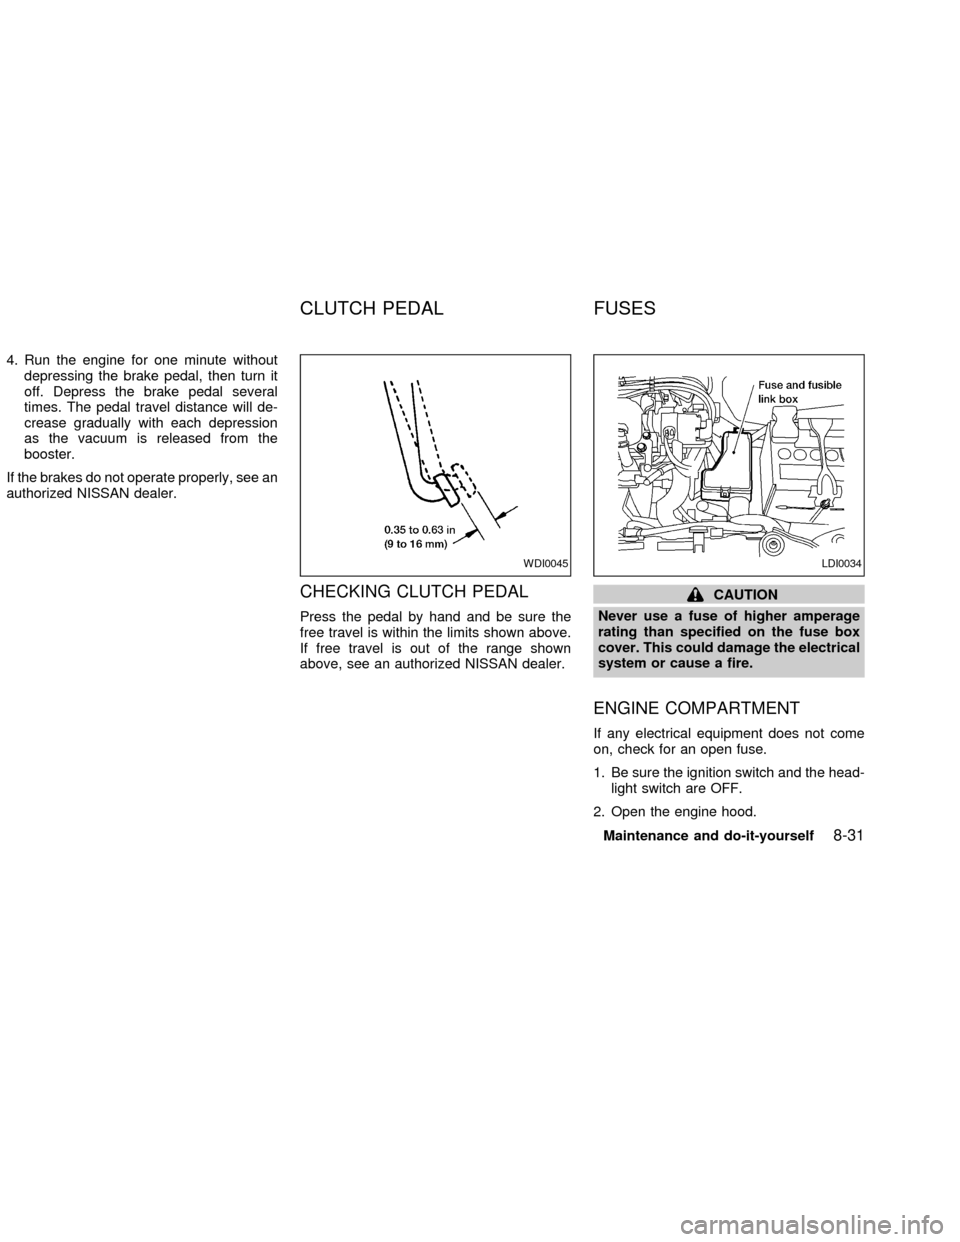
CHECKING CLUTCH PEDAL
Press the pedal by hand and be sure the
free travel is within the limits shown above.
If free travel is out of the range shown
above, see an authorized NISSAN dealer.
CAUTION
Never use a fuse of higher amperage
rating than specified on the fuse box
cover. This could damage the electrical
system or cause a fire.
ENGINE COMPARTMENT
If any electrical equipment does not come
on, check for an open fuse.
1. Be sure the ignition switch and the head-
light switch are OFF.
2. Open the engine hood.
WDI0045LDI0034
CLUTCH PEDAL FUSES
Maintenance and do-it-yourself8-31
ZX
Page 202 of 235
braking, handling, ground clearance,
body-to-tire clearance, tire chain
clearance, speedometer calibration,
headlight aim and bumper height.
Some of these effects may lead to
accidents and could result in serious
personal injury.
cIf the wheels are changed for any
reason, always replace with wheels
which have the same off-set dimen-
sion. Wheels of a different offset
could cause premature tire wear, de-
grade vehicle handling characteris-
tics and/or interference with the
brake discs/drums. Such interfer-
ence can lead to decreased braking
efficiency and/or early brake
pad/shoe wear. Refer to ªWheel/tire
sizeº in the ªTechnical and con-
sumer informationº section of this
manual for wheel off-set dimen-
sions.
cDo not install a deformed wheel or
tire even if it has been repaired. Such
wheels or tires could have unknown
structural damage and could fail
without warning.cThe use of retread tires is not recom-
mended.
cFor additional information regarding
tires, refer to ``Important Tire Safety
Information'' in the Warranty Infor-
mation Booklet (US) or ``Tire Safety
Information'' in the Warranty and
Roadside Assistance Information
booklet (Canada).
Wheel balance
Unbalanced wheels may affect vehicle han-
dling and tire life. Even with regular use,
wheels can get out of balance. Therefore,
they should be balanced as required.
Wheel balance service should be per-
formed with the wheels off the vehicle. Spin
balancing the front wheels on the vehicle
could lead to transmission damage.
cFor additional information regarding
tires, refer to ``Important Tire Safety
Information'' in the Warranty Informa-
tion Booklet (US) or ``Tire Safety In-
formation'' in the Warranty and Road-
side Assistance Information booklet
(Canada).
Care of wheels
cWash the wheels when washing the
vehicle to maintain their appearance.
cClean the inner side of the wheels when
the wheel is changed or the underside of
the vehicle is washed.
cDo not use abrasive cleaners when
washing the wheels.
c
Inspect wheel rims regularly for dents or
corrosion. Such damage may cause loss
of pressure or poor seal at the tire bead.
cNISSAN recommends waxing the road
wheels to protect against road salt in
areas where it is used during winter.
Spare tire (TEMPORARY USE
ONLY)
Observe the following precautions if the TEM-
PORARY USE ONLY spare tire must be used,
otherwise your vehicle could be damaged or
involved in an accident:
Maintenance and do-it-yourself8-47
ZX
Page 205 of 235

The following are approximate capacities. The actual refill capacities may be a little different. When refilling, follow the procedure
instructed in the ``Do-it-yourself'' section to determine the proper refill capacity.
Capacity (Approximate)
Recommended Fluids and Lubricants
US
measureImp
measureLiter
Fuel 13-1/4 gal 11 gal 50 Unleaded gasoline with an octane rating of at least 87 AKI (RON 91)*1
Engine oil *7
Drain and refill
With oil filter change QG18DE 2-7/8 qt 2-3/8 qt 2.7
cAPI Certification Mark *2 *3
cAPI grade SG/SH, Energy ConservingI&IIorAPIgrade SJ, Energy
Conserving *2 *3
cILSAC grade GF-I & GF-II *2 *3 QR25DE 4-1/8 qt 3-3/8 qt 3.9
Without oil filter change QG18DE 2-5/8 qt 2-1/4 qt 2.5
QR25DE 3-7/8 qt 3-1/4 qt 3.7
Cooling system
Without reservoir
50% Genuine NISSAN Anti-freeze coolant or equivalent
50% Demineralized or distilled water Manual transmission: QR25DE 6-1/2 qt 5-3/8 qt 6.1
QG18DE 6-3/8 qt 5-1/4 qt 6.0
Automatic transmission: QR25DE 6-3/8 qt 5-1/4 qt 6.0
QG18DE 6-1/4 qt 5-1/4 qt 5.9
Manual transmission gear oil RS5F70A/V 6-3/8 pt 5-1/4 pt 3.0 API GL-4, Viscosity SAE 75W - 85 only
RS5F51A, RS6F51H 4-7/8 qt 4 pt 2.3
Automatic transmission fluid
Refill to the proper level according to the instructions in the
``Do-it-yourself'' section.NISSAN Matic `D' (Continental U.S. and Alaska) or Canada NISSAN
Automatic Transmission Fluid.*4
Power steering fluidGenuine NISSAN PSF II or equivalent.*8
Brake and clutch fluidGenuine NISSAN Brake Fluid*5 or equivalent
DOT 3 (US FMVSS No. 116)
Multi-purpose grease Ð Ð Ð NLGI No. 2 (Lithium Soap base)
Air conditioning system refrigerant Ð Ð Ð HFC-134a (R-134a)*6
Air conditioning system lubricantsNISSAN A/C System Lubricant Type R or equivalent*6
*1: For further details, see ``Fuel recommendation.''
*2: For further details, see ``Engine oil and oil filter recommendations.''
*3: For further details, see ``Recommended SAE engine oil viscosity.''
*4: Dexron
TMIII/MerconTMor equivalent may also be used. Outside the Continental United States and Alaska contact an authorized NISSAN dealership for more
information regarding suitable fluids, including recommended brand(s) of DexronTMIII/MerconTMAutomatic Transmission Fluid.
*5: Available in mainland USA through your authorized NISSAN dealer.
*6: For further details, see ªAir conditioner specification label.º
*7: For further details, see ``Changing engine oil.''
*8: Genuine NISSAN PSF, Canada NISSAN Automatic Transmission Fluid, DexronŸ III/MerconŸ, or equivalent ATF may also be used.
CAPACITIES AND
RECOMMENDED FUEL/
LUBRICANTS
9-2Technical and consumer information
ZX
Page 220 of 235
cDo not modify the vehicle exhaust
system, brake system, etc. to install
a trailer hitch.
cTo reduce the possibility of addi-
tional damage if your vehicle is
struck from the rear, where practical,
remove the hitch and/or receiver
when not in use.
cAfter the hitch is removed, seal the
bolt holes to prevent exhaust fumes,
water or dust from entering the pas-
senger compartment.
cRegularly check that all hitch mount-
ing bolts are securely mounted.
Tire pressures
cWhen towing a trailer, inflate the vehicle
tires to the recommended cold tire pres-
sure indicated on the tire placard (lo-
cated on the driver's side rear door
pillar).
cTrailer tire condition, size, load rating
and proper inflation pressure should be
in accordance with the trailer and tire
manufacturers' specifications.
Safety chains
Always use suitable safety chains between
your vehicle and the trailer. Safety chains
should be crossed and should be attached
to the hitch, not to the vehicle bumper or
axle. Be sure to leave enough slack in the
chains to permit turning corners.
Trailer lights
Trailer lights should comply with federal
and/ or local regulations. When wiring the
vehicle for towing, connect the stop and tail
light pickup into the vehicle electrical circuit.
Trailer brakes
If your trailer is equipped with a braking
system, make sure it conforms to federal
and/or local regulations and that it is prop-
erly installed.
WARNING
Never connect a trailer brake system
directly to the vehicle brake system.
Pre-towing tips
cBe certain your vehicle maintains a level
position when a loaded and/or unloadedtrailer is hitched. Do not drive the vehicle if
it has an abnormal nose-up or nose- down
condition; check for improper tongue load,
overload, worn suspension or other pos-
sible causes of either condition.
cAlways secure items in the trailer to
prevent load shift while driving.
cBe certain your rear view mirrors con-
form to all federal, state or local regula-
tions. If not, install any mirrors required
for towing before driving the vehicle.
Trailer towing tips
In order to gain skill and an understanding
of the vehicle's behavior, you should prac-
tice turning, stopping and backing up in an
area which is free from traffic. Steering,
stability, and braking performance are
somewhat different than under normal driv-
ing conditions.
cAlways secure items in the trailer to
prevent load shift while driving.
c
Avoid abrupt starts, acceleration or stops.
cAvoid sharp turns or lane changes.
cAlways drive your vehicle at a moderate
speed.
Technical and consumer information
9-17
ZX