NISSAN SENTRA 2004 B15 / 5.G Workshop Manual
Manufacturer: NISSAN, Model Year: 2004, Model line: SENTRA, Model: NISSAN SENTRA 2004 B15 / 5.GPages: 248, PDF Size: 3.86 MB
Page 51 of 248

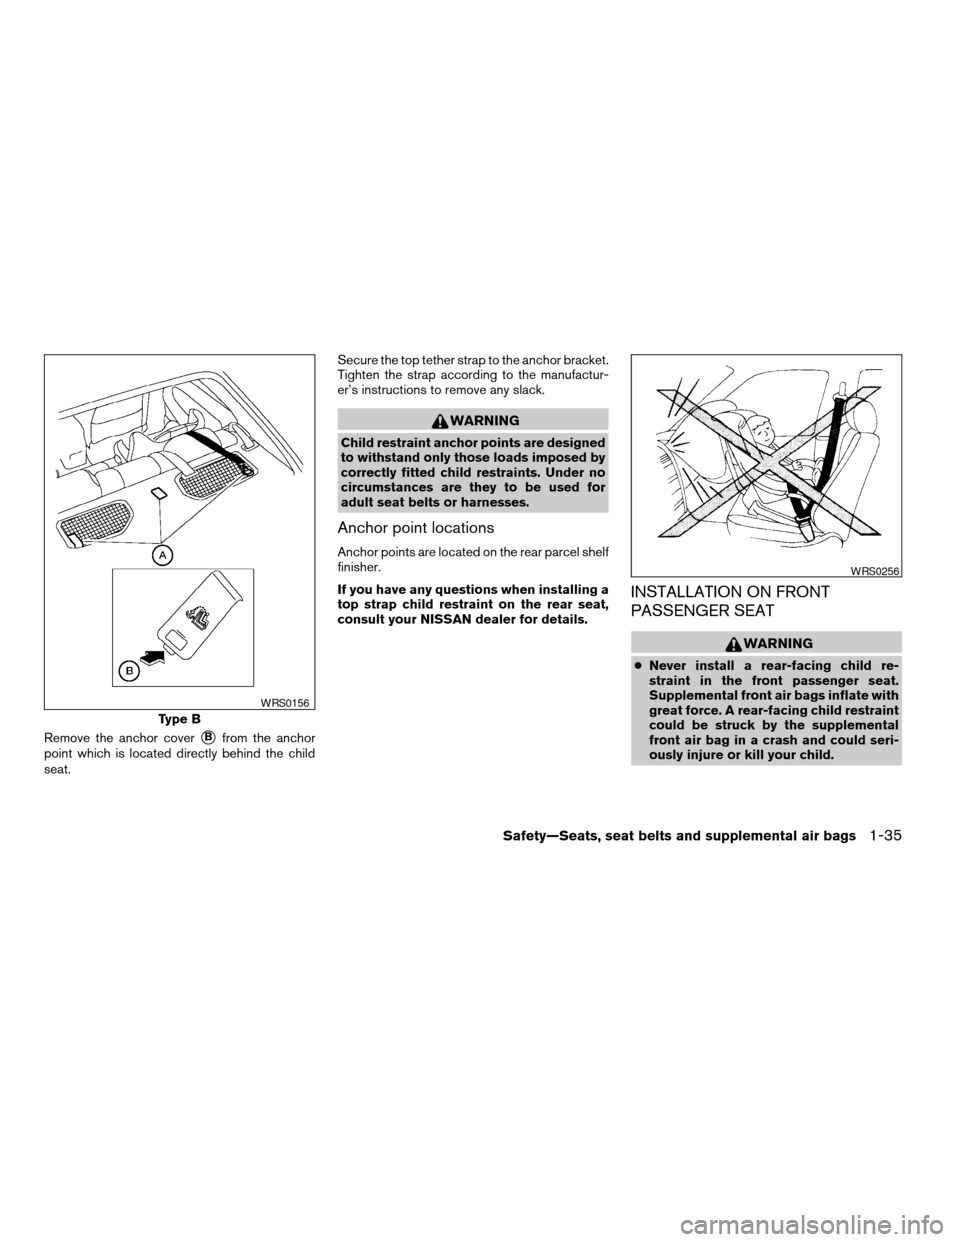
Remove the anchor coversBfrom the anchor
point which is located directly behind the child
seat.Secure the top tether strap to the anchor bracket.
Tighten the strap according to the manufactur-
er’s instructions to remove any slack.
WARNING
Child restraint anchor points are designed
to withstand only those loads imposed by
correctly fitted child restraints. Under no
circumstances are they to be used for
adult seat belts or harnesses.
Anchor point locations
Anchor points are located on the rear parcel shelf
finisher.
If you have any questions when installing a
top strap child restraint on the rear seat,
consult your NISSAN dealer for details.
INSTALLATION ON FRONT
PASSENGER SEAT
WARNING
cNever install a rear-facing child re-
straint in the front passenger seat.
Supplemental front air bags inflate with
great force. A rear-facing child restraint
could be struck by the supplemental
front air bag in a crash and could seri-
ously injure or kill your child.
Type B
WRS0156
WRS0256
Safety—Seats, seat belts and supplemental air bags1-35
ZREVIEW COPY:Ð2004 Sentra(b15)
Owners Manual(owners)ÐUSA English(nna)
03/18/04Ðtbrooks
X
Page 52 of 248

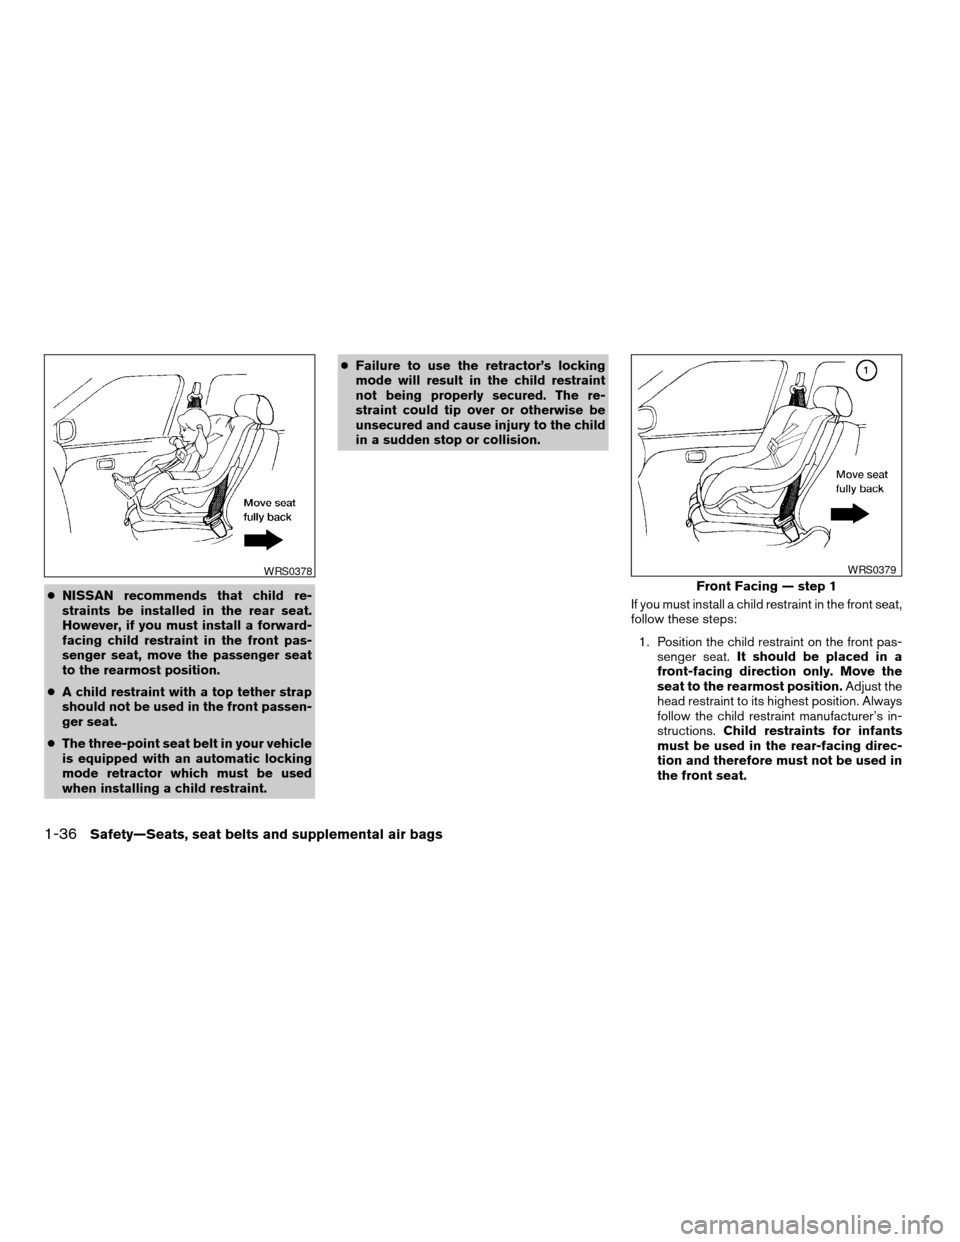
cNISSAN recommends that child re-
straints be installed in the rear seat.
However, if you must install a forward-
facing child restraint in the front pas-
senger seat, move the passenger seat
to the rearmost position.
cA child restraint with a top tether strap
should not be used in the front passen-
ger seat.
cThe three-point seat belt in your vehicle
is equipped with an automatic locking
mode retractor which must be used
when installing a child restraint.cFailure to use the retractor’s locking
mode will result in the child restraint
not being properly secured. The re-
straint could tip over or otherwise be
unsecured and cause injury to the child
in a sudden stop or collision.
If you must install a child restraint in the front seat,
follow these steps:
1. Position the child restraint on the front pas-
senger seat.It should be placed in a
front-facing direction only. Move the
seat to the rearmost position.Adjust the
head restraint to its highest position. Always
follow the child restraint manufacturer’s in-
structions.Child restraints for infants
must be used in the rear-facing direc-
tion and therefore must not be used in
the front seat.
WRS0378
Front Facing — step 1
WRS0379
1-36Safety—Seats, seat belts and supplemental air bags
ZREVIEW COPY:Ð2004 Sentra(b15)
Owners Manual(owners)ÐUSA English(nna)
03/18/04Ðtbrooks
X
Page 53 of 248

2. Route the seat belt tongue through the child
restraint and insert it into the buckle until you
hear and feel the latch engage.
Be sure to follow the child restraint manu-
facturer’s instructions for belt routing.3. Pull on the shoulder belt until all of the belt is
fully extended. At this time, the seat belt
retractor is in the automatic locking mode
(child restraint mode) . It reverts to emer-
gency locking mode when the seat belt is
fully retracted.4. Allow the seat belt to retract slightly. Pull up
on the shoulder belt to remove any slack in
the belt.
Front Facing — step 2
WRS0159
Front Facing — step 3
WRS0160
Front Facing — step 4
WRS0161
Safety—Seats, seat belts and supplemental air bags1-37
ZREVIEW COPY:Ð2004 Sentra(b15)
Owners Manual(owners)ÐUSA English(nna)
03/18/04Ðtbrooks
X
Page 54 of 248

5. Before placing the child in the child restraint,
use force to tilt the child restraint from side
to side, and tug it forward to make sure that
it is securely held in place. It should not move
more than 1 inch.
6. Check that the retractor is in the automatic
locking mode by trying to pull more seat belt
out of the retractor. If you cannot pull any
more belt webbing out of the retractor, the
retractor is in the automatic locking mode.7. Check to make sure the child restraint is
properly secured prior to each use. If the
seat belt is not locked, repeat steps 3
through 6.
After the child restraint is removed and the seat
belt is fully retracted, the automatic locking mode
(child restraint mode) is canceled.
Front Facing — step 5
WRS0380
1-38Safety—Seats, seat belts and supplemental air bags
ZREVIEW COPY:Ð2004 Sentra(b15)
Owners Manual(owners)ÐUSA English(nna)
03/18/04Ðtbrooks
X
Page 55 of 248

2 Instruments and controls
Instrument panel...................................2-2
Meters and gauges................................2-3
Speedometer and odometer.....................2-4
Trip computer (if so equipped)...................2-5
Tachometer (if so equipped).....................2-6
Engine coolant temperature gauge...............2-7
Fuel gauge....................................2-7
Warning/indicator lights and audible reminders.......2-9
Checking bulbs................................2-9
Warning lights.................................2-9
Indicator lights................................2-11
Audible reminders.............................2-12
Security systems.................................2-13
Nissan vehicle immobilizer system (NVIS) (if
so equipped)..................................2-13
Vehicle security system (if so equipped)..........2-14
Windshield wiper and washer switch...............2-17
Switch operation..............................2-17
Rear window defroster switch......................2-18
Headlight and turn signal switch....................2-18
Headlight control switch........................2-18
Daytime running light system (Canada only)......2-19Instrument brightness control...................2-19
Turn signal switch.............................2-20
Fog light switch (if so equipped)................2-20
Hazard warning flasher switch.....................2-20
Horn............................................2-21
Power outlet.....................................2-21
Cigarette lighter..................................2-22
Storage.........................................2-23
Sunglasses holder (if so equipped)..............2-23
Cup holders..................................2-24
Glove box....................................2-24
Coin box.....................................2-25
Console box (if so equipped)...................2-25
Instrument panel storage (if so equipped)........2-25
Windows........................................2-26
Power windows (if so equipped)................2-26
Manual windows..............................2-28
Sunroof (if so equipped)...........................2-28
Electric sunroof...............................2-28
Interior light......................................2-29
Map lights (if so equipped)........................2-30
Trunk light.......................................2-30
ZREVIEW COPY:Ð2004 Sentra(b15)
Owners Manual(owners)ÐUSA English(nna)
03/18/04Ðtbrooks
X
Page 56 of 248

1. Headlight/fog light (if so equipped)/turn
signal switch (P. 2-18)
2. Meters/gauges (P. 2-3)
3. Windshield wiper/washer switch (P. 2-17)
4. Heater/air conditioner control (P. 4-2)
5. Storage compartment (P. 2-25)
6. Hazard warning flasher switch (P. 2-20)
7. Center ventilators (P. 4-2)
8. Passenger supplemental air bag (P. 1-6)
9. Glove box (P. 2-24)
10. Pocket (P. 2-23)
11. Power outlet/cigarette lighter (P. 2-21,
2-22)
12. Power outlet (if so equipped) (P. 2-21)
13. Audio system (if so equipped) (P. 4-10)
14. Cruise control and main set switch
(if so equipped) (P. 5-14)
15. Tilt steering lock lever (P. 3-15)
16. Trunk release Type B (P. 3-11)
17. Fuel filler lid opening lever (P. 3-14)
18. Driver supplemental air bag (P. 1-6)
19. Hood release lever (P. 3-11)
20. Fuse box cover/coin holder (P. 8-30, 2-25)
21. Trunk release Type A (P. 3-11)
22. Instrument brightness control switch
(P. 2-19)
23. Outside mirror electric control type switch
(if so equipped) (P. 3-17)
WIC0433
INSTRUMENT PANEL
2-2Instruments and controls
ZREVIEW COPY:Ð2004 Sentra(b15)
Owners Manual(owners)ÐUSA English(nna)
04/02/04Ðskoniecz
X
Page 57 of 248

Type A
WIC0477
Type B
WIC0478
Type C
LIC0479
METERS AND GAUGES
Instruments and controls2-3
ZREVIEW COPY:Ð2004 Sentra(b15)
Owners Manual(owners)ÐUSA English(nna)
03/18/04Ðtbrooks
X
Page 58 of 248

SPEEDOMETER AND ODOMETER
Speedometer
The speedometers1indicates vehicle speed in
miles per hour (MPH) and kilometers per hour
(km/h) .
Odometer/Twin trip odometer
The odometer/twin trip odometers2is displayed
when the ignition key is in the ON position.
The odometer records the total distance the ve-
hicle has been driven.
The twin trip odometer records the distance of
individual trips.Changing the display:
For vehicles equipped with twin trip odometer,
pushing the change button
s3changes the dis-
play as follows:
ODO (odometer)!Trip
!Trip!
ODO
For vehicles equipped with trip computer, push-
ing the change button
s3changes the display as
follows:
Trip
!Trip!Outside air tempera-
ture!Distance to Empty!Average fuel con-
sumption!Average speed!Journey time!
Trip
Type D
LIC0480
Twin trip odometer
WIC0494
Trip computer
WIC0601
2-4Instruments and controls
ZREVIEW COPY:Ð2004 Sentra(b15)
Owners Manual(owners)ÐUSA English(nna)
03/18/04Ðtbrooks
X
Page 59 of 248

Resetting the trip odometer:
Pushing the change button for more than 1 sec-
ond resets the trip odometer to zero.
TRIP COMPUTER (if so equipped)
The display of the trip computer is situated in the
speedometer display. When the ignition is turned
to ON, the display scrolls all the modes of the trip
computer and then shows the mode chosen be-
fore the ignition switch is turned OFF.
If the battery terminal is disconnected,
push the trip computer mode switch more
than 1 second to activate the computer.
When the ignition switch is turned to ON, modes
of the trip computer can be selected by pushing
the trip computer change button. The following
modes can be selected:
Outside air temperature (ICY-°F or °C)
The outside air temperature is displayed in °F or
°C.
The outside air temperature mode includes a low
temperature warning feature: below 37°F (3°C) ,
the outside air temperature mode is automatically
selected and ICY will illuminate in order to draw
the driver’s attention. Press the change button if
you wish to return to the mode that was selected
before the warning occurred. The ICY indicatorwill continue blinking as long as the temperature
remains below 39°F (4°C) .
The ambient temperature sensor is located in
front of the radiator. The sensor may be affected
by road or engine heat, wind directions and other
driving conditions. The display may differ from the
actual ambient temperature or the temperature
displayed on various signs or billboards.
Distance to empty (dte—mile or km)
The distance to empty (dte) mode provides you
with an estimation of the distance that can be
driven before refueling. The dte is constantly be-
ing calculated, based on the amount of fuel in the
fuel tank and the actual fuel consumption.
The display is updated every 30 seconds.
The dte mode includes a low range warning
feature: when the fuel level is low, the dte mode is
automatically selected and the digits blink in or-
der to draw the driver’s attention. Press the
change button if you wish to return to the mode
that was selected before the warning occurred.
The dte mark (dte) will remain blinking until the
vehicle is refueled.
When the fuel level drops even lower, the dte
display will change to (----) .NOTE:
cIf the amount of fuel added while the
ignition switch is OFF is small, the dis-
play just before the ignition switch is
turned OFF may continue to be dis-
played.
cWhen driving uphill or rounding curves,
the fuel in the tank shifts, which may
momentarily change the display.Average fuel consumption (Mpg or
l/100km)
The average fuel consumption mode shows the
average fuel consumption since the last reset.
Resetting is done by pressing the change button
for more than approximately 1 second. The dis-
play is updated every 30 seconds. At about the
first 1/3 miles (500 m) after a reset, the display
shows (----) .
Average speed (MPH or km/h)
The average speed mode shows the average
vehicle speed since last reset. Resetting is done
by pressing the change button for more than
approximately 1 second. The display is updated
every 30 seconds. The first 30 seconds after a
reset, the display shows (----) .
Instruments and controls2-5
ZREVIEW COPY:Ð2004 Sentra(b15)
Owners Manual(owners)ÐUSA English(nna)
03/18/04Ðtbrooks
X
Page 60 of 248

Journey time
The journey time mode shows the time since the
last reset. The displayed time can be reset by
pressing the change button for more than ap-
proximately 1 second.
NOTE:
If a low temperature warning and low range
warning occur simultaneously, other dis-
play modes switch automatically to the
outside temperature display.
When the change button is pushed, the
display switches to the mode chosen be-
fore the warning display, and the outside
air temperature indicator marked ICY will
blink.
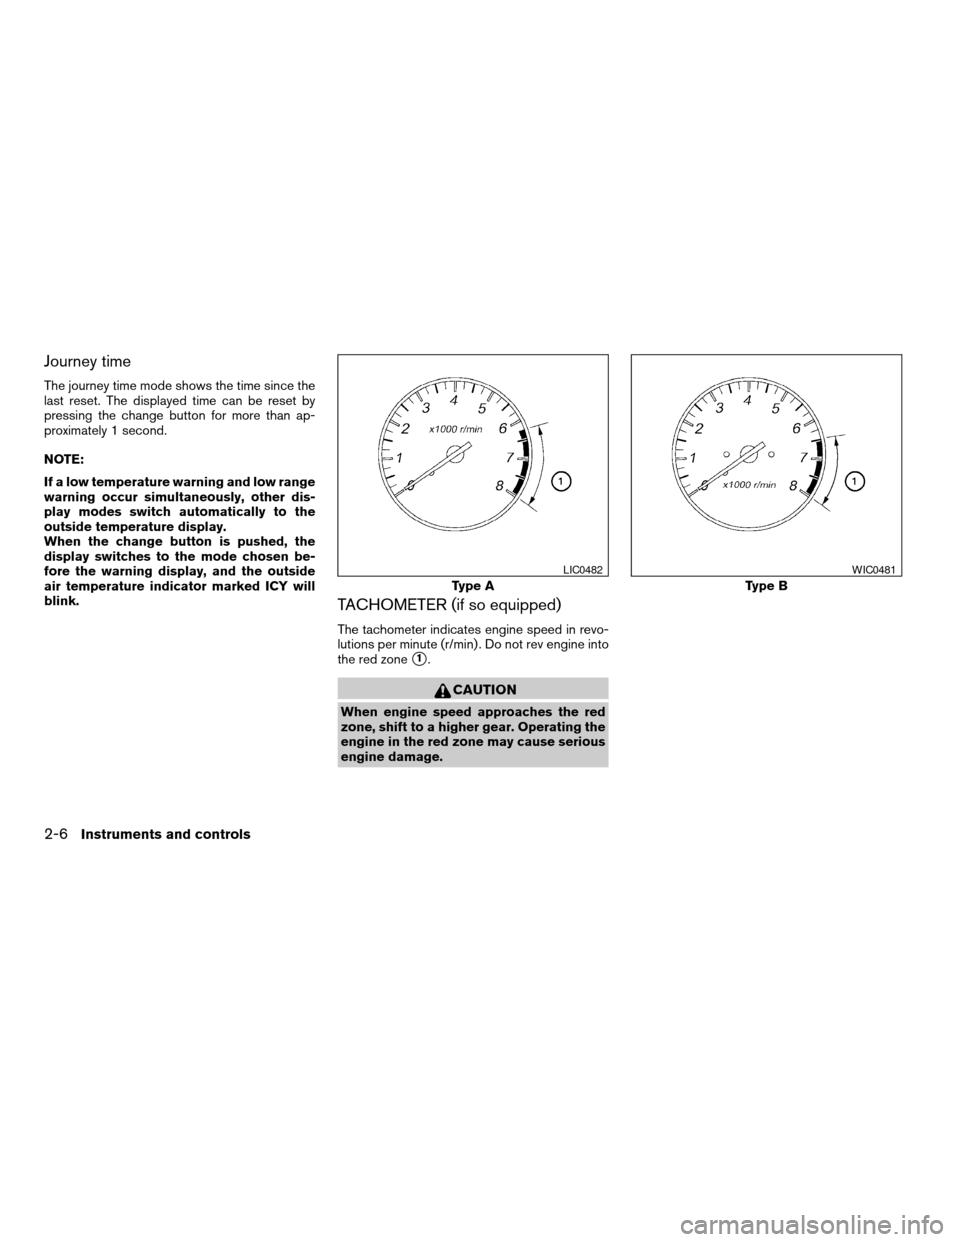
TACHOMETER (if so equipped)
The tachometer indicates engine speed in revo-
lutions per minute (r/min) . Do not rev engine into
the red zone
s1.
CAUTION
When engine speed approaches the red
zone, shift to a higher gear. Operating the
engine in the red zone may cause serious
engine damage.
Type A
LIC0482
Type B
WIC0481
2-6Instruments and controls
ZREVIEW COPY:Ð2004 Sentra(b15)
Owners Manual(owners)ÐUSA English(nna)
03/18/04Ðtbrooks
X