NISSAN SERENA 1993 Service Repair Manual
SERENA 1993
NISSAN
NISSAN
https://www.carmanualsonline.info/img/5/57387/w960_57387-0.png
NISSAN SERENA 1993 Service Repair Manual
Trending: low oil pressure, motor, turn signal bulb, set clock, steering, wiper blades, low beam
Page 1191 of 1254
WIPER
AND WASHER
Front Wiper
and Washer/Wiring
Diagram
-: ]
:
7-
!:t-- ]
_
ir A-
.:-
r-1t L I fld)l -
t -t
..: ,
;
a:\
F
:)
" L
..1&
-.|]dl
;
a
:
.t
!
.! -
;
!
:
\3
=.
I al,
a-,r
t
L.E_ P
L
6l
13,
-
o
;
,:i-
.:-]
- --._ll
Ll-l- -^-
i!!5
1-r" Cr
<
:j
-
LL
L}
,; -
.* ;
-
-snoli -
[3_] ;
ZL
r!l E
E
EL.8O
Page 1192 of 1254
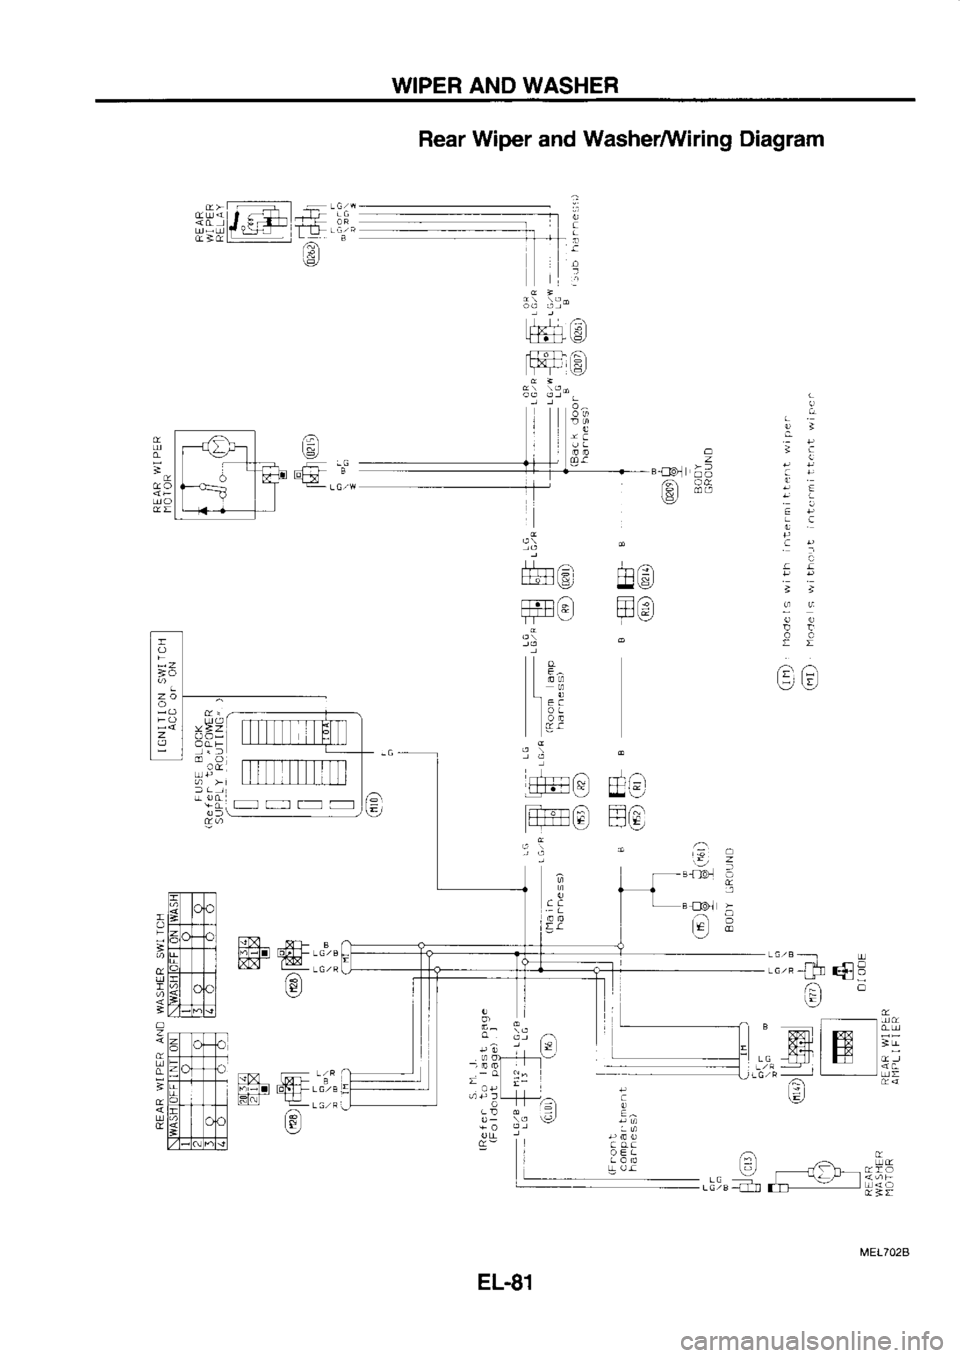
WIPER
AND WASHER
tL - a-=J
.- LG
w
-g;/'ijn ffi.:",
ffi-e"
ffi"@::: la\-/
rL,x.r \X!tF B Rear
Wiper and WasherMiring
Diagram
fr1LF l
@tal
/a /^.
I lE'
tL/ :,,
ffi,(:l
t'1tE
/:,:l
tnl
o !EEP
a!
;;
99
tt
6.r
.._,
6)
\_l
cc
,:t
z
E .","-rh
4E
€c
m
6 l;;
I IiIN
IE
Irrr *J
ra
\:,
to
z ffiLF
H+-r'le
TT- V
.
-
E?
Lil
3:
v1z
?L i | |
fi-- ll
I lL I
EL.81 rat
r-
. = -..Lf
,;:"-ri- r'rL -l
Lrl{.
a
Page 1193 of 1254
WIPER
AND WASHER
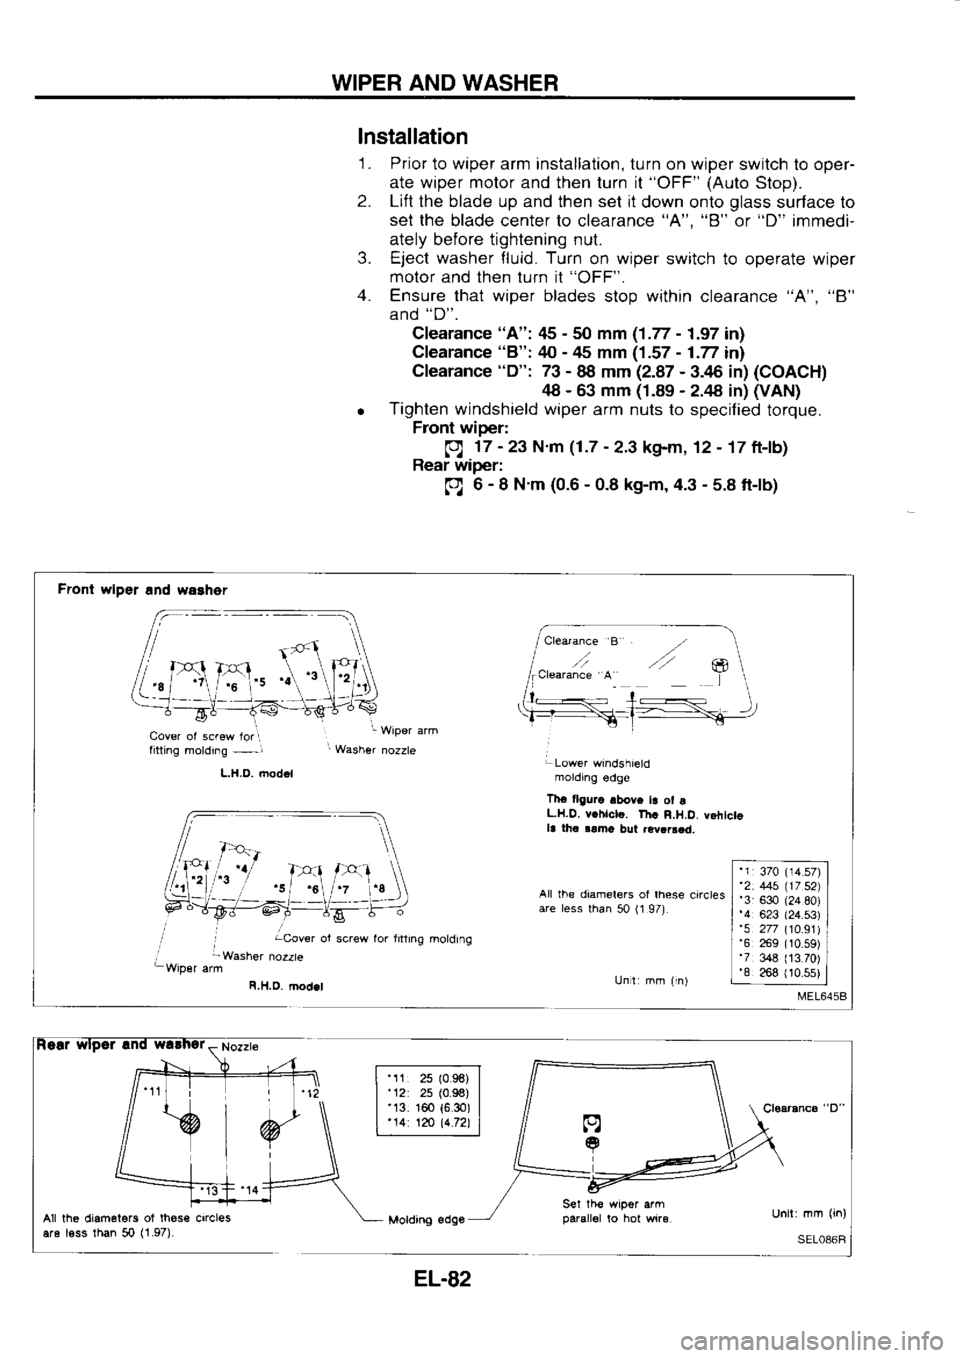
lnstallation '1 . Prior
to wiper arm installation, turn
on wiper
switch to oper-
ate wiper motor and then
turn it "OFF"
(Auto
Stop).
2. Lift
the blade up and then set it
down onto glass
surface lo
set the
blade center to clearance "A", "8"
or "D"
immedi-
ately belore tightening nut.
3. Eject washer fluid. Turn
on wiper
switch to operate wiper
molor and then turn it "OFF".
4. Ensure that wiper
blades stop within clearance "A",
"B"
and "D".
Clearance "A": tl5
-
50 mm (1.77 -
1.97 in)
Clearance "8": zl0 -
rts
mm (1.57 -
1.77 in)
Cfearanc€ "D":
73 -
88 mm (2.87 -
!6 in) (COACH)
48 -
63 mm (1.89 -
2.rA in) (VAN)
o Tighten
windshield wiper
arm nuts to
specified torque.
Front wiper:
g 17 -
23 N.m (1.7 -
2.3 kg-m, 12 - '17
ft-lb)
Rear wiper:
g 6 -
8 N'm (0.6 -
0.8 kg-m, 4.3 -
s.8 tt-lb)
Front wlDer and waaher
rl
Cover of screw lor
I
fitting molding -i
L.H.O.6od.l '
Wiper arm
LLower wtndshield
motdrng €dg€
Thr tlgurc abovc ta
ot r
L.H.O. vchlclc. Th. R.H.D. vohtcto
la lha
aamo bul .evrrsad.
,/ iwasher
nozzte All
lhe diamel€rs
ol lhese
circtes
are less
than 50 (1
97)
Unl: mm (in)
R.H.D. lnoalel \
I
tA
ol screw lor
ntlrng
moldrng '1:
370 (14.57)
'2: 445 \17 S2j
'3 630 (24
80)
'4 623 (24.s3)
'5 277 (10.91)
'6 269 t10.59)
'7 348 (13.70)
'8 268 (10.5s)
All the diamelers of
these crrcles
are less than 50 (1.97).
EL.82
Page 1194 of 1254
WIPER
AND WASHER
ll ':4ll
Yr -.::'
Nozzle hol6
bor€ diam€lor
1.0 mm (0.039
in) Installation
(Cont'd)
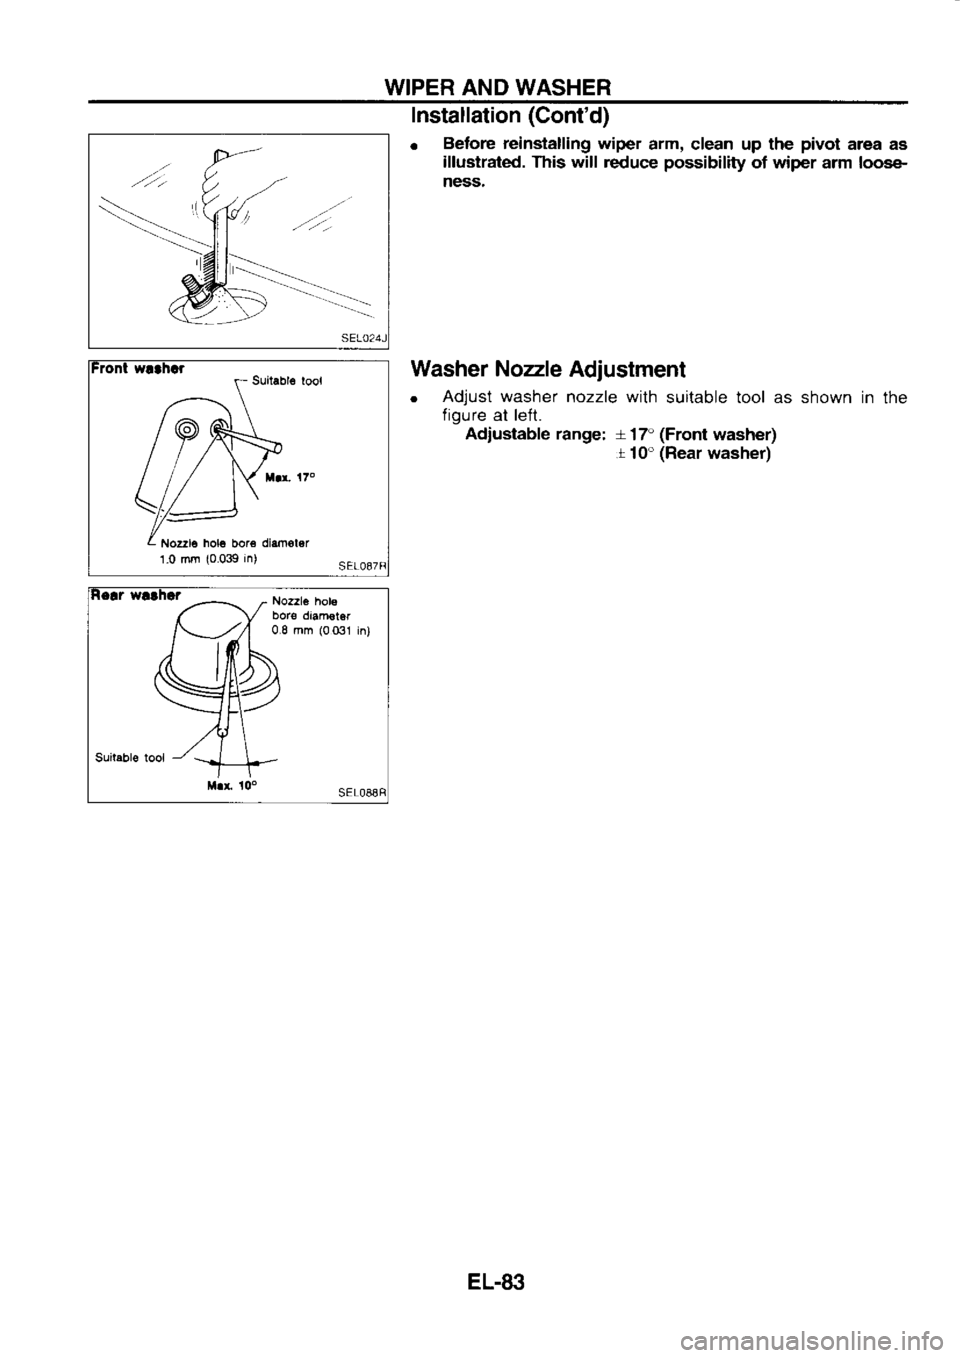
o Before
reinstalling wiper
arm, clean up the pivot
area as
illustrated. This will reduce possibility
of wiper arm loose'
ness.
Washer Nozzle
Adjustment
. Adjust
washer
nozzle with
suitable tool as shown in
the
f igure
at left.
Adiustable range: +17"
(Front
washer)
.t 10" (Rear
washer)
EL-81:l
Page 1195 of 1254
WIPER
AND WASHER
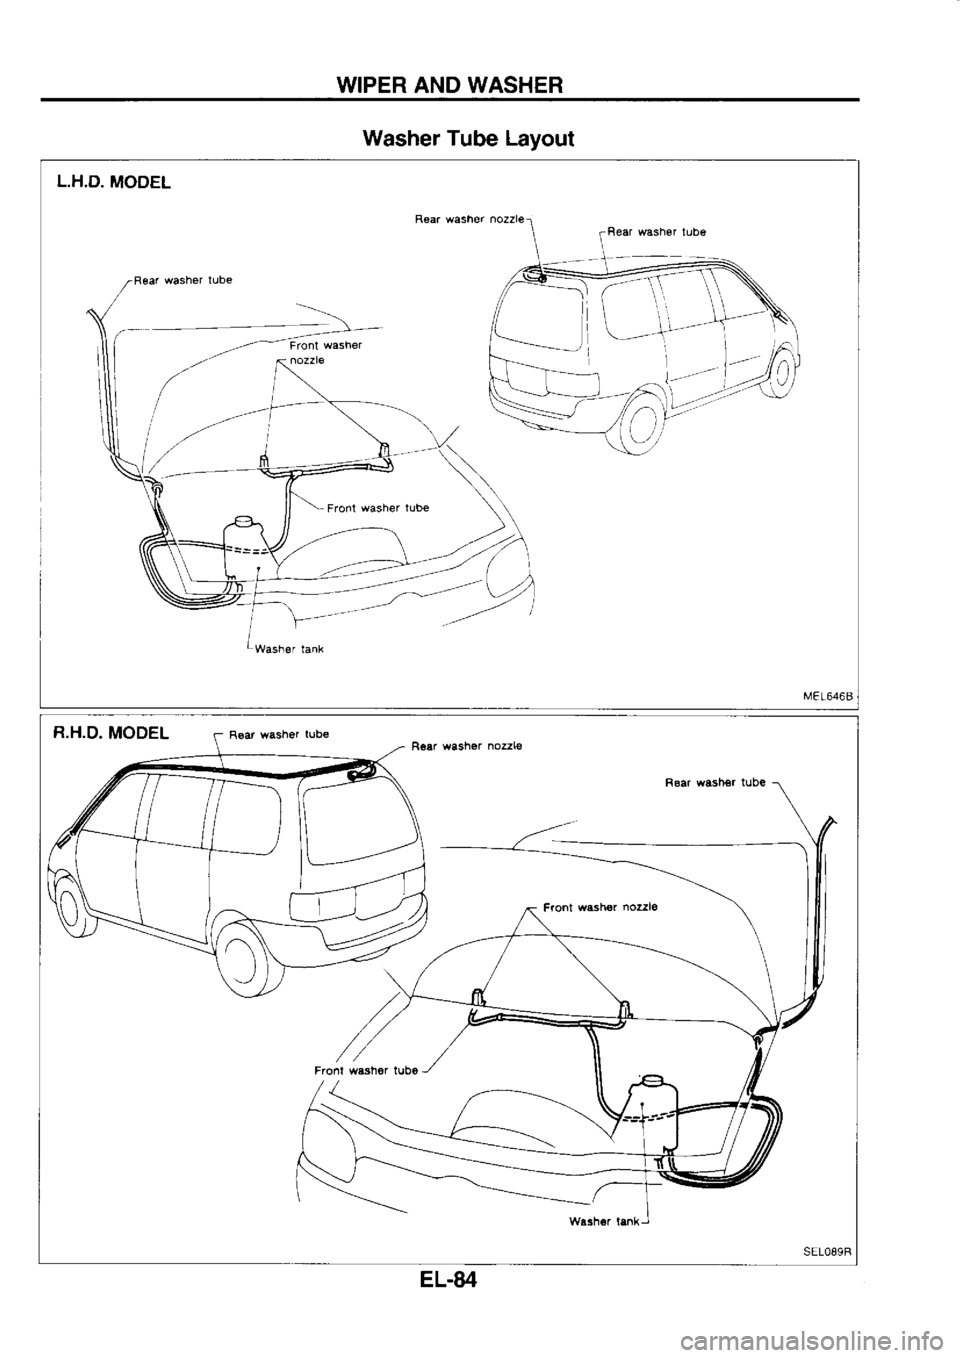
Washer Tube Layout
L.H,D. MODEL
Reer washer nozzle
EL-84
Page 1196 of 1254
WIPER
AND WASHER
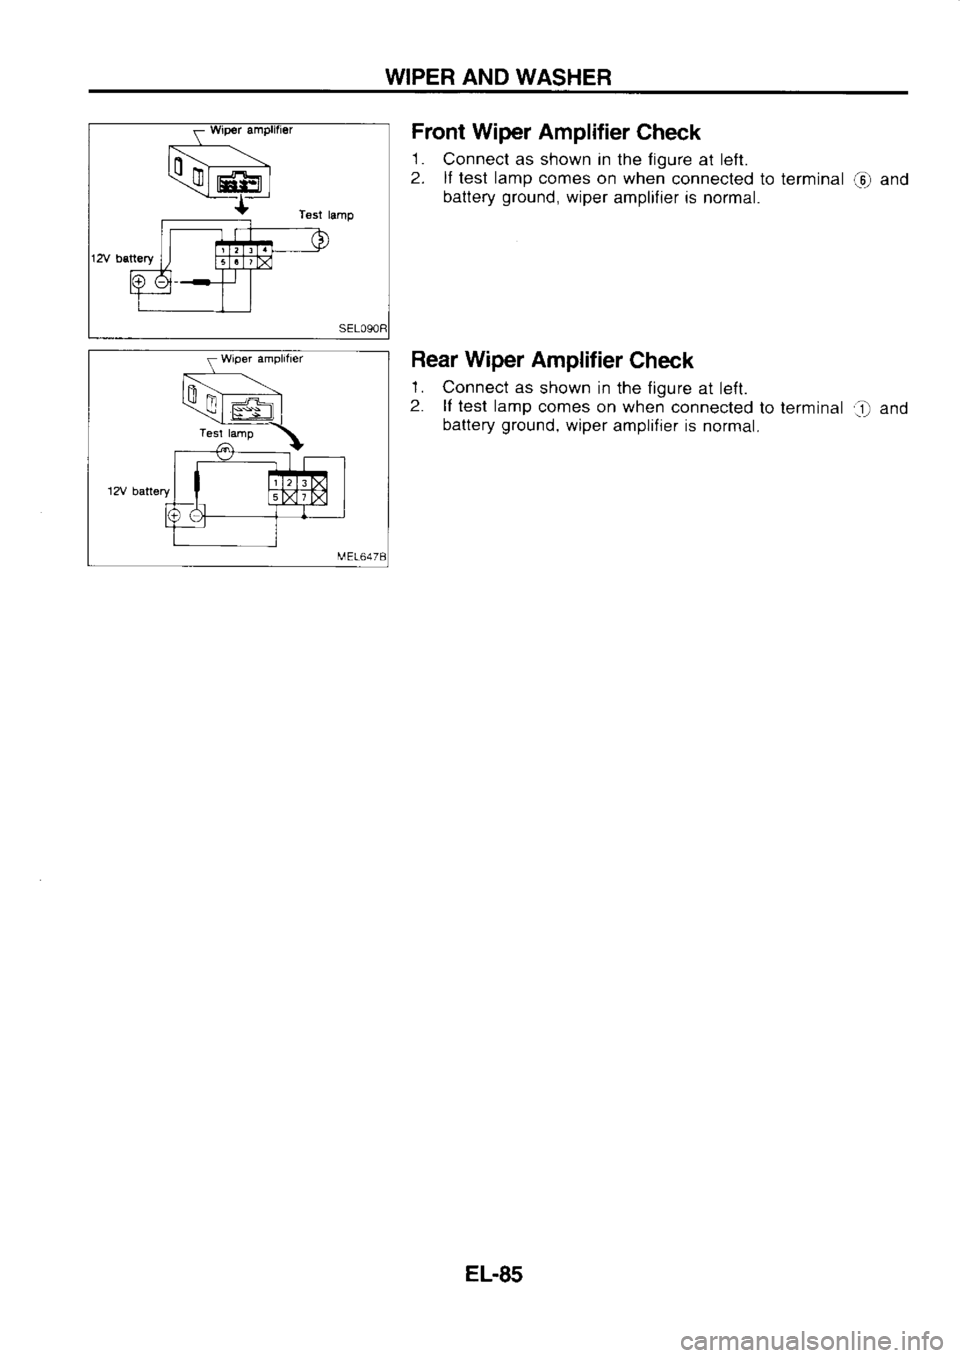
Front Wiper Amplifier
Check
1 .
Connect as shown in
the f
igure
at left.
2. lf test lamp
comes on when
connected to terminal ,O
and
battery ground,
wiper amplifier is normal.
Rear Wiper
Amplifier Check
'I . Connect as
shown in the lioure
at leit.
2. ll
test lamp
comes on wheri
connected to terminal i)
and
battery ground.
wiper amplifier is normal.
EL.85
Page 1197 of 1254
WIPER
AND WASHER
Headlamp Wiper
and WasherAViring Diagram
I ')',)
=o
99
9l,]!
333
DoraDl' I i€,P;
9QE{qq
5 3,? 5 r
c
UropL].]p
L-rooco
ro
i um i.at
ion
{
s y
slem
cl
t=, (ot
i a (c
G .t
-!"!'")
NIFI
+r .
L
,tl
\-,
B.:to|] 0
c oc
G]
\:/
I T-T
oll
tr? t_.1
!= ;
EL.86
Page 1198 of 1254
WIPER
AND WASHER
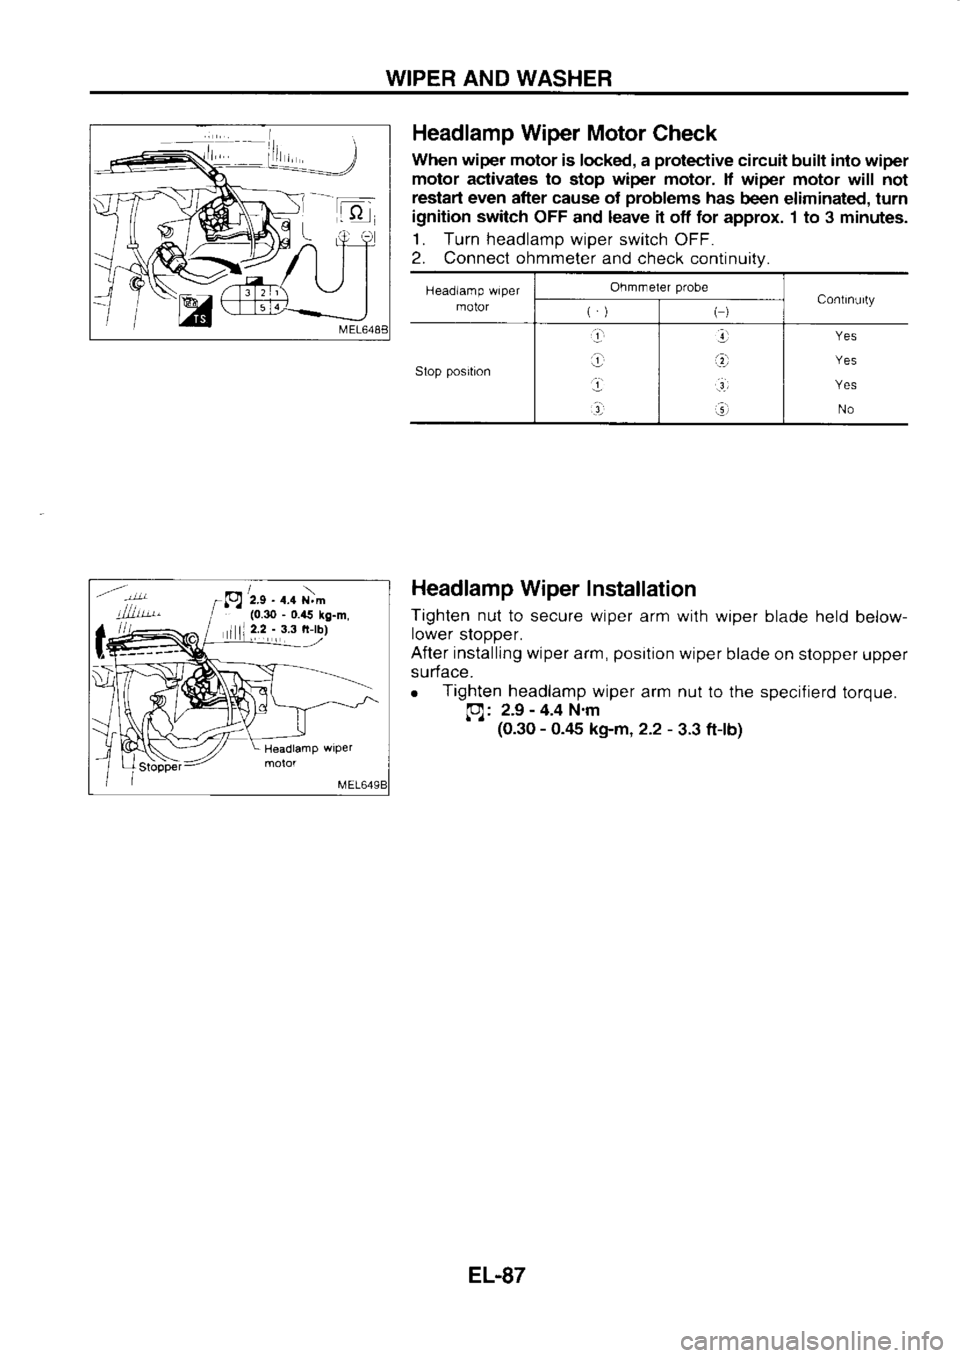
Headlamp Wiper Motor
Check
When wiper motor
is locked, a protective
circuit built into
wiper
motor activates to
stop wiper
motor.
lf wiper motor will not
restart even after cause of problems
has been eliminated, turn
ignition swilch
OFF and leave it off for approx. 1 to 3 minutes.
'| . Turn headlamo wioer switch OFF.
2. Connect ohmmeter
and check continuitv.
Headlamp Wiper Installation
Tighten nut
to secure wiper
arm with
wiper blade held
below-
rower sloooer.
After installing wiper
arm, position
wiper blade on slopper
upper
surface.
o Tighten
headlamp wiper
arm nut
to the specifierd
torque.
pl: 2.9 -
4.4 N.m
(0.30 -
0.45 kg-m, 2.2 -
3.3 ftlb)
Headiamp
wrper
molor Ohmrneler
probe
Conlrnurly
() ()
Stop position J
J .3_ Yes
Yes
Yes No
p /z.s
- ..n i"'
(0.30 -
0.45 kg-m,
I | 2.2
-,
3.3 trrbl
E1.87
Page 1199 of 1254
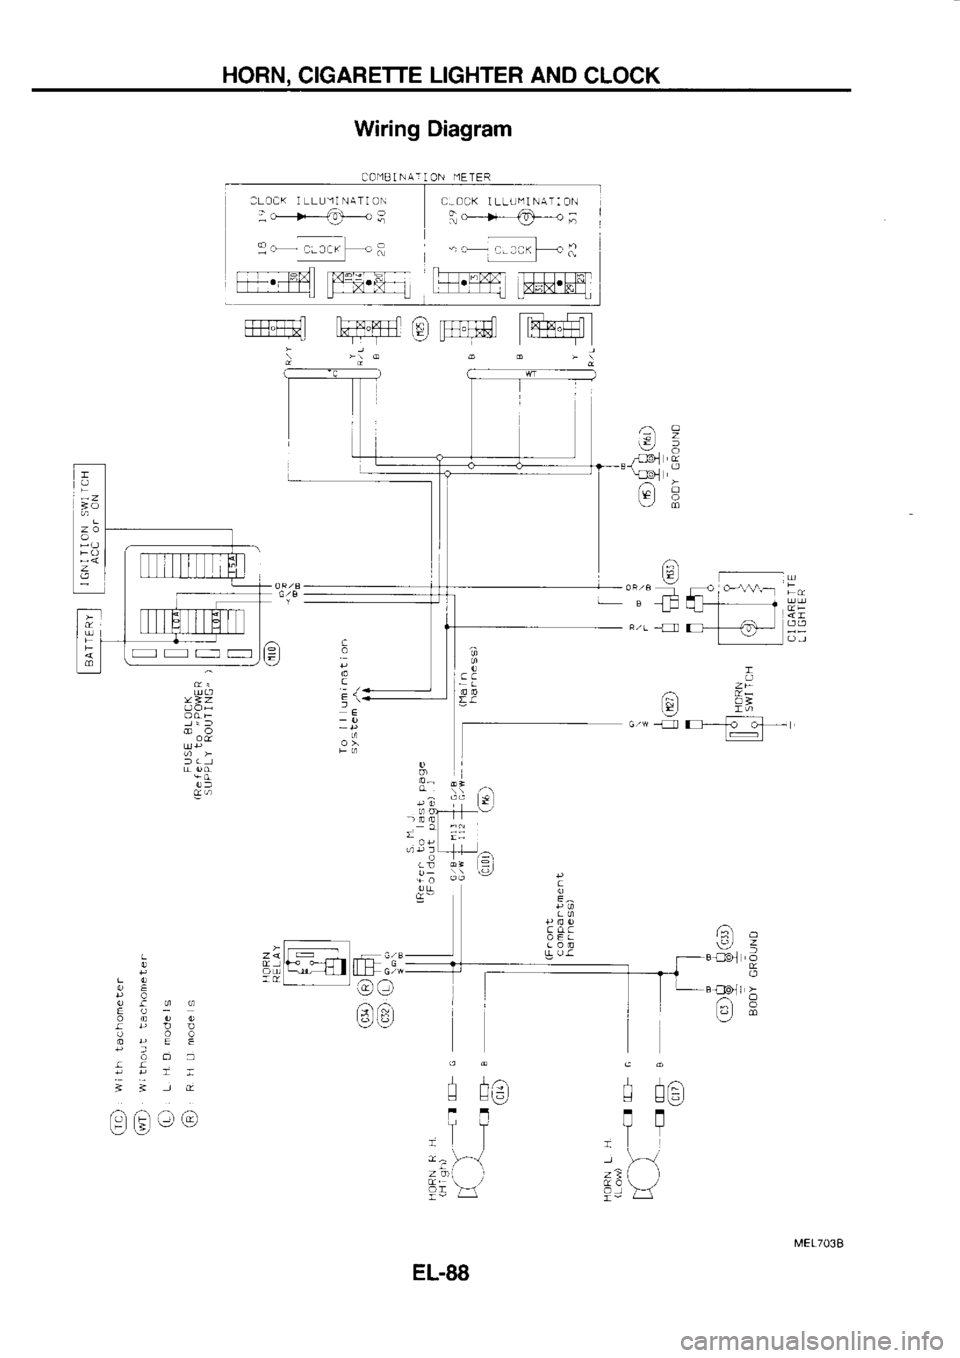
HORN.
CIGARETTE LIGHTER
AND
CLOCK
Wiring Diagram
c)
t-,
--Tl
R/r -fl
I
el i;
c "-n E---[E
=
t-l
n
cc
LI
.9
c
5\ E
E ltil
Ei
rl l
r )----(
I
!
L-'
l' i'l
TT
r)
al
Yzz
;;," >l.
_ I
Zq-_-F;B
5;Fflil iL!:G".
- 9rrl
/11 6r
19'i,
liJ lir
'e,, t0116INq-ION
NETER
]LO'K I LLU'1I NATI
ON
: o----)--€r-,.; [.0'K
I LLUIlI NAT:
ON
r
-;^
c oc
EL-88
Page 1200 of 1254
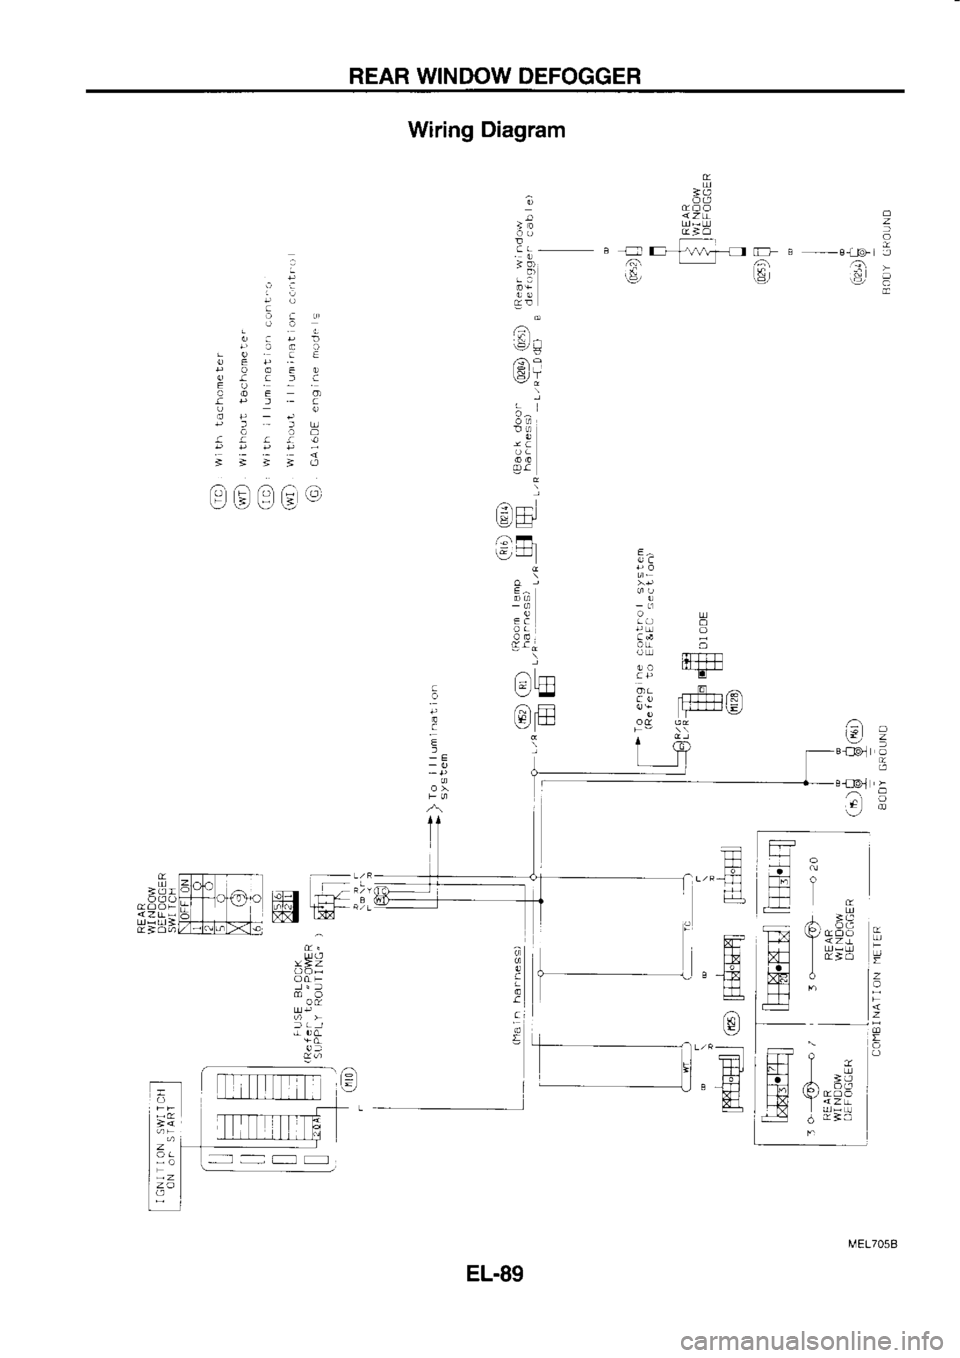
REAR
WINDOW DEFOGGER
;
r:!l
oc
oa!D
!a.co
pooEo crl:clc
EIJ
aoEo
pr'-fLrl
ataa.a
l9;;LrJ Wiring
Diagram
trTl
Tdl
rt-
fr
,a:\
\-_/
Ell m
H ffir
i
E/.==
ux Y <-:i
Ci o nll
ra
;r
ail a- ,tr
t5, - tt€'-
;
.l E
_E
F-
.-,- t
:.l
E
F ti-l
ro
g
E^
(Jc
E]
o.Ela
c rr
11 l-.1-.1-1-l I -
i rriil
'r-l ra:
-
3t0i -
EL.89
Trending: Engine mount, fuse box, MPG, fog light, brake, air condition, low beam
![NISSAN SERENA 1993 Service Repair Manual WIPER
AND WASHER
Front Wiper
and Washer/Wiring
Diagram
-: ]
:
7-
!:t-- ]
_
ir A-
.:-
r-1t L I fld)l -
t -t
..: ,
;
a:\
F
:)
" L
..1&
-.|]dl
;
a
:
.t
!
.! -
;
!
:
\3
=.
I al,
a-,r
t
L.E_ P NISSAN SERENA 1993 Service Repair Manual WIPER
AND WASHER
Front Wiper
and Washer/Wiring
Diagram
-: ]
:
7-
!:t-- ]
_
ir A-
.:-
r-1t L I fld)l -
t -t
..: ,
;
a:\
F
:)
" L
..1&
-.|]dl
;
a
:
.t
!
.! -
;
!
:
\3
=.
I al,
a-,r
t
L.E_ P](/img/5/57387/w960_57387-1190.png)

![NISSAN SERENA 1993 Service Repair Manual WIPER
AND WASHER
Headlamp Wiper
and WasherAViring Diagram
I ),)
=o
99
9l,]!
333
DoraDl I i€,P;
9QE{qq
5 3,? 5 r
c
UropL].]p
L-rooco
<xa!0:x
ro
i um i.at
ion
{
s y
slem
cl
t=, (ot
i NISSAN SERENA 1993 Service Repair Manual WIPER
AND WASHER
Headlamp Wiper
and WasherAViring Diagram
I ),)
=o
99
9l,]!
333
DoraDl I i€,P;
9QE{qq
5 3,? 5 r
c
UropL].]p
L-rooco
<xa!0:x
ro
i um i.at
ion
{
s y
slem
cl
t=, (ot
i](/img/5/57387/w960_57387-1196.png)
