drain bolt NISSAN TEANA 2008 Owner's Manual
[x] Cancel search | Manufacturer: NISSAN, Model Year: 2008, Model line: TEANA, Model: NISSAN TEANA 2008Pages: 5121, PDF Size: 69.03 MB
Page 4794 of 5121
OIL PAN
TM-321
< ON-VEHICLE REPAIR >[CVT: RE0F10A]
C
E
F
G
H
I
J
K
L
MA
B
TM
N
O
P
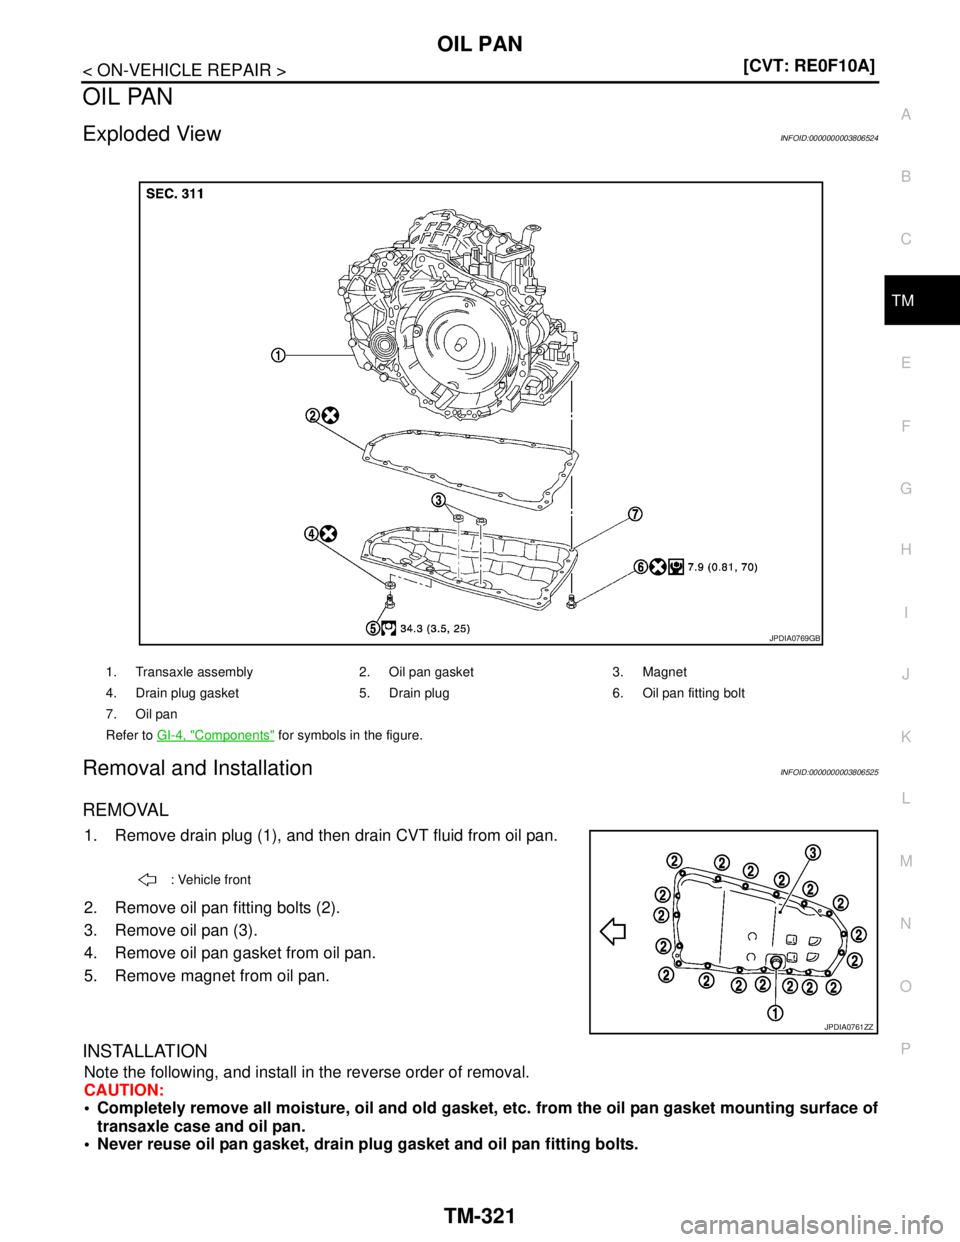
OIL PAN
Exploded ViewINFOID:0000000003806524
Removal and InstallationINFOID:0000000003806525
REMOVAL
1. Remove drain plug (1), and then drain CVT fluid from oil pan.
2. Remove oil pan fitting bolts (2).
3. Remove oil pan (3).
4. Remove oil pan gasket from oil pan.
5. Remove magnet from oil pan.
INSTALLATION
Note the following, and install in the reverse order of removal.
CAUTION:
Completely remove all moisture, oil and old gasket, etc. from the oil pan gasket mounting surface of
transaxle case and oil pan.
Never reuse oil pan gasket, drain plug gasket and oil pan fitting bolts.
1. Transaxle assembly 2. Oil pan gasket 3. Magnet
4. Drain plug gasket 5. Drain plug 6. Oil pan fitting bolt
7. Oil pan
Refer to GI-4, "
Components" for symbols in the figure.
JPDIA0769GB
: Vehicle front
JPDIA0761ZZ
Page 4848 of 5121
HEATER & COOLING UNIT ASSEMBLY
VTL-37
< ON-VEHICLE REPAIR >[WITHOUT 7 INCH DISPLAY]
C
D
E
F
G
H
J
K
L
MA
B
VTL
N
O
P
Removal and InstallationINFOID:0000000003774678
REMOVAL
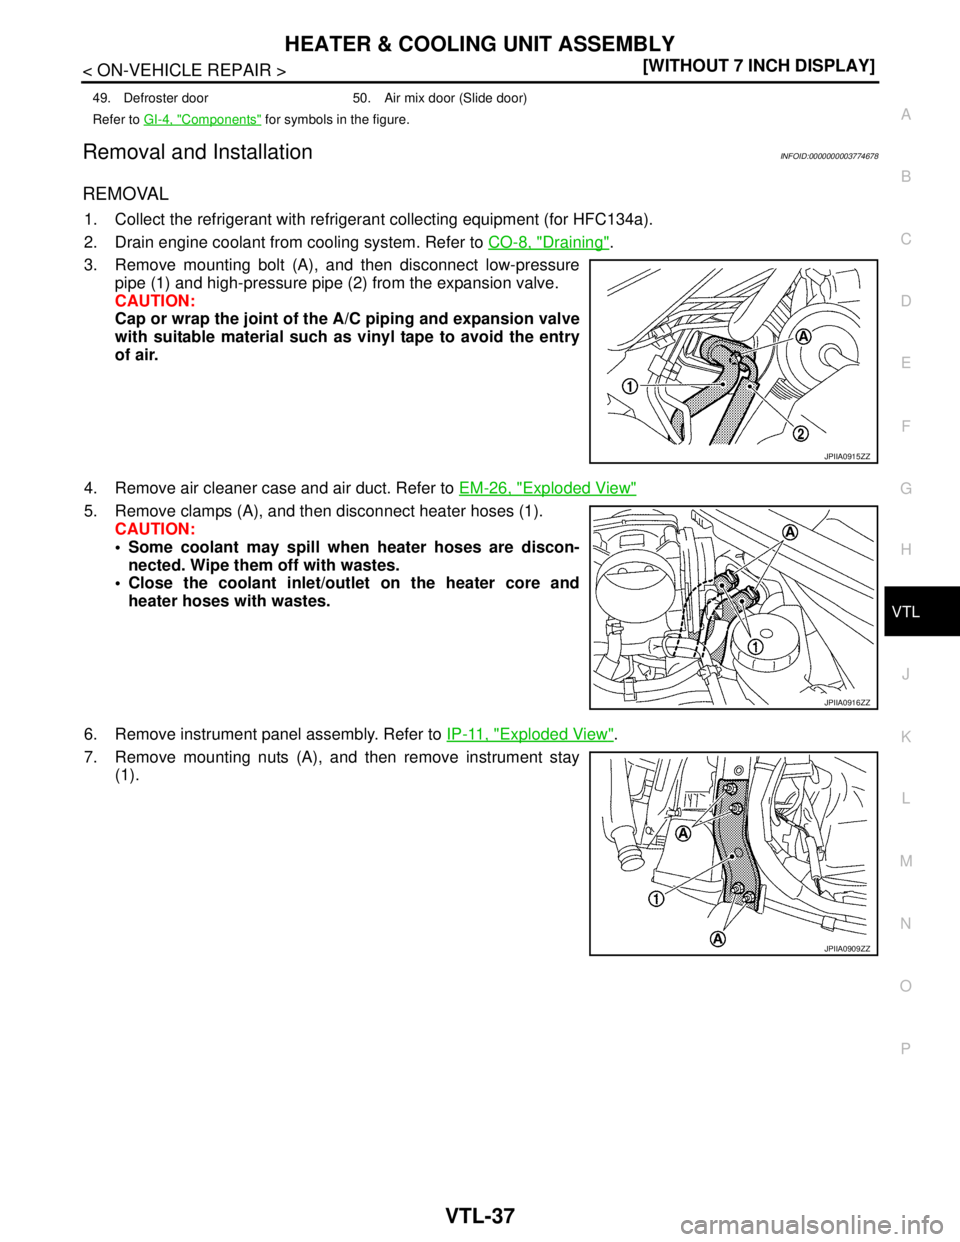
1. Collect the refrigerant with refrigerant collecting equipment (for HFC134a).
2. Drain engine coolant from cooling system. Refer to CO-8, "
Draining".
3. Remove mounting bolt (A), and then disconnect low-pressure
pipe (1) and high-pressure pipe (2) from the expansion valve.
CAUTION:
Cap or wrap the joint of the A/C piping and expansion valve
with suitable material such as vinyl tape to avoid the entry
of air.
4. Remove air cleaner case and air duct. Refer to EM-26, "
Exploded View"
5. Remove clamps (A), and then disconnect heater hoses (1).
CAUTION:
Some coolant may spill when heater hoses are discon-
nected. Wipe them off with wastes.
Close the coolant inlet/outlet on the heater core and
heater hoses with wastes.
6. Remove instrument panel assembly. Refer to IP-11, "
Exploded View".
7. Remove mounting nuts (A), and then remove instrument stay
(1).
49. Defroster door 50. Air mix door (Slide door)
Refer to GI-4, "
Components" for symbols in the figure.
JPIIA0915ZZ
JPIIA0916ZZ
JPIIA0909ZZ
Page 4849 of 5121
VTL-38
< ON-VEHICLE REPAIR >[WITHOUT 7 INCH DISPLAY]
HEATER & COOLING UNIT ASSEMBLY
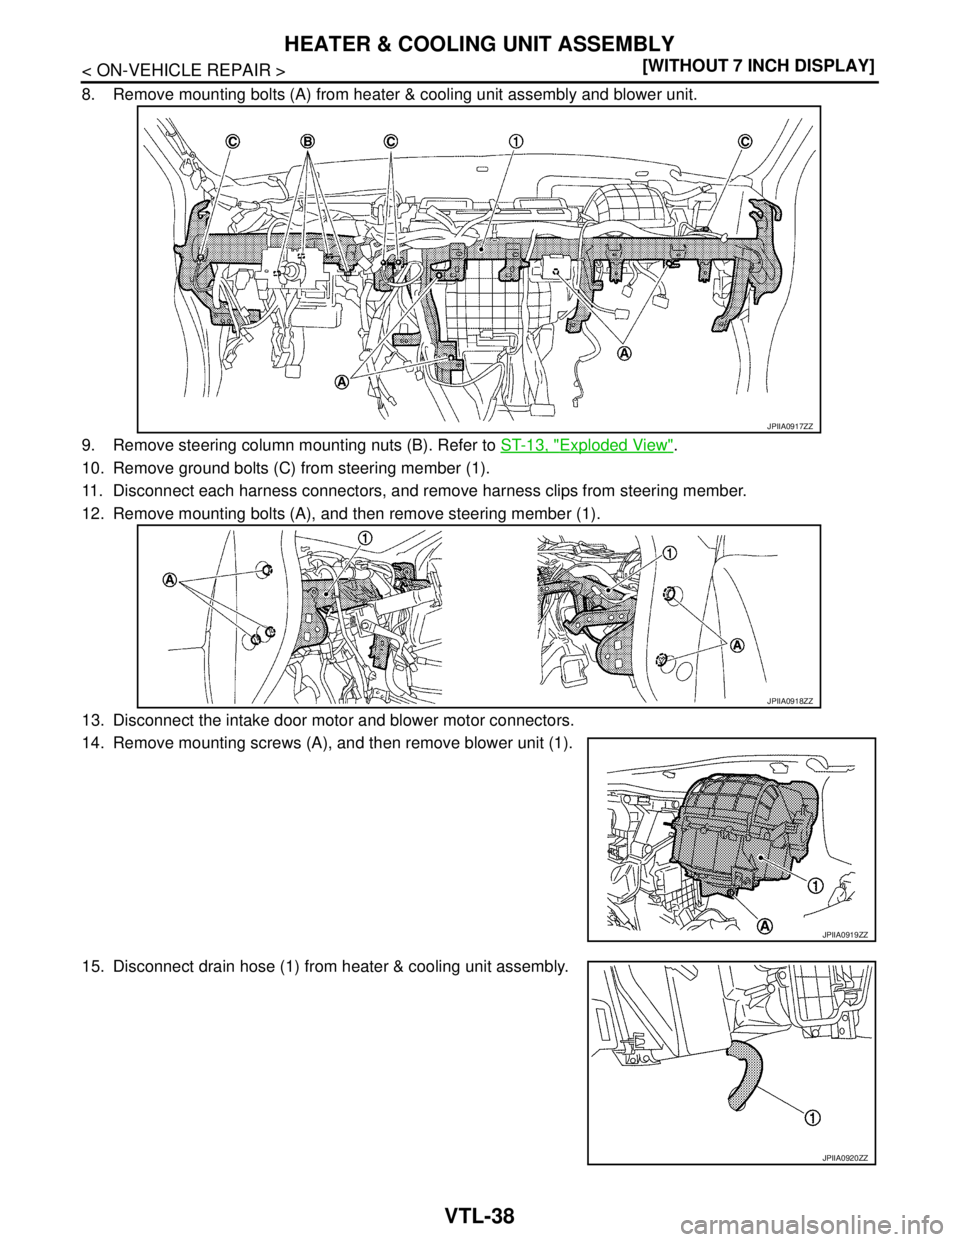
8. Remove mounting bolts (A) from heater & cooling unit assembly and blower unit.
9. Remove steering column mounting nuts (B). Refer to ST-13, "
Exploded View".
10. Remove ground bolts (C) from steering member (1).
11. Disconnect each harness connectors, and remove harness clips from steering member.
12. Remove mounting bolts (A), and then remove steering member (1).
13. Disconnect the intake door motor and blower motor connectors.
14. Remove mounting screws (A), and then remove blower unit (1).
15. Disconnect drain hose (1) from heater & cooling unit assembly.
JPIIA0917ZZ
JPIIA0918ZZ
JPIIA0919ZZ
JPIIA0920ZZ
Page 4906 of 5121
HEATER & COOLING UNIT ASSEMBLY
VTL-95
< ON-VEHICLE REPAIR >[WITH 7 INCH DISPLAY]
C
D
E
F
G
H
J
K
L
MA
B
VTL
N
O
P
Removal and InstallationINFOID:0000000003940515
REMOVAL
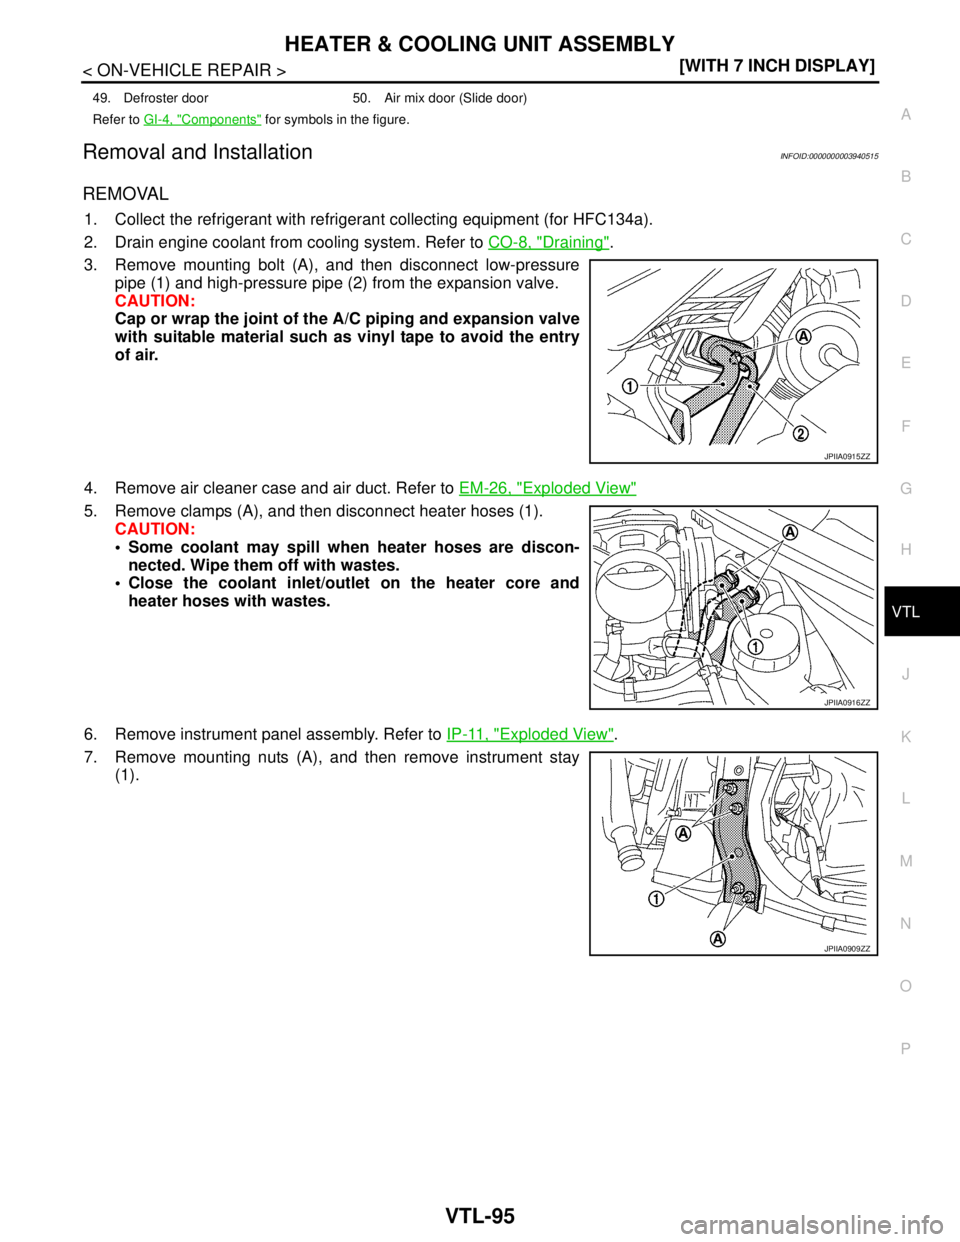
1. Collect the refrigerant with refrigerant collecting equipment (for HFC134a).
2. Drain engine coolant from cooling system. Refer to CO-8, "
Draining".
3. Remove mounting bolt (A), and then disconnect low-pressure
pipe (1) and high-pressure pipe (2) from the expansion valve.
CAUTION:
Cap or wrap the joint of the A/C piping and expansion valve
with suitable material such as vinyl tape to avoid the entry
of air.
4. Remove air cleaner case and air duct. Refer to EM-26, "
Exploded View"
5. Remove clamps (A), and then disconnect heater hoses (1).
CAUTION:
Some coolant may spill when heater hoses are discon-
nected. Wipe them off with wastes.
Close the coolant inlet/outlet on the heater core and
heater hoses with wastes.
6. Remove instrument panel assembly. Refer to IP-11, "
Exploded View".
7. Remove mounting nuts (A), and then remove instrument stay
(1).
49. Defroster door 50. Air mix door (Slide door)
Refer to GI-4, "
Components" for symbols in the figure.
JPIIA0915ZZ
JPIIA0916ZZ
JPIIA0909ZZ
Page 4907 of 5121
VTL-96
< ON-VEHICLE REPAIR >[WITH 7 INCH DISPLAY]
HEATER & COOLING UNIT ASSEMBLY
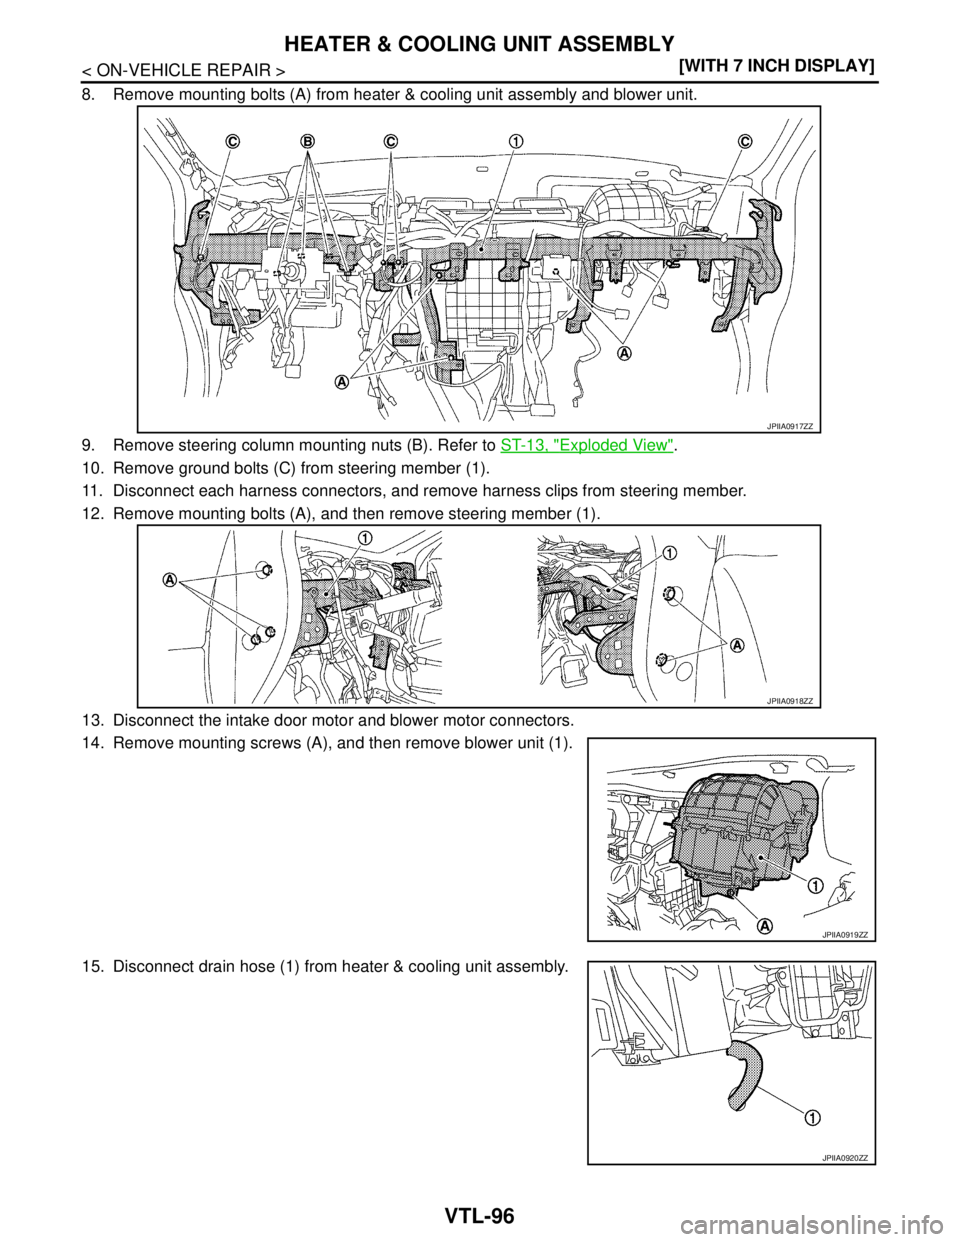
8. Remove mounting bolts (A) from heater & cooling unit assembly and blower unit.
9. Remove steering column mounting nuts (B). Refer to ST-13, "
Exploded View".
10. Remove ground bolts (C) from steering member (1).
11. Disconnect each harness connectors, and remove harness clips from steering member.
12. Remove mounting bolts (A), and then remove steering member (1).
13. Disconnect the intake door motor and blower motor connectors.
14. Remove mounting screws (A), and then remove blower unit (1).
15. Disconnect drain hose (1) from heater & cooling unit assembly.
JPIIA0917ZZ
JPIIA0918ZZ
JPIIA0919ZZ
JPIIA0920ZZ