oil temperature NISSAN TEANA 2008 Workshop Manual
[x] Cancel search | Manufacturer: NISSAN, Model Year: 2008, Model line: TEANA, Model: NISSAN TEANA 2008Pages: 5121, PDF Size: 69.03 MB
Page 2729 of 5121
![NISSAN TEANA 2008 Workshop Manual PRECAUTIONS
HAC-101
< PRECAUTION >[WITHOUT 7 INCH DISPLAY]
C
D
E
F
G
H
J
K
L
MA
B
HAC
N
O
P
WARNING:
Check that all refrigerant is discharged into the recycling equipment and the pressure in the syste NISSAN TEANA 2008 Workshop Manual PRECAUTIONS
HAC-101
< PRECAUTION >[WITHOUT 7 INCH DISPLAY]
C
D
E
F
G
H
J
K
L
MA
B
HAC
N
O
P
WARNING:
Check that all refrigerant is discharged into the recycling equipment and the pressure in the syste](/img/5/57391/w960_57391-2728.png)
PRECAUTIONS
HAC-101
< PRECAUTION >[WITHOUT 7 INCH DISPLAY]
C
D
E
F
G
H
J
K
L
MA
B
HAC
N
O
P
WARNING:
Check that all refrigerant is discharged into the recycling equipment and the pressure in the system is
less than atmospheric pressure. Then gradually loosen the discharge side hose fitting and remove it.
CAUTION:
Observe the following when replacing or cleaning refrigerant cycle components.
Store it in the same way at it is when mounted on the car when the compressor is removed. Failure
to do so will cause lubricant to enter the low-pressure chamber.
Always use a torque wrench and a back-up wrench when connecting tubes.
Immediately plug all openings to prevent entry of dust and moisture after disconnecting tubes.
Connect the pipes at the final stage of the operation when installing an air conditioner in the vehicle.
Never remove the seal caps of pipes and other components until just before required for connection.
Allow components stored in cool areas to warm to working area temperature before removing seal
caps. This prevents condensation from forming inside A/C components.
Thoroughly remove moisture from the refrigeration system before charging the refrigerant.
Replace always used O-rings.
Apply lubricant to circle of the O-rings shown in illustration when connecting tube. Be careful not to
apply lubricant to threaded portion.
O-ring must be closely attached to the groove portion of tube.
Be careful not to damage O-ring and tube when replacing the O-ring.
Connect tube until a click can be heard. Then tighten the nut or bolt by hand. Check that the O-ring is
installed to tube correctly.
Perform leakage test and make sure that there is no leakage from connections after connecting line.
Disconnect the line and replace the O-ring when the refrigerant leaking point is found. Then tighten
the connections of seal seat to the specified torque.
Service EquipmentINFOID:0000000003846402
RECOVERY/RECYCLING EQUIPMENT
Be certain to follow the manufacturer instructions for machine operation and machine maintenance. Never
introduce any refrigerant other than that specified into the machine.
ELECTRICAL LEAK DETECTOR
Be certain to follow the manufacturer instructions for tester operation and tester maintenance.
VACUUM PUMP
Name : NISSAN A/C System Oil Type S
RHA861F
Page 2869 of 5121
![NISSAN TEANA 2008 Workshop Manual PRECAUTIONS
HAC-241
< PRECAUTION >[WITH 7 INCH DISPLAY]
C
D
E
F
G
H
J
K
L
MA
B
HAC
N
O
P
WARNING:
Check that all refrigerant is discharged into the recycling equipment and the pressure in the system i NISSAN TEANA 2008 Workshop Manual PRECAUTIONS
HAC-241
< PRECAUTION >[WITH 7 INCH DISPLAY]
C
D
E
F
G
H
J
K
L
MA
B
HAC
N
O
P
WARNING:
Check that all refrigerant is discharged into the recycling equipment and the pressure in the system i](/img/5/57391/w960_57391-2868.png)
PRECAUTIONS
HAC-241
< PRECAUTION >[WITH 7 INCH DISPLAY]
C
D
E
F
G
H
J
K
L
MA
B
HAC
N
O
P
WARNING:
Check that all refrigerant is discharged into the recycling equipment and the pressure in the system is
less than atmospheric pressure. Then gradually loosen the discharge side hose fitting and remove it.
CAUTION:
Observe the following when replacing or cleaning refrigerant cycle components.
Store it in the same way at it is when mounted on the car when the compressor is removed. Failure
to do so will cause lubricant to enter the low-pressure chamber.
Always use a torque wrench and a back-up wrench when connecting tubes.
Immediately plug all openings to prevent entry of dust and moisture after disconnecting tubes.
Connect the pipes at the final stage of the operation when installing an air conditioner in the vehicle.
Never remove the seal caps of pipes and other components until just before required for connection.
Allow components stored in cool areas to warm to working area temperature before removing seal
caps. This prevents condensation from forming inside A/C components.
Thoroughly remove moisture from the refrigeration system before charging the refrigerant.
Replace always used O-rings.
Apply lubricant to circle of the O-rings shown in illustration when connecting tube. Be careful not to
apply lubricant to threaded portion.
O-ring must be closely attached to the groove portion of tube.
Be careful not to damage O-ring and tube when replacing the O-ring.
Connect tube until a click can be heard. Then tighten the nut or bolt by hand. Check that the O-ring is
installed to tube correctly.
Perform leakage test and make sure that there is no leakage from connections after connecting line.
Disconnect the line and replace the O-ring when the refrigerant leaking point is found. Then tighten
the connections of seal seat to the specified torque.
Service EquipmentINFOID:0000000003884819
RECOVERY/RECYCLING EQUIPMENT
Be certain to follow the manufacturer instructions for machine operation and machine maintenance. Never
introduce any refrigerant other than that specified into the machine.
ELECTRICAL LEAK DETECTOR
Be certain to follow the manufacturer instructions for tester operation and tester maintenance.
VACUUM PUMP
Name : NISSAN A/C System Oil Type S
RHA861F
Page 3180 of 5121
LU-8
< ON-VEHICLE MAINTENANCE >
ENGINE OIL
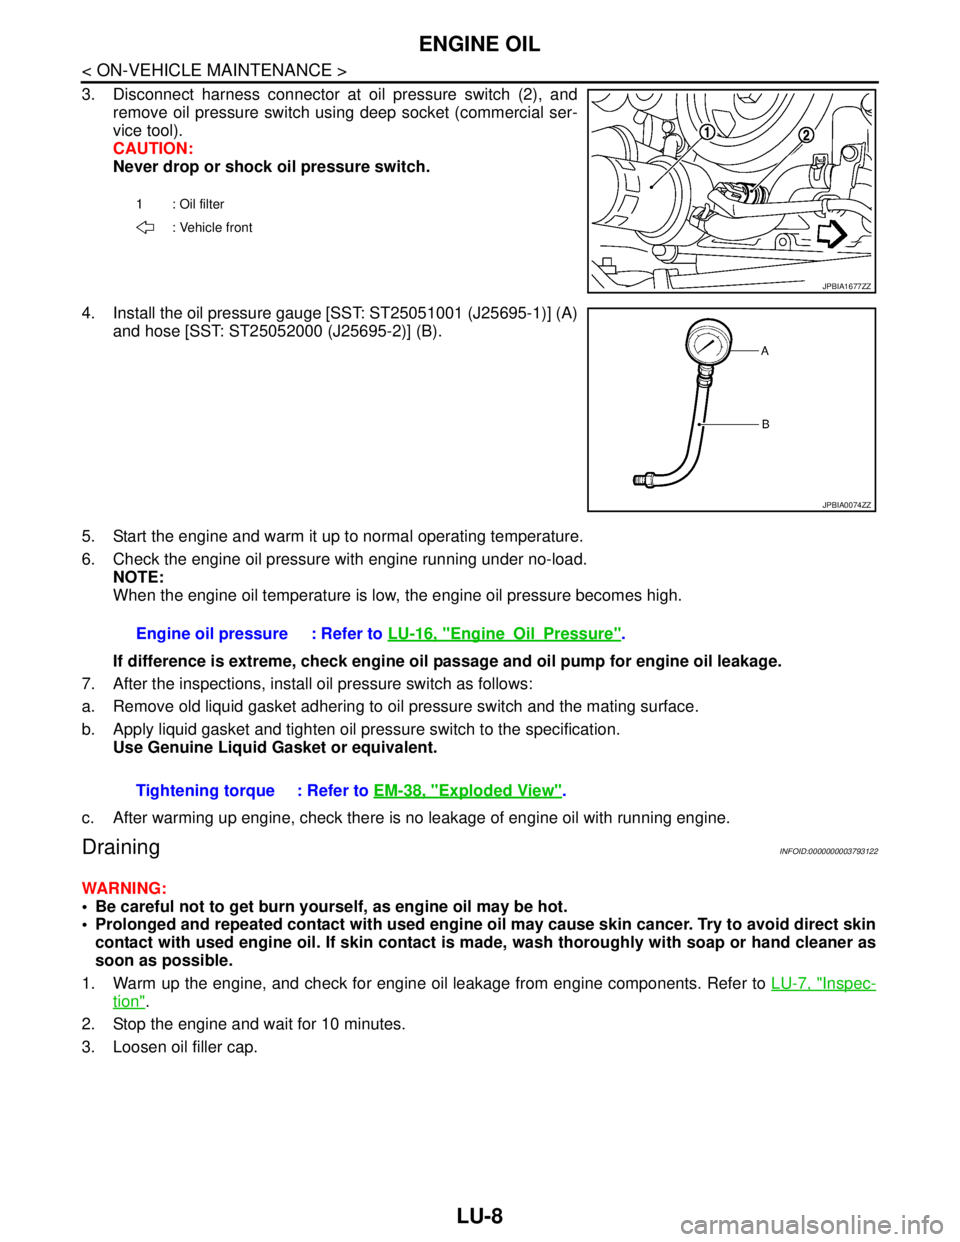
3. Disconnect harness connector at oil pressure switch (2), and
remove oil pressure switch using deep socket (commercial ser-
vice tool).
CAUTION:
Never drop or shock oil pressure switch.
4. Install the oil pressure gauge [SST: ST25051001 (J25695-1)] (A)
and hose [SST: ST25052000 (J25695-2)] (B).
5. Start the engine and warm it up to normal operating temperature.
6. Check the engine oil pressure with engine running under no-load.
NOTE:
When the engine oil temperature is low, the engine oil pressure becomes high.
If difference is extreme, check engine oil passage and oil pump for engine oil leakage.
7. After the inspections, install oil pressure switch as follows:
a. Remove old liquid gasket adhering to oil pressure switch and the mating surface.
b. Apply liquid gasket and tighten oil pressure switch to the specification.
Use Genuine Liquid Gasket or equivalent.
c. After warming up engine, check there is no leakage of engine oil with running engine.
DrainingINFOID:0000000003793122
WARNING:
Be careful not to get burn yourself, as engine oil may be hot.
Prolonged and repeated contact with used engine oil may cause skin cancer. Try to avoid direct skin
contact with used engine oil. If skin contact is made, wash thoroughly with soap or hand cleaner as
soon as possible.
1. Warm up the engine, and check for engine oil leakage from engine components. Refer to LU-7, "
Inspec-
tion".
2. Stop the engine and wait for 10 minutes.
3. Loosen oil filler cap.
1 : Oil filter
: Vehicle front
JPBIA1677ZZ
JPBIA0074ZZ
Engine oil pressure : Refer to LU-16, "EngineOilPressure".
Tightening torque : Refer to EM-38, "
Exploded View".
Page 3181 of 5121
ENGINE OIL
LU-9
< ON-VEHICLE MAINTENANCE >
C
D
E
F
G
H
I
J
K
L
MA
LU
N
P O
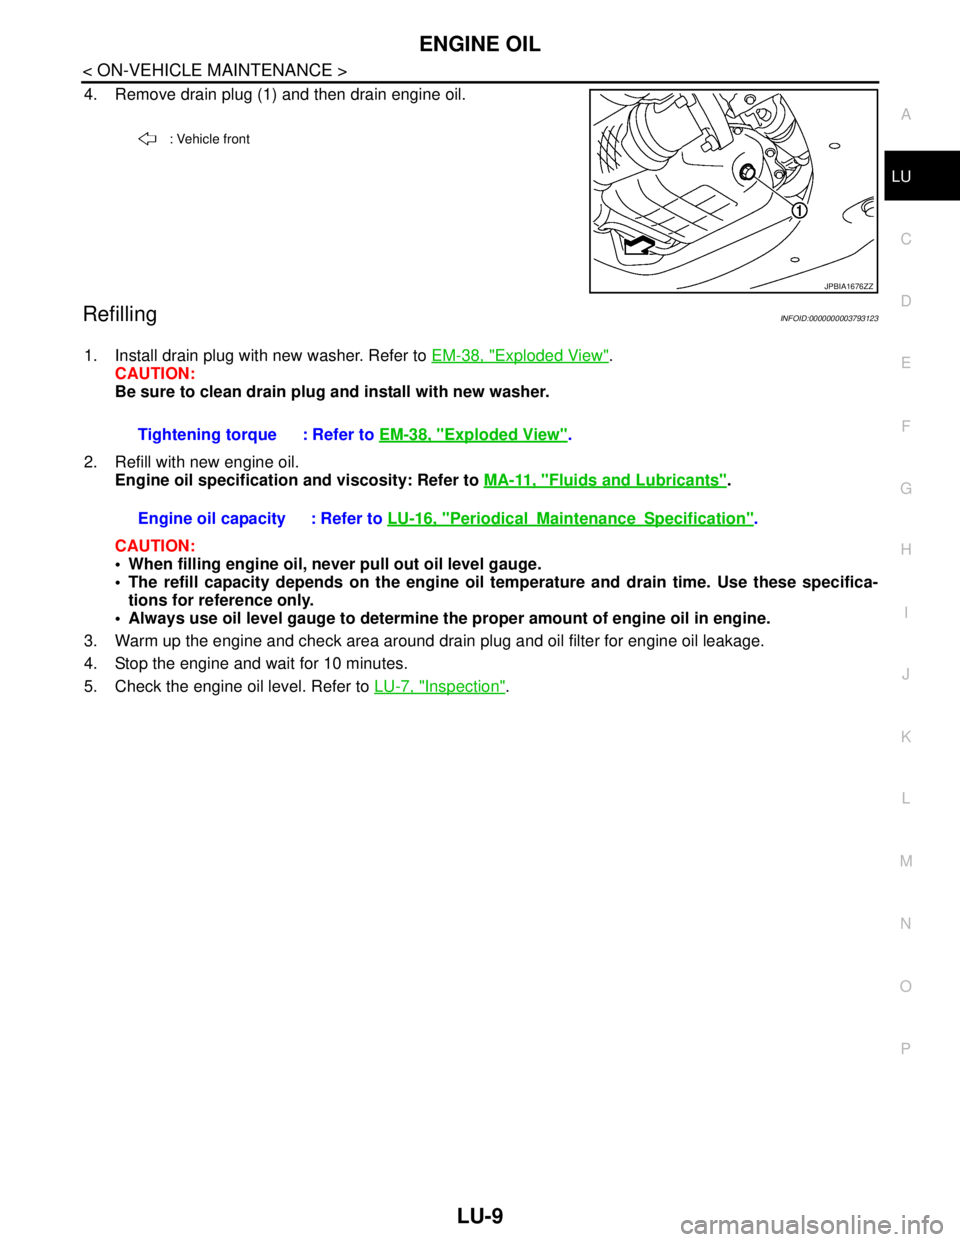
4. Remove drain plug (1) and then drain engine oil.
RefillingINFOID:0000000003793123
1. Install drain plug with new washer. Refer to EM-38, "Exploded View".
CAUTION:
Be sure to clean drain plug and install with new washer.
2. Refill with new engine oil.
Engine oil specification and viscosity: Refer to MA-11, "
Fluids and Lubricants".
CAUTION:
When filling engine oil, never pull out oil level gauge.
The refill capacity depends on the engine oil temperature and drain time. Use these specifica-
tions for reference only.
Always use oil level gauge to determine the proper amount of engine oil in engine.
3. Warm up the engine and check area around drain plug and oil filter for engine oil leakage.
4. Stop the engine and wait for 10 minutes.
5. Check the engine oil level. Refer to LU-7, "
Inspection".
: Vehicle front
JPBIA1676ZZ
Tightening torque : Refer to EM-38, "Exploded View".
Engine oil capacity : Refer to LU-16, "
PeriodicalMaintenanceSpecification".
Page 3188 of 5121
LU-16
< SERVICE DATA AND SPECIFICATIONS (SDS)
SERVICE DATA AND SPECIFICATIONS (SDS)
SERVICE DATA AND SPECIFICATIONS (SDS)
SERVICE DATA AND SPECIFICATIONS (SDS)
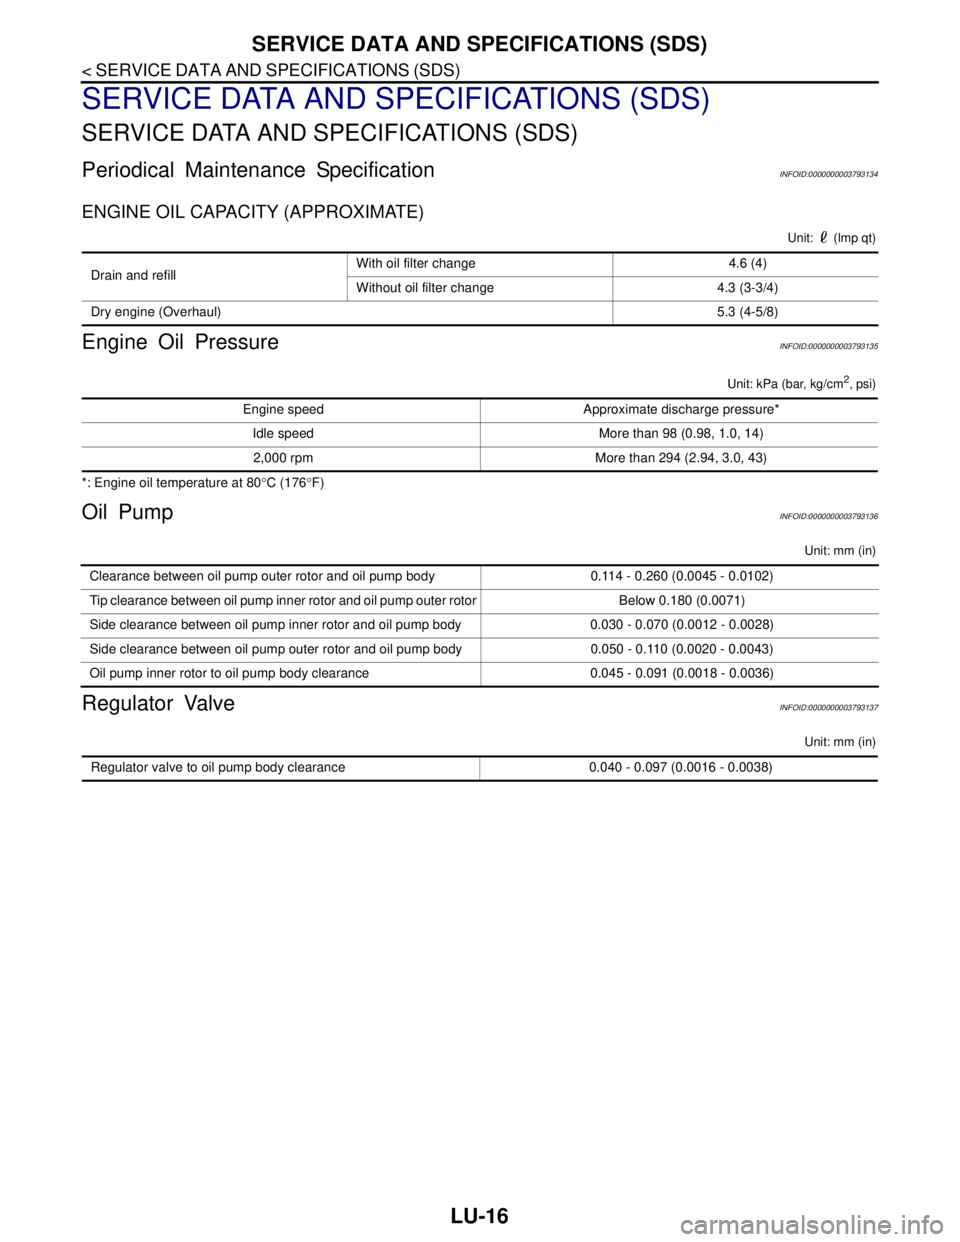
Periodical Maintenance SpecificationINFOID:0000000003793134
ENGINE OIL CAPACITY (APPROXIMATE)
Unit: (lmp qt)
Engine Oil PressureINFOID:0000000003793135
Unit: kPa (bar, kg/cm2, psi)
*: Engine oil temperature at 80°C (176°F)
Oil PumpINFOID:0000000003793136
Unit: mm (in)
Regulator ValveINFOID:0000000003793137
Unit: mm (in)
Drain and refill With oil filter change 4.6 (4)
Without oil filter change 4.3 (3-3/4)
Dry engine (Overhaul)5.3 (4-5/8)
Engine speed Approximate discharge pressure*
Idle speed More than 98 (0.98, 1.0, 14)
2,000 rpm More than 294 (2.94, 3.0, 43)
Clearance between oil pump outer rotor and oil pump body 0.114 - 0.260 (0.0045 - 0.0102)
Tip clearance between oil pump inner rotor and oil pump outer rotor Below 0.180 (0.0071)
Side clearance between oil pump inner rotor and oil pump body 0.030 - 0.070 (0.0012 - 0.0028)
Side clearance between oil pump outer rotor and oil pump body 0.050 - 0.110 (0.0020 - 0.0043)
Oil pump inner rotor to oil pump body clearance 0.045 - 0.091 (0.0018 - 0.0036)
Regulator valve to oil pump body clearance 0.040 - 0.097 (0.0016 - 0.0038)
Page 3196 of 5121
MA-8
< ON-VEHICLE MAINTENANCE >
PERIODIC MAINTENANCE
C — Towing a trailer or caravan
D — Extensive idling or urban driving
E — Driving in extremely adverse weather conditions or in areas where ambient temperatures are either
extremely low or extremely high
F — Driving in high humidity areas or in mountainous areas
G — Driving in areas using salt or other corrosive materials
H — Driving on rough and/or muddy roads or in the desert
I — Driving with frequent use of braking or in mountainous areas
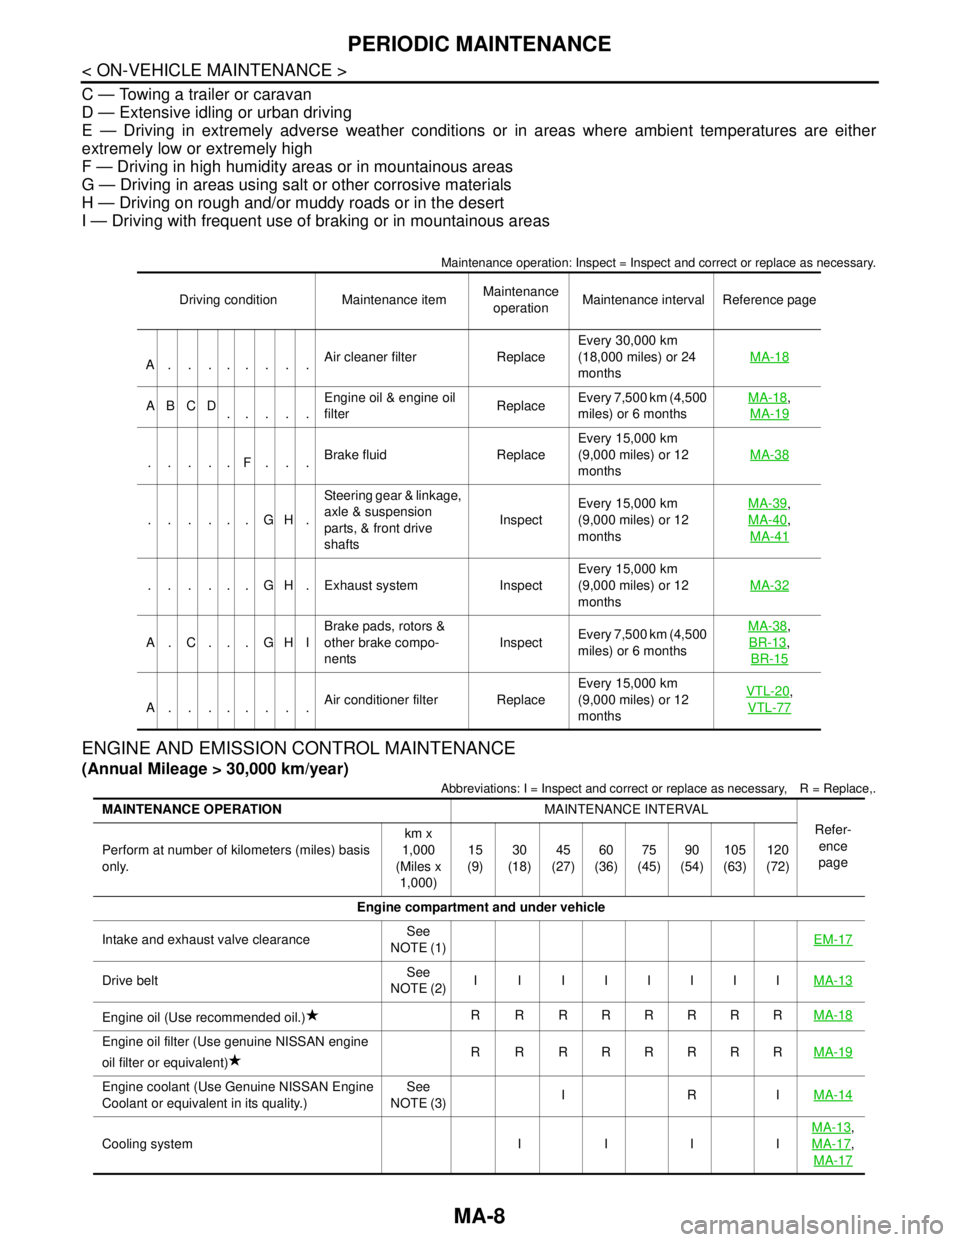
Maintenance operation: Inspect = Inspect and correct or replace as necessary.
ENGINE AND EMISSION CONTROL MAINTENANCE
(Annual Mileage > 30,000 km/year)
Abbreviations: I = Inspect and correct or replace as necessary, R = Replace,.
Driving condition Maintenance itemMaintenance
operationMaintenance interval Reference page
A........Air cleaner filter ReplaceEvery 30,000 km
(18,000 miles) or 24
monthsMA-18
ABCD
.....Engine oil & engine oil
filter ReplaceEvery 7,500 km (4,500
miles) or 6 monthsMA-18,
MA-19
.....F...Brake fluid ReplaceEvery 15,000 km
(9,000 miles) or 12
monthsMA-38
......GH.Steering gear & linkage,
axle & suspension
parts, & front drive
shafts InspectEvery 15,000 km
(9,000 miles) or 12
monthsMA-39
,
MA-40
,
MA-41
. . . . . . G H . Exhaust system InspectEvery 15,000 km
(9,000 miles) or 12
monthsMA-32
A. C. . . GHIBrake pads, rotors &
other brake compo-
nentsInspectEvery 7,500 km (4,500
miles) or 6 monthsMA-38
,
BR-13
,
BR-15
A........Air conditioner filter ReplaceEvery 15,000 km
(9,000 miles) or 12
monthsVTL-20
,
VTL-77
MAINTENANCE OPERATIONMAINTENANCE INTERVAL
Refer-
ence
page Perform at number of kilometers (miles) basis
only.km x
1,000
(Miles x
1,000)15
(9)30
(18)45
(27)60
(36)75
(45)90
(54)105
(63)120
(72)
Engine compartment and under vehicle
Intake and exhaust valve clearanceSee
NOTE (1)EM-17
Drive beltSee
NOTE (2)I I IIIIIIMA-13
Engine oil (Use recommended oil.)R RRRRRRRMA-18
Engine oil filter (Use genuine NISSAN engine
oil filter or equivalent)R RRRRRRRMA-19
Engine coolant (Use Genuine NISSAN Engine
Coolant or equivalent in its quality.)See
NOTE (3)IRIMA-14
Cooling system I I I IMA-13
,
MA-17
,
MA-17
Page 3198 of 5121
MA-10
< ON-VEHICLE MAINTENANCE >
PERIODIC MAINTENANCE
NOTE:
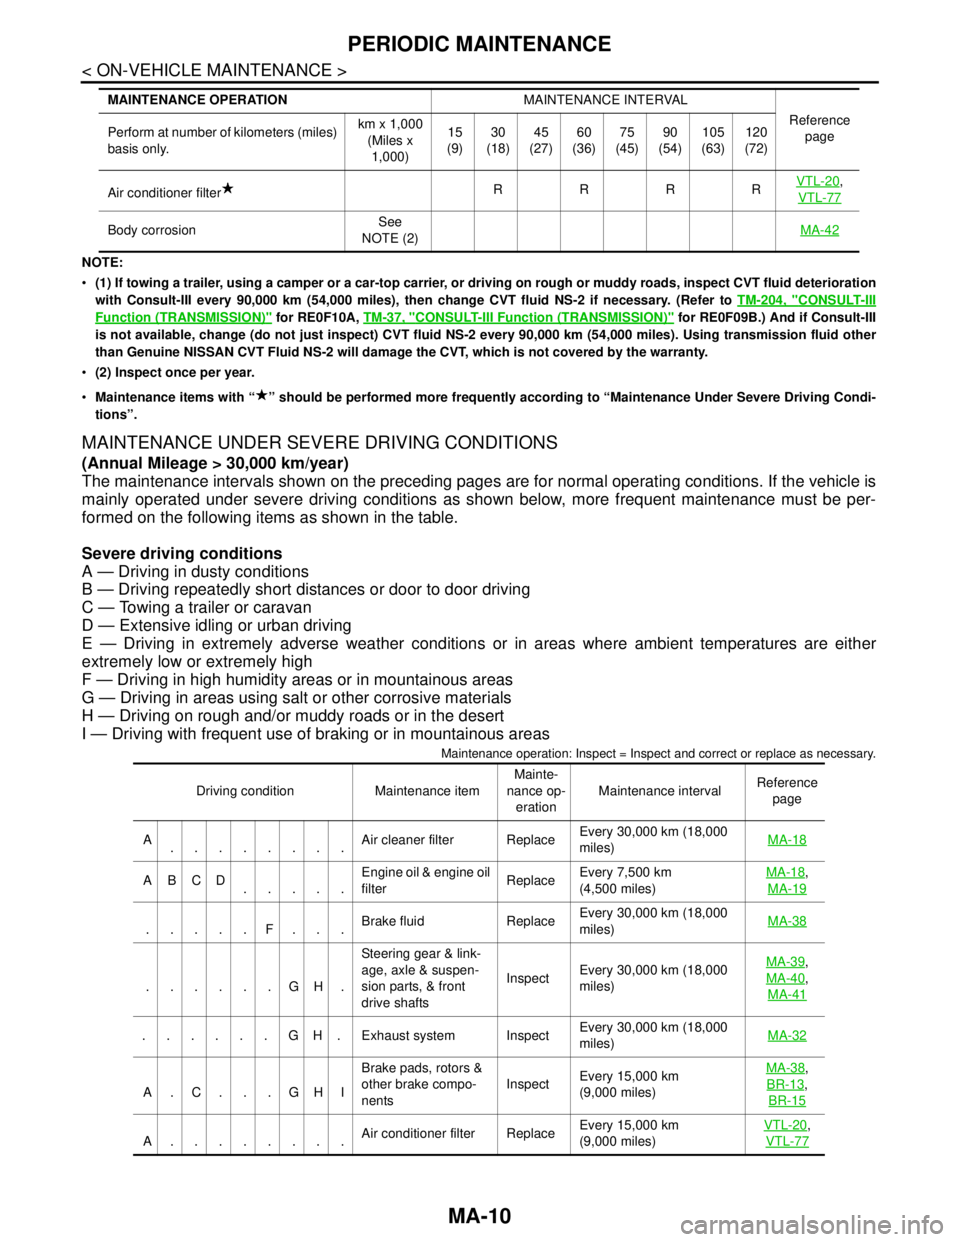
(1) If towing a trailer, using a camper or a car-top carrier, or driving on rough or muddy roads, inspect CVT fluid deterioration
with Consult-III every 90,000 km (54,000 miles), then change CVT fluid NS-2 if necessary. (Refer to TM-204, "
CONSULT-III
Function (TRANSMISSION)" for RE0F10A, TM-37, "CONSULT-III Function (TRANSMISSION)" for RE0F09B.) And if Consult-III
is not available, change (do not just inspect) CVT fluid NS-2 every 90,000 km (54,000 miles). Using transmission fluid other
than Genuine NISSAN CVT Fluid NS-2 will damage the CVT, which is not covered by the warranty.
(2) Inspect once per year.
Maintenance items with “ ” should be performed more frequently according to “Maintenance Under Severe Driving Condi-
tions”.
MAINTENANCE UNDER SEVERE DRIVING CONDITIONS
(Annual Mileage > 30,000 km/year)
The maintenance intervals shown on the preceding pages are for normal operating conditions. If the vehicle is
mainly operated under severe driving conditions as shown below, more frequent maintenance must be per-
formed on the following items as shown in the table.
Severe driving conditions
A — Driving in dusty conditions
B — Driving repeatedly short distances or door to door driving
C — Towing a trailer or caravan
D — Extensive idling or urban driving
E — Driving in extremely adverse weather conditions or in areas where ambient temperatures are either
extremely low or extremely high
F — Driving in high humidity areas or in mountainous areas
G — Driving in areas using salt or other corrosive materials
H — Driving on rough and/or muddy roads or in the desert
I — Driving with frequent use of braking or in mountainous areas
Maintenance operation: Inspect = Inspect and correct or replace as necessary.
Air conditioner filterRRRRVTL-20,
VTL-77
Body corrosionSee
NOTE (2)MA-42
MAINTENANCE OPERATIONMAINTENANCE INTERVAL
Reference
page Perform at number of kilometers (miles)
basis only.km x 1,000
(Miles x
1,000)15
(9)30
(18)45
(27)60
(36)75
(45)90
(54)105
(63)120
(72)
Driving condition Maintenance itemMainte-
nance op-
erationMaintenance intervalReference
page
A
........Air cleaner filter ReplaceEvery 30,000 km (18,000
miles) MA-18
ABCD
.....Engine oil & engine oil
filter ReplaceEvery 7,500 km
(4,500 miles) MA-18,
MA-19
.....F...Brake fluid ReplaceEvery 30,000 km (18,000
miles) MA-38
......GH.Steering gear & link-
age, axle & suspen-
sion parts, & front
drive shaftsInspectEvery 30,000 km (18,000
miles) MA-39
,
MA-40
,
MA-41
......GH.Exhaust system InspectEvery 30,000 km (18,000
miles)MA-32
A.C. . .GHIBrake pads, rotors &
other brake compo-
nentsInspectEvery 15,000 km
(9,000 miles) MA-38
,
BR-13
,
BR-15
A........Air conditioner filter ReplaceEvery 15,000 km
(9,000 miles) VTL-20
,
VTL-77
Page 3207 of 5121
ENGINE MAINTENANCE
MA-19
< ON-VEHICLE MAINTENANCE >
C
D
E
F
G
H
I
J
K
L
MB
MAN
OA
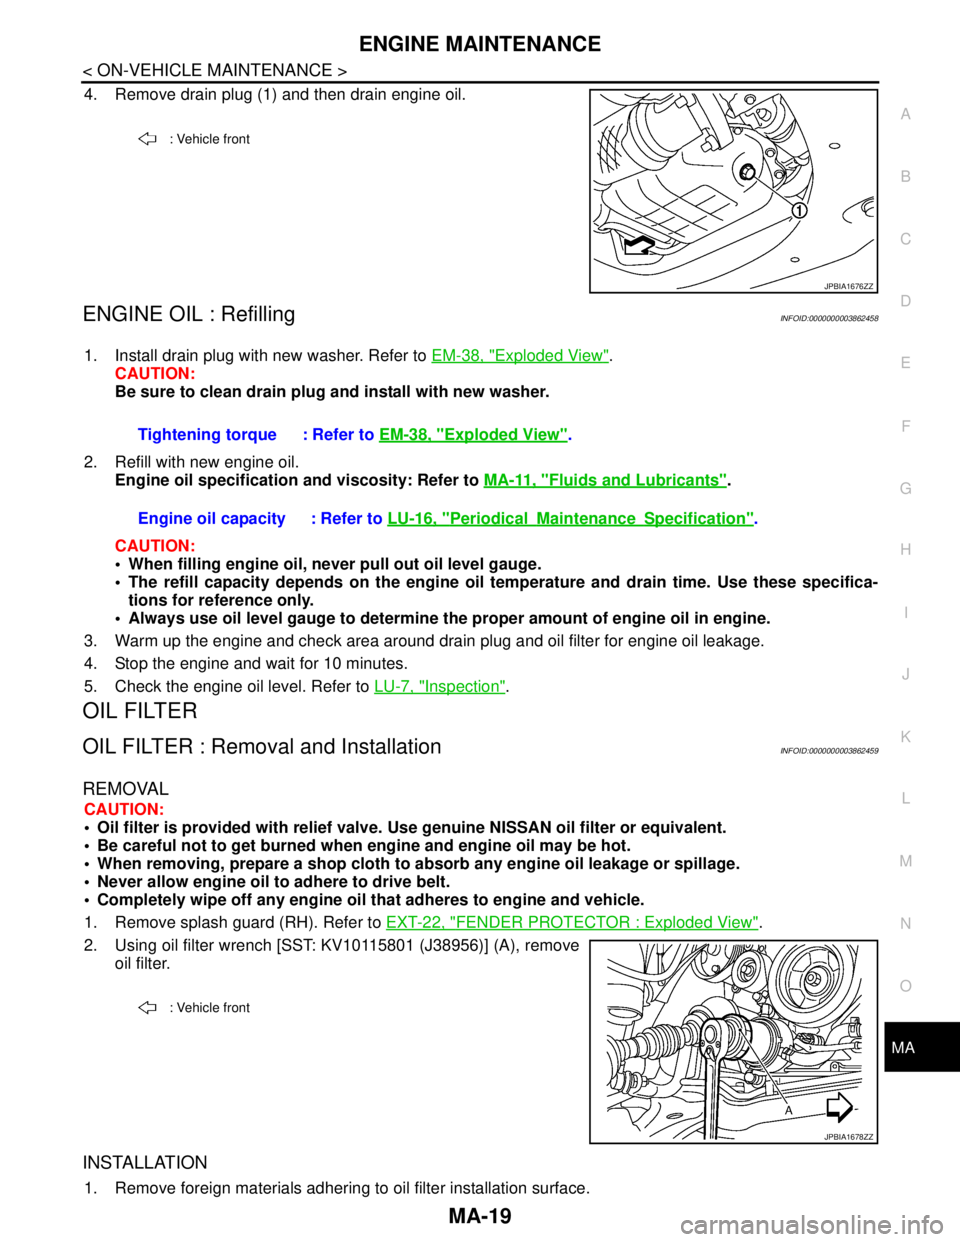
4. Remove drain plug (1) and then drain engine oil.
ENGINE OIL : RefillingINFOID:0000000003862458
1. Install drain plug with new washer. Refer to EM-38, "Exploded View".
CAUTION:
Be sure to clean drain plug and install with new washer.
2. Refill with new engine oil.
Engine oil specification and viscosity: Refer to MA-11, "
Fluids and Lubricants".
CAUTION:
When filling engine oil, never pull out oil level gauge.
The refill capacity depends on the engine oil temperature and drain time. Use these specifica-
tions for reference only.
Always use oil level gauge to determine the proper amount of engine oil in engine.
3. Warm up the engine and check area around drain plug and oil filter for engine oil leakage.
4. Stop the engine and wait for 10 minutes.
5. Check the engine oil level. Refer to LU-7, "
Inspection".
OIL FILTER
OIL FILTER : Removal and InstallationINFOID:0000000003862459
REMOVAL
CAUTION:
Oil filter is provided with relief valve. Use genuine NISSAN oil filter or equivalent.
Be careful not to get burned when engine and engine oil may be hot.
When removing, prepare a shop cloth to absorb any engine oil leakage or spillage.
Never allow engine oil to adhere to drive belt.
Completely wipe off any engine oil that adheres to engine and vehicle.
1. Remove splash guard (RH). Refer to EXT-22, "
FENDER PROTECTOR : Exploded View".
2. Using oil filter wrench [SST: KV10115801 (J38956)] (A), remove
oil filter.
INSTALLATION
1. Remove foreign materials adhering to oil filter installation surface.
: Vehicle front
JPBIA1676ZZ
Tightening torque : Refer to EM-38, "Exploded View".
Engine oil capacity : Refer to LU-16, "
PeriodicalMaintenanceSpecification".
: Vehicle front
JPBIA1678ZZ
Page 3221 of 5121
CHASSIS MAINTENANCE
MA-33
< ON-VEHICLE MAINTENANCE >
C
D
E
F
G
H
I
J
K
L
MB
MAN
OA
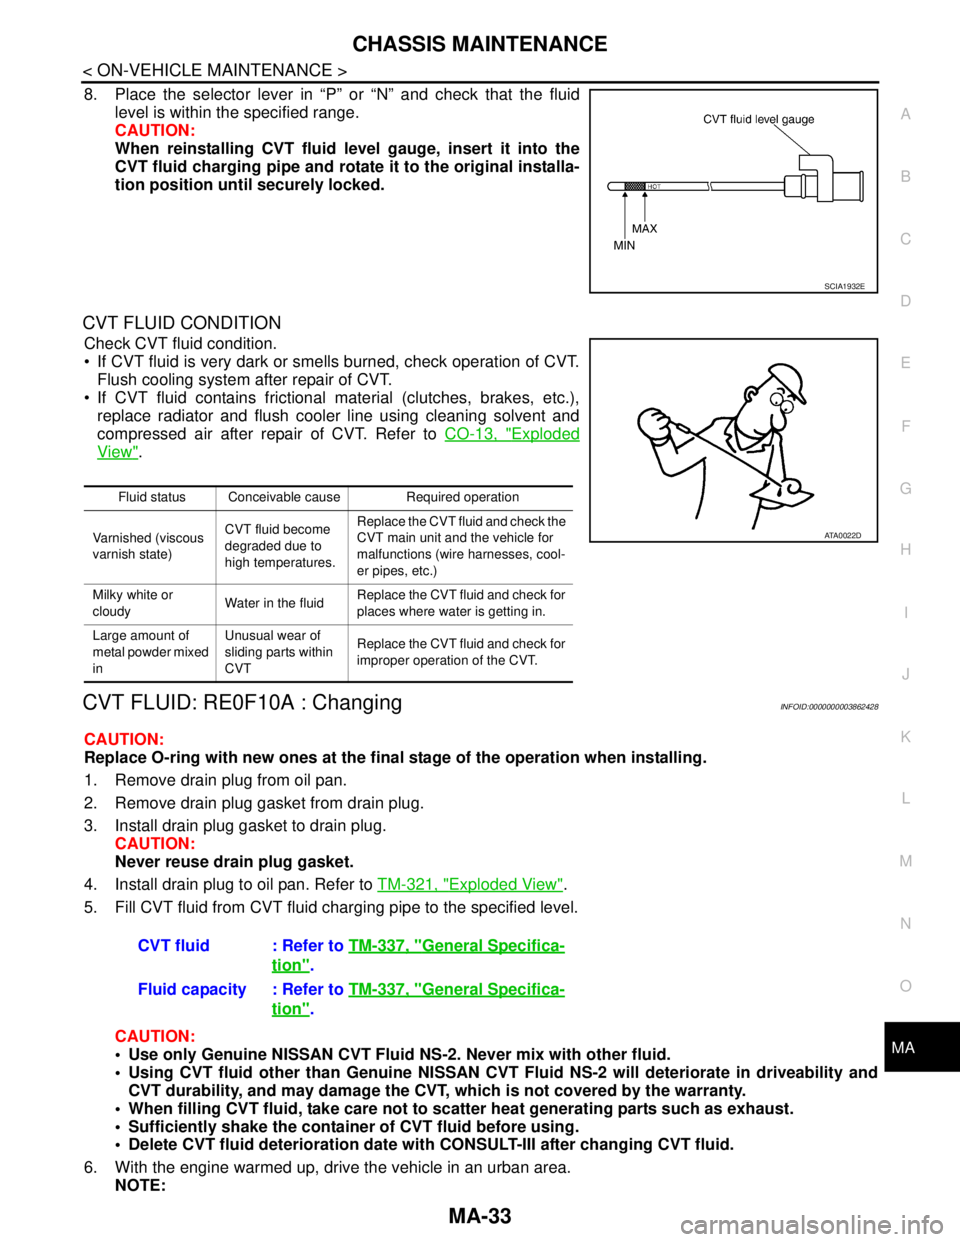
8. Place the selector lever in “P” or “N” and check that the fluid
level is within the specified range.
CAUTION:
When reinstalling CVT fluid level gauge, insert it into the
CVT fluid charging pipe and rotate it to the original installa-
tion position until securely locked.
CVT FLUID CONDITION
Check CVT fluid condition.
If CVT fluid is very dark or smells burned, check operation of CVT.
Flush cooling system after repair of CVT.
If CVT fluid contains frictional material (clutches, brakes, etc.),
replace radiator and flush cooler line using cleaning solvent and
compressed air after repair of CVT. Refer to CO-13, "
Exploded
View".
CVT FLUID: RE0F10A : ChangingINFOID:0000000003862428
CAUTION:
Replace O-ring with new ones at the final stage of the operation when installing.
1. Remove drain plug from oil pan.
2. Remove drain plug gasket from drain plug.
3. Install drain plug gasket to drain plug.
CAUTION:
Never reuse drain plug gasket.
4. Install drain plug to oil pan. Refer to TM-321, "
Exploded View".
5. Fill CVT fluid from CVT fluid charging pipe to the specified level.
CAUTION:
Use only Genuine NISSAN CVT Fluid NS-2. Never mix with other fluid.
Using CVT fluid other than Genuine NISSAN CVT Fluid NS-2 will deteriorate in driveability and
CVT durability, and may damage the CVT, which is not covered by the warranty.
When filling CVT fluid, take care not to scatter heat generating parts such as exhaust.
Sufficiently shake the container of CVT fluid before using.
Delete CVT fluid deterioration date with CONSULT-III after changing CVT fluid.
6. With the engine warmed up, drive the vehicle in an urban area.
NOTE:
SCIA1932E
Fluid status Conceivable cause Required operation
Varnished (viscous
varnish state)CVT fluid become
degraded due to
high temperatures.Replace the CVT fluid and check the
CVT main unit and the vehicle for
malfunctions (wire harnesses, cool-
er pipes, etc.)
Milky white or
cloudyWater in the fluidReplace the CVT fluid and check for
places where water is getting in.
Large amount of
metal powder mixed
inUnusual wear of
sliding parts within
CVTReplace the CVT fluid and check for
improper operation of the CVT.
ATA0022D
CVT fluid : Refer to TM-337, "General Specifica-
tion".
Fluid capacity : Refer to TM-337, "
General Specifica-
tion".
Page 3223 of 5121
CHASSIS MAINTENANCE
MA-35
< ON-VEHICLE MAINTENANCE >
C
D
E
F
G
H
I
J
K
L
MB
MAN
OA
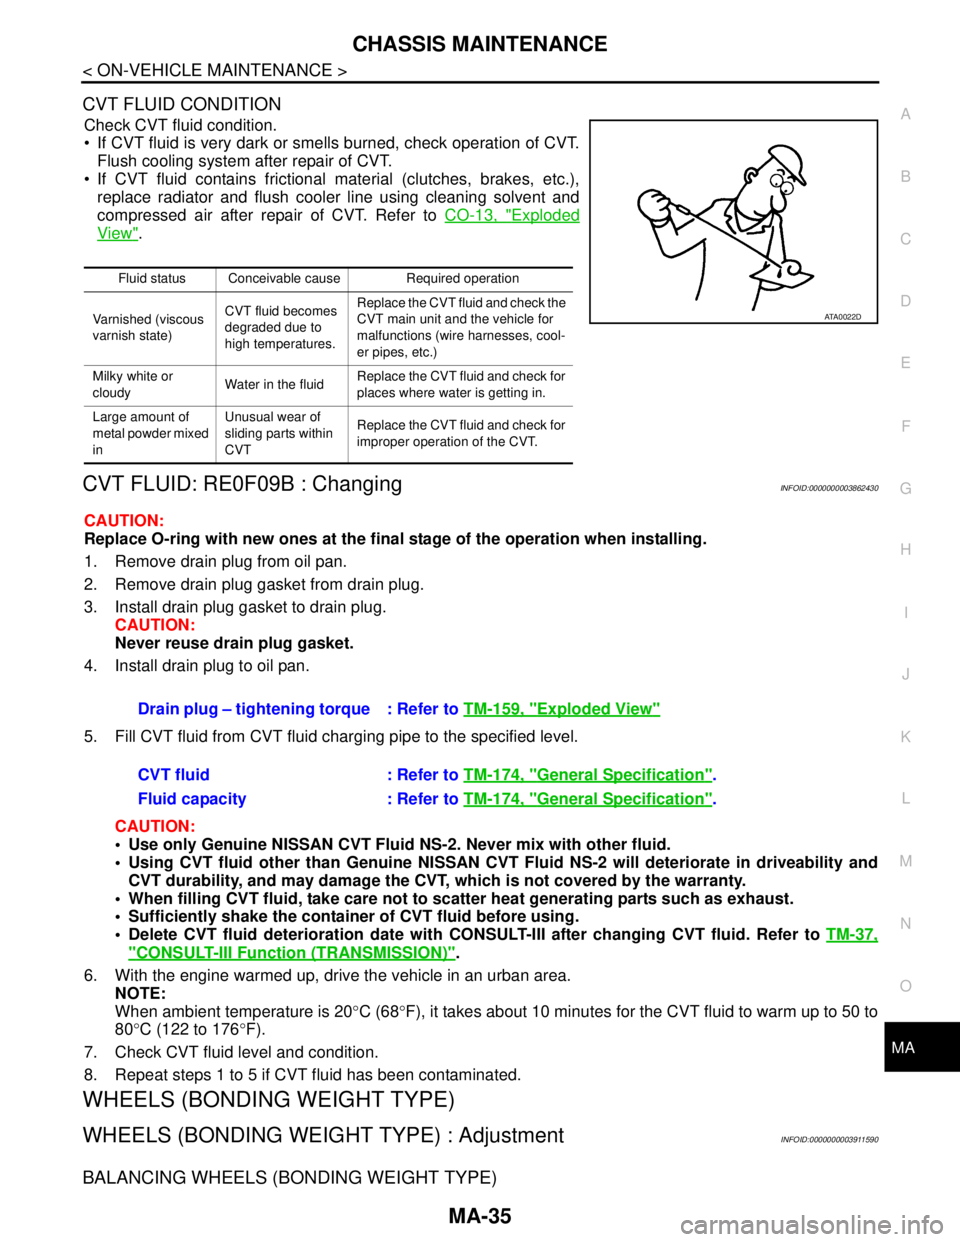
CVT FLUID CONDITION
Check CVT fluid condition.
If CVT fluid is very dark or smells burned, check operation of CVT.
Flush cooling system after repair of CVT.
If CVT fluid contains frictional material (clutches, brakes, etc.),
replace radiator and flush cooler line using cleaning solvent and
compressed air after repair of CVT. Refer to CO-13, "
Exploded
View".
CVT FLUID: RE0F09B : ChangingINFOID:0000000003862430
CAUTION:
Replace O-ring with new ones at the final stage of the operation when installing.
1. Remove drain plug from oil pan.
2. Remove drain plug gasket from drain plug.
3. Install drain plug gasket to drain plug.
CAUTION:
Never reuse drain plug gasket.
4. Install drain plug to oil pan.
5. Fill CVT fluid from CVT fluid charging pipe to the specified level.
CAUTION:
Use only Genuine NISSAN CVT Fluid NS-2. Never mix with other fluid.
Using CVT fluid other than Genuine NISSAN CVT Fluid NS-2 will deteriorate in driveability and
CVT durability, and may damage the CVT, which is not covered by the warranty.
When filling CVT fluid, take care not to scatter heat generating parts such as exhaust.
Sufficiently shake the container of CVT fluid before using.
Delete CVT fluid deterioration date with CONSULT-III after changing CVT fluid. Refer to TM-37,
"CONSULT-III Function (TRANSMISSION)".
6. With the engine warmed up, drive the vehicle in an urban area.
NOTE:
When ambient temperature is 20°C (68°F), it takes about 10 minutes for the CVT fluid to warm up to 50 to
80°C (122 to 176°F).
7. Check CVT fluid level and condition.
8. Repeat steps 1 to 5 if CVT fluid has been contaminated.
WHEELS (BONDING WEIGHT TYPE)
WHEELS (BONDING WEIGHT TYPE) : AdjustmentINFOID:0000000003911590
BALANCING WHEELS (BONDING WEIGHT TYPE)
Fluid status Conceivable cause Required operation
Varnished (viscous
varnish state)CVT fluid becomes
degraded due to
high temperatures.Replace the CVT fluid and check the
CVT main unit and the vehicle for
malfunctions (wire harnesses, cool-
er pipes, etc.)
Milky white or
cloudyWater in the fluidReplace the CVT fluid and check for
places where water is getting in.
Large amount of
metal powder mixed
inUnusual wear of
sliding parts within
CVTReplace the CVT fluid and check for
improper operation of the CVT.
ATA0022D
Drain plug – tightening torque : Refer to TM-159, "Exploded View"
CVT fluid : Refer to TM-174, "General Specification".
Fluid capacity : Refer to TM-174, "
General Specification".