brake rotor NISSAN TEANA 2014 Owner's Manual
[x] Cancel search | Manufacturer: NISSAN, Model Year: 2014, Model line: TEANA, Model: NISSAN TEANA 2014Pages: 4801, PDF Size: 51.2 MB
Page 147 of 4801

BRC-1
BRAKES
C
D E
G H
I
J
K L
M
SECTION BRC
A
B
BRC
N
O P
CONTENTS
BRAKE CONTROL SYSTEM
VDC/TCS/ABS
PRECAUTION ................ ...............................
4
PRECAUTIONS .............................................. .....4
Precaution for Supplemental Restraint System
(SRS) "AIR BAG" and "SEAT BELT PRE-TEN-
SIONER" ............................................................. ......
4
Precaution for Brake System ....................................4
Precaution for Brake Control .....................................5
Precaution for CAN System ................................ ......5
Precaution for Work ..................................................6
PREPARATION ............................................7
PREPARATION .............................................. .....7
Special Service Tool ........................................... ......7
Commercial Service Tool ..........................................7
SYSTEM DESCRIPTION ..............................8
COMPONENT PARTS ................................... .....8
Component Parts Location .................................. ......8
Component Description .............................................9
ABS Actuator and Electric Unit (Control Unit) ...........9
Wheel Sensor and Sensor Rotor ............................10
Stop Lamp Switch ...................................................10
Steering Angle Sensor ............................................10
Brake Fluid Level Switch .........................................10
Vacuum Sensor .......................................................10
Parking Brake Switch ..............................................11
VDC OFF Switch .....................................................11
SYSTEM .............................................................12
VDC/TCS/ABS ....................................................... ....12
VDC/TCS/ABS : System Diagram ...........................12
VDC/TCS/ABS : System De scription ......................12
VDC/TCS/ABS : VDC Functi on ...............................23
VDC/TCS/ABS : TCS Functi on ...............................25
VDC/TCS/ABS : ABS Function ........................... ....27
VDC/TCS/ABS : EBD Functi on ...............................28
VDC/TCS/ABS : Fail-safe ... .....................................29
DIAGNOSIS SYSTEM [ABS ACTUATOR
AND ELECTRIC UNIT (CONTROL UNIT)] .......
33
CONSULT Function (ABS) .................................. ....33
ECU DIAGNOSIS INFORMATION ..............38
ABS ACTUATOR AND ELECTRIC UNIT
(CONTROL UNIT) .............................................
38
Reference Value .................................................. ....38
Fail-safe ...................................................................41
DTC Inspection Priority Chart ..................................44
DTC Index ...............................................................45
WIRING DIAGRAM ......................................47
BRAKE CONTROL SYSTEM ...........................47
Wiring Diagram .................................................... ....47
BASIC INSPECTION ...................................55
DIAGNOSIS AND REPAIR WORK FLOW .......55
Work Flow ............................................................ ....55
Diagnostic Work Sheet ............................................56
ADDITIONAL SERVICE WHEN REPLACING
ABS ACTUATOR AND ELECTRIC UNIT
(CONTROL UNIT) .............................................
57
Description ........................................................... ....57
ADJUSTMENT OF STEERING ANGLE SEN-
SOR NEUTRAL POSITION ...............................
58
Description ........................................................... ....58
Work Procedure .......................................................58
CONFIGURATION [ABS ACTUATOR AND
ELECTRIC UNIT (CONTROL UNIT)] ................
60
Work Procedure ................................................... ....60
CALIBRATION OF DECEL G SENSOR ...........62
Description ...............................................................62
Revision: November 20132014 Altima NAMRevision: November 20132014 Altima NAM
Page 149 of 4801

BRC-3
C
D E
G H
I
J
K L
M A
B
BRC
N
O P
ABS WARNING LA MP ................................... ..112
Component Function Check ................................ ..112
Diagnosis Procedure .............................................112
BRAKE WARNING LAMP ............................. ..113
Component Function Check ................................ ..113
Diagnosis Procedure .............................................113
VDC OFF INDICATOR LAMP ..........................114
Description .......................................................... ..114
Component Function Check ..................................114
Diagnosis Procedure .............................................114
SLIP INDICATOR LAMP ..................................115
Component Function Check ................................ ..115
Diagnosis Procedure .............................................115
SYMPTOM DIAGNOSIS ............................116
VDC/TCS/ABS ................................................ ..116
Symptom Table ................................................... ..116
EXCESSIVE ABS FUNCTION OPERATION
FREQUENCY ................................................. ..
117
Diagnosis Procedure ........................................... ..117
UNEXPECTED PEDAL REACTION ................118
Diagnosis Procedure ........................................... ..118
THE BRAKING DISTANCE IS LONG ..............119
Diagnosis Procedure ........................................... ..119
ABS FUNCTION DOES NOT OPERATE .........120
Diagnosis Procedure ........................................... ..120
PEDAL VIBRATION OR ABS OPERATION
SOUND OCCURS .......................................... ..
121
Diagnosis Procedure ........................................... ..121
VEHICLE JERKS DURING VDC/TCS/ABS
CONTROL .......................................................
122
Diagnosis Procedure ........................................... ..122
NORMAL OPERATING CONDITION .............123
Description .............................................................123
REMOVAL AND INSTALLATION .............124
WHEEL SENSOR ............................................124
Exploded View - Front Wheel Sensor .................. ..124
Removal and Installation - Front Wheel Sensor ....124
Exploded View - Rear Wheel Sensor ....................125
Removal and Installation - Rear Wheel Sensor .....125
SENSOR ROTOR ............................................127
Removal and Installation - Front Sensor Rotor .....127
Removal and Installation - Rear Sensor Rotor ......127
ABS ACTUATOR AND ELECTRIC UNIT
(CONTROL UNIT) ...........................................
128
Exploded View ..................................................... ..128
Removal and Installation .......................................128
VDC OFF SWITCH ..........................................130
Removal and Installation .......................................130
YAW RATE/SIDE/DECEL G SENSOR ...........131
Removal and Installation .......................................131
STEERING ANGLE SENSOR .........................132
Exploded View .......................................................132
Removal and Installation .......................................132
Revision: November 20132014 Altima NAMRevision: November 20132014 Altima NAM
Page 155 of 4801

COMPONENT PARTSBRC-9
< SYSTEM DESCRIPTION > [VDC/TCS/ABS]
C
D E
G H
I
J
K L
M A
B
BRC
N
O P
Component DescriptionINFOID:0000000009463742
ABS Actuator and Electric Unit (Control Unit)INFOID:0000000009463743
Electric unit (control unit) is integrated with actuator and comprehensively controls VDC function, TCS func-
tion, ABS function and EBD function.
ELECTRIC UNIT (CONTROL UNIT)
• Brake fluid pressure is controlled according to signals from each sensor.
• If malfunction is detected, t he system enters fail-safe mode.
ACTUATOR
The following components are integrated with ABS actuator.
Pump
Returns the brake fluid reserved in reservoir to master cylinder by reducing pressure.
Motor
Activates the pump according to signals from ABS actuator and electric unit (control unit).
Motor Relay
Operates the motor ON/OFF according to signals fr om ABS actuator and electric unit (control unit).
Actuator Relay (Main Relay)
Operates each valve ON/OFF according to signals fr om ABS actuator and electric unit (control unit).
ABS IN Valve
Switches the fluid pressure line to increase or hold according to signals from control unit.
ABS OUT Valve
Switches the fluid pressure line to increase, hold or decrease according to signals from control unit.
Cut Valve 1, Cut Valve 2
Shuts off the ordinary brake line from master cylinder, when VDC function and TCS function are activated.
7. Rear wheel sensor LH (RH similar) 8. VDC OFF switch 9. Steering angle sensor
(view with steering wheel removed)
10. Parking brake switch 11. Stop lamp switch 12. Combination meter
Component Reference/Function
ABS actuator and electric unit (control unit) BRC-9, "ABS Actuator and Electric Unit (Control Unit)"
Wheel sensorBRC-10, "Wheel Sensor and Sensor Rotor"
Stop lamp switchBRC-10, "Stop Lamp Switch"
Steering angle sensorBRC-10, "Steering Angle Sensor"
Vacuum sensorBRC-10, "Vacuum Sensor"
VDC OFF switchBRC-11, "VDC OFF Switch"
Brake fluid level switchBRC-10, "Brake Fluid Level Switch"
Parking brake switchBRC-11, "Parking Brake Switch"
ABS warning lamp
BRC-12, "VDC/TCS/ABS : System Description"
Brake warning lamp
VDC OFF indicator lamp
SLIP indicator lamp
ECM Transmits the following signals to ABS actuator and electric unit (control unit) via CAN
communication.
• Accelerator pedal position signal
• Engine speed signal
• Target throttle position signal
TCM Transmits the current gear position signal
to ABS actuator and electric unit (control
unit) via CAN communication.
Revision: November 20132014 Altima NAMRevision: November 20132014 Altima NAM
Page 156 of 4801

BRC-10
< SYSTEM DESCRIPTION >[VDC/TCS/ABS]
COMPONENT PARTS
Suction Valve 1, Suction Valve 2
Supplies the brake fluid from master cylinder to t
he pump, when VDC function and TCS function are activated.
Return Check Valve
Returns the brake fluid from brake caliper and wheel cy linder to master cylinder by bypassing orifice of each
valve when brake is released.
Reservoir
Temporarily reserves the brake fluid drained from brake caliper, so that pressure efficiently decreases when
decreasing pressure of brake caliper and wheel cylinder.
Yaw rate/side/decel G sensor
Calculates the following information that affects the vehicle, and transmits a signal to ABS actuator and elec-
tric unit (control unit) via communication lines.
• Vehicle rotation angular velocity (yaw rate signal)
• Vehicle lateral acceleration (side G signal) and longitudinal acceleration (decel G signal)
Pressure Sensor
Detects the brake fluid pressure and transmits signal to ABS actuator and electric unit (control unit).
Wheel Sensor and Sensor RotorINFOID:0000000009463744
NOTE:
• Wheel sensor of front wheel is installed on steering knuckle.
• Sensor rotor of front wheel is integrated in wheel hub assembly.
• Wheel sensor of rear wheel is installed on back plate of rear brake.
• Sensor rotor of rear wheel is installed on rear brake drum.
• Never measure resistance and voltage value using a tester because sensor is active sensor.
• Downsize and weight reduction is aimed. IC for detection portion and magnet for sensor rotor are adopted.
• Power supply is supplied to detection portion so that magnetic field line is read. Magnetic field that is detected is converted to current
signal.
• When sensor rotor rotates, magnetic field changes. Magnetic field change is converted to current signals (rectangular wave) and is
transmitted to ABS actuator and el ectric unit (control unit). Change
of magnetic field is proportional to wheel speed.
Stop Lamp SwitchINFOID:0000000009463745
Detects the operation status of brake pedal and transmits converted electric signal to ABS actuator and elec-
tric unit (control unit).
Steering Angle SensorINFOID:0000000009463746
Detects the following information and transmits steering angl e signal to ABS actuator and electric unit (control
unit) via CAN communication.
• Steering wheel rotation amount
• Steering wheel rotation angular velocity
• Steering wheel rotation direction
Brake Fluid Level SwitchINFOID:0000000009463747
Detects the brake fluid level in reservoir tank and transmi ts converted electric signal from combination meter to
ABS actuator and electric unit (control unit) via CAN communication.
Vacuum SensorINFOID:0000000009463748
Detects the vacuum in brake booster and transmits conver ted electric signal to ABS actuator and electric unit
(control unit).
JPFIC0131GB
Revision: November 20132014 Altima NAMRevision: November 20132014 Altima NAM
Page 188 of 4801

BRC-42
< ECU DIAGNOSIS INFORMATION >[VDC/TCS/ABS]
ABS ACTUATOR AND ELECTRIC UNIT (CONTROL UNIT)
ABS FUNCTION
ABS warning lamp and SLIP indicator lamp in combi
nation meter turn ON when a malfunction occurs in sys-
tem [ABS actuator and electric unit (control unit)]. The control is suspended for VDC, TCS and ABS functions.
However, EBD functions operate normally.
EBD FUNCTION
ABS warning lamp, brake warning lamp and SLIP indicator lamp in combination meter turn ON when a mal-
function occurs in system [ABS ac tuator and electric unit (control unit) ]. The control is suspended for VDC,
TCS, ABS and EBD functions.
DTC Malfunction detected condition Fail-safe condition
C1101 When an open circuit is detected in rear RH wheel sensor circuit.
The following functions are sus-
pended:
•VDC
•ABS
• EBD (only when both rear wheels are malfunctioning)
C1102 When an open circuit is detected in rear LH wheel sensor circuit.
C1103 When an open circuit is detected in front RH wheel sensor circuit.
C1104 When an open circuit is detected in front LH wheel sensor circuit.
C1105 • When a short circuit is detected in rear RH wheel sensor circuit.
• When power supply voltage of rear RH wheel sensor is in following state.
- Rear RH wheel sensor power supply voltage: 7.2 V ≥ Rear RH wheel sensor pow-
er supply voltage
• When distance between rear RH wheel sensor and rear RH wheel sensor rotor is
large.
• When installation of rear RH wheel sensor or rear RH wheel sensor rotor is not normal.
C1106 • When a short circuit is detected in rear LH wheel sensor circuit.
• When power supply voltage of rear LH wheel sensor is in following state.
- Rear LH wheel sensor power supply voltage: 7.2 V ≥ Rear LH wheel sensor power
supply voltage
• When distance between rear LH wheel sensor and rear LH wheel sensor rotor is large.
• When installation of rear LH wheel sensor or rear LH wheel sensor rotor is not nor-
mal.
C1107 • When a short circuit is detected in front RH wheel sensor circuit.
• When power supply voltage of front RH wheel sensor is in following state.
- Front RH wheel sensor power supply voltage: 7.2 V ≥ Front RH wheel sensor
power supply voltage
• When distance between front RH wheel sensor and front RH wheel sensor rotor is large.
• When installation of front RH wheel sensor or front RH wheel sensor rotor is not normal.
C1108 • When a short circuit is detected in front LH wheel sensor circuit.
• When power supply voltage of front LH wheel sensor is in following state.
- Front LH wheel sensor power supply voltage: 7.2 V ≥ Front LH wheel sensor pow-
er supply voltage
• When distance between front LH wheel sensor and front LH wheel sensor rotor is large.
• When installation of front LH wheel sensor or front LH wheel sensor rotor is not normal.
C1109 • When ignition power supply voltage is in following state.
- Ignition power supply voltage: 10 V ≥ Ignition power supply voltage.
- Ignition power supply voltage: 16 V ≤ Ignition power supply voltage. The following functions are sus-
pended:
•VDC
•TCS
•ABS
•EBD
C 111 0
When there is an internal malfunction in the ABS actuator and electric unit (control
unit).
C 1111 W h e n a m a l f u n c t i o n i s d e t e c t e d i n m o t o r o r m o t o r r e l a y. The following functions are sus-
pended:
•VDC
•TCS
•ABS
Revision: November 20132014 Altima NAMRevision: November 20132014 Altima NAM
Page 262 of 4801

BRC-116
< SYMPTOM DIAGNOSIS >[VDC/TCS/ABS]
VDC/TCS/ABS
SYMPTOM DIAGNOSIS
VDC/TCS/ABS
Symptom TableINFOID:0000000009463838
If ABS warning lamp and SLIP indicator
lamp turn ON, perform self-diagnosis.
NOTE:
• 1: The ABS does not operate when the speed is 10 km/h (6 MPH) or less.
• 2: Under the following conditions, ABS is activated and vibration is felt when brake pedal is lightly depressed (just place a foot on it).
However, this is normal.
- When shifting gears
- When driving on slippery road
- During cornering at high speed
- When passing over bumps or grooves [approximately 50 mm (1.97 in) or more]
- When pulling away just after starting engine [at approximately 10 km/h (6 MPH) or higher] Symptom Check item Reference
Excessive ABS function operation fre-
quency Brake force distribution
BRC-117, "Diagno-
sis Procedure"Looseness of front and rear axle
Wheel sensor and rotor system
Unexpected pedal reaction Brake pedal stroke
BRC-118, "Diagno-
sis Procedure"Make sure the braking force is sufficient when the ABS is not operating.
The braking distance is long Check stopping distance when the ABS is not operating. BRC-119, "Diagno-
sis Procedure"
ABS function does not operate (Note 1) ABS ac
tuator and electric unit (control unit) BRC-120, "Diag-nosis Procedure"
Pedal vibration or ABS operation sound
occurs (Note 2) Brake pedal
BRC-121, "Diag-
nosis Procedure"ABS actuator and electric unit (control unit)
Vehicle jerks duri ng VDC/TCS/ABS con-
trol ABS actuator and electric unit (control unit)
BRC-122, "Diag-
nosis Procedure"TCM
ECM
Revision: November 20132014 Altima NAMRevision: November 20132014 Altima NAM
Page 263 of 4801

EXCESSIVE ABS FUNCTION OPERATION FREQUENCYBRC-117
< SYMPTOM DIAGNOSIS > [VDC/TCS/ABS]
C
D E
G H
I
J
K L
M A
B
BRC
N
O P
EXCESSIVE ABS FUNCTION OPERATION FREQUENCY
Diagnosis ProcedureINFOID:0000000009463839
1.CHECK START
Check front and rear brake force di stribution using a brake tester.
Is the inspection result normal?
YES >> GO TO 2
NO >> Check brake system.
2.CHECK FRONT AND REAR AXLE
Make sure that there is no excessive play in the front and rear axles. Refer to front: FAX-6, "Inspection"
, rear:
RAX-5, "On-vehicle Service"
.
Is the inspection result normal?
YES >> GO TO 3
NO >> Repair or replace malfunctioning components.
3.CHECK WHEEL SENSOR AND SENSOR ROTOR
Check the following:
• Wheel sensor installation for damage
• Sensor rotor installation for damage
• Wheel sensor connector
• Wheel sensor harness
Is the inspection result normal?
YES >> GO TO 4
NO >> • Replace wheel sensor BRC-124, "Removal and Installation - Front Wheel Sensor"
or BRC-125,
"Removal and Installation - Rear Wheel Sensor".
• Replace sensor rotor BRC-127, "Removal and Installation - Front Sensor Rotor"
or BRC-127,
"Removal and Installation - Rear Sensor Rotor".
• Repair harness.
4.CHECK ABS WARNING LAMP DISPLAY
Make sure that the ABS warning lamp is turned off af ter the ignition switch is turned ON or when driving.
Is the inspection result normal?
YES >> Inspection End.
NO >> Perform self diagnostic result. Refer to BRC-33, "CONSULT Function (ABS)"
.
Revision: November 20132014 Altima NAMRevision: November 20132014 Altima NAM
Page 2220 of 4801
EM-222
< UNIT REMOVAL AND INSTALLATION >[VQ35DE]
ENGINE ASSEMBLY
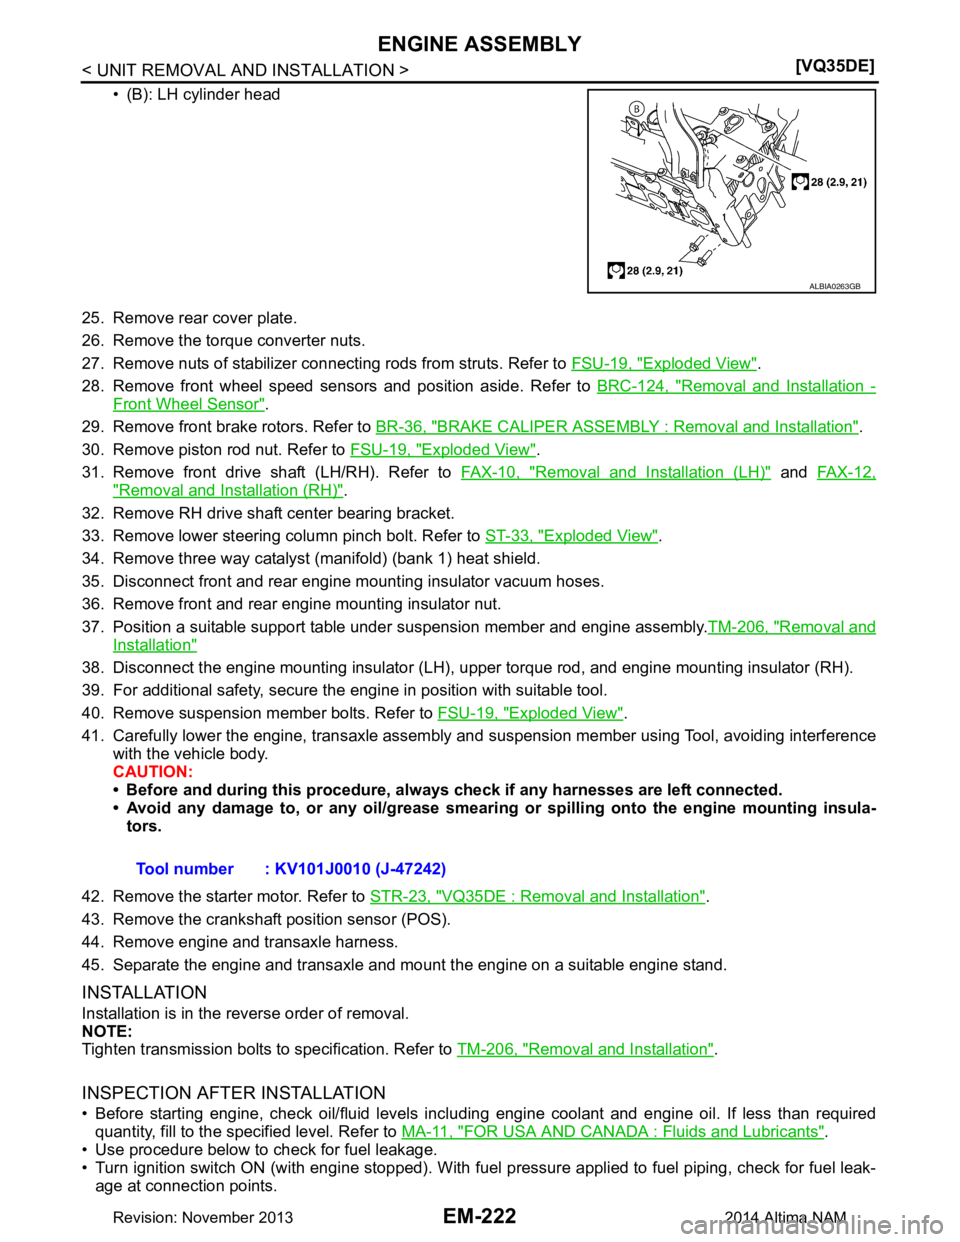
• (B): LH cylinder head
25. Remove rear cover plate.
26. Remove the torque converter nuts.
27. Remove nuts of stabilizer connecting rods from struts. Refer to FSU-19, "Exploded View"
.
28. Remove front wheel speed sensors and position aside. Refer to BRC-124, "Removal and Installation -
Front Wheel Sensor".
29. Remove front brake rotors. Refer to BR-36, "BRAKE CALIPER ASSEMBLY : Removal and Installation"
.
30. Remove piston rod nut. Refer to FSU-19, "Exploded View"
.
31. Remove front drive shaft (LH/RH). Refer to FAX-10, "Removal and Installation (LH)"
and FAX-12,
"Removal and Installation (RH)".
32. Remove RH drive shaft center bearing bracket.
33. Remove lower steering column pinch bolt. Refer to ST-33, "Exploded View"
.
34. Remove three way catalyst (manifold) (bank 1) heat shield.
35. Disconnect front and rear engine mounting insulator vacuum hoses.
36. Remove front and rear engine mounting insulator nut.
37. Position a suitable support table under suspension member and engine assembly. TM-206, "Removal and
Installation"
38. Disconnect the engine mounting insulator (LH), upper torque rod, and engine mounting insulator (RH).
39. For additional safety, secure the engine in position with suitable tool.
40. Remove suspension member bolts. Refer to FSU-19, "Exploded View"
.
41. Carefully lower the engine, transaxle assembly and suspension member using Tool, avoiding interference
with the vehicle body.
CAUTION:
• Before and during this procedure, alw ays check if any harnesses are left connected.
• Avoid any damage to, or any oil/grease smearin g or spilling onto the engine mounting insula-
tors.
42. Remove the starter motor. Refer to STR-23, "VQ35DE : Removal and Installation"
.
43. Remove the crankshaft position sensor (POS).
44. Remove engine and transaxle harness.
45. Separate the engine and transaxle and mount the engine on a suitable engine stand.
INSTALLATION
Installation is in the reverse order of removal.
NOTE:
Tighten transmission bolts to specification. Refer to TM-206, "Removal and Installation"
.
INSPECTION AFTER INSTALLATION
• Before starting engine, check oil/fluid levels including engine coolant and engine oil. If less than required
quantity, fill to the specified level. Refer to MA-11, "FOR USA AND CANADA : Fluids and Lubricants"
.
• Use procedure below to check for fuel leakage.
• Turn ignition switch ON (with engine stopped). With fuel pressure applied to fuel piping, check for fuel leak-
age at connection points.
ALBIA0263GB
Tool number : KV101J0010 (J-47242)
Revision: November 20132014 Altima NAM
Page 2460 of 4801
FAX-8
< REMOVAL AND INSTALLATION >
FRONT WHEEL HUB
REMOVAL AND INSTALLATION
FRONT WHEEL HUB
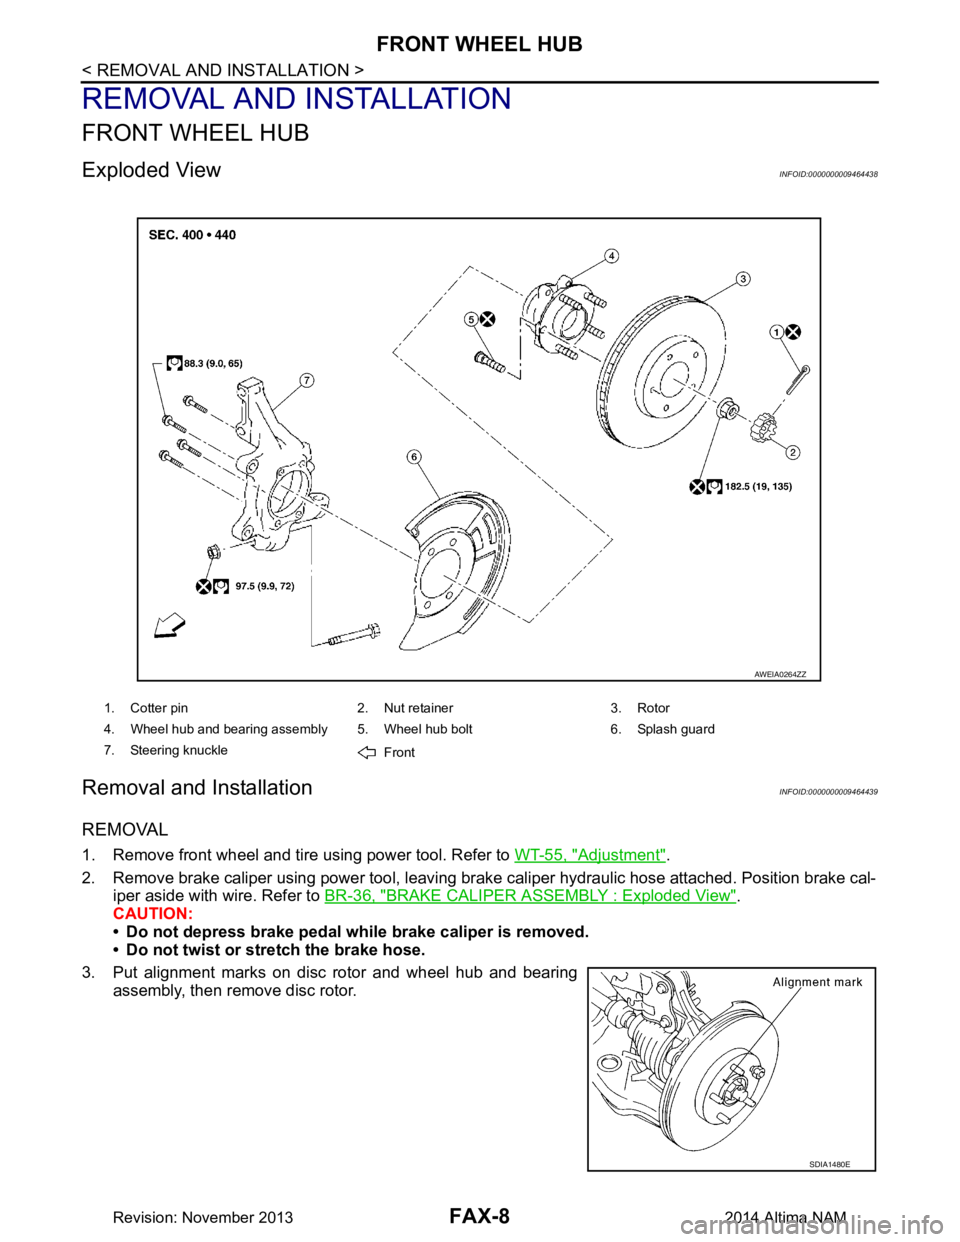
Exploded ViewINFOID:0000000009464438
Removal and InstallationINFOID:0000000009464439
REMOVAL
1. Remove front wheel and tire using power tool. Refer to WT-55, "Adjustment".
2. Remove brake caliper using power tool, leaving brak e caliper hydraulic hose attached. Position brake cal-
iper aside with wire. Refer to BR-36, "BRAKE CALIPER ASSEMBLY : Exploded View"
.
CAUTION:
• Do not depress brake pedal while brake caliper is removed.
• Do not twist or stretch the brake hose.
3. Put alignment marks on disc rotor and wheel hub and bearing assembly, then remove disc rotor.
1. Cotter pin 2. Nut retainer 3. Rotor
4. Wheel hub and bearing assembly 5. Wheel hub bolt 6. Splash guard
7. Steering knuckle Front
AWEIA0264ZZ
SDIA1480E
Revision: November 20132014 Altima NAM
Page 2462 of 4801
FAX-10
< REMOVAL AND INSTALLATION >
FRONT DRIVE SHAFT
FRONT DRIVE SHAFT
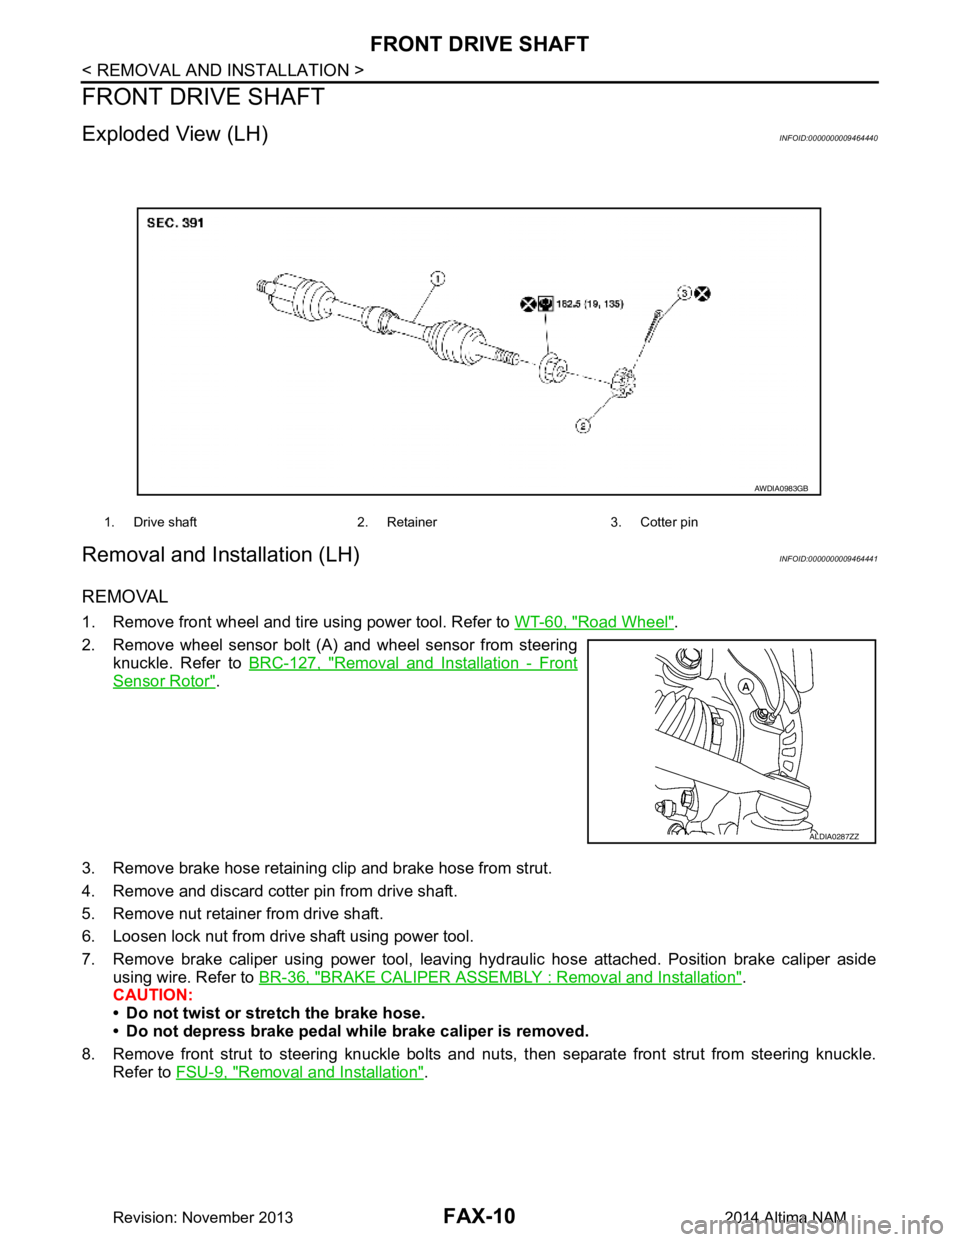
Exploded View (LH)INFOID:0000000009464440
Removal and Installation (LH)INFOID:0000000009464441
REMOVAL
1. Remove front wheel and tire using power tool. Refer to WT-60, "Road Wheel".
2. Remove wheel sensor bolt (A) and wheel sensor from steering knuckle. Refer to BRC-127, "Removal and Installation - Front
Sensor Rotor".
3. Remove brake hose retaining clip and brake hose from strut.
4. Remove and discard cotter pin from drive shaft.
5. Remove nut retainer from drive shaft.
6. Loosen lock nut from drive shaft using power tool.
7. Remove brake caliper using power tool, leaving hy draulic hose attached. Position brake caliper aside
using wire. Refer to BR-36, "BRAKE CALIPER ASSEMBLY : Removal and Installation"
.
CAUTION:
• Do not twist or stretch the brake hose.
• Do not depress brake pedal while brake caliper is removed.
8. Remove front strut to steering knuckle bolts and nut s, then separate front strut from steering knuckle.
Refer to FSU-9, "Removal and Installation"
.
1. Drive shaft 2. Retainer 3. Cotter pin
AWDIA0983GB
ALDIA0287ZZ
Revision: November 20132014 Altima NAM