magnet clutch NISSAN TEANA 2014 Service Manual
[x] Cancel search | Manufacturer: NISSAN, Model Year: 2014, Model line: TEANA, Model: NISSAN TEANA 2014Pages: 4801, PDF Size: 51.2 MB
Page 2607 of 4801
HA-1
VENTILATION, HEATER & AIR CONDITIONER
C
D E
F
G H
J
K L
M
SECTION HA
A
B
HA
N
O P
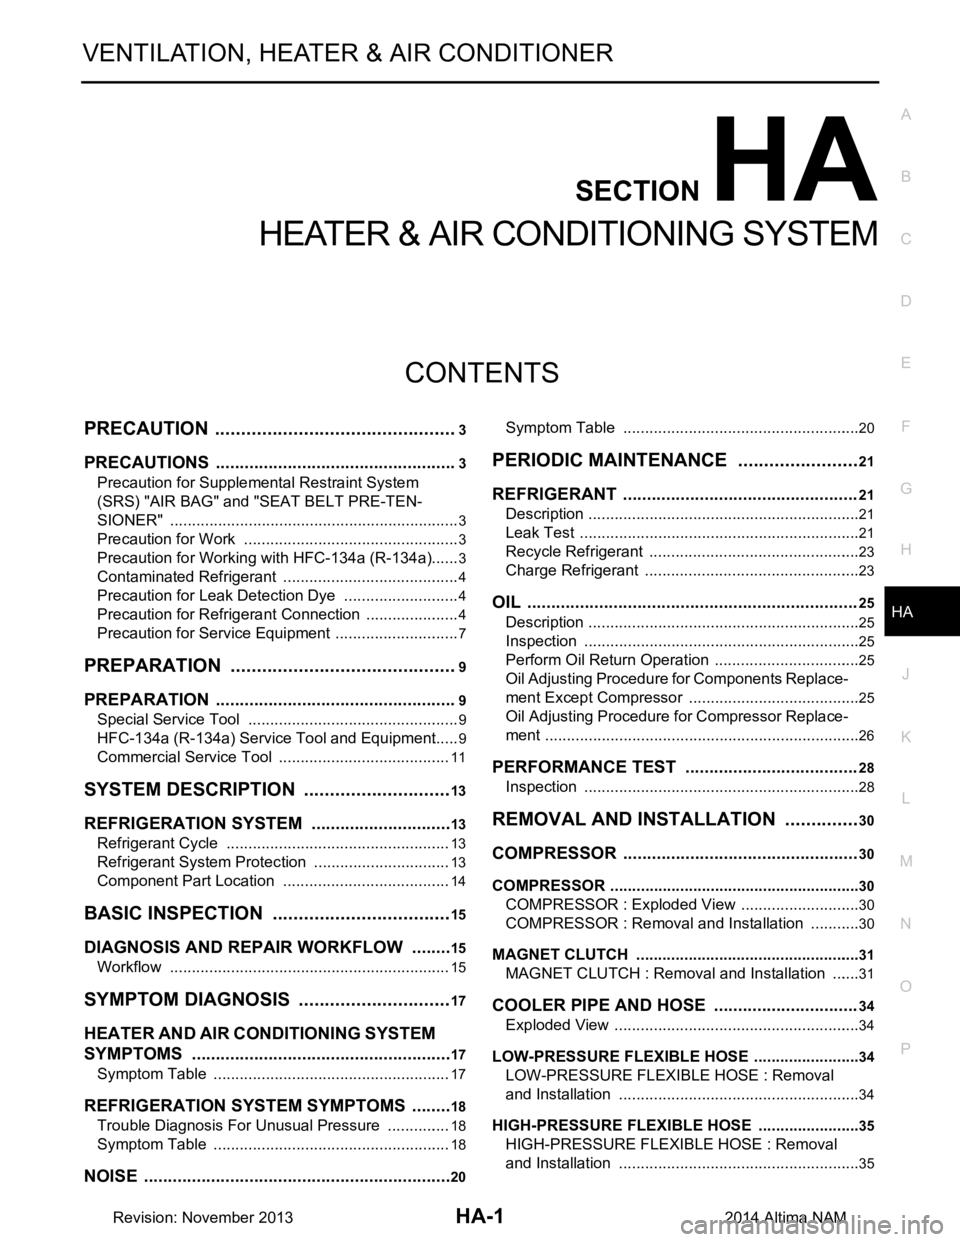
CONTENTS
HEATER & AIR CONDITIONING SYSTEM
PRECAUTION ................ ...............................3
PRECAUTIONS .............................................. .....3
Precaution for Supplemental Restraint System
(SRS) "AIR BAG" and "SEAT BELT PRE-TEN-
SIONER" ............................................................. ......
3
Precaution for Work ..................................................3
Precaution for Working with HFC-134a (R-134a) ......3
Contaminated Refrigerant .........................................4
Precaution for Leak Detection Dye ...........................4
Precaution for Refrigerant Connection ......................4
Precaution for Service Equipment ....................... ......7
PREPARATION ............................................9
PREPARATION .............................................. .....9
Special Service Tool ........................................... ......9
HFC-134a (R-134a) Service Tool and Equipment ......9
Commercial Service Tool ........................................11
SYSTEM DESCRIPTION .............................13
REFRIGERATION SYSTEM .......................... ....13
Refrigerant Cycle ................................................ ....13
Refrigerant System Protection ................................13
Component Part Location ................................... ....14
BASIC INSPECTION ...................................15
DIAGNOSIS AND REPAIR WORKFLOW ..... ....15
Workflow ............................................................. ....15
SYMPTOM DIAGNOSIS ..............................17
HEATER AND AIR CONDITIONING SYSTEM
SYMPTOMS ................................................... ....
17
Symptom Table ................................................... ....17
REFRIGERATION SYSTEM SYMPTOMS .........18
Trouble Diagnosis For Unusual Pressure ........... ....18
Symptom Table .......................................................18
NOISE .................................................................20
Symptom Table ................................................... ....20
PERIODIC MAINTENANCE ........................21
REFRIGERANT ................................ .................21
Description ........................................................... ....21
Leak Test .................................................................21
Recycle Refrigerant .................................................23
Charge Refrigerant ..................................................23
OIL .....................................................................25
Description ...............................................................25
Inspection ................................................................25
Perform Oil Return Operation ..................................25
Oil Adjusting Procedure for Components Replace-
ment Except Compressor ........................................
25
Oil Adjusting Procedure for Compressor Replace-
ment ..................................................................... ....
26
PERFORMANCE TEST ....................................28
Inspection ................................................................28
REMOVAL AND INSTALLATION ...............30
COMPRESSOR .................................................30
COMPRESSOR ........ ..................................................30
COMPRESSOR : Exploded Vi ew ............................30
COMPRESSOR : Removal an d Installation ............30
MAGNET CLUTCH ................................................ ....31
MAGNET CLUTCH : Removal and Installation .......31
COOLER PIPE AND HOSE ..............................34
Exploded View .........................................................34
LOW-PRESSURE FLEXIBLE HOSE ..................... ....34
LOW-PRESSURE FLEXIBLE HOSE : Removal
and Installation .................................................... ....
34
HIGH-PRESSURE FLEXIBLE HOSE ........................35
HIGH-PRESSURE FLEXIBLE HOSE : Removal
and Installation .................................................... ....
35
Revision: November 20132014 Altima NAM
Page 2623 of 4801
HEATER AND AIR CONDITIONING SYSTEM SYMPTOMS
HA-17
< SYMPTOM DIAGNOSIS >
C
D E
F
G H
J
K L
M A
B
HA
N
O P
SYMPTOM DIAGNOSIS
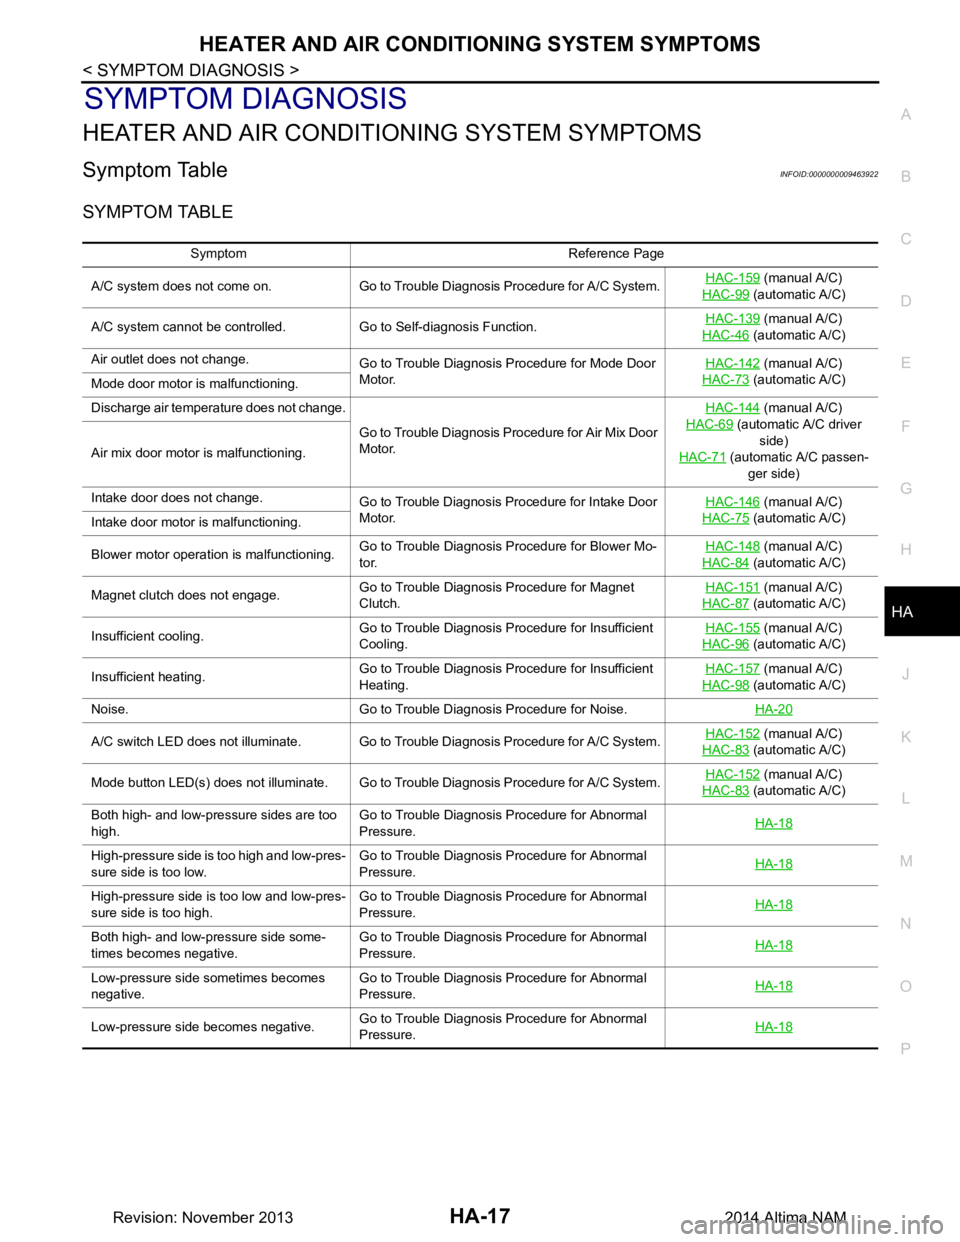
HEATER AND AIR CONDITIONING SYSTEM SYMPTOMS
Symptom TableINFOID:0000000009463922
SYMPTOM TABLE
Symptom Reference Page
A/C system does not come on. Go to Trouble Diagnosis Procedure for A/C System. HAC-159
(manual A/C)
HAC-99
(automatic A/C)
A/C system cannot be controlled. Go to Self-diagnosis Function. HAC-139
(manual A/C)
HAC-46
(automatic A/C)
Air outlet does not change. Go to Trouble Diagnosis Procedure for Mode Door
Motor. HAC-142
(manual A/C)
HAC-73
(automatic A/C)
Mode door motor is malfunctioning.
Discharge air temperature does not change.
Go to Trouble Diagnosis Procedure for Air Mix Door
Motor. HAC-144
(manual A/C)
HAC-69
(automatic A/C driver side)
HAC-71
(automatic A/C passen-
ger side)
Air mix door motor is malfunctioning.
Intake door does not change.
Go to Trouble Diagnosis Procedure for Intake Door
Motor. HAC-146
(manual A/C)
HAC-75
(automatic A/C)
Intake door motor is malfunctioning.
Blower motor operation is malfunctioning. Go to Trouble Diagnosis Procedure for Blower Mo-
tor. HAC-148
(manual A/C)
HAC-84
(automatic A/C)
Magnet clutch does not engage. Go to Trouble Diagnosis Procedure for Magnet
Clutch. HAC-151
(manual A/C)
HAC-87
(automatic A/C)
Insufficient cooling. Go to Trouble Diagnosis Procedure for Insufficient
Cooling. HAC-155
(manual A/C)
HAC-96
(automatic A/C)
Insufficient heating. Go to Trouble Diagnosis Procedure for Insufficient
Heating. HAC-157
(manual A/C)
HAC-98
(automatic A/C)
Noise. Go to Trouble Diagnosis Procedure for Noise. HA-20
A/C switch LED does not illuminate. Go to Trouble Diagnosis Procedure for A/C System.HAC-152 (manual A/C)
HAC-83
(automatic A/C)
Mode button LED(s) does not illuminate. Go to Trouble Diagnosis Procedure for A/C System. HAC-152
(manual A/C)
HAC-83
(automatic A/C)
Both high- and low-pressure sides are too
high. Go to Trouble Diagnosis Procedure for Abnormal
Pressure. HA-18
High-pressure side is too high and low-pres-
sure side is too low. Go to Trouble Diagnosis Procedure for Abnormal
Pressure. HA-18
High-pressure side is too low and low-pres-
sure side is too high. Go to Trouble Diagnosis Procedure for Abnormal
Pressure. HA-18
Both high- and low-pressure side some-
times becomes negative. Go to Trouble Diagnosis Procedure for Abnormal
Pressure. HA-18
Low-pressure side sometimes becomes
negative. Go to Trouble Diagnosis Procedure for Abnormal
Pressure. HA-18
Low-pressure side becomes negative.
Go to Trouble Diagnosis Procedure for Abnormal
Pressure. HA-18
Revision: November 20132014 Altima NAM
Page 2626 of 4801
HA-20
< SYMPTOM DIAGNOSIS >
NOISE
NOISE
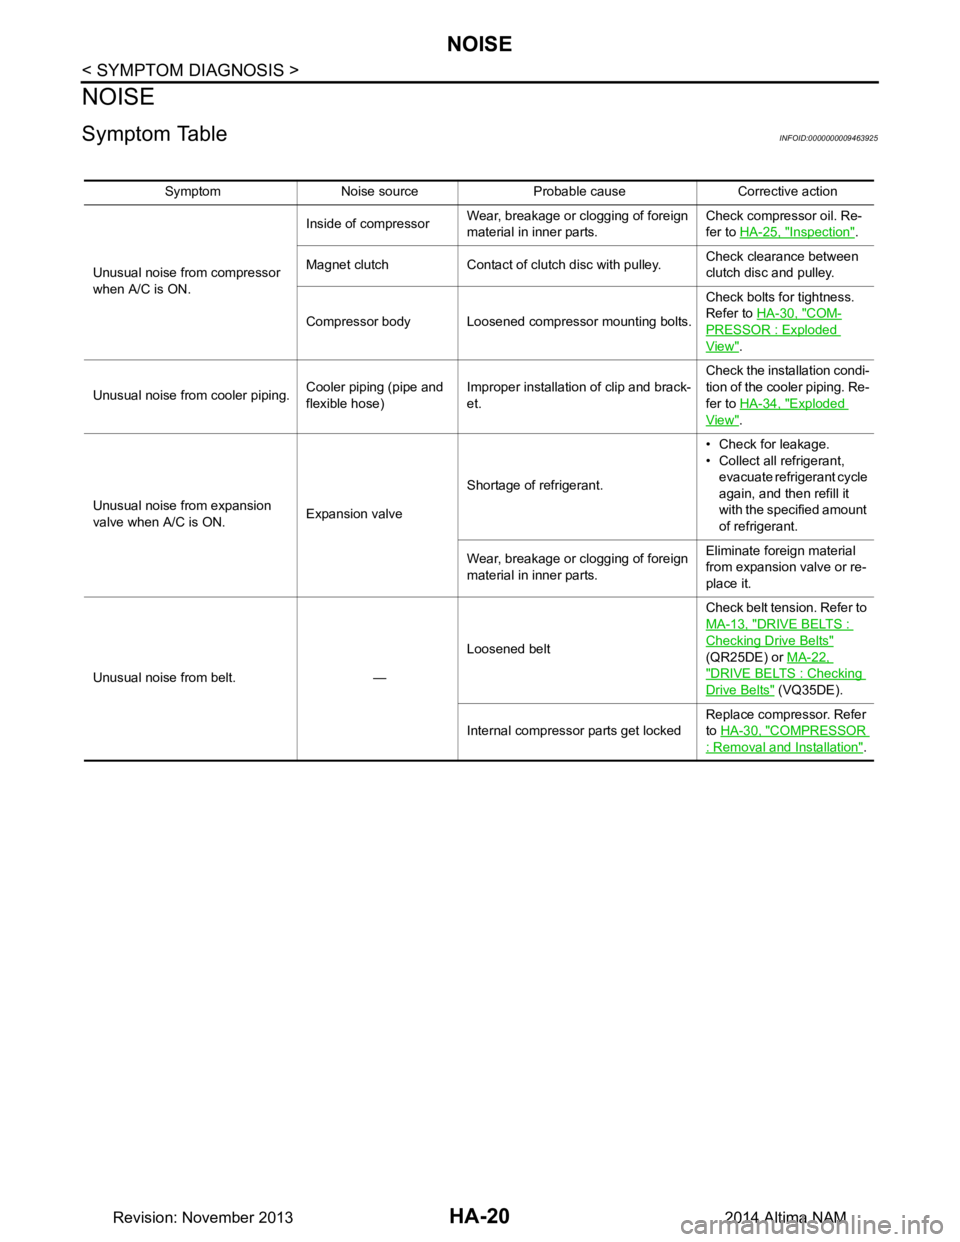
Symptom TableINFOID:0000000009463925
Symptom Noise source Probable cause Corrective action
Unusual noise from compressor
when A/C is ON. Inside of compressor
Wear, breakage or clogging of foreign
material in inner parts. Check compressor oil. Re-
fer to HA-25, "Inspection"
.
Magnet clutch Contact of clutch disc with pulley. Check clearance between
clutch disc and pulley.
Compressor body Loosened compressor mounting bolts. Check bolts for tightness.
Refer to HA-30, "COM-
PRESSOR : Exploded
View".
Unusual noise from cooler piping. Cooler piping (pipe and
flexible hose) Improper installation of clip and brack-
et. Check the installation condi-
tion of the cooler piping. Re-
fer to HA-34, "Exploded
View".
Unusual noise from expansion
valve when A/C is ON. Expansion valveShortage of refrigerant. • Check for leakage.
• Collect all refrigerant,
evacuate refrigerant cycle
again, and then refill it
with the specified amount
of refrigerant.
Wear, breakage or clogging of foreign
material in inner parts. Eliminate foreign material
from expansion valve or re-
place it.
Unusual noise from belt. — Loosened beltCheck belt tension. Refer to
MA-13, "DRIVE BELTS :
Checking Drive Belts"
(QR25DE) or MA-22,
"DRIVE BELTS : Checking
Drive Belts" (VQ35DE).
Internal compressor parts get locked Replace compressor. Refer
to HA-30, "COMPRESSOR
: Removal and Installation".
Revision: November 20132014 Altima NAM
Page 2637 of 4801
COMPRESSORHA-31
< REMOVAL AND INSTALLATION >
C
D E
F
G H
J
K L
M A
B
HA
N
O P
4. Remove the drive belt. Refer to EM-19, "Removal and Installation" (QR25DE), or EM-134, "Removal and
Installation" (VQ35DE).
5. Reposition the power steering line. Refer to ST-40, "Exploded View"
.
6. Disconnect the A/C pipes from the compressor. CAUTION:
Cap or wrap the joint of the A/C pipes with suitable material such as vinyl tape to avoid the entry of
air.
7. Disconnect the harness connector from the compressor.
8. Remove the compressor bolts and the compressor.
INSTALLATION
Installation is in the reverse order of removal.
CAUTION:
• Do not reuse the O-rings.
• Apply A/C compressor oil to th e new O-rings for installation.
• After charging the A/C refriger ant, check for leaks. Refer to HA-21, "Leak Test"
.
• Tighten the compressor bolts to specification. Refer to HA-30, "COMPRESSOR : Exploded View"
.
MAGNET CLUTCH
MAGNET CLUTCH : Removal and InstallationINFOID:0000000009463938
REMOVAL
1. Remove the front under cover. Refer to EXT-28, "Removal and Installation".
2. Partially remove the fender protector (RH). Refer to EXT-26, "FENDER PROTECTOR : Removal and
Installation".
3. Remove the drive belt. Refer to EM-19, "Removal and Installation"
(QR25DE), or EM-134, "Removal and
Installation" (VQ35DE).
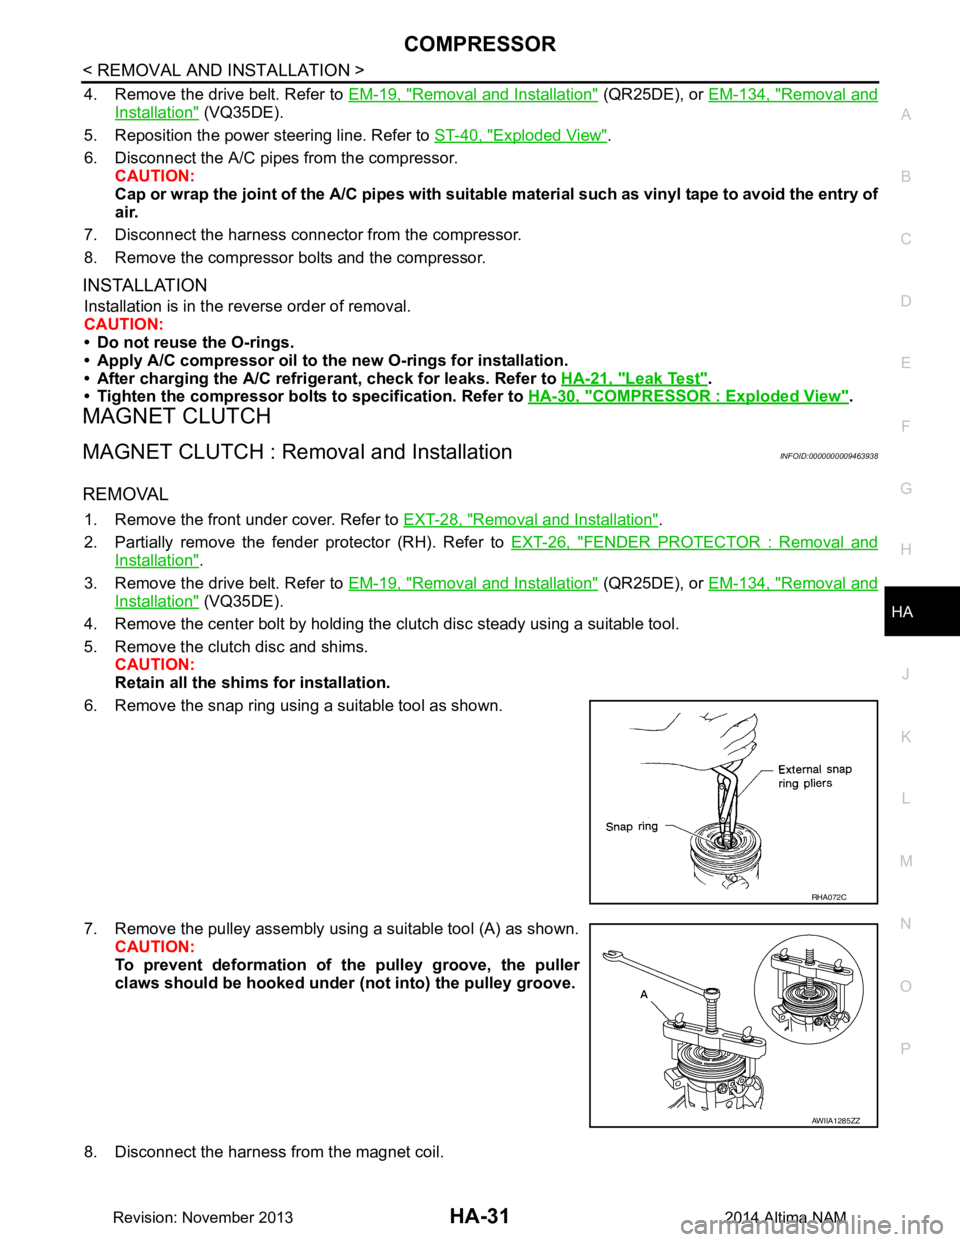
4. Remove the center bolt by holding the clutch disc steady using a suitable tool.
5. Remove the clutch disc and shims. CAUTION:
Retain all the shim s for installation.
6. Remove the snap ring using a suitable tool as shown.
7. Remove the pulley assembly using a suitable tool (A) as shown. CAUTION:
To prevent deformation of th e pulley groove, the puller
claws should be hooked under (not into) the pulley groove.
8. Disconnect the harness from the magnet coil.
RHA072C
AWIIA1285ZZ
Revision: November 20132014 Altima NAM
Page 2638 of 4801
HA-32
< REMOVAL AND INSTALLATION >
COMPRESSOR
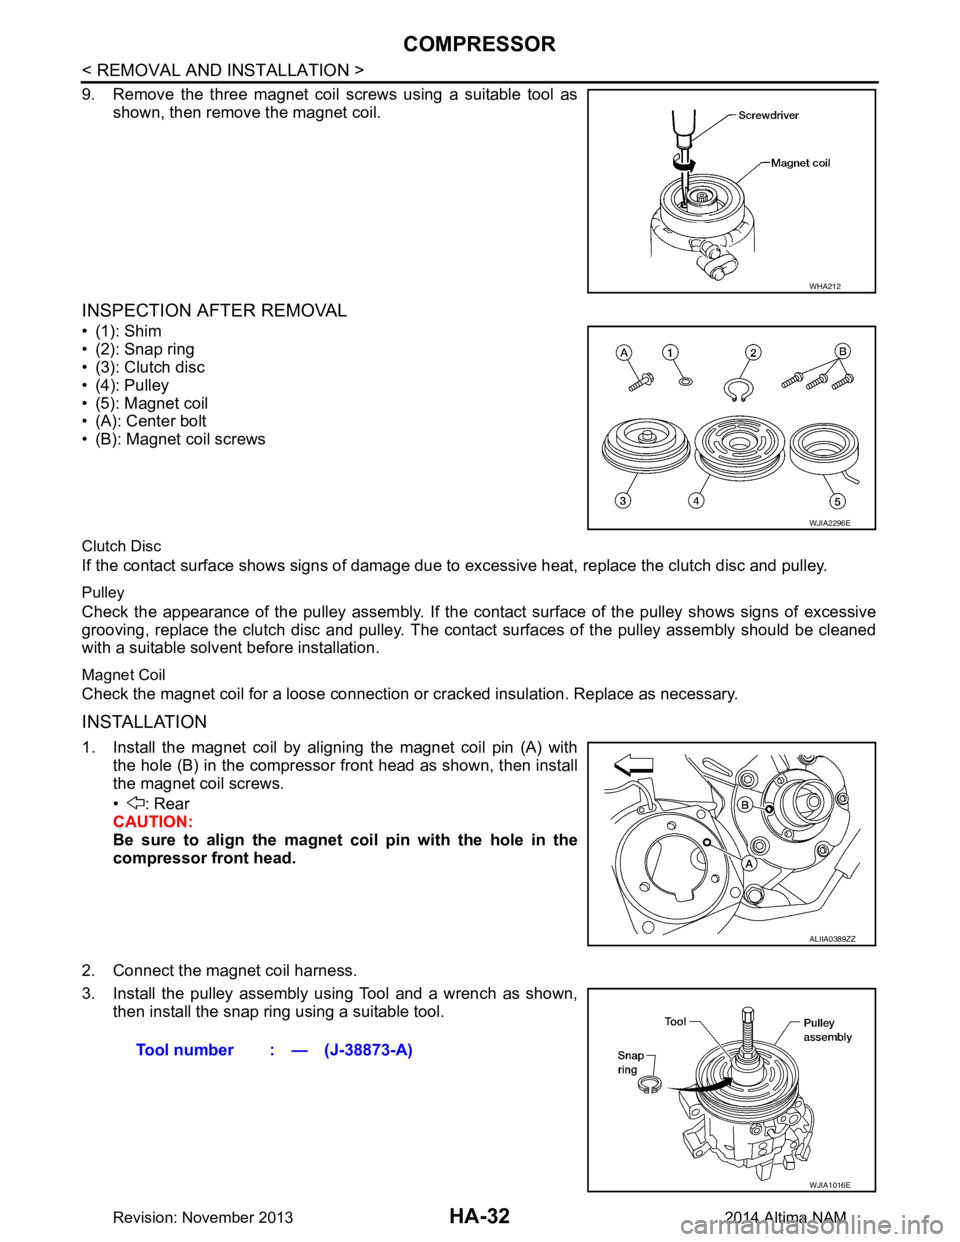
9. Remove the three magnet coil screws using a suitable tool asshown, then remove the magnet coil.
INSPECTION AFTER REMOVAL
•(1): Shim
• (2): Snap ring
• (3): Clutch disc
• (4): Pulley
• (5): Magnet coil
• (A): Center bolt
• (B): Magnet coil screws
Clutch Disc
If the contact surface shows signs of damage due to excessive heat, replace the clutch disc and pulley.
Pulley
Check the appearance of the pulley assembly. If the cont act surface of the pulley shows signs of excessive
grooving, replace the clutch disc and pulley. The contact surfaces of the pulley assembly should be cleaned
with a suitable solvent before installation.
Magnet Coil
Check the magnet coil for a loose connection or cracked insulation. Replace as necessary.
INSTALLATION
1. Install the magnet coil by aligning the magnet coil pin (A) with
the hole (B) in the compressor front head as shown, then install
the magnet coil screws.
• : Rear
CAUTION:
Be sure to align the magnet coil pin with the hole in the
compressor front head.
2. Connect the magnet coil harness.
3. Install the pulley assembly using Tool and a wrench as shown, then install the snap ring using a suitable tool.
WHA212
WJIA2296E
ALIIA0389ZZ
Tool number : — (J-38873-A)
WJIA1016E
Revision: November 20132014 Altima NAM
Page 2651 of 4801
HAC-2
Diagnosis Procedure ..............................................55
U1010 CONTROL UNIT (CAN) .........................56
Description ........................................................... ...56
DTC Logic ...............................................................56
Diagnosis Procedure ..............................................56
B2578, B2579 IN-VEHICLE SENSOR ...............57
DTC Logic ............................................................ ...57
Diagnosis Procedure ..............................................57
Component Inspection ............................................58
B257B, B257C AMBIENT SENSOR .................60
DTC Logic ............................................................ ...60
Diagnosis Procedure ..............................................60
Component Inspection ............................................61
B2581, B2582 INTAKE SENSOR ......................63
DTC Logic ............................................................ ...63
Diagnosis Procedure ..............................................63
Component Inspection ............................................64
B2630, B2631 SUNLOAD SENSOR .................66
DTC Logic ............................................................ ...66
Diagnosis Procedure ..............................................66
Component Inspection ............................................67
B2632, B2633 AIR MIX DOOR MOTOR
(DRIVER SIDE) ............................................... ...
69
DTC Logic ............................................................ ...69
Diagnosis Procedure ..............................................69
B2634, B2635 AIR MIX DOOR MOTOR (PAS-
SENGER SIDE) ............................................... ...
71
DTC Logic ............................................................ ...71
Diagnosis Procedure ..............................................71
B2636, B2637, B2638, B2639, B2654, B2655
MODE DOOR MOTOR ................................... ...
73
DTC Logic ............................................................ ...73
Diagnosis Procedure ..............................................73
B263D, B263E, B263F INTAKE DOOR MO-
TOR ................................................................. ...
75
DTC Logic ............................................................ ...75
Diagnosis Procedure ..............................................75
B27B0 A/C AUTO AMP. ....................................77
DTC Logic ............................................................ ...77
Diagnosis Procedure ..............................................77
POWER SUPPLY AND GROUND CIRCUIT .....78
A/C AUTO AMP. .................................................... ...78
A/C AUTO AMP. : Diagnosis Procedure ................78
AIR MIX DOOR MOTOR (DRIVER SIDE) .............. ...78
AIR MIX DOOR MOTOR (DRIVER SIDE) : Diag-
nosis Procedure ................................................... ...
78
AIR MIX DOOR MOTOR (PASSENGER SIDE) ..... ...79
AIR MIX DOOR MOTOR (PASSENGER SIDE) :
Diagnosis Procedure ............................................ ...
79
MODE DOOR MOTOR ........................................... ...80
MODE DOOR MOTOR : Diagnosis Procedure .......80
INTAKE DOOR MOTOR ........................................ ...81
INTAKE DOOR MOTOR : Diagnosis Procedure ....81
A/C SWITCH ASSEMBLY .........................................82
A/C SWITCH ASSEMBLY : Component Function
Check ................................................................... ...
82
A/C SWITCH ASSEMBLY : Diagnosis Procedure ...83
BLOWER MOTOR .......................................... ...84
Diagnosis Procedure ............................................ ...84
Component Inspection (Blower Motor) ...................85
Component Inspection (Front Blower Motor Re-
lay) ....................................................................... ...
85
MAGNET CLUTCH ............................................87
Component Function Check ................................ ...87
Diagnosis Procedure ...............................................87
A/C SWITCH ASSEMBLY SIGNAL CIRCUIT ...88
Diagnosis Procedure ...............................................88
DOOR MOTOR ..................................................89
Diagnosis Procedure ............................................ ...89
DOOR MOTOR COMMUNICATION CIRCUIT ...91
Diagnosis Procedure ............................................ ...91
ECV (ELECTRICAL CONTROL VALVE) ..........92
Diagnosis Procedure ............................................ ...92
Component Inspection ............................................93
SYMPTOM DIAGNOSIS ............................94
HEATER AND AIR CONDITIONING SYSTEM
CONTROL SYMPTOMS ................................. ...
94
Diagnosis Chart By Symptom .............................. ...94
INSUFFICIENT COOLING .................................96
Description ........................................................... ...96
Diagnosis Procedure ...............................................96
INSUFFICIENT HEATING .................................98
Description ........................................................... ...98
Diagnosis Procedure ...............................................98
COMPRESSOR DOES NOT OPERATE ...........99
Description ........................................................... ...99
Diagnosis Procedure ...............................................99
REMOVAL AND INSTALLATION .............101
A/C SWITCH ASSEMBLY .............................. ..101
Removal and Installation .......................................101
A/C AUTO AMP. ............................................. ..102
Exploded View ..................................................... .102
Removal and Installation .......................................102
Revision: November 20132014 Altima NAMRevision: November 20132014 Altima NAM
Page 2652 of 4801
HAC-3
C
D E
F
G H
J
K L
M A
B
HAC
N
O P
AMBIENT SENSOR ....................................... ..103
Removal and Installation .......................................103
IN-VEHICLE SENSOR ................................... ..104
Removal and Installation .......................................104
SUNLOAD SENSOR ...................................... ..105
Removal and Installation .......................................105
INTAKE SENSOR .......................................... ..106
Removal and Installation .......................................106
REFRIGERANT PRESSURE SENSOR ......... ..107
Removal and Installation .......................................107
DOOR MOTOR ............................................... ..108
Exploded View .................................................... ..108
INTAKE DOOR MOTOR ........................................ ..109
INTAKE DOOR MOTOR : Removal and Installa-
tion ...................................................................... ..
109
MODE DOOR MOTOR .......................................... ..109
MODE DOOR MOTOR : Removal and Installation ..109
AIR MIX DOOR MOTOR ....................................... ..109
AIR MIX DOOR MOTOR : Removal and Installa-
tion - Air Mix Door Motor (RH) ............................. ..
109
AIR MIX DOOR MOTOR : Removal and Installa-
tion - Air Mix Door Motor (LH) ............................. ..
109
MANUAL AIR CONDITIONER
PRECAUTION ................ ............................
110
PRECAUTIONS .............................................. ..110
Precaution for Supplemental Restraint System
(SRS) "AIR BAG" and "SEAT BELT PRE-TEN-
SIONER" ............................................................. ..
110
Precaution for Work ..............................................110
Working with HFC-134a (R-134a) .........................110
Precaution for Service Equipment .........................111
PREPARATION .........................................113
PREPARATION .............................................. ..113
Special Service Tool ........................................... ..113
Commercial Service Tool ......................................113
SYSTEM DESCRIPTION ...........................114
COMPONENT PARTS ................................... ..114
Component Part Location ................................... ..114
Component Description .........................................115
SYSTEM ...........................................................117
System Diagram .................................................. ..117
System Description ...............................................117
Air Flow Control .....................................................118
Air Inlet Control .....................................................118
Air Outlet Control ...................................................118
Compressor Control ..............................................118
Door Control ..........................................................119
Temperature Control ........................................... ..121
OPERATION ...................................................122
Switch Name and Function ....................................122
DIAGNOSIS SYSTEM (BCM) .........................124
CONSULT Function (BCM - COMMON ITEM) ......124
CONSULT Function (BCM - AIR CONDITIONER) ..125
DIAGNOSIS SYSTEM (IPDM E/R) .................126
CONSULT Function (IPDM E/R) ...........................126
ECU DIAGNOSIS INFORMATION ............128
FRONT AIR CONTROL ..................................128
Reference Value .................................................. ..128
ECM, IPDM E/R, BCM .....................................129
List of ECU Reference ...........................................129
WIRING DIAGRAM ....................................130
AIR CONDITIONER CONTROL ......................130
Wiring Diagram .................................................... ..130
BASIC INSPECTION .................................139
DIAGNOSIS AND REPAIR WORKFLOW ......139
Work Flow ............................................................ ..139
OPERATION INSPECTION ............................140
Work Procedure .....................................................140
DTC/CIRCUIT DIAGNOSIS .......................142
MODE DOOR MOTOR ....................................142
Diagnosis Procedure ........................................... ..142
AIR MIX DOOR MOTOR .................................144
Diagnosis Procedure .............................................144
INTAKE DOOR MOTOR .................................146
Diagnosis Procedure .............................................146
BLOWER MOTOR ..........................................148
Diagnosis Procedure .............................................148
Component Inspection (Blower Motor) ..................149
Component Inspection (Front Blower Motor Re-
lay) ....................................................................... ..
149
MAGNET CLUTCH .........................................151
Component Function Check ..................................151
Diagnosis Procedure .............................................151
POWER SUPPLY AND GROUND CIRCUIT
FOR FRONT AIR CONTROL ..........................
152
Description ........................................................... ..152
Component Function Check ..................................152
Diagnosis Procedure .............................................152
SYMPTOM DIAGNOSIS ............................154
Revision: November 20132014 Altima NAMRevision: November 20132014 Altima NAM
Page 2698 of 4801

OPERATION INSPECTIONHAC-49
< BASIC INSPECTION > [AUTOMATIC AIR CONDITIONER]
C
D E
F
G H
J
K L
M A
B
HAC
N
O P
YES >> GO TO 6.
NO >> Check magnet clutch system. Refer to HAC-87, "Diagnosis Procedure"
.
6.CHECK TEMPERATURE DECREASE
1. Operate the A/C compressor.
2. Operate the temperature control switch (drive r side) and lower the temperature setting to 18°C (60 °F).
3. Check that the cool air blows from the outlets.
Is the inspection result normal?
YES >> GO TO 7.
NO >> Check for insufficient cooling. Refer to HAC-96, "Diagnosis Procedure"
.
7.CHECK TEMPERATURE INCREASE
1. Operate the temperature control switch (drive r side) and raise the temperature setting to 32°C (90 °F) after
warming up the engine.
2. Check that the warm air blows from the outlets.
Is the inspection result normal?
YES >> GO TO 8.
NO >> Check for insufficient heating. Refer to HAC-98, "Diagnosis Procedure"
.
8.CHECK DUAL MODE FUNCTION
1. Press the DUAL mode switch, and then check that “DUAL” is shown on the display.
2. Operate the temperature control switch (driver si de). Check that the discharge air temperature (driver
side) changes.
3. Operate the temperature control switch (passenger side). Check that the discharge air temperature (pas-
senger side) changes.
4. Press the DUAL mode switch, and then check that the temperature setting (driver/passenger) is unified to
the driver side temperature setting.
Is the inspection result normal?
YES >> GO TO 9.
NO >> Refer to HAC-94, "Diagnosis Chart By Symptom"
and perform the appropriate diagnosis.
9.CHECK AUTO MODE
1. Press the AUTO switch, and then check t hat “AUTO” is shown on the display.
2. Operate the temperature control switch (driver side) . Check that the fan speed, outlet air or intake air
changes. The discharge air temperature or fan speed varies depending on the ambient temperature, in-
vehicle temperature, and temperature setting.
Is the inspection result normal?
YES >> Inspection End
NO >> Refer to HAC-94, "Diagnosis Chart By Symptom"
and perform the appropriate diagnosis.
Revision: November 20132014 Altima NAMRevision: November 20132014 Altima NAM
Page 2736 of 4801

MAGNET CLUTCHHAC-87
< DTC/CIRCUIT DIAGNOSIS > [AUTOMATIC AIR CONDITIONER]
C
D E
F
G H
J
K L
M A
B
HAC
N
O P
MAGNET CLUTCH
Component Function CheckINFOID:0000000009463159
1.CHECK MAGNET CLUTCH OPERATION
Perform auto active test of IPDM E/R. Refer to PCS-8, "Diagnosis Description"
.
Does it operate normally?
YES >> Inspection End.
NO >> Refer to HAC-87, "Diagnosis Procedure"
.
Diagnosis ProcedureINFOID:0000000009463160
Regarding Wiring Diagram information, refer to HAC-34, "Wiring Diagram".
1.CHECK FUSE
1. Turn ignition switch OFF.
2. Check 10A fuse (No. 53, located in IPDM E/R).
NOTE:
Refer to PG-72, "Fuse, Connector and Terminal Arrangement"
.
Is the inspection result normal?
YES >> GO TO 2.
NO >> Replace the blown fuse after repairing the affected circuit.
2.CHECK MAGNET CLUTCH POWER SUPPLY CIRCUIT
1. Disconnect compressor connec tor and IPDM E/R connector.
2. Check continuity between compressor har ness connector and IPDM E/R harness connector.
Is the inspection result normal?
YES >> GO TO 3.
NO >> Repair harness or connector.
3.CHECK MAGNET CLUTCH GROUND CIRCUIT
1. Disconnect compressor connector.
2. Check continuity between comp ressor harness connector and ground.
Is the inspection result normal?
YES >> GO TO 4.
NO >> Repair harness or connector.
4.CHECK MAGNET CLUTCH
Directly apply battery voltage to the magnet cl utch. Check operation visually and by sound.
Does it operate normally?
YES >> Replace IPDM E/R. Refer to PCS-32, "Removal and Installation".
NO >> Replace magnet clutch. Refer to HA-31, "MAGNET CLUTCH : Removal and Installation"
.
Compressor IPDM E/R
Continuity
Connector Terminal Connector Terminal
F3 1 F83 56 Yes
Compressor —Continuity
Connector Terminal
F3 2 Ground Yes
Revision: November 20132014 Altima NAMRevision: November 20132014 Altima NAM
Page 2743 of 4801

HAC-94
< SYMPTOM DIAGNOSIS >[AUTOMATIC AIR CONDITIONER]
HEATER AND AIR CONDITIONING
SYSTEM CONTROL SYMPTOMS
SYMPTOM DIAGNOSIS
HEATER AND AIR CONDITIONING SYSTEM CONTROL SYMPTOMS
Diagnosis Chart By SymptomINFOID:0000000009463166
NOTE:
Perform the self-diagnoses with CONSULT before perfo rming the symptom diagnosis. If DTC is detected, per-
form the corresponding diagnosis.
Symptom Corresponding malfunction part Reference
• Air conditioning does not activate.
• Air conditioning cannot be controlled.
• Operation status of air conditioning is not indicated on display. • A/C auto amp. ignition power supply
circuit
• Front A/C control (A/C auto amp.) HAC-78, "A/C AUTO AMP. : Diag-
nosis Procedure"
• Air outlet does not change.
• Mode door motor does not operate normally. • Circuit between mode door motor
and A/C auto amp.
• Mode door motor control linkage
• Mode door motor
• A/C auto amp. HAC-80, "MODE DOOR MOTOR :
Diagnosis Procedure"
• Discharge air temperature of driver side does not
change.
• Air mix door motor LH does not operate normally. • Circuit between air mix door motor
LH and A/C auto amp.
• Air mix door motor LH installation condition
• Air mix door motor LH
• A/C auto amp. HAC-78, "AIR MIX DOOR MOTOR
(DRIVER SIDE) : Diagnosis Proce-
dure"
• Discharge air temperature of passenger side does
not change.
• Air mix door motor RH does not operate normally. • Circuit between air mix door motor
RH and A/C auto amp.
• Air mix door motor RH installation condition
• Air mix door motor RH
• A/C auto amp. HAC-79, "AIR MIX DOOR MOTOR
(PASSENGER SIDE) : Diagnosis
Procedure"
• Intake door does not change.
• Intake door motor does not operate normally. • Circuit between intake door motor
and A/C auto amp.
• Intake door motor control linkage
• Intake door motor
• A/C auto amp. HAC-81, "INTAKE DOOR MOTOR :
Diagnosis Procedure"
All door motors do not operate normally.
• Each door motor power supply and
ground circuit
• A/C auto amp. HAC-89, "Diagnosis Procedure"
Blower motor operation is malfunctioning. • Power supply system of front blower
motor
• Circuit between front blower motor
and A/C auto amp.
• Front blower motor
• A/C auto amp. HAC-84, "Diagnosis Procedure"
Compressor does not operate. • Circuit between magnet clutch and
IPDM E/R
• Magnet clutch
• IPDM E/R (A/C relay)
• Circuit between ECM and refriger- ant pressure sensor
• Refrigerant pressure sensor
• CAN communication circuit
• A/C auto amp. HAC-87, "Diagnosis Procedure"
Revision: November 20132014 Altima NAMRevision: November 20132014 Altima NAM