NISSAN TIIDA 2008 Service Repair Manual
Manufacturer: NISSAN, Model Year: 2008, Model line: TIIDA, Model: NISSAN TIIDA 2008Pages: 2771, PDF Size: 60.61 MB
Page 1771 of 2771
EM-94
< SERVICE INFORMATION >
CYLINDER BLOCK
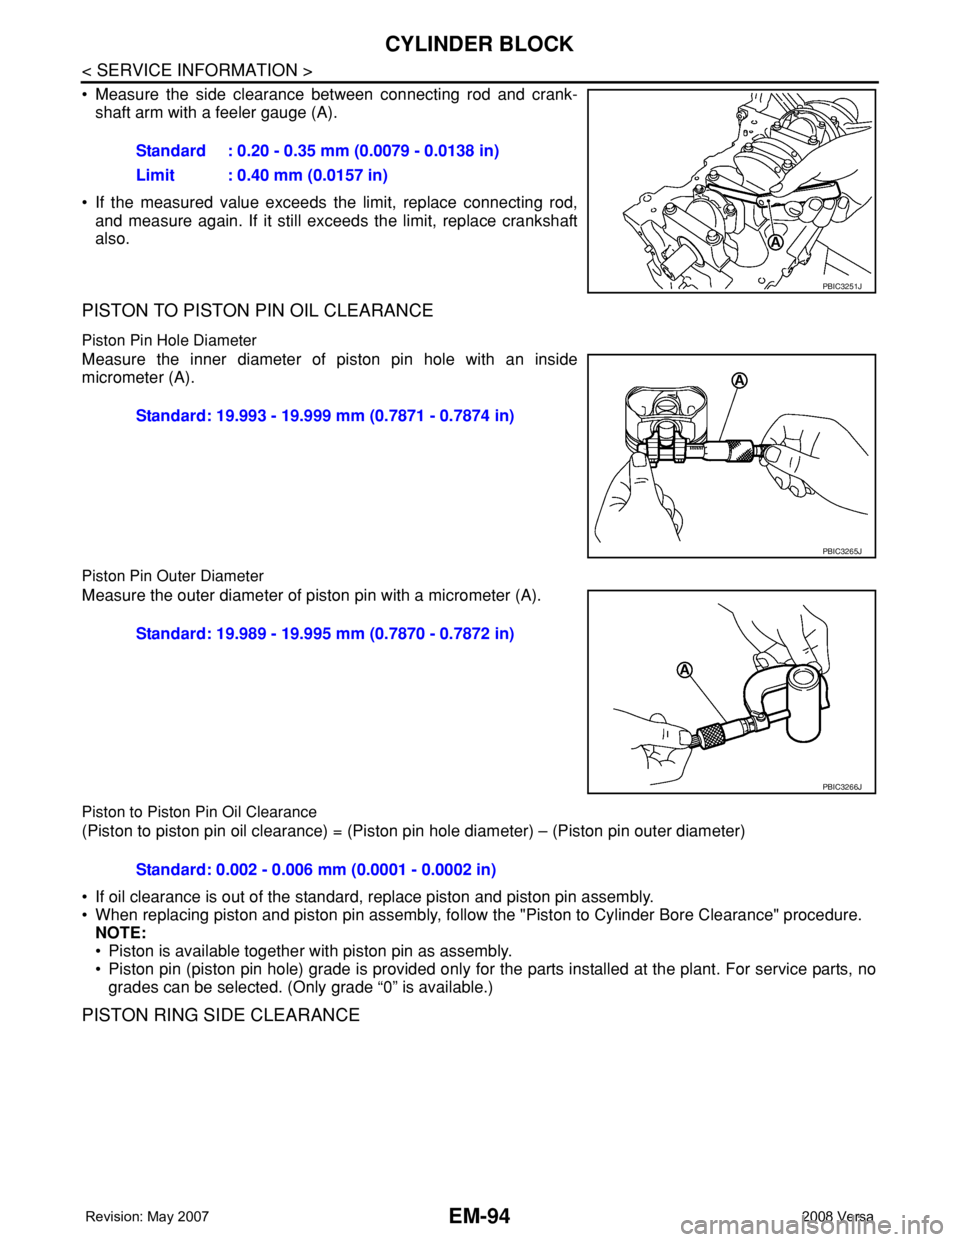
• Measure the side clearance between connecting rod and crank-
shaft arm with a feeler gauge (A).
• If the measured value exceeds the limit, replace connecting rod,
and measure again. If it still exceeds the limit, replace crankshaft
also.
PISTON TO PISTON PIN OIL CLEARANCE
Piston Pin Hole Diameter
Measure the inner diameter of piston pin hole with an inside
micrometer (A).
Piston Pin Outer Diameter
Measure the outer diameter of piston pin with a micrometer (A).
Piston to Piston Pin Oil Clearance
(Piston to piston pin oil clearance) = (Piston pin hole diameter) – (Piston pin outer diameter)
• If oil clearance is out of the standard, replace piston and piston pin assembly.
• When replacing piston and piston pin assembly, follow the "Piston to Cylinder Bore Clearance" procedure.
NOTE:
• Piston is available together with piston pin as assembly.
• Piston pin (piston pin hole) grade is provided only for the parts installed at the plant. For service parts, no
grades can be selected. (Only grade “0” is available.)
PISTON RING SIDE CLEARANCE
Standard : 0.20 - 0.35 mm (0.0079 - 0.0138 in)
Limit : 0.40 mm (0.0157 in)
PBIC3251J
Standard: 19.993 - 19.999 mm (0.7871 - 0.7874 in)
PBIC3265J
Standard: 19.989 - 19.995 mm (0.7870 - 0.7872 in)
PBIC3266J
Standard: 0.002 - 0.006 mm (0.0001 - 0.0002 in)
Page 1772 of 2771
CYLINDER BLOCK
EM-95
< SERVICE INFORMATION >
C
D
E
F
G
H
I
J
K
L
MA
EM
N
P O
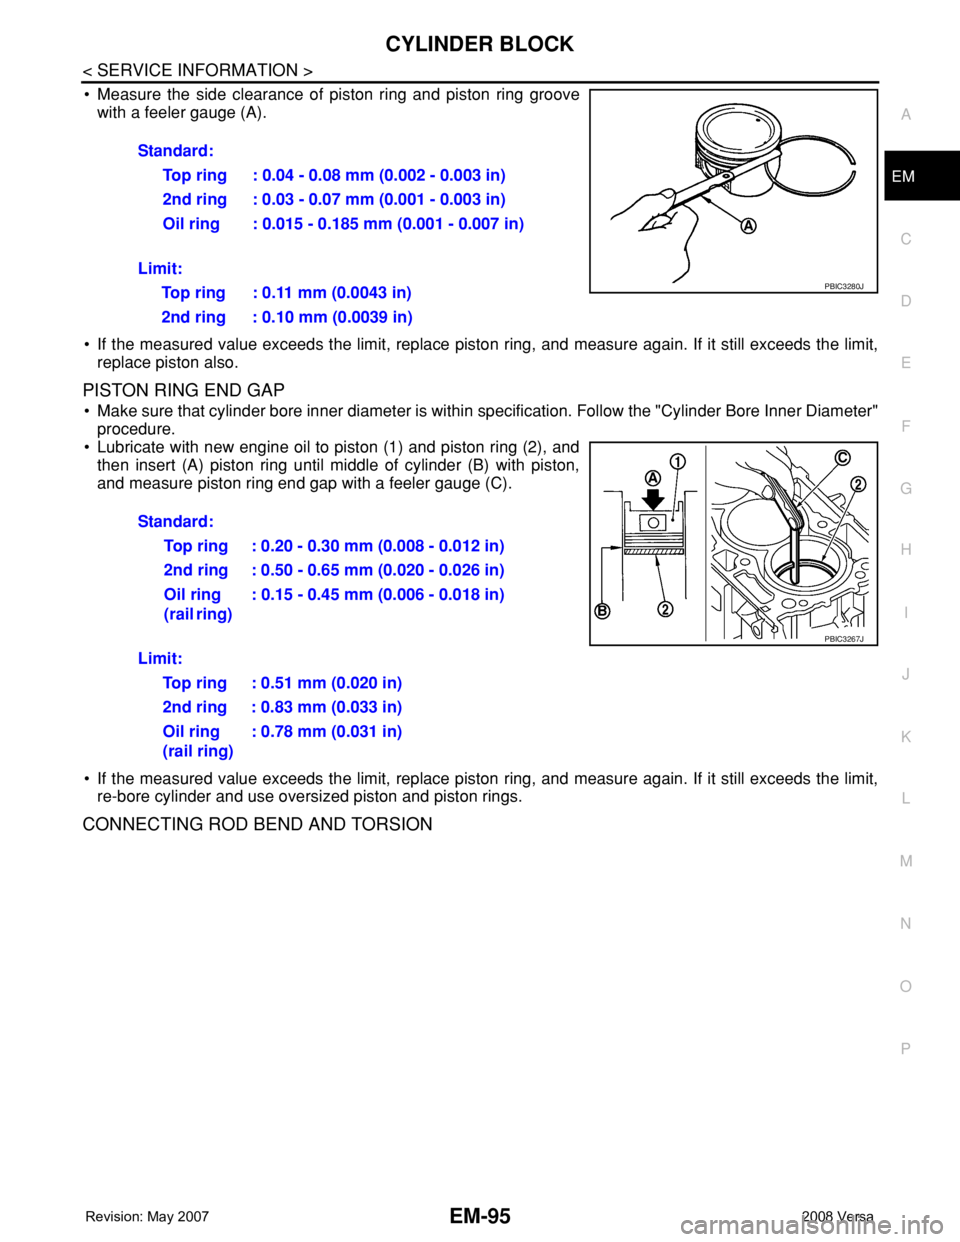
• Measure the side clearance of piston ring and piston ring groove
with a feeler gauge (A).
• If the measured value exceeds the limit, replace piston ring, and measure again. If it still exceeds the limit,
replace piston also.
PISTON RING END GAP
• Make sure that cylinder bore inner diameter is within specification. Follow the "Cylinder Bore Inner Diameter"
procedure.
• Lubricate with new engine oil to piston (1) and piston ring (2), and
then insert (A) piston ring until middle of cylinder (B) with piston,
and measure piston ring end gap with a feeler gauge (C).
• If the measured value exceeds the limit, replace piston ring, and measure again. If it still exceeds the limit,
re-bore cylinder and use oversized piston and piston rings.
CONNECTING ROD BEND AND TORSION
Standard:
Top ring : 0.04 - 0.08 mm (0.002 - 0.003 in)
2nd ring : 0.03 - 0.07 mm (0.001 - 0.003 in)
Oil ring : 0.015 - 0.185 mm (0.001 - 0.007 in)
Limit:
Top ring : 0.11 mm (0.0043 in)
2nd ring : 0.10 mm (0.0039 in)
PBIC3280J
Standard:
Top ring : 0.20 - 0.30 mm (0.008 - 0.012 in)
2nd ring : 0.50 - 0.65 mm (0.020 - 0.026 in)
Oil ring
(rail ring) : 0.15 - 0.45 mm (0.006 - 0.018 in)
Limit:
Top ring : 0.51 mm (0.020 in)
2nd ring : 0.83 mm (0.033 in)
Oil ring
(rail ring): 0.78 mm (0.031 in)
PBIC3267J
Page 1773 of 2771
EM-96
< SERVICE INFORMATION >
CYLINDER BLOCK
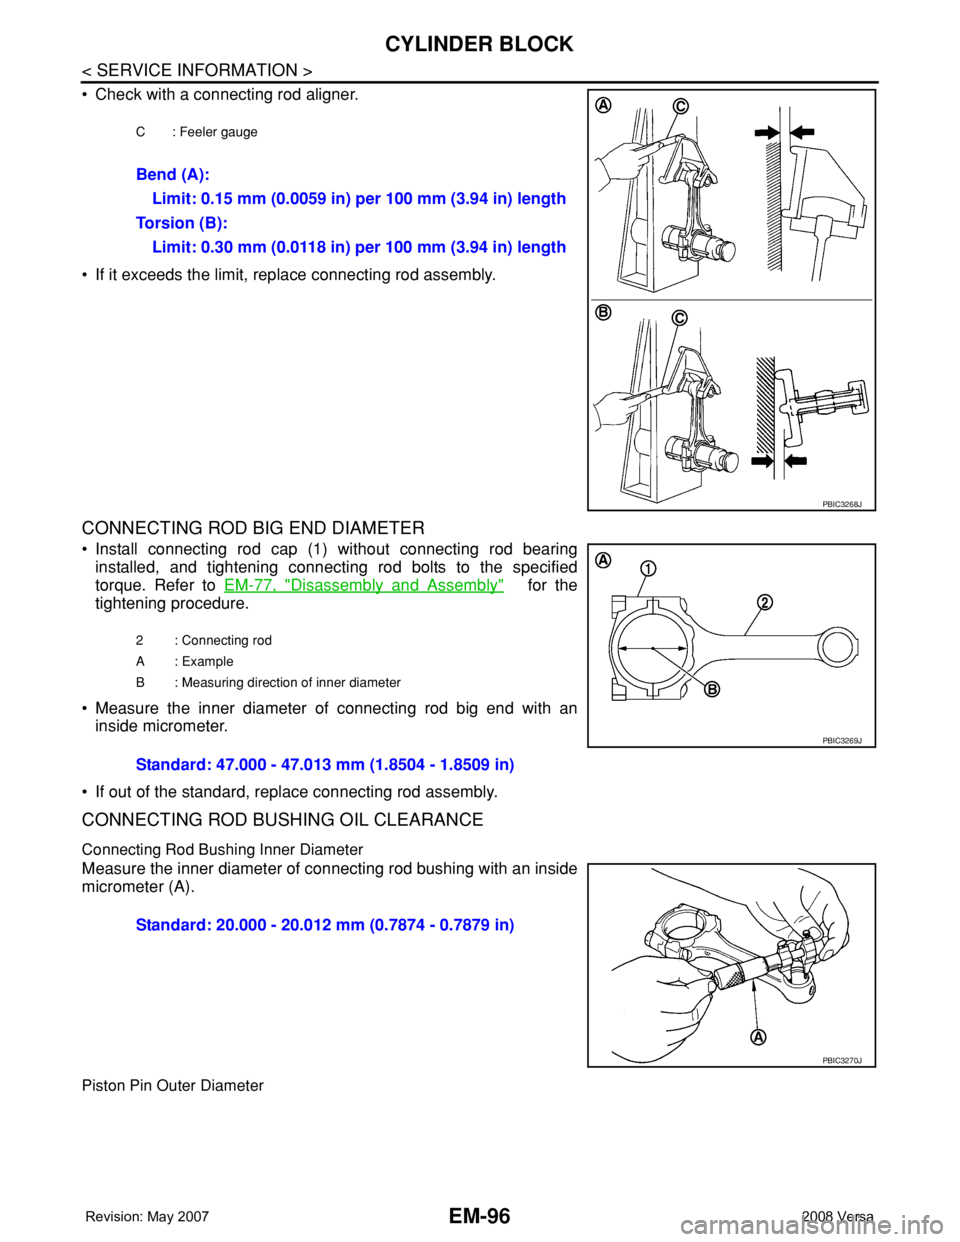
• Check with a connecting rod aligner.
• If it exceeds the limit, replace connecting rod assembly.
CONNECTING ROD BIG END DIAMETER
• Install connecting rod cap (1) without connecting rod bearing
installed, and tightening connecting rod bolts to the specified
torque. Refer to EM-77, "
Disassembly and Assembly" for the
tightening procedure.
• Measure the inner diameter of connecting rod big end with an
inside micrometer.
• If out of the standard, replace connecting rod assembly.
CONNECTING ROD BUSHING OIL CLEARANCE
Connecting Rod Bushing Inner Diameter
Measure the inner diameter of connecting rod bushing with an inside
micrometer (A).
Piston Pin Outer Diameter
C : Feeler gauge
Bend (A):
Limit: 0.15 mm (0.0059 in) per 100 mm (3.94 in) length
To r s i o n ( B ) :
Limit: 0.30 mm (0.0118 in) per 100 mm (3.94 in) length
PBIC3268J
2 : Connecting rod
A : Example
B : Measuring direction of inner diameter
Standard: 47.000 - 47.013 mm (1.8504 - 1.8509 in)
PBIC3269J
Standard: 20.000 - 20.012 mm (0.7874 - 0.7879 in)
PBIC3270J
Page 1774 of 2771
CYLINDER BLOCK
EM-97
< SERVICE INFORMATION >
C
D
E
F
G
H
I
J
K
L
MA
EM
N
P O
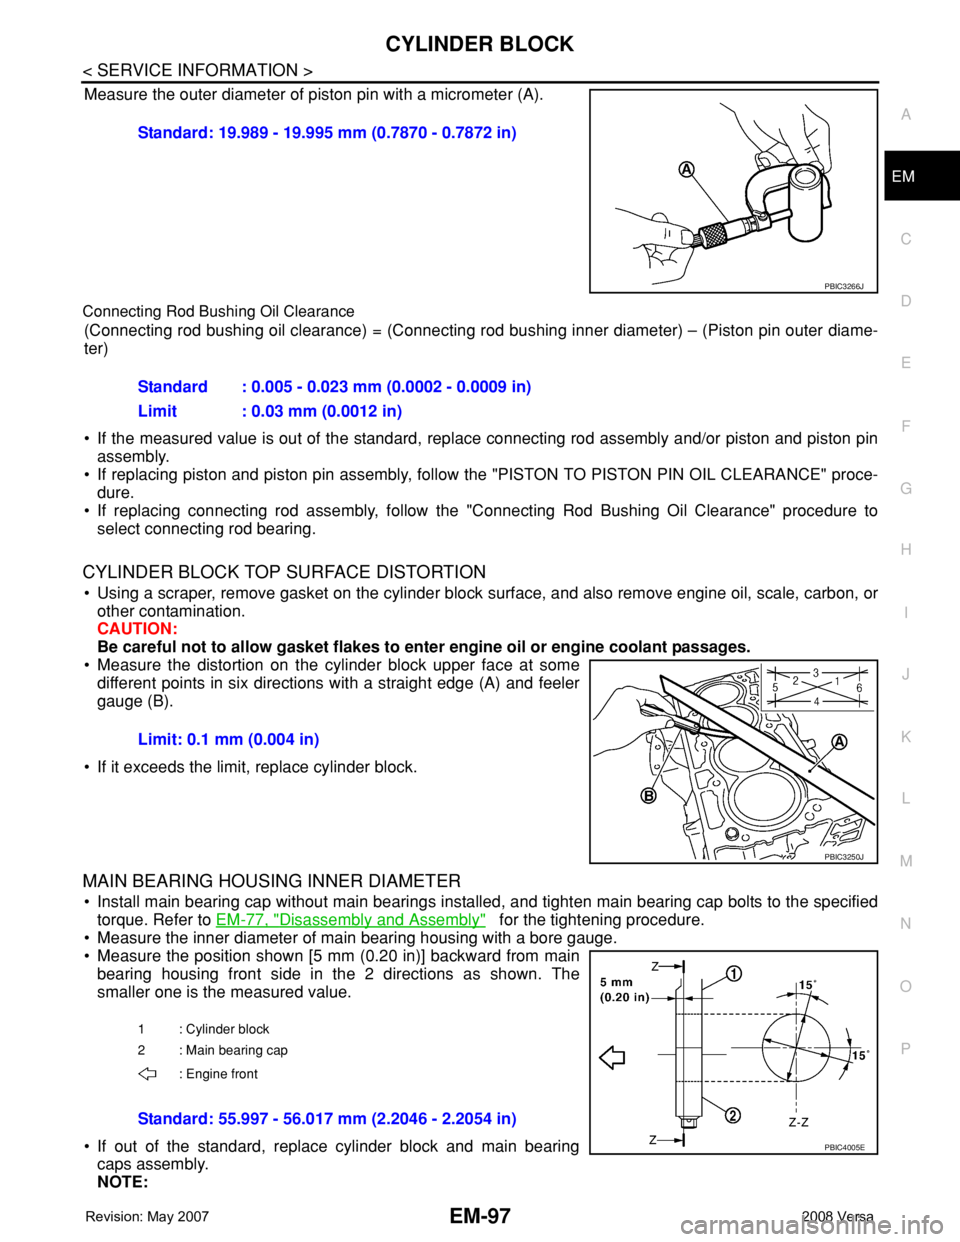
Measure the outer diameter of piston pin with a micrometer (A).
Connecting Rod Bushing Oil Clearance
(Connecting rod bushing oil clearance) = (Connecting rod bushing inner diameter) – (Piston pin outer diame-
ter)
• If the measured value is out of the standard, replace connecting rod assembly and/or piston and piston pin
assembly.
• If replacing piston and piston pin assembly, follow the "PISTON TO PISTON PIN OIL CLEARANCE" proce-
dure.
• If replacing connecting rod assembly, follow the "Connecting Rod Bushing Oil Clearance" procedure to
select connecting rod bearing.
CYLINDER BLOCK TOP SURFACE DISTORTION
• Using a scraper, remove gasket on the cylinder block surface, and also remove engine oil, scale, carbon, or
other contamination.
CAUTION:
Be careful not to allow gasket flakes to enter engine oil or engine coolant passages.
• Measure the distortion on the cylinder block upper face at some
different points in six directions with a straight edge (A) and feeler
gauge (B).
• If it exceeds the limit, replace cylinder block.
MAIN BEARING HOUSING INNER DIAMETER
• Install main bearing cap without main bearings installed, and tighten main bearing cap bolts to the specified
torque. Refer to EM-77, "
Disassembly and Assembly" for the tightening procedure.
• Measure the inner diameter of main bearing housing with a bore gauge.
• Measure the position shown [5 mm (0.20 in)] backward from main
bearing housing front side in the 2 directions as shown. The
smaller one is the measured value.
• If out of the standard, replace cylinder block and main bearing
caps assembly.
NOTE:Standard: 19.989 - 19.995 mm (0.7870 - 0.7872 in)
PBIC3266J
Standard : 0.005 - 0.023 mm (0.0002 - 0.0009 in)
Limit : 0.03 mm (0.0012 in)
Limit: 0.1 mm (0.004 in)
PBIC3250J
1 : Cylinder block
2 : Main bearing cap
: Engine front
Standard: 55.997 - 56.017 mm (2.2046 - 2.2054 in)
PBIC4005E
Page 1775 of 2771
EM-98
< SERVICE INFORMATION >
CYLINDER BLOCK
Main bearing caps cannot be replaced as a single, because it is machined together with cylinder block.
PISTON TO CYLINDER BORE CLEARANCE
Cylinder Bore Inner Diameter
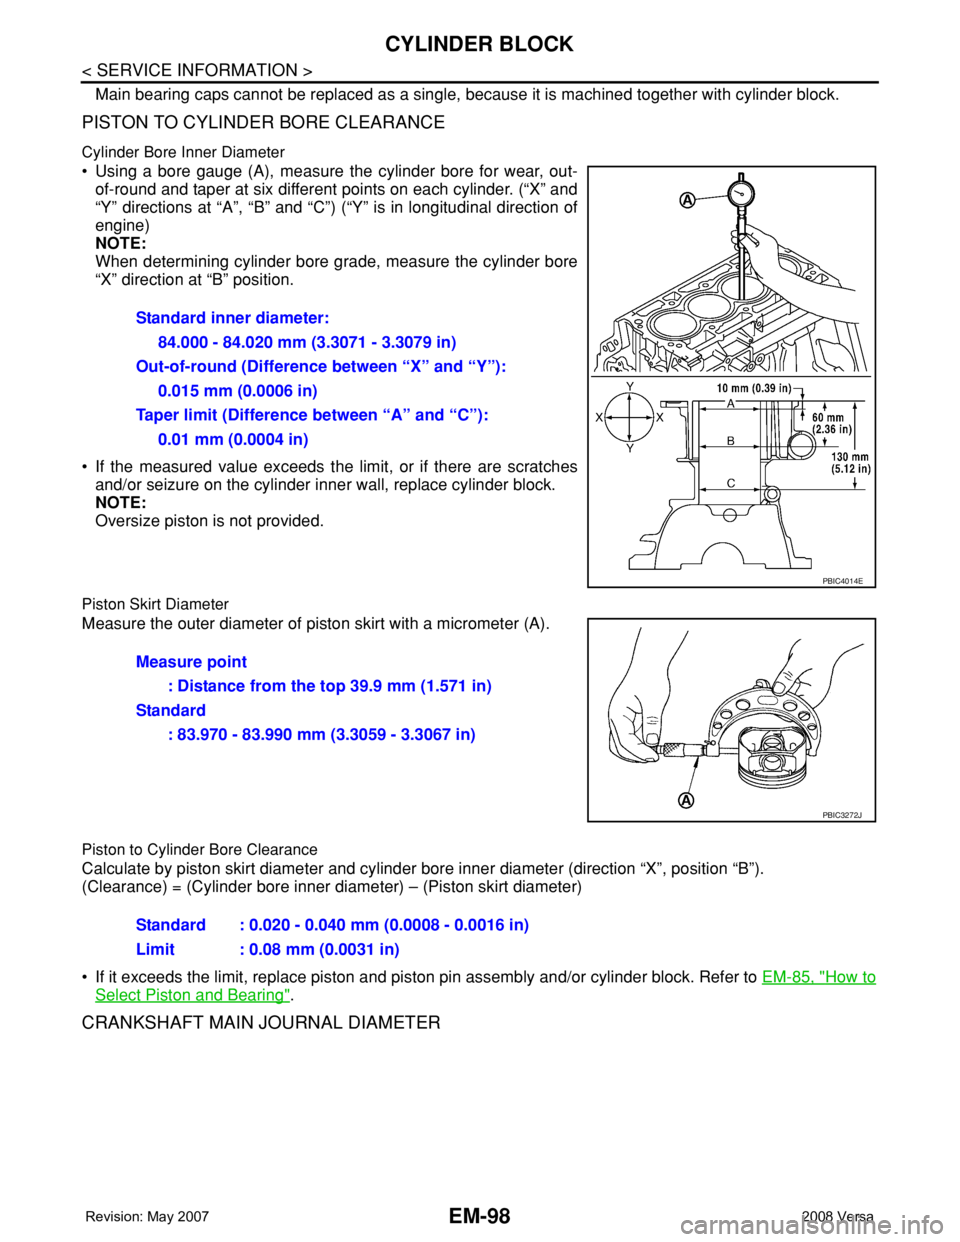
• Using a bore gauge (A), measure the cylinder bore for wear, out-
of-round and taper at six different points on each cylinder. (“X” and
“Y” directions at “A”, “B” and “C”) (“Y” is in longitudinal direction of
engine)
NOTE:
When determining cylinder bore grade, measure the cylinder bore
“X” direction at “B” position.
• If the measured value exceeds the limit, or if there are scratches
and/or seizure on the cylinder inner wall, replace cylinder block.
NOTE:
Oversize piston is not provided.
Piston Skirt Diameter
Measure the outer diameter of piston skirt with a micrometer (A).
Piston to Cylinder Bore Clearance
Calculate by piston skirt diameter and cylinder bore inner diameter (direction “X”, position “B”).
(Clearance) = (Cylinder bore inner diameter) – (Piston skirt diameter)
• If it exceeds the limit, replace piston and piston pin assembly and/or cylinder block. Refer to EM-85, "
How to
Select Piston and Bearing".
CRANKSHAFT MAIN JOURNAL DIAMETER
Standard inner diameter:
84.000 - 84.020 mm (3.3071 - 3.3079 in)
Out-of-round (Difference between “X” and “Y”):
0.015 mm (0.0006 in)
Taper limit (Difference between “A” and “C”):
0.01 mm (0.0004 in)
PBIC4014E
Measure point
: Distance from the top 39.9 mm (1.571 in)
Standard
: 83.970 - 83.990 mm (3.3059 - 3.3067 in)
PBIC3272J
Standard : 0.020 - 0.040 mm (0.0008 - 0.0016 in)
Limit : 0.08 mm (0.0031 in)
Page 1776 of 2771
CYLINDER BLOCK
EM-99
< SERVICE INFORMATION >
C
D
E
F
G
H
I
J
K
L
MA
EM
N
P O
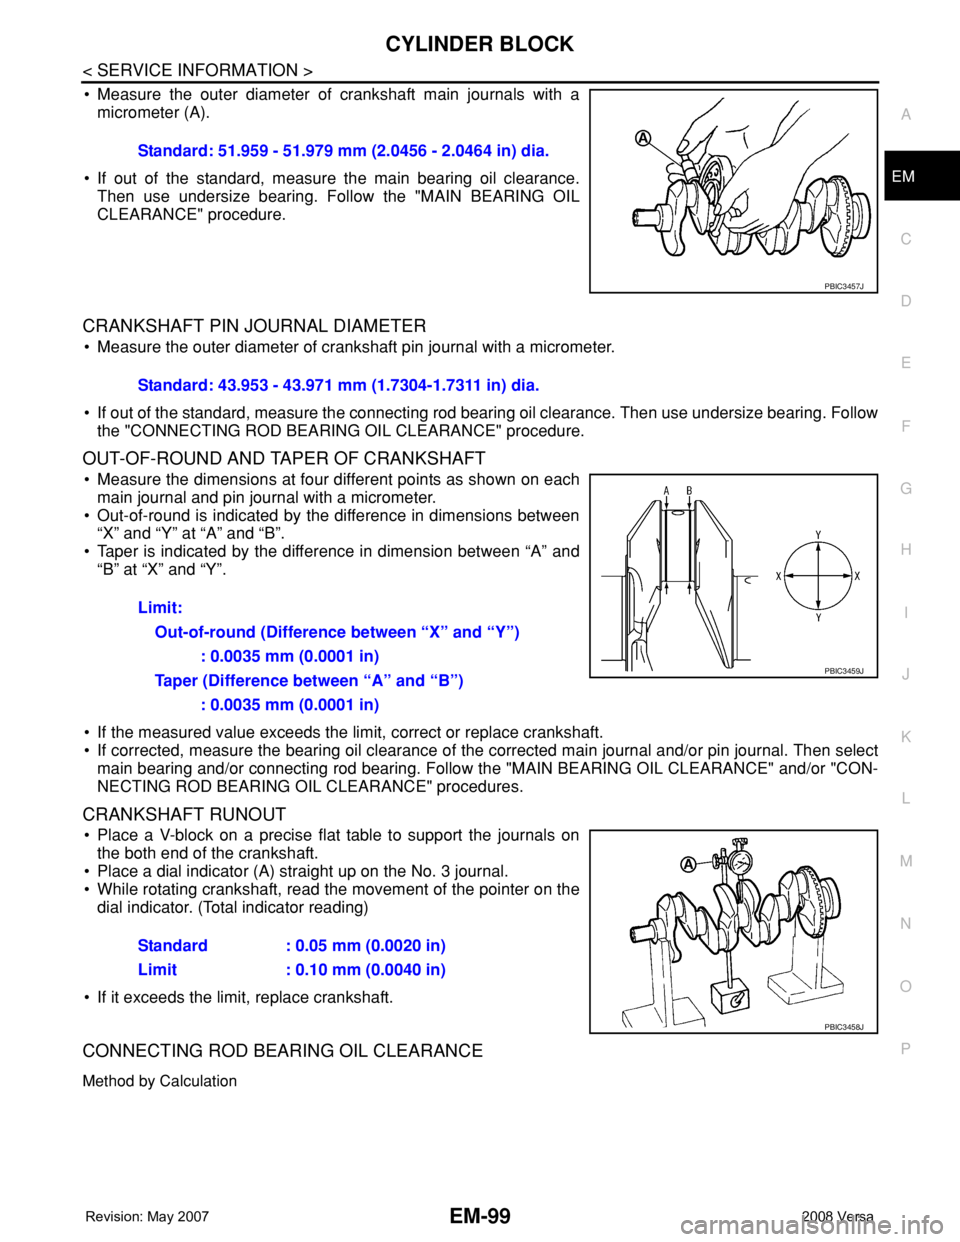
• Measure the outer diameter of crankshaft main journals with a
micrometer (A).
• If out of the standard, measure the main bearing oil clearance.
Then use undersize bearing. Follow the "MAIN BEARING OIL
CLEARANCE" procedure.
CRANKSHAFT PIN JOURNAL DIAMETER
• Measure the outer diameter of crankshaft pin journal with a micrometer.
• If out of the standard, measure the connecting rod bearing oil clearance. Then use undersize bearing. Follow
the "CONNECTING ROD BEARING OIL CLEARANCE" procedure.
OUT-OF-ROUND AND TAPER OF CRANKSHAFT
• Measure the dimensions at four different points as shown on each
main journal and pin journal with a micrometer.
• Out-of-round is indicated by the difference in dimensions between
“X” and “Y” at “A” and “B”.
• Taper is indicated by the difference in dimension between “A” and
“B” at “X” and “Y”.
• If the measured value exceeds the limit, correct or replace crankshaft.
• If corrected, measure the bearing oil clearance of the corrected main journal and/or pin journal. Then select
main bearing and/or connecting rod bearing. Follow the "MAIN BEARING OIL CLEARANCE" and/or "CON-
NECTING ROD BEARING OIL CLEARANCE" procedures.
CRANKSHAFT RUNOUT
• Place a V-block on a precise flat table to support the journals on
the both end of the crankshaft.
• Place a dial indicator (A) straight up on the No. 3 journal.
• While rotating crankshaft, read the movement of the pointer on the
dial indicator. (Total indicator reading)
• If it exceeds the limit, replace crankshaft.
CONNECTING ROD BEARING OIL CLEARANCE
Method by Calculation
Standard: 51.959 - 51.979 mm (2.0456 - 2.0464 in) dia.
PBIC3457J
Standard: 43.953 - 43.971 mm (1.7304-1.7311 in) dia.
Limit:
Out-of-round (Difference between “X” and “Y”)
: 0.0035 mm (0.0001 in)
Taper (Difference between “A” and “B”)
: 0.0035 mm (0.0001 in)
PBIC3459J
Standard : 0.05 mm (0.0020 in)
Limit : 0.10 mm (0.0040 in)
PBIC3458J
Page 1777 of 2771
EM-100
< SERVICE INFORMATION >
CYLINDER BLOCK
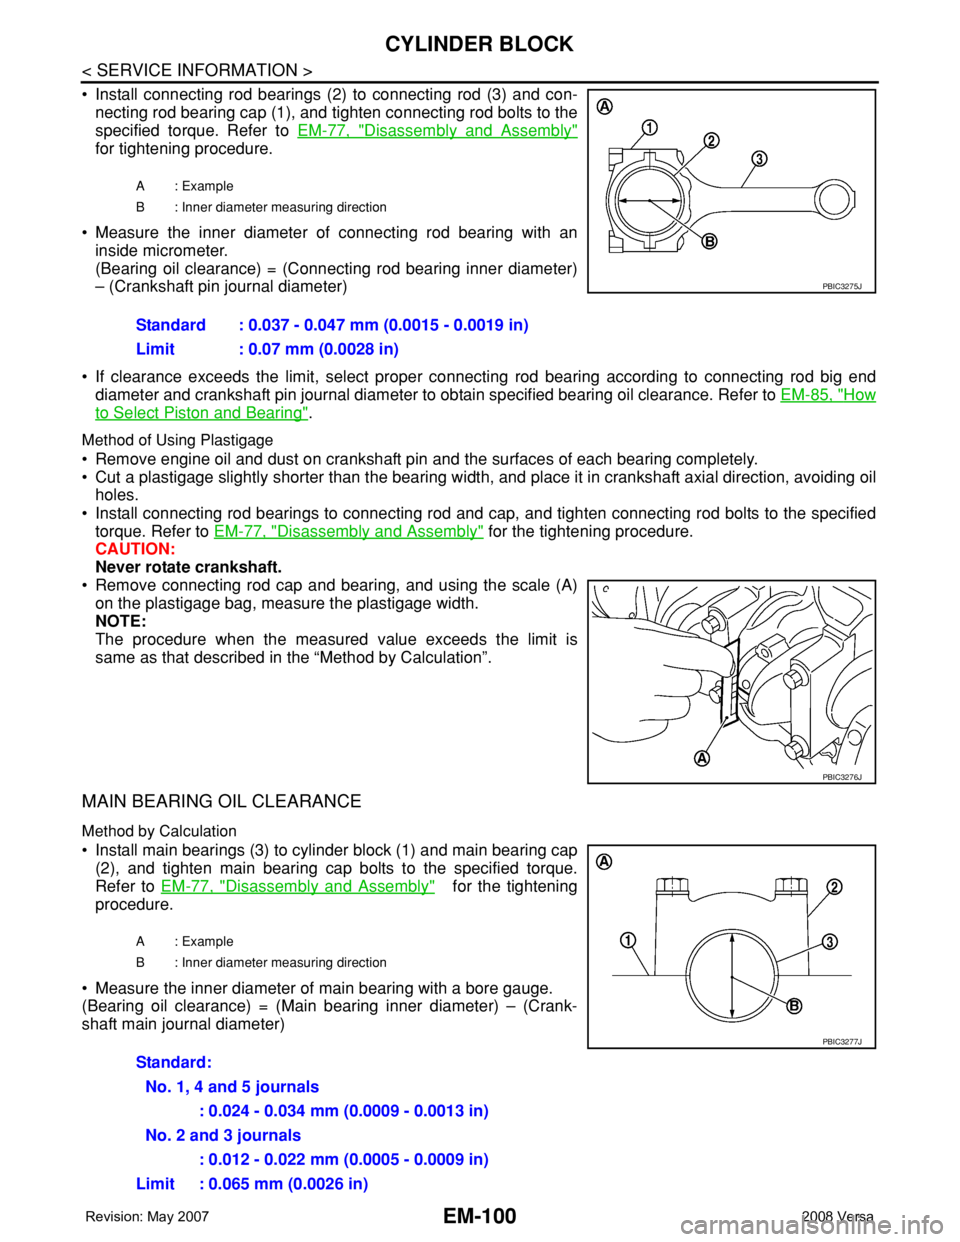
• Install connecting rod bearings (2) to connecting rod (3) and con-
necting rod bearing cap (1), and tighten connecting rod bolts to the
specified torque. Refer to EM-77, "
Disassembly and Assembly"
for tightening procedure.
• Measure the inner diameter of connecting rod bearing with an
inside micrometer.
(Bearing oil clearance) = (Connecting rod bearing inner diameter)
– (Crankshaft pin journal diameter)
• If clearance exceeds the limit, select proper connecting rod bearing according to connecting rod big end
diameter and crankshaft pin journal diameter to obtain specified bearing oil clearance. Refer to EM-85, "
How
to Select Piston and Bearing".
Method of Using Plastigage
• Remove engine oil and dust on crankshaft pin and the surfaces of each bearing completely.
• Cut a plastigage slightly shorter than the bearing width, and place it in crankshaft axial direction, avoiding oil
holes.
• Install connecting rod bearings to connecting rod and cap, and tighten connecting rod bolts to the specified
torque. Refer to EM-77, "
Disassembly and Assembly" for the tightening procedure.
CAUTION:
Never rotate crankshaft.
• Remove connecting rod cap and bearing, and using the scale (A)
on the plastigage bag, measure the plastigage width.
NOTE:
The procedure when the measured value exceeds the limit is
same as that described in the “Method by Calculation”.
MAIN BEARING OIL CLEARANCE
Method by Calculation
• Install main bearings (3) to cylinder block (1) and main bearing cap
(2), and tighten main bearing cap bolts to the specified torque.
Refer to EM-77, "
Disassembly and Assembly" for the tightening
procedure.
• Measure the inner diameter of main bearing with a bore gauge.
(Bearing oil clearance) = (Main bearing inner diameter) – (Crank-
shaft main journal diameter)
A : Example
B : Inner diameter measuring direction
Standard : 0.037 - 0.047 mm (0.0015 - 0.0019 in)
Limit : 0.07 mm (0.0028 in)
PBIC3275J
PBIC3276J
A : Example
B : Inner diameter measuring direction
Standard:
No. 1, 4 and 5 journals
: 0.024 - 0.034 mm (0.0009 - 0.0013 in)
No. 2 and 3 journals
: 0.012 - 0.022 mm (0.0005 - 0.0009 in)
Limit : 0.065 mm (0.0026 in)
PBIC3277J
Page 1778 of 2771
CYLINDER BLOCK
EM-101
< SERVICE INFORMATION >
C
D
E
F
G
H
I
J
K
L
MA
EM
N
P O
• If clearance exceeds the limit, select proper main bearing according to main bearing inner diameter and
crankshaft main journal diameter to obtain specified bearing oil clearance. Refer to EM-85, "
How to Select
Piston and Bearing".
Method of Using Plastigage
• Remove engine oil and dust on crankshaft main journal and the surfaces of each bearing completely.
• Cut a plastigage slightly shorter than the bearing width, and place it in crankshaft axial direction, avoiding oil
holes.
• Install main bearings to cylinder block and main bearing cap, and tighten main bearing cap bolts to the spec-
ified torque. Refer to EM-77, "
Disassembly and Assembly" for the tightening procedure.
CAUTION:
Never rotate crankshaft.
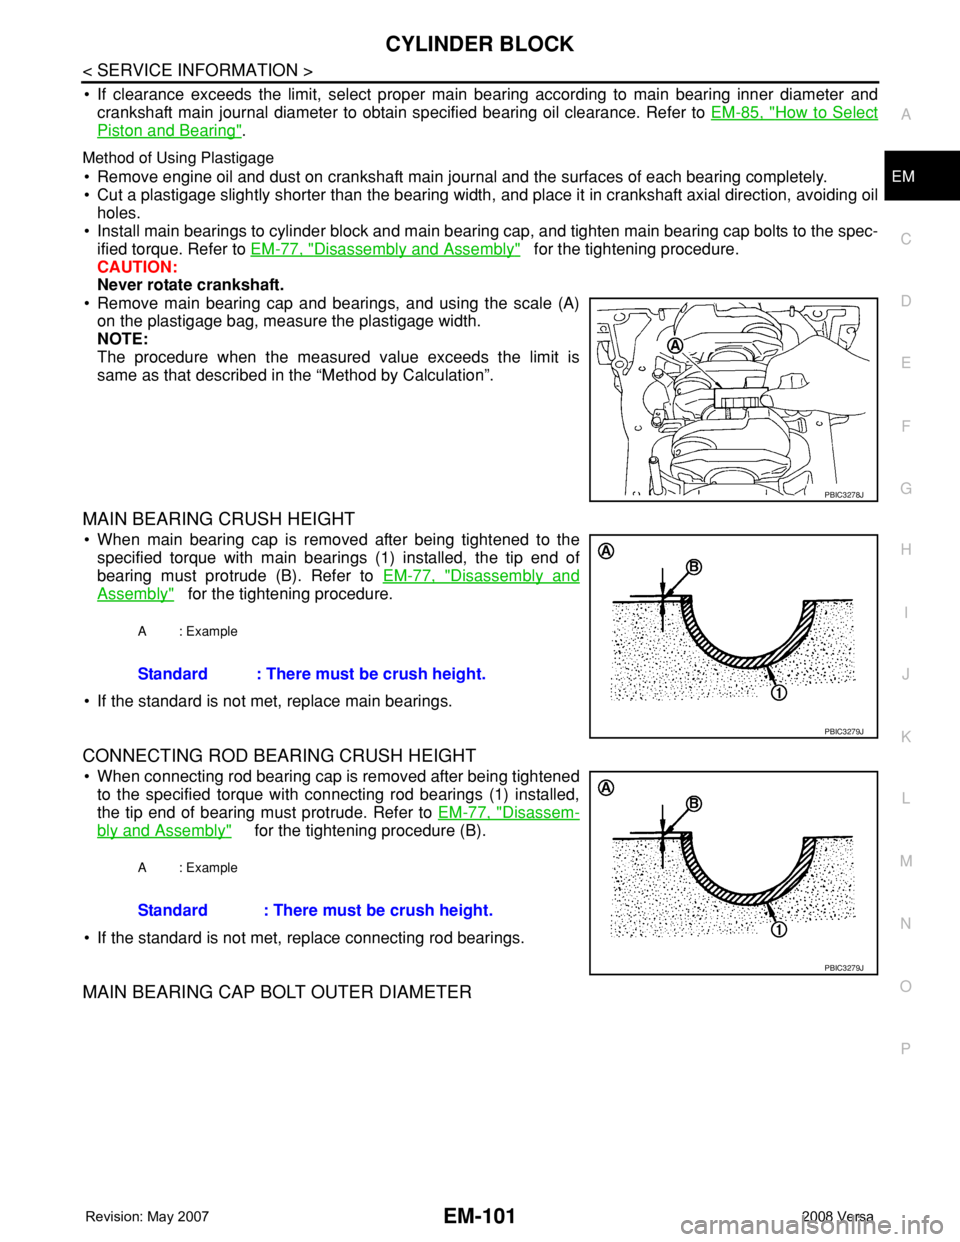
• Remove main bearing cap and bearings, and using the scale (A)
on the plastigage bag, measure the plastigage width.
NOTE:
The procedure when the measured value exceeds the limit is
same as that described in the “Method by Calculation”.
MAIN BEARING CRUSH HEIGHT
• When main bearing cap is removed after being tightened to the
specified torque with main bearings (1) installed, the tip end of
bearing must protrude (B). Refer to EM-77, "
Disassembly and
Assembly" for the tightening procedure.
• If the standard is not met, replace main bearings.
CONNECTING ROD BEARING CRUSH HEIGHT
• When connecting rod bearing cap is removed after being tightened
to the specified torque with connecting rod bearings (1) installed,
the tip end of bearing must protrude. Refer to EM-77, "
Disassem-
bly and Assembly" for the tightening procedure (B).
• If the standard is not met, replace connecting rod bearings.
MAIN BEARING CAP BOLT OUTER DIAMETER
PBIC3278J
A : Example
Standard : There must be crush height.
PBIC3279J
A : Example
Standard : There must be crush height.
PBIC3279J
Page 1779 of 2771
EM-102
< SERVICE INFORMATION >
CYLINDER BLOCK
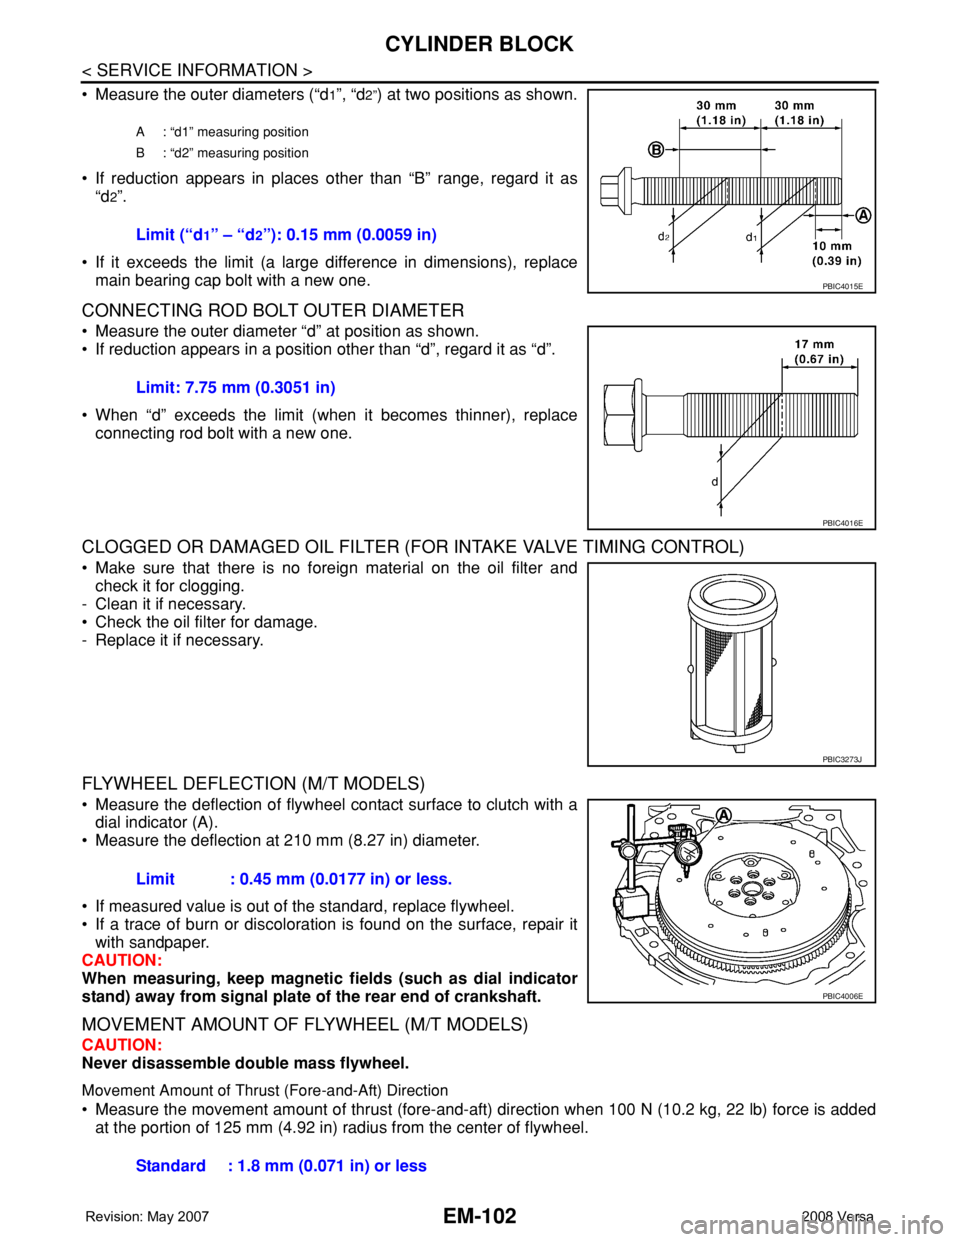
• Measure the outer diameters (“d1”, “d2”) at two positions as shown.
• If reduction appears in places other than “B” range, regard it as
“d
2”.
• If it exceeds the limit (a large difference in dimensions), replace
main bearing cap bolt with a new one.
CONNECTING ROD BOLT OUTER DIAMETER
• Measure the outer diameter “d” at position as shown.
• If reduction appears in a position other than “d”, regard it as “d”.
• When “d” exceeds the limit (when it becomes thinner), replace
connecting rod bolt with a new one.
CLOGGED OR DAMAGED OIL FILTER (FOR INTAKE VALVE TIMING CONTROL)
• Make sure that there is no foreign material on the oil filter and
check it for clogging.
- Clean it if necessary.
• Check the oil filter for damage.
- Replace it if necessary.
FLYWHEEL DEFLECTION (M/T MODELS)
• Measure the deflection of flywheel contact surface to clutch with a
dial indicator (A).
• Measure the deflection at 210 mm (8.27 in) diameter.
• If measured value is out of the standard, replace flywheel.
• If a trace of burn or discoloration is found on the surface, repair it
with sandpaper.
CAUTION:
When measuring, keep magnetic fields (such as dial indicator
stand) away from signal plate of the rear end of crankshaft.
MOVEMENT AMOUNT OF FLYWHEEL (M/T MODELS)
CAUTION:
Never disassemble double mass flywheel.
Movement Amount of Thrust (Fore-and-Aft) Direction
• Measure the movement amount of thrust (fore-and-aft) direction when 100 N (10.2 kg, 22 lb) force is added
at the portion of 125 mm (4.92 in) radius from the center of flywheel.
A : “d1” measuring position
B : “d2” measuring position
Limit (“d1” – “d2”): 0.15 mm (0.0059 in)
PBIC4015E
Limit: 7.75 mm (0.3051 in)
PBIC4016E
PBIC3273J
Limit : 0.45 mm (0.0177 in) or less.
PBIC4006E
Standard : 1.8 mm (0.071 in) or less
Page 1780 of 2771
CYLINDER BLOCK
EM-103
< SERVICE INFORMATION >
C
D
E
F
G
H
I
J
K
L
MA
EM
N
P O
• If measured value is out of the standard, replace flywheel.
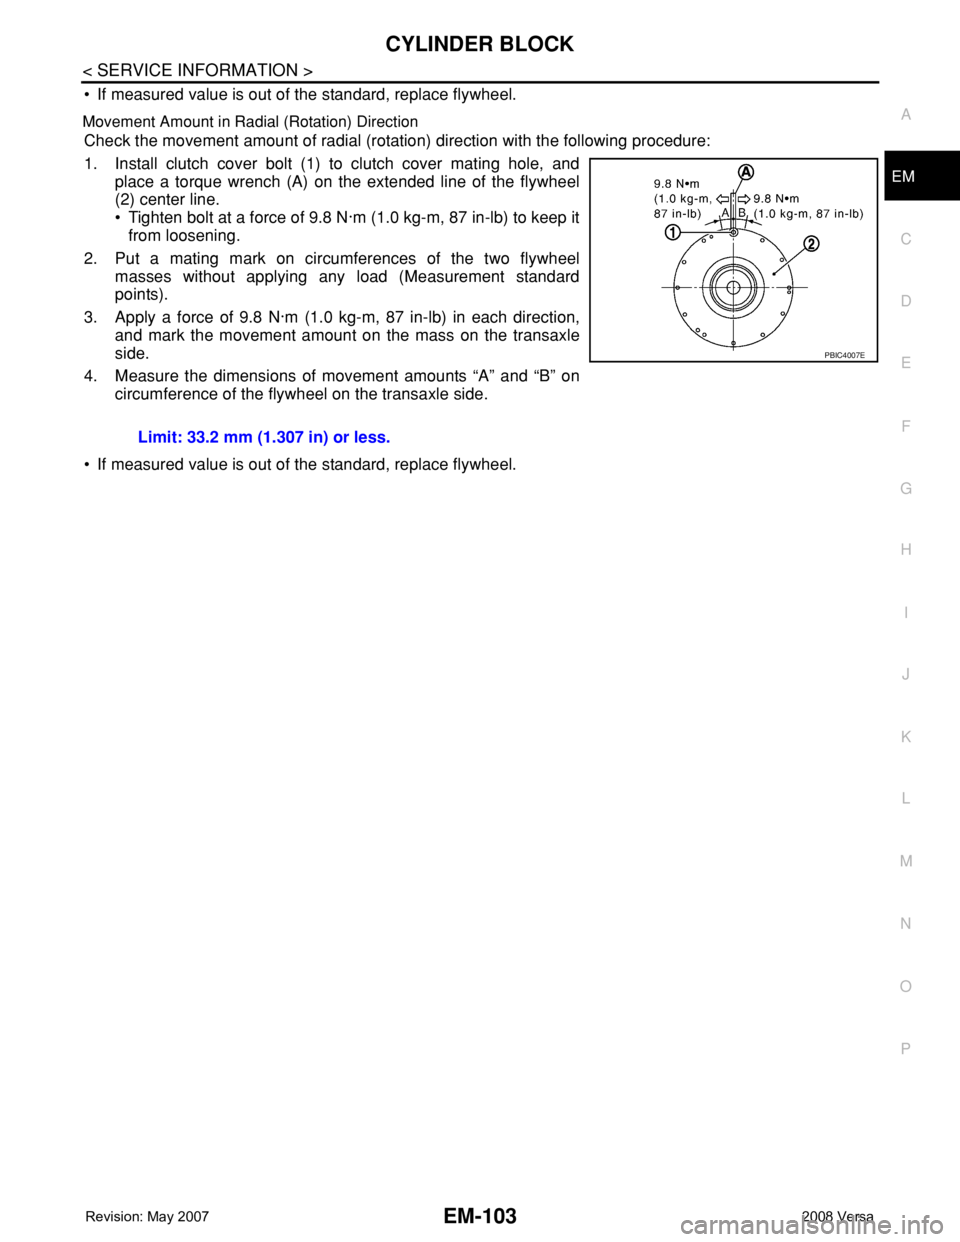
Movement Amount in Radial (Rotation) Direction
Check the movement amount of radial (rotation) direction with the following procedure:
1. Install clutch cover bolt (1) to clutch cover mating hole, and
place a torque wrench (A) on the extended line of the flywheel
(2) center line.
• Tighten bolt at a force of 9.8 N·m (1.0 kg-m, 87 in-lb) to keep it
from loosening.
2. Put a mating mark on circumferences of the two flywheel
masses without applying any load (Measurement standard
points).
3. Apply a force of 9.8 N·m (1.0 kg-m, 87 in-lb) in each direction,
and mark the movement amount on the mass on the transaxle
side.
4. Measure the dimensions of movement amounts “A” and “B” on
circumference of the flywheel on the transaxle side.
• If measured value is out of the standard, replace flywheel.Limit: 33.2 mm (1.307 in) or less.
PBIC4007E