light NISSAN TIIDA 2011 Service Repair Manual
[x] Cancel search | Manufacturer: NISSAN, Model Year: 2011, Model line: TIIDA, Model: NISSAN TIIDA 2011Pages: 3787, PDF Size: 78.35 MB
Page 1875 of 3787
BASIC SERVICE PROCEDUREEC-581
< SERVICE INFORMATION > [MR18DE]
C
D
E
F
G H
I
J
K L
M A
EC
NP
O
• Electric load switch: OFF
[Air conditioner, headlamp, rear window defogger]
On vehicles equipped with daytime light systems, if the parking brake is applied before the engine is
started the headlamp will not be illuminated.
• Steering wheel: Neutral (Straight-ahead position)
• Vehicle speed: Stopped
• Transmission: Warmed-up
- Models with CONSULT-III (A/T and CVT models)
• Drive vehicle until “FLUID TEMP SE” in “DATA MONI TOR” mode of “A/T” or “CVT” system indicates less
than 0.9 V.
- Models without CONSULT-III (A/T and CVT models) and M/T models
• Drive vehicle for 10 minutes.
OPERATION PROCEDURE
With CONSULT-III
1. Perform EC-580, "Accelerator Pedal Released Position Learning".
2. Perform EC-580, "
Throttle Valve Closed Position Learning".
3. Start engine and warm it up to normal operating temperature.
4. Check that all items listed under the topic PREP ARATION (previously mentioned) are in good order.
5. Select “IDLE AIR VOL LEA RN” in “WORK SUPPORT” mode.
6. Touch “START” and wait 20 seconds.
7. Make sure that “CMPLT” is displayed on CONSULT-III screen. If “CMPLT” is not displayed, Idle Air Vol-
ume Learning will not be carried out successfully. In this case, find the cause of the incident by referring to
the DIAGNOSTIC PROCEDURE below.
8. Rev up the engine two or three times and make sure that idle speed and ignition timing are within the specifications.
Refer to EC-574, "
Basic Inspection".
Without CONSULT-III
NOTE:
•It is better to count the time accurately with a clock.
• It is impossible to switch the di agnostic mode when an accelerator pedal position sensor circuit has
a malfunction.
1. Perform EC-580, "
Accelerator Pedal Released Position Learning".
2. Perform EC-580, "
Throttle Valve Closed Position Learning".
3. Start engine and warm it up to normal operating temperature.
4. Check that all items listed under the topic PREP ARATION (previously mentioned) are in good order.
5. Turn ignition switch OFF and wait at least 10 seconds.
6. Confirm that accelerator pedal is fully releas ed, turn ignition switch ON and wait 3 seconds.
7. Repeat the following procedure quick ly five times within 5 seconds.
a. Fully depress the accelerator pedal.
b. Fully release the accelerator pedal.
8. Wait 7 seconds, fully depress the accelerator pedal and keep it for approx. 20 seconds until the MIL stops blinking and turned ON.
9. Fully release the accelerator pedal within 3 seconds after the MIL turned ON.
10. Start engine and let it idle.
Item Specification
Idle speed M/T: 700
± 50 rpm (in Neutral position)
A/T: 700 ± 50 rpm (in P or N position)
CVT: 700 ± 50 rpm (in P or N position)
Ignition timing M/T: 13
± 5 ° BTDC (in Neutral position)
A/T: 13 ± 5° BTDC (in P or N position)
CVT: 13 ± 5 ° BTDC (in P or N position)
Revision: May 2010 2011 Versa
Page 1877 of 3787
BASIC SERVICE PROCEDUREEC-583
< SERVICE INFORMATION > [MR18DE]
C
D
E
F
G H
I
J
K L
M A
EC
NP
O
1. Remove fuel pump fuse (1) located in IPDM E/R (2).
• : Vehicle front
2. Start engine.
3. After engine stalls, crank it two or three times to release all fuel pressure.
4. Turn ignition switch OFF.
5. Reinstall fuel pump fuse after servicing fuel system.
FUEL PRESSURE CHECK
CAUTION:
Before disconnecting fuel line, release fuel pressure from fuel line to eliminate danger.
NOTE:
• Prepare pans or saucers under the disconnected fuel line because the fuel may spill out. The fuel
pressure cannot be completely released because C11 models do not have fuel return system.
• The fuel hose connection method used when taking fuel pressure check must not be used for other
purposes.
• Be careful not to scratch or put debris around connection area when servicing, so that the quick
connector maintains seal abil ity with O-rings inside.
• Do not perform fuel pressure check with electrical systems operating (i.e. lights, rear defogger, A/C,
etc.) Fuel pressure gauge may indicate false readin gs due to varying engine load and changes in
manifold vacuum.
1. Release fuel pressure to zero. Refer to "FUEL PRESSURE RELEASE".
2. Prepare fuel hose for fuel pressure check B and fuel tube adapter (KV10118400) D, then connect fuel pressure gauge A.
• : To quick connector
• : To fuel tube (engine side)
• C: Clamp
• Use suitable fuel hose for fuel pressure check (genuineNISSAN fuel hose without quick connector).
• To avoid unnecessary force or tension to hose, use moder- ately long fuel hose for fuel pressure check.
• Do not use the fuel hose for checking fuel pressure with dam- age or cracks on it.
• Use Pressure Gauge to check fuel pressure.
3. Remove fuel hose. Refer to EM-154, "
Removal and Installation".
• Do not twist or kink fuel hose because it is plastic hose.
4. Connect fuel hose for fuel pressure check (1) to fuel tube (engine side) with clamp (2) as shown in the figure.
• No.2 spool (5)
• Wipe off oil or dirt from hose insertion part using cloth moist-ened with gasoline.
• Apply proper amount of gasoline between top of the fuel tube (3) and No.1 spool (4).
• Insert fuel hose for fuel pressure check until it touches the No.1 spool on fuel tube.
• Use NISSAN genuine hose clamp (part number: 16439 N4710
or 16439 40U00).
• When reconnecting fuel line, always use new clamps.
• Use a torque driver to tighten clamps.
• Install hose clamp to the positi on within 1 - 2 mm (0.04 - 0.08 in).
• Make sure that clamp screw does not contact adjacent parts.
PBIB2958E
Tightening torque: 1 - 1.5 N·m (0.1 - 0.15 kg-m, 9 - 13 in-lb)
PBIB2982E
PBIB2983E
Revision: May 2010 2011 Versa
Page 1884 of 3787
EC-590
< SERVICE INFORMATION >[MR18DE]
TROUBLE DIAGNOSIS
DTC Inspection Priority Chart
INFOID:0000000006341731
If some DTCs are displayed at the same time, perform inspections one by one based on the following priority
chart.
Fail-Safe ChartINFOID:0000000006341732
When the DTC listed below is detected, the ECM enters fail-safe mode and the MIL lights up.
Priority Detected items (DTC)
1 • U0101 U0140 U1001 CAN communication line • P0101 P0102 P0103 Mass air flow sensor
• P0112 P0113 P0127 Intake air temperature sensor
• P0116 P0117 P0118 P0125 Engine coolant temperature sensor
• P0122 P0123 P0222 P0223 P1225 P1226 P2135 Throttle position sensor
• P0128 Thermostat function
• P0181 P0182 P0183 Fuel tank temperature sensor
• P0327 P0328 Knock sensor
• P0335 Crankshaft position sensor (POS)
• P0340 Camshaft position sensor (PHASE)
• P0460 P0461 P0462 P0463 Fuel level sensor
• P0500 Vehicle speed sensor
• P0605 P0607 ECM
• P0643 Sensor power supply
• P0705 Transmission range switch
• P0850 Park/neutral position (PNP) switch
• P1610 - P1615 NATS
• P2122 P2123 P2127 P2128 P2138 Accelerator pedal position sensor
2 • P0031 P0032 Air fuel ratio (A/F) sensor 1 heater • P0037 P0038 Heated oxygen sensor 2 heater
• P0075 Intake valve timing control solenoid valve
• P0130 P0131 P0132 P014C P014D P2A00 Air fuel ratio (A/F) sensor 1
• P0137 P0138 P0139 Heated oxygen sensor 2
• P0441 EVAP control system purge flow monitoring
• P0443 P0444 P0445 EVAP canister purge volume control solenoid valve
• P0447 P0448 EVAP canister vent control valve
• P0451 P0452 P0453 EVAP control system pressure sensor
• P1217 Engine over temperature (OVERHEAT)
• P1805 Brake switch
• P2100 P2103 Throttle control motor relay
• P2101 Electric throttle control function
• P2118 Throttle control motor
3 • P0011 Intake valve timing control • P0171 P0172 Fuel injection system function
• P0300 - P0304 Misfire
• P0420 Three way catalyst function
• P0442 P0456 EVAP co ntrol system (SMALL LEAK, VERY SMALL LEAK)
• P0455 EVAP control system (GROSS LEAK)
• P0506 P0507 Idle speed control system
• P050A P050B P050E Cold start control
• P0710 P0715 P0720 P0725 P0731 P0732 P0733 P0734 P0740 P0744 P0745 P0746 P0750 P0755 P0776 P0778 P0840 P0845 P1705 P1740 P1760 P1777 P1778 A/T or CVT related sensors, solenoid valves and switches
• P1148 Closed loop control
• P1211 TCS control unit
• P1212 TCS communication line
• P1564 ASCD steering switch
• P1572 ASCD brake switch
• P1574 ASCD vehicle speed sensor
• P1715 Input speed sensor
• P2119 Electric throttle control actuator
Revision: May 2010 2011 Versa
Page 1885 of 3787
TROUBLE DIAGNOSISEC-591
< SERVICE INFORMATION > [MR18DE]
C
D
E
F
G H
I
J
K L
M A
EC
NP
O
• When there is an open circuit on MIL circuit, the ECM c
annot warn the driver by lighting up MIL when there
is malfunction on engine control system.
Therefore, when electrical controlled throttle and pa rt of ECM related diagnoses are continuously detected
as NG for 5 trips, ECM warns the driver that engine control system malfunctions and MIL circuit is open by
means of operating fail-safe function.
The fail-safe function also operates when above diagnoses except MIL circuit are detected and demands the
driver to repair the malfunction.
DTC No. Detected items Engine operating condition in fail-safe mode
P0102
P0103 Mass air flow sensor circuit Engine speed will not rise more than 2,400 rpm due to the fuel cut.
P0117
P0118 Engine coolant temperature
sensor circuit Engine coolant temperature will be determined by ECM based on the following condi-
tion.
CONSULT-III displays the engine coolant temperature decided by ECM.
Condition Engine coolant temperature decided
(CONSULT-III display)
Just as ignition switch is turned ON
or START 40
°C (104 °F)
Approx. 4 minutes or more after
engine starting. 80
°C (176 °F)
Except as shown above 40 - 80°
C (104 - 176 °F)
(Depends on the time)
When the fail-safe system for engine coolant temperature sensor is activated, the cool-
ing fan operates while engine is running.
P0122
P0123
P0222
P0223
P2135 Throttle position sensor The ECM controls the electric throttle control actuator in regulating the throttle opening
in order for the idle position to be within +10 degrees.
The ECM regulates the opening speed of the throttle valve to be slower than the normal
condition.
So, the acceleration will be poor.
P0643 Sensor power supply ECM stops the electric throttle control actuator control, throttle valve is maintained at a fixed opening (approx. 5 degrees) by the return spring.
P2100
P2103 Throttle control relay ECM stops the electric throttle control actuator control, throttle valve is maintained at a
fixed opening (approx. 5 degrees) by the return spring.
P2101 Electric throttle control func- tion ECM stops the electric throttle control actuator control, throttle valve is maintained at a
fixed opening (approx. 5 degrees) by the return spring.
P2118 Throttle control motor ECM stops the electric throttle control actuator control, throttle valve is maintained at a fixed opening (approx. 5 degrees) by the return spring.
P2119 Electric throttle control actu- ator (When electric throttle control actuator does not function properly due to the return
spring malfunction:)
ECM controls the electric throttle actuator by regulating the throttle opening around the
idle position. The engine speed will not rise more than 2,000 rpm.
(When throttle valve opening angle in fail-safe mode is not in specified range:)
ECM controls the electric throttle control ac
tuator by regulating the throttle opening to
20 degrees or less.
(When ECM detects the throttle valve is stuck open:)
While the vehicle is driving, it slows down gradually by fuel cut. After the vehicle stops,
the engine stalls.
The engine can restart in N or P (A/T, CVT), Neutral (M/T) position, and engine speed
will not exceed 1,000 rpm or more.
P2122
P2123
P2127
P2128
P2138 Accelerator pedal position
sensor
The ECM controls the electric throttle control actuator in regulating the throttle opening
in order for the idle position to be within +10 degrees.
The ECM regulates the opening speed of the throttle valve to be slower than the normal
condition.
So, the acceleration will be poor.
Engine operating condition in fail-safe mode
Engine speed will not rise more than 2,500 rpm due to the fuel cut
Revision: May 2010 2011 Versa
Page 1900 of 3787
EC-606
< SERVICE INFORMATION >[MR18DE]
TROUBLE DIAGNOSIS
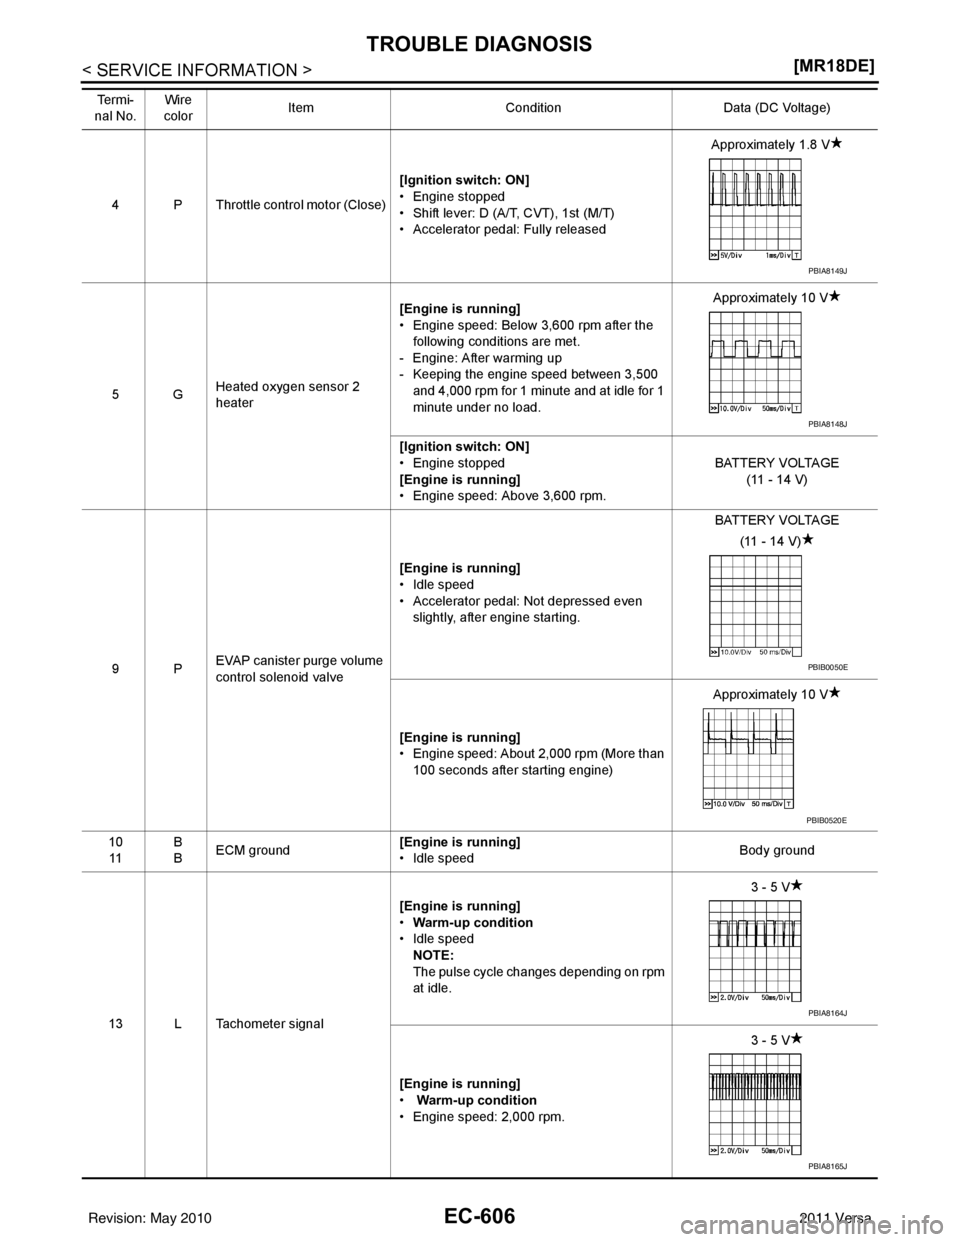
4 P Throttle contro
l motor (Close)[Ignition switch: ON]
• Engine stopped
• Shift lever: D (A/T, CVT), 1st (M/T)
• Accelerator pedal: Fully released Approximately 1.8 V
5G Heated oxygen sensor 2
heater [Engine is running]
• Engine speed: Below 3,600 rpm after the
following conditions are met.
- Engine: After warming up
- Keeping the engine speed between 3,500 and 4,000 rpm for 1 minute and at idle for 1
minute under no load. Approximately 10 V
[Ignition switch: ON]
• Engine stopped
[Engine is running]
• Engine speed: Above 3,600 rpm. BATTERY VOLTAGE
(11 - 14 V)
9P EVAP canister purge volume
control solenoid valve [Engine is running]
• Idle speed
• Accelerator pedal: Not depressed even
slightly, after engine starting. BATTERY VOLTAGE
(11 - 14 V)
[Engine is running]
• Engine speed: About 2,000 rpm (More than 100 seconds after starting engine) Approximately 10 V
10 11 B
B
ECM ground [Engine is running]
• Idle speed
Body ground
13 L Tachometer signal [Engine is running]
•
Warm-up condition
• Idle speed NOTE:
The pulse cycle changes depending on rpm
at idle. 3 - 5 V
[Engine is running]
• Warm-up condition
• Engine speed: 2,000 rpm. 3 - 5 V
Te r m i -
nal No. Wire
color Item
Condition Data (DC Voltage)
PBIA8149J
PBIA8148J
PBIB0050E
PBIB0520E
PBIA8164J
PBIA8165J
Revision: May 2010 2011 Versa
Page 1905 of 3787
TROUBLE DIAGNOSISEC-611
< SERVICE INFORMATION > [MR18DE]
C
D
E
F
G H
I
J
K L
M A
EC
NP
O
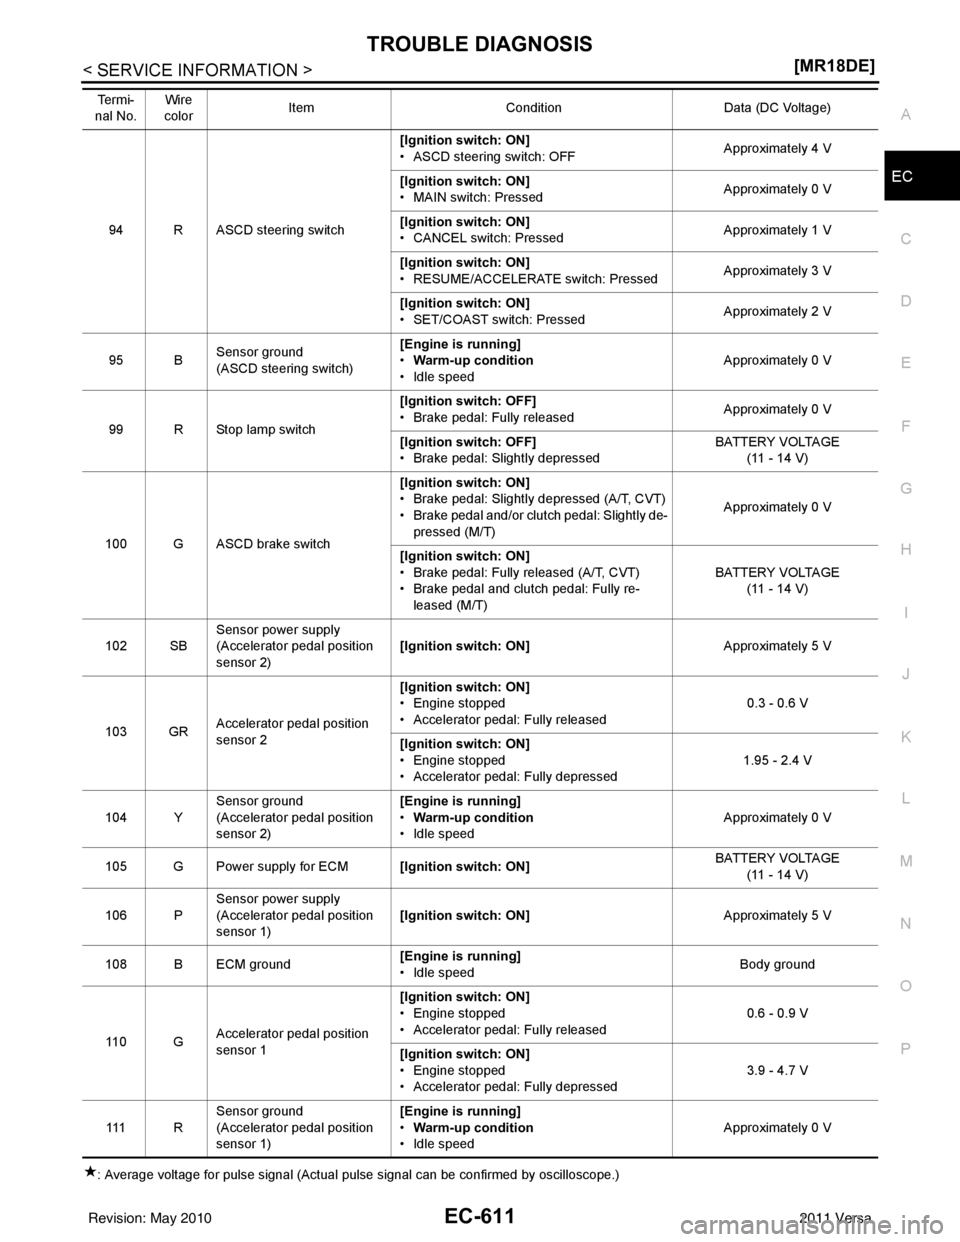
: Average voltage for pulse signal (Actual pulse signal can be confirmed by oscilloscope.) 94 R ASCD steering switch
[Ignition switch: ON]
• ASCD steering switch: OFF
Approximately 4 V
[Ignition switch: ON]
• MAIN switch: Pressed Approximately 0 V
[Ignition switch: ON]
• CANCEL switch: Pressed Approximately 1 V
[Ignition switch: ON]
• RESUME/ACCELERATE switch: Pressed Approximately 3 V
[Ignition switch: ON]
• SET/COAST switch: Pressed Approximately 2 V
95 B Sensor ground
(ASCD steering switch) [Engine is running]
•
Warm-up condition
• Idle speed Approximately 0 V
99 R Stop lamp switch [Ignition switch: OFF]
• Brake pedal: Fully released
Approximately 0 V
[Ignition switch: OFF]
• Brake pedal: Slightly depressed BATTERY VOLTAGE
(11 - 14 V)
100 G ASCD brake switch [Ignition switch: ON]
• Brake pedal: Slightly depressed (A/T, CVT)
• Brake pedal and/or clutch pedal: Slightly de-
pressed (M/T) Approximately 0 V
[Ignition switch: ON]
• Brake pedal: Fully released (A/T, CVT)
• Brake pedal and clutch pedal: Fully re- leased (M/T) BATTERY VOLTAGE
(11 - 14 V)
102 SB Sensor power supply
(Accelerator pedal position
sensor 2) [Ignition switch: ON]
Approximately 5 V
103 GR Accelerator pedal position
sensor 2 [Ignition switch: ON]
• Engine stopped
• Accelerator pedal: Fully released
0.3 - 0.6 V
[Ignition switch: ON]
• Engine stopped
• Accelerator pedal: Fully depressed 1.95 - 2.4 V
104 Y Sensor ground
(Accelerator pedal position
sensor 2) [Engine is running]
•
Warm-up condition
• Idle speed Approximately 0 V
105 G Power supply for ECM [Ignition switch: ON] BATTERY VOLTAGE
(11 - 14 V)
106 P Sensor power supply
(Accelerator pedal position
sensor 1) [Ignition switch: ON]
Approximately 5 V
108 B ECM ground [Engine is running]
• Idle speed Body ground
11 0 G Accelerator pedal position
sensor 1 [Ignition switch: ON]
• Engine stopped
• Accelerator pedal: Fully released
0.6 - 0.9 V
[Ignition switch: ON]
• Engine stopped
• Accelerator pedal: Fully depressed 3.9 - 4.7 V
111 R Sensor ground
(Accelerator pedal position
sensor 1) [Engine is running]
•
Warm-up condition
• Idle speed Approximately 0 V
Te r m i -
na l No
. Wi
re
color Item
Condition Data (DC Voltage)
Revision: May 2010 2011 Versa
Page 1909 of 3787
TROUBLE DIAGNOSISEC-615
< SERVICE INFORMATION > [MR18DE]
C
D
E
F
G H
I
J
K L
M A
EC
NP
O
AIR COND SIG
[ON/OFF]
• Indicates [ON/OFF] condition of the air conditioner switch as
determined by the air conditioner signal.
P/N POSI SW
[ON/OFF] • Indicates [ON/OFF] condition from the park/neutral position
(PNP) signal.
PW/ST SIGNAL
[ON/OFF] • [ON/OFF] condition of the power steering system (deter-
mined by the signal sent from EPS control unit) is indicated.
LOAD SIGNAL
[ON/OFF] • Indicates [ON/OFF] condition from the electrical load signal.
ON: Rear window defogger switch is ON and/or lighting
switch is in 2nd position.
OFF: Both rear window defogger switch and lighting switch
are OFF.
IGNITION SW
[ON/OFF] • Indicates [ON/OFF] condition from ignition switch.
HEATER FAN SW
[ON/OFF] • Indicates [ON/OFF] condition from the heater fan switch sig-
nal.
BRAKE SW
[ON/OFF] • Indicates [ON/OFF] condition from the stop lamp switch sig-
nal.
INJ PULSE-B1
[msec] • Indicates the actual fuel injection pulse width compensated
by ECM according to the input signals. • When the engine is stopped, a certain com-
puted value is indicated.
IGN TIMING
[BTDC] • Indicates the ignition timing computed by ECM according to
the input signals. • When the engine is stopped, a certain value
is indicated.
CAL/LD VALUE
[%] • “Calculated load value” indicates the value of the current air-
flow divided by peak airflow.
MASS AIRFLOW
[g·m/s] • Indicates the mass airflow computed by ECM according to
the signal voltage of the mass air flow sensor.
PURG VOL C/V
[%] • Indicates the EVAP canister purge volume control solenoid
valve control value computed by the ECM according to the in-
put signals.
• The opening becomes larger as the value increases.
INT/V TIM(B1)
[ ° CA] • Indicates [
°CA] of intake camshaft advanced angle.
INT/V SOL(B1)
[%] • The control value of the intake valve timing control solenoid
valve (determined by ECM according to the input signal) is in-
dicated.
• The advance angle becomes larger as the value increases
AIR COND RLY
[ON/OFF] • The air conditioner relay control condition (determined by
ECM according to the input signals) is indicated.
FUEL PUMP RLY
[ON/OFF] • Indicates the fuel pump relay control condition determined by
ECM according to the input signals.
VENT CONT/V
[ON/OFF] • The control condition of the EVAP canister vent control valve
(determined by ECM according to the input signals) is indi-
cated.
ON: Closed
OFF: Open
THRTL RELAY
[ON/OFF] • Indicates the throttle control
motor relay control condition de-
termined by the ECM according to the input signals.
COOLING FAN
[HI/LOW/OFF] • Indicates the condition of the cooling fan (determined by
ECM according to the input signals).
HI: High speed operation
LOW: Low speed operation
OFF: Stop
HO2S2 HTR (B1)
[ON/OFF] • Indicates [ON/OFF] condition of heated oxygen sensor 2
heater determined by ECM according to the input signals.
I/P PULLY SPD
[rpm] • Indicates the engine speed computed from the input speed
se ns
or si
gnal.
Monitored item [Unit]
Description Remarks
Revision: May 2010 2011 Versa
Page 1911 of 3787
TROUBLE DIAGNOSISEC-617
< SERVICE INFORMATION > [MR18DE]
C
D
E
F
G H
I
J
K L
M A
EC
NP
O
NOTE:
Any monitored item that does not match the vehicle being diagnosed is deleted from the display automatically.
ACTIVE TEST MODE
Test Item
HO2 S2 DIAG2 (B1)
[INCMP/CMPLT]
• Indicates DTC P0139 self-diagnosis (slow response) condi-
tion.
INCMP: Self-diagnosis is incomplete.
CMPLT: Self-diagnosis is complete.
A/F SEN1
DIAG1(B1)
[INCMP/CMPLT] • Indicates DTC P015A or P015B self-diagnosis condition.
INCMP: Self-diagnosis is incomplete.
CMPLT: Self-diagnosis is complete.
A/F SEN1
DIAG2(B1)
[INCMP/CMPLT] • Indicates DTC P014C or P014D self-diagnosis condition.
INCMP: Self-diagnosis is incomplete.
CMPLT: Self-diagnosis is complete.
A/F SEN1
DIAG3(B1)
[ABSNT/PRSNT] • Indicates DTC P014C, P014D, P015A or P015B self-diagno-
sis condition.
ABSNT: The vehicle condition is not within the diagnosis
range.
PRSNT: The vehicle condition is within the diagnosis range.
Monitored item [Unit]
Description Remarks
Test itemCondition JudgmentCheck item (Remedy)
FUEL INJEC-
TION • Engine: Return to the original
trouble condition
• Change the amount of fuel injec- tion using CONSULT-III. If trouble symptom disappears, see
CHECK ITEM.
• Harness and connectors
• Fuel injector
• Air fuel ratio (A/F) sensor 1
IGNITION TIM-
ING • Engine: Return to the original
trouble condition
• Timing light: Set
• Retard the ignition timing using CONSULT-III. If trouble symptom disappears, see
CHECK ITEM.
• Perform Idle Air Volume Learning.
POWER BAL-
ANCE • Engine: After warming up, idle the
engine.
• A/C switch OFF
• Shift lever: P or N (A/T, CVT), Neutral (M/T)
• Cut off each fuel injector signal one at a time using CONSULT-III. Engine runs rough or dies.
• Harness and connectors
• Compression
• Fuel injector
• Power transistor
•Spark plug
• Ignition coil
COOLING FAN* • Ignition switch: ON
• Turn the cooling fan “LOW”, “HI”
and “OFF” with CONSULT-III. Cooling fan moves and stops.
• Harness and connectors
• Cooling fan relay
• Cooling fan motor
ENG COOLANT
TEMP • Engine: Return to the original
trouble condition
• Change the engine coolant tem-
perature using CONSULT-III. If trouble symptom disappears, see
CHECK ITEM. • Harness and connectors
• Engine coolant temperature sen-
sor
• Fuel injector
FUEL PUMP RE-
LAY • Ignition switch: ON
(Engine stopped)
• Turn the fuel pump relay ON and
OFF using CONSULT-III and lis-
ten to operating sound. Fuel pump relay makes the operat-
ing sound.
• Harness and connectors
• Fuel pump relay
PURG VOL
CONT/V • Engine: After warming up, run en-
gine at 1,500 rpm.
• Change the EVAP canister purge volume control solenoid valve
opening percent using CON-
SULT-III. Engine speed changes according to
the opening percent.
• Harness and connectors
• EVAP canister purge volume con-
trol solenoid valve
FUEL/T TEMP
SEN • Change the fuel tank temperature using CONSULT-III.
Revision: May 2010
2011 Versa
Page 1914 of 3787
EC-620
< SERVICE INFORMATION >[MR18DE]
TROUBLE DIAGNOSIS
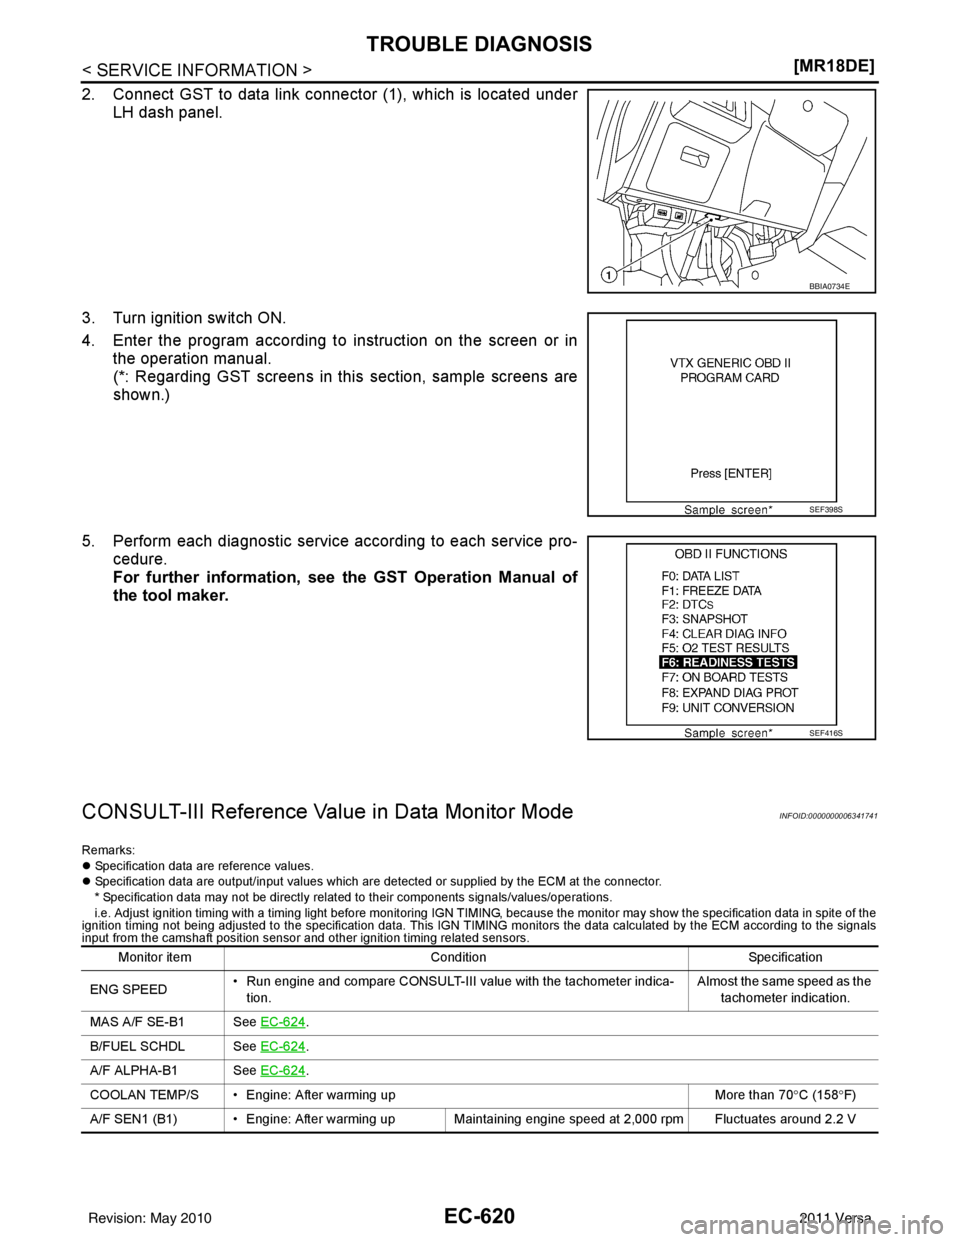
2. Connect GST to data link connector (1), which is located under
LH dash panel.
3. Turn ignition switch ON.
4. Enter the program according to instruction on the screen or in the operation manual.
(*: Regarding GST screens in this section, sample screens are
shown.)
5. Perform each diagnostic service according to each service pro- cedure.
For further information, see the GST Operation Manual of
the tool maker.
CONSULT-III Reference Value in Data Monitor ModeINFOID:0000000006341741
Remarks:
z Specification data are reference values.
z Specification data are output/input values which are detected or supplied by the ECM at the connector.
* Specification data may not be directly relate d to their components signals/values/operations.
i.e. Adjust ignition timing with a timing light before monitoring IGN TIMING, because the monitor may show the specification data in spite of the
ignition timing not being adjusted to the specification data. This IGN TIMING moni tors the data calculated by the ECM according to the signals
input from the camshaft position sensor and other ignition timing related sensors.
BBIA0734E
SEF398S
SEF416S
Monitor item Condition Specification
ENG SPEED • Run engine and compare CONSULT-III value with the tachometer indica-
tion. Almost the same speed as the
tachometer indication.
MAS A/F SE-B1 See EC-624
.
B/FUEL SCHDL See EC-624
.
A/F ALPHA-B1 See EC-624
.
COOLAN TEMP/S • Engine: After warming up More than 70°C (158 °F)
A/F SEN1 (B1) • Engine: After warming up Maintaining engine speed at 2,000 rpm Fluctuates around 2.2 V
Revision: May 2010 2011 Versa
Page 1915 of 3787
TROUBLE DIAGNOSISEC-621
< SERVICE INFORMATION > [MR18DE]
C
D
E
F
G H
I
J
K L
M A
EC
NP
O
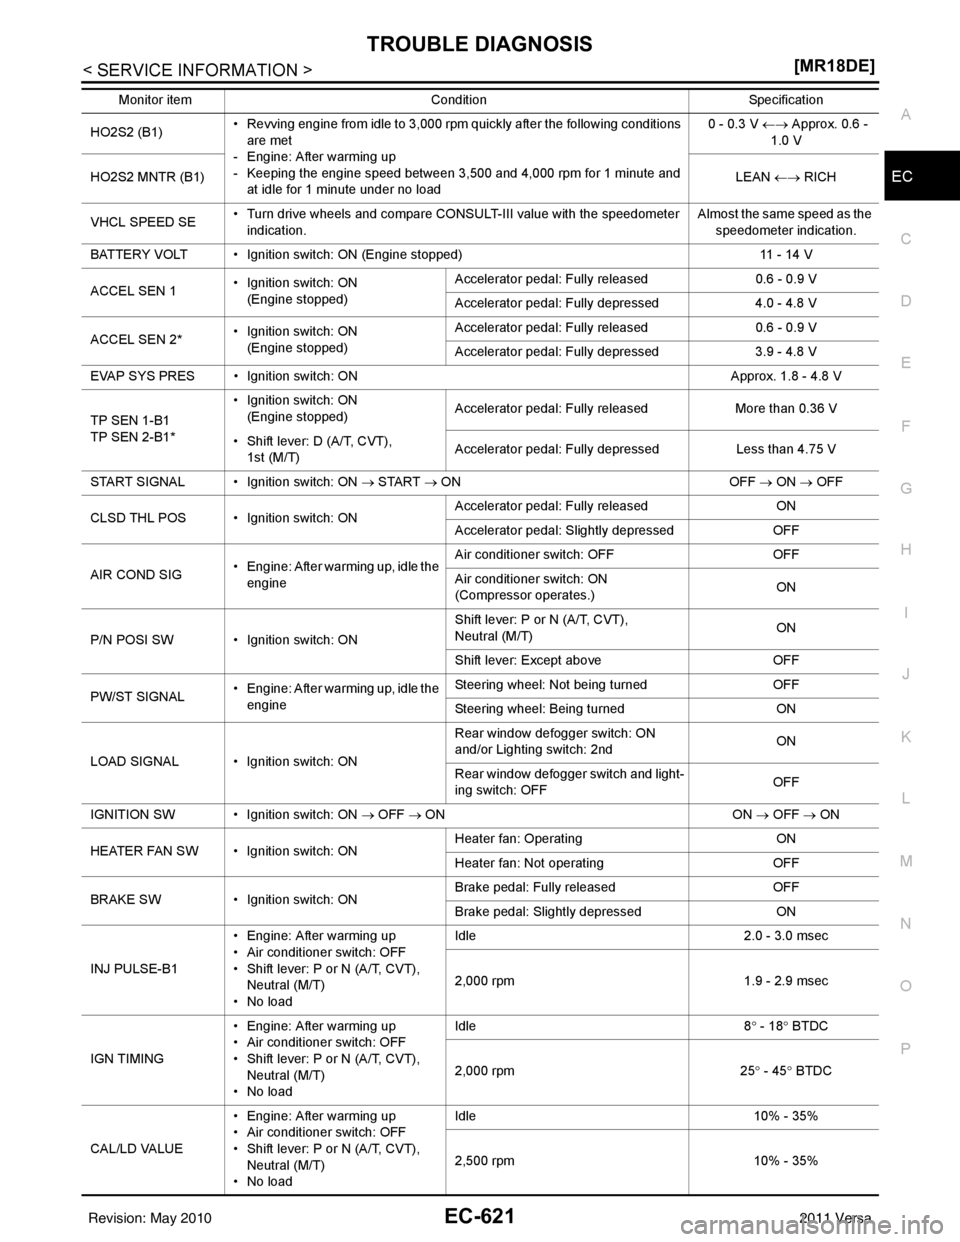
HO2S2 (B1)
• Revving engine from idle to 3,000 rpm quickly after the following conditions
are met
- Engine: After warming up
- Keeping the engine speed between 3,500 and 4,000 rpm for 1 minute and at idle for 1 minute under no load 0 - 0.3 V
←→ Approx. 0.6 -
1.0 V
HO2S2 MNTR (B1) LEAN ←→ RICH
VHCL SPEED SE • Turn drive wheels and compare CONSULT-III value with the speedometer
indication. Almost the same speed as the
speedometer indication.
BATTERY VOLT • Ignition switch: ON (Engine stopped) 11 - 14 V
ACCEL SEN 1 • Ignition switch: ON
(Engine stopped) Accelerator pedal: Fully released
0.6 - 0.9 V
Accelerator pedal: Fully depressed 4.0 - 4.8 V
ACCEL SEN 2* • Ignition switch: ON
(Engine stopped) Accelerator pedal: Fully released
0.6 - 0.9 V
Accelerator pedal: Fully depressed 3.9 - 4.8 V
EVAP SYS PRES • Ignition switch: ON Approx. 1.8 - 4.8 V
TP SEN 1-B1
TP SEN 2-B1* • Ignition switch: ON
(Engine stopped) Accelerator pedal: Fully released
More than 0.36 V
• Shift lever: D (A/T, CVT), 1st (M/T) Accelerator pedal: Fully depressed
Less than 4.75 V
START SIGNAL • Ignition switch: ON → START → ON OFF → ON → OFF
CLSD THL POS • Ignition switch: ON Accelerator pedal: Fully released
ON
Accelerator pedal: Slightly depressed OFF
AIR COND SIG • Engine: After warming up, idle the
engine Air conditioner switch: OFF
OFF
Air conditioner switch: ON
(Compressor operates.) ON
P/N POSI SW • Ignition switch: ON Shift lever: P or N (A/T, CVT),
Neutral (M/T)
ON
Shift lever: Except above OFF
PW/ST SIGNAL • Engine: After warming up, idle the
engine Steering wheel: Not being turned
OFF
Steering wheel: Being turned ON
LOAD SIGNAL • Ignition switch: ON Rear window defogger switch: ON
and/or Lighting switch: 2nd
ON
Rear window defogger switch and light-
ing switch: OFF OFF
IGNITION SW • Ignition switch: ON → OFF → ON ON → OFF → ON
HEATER FAN SW • Ignition switch: ON Heater fan: Operating
ON
Heater fan: Not operating OFF
BRAKE SW • Ignition switch: ON Brake pedal: Fully released
OFF
Brake pedal: Slightly depressed ON
INJ PULSE-B1 • Engine: After warming up
• Air conditioner switch: OFF
• Shift lever: P or N (A/T, CVT),
Neutral (M/T)
•No load Idle
2.0 - 3.0 msec
2,000 rpm 1.9 - 2.9 msec
IGN TIMING • Engine: After warming up
• Air conditioner switch: OFF
• Shift lever: P or N (A/T, CVT),
Neutral (M/T)
•No load Idl
e
8° - 18 ° BT
DC
2,000 rpm 25° - 45 ° BTDC
CAL/LD VALUE • Engine: After warming up
• Air conditioner switch: OFF
• Shift lever: P or N (A/T, CVT),
Neutral (M/T)
•No load Idle
10% - 35%
2,500 rpm 10% - 35%
Monitor item
Condition Specification
Revision: May 2010 2011 Versa