display NISSAN TITAN 2017 2.G Quick Reference Guide
[x] Cancel search | Manufacturer: NISSAN, Model Year: 2017, Model line: TITAN, Model: NISSAN TITAN 2017 2.GPages: 40, PDF Size: 2.22 MB
Page 32 of 40

30
VEHICLE PHONEBOOK
To access the vehicle phonebook:
1. Pr
ess the
button on the control panel.
2. Selec
t the “Phonebook” key
4.
3.
Choose the desir
ed entry from the
displayed list.
MAKING A CALL
1.
Press the
button on the control panel. The
“PHONE” screen 5 will appear on the display.
2. Selec
t one of the following options to make a call:
“Phonebook”: Select the name from an entry stored in the vehicle phonebook.
“Call Lists”: Select the name from the incoming, outgoing or missed
call history.
“Redial”: Dial the last outgoing call from the vehicle.
: Input the phone number manually using the keypad displayed on
the screen.
RECEIVING/ENDING A CALL
To accept the incoming call, either:
•
Pr
ess the
button on the steering
wheel, or
• Selec
t the
icon on the screen.
To reject the incoming call, either:
•
Pr
ess the
button on the steering
wheel, or
• Selec
t the
icon on the screen.
To end a cellular phone call, either:
• Pr
ess the
button on the steering wheel, or
• Selec
t the
icon on the screen.
1 Some jurisdictions prohibit the use of cellular telephones while driving.2 Availability of specific features is dependent upon the phone’s Bluetooth ®
support. Please refer to your
phone owner’s manual for details. Bluetooth ®
word mark and logos are owned by Bluetooth SIG, Inc., and
any use of such marks by NISSAN is under license. See www.NissanUSA.com/bluetooth for details.
3 Never program while driving. GPS mapping may not be detailed in all areas or reflect current road status.4 Laws in some jurisdictions may restrict the use of “Text-to-Speech”. Some applications and features, such as social networking and texting, may also be restricted. Check local regulations for any requirements
before using these features.
Compatible smartphone required. Text rates and/or data usage may apply.
To view detailed instructional videos regarding these and other features, please go to
www.nissanownersinfo.mobi.
For more information, refer to the “Monitor, climate, audio, phone and voice recognition systems
(section 4)” of your Owner’s Manual.
4
5
SYSTEM GUIDE
To view detailed instructional videos regarding these and other features, please go to www.nissanownersinfo.mobi.
Page 33 of 40

31
NISSAN MOBILE ENTERTAINMENT SYSTEM (MES)
(if so equipped)
With the MES, you can play DVD videos,
video CDs or CDs that contain music or
sound content. Images will display on the
corresponding monitor. Sound will play
from the vehicle’s audio system (or wireless
headphones provided in the kit) or your own
wired headphones af ter connecting them to
the headphone jacks of the corresponding
DVD player.
1.
Plac
e the ignition switch in the
ACC or
ON position.
2.
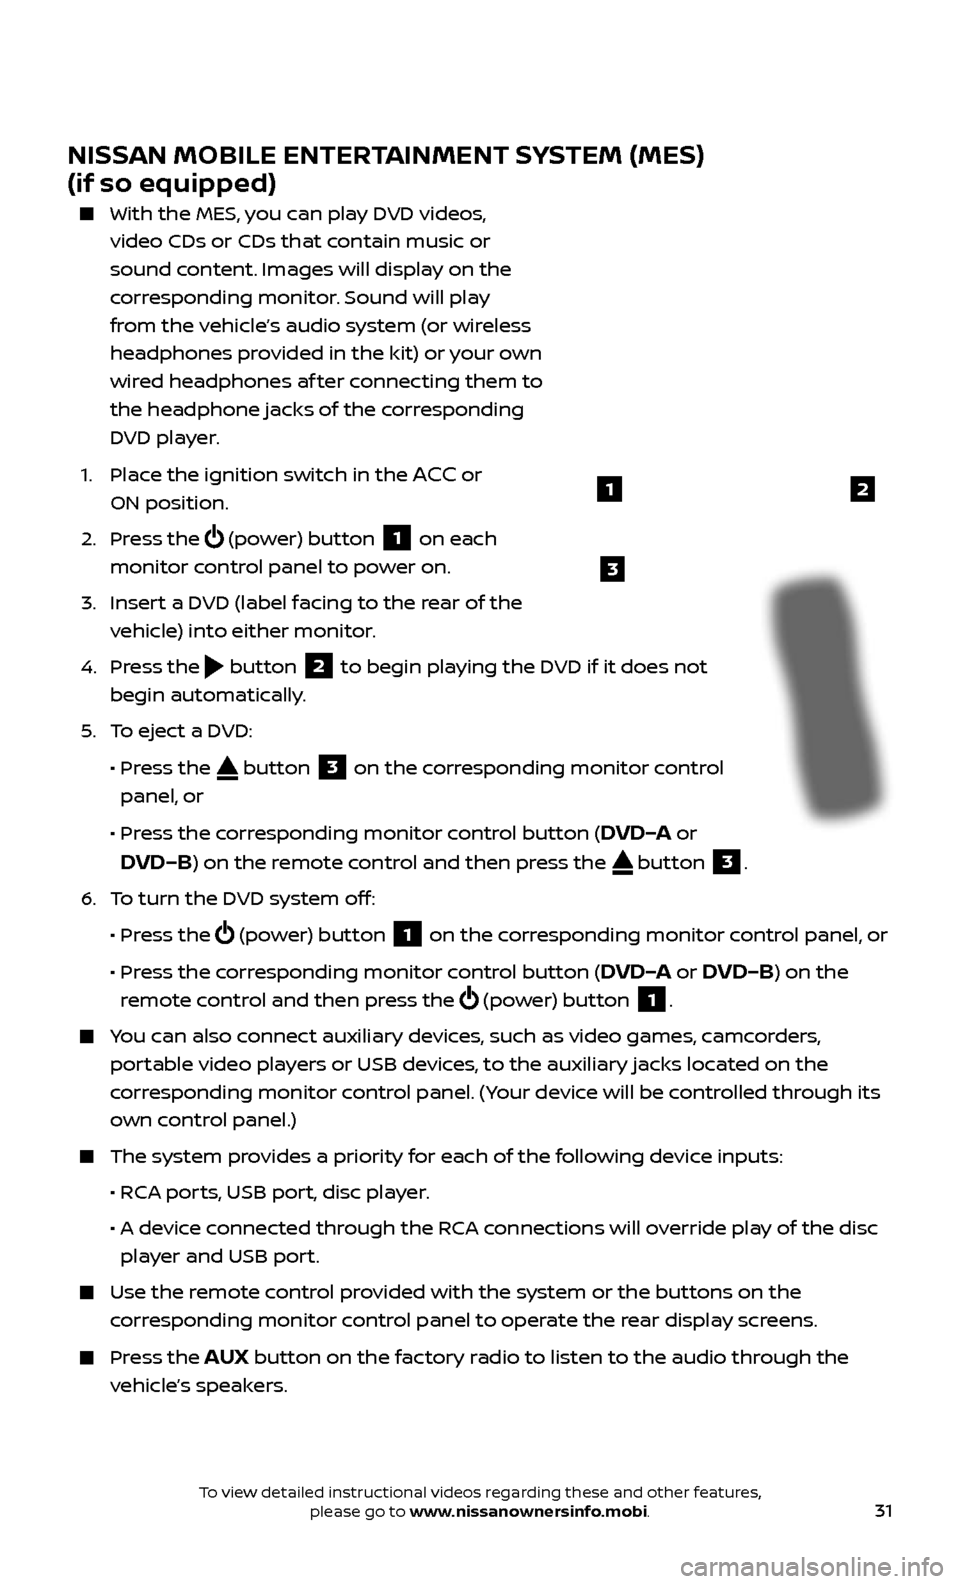
Press the
(power) button 1 on each
monitor control panel to power on.
3.
Inser
t a DVD (label facing to the rear of the
vehicle) into either monitor.
4.
Press the
button 2 to begin playing the DVD if it does not
begin automatically.
5
.
T
o eject a DVD:
•
Pr
ess the
button 3 on the corresponding monitor control
panel, or
•
Pr
ess the corresponding monitor control button (
DVD–A or
DVD–B) on the remote control and then press the button 3.
6
.
T
o turn the DVD system off:
•
Pr
ess the
(power) button 1 on the corresponding monitor control panel, or
•
Pr
ess the corresponding monitor control button (
DVD–A or DVD–B) on the
remote control and then press the
(power) button 1.
You can also connect auxiliary devices, such as video games, camcorders,
portable video players or USB devices, to the auxiliary jacks located on the
corresponding monitor control panel. (Your device will be controlled through its
own control panel.)
The system pr ovides a priority for each of the following device inputs:
•
R
CA ports, USB port, disc player.
•
A devic
e connected through the RCA connections will override play of the disc
player and USB port.
Use the r emote control provided with the system or the buttons on the
corresponding monitor control panel to operate the rear display screens.
Press the AUX button on the factory radio to listen to the audio through the
vehicle’s speakers.
3
21
To view detailed instructional videos regarding these and other features, please go to www.nissanownersinfo.mobi.
Page 34 of 40

32To view detailed instructional videos regarding these and other features, please go to www.nissanownersinfo.mobi.
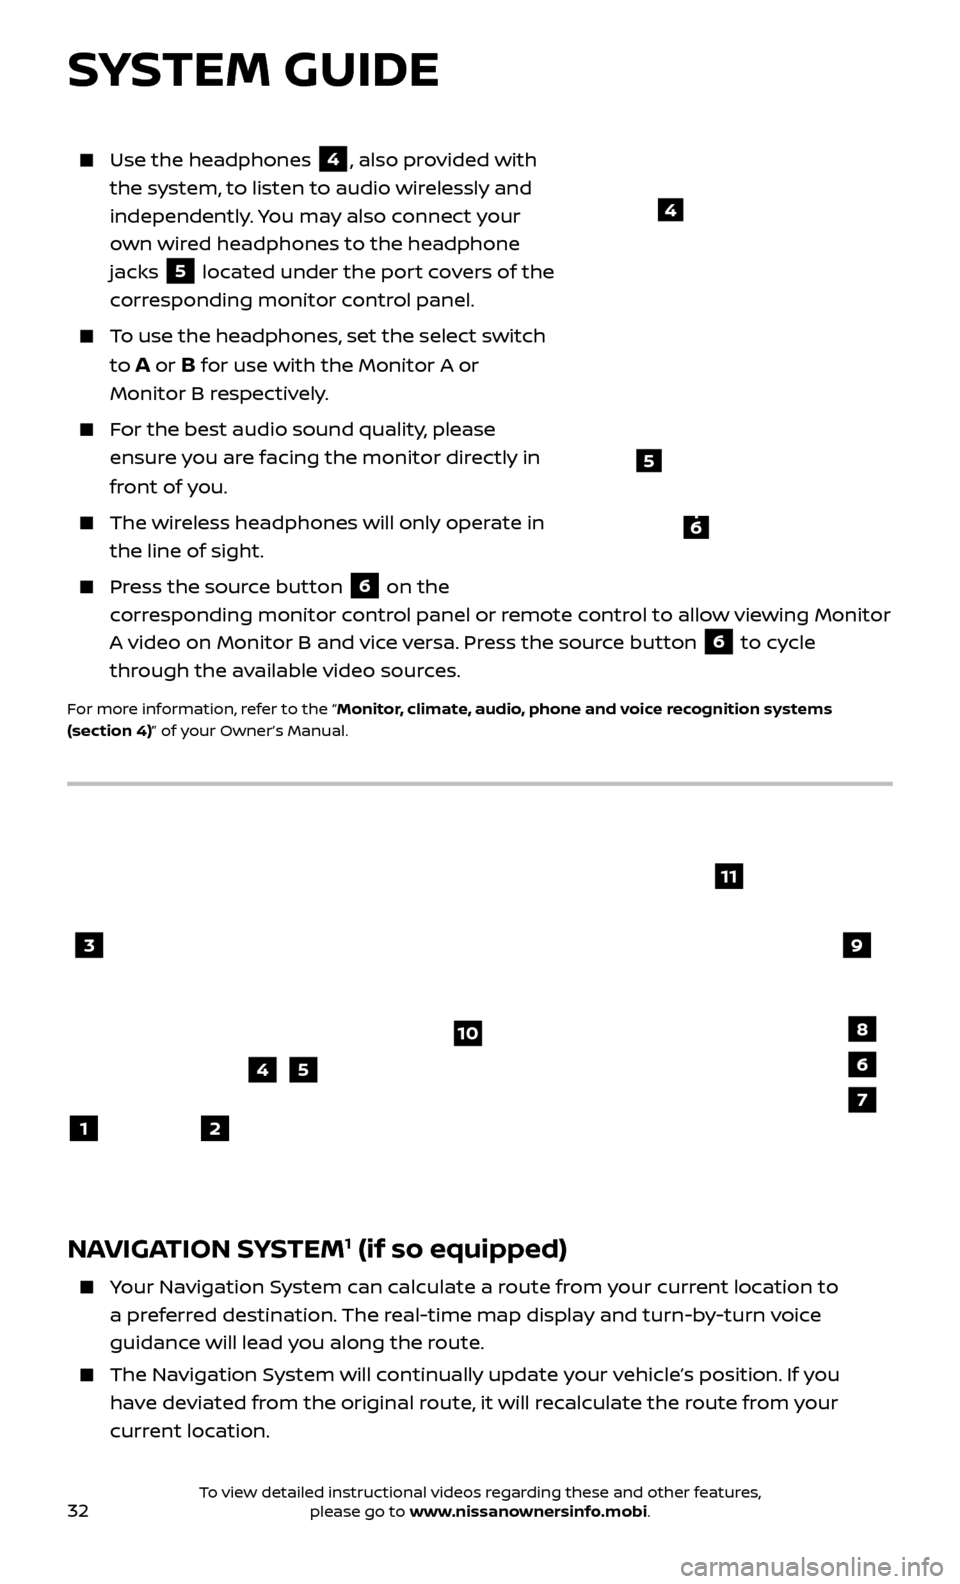
Use the headphones 4, also provided with
the system, to listen to audio wirelessly and
independently. You may also connect your
own wired headphones to the headphone
jacks
5 located under the port covers of the
corresponding monitor control panel.
To use the headphones, set the select switch
to
A or B for use with the Monitor A or
Monitor B respectively.
For the best audio sound quality, please ensure you are facing the monitor directly in
front of you.
The wireless headphones will only operate in the line of sight.
Press the source button 6 on the
corresponding monitor control panel or remote control to allow viewing Monitor
A video on Monitor B and vice versa. Press the source button
6 to cycle
through the available video sources.
For more information, refer to the “Monitor, climate, audio, phone and voice recognition systems
(section 4)” of your Owner’s Manual.
4
NAVIGATION SYSTEM1 (if so equipped)
Your Navigation System can calculate a route from your current location to a preferred destination. The real-time map display and turn-by-turn voice
guidance will lead you along the route.
The Navigation System will continually update your vehicle’s position. If you have deviated from the original route, it will recalculate the route from your
current location.
3
2
4
1
10
6
11
5
8
7
9
SYSTEM GUIDE
5
6
Page 35 of 40

33
To help promote safe driving, some functions cannot be operated or have limited operation when the vehicle speed is above 5 mph (8 km/h). The
on-screen text and keys for these restricted functions will be “grayed-out”
or muted and cannot be selected while driving. These functions will become
available again when the vehicle speed is reduced to 5 mph (8 km/h). Voice
commands may be available for some of the restricted functions. For more
information, refer to the “Monitor, climate, audio, phone and voice recognition
systems (section 4)” of your Owner’s Manual.
1 NAV button – Press to access the functions of the Navigation System.
2 MAP button – Press to display the current location map screen.
3 VOL control knob – Turn right to increase the volume or lef t to decrease
the volume.
4 key – Select to zoom the map in.
5 key – Select to zoom the map out.
6 button – Press to access SiriusXM Traffic, MyApps, Settings, SiriusXM
Travel Link, Voice Commands, and NissanConnectSM Services.
7 button – Press to change the display brightness between day and night
modes. While the mode is being displayed, the brightness can be adjusted using
the
TUNE•SCROLL knob. Press and hold to turn the display off. Press again to
turn the display on.
8 BACK button – Press to return to the previous screen.
9 TUNE•SCR OLL knob – Turn to navigate the items in a list. Press to select a
menu item.
10 Touch-screen display
11 SD-card location – An SD-card with map data must be inserted here for map functions to operate.
1 Never program while driving. GPS mapping may not be detailed in all areas or reflect current road status.
For more information, refer to your Navigation System Owner’s Manual.
To view detailed instructional videos regarding these and other features, please go to www.nissanownersinfo.mobi.