key NISSAN VERSA HATCHBACK 2012 1.G Quick Reference Guide
[x] Cancel search | Manufacturer: NISSAN, Model Year: 2012, Model line: VERSA HATCHBACK, Model: NISSAN VERSA HATCHBACK 2012 1.GPages: 16, PDF Size: 1.55 MB
Page 3 of 16

tAbLe Of cOntentS
• A cellular telephone should not be used for any purpose while
driving so full attention may be given to vehicle operation.
• Always wear your seat belt.
• Supplemental air bags do not replace proper seat belt usage.
• Children 12 and under should always ride in the rear seat
properly secured in child restraints or seat belts according to
their age and weight.
• Do not drink and drive.
for more information, refer to the “Safety — Seats, seat belts and
supplemental restraint system (section 1)”,
“Display screen, heater,
air conditioner, audio and phone systems (section 4)” and “Starting
and driving (section 5)” of your Owner’s Manual.
Additional information about your vehicle is also
available in your Owner’s Manual, navigation System Owner’s Manual and at www.nissanusa.com.
to view detailed
instructional videos, go to
www.nissanownersinfo.mobi/2012/versahatchback or snap this barcode with an appropriate barcode reader.
E SSE ntial i nformation
Loose Fuel Cap . . . . . . . . . . . . . . . . . . . . . . . . . . . . . . . . . . . .\
. . . . . . . . . . . . 2
tire Pressure Monitoring System (tPMS) ...........................2
fir St DrivE fEatur ES
niSSAn intelligent key
® System (if so equipped) .................... 3
Rear Hatch Release (NISSAN Intelligent Key® models only) ........... 3
Seat Adjustments .............................................. 4
Outside Mirror Control Switch .................................... 4
Starting/Stopping the Engine ..................................... 4
headlight control .............................................. 5
Windshield Wiper/Washer Switch ................................ 6
Climate Control (if so equipped) .................................. 6
fM/AM/XM
® Satellite Radio with CD Player (if so equipped) ...........8
Cruise Control (if so equipped) ................................... 9
fuel-filler door ................................................. 9
Sy StEm GuiDE
bluetooth
® Hands-free Phone System (if so equipped) ...............10
Navigation System (if so equipped) ............................... 12
Page 5 of 16

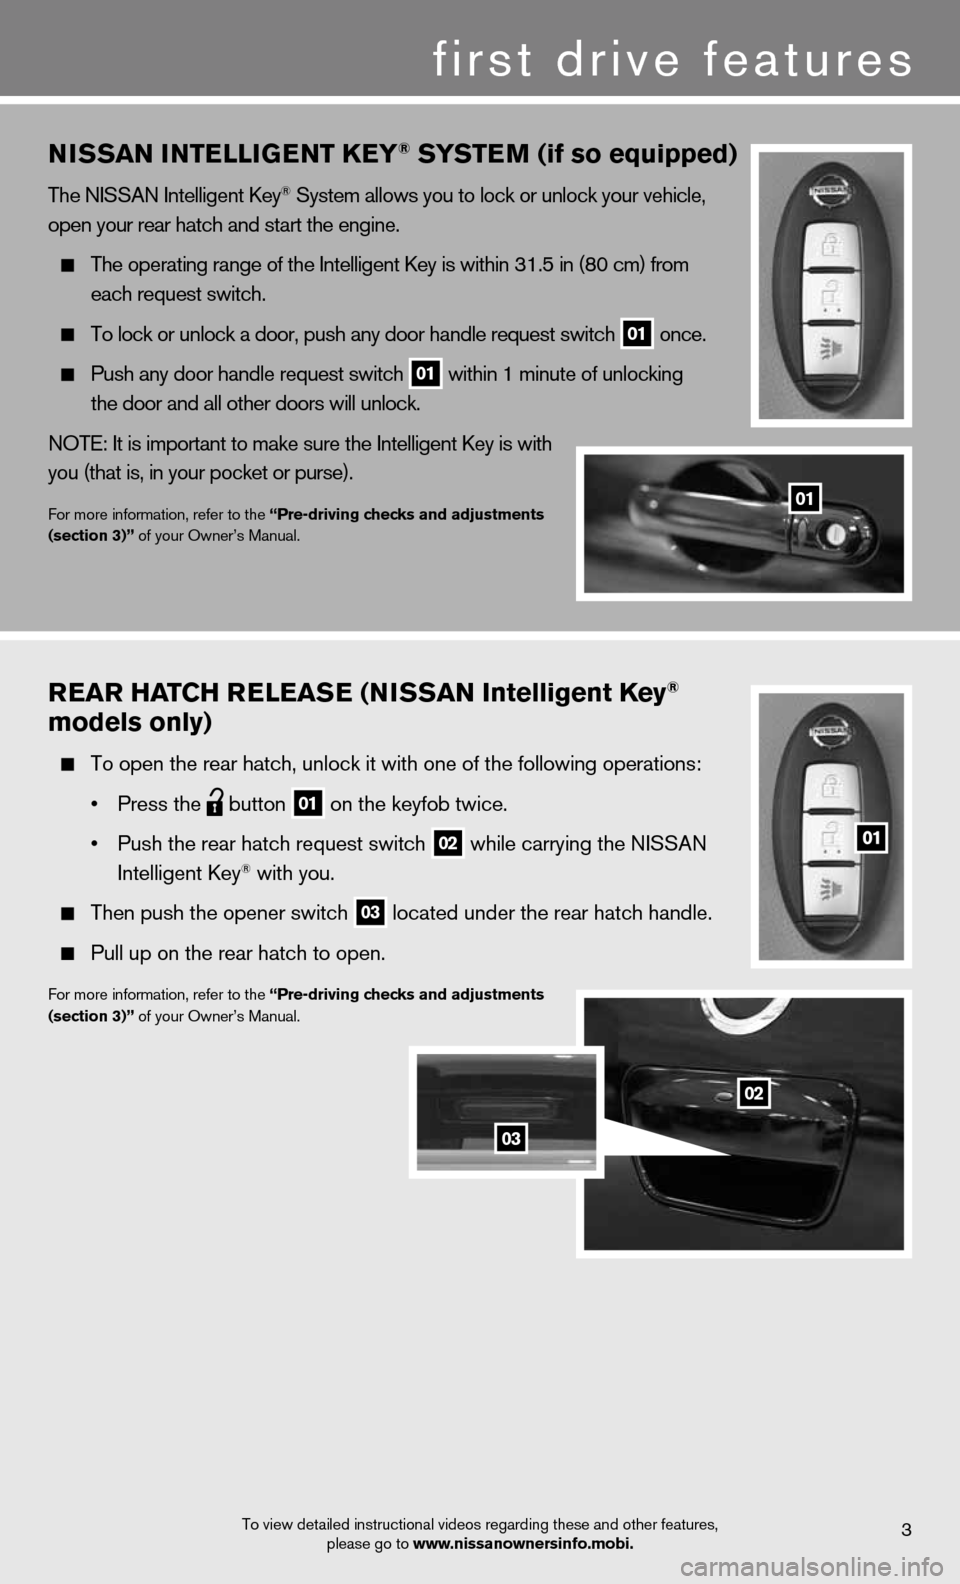
niSSan intE lliGE nt KEy® SyStE m (if so equipped)
the niSSAn intelligent key® System allows you to lock or unlock your vehicle,
open your rear hatch and start the engine.
The operating range of the Intelligent Key is within 31.5 in (80 cm) from
each request switch.
To lock or unlock a door, push any door handle request switch
01 once.
Push any door handle request switch
01 within 1 minute of unlocking
the door and all other doors will unlock.
NOTE: It is important to make sure the Intelligent Key is with
you (that is, in your pocket or purse).
for more information, refer to the “Pre-driving checks and adjustments
(section 3)” of your Owner’s Manual.
first drive features
01
3To view detailed instructional videos regarding these and other features, please go to www.nissanownersinfo.mobi.
rEar Hat CH rElEaSE (ni SSan intelligent Key®
models only)
To open the rear hatch, unlock it with one of the following operations:
• Press the
button
01 on the keyfob twice.
• Push the rear hatch request switch
02 while carrying the NISSAN
intelligent key® with you.
Then push the opener switch
03 located under the rear hatch handle.
Pull up on the rear hatch to open.
for more information, refer to the “Pre-driving checks and adjustments
(section 3)” of your Owner’s Manual.
02
03
Page 6 of 16

To view detailed instructional videos regarding these and other features, please go to www.nissanownersinfo.mobi.
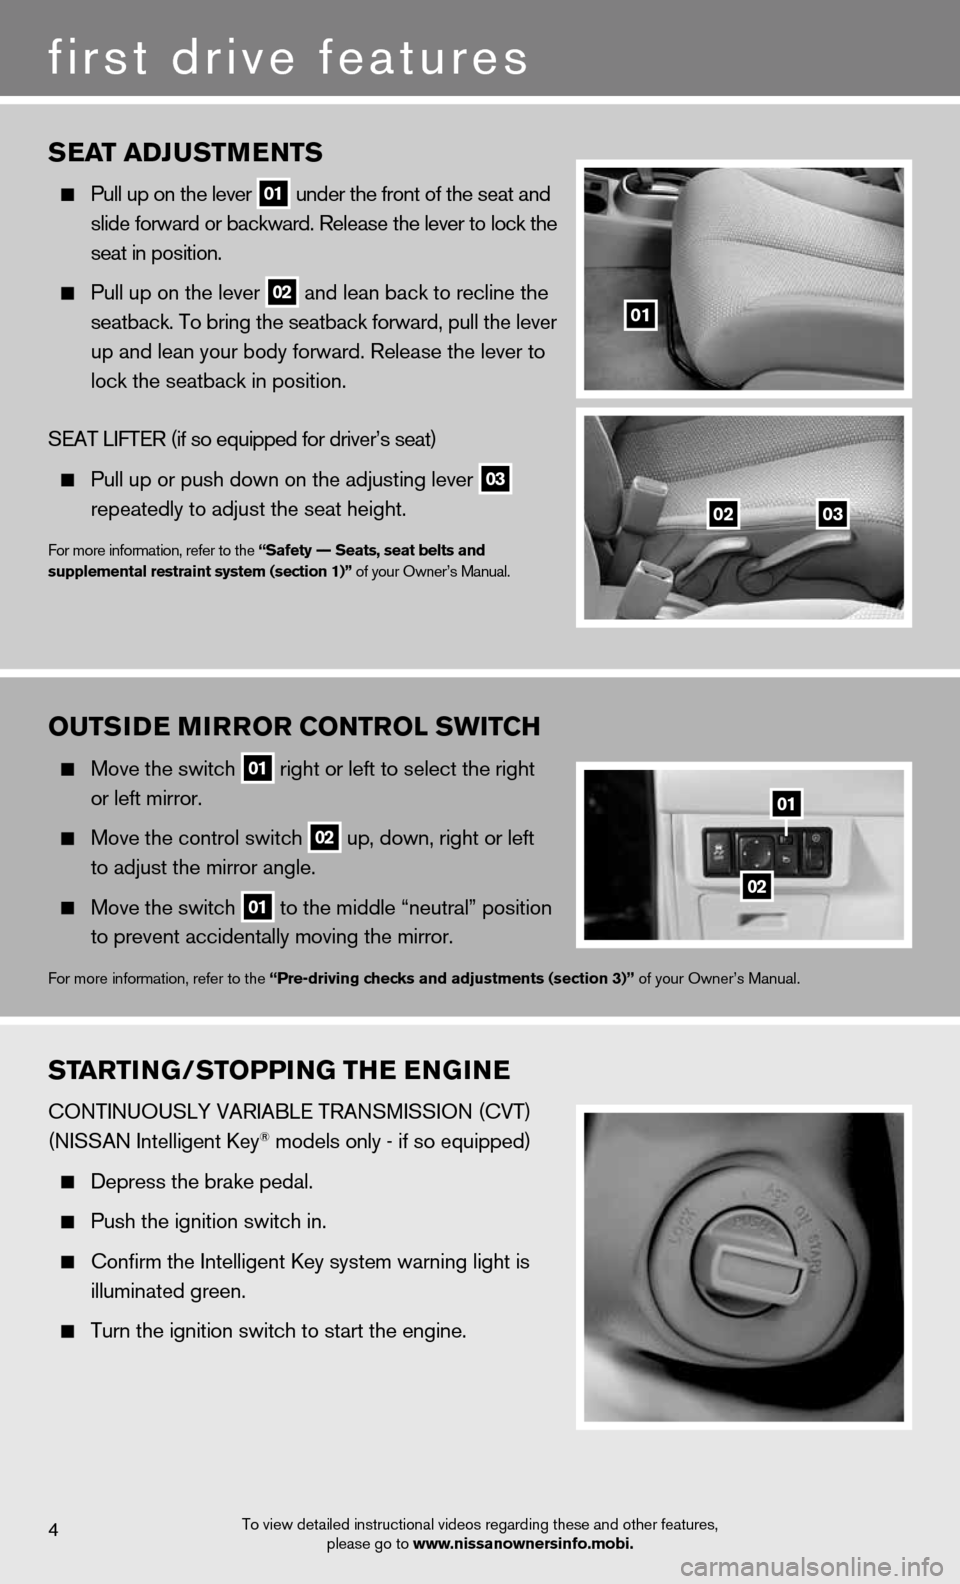
StartinG/StoPPin G tHE EnG in E
cOntinuOuSLY VARiAbLe tRAnSMiSSiOn (cVt)
(niSSAn intelligent key® models only - if so equipped)
Depress the brake pedal.
Push the ignition switch in.
confirm the intelligent key system warning light is
illuminated green.
Turn the ignition switch to start the engine.
4
first drive features
SEat aDJ uStm EntS
Pull up on the lever
01 under the front of the seat and
slide forward or backward. Release the lever to lock the
seat in position.
Pull up on the lever
02 and lean back to recline the
seatback. To bring the seatback forward, pull the lever
up and lean your body forward. Release the lever to
lock the seatback in position.
SeAt LifteR (if so equipped for driver’s seat)
Pull up or push down on the adjusting lever
03
repeatedly to adjust the seat height.
for more information, refer to the “Safety –– Seats, seat belts and
supplemental restraint system (section 1)” of your Owner’s Manual.
01
0203
outS
iDE mirror Control SWit CH
Move the switch
01 right or left to select the right
or left mirror.
Move the control switch
02 up, down, right or left
to adjust the mirror angle.
Move the switch
01 to the middle “neutral” position
to prevent accidentally moving the mirror.
for more information, refer to the “Pre-driving checks and adjustments (section 3)” of your Owner’s Manual.
01
02
Page 13 of 16

To view detailed instructional videos regarding these and other features, please go to www.nissanownersinfo.mobi.11
cOnnectinG PROceduRe
NOTE: The vehicle must be stationary when connecting the phone.
1. Press the
button on the steering wheel. The system announces the available commands.
2. Say: “Connect phone”. The system acknowledges the command and announces the next set
of available commands.
3. Say: “Add phone”. The system acknowledges the command and asks you to initiate connecting
from the phone handset.
4. Initiate connecting from the phone:
The connecting procedure varies according to each cellular phone model. For detailed
connecting instructions and compatible phones, please visit
www.nissanusa.com/bluetooth.
When prompted for a Passkey code, enter “1234” from the handset. (The Passkey code is
assigned by NISSAN and cannot be changed.)
5. Say a name for the phone when the system asks you to provide one. You can give the phone
a name of your choice.
PhOnebOOk SetuP
Depending on your cell phone, the system may automatically download your cell phone’s
entire phonebook to the vehicle’s Bluetooth system.
If the phonebook does not download automatically, 40 entries can be individually downloaded.
to manually download entries:
1. Push the
button on the steering wheel.
2. After the tone, say “Phonebook”.
3. After the next tone, say “Transfer Entry”. The system acknowledges the command and
asks you to initiate the transfer from the phone handset. The new contact phone number
will be transferred from the cellular phone to the vehicle.
The transfer procedure varies according to each cellular phone. See your cellular phone’s
owner’s manual for details. You can also visit www.nissanusa.com/bluetooth for
instructions on transferring phone numbers from NISSAN recommended cellular phones.
4. The system repeats the number and prompts you for the next command. When you have
finished entering numbers or transferring an entry, choose “Store.”
5. The system confirms the name, location and number.
MAkinG A cALL fROM the PhOnebOOk
1. Press the
button.
2. After waiting for the tone, say “Call”.
3. After the next tone, speak a name of a phonebook entry. For example “Michael Smith”.
4. Confirm the correct name is recognized by saying “Dial” after the tone.
NOTE: Names stored in all UPPERCASE letters may not be recognized correctly by the voice
recognition system.